Free Christmas Tree Irish Chain Quilt Pattern
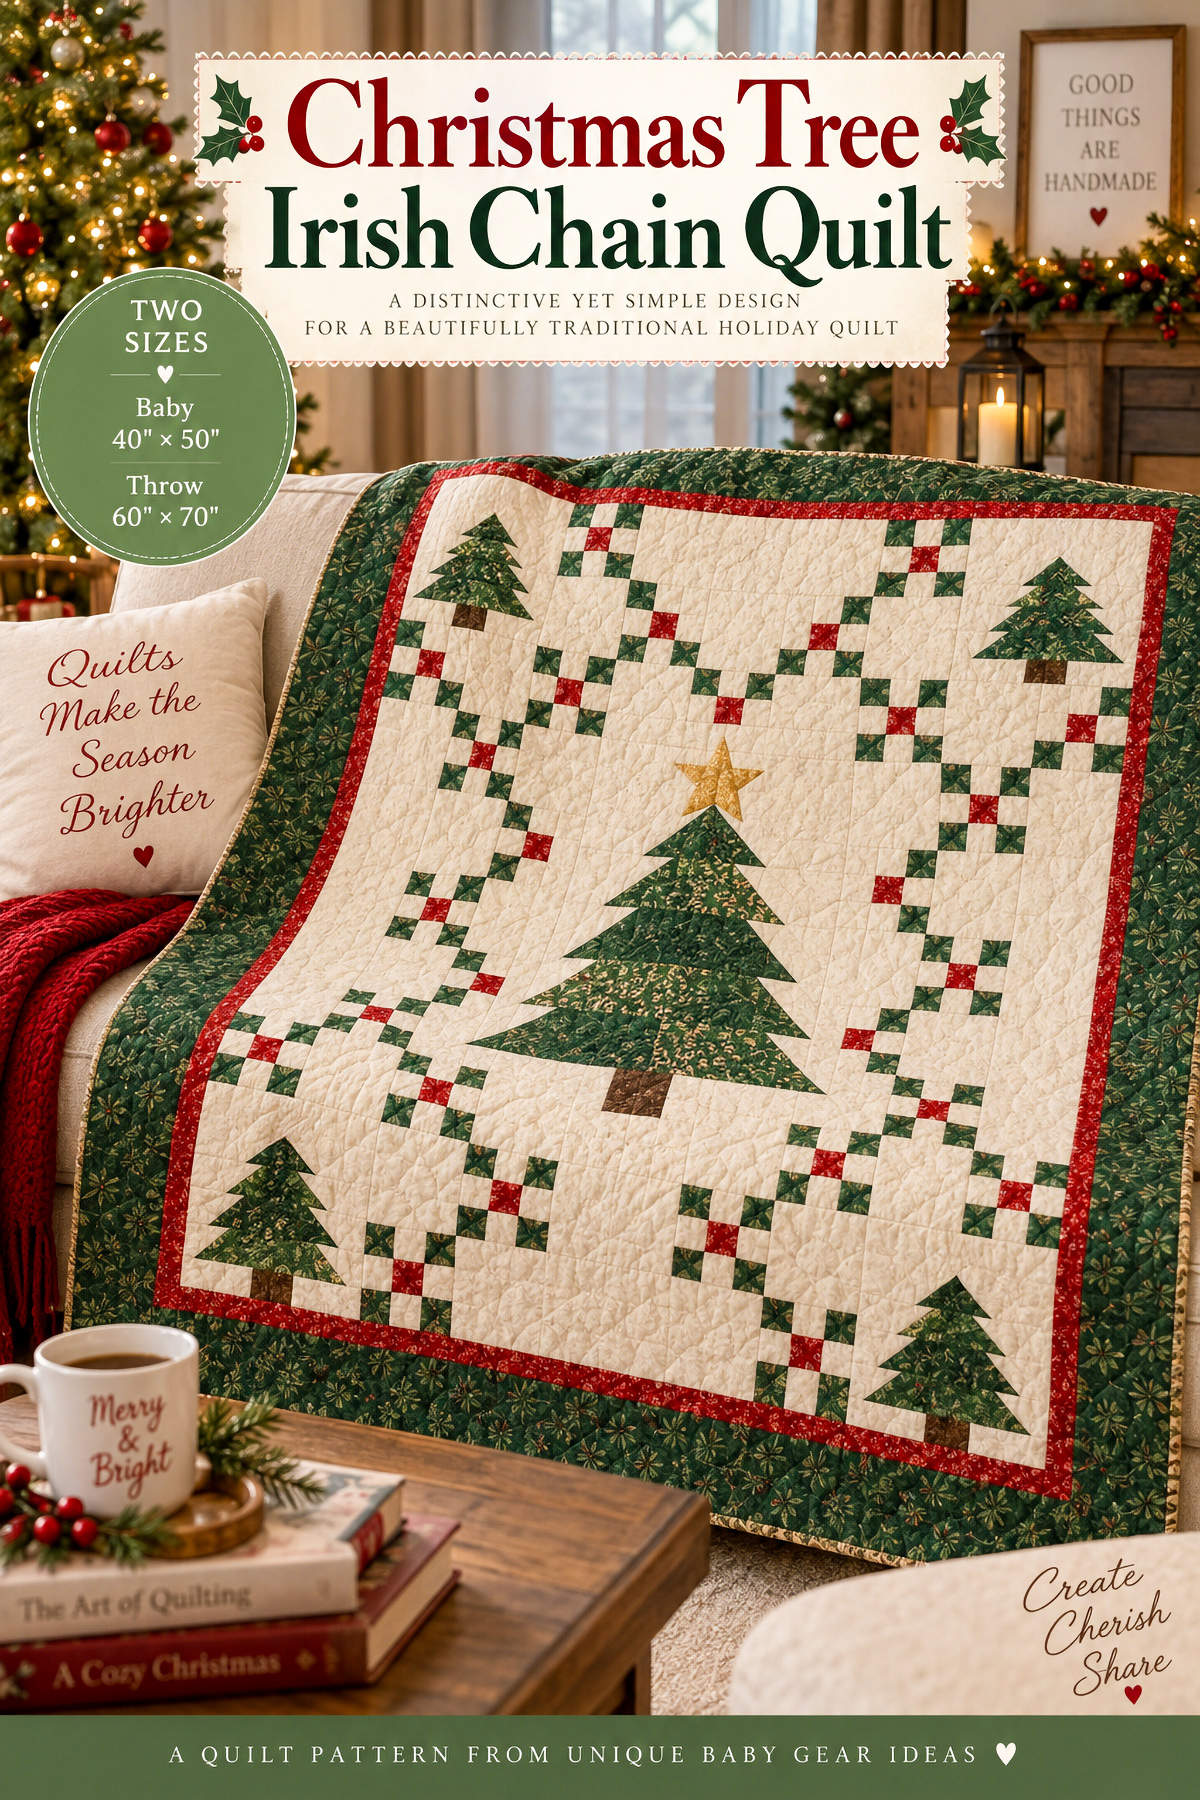
This free Christmas tree Irish chain quilt pattern presents a distinctive yet simple design that can become a keepsake from baby's first Christmas or a handmade gift a friend or family member will treasure. The design features one large pieced patchwork Christmas tree center medallion surrounded by simpler trees and a classic chain of green and red squares. The pattern includes a 40 × 50 inch crib quilt and a 60 × 70 inch throw. Most of the quilt is made with rotary cut squares, rectangles and half square triangles, with one small template-pieced five-point star above the center tree. Get ready, quilters. Your rotary cutter is about to become your best friend.
By Jan Bay
Explore More Free Quilt Patterns
Helpful Quilting Supplies for This Project
Jump to:
Pattern at a Glance
Materials and Yardage
Cutting Chart
Irish Chain Blocks
Small Christmas Tree Blocks
Feature Tree Medallion
Five-Point Star
Crib Quilt Layout
Throw Quilt Layout
Finishing and Binding
Baby Quilt Safety
Pattern Checkpoints
Christmas Tree Irish Chain Quilt Pattern at a Glance
The wider decorative border shown in the main page image is an optional styling variation and is not included in the cutting chart or stated quilt sizes. The pattern below makes the Christmas tree and Irish chain field inside that border. If you add a border of your own, recalculate the finished size, backing, batting and binding for the border width you choose.
I wanted the Christmas tree to be the first thing you notice, with the Irish chain framing it instead of competing with it. The four smaller trees in the crib quilt repeat that shape at the corners, while a few red squares break up all that green without turning the quilt into a red-and-green checkerboard.
The crib quilt finishes at 40 × 50 inches. The throw finishes at 60 × 70 inches. Both use the same 20 × 30 inch feature-tree medallion, so you don't have to learn a second center construction if you decide to make the larger size.
| Part | Crib Quilt | Throw Quilt |
|---|---|---|
| Finished patchwork field | 40 × 50 inches | 60 × 70 inches |
| Feature medallion | 20 × 30 inches | 20 × 30 inches |
| Small tree blocks | 4 | 8 |
| Irish chain blocks | 10 | 28 |
| Red-center chain blocks | 4 | 8 |
Use a 1/4-inch seam allowance throughout. HST means half square triangle. WOF means width of fabric; the yardage and binding calculations assume about 40 inches of usable WOF. The Irish chain and tree blocks are rotary cut. The only template-pieced section is the small five-point gold star above the feature tree.
Skill level: Confident beginner to intermediate. The Irish chain and tree blocks use basic rotary cutting and HST piecing. The five-point star is the only more advanced section because it uses templates and inset seams.
The dimensions and fabric amounts below are calculated from the finished block geometry. This pattern has not been physically test-sewn, so I've included measurement checkpoints along the way. If a block is off, fix it before you sew it into the quilt. That's much easier than discovering the problem after five rows are together.
Materials and Yardage
Quilting cotton works well for the whole top. I'd use tone-on-tone or small Christmas prints for the trees so the patchwork shows without losing the tree shape. Keep the ivory fairly quiet. The chain already gives the background plenty to do.
You'll also need coordinating sewing thread, backing, batting, a rotary cutter and mat, quilting ruler, iron, marking pencil or pen, sewing machine with a reliable 1/4-inch seam, and the printable five-point star templates supplied below.
| Fabric | 40 × 50 Crib | 60 × 70 Throw |
|---|---|---|
| Warm ivory background | 2 1/4 yd | 4 yd |
| Deep green Irish chain | 1/2 yd | 1 1/4 yd |
| Tree Green A | 1 fat quarter | 1/3 yd |
| Tree Green B | 1 fat quarter | 1/3 yd |
| Tree Green C | 1 fat quarter | 1/3 yd |
| Deep red accent | 1/8 yd | 1/8 yd |
| Brown trunks | 1/8 yd | 1/8 yd |
| Muted gold star | 1/8 yd | 1/8 yd |
| Binding | 3/8 yd | 1/2 yd |
| Backing, standard width | 3 1/4 yd | 4 1/2 yd |
| Batting | about 50 × 60 inches | about 72 × 90 inches |
The yardage includes a cutting margin. Directional prints may need a little more, especially if you want every motif facing the same way.
Cutting Chart
Press your fabric before cutting. Keep each tree tier together after you cut it. There are enough similar-looking green pieces here that a few labeled clips or scraps of paper will save you some head scratching later.
Irish Chain Squares
Every Irish chain block finishes at 10 inches square and contains 25 squares arranged in a 5 × 5 grid. Cut every chain square at 2 1/2 inches.
| Size | Ivory 2 1/2-inch Squares | Green 2 1/2-inch Squares | Red 2 1/2-inch Squares |
|---|---|---|---|
| Crib | 160 | 86 | 4 |
| Throw | 448 | 244 | 8 |
Cut for Each 10-Inch Small Tree Block
| Fabric | Cut | For 1 Block | Crib, 4 Blocks | Throw, 8 Blocks |
|---|---|---|---|---|
| Ivory | 10 1/2 × 1 in. | 3 | 12 | 24 |
| Ivory | 10 1/2 × 1 1/2 in. | 1 | 4 | 8 |
| Ivory | 3 1/2 × 2 1/2 in. | 2 | 8 | 16 |
| Ivory | 2 1/2 × 2 1/2 in. | 2 | 8 | 16 |
| Ivory | 1 1/2 × 2 1/2 in. | 2 | 8 | 16 |
| Ivory | 4 1/2 × 2 in. | 2 | 8 | 16 |
| Ivory | 3 in. square for HSTs | 3 | 12 | 24 |
| Green A | 3 in. square | 1 | 4 | 8 |
| Green B | 3 in. square | 1 | 4 | 8 |
| Green B | 2 1/2 in. square | 1 | 4 | 8 |
| Green C | 3 in. square | 1 | 4 | 8 |
| Green C | 2 1/2 in. square | 2 | 8 | 16 |
| Brown | 2 1/2 × 2 in. | 1 | 4 | 8 |
Each small tree block starts with 22 cut pieces and finishes at 10 inches square.
Cut for the 20 × 30 Feature Medallion
The feature medallion is identical for the crib and throw quilts.
| Fabric | Cut | Qty |
|---|---|---|
| Ivory | 20 1/2 × 1 in. strips | 6 |
| Ivory | 20 1/2 × 2 1/2 in. bottom strip | 1 |
| Ivory | 8 × 5 1/2 in. star-band rectangles | 2 |
| Ivory | 8 × 3 in. | 2 |
| Ivory | 6 1/2 × 3 1/2 in. | 2 |
| Ivory | 5 × 4 in. | 2 |
| Ivory | 3 1/2 × 4 1/2 in. | 2 |
| Ivory | 2 × 5 in. | 2 |
| Ivory | 9 × 3 in. trunk-row rectangles | 2 |
| Ivory | HST squares: 3 1/2, 4, 4 1/2, 5 and 5 1/2 in. | 1 each |
| Assorted greens | HST squares: 3 1/2, 4, 4 1/2, 5 and 5 1/2 in. | 1 each |
| Assorted greens | 2 1/2 × 3 1/2 in. | 1 |
| Assorted greens | 2 1/2 × 4 in. | 2 |
| Assorted greens | 2 1/2 × 4 1/2 in. | 3 |
| Assorted greens | 2 1/2 × 5 in. | 4 |
| Brown | 3 1/2 × 3 in. | 1 |
The star pieces are cut from the printable template rather than the rotary-cut chart. The template set uses 6 gold pieces and 10 ivory pieces.
Make the Irish Chain Blocks
The chain is simple once you see the grid. Every block is five squares across and five squares down.
G  I  I  I  G
I  G  I  G  I
I  I  X  I  I
I  G  I  G  I
G  I  I  I  G
G is deep green. I is ivory. X is either green or deep red.
A regular chain block uses 9 green squares and 16 ivory squares. A red-center block uses 8 green squares, 1 red square and 16 ivory squares.
Sew the squares into five rows of five. Press the seams in opposite directions from one row to the next so the intersections nest. Join the rows and press.
Each completed chain block should measure 10 1/2 inches square unfinished. Make 10 blocks for the crib quilt or 28 for the throw.
Make the Small Christmas Tree Blocks
These are the little trees that finally gave this quilt the look I wanted. Each one has three clean tiers instead of a chunky staircase shape. The finished branch widths are 4 inches, 6 inches and 8 inches.
Make the Half Square Triangles
For one tree, pair each 3-inch green square with one 3-inch ivory square, right sides together. Draw a diagonal line from corner to corner on the wrong side of the ivory square.
Sew 1/4 inch on each side of the marked line. Cut on the line, press the seam toward the green and trim each HST to 2 1/2 inches square.
Repeat with Green A, Green B and Green C. You should have 6 trimmed HSTs for one tree.
Assemble the Top Tier
Lay out one 3 1/2 × 2 1/2 inch ivory rectangle, two Green A HSTs and the second ivory rectangle.
Turn the HSTs so the green halves form one upward-pointing triangle. The green point should meet at the top center and the green base should run across the bottom of the two HST units.
Sew the four pieces together. The row should measure 10 1/2 × 2 1/2 inches.
Assemble the Middle Tier
Lay out one 2 1/2-inch ivory square, one Green B HST, the 2 1/2-inch Green B square, the second Green B HST and the second ivory square.
Turn the HSTs so their ivory corners are at the upper outside edges and their green halves continue the sloping sides of the tier.
Sew the five pieces together. The row should measure 10 1/2 × 2 1/2 inches.
Assemble the Lower Tier
Lay out one 1 1/2 × 2 1/2 inch ivory rectangle, one Green C HST, two 2 1/2-inch Green C squares, the second HST and the second ivory rectangle. Place the left HST with its ivory triangle at the upper-left outside corner. Mirror the right HST so its ivory triangle is at the upper-right outside corner. The green portions should slope outward as the tier widens toward the bottom.
Sew the six pieces together. The row should measure 10 1/2 × 2 1/2 inches.
Make the Trunk Row
Sew one 4 1/2 × 2 inch ivory rectangle to each side of the 2 1/2 × 2 inch brown rectangle.
The trunk row should measure 10 1/2 × 2 inches.
Finish the Small Tree Block
Join the rows from top to bottom in this order:
10 1/2 × 1 inch ivory strip
top tree tier
10 1/2 × 1 inch ivory strip
middle tree tier
10 1/2 × 1 inch ivory strip
lower tree tier
trunk row
10 1/2 × 1 1/2 inch ivory bottom strip
Press after each seam. The completed block should measure 10 1/2 inches square unfinished.
Make 4 small tree blocks for the crib quilt or 8 for the throw.
Piece the Large Feature Tree Medallion
The large tree uses the same idea as the corner trees, only with five tiers and more green fabric showing inside each tier. The branch widths finish at 5, 8, 11, 14 and 17 inches, so each tier grows naturally as you move down the tree.
Mix the three greens through the center pieces. I wouldn't make each tier one solid fabric. A little variation is what gives the big tree that patchwork look in the example.
Make the Feature-Tree HSTs
| Tier | Green + Ivory Starting Squares | Trim Each HST To | Finished Tier Width |
|---|---|---|---|
| 1 | 3 1/2 in. | 3 in. | 5 in. |
| 2 | 4 in. | 3 1/2 in. | 8 in. |
| 3 | 4 1/2 in. | 4 in. | 11 in. |
| 4 | 5 in. | 4 1/2 in. | 14 in. |
| 5 | 5 1/2 in. | 5 in. | 17 in. |
For each tier, pair the listed green square with the same-size ivory square. Use the same two-at-a-time HST method as you used for the small trees. Trim carefully to the size shown in the table.
Assemble Tier 1
Sew an 8 × 3 inch ivory rectangle, the two 3-inch HSTs and the second 8 × 3 inch ivory rectangle into one row.
Turn the HSTs so their green halves form one centered upward-pointing triangle. The row should measure 20 1/2 × 3 inches.
Assemble Tier 2
Sew a 6 1/2 × 3 1/2 inch ivory rectangle, one 3 1/2-inch HST, the 2 1/2 × 3 1/2 inch green rectangle, the second HST and the second ivory rectangle.
The row should measure 20 1/2 × 3 1/2 inches.
Assemble Tier 3
Sew a 5 × 4 inch ivory rectangle, one 4-inch HST, two 2 1/2 × 4 inch green rectangles, the second HST and the second ivory rectangle.
The row should measure 20 1/2 × 4 inches.
Assemble Tier 4
Sew a 3 1/2 × 4 1/2 inch ivory rectangle, one 4 1/2-inch HST, three 2 1/2 × 4 1/2 inch green rectangles, the second HST and the second ivory rectangle.
The row should measure 20 1/2 × 4 1/2 inches.
Assemble Tier 5
Sew a 2 × 5 inch ivory rectangle, one 5-inch HST, four 2 1/2 × 5 inch green rectangles, the second HST and the second ivory rectangle.
The row should measure 20 1/2 × 5 inches.
In every tier, keep the ivory at the upper outside corners of the HSTs so the green forms the sloping tree edge.
Piece the Five-Point Gold Star
Download the Five-Point Star Templates
Print the template PDF at 100 percent or Actual Size. Check the 1-inch calibration square before cutting your fabric.
The gold star is the one special construction in the quilt. It finishes at 5 inches square and uses inset seams. I'd make a scrap-fabric practice star first if inset seams are new to you.
Print the PDF at 100 percent or Actual Size. Measure the calibration square. It must measure exactly 1 inch before you cut anything.
Using the full-size templates, cut:
Gold: Template A once and Template B five times.
Ivory: Template C five times and Templates D, E, F, G and H once each.
The seam allowances are already included. Transfer the black seam-intersection dots to the wrong side of each fabric piece.
Sew one B star point to each side of center pentagon A. Start and stop at the marked dots rather than sewing through the seam allowances.
Set one ivory C piece into each opening between adjacent gold points. Sew each inset seam from dot to dot.
Once A, the five B pieces and the five C pieces are joined, add ivory frame pieces D through H in the order shown on the assembly map. Use the marked partial seams where needed, then return and finish those seams after the neighboring frame pieces are attached.
Press without stretching the bias edges. Square the star block to 5 1/2 × 5 1/2 inches unfinished. It will finish at 5 inches square in the medallion.
Finish the 20 × 30 Medallion
Make the star band by sewing an 8 × 5 1/2 inch ivory rectangle to each side of the unfinished star block. The band should measure 20 1/2 × 5 1/2 inches.
Make the trunk row by sewing one 9 × 3 inch ivory rectangle to each side of the 3 1/2 × 3 inch brown rectangle. The row should measure 20 1/2 × 3 inches.
Now join the medallion from top to bottom:
20 1/2 × 1 inch ivory strip
star band
20 1/2 × 1 inch ivory strip
Tier 1
20 1/2 × 1 inch ivory strip
Tier 2
20 1/2 × 1 inch ivory strip
Tier 3
20 1/2 × 1 inch ivory strip
Tier 4
20 1/2 × 1 inch ivory strip
Tier 5
trunk row
20 1/2 × 2 1/2 inch ivory bottom strip
Press the completed medallion and measure it before going farther. It should be 20 1/2 × 30 1/2 inches unfinished and will finish at exactly 20 × 30 inches in the quilt.
Assemble the 40 × 50 Crib Quilt
Now the quilt starts looking like the one in the main page image.
Use this key:
T = small tree block
C = green-center Irish chain block
R = red-center Irish chain block
F = part of the one-piece feature medallion
T  C  R  T
C  F  F  C
R  F  F  R
C  F  F  C
T  R  C  T
The six F positions are not six blocks. Together they represent the single 20 × 30 inch feature-tree medallion.
Sew the four 10-inch blocks in the top row together. The row should measure 40 1/2 × 10 1/2 inches unfinished.
For the center section, sew the three chain blocks at the left into one vertical column. Make the matching three-block column for the right side. Each column should measure 10 1/2 × 30 1/2 inches unfinished.
Sew one chain column to each side of the feature medallion. The complete center section should measure 40 1/2 × 30 1/2 inches unfinished.
Sew the four blocks in the bottom row together. That row should also measure 40 1/2 × 10 1/2 inches unfinished.
Join the top row, center section and bottom row. Your completed crib quilt top should measure 40 1/2 × 50 1/2 inches before quilting and binding. The stated 40 × 50 inch measurement refers to the finished patchwork field inside the binding. The completed bound quilt will remain approximately 40 1/2 × 50 1/2 inches edge to edge, with small variation possible from quilting and binding.
Assemble the 60 × 70 Throw Quilt
The throw keeps the same feature tree. The extra size comes from more 10-inch blocks around it, not from stretching the center tree or hiding the design inside a huge plain border.
T  C  C  R  C  T
R  T  C  C  T  C
C  C  F  F  C  R
C  R  F  F  R  C
R  C  F  F  C  C
C  T  C  C  T  R
T  C  R  C  C  T
The layout uses 8 small tree blocks, 28 chain blocks and the same 20 × 30 inch feature medallion.
Sew Row 1 and Row 2 separately. Each row should measure 60 1/2 × 10 1/2 inches unfinished. Join those two rows to make a 60 1/2 × 20 1/2 inch upper section.
For the center section, sew the six chain blocks to the left of the medallion into a 2 × 3 block panel. Make another 2 × 3 panel for the right side. Each panel should measure 20 1/2 × 30 1/2 inches unfinished.
Join the left panel, feature medallion and right panel. The center section should measure 60 1/2 × 30 1/2 inches unfinished.
Sew Row 6 and Row 7 separately, then join them to make the lower 60 1/2 × 20 1/2 inch section.
Join the upper section, center section and lower section. The throw top should measure 60 1/2 × 70 1/2 inches before quilting and binding. The stated 60 × 70 inch measurement refers to the finished patchwork field inside the binding. The completed bound quilt will remain approximately 60 1/2 × 70 1/2 inches edge to edge, with small variation possible from quilting and binding.
Quilt and Bind the Christmas Tree Quilt
Give the whole top a final press and check that the outside edges are square before you layer it with batting and backing.
You don't need fancy quilting to make this design work. Straight diagonal quilting can follow the chain nicely, or you can use a simple all-over design that doesn't compete with the trees.
For the crib quilt, cut 5 binding strips at 2 1/2 inches × WOF. Five 40-inch usable strips give about 200 inches of binding for a quilt perimeter of 180 inches, leaving enough for joining and finishing.
For the throw, cut 7 binding strips at 2 1/2 inches × WOF. Seven 40-inch usable strips give about 280 inches for a 260-inch perimeter.
Join the binding strips end to end, press the strip in half lengthwise and attach it with your preferred double-fold binding method.
If you like this two-size seasonal approach, my free orange and blue pumpkin quilt pattern gives you another rotary-cut project built around a completely different medallion design.
A Quick Note About the Crib-Size Quilt
The 40 × 50 inch version is sized as a baby or crib quilt, but that doesn't mean it belongs loose in an infant's sleep space. Current U.S. Consumer Product Safety Commission safe-sleep guidance says an infant sleep space should be kept bare with only a fitted sheet and no blankets, quilts or other soft items.
Use the quilt for supervised cuddling, tummy time, nursery display, outings or as a keepsake until a child is old enough to use it appropriately.
Check These Measurements Before You Finish
I wouldn't wait until the whole quilt is assembled to find out that one set of blocks is running large. Check these as you work:
| Component | Unfinished Measurement | Finished Measurement |
|---|---|---|
| Irish chain block | 10 1/2 × 10 1/2 in. | 10 × 10 in. |
| Small tree block | 10 1/2 × 10 1/2 in. | 10 × 10 in. |
| Five-point star block | 5 1/2 × 5 1/2 in. | 5 × 5 in. |
| Feature medallion | 20 1/2 × 30 1/2 in. | 20 × 30 in. |
| Crib quilt top | 40 1/2 × 50 1/2 in. | 40 × 50 in. |
| Throw quilt top | 60 1/2 × 70 1/2 in. | 60 × 70 in. |
For the crib and throw rows above, the 40 × 50 inch and 60 × 70 inch finished measurements refer to the patchwork field inside the binding. The assembled quilt tops measure 1/2 inch larger in each direction because the outer 1/4-inch seam allowance remains around the perimeter.
As a final piece-count check, the crib top starts with 396 cut pieces before backing and binding: 250 pieces for the Irish chain blocks, 88 for the four small tree blocks and 58 for the feature medallion including the 16 star-template pieces.
The throw starts with 934 cut pieces: 700 for the 28 Irish chain blocks, 176 for the eight small tree blocks and the same 58-piece feature medallion.
This pattern has been mathematically checked against the intended 40 × 50 and 60 × 70 layouts and against the finished design shown on the page. It has not been physically test-sewn. Keep the measurement checkpoints in the pattern rather than trimming a block simply to force it to fit.
When you click on links to various merchants on this site and make a purchase, this may result in this site earning a commission. This does not affect the price you pay.

UBGI Gold Standard 2026
Reviewed under the site's
editorial checklist.
Photos, decorating ideas, party setups and reader submissions are shared for inspiration unless a page is specifically presented as a pattern, tutorial, reference guide or step-by-step project. Follow the instructions, measurements, safety guidance and manufacturer directions provided for the particular project or product.
About Jan | Contact | Baby Nursery Ideas (Blog) | Site Map | Privacy Policy | Disclosure Policy | Disclaimer | Affiliate Disclosure | Earnings Disclosure | Facebook | Pinterest
I am a participant in the Amazon Services LLC Associates Program, an affiliate advertising program designed to provide a means for us to earn fees by linking to Amazon. As an Amazon Associate I earn from qualifying purchases.
Copyright © 2006-2026. All Rights Reserved.