Free Gingerbread House Quilt Pattern with Christmas Irish Chain and Stars
By Jan Bay
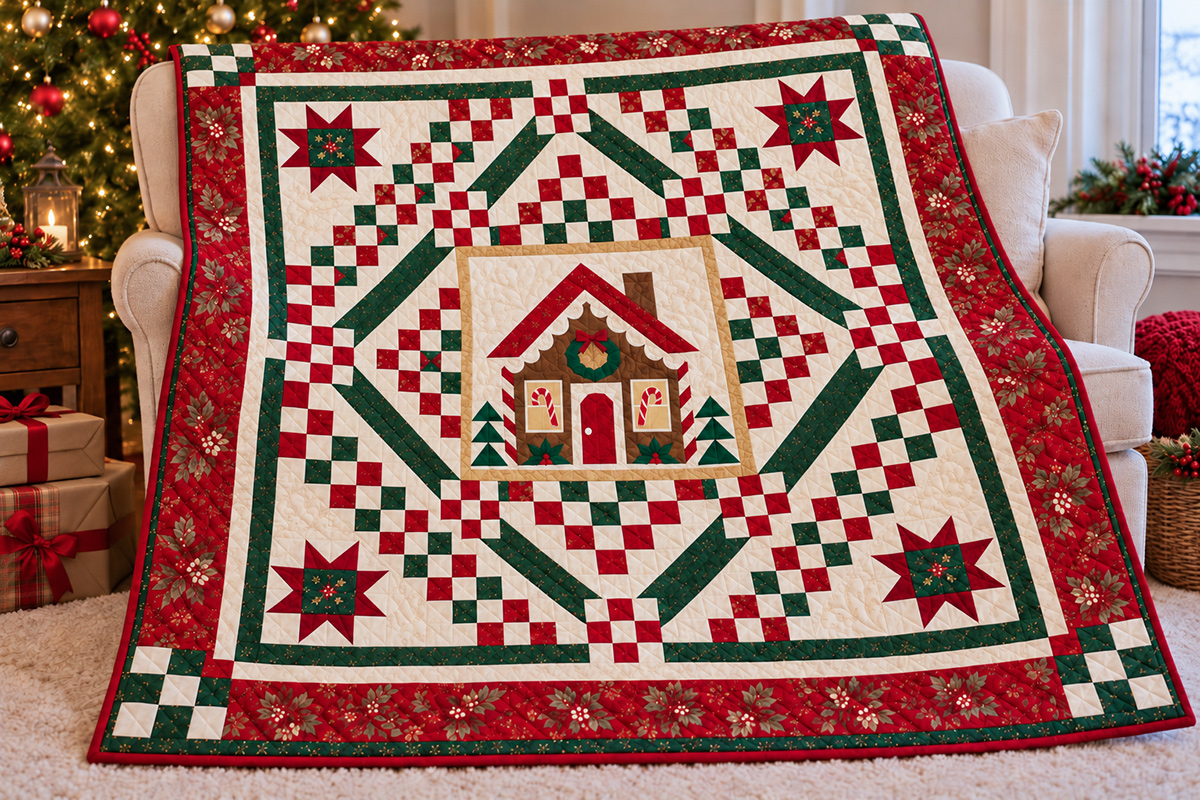
This gingerbread house quilt pattern brings together the cozy colors of Christmas with a traditional Irish-chain-inspired setting. A quaint gingerbread house sits at the center, surrounded by cranberry, evergreen and cream patchwork, four corner stars and a festive holiday floral print border. The diamond framing, interrupted by checkerboard blocks, adds a distinctive touch without taking away from the classic holiday look.
Explore More Free Fall and Holiday Quilt Patterns
Free Baby Quilt Patterns and Quilt Ideas
Free Christmas Star Quilt Pattern in Crib, Throw and Full Sizes
Free Christmas Tree Irish Chain Quilt Pattern
See Supplies for This Quilt Project Here.
Jump to a Section of the Gingerbread House Quilt Pattern
Gingerbread House Quilt: Finished Size and Skill Level
This Christmas quilt finishes at approximately 68 x 68 inches, making it a generous square throw for a sofa, armchair or holiday bed display. The gingerbread house sits in a 22-inch center medallion, surrounded by diagonal cranberry, evergreen and cream patchwork and four corner stars.
The design has a few more steps than an ordinary patchwork quilt, but the pieces are organized into manageable sections. You'll make the corner stars, assemble the surrounding chain panels, complete the gingerbread house applique, and then join everything before adding the borders.
Finished quilt size: Approximately 68 x 68 inches.
Unquilted top: 68 1/2 x 68 1/2 inches, measured from raw edge to raw edge.
Skill level: Confident intermediate, with some experience using foundation-paper-piecing techniques.
Seam allowance: 1/4 inch for patchwork seams unless otherwise specified. The raw-edge applique templates have no added seam allowance.
Techniques: Square patchwork, half-square triangles, foundation paper piecing, fusible applique, decorative stitching and traditional quilt binding.
Construction at a glance: The center patchwork field finishes at 54 inches square. A 1-inch interrupted evergreen perimeter brings it to 56 inches, followed by a 6-inch outer frame on each side.
Don't confuse the 68-inch finished design measurement with the 68 1/2-inch unfinished quilt top. That extra half inch includes the outside seam allowances that will be covered during binding. The final measurement may also change slightly with quilting and washing.
Fabric Requirements for the Gingerbread House Quilt Pattern
I would keep the cranberry, evergreen and cream combination shown in the finished quilt. The three colors help the diagonal chains stand out without overwhelming the gingerbread house in the middle. A cranberry Christmas floral makes a lovely outer border, especially when it's separated from the patchwork by the narrow green and cream bands.
The yardages below follow the engineered pattern and assume at least 40 inches of usable fabric width after removing selvages. If you're using directional prints or want to match a large floral repeat across the borders, buy extra fabric.
- Cream background: 3 1/4 yards for patchwork, half-square triangles, star corners, the medallion background and borders.
- Cranberry patchwork: 1 3/4 yards for chain squares, star points, gingerbread roof, door, bow and decorative details.
- Evergreen: 2 1/4 yards for patchwork, diamond framing, cornerstones, star centers, wreath, trees and holly.
- Cranberry Christmas floral: 1 yard for the outer border.
- Gingerbread-brown fabric: 1/2 yard for the house and chimney.
- White applique fabric: 1/2 yard for the scalloped icing and candy-striped post bases.
- Cream or ivory applique fabric: 1/2 yard for window frames, candy canes, door surround and small details. Keep this separate from the white icing fabric.
- Tan or antique-gold fabric: 1/2 yard for the narrow center frame, window insets and wreath center.
- Lighter evergreen: One fat eighth, approximately 9 x 22 inches, for the tree overlays.
- Cranberry binding: 3/4 yard, separate from the cranberry patchwork allowance.
Backing: Choose either 4 3/4 yards of standard-width fabric or 2 1/2 yards of 108-inch-wide backing.
Batting: One 80 x 80-inch piece.
Additional supplies: Three yards of lightweight fusible web approximately 20 inches wide, foundation-piecing paper, removable stabilizer for a section approximately 24 inches square, coordinating machine and embroidery threads, fabric marking tools, rotary cutter, ruler, pins or clips, and your usual quilting supplies.
You'll also need the printable pattern and actual-size template PDFs provided below. Print the star foundation sheet four times. The larger gingerbread-house applique pieces come on multiple sheets that must be aligned before cutting.
Use a needle suited to your fabric and stitching method. For a useful reference on machine-needle sizes and applications, see the SCHMETZ needle and fabric guide.
Before cutting the cranberry fabrics, check them for color transfer. There is quite a bit of light cream fabric next to the red, and that's one place where a little preparation is worth the trouble.
Cutting Instructions for the Gingerbread House Quilt
Before you begin cutting, print the complete pattern and keep the cutting charts beside you. I would separate the cream, cranberry and evergreen pieces into labeled groups as they're cut. Several sizes look similar, and keeping the cornerstones and star pieces apart from the chain squares will save confusion later.
All measurements below are in inches. A 2-inch finished patchwork square is cut 2 1/2 inches square to allow for the seams.
Cream Background Fabric
- 292 squares measuring 2 1/2 x 2 1/2 inches, including 276 field squares and 16 cornerstone squares.
- 32 squares measuring 3 x 3 inches for half-square triangles.
- 16 squares measuring 2 3/4 x 2 3/4 inches for star corners.
- 16 rectangles measuring 4 3/4 x 3 1/2 inches for the star foundations.
- One 21 1/2-inch square for the gingerbread-house medallion background.
- Eight rectangles measuring 1 1/2 x 2 1/2 inches for the interrupted border inserts.
- Six width-of-fabric strips, each 1 1/2 inches wide, for the outer cream border bands.
Cranberry Patchwork Fabric
- 116 squares measuring 2 1/2 x 2 1/2 inches for the chain panels.
- 32 squares measuring 3 1/2 x 3 1/2 inches for foundation-pieced star points.
- Four rectangles measuring 1 1/2 x 2 1/2 inches for the checkerboard border interruptions.
- Reserve an 18 x 40-inch section for the roof, door, bow, decorative stripes and other cranberry applique pieces.
Evergreen Fabric
- 108 squares measuring 2 1/2 x 2 1/2 inches, including 88 field squares and 20 cornerstone squares.
- 32 squares measuring 3 x 3 inches for half-square triangles.
- Four squares measuring 4 x 4 inches for the star centers.
- Four strips measuring 1 1/2 x 24 1/2 inches for the side perimeter sections.
- Four strips measuring 1 1/2 x 25 1/2 inches for the top and bottom perimeter sections.
- Six width-of-fabric strips, each 1 1/2 inches wide, for the outer evergreen border bands.
- Reserve an 18 x 40-inch section for the evergreen applique details.
Floral Borders, Binding and Medallion Details
- Cranberry floral: Six width-of-fabric strips, each 4 1/2 inches wide, to make the four outer floral border sections.
- Tan frame: Two strips measuring 1 x 21 1/2 inches and two strips measuring 1 x 22 1/2 inches.
- Binding: Eight width-of-fabric strips measuring 2 1/2 inches wide.
- Gingerbread brown: Reserve approximately 16 1/2 x 40 inches for the house and chimney.
- White icing and posts: Reserve approximately 11 x 40 inches.
- Cream applique details: Reserve approximately 11 x 40 inches.
- Gold, wreath and tree details: Cut from the reserved applique fabrics using their individual printed templates.
For the larger border pieces, join the width-of-fabric strips using straight 1/4-inch seams, press those seams open, and then cut the required finished strip lengths. Don't cut all the long border pieces directly from a single folded strip and assume they'll fit without joining.
The foundation-piecing patches are intentionally cut larger than their finished sections. Wait until each star point is sewn before trimming it to its exact unfinished size.
Applique cutting: Trace the mirrored fusible templates onto the paper side of fusible web. Rough-cut around them, fuse to the wrong side of the matching fabric, and then cut precisely along the printed outline. Do not add a 1/4-inch seam allowance to these raw-edge applique shapes.
Keep the numbered applique templates with their fabric pieces until you're ready to assemble the gingerbread house. The larger roof, icing and house-body shapes are printed across multiple pages, so join those paper templates before cutting fabric.
Make the Gingerbread House Quilt Medallion
The gingerbread house is the centerpiece of this quilt, so I would give it some extra attention before stitching anything permanently. The brown walls, cranberry roof, white icing, candy-cane windows and little Christmas trees need to sit together just as they do in the finished example.
This section uses layered raw-edge applique rather than trying to piece all those little holiday decorations into the background. That's especially helpful for the scalloped icing, wreath, candy canes and holly leaves.
Prepare the 22-Inch Center Block
- Square the cream background fabric to 21 1/2 inches.
- Sew one tan strip measuring 1 x 21 1/2 inches to each side. Press toward the tan fabric.
- Attach the two 1 x 22 1/2-inch tan strips across the top and bottom.
- Press and check that the framed block measures 22 1/2 inches square, unfinished.
- Mark the vertical and horizontal centers lightly with a removable fabric marker.
- Assemble the nine-page front-view placement guide from the template PDF. Match its finished 22-inch square to the center block's seam lines, allowing 1/4 inch outside the placement area for joining the block.
Frame this block before applying the decorations. The right-hand Christmas tree overlaps the tan frame slightly, and framing first allows that detail to be placed correctly without cutting into the tree.
Step 1. Make the Gingerbread House Body
Use applique piece P02 for the brown chimney and P03 for the main gingerbread-house body.
- Position the chimney first, following the full-size front-view placement guide.
- Arrange the brown house body beneath the roof area, keeping its center aligned with the block.
- Check the house walls and lower edge before fusing. The door and windows will be positioned over this brown base.
- Fuse and secure the chimney and body according to the fusible-web instructions.
Step 2. Add the Candy-Striped Side Posts
Use P04 and P05 for the continuous white bases. The red diagonal stripes are P06-P09 on the left and P10-P13 on the right.
- Place the white bases along the outside of the gingerbread-house walls.
- Keep the upper ends tucked into the roof-icing area as shown on the placement guide.
- Add the four cranberry diagonal stripes to each post, following their matching template outlines.
- Check that the left and right stripe arrangements mirror one another before fusing.
- Stitch the exposed edges, leaving the portions that will be covered by the icing and roof appropriately secured beneath those later layers.
The finished posts should look like complete white candy-striped columns, not separate red pieces sticking out from the house.
Step 3. Attach the Scalloped Icing and Roof
The white scalloped icing is piece P15, and the cranberry roof is P14. Follow the final approved outlines in the printable templates.
- Arrange the continuous white icing piece over the upper gingerbread-house body and the tops of the striped posts.
- Check the matching scallops on the left and right roof slopes.
- Keep the small rounded center beneath the roof peak and the smooth icing transitions at both eaves.
- Fuse the icing in position, leaving its upper edge ready to be covered by the roof.
- Place the cranberry roof over the icing, matching the peak and both sloping ends to the full-size guide.
- Fuse the roof and stitch the exposed edges securely.
Use shorter stitches around the icing curves. At each scallop valley, stop with the needle down, lift the presser foot, turn the fabric slightly, and continue. Avoid pulling the applique out of shape.
Step 4. Make the Two Gingerbread House Windows
You'll need two matching windows with cream frames and warm gold centers.
- Place the left cream window frame P16, followed by its gold inset P17.
- Place the right cream frame P19, followed by its gold inset P20.
- Check that the windows are level and equally positioned on either side of the door.
- Mark the narrow horizontal window dividers using guides P18 and P21.
- Stitch the divider areas using short rows of matching cream thread. These are stitched details, not additional fabric strips.
Step 5. Add the Gingerbread House Door
Center the cream doorway surround P22 beneath the wreath position. Place the cranberry door P23 over the cream surround, leaving the narrow cream frame visible.
The door has clipped upper corners rather than a fully rounded arch. Add the small cream doorknob P24 on the viewer's left side, using either the applique circle or matching cream fill stitches.
Step 6. Put a Candy Cane in Each Window
These are actual little candy-cane shapes, not simply diagonal red-and-white stripes. Each cane leans inside its window, and the curved end turns away from the center door.
- Use P25 for the left candy cane and P28 for the right candy cane.
- Cut each white silhouette from its mirrored fusible template.
- Place the left cane with its crook facing toward the left outside wall.
- Place the right cane with its crook facing toward the right outside wall.
- Fuse and edge-stitch both white shapes.
- Transfer the seven red stripe regions for each cane from the front-view stitch-placement guide.
- Fill the red sections using short hand stitches or closely spaced machine stitches, leaving the white spaces between them uncovered.
The white cane silhouettes are approximately 0.600 inch wide. Their red regions sit inside the white edges, so don't try to cover the entire cane with one very wide machine satin stitch.
Check the direction before stitching: Both candy-cane crooks must face outward, away from the door. The mirrored cutting sheets are for preparing fusible applique pieces; the front-view placement guide shows their final direction.
Step 7. Make the Wreath and Bow
Place the evergreen wreath silhouette P31 above the door, followed by the warm gold center P32. The two pieces form the layered wreath without requiring you to cut a fragile, narrow ring.
Add the cranberry bow using pieces P33-P37. Position the loops and tails first, then place the center knot over their joining point.
Keep the wreath centered over the door as shown in the approved medallion.
Step 8. Make the Christmas Trees
Each tree has three stacked triangular tiers, with contrasting green overlays giving the branches a little more dimension.
- Left tree: Evergreen bases P38, P40 and P42, with lighter green overlays P39, P41 and P43.
- Right tree: Evergreen bases P44, P46 and P48, with lighter green overlays P45, P47 and P49.
Arrange all three tiers of each tree before fusing. Check that the pieces overlap as shown on the placement guide. Keep the trees' approved individual shapes rather than forcing them into identical silhouettes.
The lower right tree crosses onto the tan frame by approximately 0.098 inch. This tiny overlap is intentional. Because the frame was attached first, you can sew the tree over it without clipping the branch.
Step 9. Add the Holly and Berries
The holly decorations sit near the lower corners of the gingerbread-house walls.
- Left holly: Evergreen leaves P50-P54, with cranberry berries P55-P57.
- Right holly: Evergreen leaves P58-P62, with cranberry berries P63-P65.
Arrange each five-leaf group, fuse the leaves, and then add its three berries. The small berries can be appliqued or filled with short red stitches. I would skip beads or buttons here.
Finish the Medallion
Stitch all remaining exposed applique edges, secure thread ends, and remove the stabilizer according to its manufacturer's directions. Press carefully from the back on a padded surface so the raised stitching and applique details don't become flattened.
Before joining the medallion to the patchwork, check that it still measures 22 1/2 inches square unfinished.
You should now have a finished gingerbread house with its cranberry roof, matched scalloped icing, wreath, red door, two outward-facing window candy canes, striped side posts, Christmas trees and holly decorations.
Sew the Four Christmas Star Quilt Blocks
The four cranberry-and-evergreen stars give the quilt its Christmas character beyond the gingerbread house itself. Each star finishes at 8 inches square, with a green center and eight cranberry points surrounded by cream.
These stars use foundation-paper-pieced point units because their proportions are a little different from ordinary flying-geese blocks. The completed stars must match the specific shapes shown in the finished quilt.
Make the Foundation-Pieced Star Points
Print four copies of the star foundation sheet from the actual-size template PDF. Each sheet contains four point foundations, giving you 16 point units altogether.
For each point unit, prepare:
- One cream rectangle measuring 4 3/4 x 3 1/2 inches.
- Two cranberry squares measuring 3 1/2 x 3 1/2 inches.
- One printed foundation template.
- Place the cream fabric wrong side against the unprinted side of the foundation paper, covering region F1 and extending beyond its seam lines.
- Position the first cranberry patch right sides together with the cream fabric. Fold the paper along the F1/F2 sewing line and trim the exposed fabric to a 1/4-inch allowance.
- Check that the cranberry patch will completely cover F2 when opened.
- Sew along the foundation line using a short machine stitch, approximately 1.5 mm.
- Open the fabric and press without stretching.
- Repeat for the second cranberry patch, F3.
- Trim the finished foundation unit to 4 x 2 3/4 inches, cutting on the outer solid trimming line rather than the inner finished-size boundary.
- Once the point unit is stable, carefully remove the foundation paper, supporting the stitched seams so they don't pull out or distort. Do this before sewing the point units into the completed star blocks.
Make 16 matching units. Each finishes at 3 1/2 x 2 1/4 inches when sewn into the star.
Assemble Each Eight-Point Star
For one star, gather four completed point units, one green center square cut 4 inches, and four cream corner squares cut 2 3/4 inches.
- Arrange the first row with a cream corner square, a horizontal star-point unit, and another cream corner square.
- Arrange the middle row with one rotated point unit, the green center, and another rotated point unit.
- Arrange the bottom row to match the top row.
- Check that all four point-unit cream triangle tips face toward the green center.
- Sew each row together using accurate 1/4-inch seams.
- Press the top and bottom row seams toward the corners and the middle row seams toward the center where practical.
- Join the three rows, matching intersections carefully.
Each completed star should measure 8 1/2 inches square before being sewn into the larger corner panel.
Make four stars. Do not stretch a smaller block to reach the required size. Check the seam allowance and point-unit dimensions if one comes out short.
Sew the Irish-Chain-Style Christmas Patchwork
The diagonal cranberry and evergreen chains are what give this quilt so much movement. They surround the gingerbread house without filling every background space, leaving plenty of cream fabric to show off the stars and decorative quilting.
The patchwork is built from 2-inch finished squares and half-square triangles. You'll make four corner panels containing the stars and four rectangular chain panels. Once those are assembled, they're rotated around the center medallion.
Make 64 Half-Square Triangles
- Pair one 3-inch cream square with one 3-inch evergreen square, right sides together.
- Mark a diagonal line from corner to corner on the wrong side of the cream square.
- Sew 1/4 inch on each side of the marked line.
- Cut directly along the marked diagonal between the stitching lines.
- Open the two resulting units and press toward the evergreen fabric without stretching the bias edges.
- Trim each half-square triangle to 2 1/2 inches square, keeping the ruler's diagonal line aligned with the seam.
Repeat with all 32 pairs to produce 64 half-square triangles. Each unit finishes at 2 inches square after assembly.
Make one practice unit first. You need the seam to run cleanly between opposite corners after trimming, or the green diagonal framing won't line up properly.
Make Four Corner Panels: Panel A
Each corner panel finishes at 16 x 16 inches and includes one of the completed 8-inch stars.
For each Panel A, use:
- 33 cream squares.
- 7 cranberry squares.
- 6 evergreen squares.
- 2 green-and-cream half-square triangles.
- 1 completed eight-point star.
Use the Panel A color-placement chart on page 8 of the complete pattern PDF. It shows the exact arrangement of the red, green and cream squares and the direction of both half-square triangles.
- Lay out the panel as an 8 x 8 grid of 2-inch finished units, with the star occupying the designated central 4 x 4 area.
- Sew the eight squares of the top row together. This strip measures 16 1/2 x 2 1/2 inches unfinished.
- For rows 2 through 5, sew the cream squares of the first column into a vertical strip measuring 2 1/2 x 8 1/2 inches.
- Assemble the squares in columns 6 through 8 of those rows into a rectangle measuring 6 1/2 x 8 1/2 inches.
- Join the left strip, completed star and right rectangle to make the middle band, measuring 16 1/2 x 8 1/2 inches.
- Assemble rows 6, 7 and 8 individually, then join them into a bottom band measuring 16 1/2 x 6 1/2 inches.
- Join the top, middle and bottom bands.
Check that Panel A measures 16 1/2 inches square unfinished.
Make four identical Panel A units. The panels will be rotated during final assembly, so don't reverse or mirror their patchwork layouts.
Make Four Rectangular Chain Panels: Panel B
Panel B finishes at 22 x 16 inches and forms the patchwork sections above, below and beside the gingerbread house.
For each Panel B, use:
- 36 cream squares.
- 22 cranberry squares.
- 16 evergreen squares.
- 14 green-and-cream half-square triangles.
The Panel B color-placement chart on page 9 of the PDF shows 11 columns and 8 rows. Follow the diagram closely, particularly where the green diamond framing crosses the patchwork.
- Lay out the 11 squares or half-square-triangle units in each row according to the diagram.
- Sew each row from left to right. Every completed row should measure 22 1/2 x 2 1/2 inches unfinished.
- Press the odd-numbered rows in one direction and the even-numbered rows in the opposite direction where practical.
- Join all eight rows, keeping the chain colors and half-square triangles in their correct positions.
- Check the upper checkerboard interruption and the two lower diagonal junctions against the printed panel diagram.
Each Panel B should measure 22 1/2 x 16 1/2 inches unfinished.
Make four identical panels and mark the top edge of each. You'll need those markings when rotating the panels around the center medallion.
The cream gaps between the green framing and patchwork chains are intentional. Don't fill those spaces with extra colored squares just because they appear empty. They help separate the diagonal designs in the finished quilt.
Make the Interrupted Evergreen Diamond Framing
The interrupted diamond is one of my favorite details in this gingerbread house quilt. Instead of letting a continuous green band run all the way around the center, the diamond stops at four checkerboard intersections. Those little breaks add another patchwork detail and distinguish the framing from an ordinary uninterrupted diamond.
There are two parts to this treatment: the larger diagonal green bands already built into Panels A and B, and the narrow interrupted green perimeter added after the nine main quilt sections are joined.
Check the Diagonal Bands
The green diagonals are assembled from ordinary patchwork squares and half-square triangles, not long bias-cut strips.
The engineered diagonal framing is approximately 2.828 inches wide when measured perpendicular to the diagonal. Follow the panel layouts rather than trying to cut a separate strip to that measurement.
Before joining the panels, lay them out around the medallion and check that the green diagonal sections align correctly. The cranberry-and-cream checkerboard motifs should interrupt the band at the top, bottom, left and right.
Prepare the Four Narrow Checker Inserts
Each narrow perimeter insert is made from three rectangles cut 1 1/2 x 2 1/2 inches, arranged cream, cranberry, cream.
- Join the three rectangles along their 1 1/2-inch edges with 1/4-inch seams.
- Press the seams open to reduce bulk.
- Check that the assembled insert measures 1 1/2 x 6 1/2 inches unfinished.
- Make four matching inserts.
Build the Left and Right Green Perimeter Strips
For each side, join one green strip measuring 1 1/2 x 24 1/2 inches to each end of a checker insert.
The completed strip should measure 1 1/2 x 54 1/2 inches. Make two and attach them to the left and right edges of the central patchwork field.
Build the Top and Bottom Perimeter Strips
For each remaining side, join one green strip measuring 1 1/2 x 25 1/2 inches to each end of a checker insert.
Each completed strip should measure 1 1/2 x 56 1/2 inches. Attach these to the top and bottom edges after the side strips are in place.
Match the cranberry center of every checker insert with the corresponding interruption in the patchwork. Pin those junctions before sewing, then press carefully.
Once all four perimeter strips are attached, the quilt center should measure 56 1/2 inches square unfinished.
Don't continue the green fabric across those checkerboard openings. The interruptions are part of the approved design, not gaps that need to be filled.
Assemble the Gingerbread House Christmas Quilt Top
Now comes the fun part. Once the stars, chain panels and gingerbread house are complete, you can arrange all nine main sections and see the full Christmas quilt come together.
Lay the panels on a large flat surface before sewing. Check the direction of the diagonal chains and evergreen framing against the layout below. The house should be upright, with a star in each outside corner.
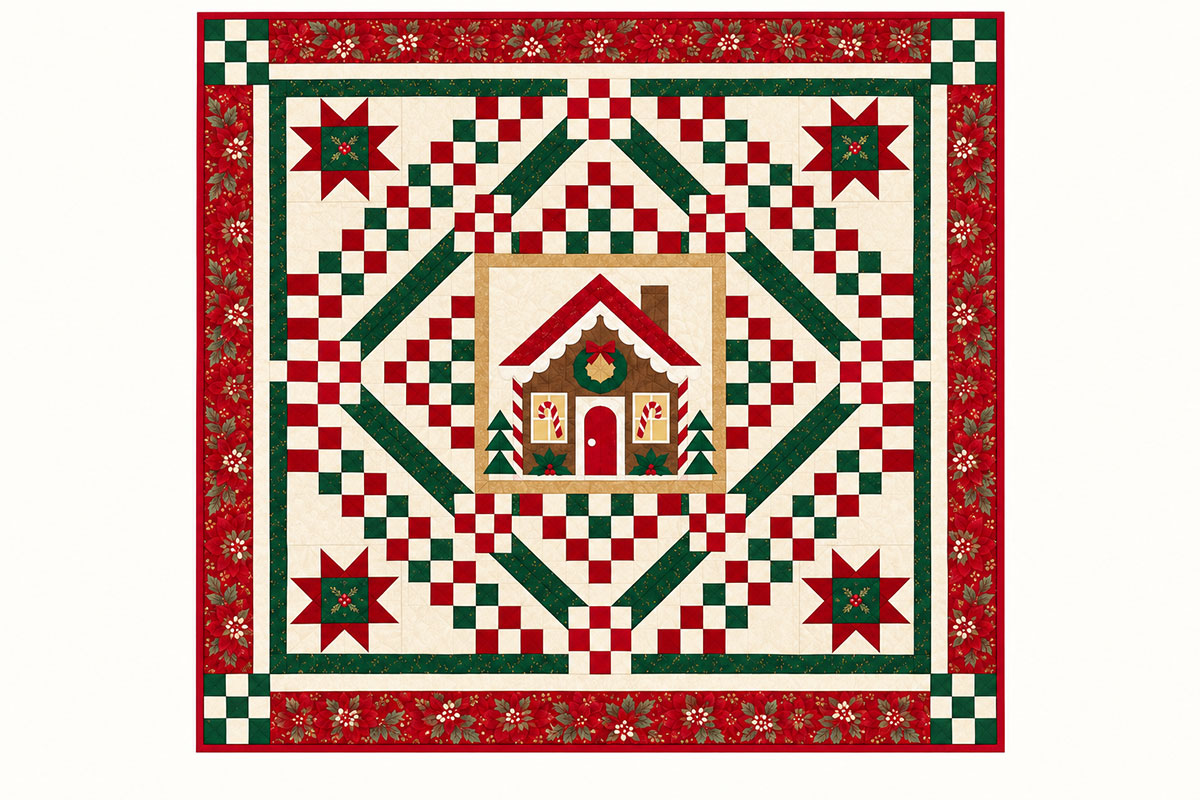
The construction diagram shows the approved flat patchwork arrangement. The floral fabric prints and decorative quilting visible in the finished photograph are omitted so the individual sections are easier to distinguish.
Arrange the Nine Main Sections
Use the four completed Panel A corner blocks, four Panel B chain blocks, and the finished 22-inch gingerbread house medallion.
Top row, left to right: Panel A in its original orientation, Panel B in its original orientation, and Panel A rotated 90 degrees clockwise.
Middle row: Panel B rotated 90 degrees counterclockwise, the gingerbread-house medallion upright, and Panel B rotated 90 degrees clockwise.
Bottom row: Panel A rotated 90 degrees counterclockwise, Panel B rotated 180 degrees, and Panel A rotated 180 degrees.
Rotate the completed panels flat on your work surface. Don't flip them over or mirror their patchwork.
Sew the Three Main Rows
- Sew the three sections of the top row together. The completed row should measure 54 1/2 inches wide and 16 1/2 inches high unfinished.
- Join the left chain panel, gingerbread-house medallion and right chain panel. This middle row should measure 54 1/2 inches wide and 22 1/2 inches high unfinished.
- Join the three bottom-row sections, producing a row measuring 54 1/2 x 16 1/2 inches unfinished.
- Press the joining seams open or toward the larger medallion where practical.
- Join the three rows, matching the panel seams, chain intersections and diagonal green framing.
The assembled central field should measure 54 1/2 inches square unfinished.
Look carefully at all four diamond interruptions before adding the next border. The green bands should stop cleanly at their checkerboard junctions.
Add the Interrupted Green Perimeter
Attach the left and right interrupted evergreen strips first, then the top and bottom strips as described in the diamond-framing section.
The result should measure 56 1/2 inches square unfinished.
Make the Outer Floral Border Panels
Each of the four outer frame panels contains three fabric bands:
- One cream strip measuring 1 1/2 x 56 1/2 inches.
- One cranberry floral strip measuring 4 1/2 x 56 1/2 inches.
- One evergreen strip measuring 1 1/2 x 56 1/2 inches.
Join the strips along their long edges, keeping cream toward the center of the quilt and evergreen toward the outside edge.
Each finished frame panel should measure 6 1/2 x 56 1/2 inches unfinished.
Make the Four Checkerboard Cornerstones
Each outer cornerstone is a 3 x 3 checkerboard made from nine squares cut 2 1/2 inches.
For each cornerstone, use five evergreen squares and four cream squares.
- Arrange the first row green, cream, green.
- Arrange the second row cream, green, cream.
- Arrange the third row green, cream, green.
- Sew the squares into three rows, press alternating seams in opposite directions, and join the rows.
Each completed cornerstone measures 6 1/2 inches square unfinished. Make four.
Attach the Outer Border
- Attach one complete floral frame panel to the left side of the quilt, with the cream strip toward the center.
- Attach a matching panel to the right side.
- Sew one checkerboard cornerstone to each end of the remaining top border panel.
- Repeat for the bottom border.
- Attach the top and bottom border assemblies, matching the corners and seam intersections.
Press the seams carefully and check that the complete unquilted top measures approximately 68 1/2 inches square.
The quilt should now have its four corner stars, interrupted evergreen diamond, diagonally arranged Christmas patchwork, gingerbread house and cranberry floral outer border. Add the thin cranberry binding after quilting to complete the appearance shown in the finished photograph.
Quilting, Binding and Finishing Your Gingerbread House Quilt
With the patchwork complete, you can choose quilting that brings out the stars, gingerbread house and diagonal chains without competing with them. The finished example has flowing decorative stitching in the cream background, which gives those open spaces a softer appearance.
Prepare the Backing
For standard-width backing, cut two lengths measuring 80 inches, each with at least 40 inches of usable fabric width. Remove the selvages, sew the long edges together with a 1/2-inch seam, and press open. The backing should measure approximately 79 x 80 inches before final trimming.
Trim the backing to at least 78 x 78 inches. If you're using 108-inch-wide backing, cut a length of approximately 80 inches and prepare a 78-inch square.
Use batting measuring approximately 80 x 80 inches, or at least 78 inches square after trimming. Check the requirements of your quilting method before cutting away any extra working allowance.
Layer and Quilt
- Place the backing wrong side up on a large flat surface.
- Lay the batting over it and smooth away wrinkles.
- Center the quilt top over the batting, right side up.
- Baste the layers from the center outward, using your preferred quilting method.
- Stabilize the main panel seams and central medallion before quilting the larger cream background areas.
Flowing feathers, soft leaves or gentle curved quilting can look lovely in the cream fabric. Around the gingerbread house, outline quilting can help separate the appliqued details from the background.
Keep the stitching manageable around the tiny candy-cane stripes and scalloped icing. Dense stitching isn't necessary everywhere, and it could distort those smaller details. Follow the batting manufacturer's maximum quilting-distance instructions.
Make and Attach the Binding
Cut eight cranberry binding strips, each 2 1/2 inches wide across the usable width of fabric.
- Join the eight strips with diagonal seams.
- Trim the joining seam allowances to 1/4 inch and press them open.
- Fold the complete binding strip lengthwise, wrong sides together, and press.
- Attach the binding to the front of the quilt using a 1/4-inch seam, mitering the corners.
- Leave loose tails at the beginning and end so the binding can be joined neatly.
- Join those tails diagonally without twisting, complete the attachment seam, and turn the binding to the back.
- Finish with hand slipstitching or secure machine stitching.
The eight binding strips provide approximately 302 1/2 inches of joined binding before the closing seam, assuming 40 inches of usable fabric width. That gives sufficient working length for the quilt perimeter and corners.
Final Quilt Check
Remove the basting and temporary markings, and check that no foundation paper remains in the pieced star seams. Examine the gingerbread house for missed applique stitches, especially around the icing curves, candy-cane hooks, wreath and tree points.
Check the binding corners and joins, secure loose threads, and add a quilt label with the maker's name and date if you wish.
Test the cranberry fabrics for color transfer before washing. Follow the care instructions for your fabric, batting and fusible materials.
Because this pattern has not been physically test-sewn, I would also make a practice star point and one half-square triangle before cutting all the matching units. The measurements have been digitally reviewed, but a small fabric test can catch machine-specific seam and pressing differences.
And that's your Christmas gingerbread house quilt, complete with its four stars, candy-cane windows and interrupted evergreen diamond framing.
Download the Free Gingerbread House Quilt Pattern and Templates
Ready to make your own gingerbread house quilt? I've separated the printable instructions, full-size templates and engineering measurements into three PDF files. You can download them individually, and you won't have to print all 41 template pages unless you need every applique piece.
Free Gingerbread House Quilt PDF Downloads
Download the Complete Gingerbread House Quilt Pattern (20 Pages)
Includes fabric requirements, cutting charts, Irish-chain patchwork, four corner stars, gingerbread house applique instructions, assembly diagrams, quilting and binding.
Download the Actual-Size Quilt Templates (41 Pages)
Includes the gingerbread house, scalloped roof icing, windows, candy canes, wreath, Christmas trees, holly, full-size applique placement guides and foundation-piecing templates for the corner stars.
Download the Quilt Engineering and Measurement Audit (4 Pages)
Includes the calculated quilt measurements, component quantities, template verification and comparison with the approved finished design.
Printing Your Quilt Templates
Print the actual-size templates at 100% or Actual Size. Don't select Fit to Page, Shrink to Fit or other automatic scaling settings.
Measure the one-inch calibration square both horizontally and vertically before cutting any fabric. The larger applique templates span several sheets. Match their printed coordinates and overlap marks when joining the pages.
Print four copies of the star foundation sheet. You only need one copy of the other applique and placement sheets unless you'd like extras.
Pattern note: This quilt pattern has been mathematically reviewed and digitally checked, but it has not been physically sewn or test-quilted.
When you click on links to various merchants on this site and make a purchase, this may result in this site earning a commission. This does not affect the price you pay.

UBGI Gold Standard 2026
Reviewed under the site's
editorial checklist.
Photos, decorating ideas, party setups and reader submissions are shared for inspiration unless a page is specifically presented as a pattern, tutorial, reference guide or step-by-step project. Follow the instructions, measurements, safety guidance and manufacturer directions provided for the particular project or product.
About Jan | Contact | Baby Nursery Ideas (Blog) | Site Map | Privacy Policy | Disclosure Policy | Disclaimer | Affiliate Disclosure | Earnings Disclosure | Facebook | Pinterest
I am a participant in the Amazon Services LLC Associates Program, an affiliate advertising program designed to provide a means for us to earn fees by linking to Amazon. As an Amazon Associate I earn from qualifying purchases.
Copyright © 2006-2026. All Rights Reserved.