Free Star Quilt Pattern in Crib, Throw and Full Sizes
By Jan Bay
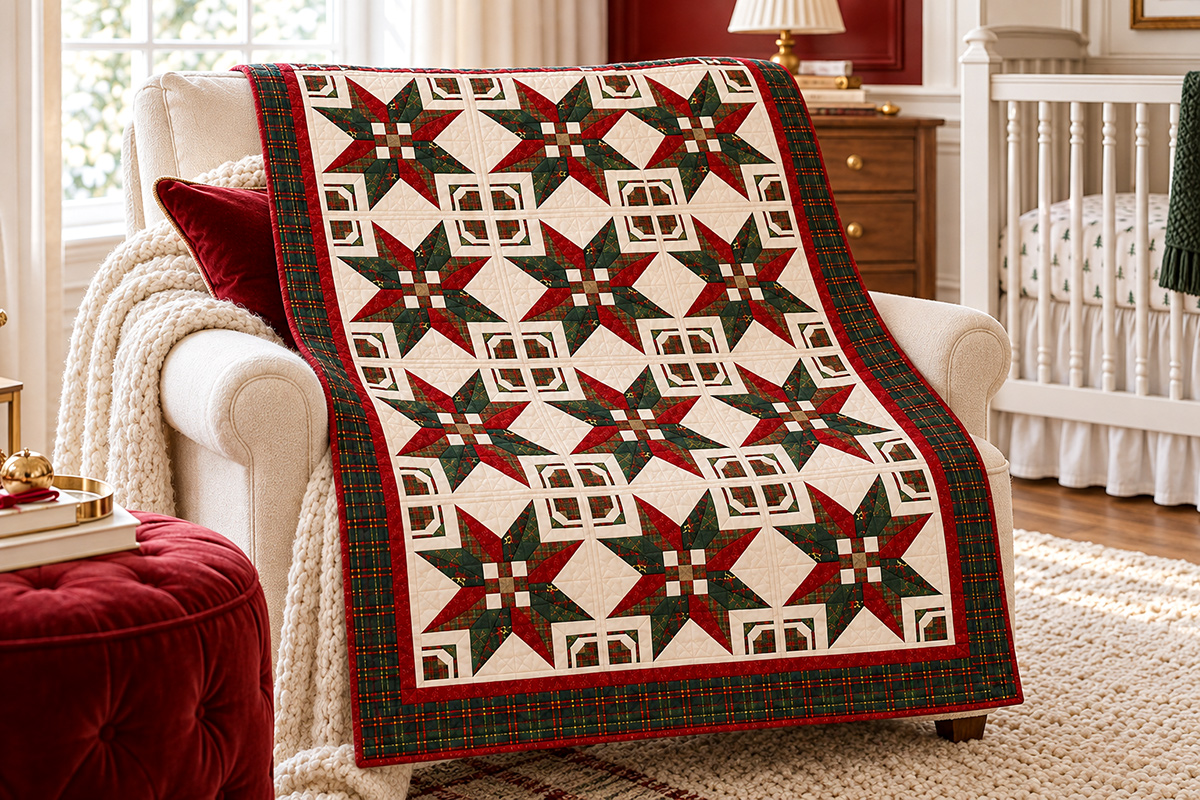
I wanted the Hearthlight Star quilt to look like Christmas morning, with rich cranberry reds, deep evergreen greens and a little Christmas plaid. The eight-pointed stars have checkerboard centers, split-color points and decorative corners that create another pattern when the blocks meet. This free star quilt pattern includes 12-inch blocks for the baby quilt and 16-inch blocks for the throw and full-size versions. And there's no reason to put this pattern away after the Christmas holidays. The same star design would be just as pretty in cool winter blues, autumn colors or soft spring prints.Explore More Free Quilt Patterns
Christmas Tree Irish Chain Quilt Pattern
See Supplies for This Project Here.
Jump to the Star Quilt Instructions
Foundation-Piece the Star Points
Arrange the Baby, Throw and Full Quilts
Hearthlight Star Quilt Sizes
I wanted those long, split-color star points to stand out, but the little clipped corner frames matter just as much. They give the quilt another pattern when the blocks meet. You’ll sew those green corner wedges from fabric, then add the very narrow green outlines with machine satin stitching. They look like tiny pieces of green fabric in the finished design, but there’s no fussy sliver to piece.
| Size | Block | Layout | Finished quilt |
|---|---|---|---|
| Baby | 12-inch | 3 across × 4 down | 42 × 54 |
| Throw | 16-inch | 3 across × 4 down | 54 × 70 |
| Full | 16-inch | 5 across × 6 down | 86 × 102 |
Both the baby and throw quilts have three blocks across and four down, just like the finished example. The full-size version uses five across and six down. After the blocks are joined, add a 1-inch finished cranberry border and a 2-inch finished plaid border. There’s no sashing between the stars, and the binding doesn’t add to the finished measurements.
Fabric, Supplies and Complete Cutting Lists
Before buying the fabric, decide which size you want. This quilt uses quite a few little sections, and I wouldn't cut all of them until I'd sewn one complete sample block. The fabric amounts below come from the actual cutting layouts in the printable pattern, with enough room left around each patch to flip it into place when paper piecing.
The yardages are purchasing allowances, not the smallest amount a very experienced quilter might use. They assume 40 inches of usable fabric width, generous paper-piecing rough cuts, a 10% reserve, and rounding up to the next quarter-yard. That extra fabric is there for a reason. Check the cutting plan before trying to reduce it.
| Fabric | Baby | Throw | Full |
|---|---|---|---|
| Cream | 3 3/4 yd | 5 yd | 12 1/2 yd |
| Cranberry | 2 yd | 2 3/4 yd | 6 1/4 yd |
| Evergreen | 1 1/2 yd | 1 3/4 yd | 4 1/4 yd |
| Plaid | 3 1/2 yd | 4 3/4 yd | 11 yd |
| Oatmeal | 1/4 yd | 1/4 yd | 1/4 yd |
| Separate binding | 1/2 yd | 3/4 yd | 1 yd |
| 40-inch usable backing | 3 1/4 yd | 4 yd | 8 3/4 yd |
The cranberry amount includes the narrow inner border, and the plaid amount includes the outer border. Binding is listed separately. You can use oatmeal scraps for the center squares if the pieces are large enough. The tartan in the example is beautiful, but directional plaid matching takes additional fabric and is not included in these estimates.
Computed Fabric Cutting Lengths
These are the calculated strip lengths before the purchasing reserve. They're useful if you're checking the cutting plan against the fabric you already have.
| Fabric | Baby | Throw | Full |
|---|---|---|---|
| Cream | 120 1/2 in | 162 3/8 in | 405 1/8 in |
| Cranberry | 63 in | 83 3/8 in | 197 3/8 in |
| Evergreen | 42 in | 55 3/8 in | 138 1/4 in |
| Plaid | 108 in | 148 1/4 in | 352 in |
| Oatmeal | 2 1/4 in | 2 5/8 in | 5 1/4 in |
The strip-layout appendix in the printable pattern groups identical cutting rows. An R after a patch ID means that particular rough-cut rectangle is rotated 90 degrees on the fabric. It doesn't mean you rotate the finished patch or foundation design.
Directional matching, additional shrinkage, damaged fabric and extra sample blocks require additional material. The sample block is not included in the quilt's fabric count. Backing amounts allow 4 inches of extra fabric on each edge, though your quilting method may require something different.
Color key: C = cream; R = cranberry; G = evergreen; P = plaid; O = oatmeal. Brown on the construction diagrams represents plaid fabric. It isn't another color you need to buy.
Tools and Supplies
Along with your quilting cotton, you'll need removable foundation paper, an accurate rotary cutter and rulers, an iron, pins or clips, and a sewing machine that can handle both paper piecing and adjustable zigzag stitches.
For the green corner accents, you'll also need matching evergreen machine-embroidery thread, a compatible needle, an open-toe or satin-stitch foot, a zigzag-compatible needle plate and lightweight embroidery stabilizer. Choose the stabilizer for your particular cotton and sewing machine.
Use the complete Hearthlight Star printable pattern together with the actual-size 12-inch and 16-inch foundation templates and the R3 satin-stitch placement guides.
Print the templates at 100% or Actual Size. Measure the 1-inch calibration square horizontally and vertically before cutting anything. Don't use Fit to Page, Shrink or additional mirroring.
12-Inch Cutting List: Framed Corner Pieces
The measurements below are generous rough-cut fabric rectangles for foundation paper piecing. They already include seam coverage and placement room. Don't add another seam allowance. Trim the sewn foundation to its printed outer cutting line.
Each of these pieces is used four times per block, or 48 times for the complete 12-block baby quilt.
| Patch | Fabric | Cut Size (inches) | Quantity |
|---|---|---|---|
| FL1 | Plaid | 3 1/8 × 2 3/4 | 48 |
| FL2 | Cream | 1 3/4 × 2 3/4 | 48 |
| FL3 | Cream | 2 × 2 3/4 | 48 |
| FL4 | Cranberry | 1 5/8 × 3 1/8 | 48 |
| FL5 | Cranberry | 2 × 2 1/2 | 48 |
| FL6 | Evergreen | 1 3/4 × 2 3/4 | 48 |
| FL7 | Cream | 1 3/4 × 4 3/8 | 48 |
| FL8 | Cream | 4 5/8 × 1 5/8 | 48 |
| FR1 | Plaid | 2 3/4 × 3 1/8 | 48 |
| FR2 | Cream | 2 3/4 × 1 3/4 | 48 |
| FR3 | Cream | 2 3/4 × 2 | 48 |
| FR4 | Cranberry | 3 1/8 × 1 5/8 | 48 |
| FR5 | Cranberry | 2 1/2 × 2 | 48 |
| FR6 | Evergreen | 2 3/4 × 1 3/4 | 48 |
| FR7 | Cream | 4 3/8 × 1 3/4 | 48 |
| FR8 | Cream | 1 5/8 × 4 5/8 | 48 |
The R3 FL and FR foundations have eight fabric regions each. Region 6 is the pieced green wedge. The microscopic green frame rail has been removed and will be replaced by machine satin stitching later.
12-Inch Cutting List: Star Points and Checkerboard
Use these rough-cut rectangles for the remaining star sections and checkerboard center. Keep the patch IDs with the fabric pieces. They match the final R3 foundation templates.
| Patch | Fabric | Cut Size (inches) | Quantity |
|---|---|---|---|
| CR1 | Plaid | 2 3/4 × 4 1/4 | 48 |
| CR2 | Cranberry | 2 3/4 × 4 1/4 | 48 |
| CR3 | Cream | 2 3/4 × 3 1/8 | 48 |
| CB1 | Plaid | 3 1/8 × 2 3/4 | 48 |
| CB2 | Evergreen | 5 3/4 × 2 3/4 | 48 |
| CB3 | Plaid | 5 1/8 × 2 3/4 | 48 |
| CB4 | Cream | 3 1/8 × 2 3/4 | 48 |
| EL1 | Plaid | 2 1/4 × 3 5/8 | 48 |
| EL2 | Cranberry | 2 3/4 × 4 5/8 | 48 |
| EL3 | Cream | 2 3/4 × 4 5/8 | 48 |
| ER1 | Evergreen | 2 1/4 × 3 5/8 | 48 |
| ER2 | Plaid | 2 3/4 × 4 5/8 | 48 |
| ER3 | Cream | 2 3/4 × 4 5/8 | 48 |
| CO1 | Cream | 2 1/4 × 2 1/4 | 24 |
| CO2 | Plaid | 2 1/4 × 2 1/4 | 24 |
| CO3 | Cream | 2 1/4 × 2 1/4 | 24 |
| CM1 | Plaid | 2 1/4 × 2 1/4 | 12 |
| CM2 | Oatmeal | 2 1/4 × 2 1/4 | 12 |
| CM3 | Plaid | 2 1/4 × 2 1/4 | 12 |
The CO foundations make the top and bottom checkerboard rows. CM makes the middle row. Although these rough-cut pieces are larger than the finished squares, don't trim them down before paper piecing. The printed foundations establish their finished sizes.
16-Inch Cutting List: Framed Corner Pieces
These are rough-cut rectangles for the 16-inch block foundations. Use the 12-block quantities for the throw or the 30-block quantities for the full quilt. Don't add extra seam allowances to these measurements.
| Patch | Fabric | Cut Size (inches) | Throw | Full |
|---|---|---|---|---|
| FL1 | Plaid | 3 5/8 × 3 1/4 | 48 | 120 |
| FL2 | Cream | 2 × 3 1/4 | 48 | 120 |
| FL3 | Cream | 2 1/4 × 3 1/8 | 48 | 120 |
| FL4 | Cranberry | 1 3/4 × 3 5/8 | 48 | 120 |
| FL5 | Cranberry | 2 1/8 × 2 3/4 | 48 | 120 |
| FL6 | Evergreen | 1 7/8 × 3 | 48 | 120 |
| FL7 | Cream | 1 7/8 × 5 1/4 | 48 | 120 |
| FL8 | Cream | 5 5/8 × 1 3/4 | 48 | 120 |
| FR1 | Plaid | 3 1/4 × 3 5/8 | 48 | 120 |
| FR2 | Cream | 3 1/4 × 2 | 48 | 120 |
| FR3 | Cream | 3 1/8 × 2 1/4 | 48 | 120 |
| FR4 | Cranberry | 3 5/8 × 1 3/4 | 48 | 120 |
| FR5 | Cranberry | 2 3/4 × 2 1/8 | 48 | 120 |
| FR6 | Evergreen | 3 × 1 7/8 | 48 | 120 |
| FR7 | Cream | 5 1/4 × 1 7/8 | 48 | 120 |
| FR8 | Cream | 1 3/4 × 5 5/8 | 48 | 120 |
You'll make four FL foundations and four FR foundations for each star block. The narrow green rail is not one of these fabric patches. FL6 and FR6 form the pieced green corner wedge; the green outline beside the cranberry frame will be satin stitched.
16-Inch Cutting List: Star Points and Checkerboard
The star-point panels are larger than those in the baby quilt, but the fabric order is the same. Keep the patch labels with the pieces so you don't mix up the cranberry, plaid and evergreen sections.
| Patch | Fabric | Cut Size (inches) | Throw | Full |
|---|---|---|---|---|
| CR1 | Plaid | 3 1/4 × 5 1/4 | 48 | 120 |
| CR2 | Cranberry | 3 1/4 × 5 1/4 | 48 | 120 |
| CR3 | Cream | 3 1/4 × 3 5/8 | 48 | 120 |
| CB1 | Plaid | 3 5/8 × 3 1/4 | 48 | 120 |
| CB2 | Evergreen | 7 1/4 × 3 1/4 | 48 | 120 |
| CB3 | Plaid | 6 1/8 × 3 1/4 | 48 | 120 |
| CB4 | Cream | 3 5/8 × 3 1/4 | 48 | 120 |
| EL1 | Plaid | 2 1/2 × 4 1/8 | 48 | 120 |
| EL2 | Cranberry | 3 1/4 × 5 5/8 | 48 | 120 |
| EL3 | Cream | 3 1/4 × 5 5/8 | 48 | 120 |
| ER1 | Evergreen | 2 1/2 × 4 1/8 | 48 | 120 |
| ER2 | Plaid | 3 1/4 × 5 5/8 | 48 | 120 |
| ER3 | Cream | 3 1/4 × 5 5/8 | 48 | 120 |
| CO1 | Cream | 2 5/8 × 2 5/8 | 24 | 60 |
| CO2 | Plaid | 2 5/8 × 2 5/8 | 24 | 60 |
| CO3 | Cream | 2 5/8 × 2 5/8 | 24 | 60 |
| CM1 | Plaid | 2 5/8 × 2 5/8 | 12 | 30 |
| CM2 | Oatmeal | 2 5/8 × 2 5/8 | 12 | 30 |
| CM3 | Plaid | 2 5/8 × 2 5/8 | 12 | 30 |
The 16-inch checkerboard is especially important to get right. Its finished cells measure exactly 1 1/3 inches, so follow the printed foundation lines rather than rounding the measurements to ordinary eighth-inch ruler marks.
Verified Strip Cutting Layouts
The printable pattern also includes strip-by-strip cutting layouts for each fabric and quilt size. Those are the layouts used to calculate the purchasing amounts above. Follow the patch IDs and dimensions in the charts, and turn a rough-cut rectangle 90 degrees only where the cutting layout calls for it. That doesn't change the orientation of the finished star.
If you have suitable offcuts, you can use them, provided they're large enough to cover the entire listed rectangle in the correct fabric. I wouldn't reduce the purchasing amounts on the assumption that every scrap will work.
Star Quilt Pattern: The Nine-Unit Hearthlight Block
Each Hearthlight Star block comes together in nine big units: four framed corners, four star-point panels, and one checkerboard center. The corner units also carry pieces of the star. That's what gives the points their broad, swept shape instead of the skinny points you'd get from an ordinary star block.
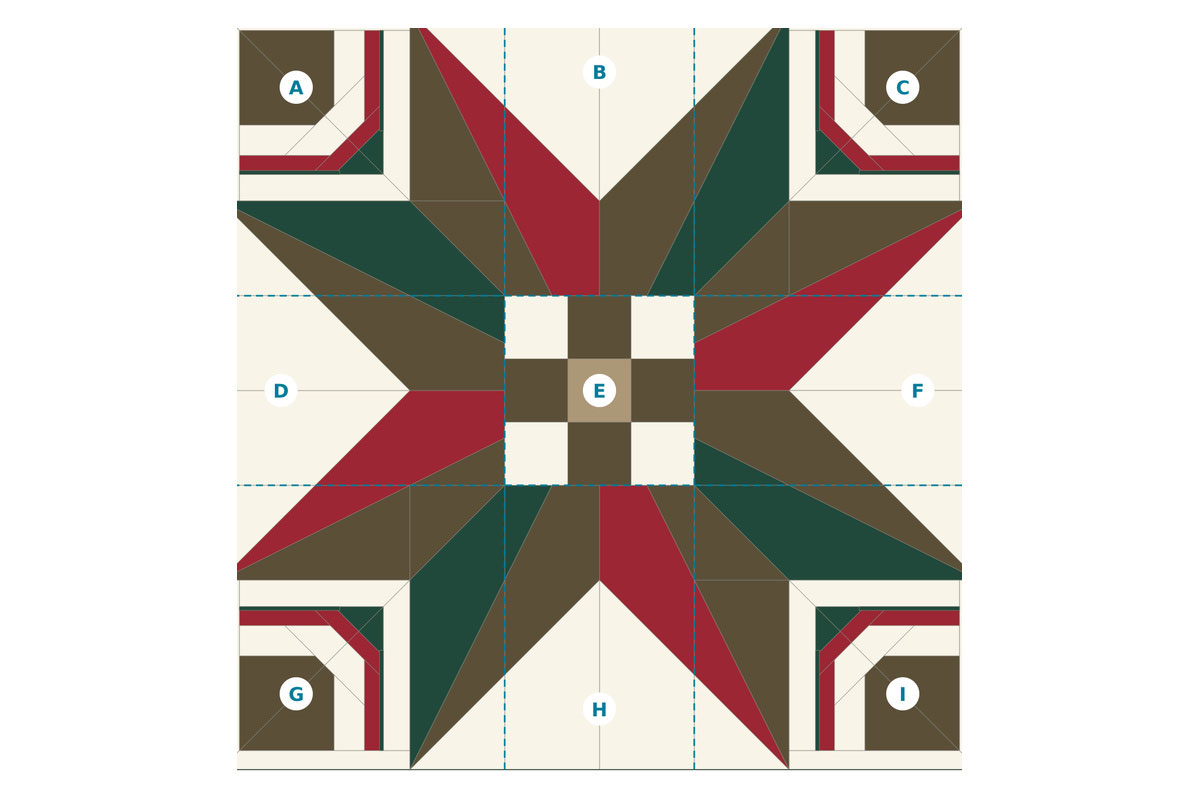
Think of the block as three rows. Across the top are corner A, star panel B and corner C. The middle has star panel D, checkerboard E and star panel F. Across the bottom are corner G, star panel H and corner I.
Don't treat those four corner units as decorations you can sew separately and add at the end. The colored star pieces belong inside them. Leave those pieces out and the finished star won't match the quilt in the photograph.
Use a consistent 1/4-inch seam allowance throughout. The printed foundations are already reversed for sewing from the paper side, while the block diagram shows the finished fabric side. Don't mirror the printed templates again.
12-Inch Finished Block
| Unit | Finished Size | Trimmed Size |
|---|---|---|
| A, C, G, I: corners | 4 1/2 × 4 1/2 | 5 × 5 |
| B, H: top and bottom panels | 3 × 4 1/2 | 3 1/2 × 5 |
| D, F: side panels | 4 1/2 × 3 | 5 × 3 1/2 |
| E: checkerboard | 3 × 3 | 3 1/2 × 3 1/2 |
The finished row width is 4 1/2 + 3 + 4 1/2 = 12 inches. After assembly, the unfinished block measures 12 1/2 inches square.
16-Inch Finished Block
| Unit | Finished Size | Trimmed Size |
|---|---|---|
| A, C, G, I: corners | 6 × 6 | 6 1/2 × 6 1/2 |
| B, H: top and bottom panels | 4 × 6 | 4 1/2 × 6 1/2 |
| D, F: side panels | 6 × 4 | 6 1/2 × 4 1/2 |
| E: checkerboard | 4 × 4 | 4 1/2 × 4 1/2 |
The finished row width is 6 + 4 + 6 = 16 inches. Once everything is joined, the unfinished block measures 16 1/2 inches square.
Both block sizes use exactly the same design and fabric placement. You can make the smaller one for the baby quilt without losing those long star points or changing the clipped-corner details.
Sew the Checkerboard Center
The little checkerboard is simple compared with the star points, but I wouldn't change its arrangement. Those alternating cream and plaid squares, with oatmeal right in the middle, are part of what makes the Hearthlight Star look like itself.
Use the CO foundation twice and the CM foundation once. CO reads cream, plaid, cream. CM reads plaid, oatmeal, plaid. Arrange the three rows CO / CM / CO, sew the two horizontal seams, and match the vertical square boundaries carefully.
| Measurement | 12-Inch Block | 16-Inch Block |
|---|---|---|
| Finished cell | 1 inch | 1 1/3 inches |
| Finished row | 3 × 1 | 4 × 1 1/3 |
| Trimmed row | 3 1/2 × 1 1/2 | 4 1/2 × 1 5/6 |
| Completed unfinished center | 3 1/2 inches square | 4 1/2 inches square |
The 16-inch center uses exact thirds. Each finished cell is 4/3 inch, or 96 PDF points, and each trimmed row is 11/6 inches high, or 132 PDF points. Follow the printed foundation rather than trying to round those measurements to convenient ruler marks.
Keep the oatmeal square in the middle of every checkerboard. Around it, the four plaid squares form a cross, with cream at the corners. I like that small break in the Christmas colors; it gives your eye somewhere to rest without changing the star.
Press gently and check that the completed center is square before putting it aside. Don't stretch the seams to force a measurement. It's easier to correct a little checkerboard now than after the long star points are attached.
Piece the Clipped-Corner Frames
Start with the upper-left corner, labeled A on the front-view drawing. The FL and FR foundations make the clipped frame. CR adds the adjoining cranberry point, while CB supplies the green and plaid star sections along the bottom.
You'll make four of these corners and rotate them into place. Don't mirror them. The cranberry, evergreen and plaid sections have to follow the same arrangement in every block.
Join the Two Frame Halves
Foundation-piece FL and FR using the R3 numbered templates. Place the completed halves right sides together, matching their long diagonal finished lines. Pin through the matching intersections, then stitch exactly 1/4 inch from the diagonal trim edge.
Press the diagonal seam open and trim the dog-ears. The joined frame should measure:
Baby: 3 1/2 × 3 1/2 inches unfinished.
Throw and full: 4 1/2 × 4 1/2 inches unfinished.
Support the fabric while removing the foundation paper in small pieces. Press gently. Don't drag the iron across the clipped corner or stretch the little green wedge.
You'll add the two machine-stitched green accents at this stage, before attaching CR and CB. The next section explains exactly where those stitches belong.
Finish Each Corner Unit
Once both green accents are finished, attach CR to the right side of the frame, using the front-view drawing for orientation.
The assembly should measure 5 × 3 1/2 inches for the baby block or 6 1/2 × 4 1/2 inches for the larger block.
Now sew CB across the bottom, matching its top edge to the frame-and-CR assembly. The finished corner unit measures 5 inches square unfinished for baby or 6 1/2 inches square unfinished for throw and full.
The plaid center belongs toward the outer corner. The colored star sections face inward toward the checkerboard.
Make four identical corner units. Position the first at A, then rotate complete units 90 degrees clockwise for C, 180 degrees for I, and 270 degrees for G.
Keep the star sections attached when you rotate each corner. They're part of the unit, not separate decorations.
Machine-Satin-Stitch the Green Corner Accents
Those fine green lines beside the cranberry framing are stitched with thread, not pieced from narrow strips of cotton. That's intentional. It keeps the delicate green outline in the finished design without asking you to sew a fabric rail only about 1.5 to 2 mm wide.
The actual green corner wedge is still pieced from evergreen fabric. We're only replacing the thin straight green outlines with satin stitching.
Choose Your Thread and Stabilizer
Use smooth, colorfast evergreen machine-embroidery thread that closely matches the pieced green wedge. A 40-weight polyester embroidery thread is a reasonable starting choice. I'd skip metallic, variegated or bulky decorative thread here. The little outlines are supposed to blend with the fabric, not compete with the star.
Use a compatible needle and bobbin thread, an open-toe or satin-stitch foot, and a needle plate that allows zigzag stitching. Follow your machine and thread manufacturers' guidance for needle size and tension.
Support each completed frame with lightweight embroidery stabilizer extending beyond its raw edges. A lightweight tear-away may suit stable quilting cotton. If the fabric tunnels or removing the stabilizer stresses the stitching, a lightweight cut-away may work better. Trim retained stabilizer carefully, since it can affect how the quilt drapes.
For cutting estimates, allow a 5-inch stabilizer square for each baby frame or a 6-inch square for each throw or full-size frame.
Transfer the Placement Markings
Print the separate R3 satin-stitch placement guide for the correct block size at 100%. Measure its 1-inch calibration square in both directions.
The guide shows the finished fabric side, not the paper side. Do not mirror it. Align the raw edges of your completed frame with the guide, keeping TOP at the upper edge.
Transfer the two stitch centerlines and their starting and ending marks onto the fabric face with a fine removable fabric marker. A light box may help if your fabric is dark.
Don't stitch through the placement-guide paper. It is a marking guide, not another foundation.
Set the Satin-Stitch Width and Density
For the 12-inch block, the green band is designed to cover approximately 0.060 inch, or 1.524 mm.
For the 16-inch block, the target is 0.080 inch, or 2.032 mm.
Begin with a narrow zigzag near 1.5 mm wide for baby or 2.0 mm for throw and full. These are starting settings, not guarantees of exact coverage. Check that your machine's foot and needle plate provide enough clearance.
Shorten the forward stitch length until the zigzag forms a filled satin band. A starting range of approximately 0.3 to 0.5 mm on comparable scrap cotton and stabilizer is reasonable, but you'll need to adjust it for your machine, thread and fabric.
If cranberry shows between the stitches, first check the thread, placement, tension and stabilizer. If the stitches bunch up or the machine struggles to feed, lengthen the stitch slightly. Don't keep piling stitches into one spot or set the forward length to zero for the whole run.
Stitch the Two Green Lines
There are two separate straight stitch runs on each frame.
Start at S1 and follow the vertical centerline to E1. Then start at S2 and follow the horizontal centerline to E2.
Both lines finish slightly inside the existing pieced green wedge. Stop at the marked endpoints. Don't stitch diagonally across the wedge or try to turn the satin stitching around the clipped corner.
| Placement | 12-Inch Block | 16-Inch Block |
|---|---|---|
| S1 vertical start (x,y) | 2.550, 0.300 | 3.400, 0.400 |
| E1 vertical end (x,y) | 2.550, 1.890 | 3.400, 2.520 |
| S2 horizontal start (x,y) | 0.300, 2.550 | 0.400, 3.400 |
| E2 horizontal end (x,y) | 1.890, 2.550 | 2.520, 3.400 |
| Target band width | 0.060 in | 0.080 in |
| Length of each run | 1.590 in | 2.120 in |
| Minimum overlap into wedge | 0.030 in | 0.040 in |
These coordinates are measured from the finished upper-left corner of the frame, not its raw edge. If you're measuring from raw edges, account for the 1/4-inch seam allowance. It's much easier to use the actual-size placement guide rather than trying to mark those decimals with a ruler.
Secure the Thread and Finish the Frame
Leave thread tails at the beginning and end of each run. Bring the upper tails to the back, tie them with the bobbin tails and bury the ends beneath the stitches. Avoid repeated reversing that builds a thick lump.
Remove or trim the stabilizer according to its type, supporting the little satin bands so they aren't pulled loose.
Press from the back on a padded surface, using a pressing cloth and heat appropriate for your thread. Don't flatten the raised satin stitching with a hot iron.
Check for puckering, loose thread ends, cranberry showing through, or distortion around the corner. Then attach CR and CB as described above.
Accent Stitching Quantities
| Quantity | Baby | Throw | Full |
|---|---|---|---|
| Major units per block | 9 | 9 | 9 |
| Foundation sections per block | 27 | 27 | 27 |
| Fabric patches per block | 125 | 125 | 125 |
| Total foundation sections | 324 | 324 | 810 |
| Total fabric patches | 1,500 | 1,500 | 3,750 |
| Frames and stabilizer squares | 48 at 5 in | 48 at 6 in | 120 at 6 in |
| Individual satin-stitch runs | 96 | 96 | 240 |
| Total stitch centerline length | 152.64 in | 203.52 in | 508.80 in |
If your stabilizer has 20 usable inches of width, the calculated purchasing amounts, including a reserve, are approximately 2 yards for baby, 3 yards for throw or 7 1/2 yards for full. Recalculate if your stabilizer comes in a different width.
Thread consumption depends on stitch density, tension and thread tails, so there isn't a physically verified spool requirement. Have matching extra thread available before beginning.
Foundation-Piece the Star Points
Foundation paper piecing is what lets you make those long, sharply angled star points without trying to measure every diagonal by hand. The printed lines establish the shape, and the fabric rectangles give you enough material to flip each piece over its assigned area.
If this technique is new to you, the BERNINA/WeAllSew foundation-paper-piecing tutorial explains the basic fold, stitch, trim and press method. Use the Hearthlight templates and fabric sequence for this particular quilt, though, rather than substituting the tutorial's sample block.
Prepare the Foundation Templates
Print the eight matching foundation masters at 100% or Actual Size. Measure every calibration square horizontally and vertically before sewing. Keep the 12-inch and 16-inch sets separate.
The foundation drawings are already reversed for stitching from the paper side. Don't mirror them again. Their printed side will be behind the fabric, and the finished fabric face should match the front-view construction diagrams.
Sew the Numbered Fabric Sections
Cut the generous fabric rectangles from the cutting lists. Keep their patch IDs attached or grouped so you don't accidentally put cranberry where evergreen belongs.
For region 1, place the fabric wrong side against the unprinted side of the paper, with the right side of the fabric facing outward. Make sure it covers the entire first region, including its seam and outside trimming allowances.
Before adding the next piece, fold the foundation along its new stitching line and check where the fabric will land after you flip it open. It must cover the entire numbered region and any outer trimming allowance.
Place the next piece right sides together with the previous fabric. Stitch from the printed side of the paper, following the boundary for the new region. Extend the stitching slightly beyond the seam endpoints into the allowance.
Fold back the paper, trim the fabric seam allowance to 1/4 inch, then open the new fabric and press gently. Repeat in numerical order.
Don't stitch all the printed lines at once. Each line is sewn when its corresponding numbered fabric region is added.
Foundation Fabric Sequence
| Foundation | Fabric Sequence | Per Block |
|---|---|---|
| FL | P, C, C, R, R, G, C, C | 4 |
| FR | P, C, C, R, R, G, C, C | 4 |
| CR | P, R, C | 4 |
| CB | P, G, P, C | 4 |
| EL | P, R, C | 4 |
| ER | G, P, C | 4 |
| CO | C, P, C | 2 |
| CM | P, O, P | 1 |
R3 correction: FL and FR have eight fabric regions each. Region 6 is the pieced green wedge. The old microscopic green rail fabric piece is gone. The straight green outlines are added later with satin stitching.
After sewing the last numbered section, trim each foundation on its heavy outer cutting line. The dashed line marks the finished section and is not where you cut.
For FL and FR, retain the full diagonal allowance and pointed dog-ears until the two halves are joined. The fabric should stay supported by its paper until the instructions tell you to remove it.
Make the Four Edge Panels
Foundation-piece EL and ER, then place them fabric side up in the top-panel orientation with EL on the left and ER on the right. Join their adjacent long edges.
The assembled panel measures 3 1/2 × 5 inches unfinished for baby or 4 1/2 × 6 1/2 inches unfinished for throw and full.
The cream opening faces outward. The flatter colored edge belongs against the checkerboard center.
Make four identical edge panels. Position the first at B. Rotate it 90 degrees clockwise for F, 180 degrees for H and 270 degrees for D.
Always rotate the whole panel. Swapping EL and ER changes the star's color arrangement, and that's not the design we're making.
Assemble Each Star Block
Once the four corner units, four edge panels and checkerboard center are finished, you're ready to bring the star together. Lay everything out first, fabric side up, and compare the colors and angles with the construction drawing.
Arrange the nine units in three rows:
Top row: A, B, C.
Middle row: D, E, F.
Bottom row: G, H, I.
Sew each row together using 1/4-inch seams, matching the printed intersections. Then join the three rows, taking particular care where the star points meet the checkerboard.
Press seam allowances open or toward the side with less bulk. Keep the long points flat and don't pull on them while pressing.
| Measurement | 12-Inch Block | 16-Inch Block |
|---|---|---|
| Unfinished top row | 12 1/2 × 5 | 16 1/2 × 6 1/2 |
| Unfinished middle row | 12 1/2 × 3 1/2 | 16 1/2 × 4 1/2 |
| Unfinished bottom row | 12 1/2 × 5 | 16 1/2 × 6 1/2 |
| Completed unfinished block | 12 1/2 × 12 1/2 | 16 1/2 × 16 1/2 |
Remove the remaining foundation paper carefully after the block is secure, supporting the seams as you work.
Before making the next block, compare this one with the front-view diagram. Check the direction of all eight star points, the checkerboard center, the four corner frames and the satin-stitched green outlines.
A perfectly square block with one reversed star point is still the wrong block. Better to catch it now than after twelve or thirty of them are sewn together.
Arrange the Baby, Throw and Full Quilts
Keep every Hearthlight Star block in the same orientation as the approved quilt. The repeated corner frames create little secondary geometric accents where the blocks meet, and those details look best when the placement stays consistent.
Baby Quilt: 42 × 54 Inches
Arrange 12 blocks, each finishing at 12 inches, with three blocks across and four rows down. The block field finishes at 36 × 48 inches before borders.
After adding the 1-inch cranberry and 2-inch plaid borders, the calculated finished size is 42 × 54 inches.
Throw Quilt: 54 × 70 Inches
Arrange 12 blocks, each finishing at 16 inches, with three blocks across and four rows down. The block field finishes at 48 × 64 inches before borders.
With the same cranberry and plaid borders, the calculated finished size is 54 × 70 inches.
Full Quilt: 86 × 102 Inches
Arrange 30 of the 16-inch blocks, five across and six rows down. The block field finishes at 80 × 96 inches before borders.
After adding both borders, the calculated finished size is 86 × 102 inches.
Join the blocks directly with 1/4-inch seams, keeping the star points aligned. Don't add sashing. The corner frames are meant to meet one another and form the secondary pattern between the stars.
If you're planning the full-size quilt, check the dimensions against your particular mattress and the amount of overhang you want. The calculated quilt size doesn't account for quilting shrinkage.
Borders, Backing, Batting and Binding
Once the blocks are joined, the borders finish the Christmas look without taking attention away from the stars. I'd keep the cranberry inner border narrow and let the darker plaid provide the outside frame, just as it does in the finished example.
Cut and Attach the Borders
Cut the cranberry inner-border strips 1 1/2 inches wide and the plaid outer-border strips 2 1/2 inches wide. Join shorter strips as needed before cutting the assembled lengths below.
Attach the side borders first, then the top and bottom. Measure the actual quilt through its center before cutting the final lengths. The chart gives theoretical assembled cutting lengths, including the outside seam allowances.
| Assembled Border Strips | Baby | Throw | Full |
|---|---|---|---|
| Inner sides, cut 2 | 1 1/2 × 48 1/2 | 1 1/2 × 64 1/2 | 1 1/2 × 96 1/2 |
| Inner top/bottom, cut 2 | 1 1/2 × 38 1/2 | 1 1/2 × 50 1/2 | 1 1/2 × 82 1/2 |
| Outer sides, cut 2 | 2 1/2 × 50 1/2 | 2 1/2 × 66 1/2 | 2 1/2 × 98 1/2 |
| Outer top/bottom, cut 2 | 2 1/2 × 42 1/2 | 2 1/2 × 54 1/2 | 2 1/2 × 86 1/2 |
| Inner 40-inch WOF strips | 5 | 6 | 10 |
| Outer 40-inch WOF strips | 5 | 7 | 10 |
Join the border strips end to end with straight 1/4-inch seams. Each join uses 1/2 inch of their combined length. The cutting calculations are based on straight joins, not diagonal border joins.
Press the joins open and arrange them away from block corners where possible.
The quilt tops should measure approximately 42 1/2 × 54 1/2 inches unfinished for baby, 54 1/2 × 70 1/2 inches for throw, or 86 1/2 × 102 1/2 inches for full.
If your sewn block field is slightly different, measure through its center and adjust the borders accordingly. Don't pull a border strip tight to make the measurements agree. That can distort those carefully pieced star points.
Backing and Batting
Allow enough backing and batting for the quilting method you're using. The table below provides 4 inches of working allowance on every edge.
| Backing / Batting | Baby | Throw | Full |
|---|---|---|---|
| Minimum working size | 50 × 62 | 62 × 78 | 94 × 110 |
| 40-inch backing panels | 2 at 50 long | 2 at 62 long | 3 at 94 long |
| Height after 1/2-inch joins | 79 | 79 | 118 |
| Backing purchase with reserve | 3 1/4 yd | 4 yd | 8 3/4 yd |
Join the backing panels horizontally with 1/2-inch seams and press those seams open. The 40-inch fabric width contributes to the finished backing height.
Trim the pieced backing to at least the working size shown above. Use batting large enough for the same dimensions, and follow the quilting-distance instructions for the batting you've chosen.
Extra-wide backing is another option if its usable dimensions are large enough for the finished quilt plus the needed quilting allowance.
Layer the backing, batting and quilt top, then baste and quilt. I'd keep the quilting balanced between the open cream spaces and the more densely pieced star sections. Avoid pulling the long points out of shape.
After quilting, trim the extra backing and batting without cutting away the outside quilt-top allowance needed for binding.
Cut and Sew the Binding
| Separate Binding | Baby | Throw | Full |
|---|---|---|---|
| 2 1/2 × 40-inch strips | 6 | 7 | 11 |
| Length after diagonal joins | 227 1/2 | 265 | 415 |
| Quilt perimeter + 10 inches | 202 | 258 | 386 |
| Fabric purchase with reserve | 1/2 yd | 3/4 yd | 1 yd |
Join the binding strips diagonally. Each diagonal join in 2 1/2-inch strips uses approximately 2 1/2 inches of their combined length.
Press the completed binding strip in half lengthwise, wrong sides together. Attach it with a 1/4-inch seam, miter the corners, join the ends neatly and finish the folded edge on the back.
For the full quilt, cut 11 binding strips. Ten strips would leave only about 1 1/2 inches beyond the quilt's perimeter after diagonal joins. That's not a sensible amount to leave for finishing the ends.
Troubleshooting Before the Next Block
If cranberry shows through the green stitching: Check the satin-stitch position, matching thread, stabilizer and stitch density. Don't widen the band just to cover a marking mistake. If the stitches bunch up, adjust the forward stitch length, support or tension rather than sewing repeated dense passes.
If a star point faces the wrong direction: Compare the fabric side with the front-view block drawing. EL and ER have different color arrangements. Rotate complete panels and corners, but don't interchange their individual halves or mirror the printed foundations again.
If a block is undersized: Check the printed calibration square and the unfinished unit measurements. The 16-inch checkerboard uses exact thirds. Rounding those measurements or stretching the block can throw off the surrounding seams.
If you're using scraps: Reuse an offcut only when it can supply the complete rough-cut rectangle in the correct fabric. The purchasing charts don't assume that every leftover piece can be reused.
Christmas and Year-Round Colors
The Christmas version is the one that started this design: cranberry red, deep evergreen, small-scale tartan, cream backgrounds and a little oatmeal in the checkerboard centers. I'd keep the red and green points in their established positions so the colors move consistently around every star.
But there's no reason to put this pattern away when Christmas is over. The star and framed corners don't depend on holiday prints to look good.
Winter: Icy blue, dusty teal, soft blue-gray checks and crisp white backgrounds would give the quilt an entirely different look. I'd keep the darker teal in the evergreen positions and the lighter blue where cranberry appears in the Christmas version.
Autumn: Rust, olive, caramel, oatmeal and a small brown check would make a beautiful fall quilt without changing a single foundation.
Spring: Dusty rose, moss green, muted coral and white would soften the whole design. A small floral or gingham print could replace the Christmas plaid.
Everyday: Navy, charcoal and white would give the long star points a crisp, tailored appearance. You could also use two contrasting solids and reserve one small print for the checkerboard and corner accents.
For any new colorway, substitute fabrics consistently according to the original color letters. Keep enough contrast between the star points and the cream background so the eight-pointed silhouette remains clear.
The 12-inch and 16-inch templates don't change with the colors. Neither do the checkerboard measurements, nine-unit assembly or quilt layouts.
Pattern Review and Baby Quilt Safety
Pattern note: This original advanced foundation-paper-piecing pattern has been mathematically reviewed for dimensions, template geometry, fabric cutting quantities and assembly, but it has not been physically sewn from these instructions. The narrow green frame accents are machine stitched rather than pieced from fabric. Thread coverage, tension, stabilizer, pressing and fabric handling can affect the finished result. Make one complete sample block before cutting fabric for the quilt.
Baby quilt use: The baby-size Hearthlight Star is intended for supervised awake floor time or as a keepsake. Keep quilts, blankets and other loose bedding out of an infant's sleep space.
When you click on links to various merchants on this site and make a purchase, this may result in this site earning a commission. This does not affect the price you pay.

UBGI Gold Standard 2026
Reviewed under the site's
editorial checklist.
Photos, decorating ideas, party setups and reader submissions are shared for inspiration unless a page is specifically presented as a pattern, tutorial, reference guide or step-by-step project. Follow the instructions, measurements, safety guidance and manufacturer directions provided for the particular project or product.
About Jan | Contact | Baby Nursery Ideas (Blog) | Site Map | Privacy Policy | Disclosure Policy | Disclaimer | Affiliate Disclosure | Earnings Disclosure | Facebook | Pinterest
I am a participant in the Amazon Services LLC Associates Program, an affiliate advertising program designed to provide a means for us to earn fees by linking to Amazon. As an Amazon Associate I earn from qualifying purchases.
Copyright © 2006-2026. All Rights Reserved.