Free Quilted Christmas Stocking Pattern with Farmhouse Patchwork
By Jan Bay
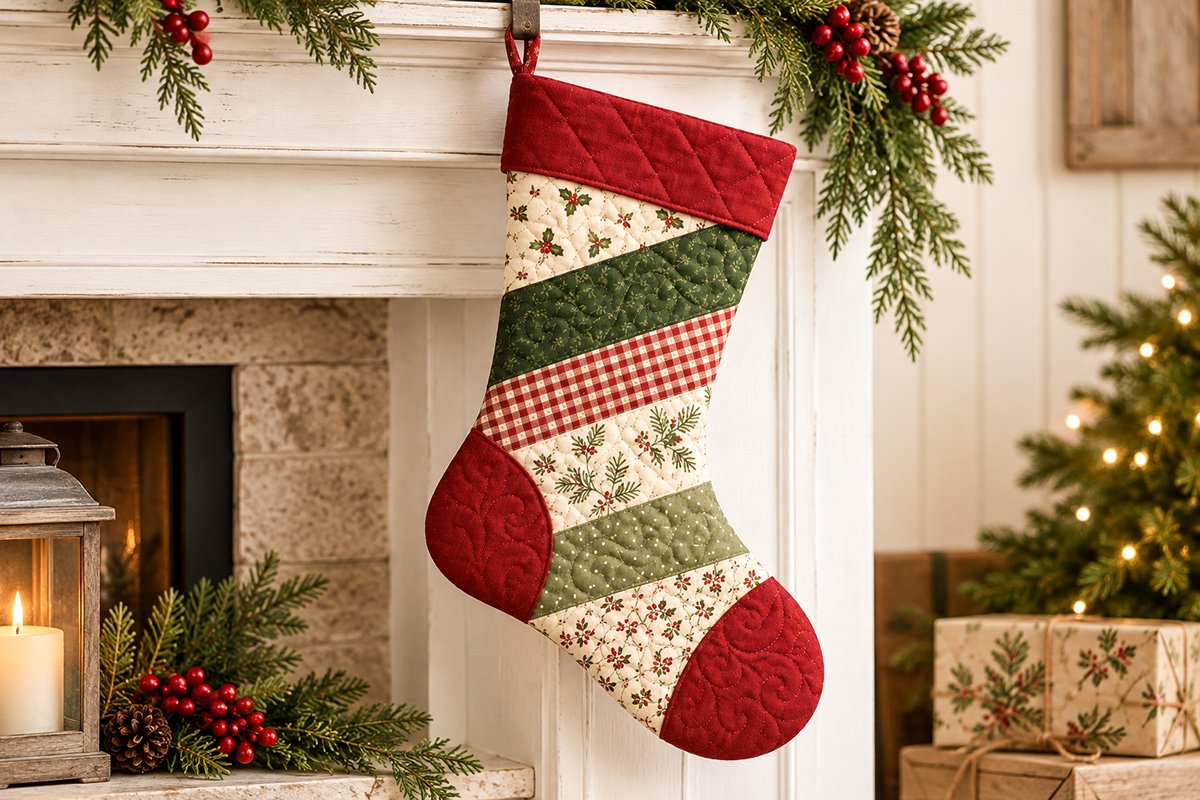
This free quilted Christmas stocking pattern brings together cranberry red, evergreen, vintage holiday prints and wide diagonal fabric strips for that cozy farmhouse look. Fully lined with a quilted cuff and matching heel and toe, it's the kind of Christmas stocking that will make you smile every December. And you don't have to start with brand-new Christmas fabrics. If you've saved a well-loved baby quilt that's worn or stained in a few places, its clean, sturdy sections could become part of a Christmas stocking that preserves those precious memories.
Explore More Christmas Stocking and Quilt Patterns
On This Page
Finished Size and Supplies for This Quilted Christmas Stocking Pattern
Before you start pulling out Christmas fabrics, let's look at what you're making. This is a generously sized stocking with a curved heel, rounded toe and an opening wide enough for little gifts and stocking stuffers. The diagonal patchwork does most of the decorating, so you won't need to piece dozens of tiny quilt blocks.
The finished stocking should measure approximately 19 inches from the top opening to the bottom of the toe, with a maximum heel-to-toe width of approximately 12 inches. These are calculated measurements based on the printable template, not measurements taken from a sewn sample.
Project details
- Skill level: Confident beginner to intermediate
- Finished size: Approximately 19 inches tall and 12 inches across at the widest point
- Top opening: Approximately 15 1/4 inches around
- Seam allowance: 1/4 inch unless otherwise stated
- Construction: Six diagonal patchwork bands, quilted back, curved heel and toe appliques, quilted cuff and separate fabric lining
- Orientation: Toe points to the right when you're looking at the finished front
- Fabric: Quilting-weight cotton
Fabric and supplies
- Six coordinating Christmas-print fat quarters, each with at least 19 inches of usable length in the cutting direction
- 1/2 yard cranberry-red cotton for the cuff, heel, toe and hanging loop
- 1/2 yard coordinating quilting cotton for the stocking back
- 3/4 yard cotton fabric for the lining and cuff facing
- 3/4 yard lightweight cotton muslin for the quilt backing layers
- Quilt batting sufficient for two 14-by-22-inch stocking pieces and two small cuff pieces
- Lightweight fusible fleece for the cranberry heel and toe appliques
- Coordinating sewing thread
- Size 80/12 sewing-machine needle, with a 90/14 available for thicker seams
- Walking foot or free-motion quilting foot
- Rotary cutter, cutting mat and quilting ruler
- Fabric scissors, pins or sewing clips and removable fabric marker
- Iron and pressing cloth
- Printer paper, ruler and transparent tape for assembling the template
I'd choose Christmas prints with small holly leaves, pine branches, gingham and a quiet dotted fabric. Cranberry red and deep evergreen provide plenty of Christmas color, while the ivory prints keep the patchwork from looking too busy.
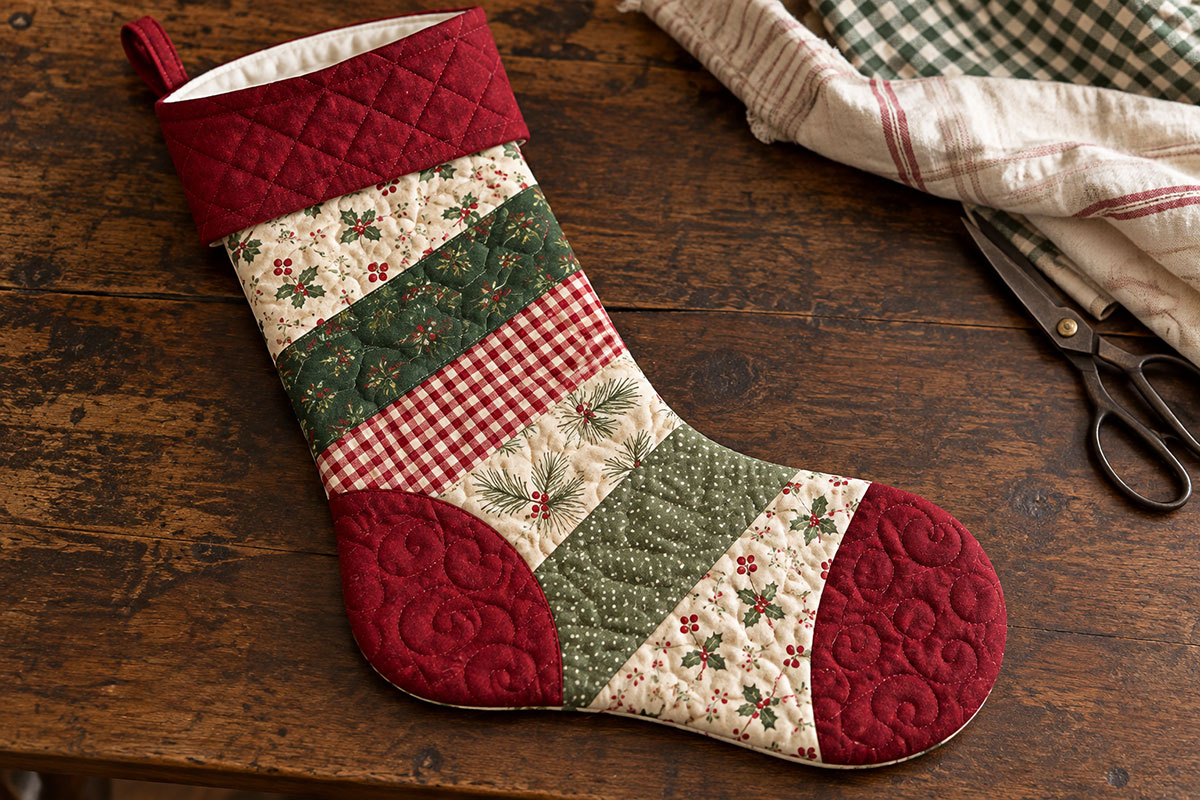
The stocking in the photograph has a quilted cranberry cuff, a matching heel and toe, and six broad diagonal sections. We'll keep those details exactly where they belong.
If you have scraps left from a Christmas quilt, check their sizes before buying more fabric. The four middle strips are relatively narrow, so this is a good project for using some of those leftover holiday prints.
Before cutting: Check the 1-inch calibration square on the printable template. The body pattern already includes the 1/4-inch outside seam allowance, so don't add another allowance around the stocking outline.
Free Printable Stocking Template
You won't have to draw your stocking shape freehand. The printable pattern includes the full-size body, the curved cranberry heel and toe pieces, and placement lines for the diagonal patchwork.
Download the Free Quilted Christmas Stocking Template (PDF)
The PDF has nine pages. Page 1 contains the layout diagram and calibration square. Pages 2 through 7 form the full-size stocking body. Pages 8 and 9 contain the separate heel and toe applique templates.
Printing and assembling the pattern
- Print the PDF on US Letter paper at 100% or Actual Size. Turn off Fit to Page, Shrink to Fit and other automatic scaling options.
- Measure the calibration square on page 1. It must measure exactly 1 inch on each side.
- Arrange the six stocking-body sheets in three rows, with pages 2 and 3 on top, pages 4 and 5 in the middle, and pages 6 and 7 at the bottom.
- Trim the sheets along their printed tile rectangles.
- Bring the neighboring tile edges together without overlapping the printed pattern area. Match the stocking outlines and colored placement guides.
- Tape the sheets securely together on the back.
- Cut around the solid black outside stocking outline.
- Keep the placement diagram handy, or trace the red heel and toe placement curves onto separate tracing paper.
- Cut out the separate heel and toe paper patterns from pages 8 and 9.
The green dashed lines on the body pattern show the five seams between the six patchwork strips. The red dashed curves show where the finished inside edges of the heel and toe appliques belong.
Those dashed lines are guides, not additional cutting lines.
Before cutting your fabric, lay the assembled paper pattern on a table. The toe should point right, the opening should be straight across the top, and the heel and toe curves should be smooth. If a printed line doesn't meet properly at a page join, check the printing scale and tile alignment.
I'd check the paper pattern now rather than discover a crooked join after quilting the fabric.
Fabric Cutting Chart
The stocking front is pieced from six rectangular fabric strips. We'll join them into one larger panel, position the stocking template diagonally over the finished patchwork and cut the stocking shape after quilting.
That approach saves you from cutting six complicated angled shapes before sewing. It also gives you a little room to adjust the placement of your favorite prints.
Cutting the six patchwork strips
| Strip | Fabric | Cut size |
|---|---|---|
| A | Ivory holly print | 7 1/4 x 19 inches |
| B | Deep evergreen print | 3 1/4 x 19 inches |
| C | Cranberry and ivory gingham | 3 1/4 x 19 inches |
| D | Ivory pine-branch print | 3 1/4 x 19 inches |
| E | Muted sage dotted print | 3 1/4 x 19 inches |
| F | Ivory small-sprig print | 7 1/4 x 19 inches |
The two wider ivory strips belong at the top and bottom of the panel. The four narrower strips run between them in the order shown.
Cut the strips with their 19-inch edges straight and parallel. If your fabric is directional, check which way the printed holly branches or other motifs will face after the strips are angled.
Cutting the remaining pieces
- Stocking back: One 14-by-22-inch rectangle of coordinating fabric, to be quilted before cutting the final stocking shape
- Batting: Two pieces measuring 14 by 22 inches
- Muslin: Two pieces measuring 14 by 22 inches
- Lining: Two rectangles measuring 14 by 22 inches, to be cut into mirrored stocking shapes
- Heel applique: One cranberry piece cut from PDF page 8
- Toe applique: One cranberry piece cut from PDF page 9
- Outer cuff: Two cranberry rectangles, 8 1/2 by 3 1/2 inches each, to be quilted and then trimmed to 8 1/8 by 3 inches
- Cuff facing: Two cotton rectangles, 8 1/8 by 3 inches each
- Cuff batting: Two pieces, 8 1/2 by 3 1/2 inches each, to be trimmed with the quilted outer cuff pieces
- Hanging loop: One cranberry strip, 2 1/2 by 7 inches
The applique templates include their turned-edge allowances. Cut them directly on the solid outside lines.
For the lining, cut one stocking shape with the template facing up and one with it reversed. The two pieces must match when placed right sides together.
Don't cut the patchwork front or the quilted back into their final stocking shapes yet. We'll quilt the larger pieces first and use the full-size template to trim them afterward.
Measurement checkpoint: The six patchwork strips total 27 1/2 inches in width before sewing. Five seams, each with a 1/4-inch allowance on both sides, reduce the completed panel width by 2 1/2 inches. Your finished strip set should measure approximately 25 by 19 inches before quilting.
Sewing the Diagonal Patchwork
Now we get to the patchwork that gives this stocking its farmhouse character. The fabric strips are sewn together with ordinary straight seams, but they'll run diagonally across the stocking when we're finished.
Keep your 1/4-inch seam allowance consistent. These are wide strips, so they're not difficult to sew, but a little extra fabric disappearing into each seam can throw off the placement lines.
Step 1. Sew the six strips together
- Lay out strips A through F in the order shown in the cutting chart.
- Place strip B right sides together with strip A, matching one 19-inch edge.
- Pin the long edge and sew with a 1/4-inch seam allowance.
- Open the strips and press the seam toward the darker evergreen fabric.
- Place strip C right sides together with strip B, matching their remaining long edges.
- Sew with a 1/4-inch seam and press.
- Continue adding strips D, E and F in the same manner.
- Press the completed strip set flat, being careful not to stretch the fabrics.
The completed panel should measure approximately 25 by 19 inches. Each of the four narrower middle strips should measure 2 3/4 inches between its sewn seams.
Check the middle strips with your quilting ruler before moving on. They're the ones that need to line up with the five green placement guides on the printable template.
Step 2. Arrange the diagonal layout
- Spread the completed patchwork panel right side up on your cutting surface.
- Lay the full-size stocking template over the fabric with the toe pointing to the right.
- Rotate the patchwork panel beneath the template until its five sewn seams rise gently toward the right, following the green dashed lines.
- Begin by matching the seam between strips A and B with the first green dashed placement line.
- Check that the remaining four seams follow the other green guides.
- Move the panel slightly if needed, keeping the seams parallel to the printed guides.
- Check that the complete stocking outline, including the heel and rounded toe, falls within the patchwork fabric.
- Pin the template to the panel when the placement is correct.
The seams should rise approximately 3 inches over a horizontal distance of 14 inches. That's a gentle diagonal, not a steep angle.
You should now see the same general arrangement as the finished stocking photograph: ivory holly print at the top, followed by evergreen, cranberry gingham, ivory pine branches, sage and another ivory print toward the foot.
Don't worry if some of the first and last ivory strips extend well beyond the paper pattern. That's intentional. The extra fabric gives us room to position the diagonal layout correctly before trimming.
Step 3. Mark the stocking outline
- Hold the paper template securely in place.
- Trace the full outside stocking shape onto the right side of the patchwork with a removable fabric marker.
- Transfer the red heel and toe placement curves from the template.
- Mark the top opening and both side-seam positions.
- Remove the paper template and check that the tracing is smooth and complete.
We're going to quilt the panel before cutting out the stocking, so leave the extra fabric in place for now.
I'd also take a quick look at the arrangement before moving on. The cranberry gingham should be easy to see across the middle, with the darker evergreen above it and the quieter sage print below. Those contrasting strips are what give the stocking its old-fashioned patchwork charm.
Quilting the Stocking
The little curls and softly raised quilting stitches are part of what makes this stocking so pretty. The patchwork provides the colors, but the quilting gives the fabric that soft, slightly padded appearance.
The finished stocking has curved quilting across the larger fabric sections and a diamond-quilted cranberry cuff. You can use a free-motion quilting foot for the swirls or mark the curves first and follow them slowly with your sewing machine.
Step 4. Prepare the patchwork quilt sandwich
- Place one 14-by-22-inch muslin backing piece on your work surface.
- Lay one matching piece of batting over the muslin.
- Center the traced stocking area of the pieced front over the batting, right side up. All parts of the traced outline must be supported by batting and muslin.
- Smooth the layers and secure them with quilting pins or temporary basting spray.
- Make sure the patchwork hasn't shifted or stretched while arranging the layers.
You won't need to add batting beneath every inch of the oversized patchwork panel. Just make certain there's batting and muslin beneath the entire stocking outline, with a little room beyond the cutting line.
Step 5. Quilt the patchwork front
- Begin by stitching in the ditch along the five diagonal seams. This holds the strip piecing against the batting and muslin.
- Mark small, gently curling quilting swirls on the larger fabric sections. Curves approximately 1 to 1 1/2 inches across will give you a similar look to the finished example.
- Stitch the swirls through all three layers, working gradually from the center toward the outer edges.
- Use smaller connecting curves where a narrow fabric strip doesn't have room for a full swirl.
- Keep the quilting fairly even so that no large area is left loose while the neighboring sections are densely stitched.
- Remove the temporary quilting design marks according to the marker manufacturer's instructions, but keep the stocking outline and heel and toe placement guides. If those guides have faded or been covered by quilting, transfer them again from the full-size template before attaching the appliques.
- Press lightly from the back if necessary. Don't flatten the raised quilting.
If you've never tried free-motion quilting, practice your swirls on a scrap sandwich first. They don't need to look like perfectly matched little circles. Gentle, continuous curves are what we're after.
There's no need to quilt around every printed holly leaf or pine branch. Let the Christmas fabrics do their job, and keep the decorative quilting simple enough that the diagonal arrangement remains visible.
Step 6. Quilt the stocking back
- Place the second 14-by-22-inch muslin piece on your work surface.
- Add the second piece of batting.
- Place the coordinating stocking-back fabric right side up over the batting.
- Pin or baste all three layers together.
- Quilt the back with swirls similar in scale to those on the patchwork front.
- Remove the basting pins and any temporary markings.
The stocking back doesn't need diagonal patchwork unless you want to make an additional pieced panel. A single coordinating Christmas print makes a perfectly good back, and it keeps the sewing considerably simpler.
Step 7. Cut the quilted stocking shapes
- Replace the stocking template over the traced front outline.
- Check that the five patchwork seams still follow the green placement guides.
- Cut the quilted front along the outside stocking cutting line.
- Turn the template over so that the stocking toe points in the opposite direction.
- Place the reversed template over the quilted backing fabric and trace its outline.
- Cut out the stocking back.
- Before covering the front with another piece, check that the red heel and toe placement curves are still visible. With the front right side up and the toe pointing right, retrace either curve from the full-size template if necessary.
- Lay the two quilted pieces right sides together and check their alignment.
The front and back should now be matching shapes, with the heel, toe and opening lining up when their right sides face each other.
Before continuing: Check that the quilting stitches secure all three layers near the edges. If you have an area where the batting or muslin wants to separate, sew a line of staystitching within the 1/4-inch seam allowance.
You now have the two main stocking pieces ready for the cranberry details.
Adding the Cranberry Heel and Toe
The matching cranberry heel and toe give this stocking its finished farmhouse look. They're curved pieces with decorative quilting, rather than plain red rectangles added to the front.
Both pieces are appliqued over the already quilted stocking front. Their curved inside edges are turned under and topstitched, while the outside edges are caught in the stocking seams when we assemble the body.
Step 8. Prepare the cranberry appliques
- Take the cranberry heel and toe fabric pieces cut from pages 8 and 9 of the printable PDF.
- Transfer the dashed finished-edge curves from the paper patterns to the wrong sides of the fabric.
- Cut lightweight fusible fleece pieces slightly smaller than the finished appliques, keeping the fleece away from the curved turn-under allowance and outer construction seam allowances.
- Fuse the fleece to the wrong sides of the cranberry fabric, following the manufacturer's instructions.
- On the right sides, mark a few small curling swirls similar to those on the stocking front.
- Quilt through the cranberry fabric and its fleece layer.
- Turn the 1/4-inch allowance along each inside curved edge toward the wrong side.
- Press the curved folds carefully. Make small clips in the allowance where necessary, stopping short of the finished fold.
Don't turn under the edges that follow the outside stocking shape. Those edges need to remain flat so they'll fit neatly into the construction seams.
I'd keep the cranberry quilting fairly close in scale to the swirls on the other fabric sections. The quilting should make the patches look like part of the same stocking.
Step 9. Attach the heel applique
- Lay the quilted stocking front right side up with the toe pointing right.
- Position the cranberry heel over the lower left heel area.
- Match its folded inside curve to the red dashed heel placement line transferred from the template.
- Align its remaining raw edges with the stocking's outside cutting edges.
- Pin or baste the applique without stretching the curved fabric.
- Topstitch approximately 1/8 inch from the folded inside edge.
- Staystitch the outside raw edges within the 1/4-inch seam allowance.
The heel should follow the stocking's rounded lower-left curve without bunching or lifting away from the quilted fabric beneath it.
Step 10. Attach the toe applique
- Position the cranberry toe piece over the rounded right end of the stocking.
- Match its folded inside curve to the transferred red placement line.
- Align the remaining raw edges with the outside stocking shape.
- Pin or baste the applique in position.
- Topstitch approximately 1/8 inch from its folded inside edge.
- Staystitch the remaining raw edges within the construction seam allowance.
The toe should wrap smoothly around the right end of the stocking. Make sure the rounded outside edge isn't pulled inward by the applique.
Lay the stocking flat and compare it with the finished photograph. You should see the six diagonal patchwork sections, the cranberry heel covering the lower left curve and the matching cranberry toe covering the rounded right end.
That's the decorative stocking front finished. The rest of the project is mostly sewing the pieces together and adding the lining, cuff and hanging loop.
Making the Cuff and Lining
I'd keep the cuff a solid cranberry red rather than adding another Christmas print. The patchwork already has plenty going on, and the deep red cuff gives all those different fabrics a nice frame.
The cuff will have diamond quilting on the outside and a smooth cotton facing inside. We'll also make a separate lining, so there won't be exposed patchwork seams or loose batting inside the finished stocking.
Step 11. Quilt the cranberry cuff pieces
- Place one 8 1/2-by-3 1/2-inch cranberry cuff rectangle right side up over a matching piece of batting.
- Baste the two layers together. Place temporary stabilizer beneath the batting if your machine needs it.
- Mark diagonal quilting lines approximately 1 1/4 inches apart.
- Mark another set of diagonal lines crossing the first set to form diamonds.
- Quilt along the marked lines with matching cranberry thread.
- Repeat with the second cranberry cuff rectangle.
- Remove the temporary stabilizer, if used, and trim loose threads.
- Press the quilted pieces lightly and trim each one to exactly 8 1/8 by 3 inches, keeping the edges square. If quilting has drawn a piece smaller than that measurement, remake it from a slightly larger rectangle rather than stretching it to fit.
The diamond pattern is a nice contrast to the curling swirls on the stocking body. You don't have to add embroidery or decorative trim to the cuff. The quilting is enough.
Step 12. Assemble the cuff
- Place the two quilted cranberry rectangles right sides together, matching their short ends.
- Sew both short ends with 1/4-inch seams to form a ring.
- Trim the excess batting from the seam allowances and press the seams open carefully.
- Repeat with the two plain cotton cuff-facing rectangles to make a second ring.
- Place the cranberry ring and cotton-facing ring right sides together.
- Match the side seams and align the upper raw edges.
- Sew all the way around the upper edge with a 1/4-inch seam.
- Turn the cuff so the quilted cranberry fabric is on the outside and the cotton facing is inside.
- Press the sewn upper edge smooth.
- Turn the two lower raw edges toward the wrong side by 1/4 inch. Press them without sewing them together yet.
The finished cuff should measure approximately 2 1/2 inches deep, with a circumference of approximately 15 1/4 inches.
Set it aside until the stocking body and lining are assembled.
Step 13. Cut and sew the lining
Take the two 14-by-22-inch lining fabric rectangles from the cutting chart. We need one stocking shape facing right and one facing left.
- Place the full-size stocking template over the first lining rectangle and trace the outside cutting line.
- Cut out the first lining piece.
- Turn the template over and trace the reversed stocking shape on the second lining rectangle.
- Cut out the second piece.
- Place the two lining pieces right sides together, matching the heel, toe and top opening.
- Pin around the outside edges. Leave the entire top opening unsewn.
- Mark a 4-inch turning opening along a relatively straight section of one side seam.
- Sew around the stocking shape with a 1/4-inch seam allowance, stopping and restarting at the marked turning opening.
- Backstitch at both ends of the opening.
- Clip the curved seam allowances carefully without cutting the stitching.
- Leave the lining wrong side out.
Don't close the little opening yet. We'll use it to turn the stocking right side out after the lining and outer body are joined.
A smooth cotton lining makes it easier to slip little gifts into the stocking, and it keeps the inside looking as finished as the outside. There's no need to quilt the lining or add batting to it.
Assembling and Finishing the Stocking
We're almost finished. All the decorative sewing is behind us, and now it's time to turn the quilted pieces into a real Christmas stocking.
Take your time around the curved heel and toe, especially where the extra cranberry fabric adds another layer. Those seams will look much nicer if the batting is trimmed carefully before turning.
Step 14. Sew the outside stocking
- Place the quilted stocking front and back right sides together.
- Match the top corners, heel curve, bottom edge and rounded toe.
- Pin or clip around the outside edge, leaving the top opening completely unsewn.
- Starting at one upper corner, sew around the entire stocking shape with a 1/4-inch seam allowance.
- Backstitch at the beginning and end.
- Trim bulky batting from the seam allowances, especially where the heel and toe appliques are caught in the seams.
- Clip the inward curves carefully, stopping short of the stitching.
- Trim small wedges from the seam allowance around the outward toe curve if needed to reduce bulk, without cutting the seam.
- Turn the stocking right side out through the open top.
- Gently shape the heel and toe with a blunt turning tool.
Don't force sharp points into those curves. The heel and toe should stay softly rounded, just like the stocking in the photograph.
Lay the stocking flat and make sure the cranberry appliques are securely caught in the outside seams. The diagonal patchwork should still be smooth, without any puckering or twisted fabric.
Step 15. Join the stocking and lining
- Keep the quilted outer stocking right side out.
- Keep the lining wrong side out.
- Slide the quilted stocking inside the lining so their right sides are touching.
- Match the top opening edges and align the side seams.
- Pin around the entire opening.
- Sew around the opening with a 1/4-inch seam allowance.
- Reach through the 4-inch turning opening in the lining and carefully pull the stocking through.
- Push the lining down inside the quilted stocking, gently matching the heel and toe.
- Close the turning opening with a hand-sewn ladder stitch or a narrow machine edge stitch.
- Press the finished upper edge and topstitch approximately 1/8 inch from the opening.
Reach inside and check that the lining is lying smoothly against the quilted stocking. It shouldn't pull the toe inward or bunch up at the bottom.
If the lining seems a little too full around the toe, smooth the excess toward the seam rather than making a deep tuck. You want enough room inside for stocking stuffers without having extra fabric twisting around them.
Step 16. Attach the quilted cranberry cuff
- Slide the prepared cuff over the upper portion of the stocking, with the diamond-quilted cranberry side facing outward.
- Align the cuff's finished upper edge with the stocking's finished top opening.
- Match the cuff side seams to the stocking side seams.
- Check the fit around the entire opening. The cuff should sit snugly without gathering the stocking underneath.
- If the cuff is slightly too tight or loose, adjust its side seams before stitching it in place.
- Pin the cuff evenly around the opening, keeping the inner and outer cuff layers smooth.
- Topstitch approximately 1/8 inch from the cuff's lower folded edge, catching the facing and stocking beneath it.
- Topstitch approximately 1/8 inch from the cuff's upper finished edge to secure it to the stocking opening.
- Remove the pins and check that the cuff is smooth all the way around.
You should have a cranberry cuff approximately 2 1/2 inches deep. Both its upper and lower edges should be neatly finished, with no raw fabric or batting showing.
The finished cuff sits on the outside of the stocking, covering the upper portion of the ivory patchwork. It shouldn't be so deep that it hides the evergreen strip beneath it.
Step 17. Sew the hanging loop
A quilted Christmas stocking needs a hanging loop that can handle more than the stocking's own weight. A few pieces of candy or little gifts can add up quickly, so don't attach the loop with just a couple of stitches.
- Take the 2 1/2-by-7-inch cranberry fabric strip.
- Fold it in half lengthwise, wrong sides together, and press a center crease.
- Open the strip and fold both long raw edges inward to meet the crease.
- Fold the strip along the original crease again, enclosing the raw edges.
- Press and topstitch along both long edges.
- Fold the finished strap into a loop, bringing its two ends together.
- Position the ends inside the stocking at the upper heel-side corner, approximately 3/4 inch below the opening.
- Pin the two ends flat against the inside cuff area.
- Sew a reinforced rectangle through the loop ends and the cuff and stocking layers. Sew an X inside the rectangle for additional reinforcement.
- Check that the stitches have securely caught both ends of the loop.
- Trim any loose threads.
The folded loop should extend approximately 3 inches above the stocking. Position it at the heel-side corner so the toe hangs outward when the stocking is placed on a mantel hook.
Keep the finished stocking and its hanging hook out of reach of babies and toddlers, away from open flames and hot surfaces. Don't hang it from a crib or place it inside a baby's sleep space. The hanging loop is intended for ordinary decorative use and light stocking contents, not as a load-bearing strap.
Step 18. Finish the stocking
- Inspect the outside seam for loose stitches or small openings.
- Check that the cranberry heel and toe lie flat.
- Make sure the cuff is securely attached at both its upper and lower edges.
- Check that the lining is closed and sits smoothly inside the stocking.
- Remove all remaining pins, clips, temporary basting threads and fabric-marking lines, following the marker manufacturer's directions.
- Check the inside lining and cuff for stray needles, loose threads or exposed raw edges.
- Give the stocking a light final press using a pressing cloth where needed.
- Allow it to cool and dry before filling or hanging.
And there's your farmhouse patchwork Christmas stocking, complete with the cranberry cuff, matching heel and toe, and all those pretty Christmas fabrics running diagonally across the front.
If you're making several for the same mantel, you can keep the stocking shape and cranberry accents alike while choosing different fabrics for each patchwork front. They'll look as though they belong together without being identical.
Making a Christmas Stocking from an Old Baby Quilt
Now, about that baby quilt you've kept tucked away because you just couldn't bring yourself to part with it.
Maybe the edges are frayed, there's a stain that won't come out, or the quilt has simply seen better days. If some of the fabric is still in good condition, you may be able to give it another Christmas or two, or twenty, as part of a handmade stocking.
There are two ways to approach this, and I'd make the choice based on how much of the original quilt you want to preserve.
Option 1. Use fabric from the old quilt in the diagonal patchwork
This option keeps the same six-strip design as the stocking in the photograph. You'll replace one or two new Christmas prints with fabric recovered from the old quilt.
- Spread the baby quilt on a clean, flat surface and inspect both sides.
- Look for sections where the cotton fabric is clean, sturdy and free from holes or weakened fibers.
- Choose one or two areas with prints or colors that will look nice beside the Christmas fabrics.
- Carefully remove the original quilting stitches from those areas and separate the quilt-top fabric from the old batting and backing.
- Gently press the recovered fabric if its condition permits.
- Cut the fabric into the required strip dimensions from the cutting chart.
- If you need more than one piece to make a complete strip, join the smaller pieces with 1/4-inch seams, press them flat and trim the completed strip to the required size.
- Substitute the recovered fabric for the corresponding new print and continue with the main stocking instructions.
Why remove the old batting? Our stocking pattern adds new batting and a backing layer before quilting. If you leave the old batting attached to individual patchwork strips, those sections will be thicker than the neighboring fabrics. The diagonal seams could become bulky and difficult to sew.
There's no reason to use every usable scrap from the old quilt. One familiar little print mixed among the Christmas fabrics may be all you need to bring back the memories associated with it.
Option 2. Keep the old quilting intact on the stocking back
If the baby quilt has a large, attractive section with sound fabric and quilting stitches, you might prefer to keep those layers together. In that case, use the old quilt for the stocking back and make the patchwork front exactly as described in the main pattern.
- Find a sturdy section of the old quilt large enough to fit the complete stocking-back template.
- Check that the existing top fabric, batting, backing and quilting stitches are securely attached.
- Lay the reversed full-size stocking template over the selected area.
- Trace and cut the stocking back directly from the existing quilted layers.
- Do not add another layer of batting or muslin to this piece. The old quilt already contains those layers.
- Make the new diagonal patchwork front using the main pattern instructions.
- Join the quilted front and reused back with the same 1/4-inch seam allowance.
- Carefully grade or trim excess seam allowance bulk where needed, especially around the heel and toe.
- Make a fresh cotton lining and finish the stocking using the regular assembly instructions.
This way, the Christmas stocking keeps a recognizable section of the original baby's quilt, including its quilting stitches, without changing the appearance of the farmhouse patchwork front.
What if the old quilt is too fragile to cut?
Some quilts are better left exactly as they are. If the fabric is splitting, the seams are coming apart or the batting has deteriorated, cutting it into smaller pieces may cause more damage.
I'd be especially reluctant to cut into an antique quilt, a particularly valuable family heirloom or one with historically important workmanship. The National Quilt Museum's quilt conservation information offers useful guidance for caring for older quilts.
If yours is too precious or fragile to cut, there's another possibility. Choose new fabrics that remind you of the original quilt's colors or prints. You could even photograph a favorite patch before making a new stocking inspired by it.
You don't have to cut up something irreplaceable to preserve the memories attached to it.
Whether you're sewing with new Christmas fat quarters or adding a little piece of a much-loved baby quilt, you'll end up with a stocking that has a story behind it. And that's a lovely thing to bring out every December.
If you're looking for another handmade Christmas project, take a look at my baby Christmas crafts or browse the baby quilt patterns for more sewing ideas.
Pattern development note: The stocking template and written construction have been reviewed mathematically for dimensional consistency. Finished measurements and fabric quantities are estimates. The stocking has not been physically sewn from these instructions, so quilting shrinkage, cuff fit, fabric handling and final assembly still require confirmation with a completed sample.
When you click on links to various merchants on this site and make a purchase, this may result in this site earning a commission. This does not affect the price you pay.

UBGI Gold Standard 2026
Reviewed under the site's
editorial checklist.
Photos, decorating ideas, party setups and reader submissions are shared for inspiration unless a page is specifically presented as a pattern, tutorial, reference guide or step-by-step project. Follow the instructions, measurements, safety guidance and manufacturer directions provided for the particular project or product.
About Jan | Contact | Baby Nursery Ideas (Blog) | Site Map | Privacy Policy | Disclosure Policy | Disclaimer | Affiliate Disclosure | Earnings Disclosure | Facebook | Pinterest
I am a participant in the Amazon Services LLC Associates Program, an affiliate advertising program designed to provide a means for us to earn fees by linking to Amazon. As an Amazon Associate I earn from qualifying purchases.
Copyright © 2006-2026. All Rights Reserved.