Free Pieced Cat Quilt Block Pattern
By Jan Bay
This free cat quilt block pattern uses straightforward patchwork piecing to make a sitting cat with pointed ears and a visible tail. Sew it in black, gray, orange, calico or any fabric you like for baby quilts, wall hangings and other patchwork projects.
Explore More Free Baby Quilt Patterns
Free Maple Leaf Quilt Block Pattern
Supplies for This Quilt Project
Jump to:
Pattern note: This block is drafted to measure 12½ inches unfinished and 12 inches finished. I recommend sewing one test block before cutting pieces for an entire quilt. Check the tail bend, face placement and final 12½-inch measurement on that first block, then make any small adjustments needed for your own seam allowance and pressing.
Free Cat Quilt Block Pattern Size and Construction
This pattern makes one 12½-inch unfinished cat quilt block. Once it is sewn into a quilt, the block finishes at 12 inches square.
The cat is built with ordinary straight seams, two half-square triangle ear units and a few stitch-and-flip corners. The body, front leg and tail are pieced separately, then joined into one lower section. You won't need an appliqué template or foundation paper pattern.
I kept the cat large inside the block because I want the silhouette to be easy to recognize when several blocks are used in a quilt. The pointed ears, sloping shoulder, separate front leg and turned tail are all part of the finished design shown in the example image.
The measurements below include ¼-inch seam allowances. The finished dimensions are calculated from the construction rather than taken from a physically test-sewn sample.
Materials
For one 12-inch finished cat block:
1 fat quarter light background quilting cotton
1 fat eighth black, charcoal, gray, orange or other cat fabric
Small amount of light embroidery floss for the eyes and nose
Coordinating sewing thread
You'll also need:
Sewing machine
¼-inch presser foot if you use one
Rotary cutter
Acrylic quilting ruler
Self-healing cutting mat
Fabric marking pencil or removable marker
Iron and ironing surface
Embroidery needle
A consistent ¼-inch seam matters more here than sewing quickly. Several small units have to add up to exactly 12½ inches. Press as you go and check the unit measurements before moving to the next section.
If you're using a rotary cutter, cut away from yourself and close or cover the blade whenever you put the cutter down. OLFA also has a useful rotary cutter safety guide if you want a refresher before cutting the smaller pieces.
Cutting Instructions
From the light background fabric, cut:
2 rectangles, 3½ × 5½ inches, for the sides of the head
1 square, 3 × 3 inches, for the ear half-square triangles
1 square, 2½ × 2½ inches, for the space between the ears
2 squares, 1½ × 1½ inches, for the lower head corners
4 rectangles, 1½ × 3 inches, for the upper and middle tail background
1 rectangle, 1½ × 2½ inches, for the lower tail background
1 square, 1½ × 1½ inches, for the angled tail tip
1 square, 3½ × 3½ inches, for the sloping body shoulder
1 rectangle, 1½ × 5½ inches, for the space between the body and front leg
1 rectangle, 2 × 5½ inches, for the background above the front paw
From the cat fabric, cut:
1 square, 3 × 3 inches, for the ear half-square triangles
1 rectangle, 6½ × 3½ inches, for the face
2 rectangles, 1½ × 3 inches, for the upper and middle tail
2 rectangles, 1½ × 2½ inches, for the lower tail turn
1 rectangle, 5½ × 7½ inches, for the main body
1 rectangle, 1½ × 2½ inches, for the upper chest connection
1 rectangle, 2 × 7½ inches, for the front leg
1 rectangle, 2 × 2½ inches, for the paw
Keep the tail pieces grouped together after cutting. They are small, and the difference between the 3-inch and 2½-inch lengths matters.
Piece the Cat Head
1. Make the ears. Place the 3-inch background square and 3-inch cat fabric square right sides together. Draw one diagonal line from corner to corner on the wrong side of the lighter square.
Sew a line ¼ inch on each side of the drawn line. Cut directly on the drawn line to separate the square into two half-square triangle units. Press the seams toward the cat fabric and trim each unit to exactly 2½ inches square.
Rotate the two units so they mirror each other. On the left ear, the dark triangle should run along the lower edge and the outside left edge. On the right ear, the dark triangle should run along the lower edge and outside right edge. The dark points become the two pointed ears.
Place the 2½-inch background square between the two ear units. Sew the three pieces together in one row. Press the seams toward the center background square. The ear row should measure 6½ × 2½ inches.
2. Shape the lower corners of the face. Place one 1½-inch background square right sides together on the lower-left corner of the 6½ × 3½-inch cat fabric face rectangle.
Draw a diagonal from the upper-left corner of the small square to its lower-right corner. Sew on the line. Trim the fabric ¼ inch toward the outside lower-left corner, then press the background triangle open.
Repeat at the lower-right corner, this time mirroring the diagonal. Sew from the upper-right corner of the small square to its lower-left corner. Trim toward the outside lower-right corner and press open.
The face unit should still measure 6½ × 3½ inches. Those two small background triangles soften the lower corners without adding curved seams.
3. Join the ears and face. Sew the 6½ × 2½-inch ear row to the top of the face unit. Press the seam toward the face. The completed center head unit should measure 6½ × 5½ inches.
4. Add the background sides. Sew one 3½ × 5½-inch background rectangle to each side of the head unit. Press the seams toward the background.
The completed upper section should measure 12½ × 5½ inches. Check that measurement now rather than trying to correct it after the body is attached.
Piece the Cat Body
1. Shape the cat's back and shoulder. Place the 3½-inch background square right sides together on the upper-left corner of the 5½ × 7½-inch cat body rectangle.
Draw a diagonal from the lower-left corner of the square to its upper-right corner. Sew on that line. Trim ¼ inch toward the outside upper-left corner and press the background triangle open.
The body rectangle should still measure 5½ × 7½ inches. The diagonal edge is the sloping line that runs from the cat's back toward the neck.
2. Make the narrow chest-gap unit. Sew the 1½ × 2½-inch cat fabric rectangle to the top of the 1½ × 5½-inch background rectangle. Press toward the dark fabric.
This unit should measure 1½ × 7½ inches. The dark portion connects the upper body to the front of the cat while the cream section below leaves a narrow opening between the body and front leg.
3. Make the paw-side unit. Sew the 2 × 5½-inch background rectangle above the 2 × 2½-inch cat fabric rectangle. Press toward the cat fabric.
This unit should measure 2 × 7½ inches. The dark lower section forms the paw that extends to the right of the straight front leg.
Set the 2 × 7½-inch cat fabric front-leg rectangle beside these pieces, but don't sew the full body row together yet. The tail unit goes on the opposite side first.
Add the Pieced Cat Tail
The tail is made as a separate 3½ × 7½-inch unit. Building it in three short rows gives it the upright shape and the little turn at the bottom without using a curved seam.
1. Make the upper tail row. Take one 1½ × 3-inch cat fabric rectangle. Place the 1½-inch background square on its upper-left corner.
Draw a diagonal from the lower-left corner of the square to its upper-right corner. Sew on the line, trim ¼ inch toward the outside upper-left corner and press the background open. This makes the angled top of the tail.
Sew a 1½ × 3-inch background rectangle to each side of this dark tail piece. Press toward the background. The upper tail row should measure 3½ × 3 inches.
2. Make the middle tail row. Sew one 1½ × 3-inch cat fabric rectangle between two 1½ × 3-inch background rectangles. Press toward the background. This row should also measure 3½ × 3 inches.
3. Make the lower tail turn. Sew the 1½ × 2½-inch background rectangle to one 1½ × 2½-inch cat fabric rectangle. Add the second 1½ × 2½-inch cat fabric rectangle to the other side.
The lower row should read background, dark tail, dark tail from left to right and measure 3½ × 2½ inches. That extra dark section on the right is what turns the tail back toward the body instead of leaving it as a straight vertical stripe.
4. Join the three tail rows. Sew the upper row to the middle row, then add the lower row. Press the horizontal seams in opposite directions if that helps the unit lie flatter.
The finished tail unit should measure 3½ × 7½ inches.
Lay it beside the body before sewing. The angled tip belongs at the upper end, and the wider dark turn belongs at the lower-right corner next to the cat's body.
Assemble the Cat Quilt Block
Arrange the five lower units from left to right in this order:
Tail unit, 3½ × 7½ inches
Main body, 5½ × 7½ inches
Chest-gap unit, 1½ × 7½ inches
Front leg, 2 × 7½ inches
Paw-side unit, 2 × 7½ inches
Sew the units together one at a time with ¼-inch seams. Press the long vertical seams in whichever direction gives you the flattest result. The complete lower cat section should measure 12½ × 7½ inches.
Now place the 12½ × 5½-inch head section above the 12½ × 7½-inch body section. Make sure the head is upright and the tail is on the left.
Sew the two sections together with a ¼-inch seam. Press the seam toward the lower section.
Your block should now measure 12½ × 12½ inches unfinished. Once the block is sewn into a quilt with ¼-inch seams on all four sides, the visible block finishes at 12 × 12 inches.
Add the face before quilting. For the same look as the example quilt, use light embroidery floss to satin stitch two small square eyes and a tiny inverted triangle nose.
Mark the vertical center of the face. Place the eye centers about 1¼ inches to either side of that centerline and about 1½ inches below the seam where the ear row joins the face. Make each eye about ⅜ inch square.
Center a small inverted triangle nose between the eyes, about ¾ inch below them. Keep it around ⅜ inch wide. There is no need to add a mouth unless you want to change the expression.
If you prefer a plain silhouette cat, you can leave the embroidery off. The pieced ears, body and tail still make the animal easy to recognize.
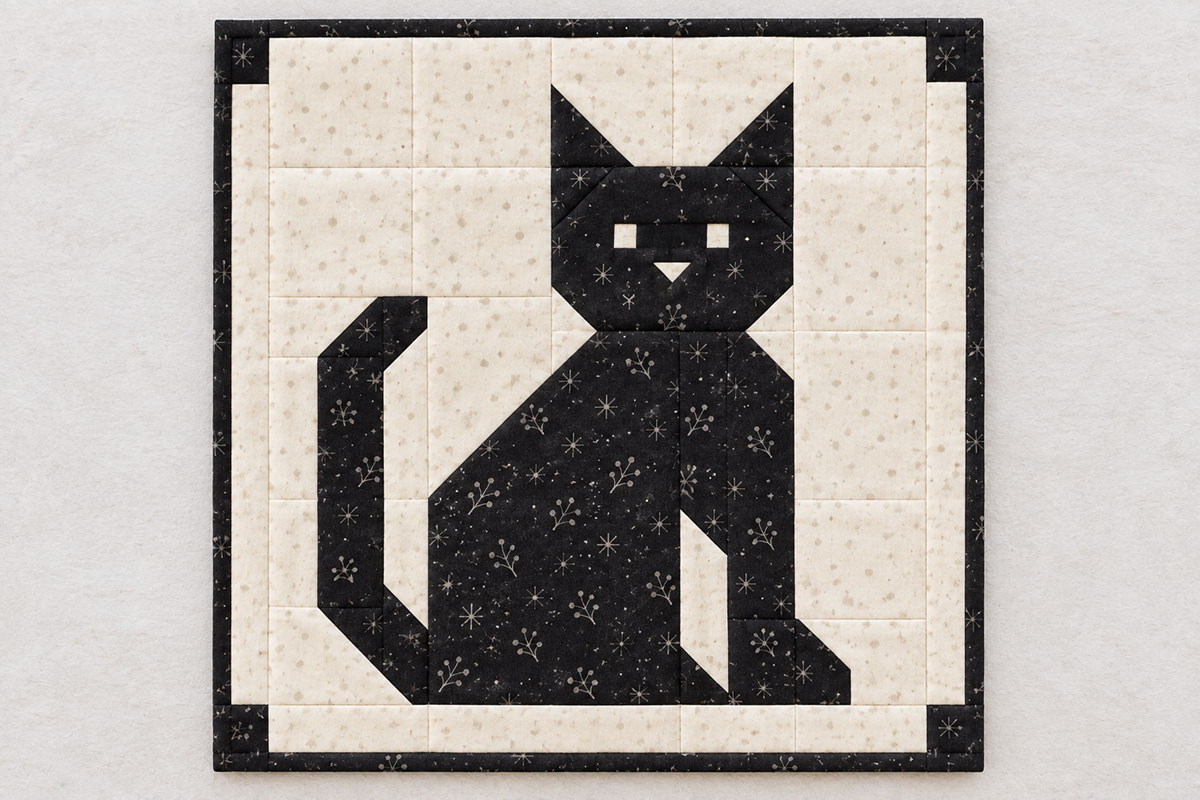
Before using the block in a larger quilt, place a square ruler over it and check all four edges. If you need to tidy a thread or shave away a tiny amount of uneven fabric, do that now. Don't trim the block below 12½ inches.
Black Cat Halloween Option
Black fabric turns the same block into a Halloween cat without changing one cutting measurement. I'd use black or charcoal for the cat and keep the background fairly light so the ears, leg and tail don't disappear into the surrounding fabric.
You don't have to use Halloween prints. A black cat on cream, gray, tan or a tiny low-volume print still looks seasonal in October and doesn't lock the finished quilt into one holiday.
If you do want a more obvious fall quilt, alternate these black cat blocks with the free pumpkin quilt block pattern. Keep each design in its own 12-inch block rather than trying to squeeze a pumpkin and cat into the same square.
After Halloween, make the very same cat in orange, gray, brown, calico-style prints or softer nursery fabrics. Nothing in the construction is specific to a black cat.
Ways to Use the Cat Quilt Block
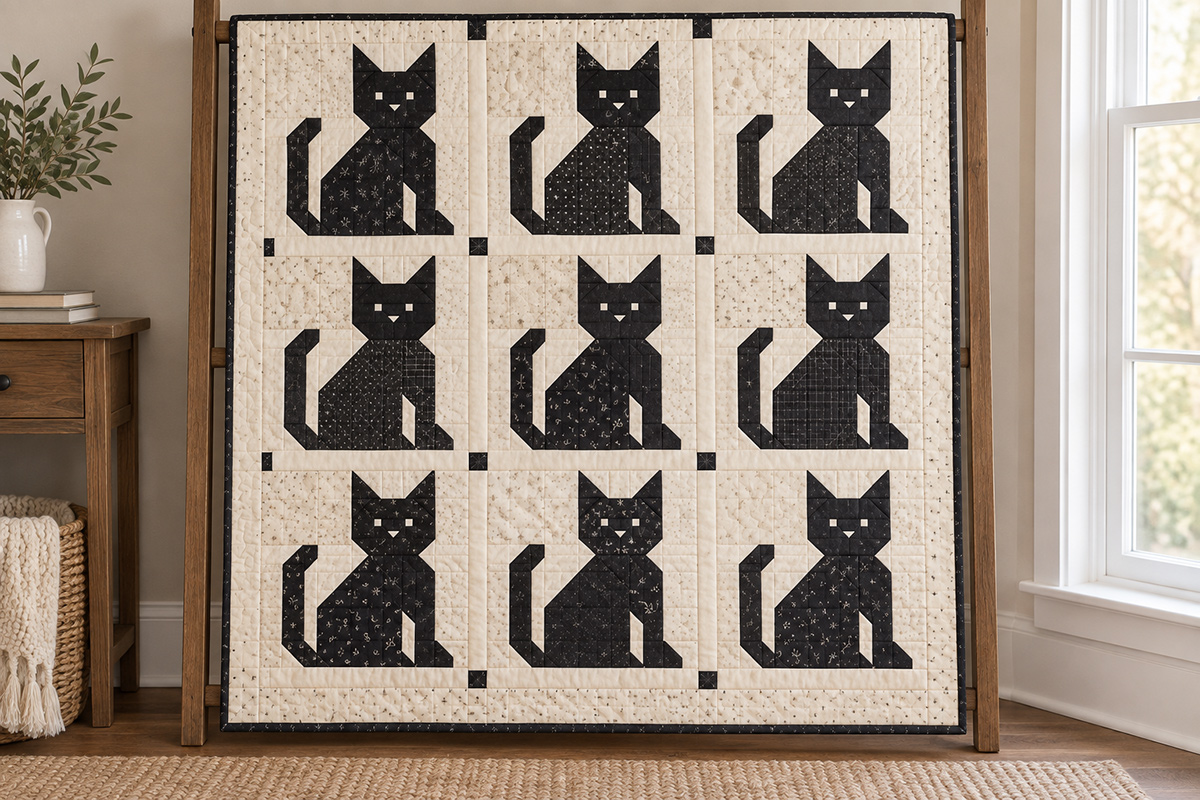
The hero quilt shows one way to repeat the block. This page is the pattern for the 12-inch cat block itself rather than a separate full-quilt pattern.
For a cat baby quilt similar to the example: make 9 blocks and arrange them three across and three down. With 1½-inch finished sashing between the blocks and a 2-inch finished border around the outside, the calculated quilt top will finish at about 43 × 43 inches.
You can make every cat from the same fabric, or keep the background consistent and change the cat fabric from block to block. I prefer the second option if you're using scraps because the repeated silhouette keeps the quilt organized even when the prints change.
For a smaller wall hanging: make four blocks and arrange them two by two. With 1-inch finished sashing between the blocks and a 2-inch finished outside border, the top will be about 29 inches square.
For one-block projects: add a border around a single block for a small wall hanging, use it as the center of a larger patchwork panel, or work it into another baby quilt layout. A 2½-inch finished border around one 12-inch block would bring the finished square to about 17 inches.
If you want another pieced block that works with the same sort of simple patchwork construction, the free maple leaf quilt block pattern gives you a second seasonal option. You can also browse the baby quilt patterns page for more ways to build a larger quilt around individual blocks.
I'd make the first cat block by itself before cutting fabric for a whole quilt. Once you're happy with the tail angle, face placement and your finished 12½-inch measurement, cut the remaining blocks assembly-line style. That's plenty of repetition without having to rethink the construction each time.
When you click on links to various merchants on this site and make a purchase, this may result in this site earning a commission. This does not affect the price you pay.

UBGI Gold Standard 2026
Reviewed under the site's
editorial checklist.
Photos, decorating ideas, party setups and reader submissions are shared for inspiration unless a page is specifically presented as a pattern, tutorial, reference guide or step-by-step project. Follow the instructions, measurements, safety guidance and manufacturer directions provided for the particular project or product.
About Jan | Contact | Baby Nursery Ideas (Blog) | Site Map | Privacy Policy | Disclosure Policy | Disclaimer | Affiliate Disclosure | Earnings Disclosure | Facebook | Pinterest
I am a participant in the Amazon Services LLC Associates Program, an affiliate advertising program designed to provide a means for us to earn fees by linking to Amazon. As an Amazon Associate I earn from qualifying purchases.
Copyright © 2006-2026. All Rights Reserved.