Free Crochet Jellyfish Pattern (Amigurumi Toy, Baby Lovey & Mobile)
This crochet jellyfish pattern is a sweet way to make a soft handmade sea creature that can work as a toy, a baby lovey, or even part of a nursery mobile. I designed this idea for makers who want something cute and giftable without choosing a project that feels too hard or fussy. The rounded top, curly tentacles, and simple shaping give it that classic jellyfish look while still keeping the steps beginner-friendly and easy to follow.
More Crochet Baby Patterns You May Love:
Free Crochet Fish Pattern Crochet Turtle Lovey Pattern Seahorse Crochet Lovey Pattern Crochet Penguin Lovey Pattern Owl Baby Lovey Crochet Pattern Nursery Ideas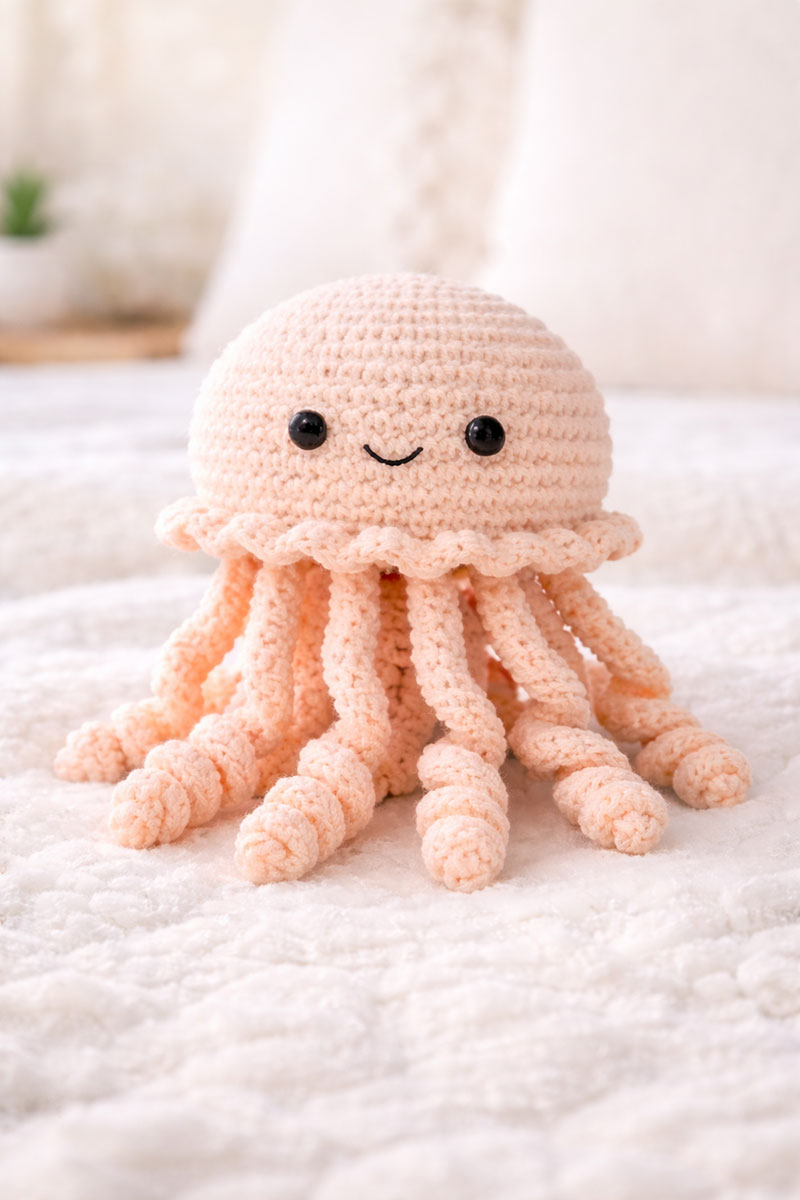
This soft yarn works well for a crochet jellyfish pattern and gives the tentacles a nice drape.
Jump to What You Need:
Supplies You Will Need How to Crochet a Jellyfish Crochet the Top Dome Make the Tentacles Assemble the Jellyfish Baby Lovey and Mobile Ideas Jellyfish Pattern Tips Crochet Jellyfish FAQSupplies You Will Need
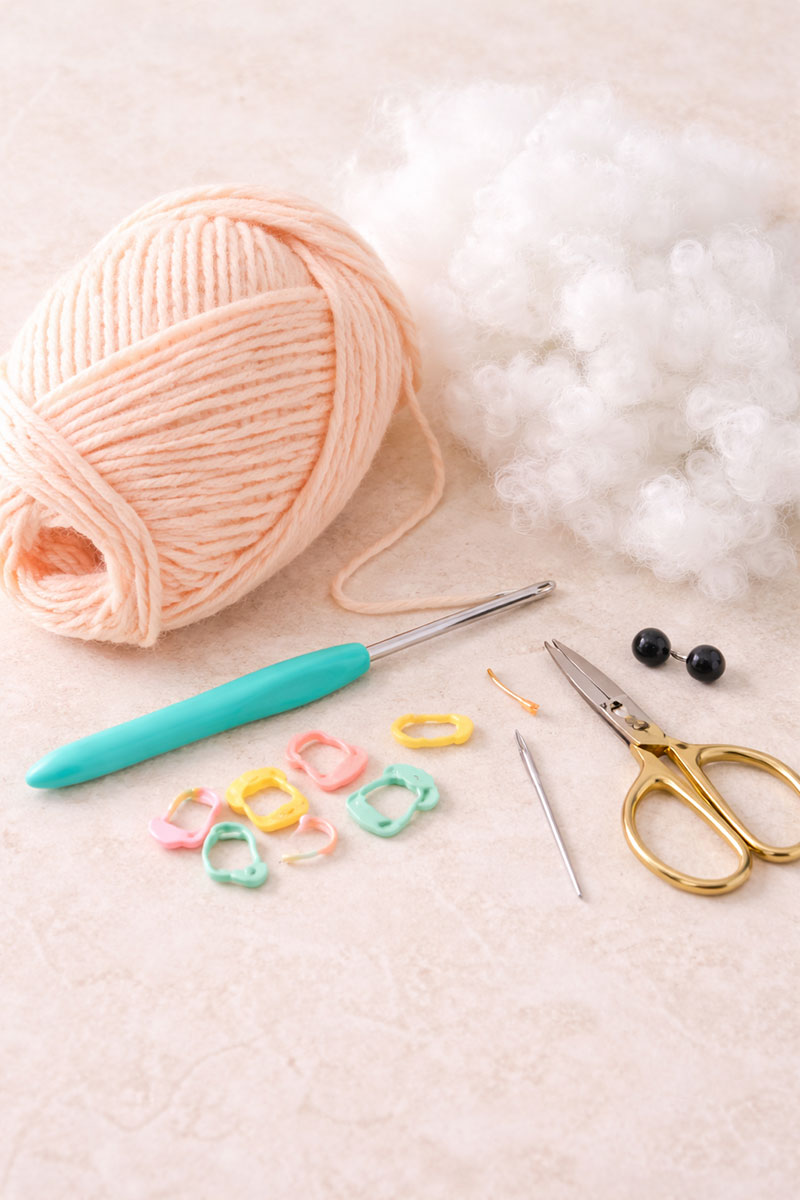
To make the jellyfish shown, use a smooth worsted weight yarn in a soft peach or blush shade. You will also need a 3.5 mm crochet hook, polyester fiberfill, a yarn needle, scissors, stitch markers, and one pair of 8 mm black safety eyes. If this jellyfish will be handled by a baby, skip the safety eyes and embroider the face with black thread instead.
Materials list:
Worsted weight yarn in light peach or blush
3.5 mm crochet hook
Polyester fiberfill
Yarn needle
Stitch marker
Scissors
8 mm safety eyes or black embroidery thread
Abbreviations used: mr = magic ring, ch = chain, sc = single crochet, inc = 2 sc in the same stitch, sl st = slip stitch, dc = double crochet, rep = repeat.
Finished size: about 5 inches tall and about 5 inches wide when made with worsted weight yarn and a 3.5 mm hook.
How to Crochet a Jellyfish
This jellyfish is made in four simple stages. First you crochet the rounded top dome. Next you add the soft ruffle around the lower edge. Then you make the flat underside circle and the ten tentacles. Last, you attach the tentacles, stuff the body lightly, and sew everything together. The shape comes from keeping the top dome smooth and gently stuffed, not hard or overfilled.
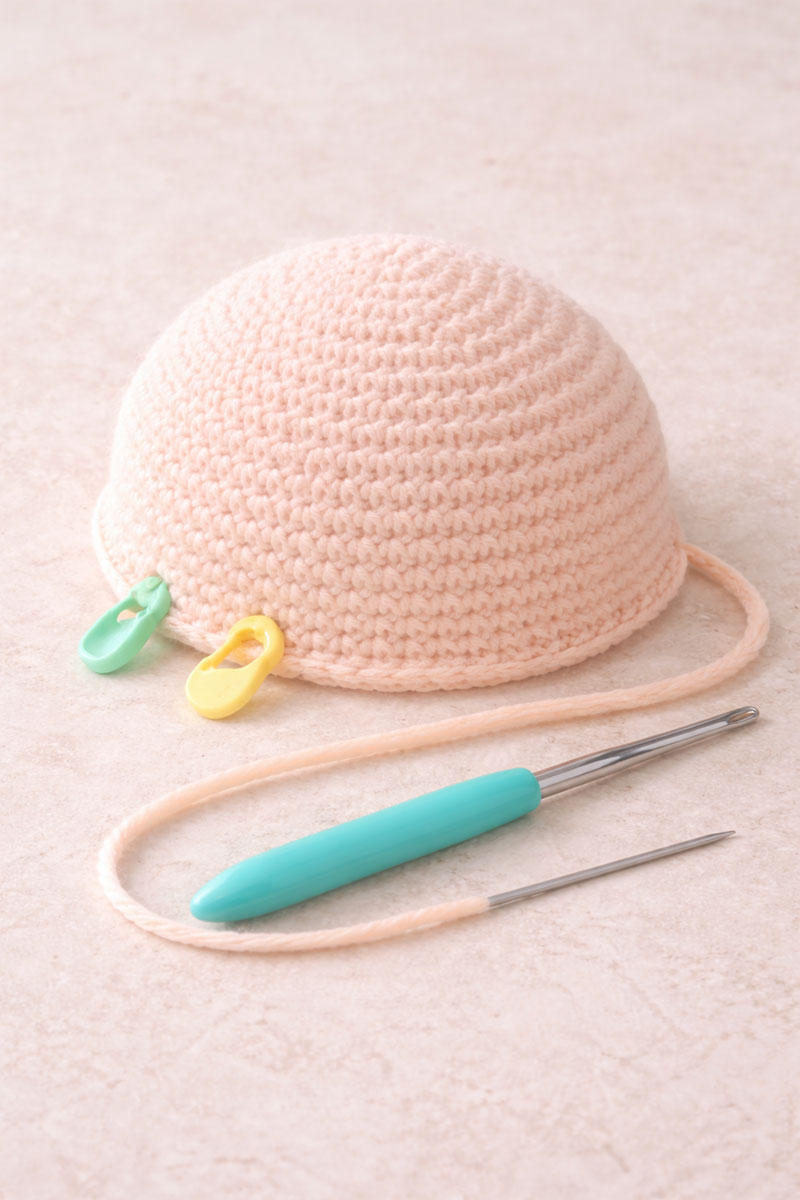
Part 1: Crochet the Top Dome
Work the dome in continuous rounds. Use a stitch marker at the first stitch of every round so you do not lose your place.
Round 1: 6 sc in mr. (6)
Round 2: inc in each stitch around. (12)
Round 3: rep [sc, inc] 6 times. (18)
Round 4: rep [2 sc, inc] 6 times. (24)
Round 5: rep [3 sc, inc] 6 times. (30)
Round 6: rep [4 sc, inc] 6 times. (36)
Round 7: rep [5 sc, inc] 6 times. (42)
Round 8: rep [6 sc, inc] 6 times. (48)
Rounds 9 through 15: sc in each stitch around. (48 each round)
Round 16: working in back loops only, sc in each stitch around. (48)
Round 17: sc in each stitch around. (48)
Fasten off, leaving the top dome open. Do not stuff it yet. The back-loop-only round is important because it gives you the neat turning point where the ruffle will sit, just like the little flounce you see at the base of the jellyfish.
Part 2: Add the Ruffle Edge
Turn the dome so the unused front loops from Round 16 are facing you. Join yarn in any front loop.
Ruffle Round: rep [sl st in next loop, 5 dc in next loop, sl st in next loop] around.
This makes a soft scalloped edge very similar to the one in the example above. When you finish the round, fasten off and weave in the tail. The ruffle should sit gently outward, not stand up stiffly.
Part 3: Crochet the Underside Circle
The underside is a flat circle that closes the jellyfish and gives you a clean place to attach the tentacles.
Round 1: 6 sc in mr. (6)
Round 2: inc in each stitch around. (12)
Round 3: rep [sc, inc] 6 times. (18)
Round 4: rep [2 sc, inc] 6 times. (24)
Round 5: rep [3 sc, inc] 6 times. (30)
Round 6: rep [4 sc, inc] 6 times. (36)
Round 7: rep [5 sc, inc] 6 times. (42)
Round 8: rep [6 sc, inc] 6 times. (48)
Fasten off, leaving a long tail for sewing. This underside should lie flat. Do not stuff it.
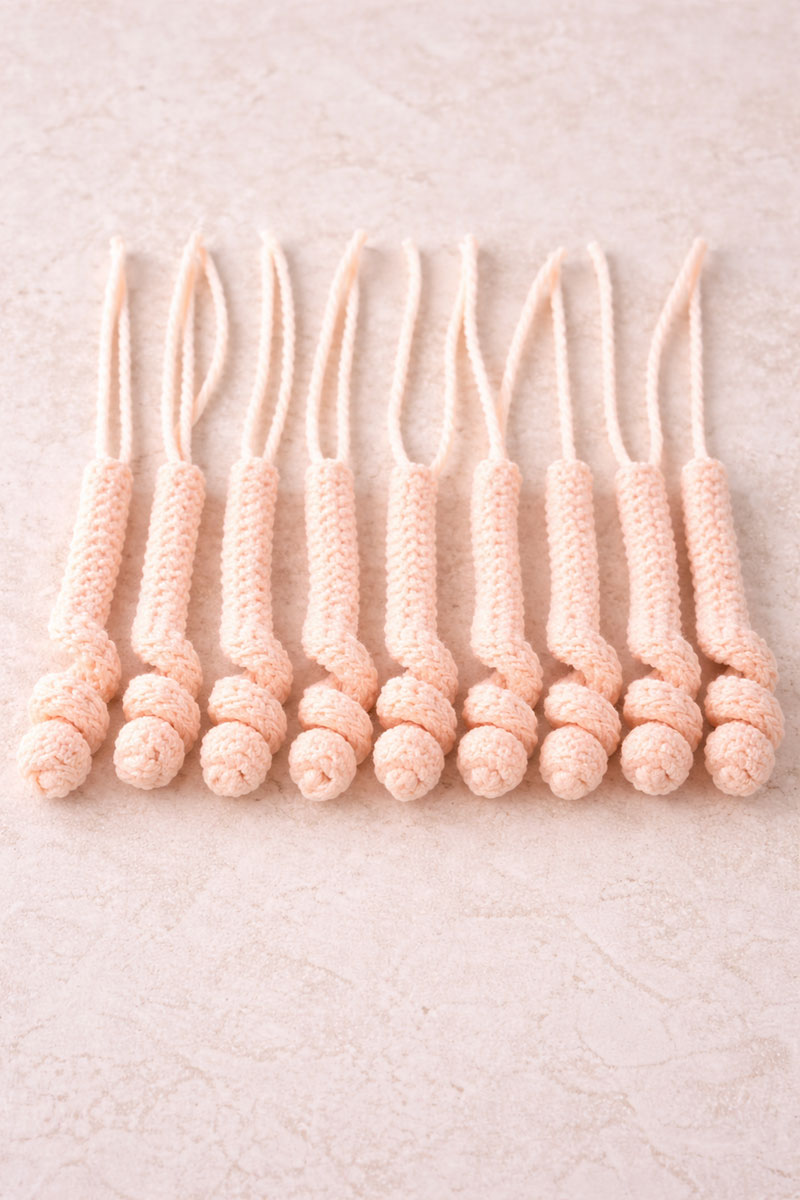
Part 4: Make the Ten Tentacles
The jellyfish has thick tentacles that hang mostly straight, with a little curl at the ends. To get that look, each tentacle starts with a tightly curled tip and then continues upward in plain single crochet for the rest of the length.
Make 10 tentacles exactly the same way:
Ch 22.
Starting in the 2nd ch from hook, work 3 sc in each of the next 6 chains.
Then work 1 sc in each of the remaining 15 chains.
Fasten off, leaving a long tail for sewing.
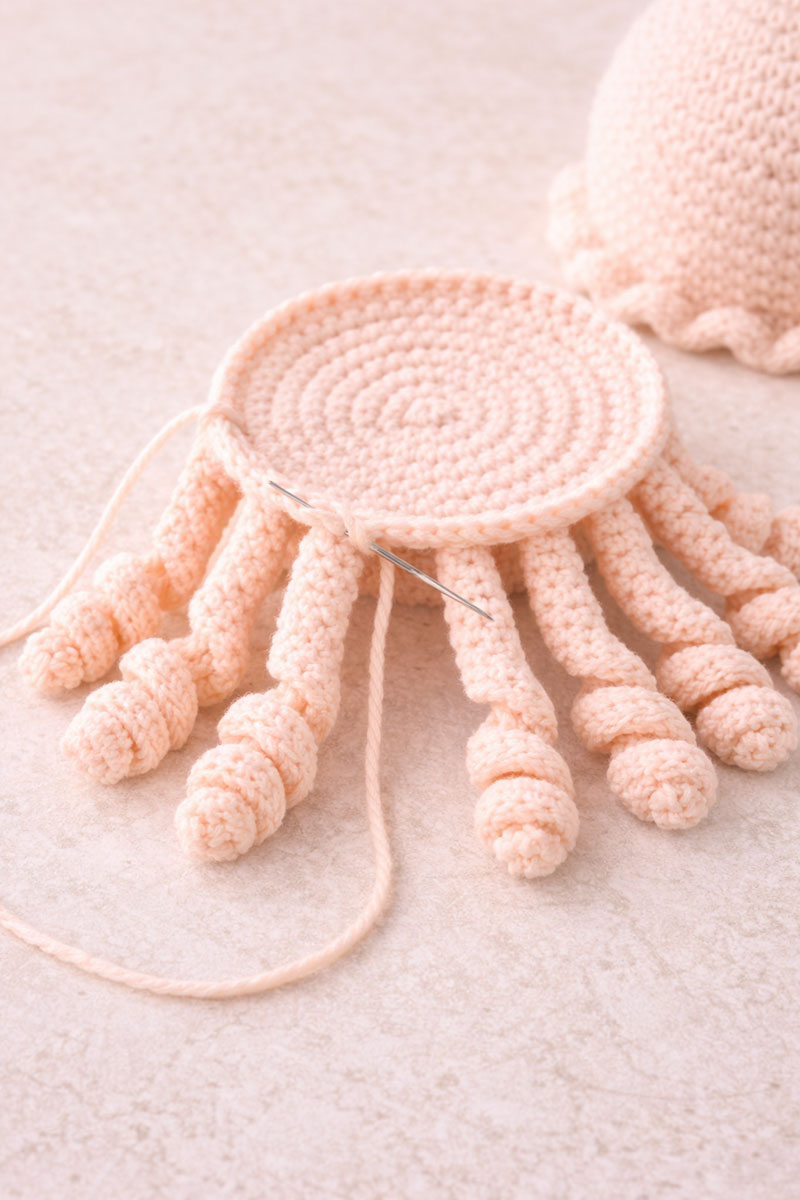
The first part of the tentacle will coil by itself. The upper part stays straighter and gives you that soft rope-like look from example image. When all 10 are finished, lay them out side by side to make sure they are the same length.
Part 5: Attach the Tentacles
Take the flat underside circle and place it with the wrong side facing up. You are going to attach the tentacles around the outer half of this circle so they fall from the edge of the jellyfish, not from the middle.
Exact placement guide:
Mark these stitch positions on Round 8 of the underside circle: 1, 6, 11, 16, 21, 26, 31, 36, 41, and 46. These ten marked points space the tentacles evenly around the circle.
Sew one tentacle at each marked point. Place the top of each tentacle just inside the edge of the underside circle so about 2 stitches of the tentacle top are anchored securely. Knot well and weave in the ends on the wrong side. When you are done, the tentacles should form an even ring around the underside.
This exact placement matters because it gives the jellyfish the same balanced look as the one at the top of this tutorial. If you bunch the tentacles too close together, the jellyfish will look crowded. If you place them too far toward the center, it will not have that soft hanging shape.
Part 6: Add the Face and Finish the Body
Before you close the jellyfish, place the face on the front of the dome.
Safety eye placement:
Insert the 8 mm safety eyes between Rounds 11 and 12 of the top dome. Count 6 stitches between the eyes (this usually measures about 8 stitches from center to center). Place a stitch marker where each eye will go before inserting them to make sure they are level. That means there should be 6 full stitches visible between the eyes when viewed from the front.
Important: If you are making this crochet jellyfish for a baby or young child, do not use safety eyes. Use embroidered eyes instead, since small plastic eyes can become a choking hazard if they come loose.
Mouth placement:
Using black embroidery thread, stitch a small curved smile centered halfway between the eyes, one round lower, between Rounds 12 and 13. Keep the smile short and simple. The face of the jelly fish is tiny and gentle, not oversized.
Now place the underside circle against the open bottom of the top dome, with the tentacles hanging outward and the right sides facing out. Match the 48 stitches of the underside to the 48 stitches of the open dome.
Sew the underside to the dome with a whipstitch or mattress stitch. When you are about three quarters of the way around, stop and add stuffing. Use a small handful of fiberfill at a time. The goal is a softly rounded dome, not a hard ball. The jellyfish looks lightly stuffed, so stop as soon as the top feels smooth and pillowy and holds its shape without bulging. Finish sewing the opening closed and weave in the tail.
The finished dome should measure about 3 to 3.5 inches across and look softly rounded, not tall or egg-shaped.
Baby Lovey and Mobile Ideas
This exact crochet jellyfish pattern makes the topper only. If you want to turn it into a baby lovey, sew the finished jellyfish to the center of a small crocheted blanket square or circle after the jellyfish is fully finished. If you want to use it in a nursery mobile, make several in coordinating colors and hang them well out of reach as decor only.
For a coordinated ocean set, this jellyfish pairs naturally with my crochet octopus pattern for a soft, rounded shape and gentle drape, the crochet sea turtle pattern for a calm coastal look, and the crochet whale pattern if you want a slightly larger piece that still fits the same sea creature theme. If you want to compare all of the designs before choosing, my crochet animal lovey patterns page brings the sea creatures, woodland animals, farm animals, and other lovey styles together in one place. For layout and styling, my ocean crib mobile ideas page shows how to space and arrange pieces like this so they hang evenly and create a soft, flowing look above the crib.
My crochet sea creature patterns page gathers the jellyfish, octopus, whale, turtle, fish, and other ocean designs in one place, while a small crochet starfish lovey pattern adds one more simple sea creature for a handmade nursery set, baby gift basket, or mobile display.
Do not place handmade toys, mobiles, or loose decorative items in a baby's sleep space.
If you are planning the room's decor around this idea, take a look at baby nursery themes to see how ocean-inspired pieces like this can fit into a complete nursery design.
For baby use, embroidered eyes are the safer choice. If you are making a display-only version, the safety eyes match the example image more closely.
Jellyfish Pattern Tips
Tip 1: Keep the dome smooth. If your top looks pointy, add a little more stuffing and smooth it gently with your hands.
Tip 2: Do not overstuff. Too much stuffing will stretch the stitches and make the jellyfish look taller and firmer than the example image.
Tip 3: Make all 10 tentacles before attaching any of them. This helps you check that the lengths match.
Tip 4: Count the stitches between the eyes. The face looks cutest when it stays small and centered.
Tip 5: If the ruffle flares too much, gently steam it from a distance or flatten it lightly with your fingers after assembly.
Crochet Jellyfish FAQ
Is this crochet jellyfish pattern beginner friendly?
Yes. The pattern uses basic single crochet, simple increases, a very easy ruffle round, and straightforward sewing. A beginner who can crochet in the round and count stitches should be able to make it.
How many tentacles does this jellyfish have?
This version uses 10 tentacles to match the full balanced look of the example image.
Can I embroider the eyes instead of using safety eyes?
Yes. For a baby-safe version, embroider two small eyes and the mouth instead of using safety eyes.
Why does my jellyfish not look like the example image?
The three biggest reasons are overstuffing the dome, skipping the ruffle round, or placing the tentacles too far inward on the underside circle.
Can I use this crochet jellyfish pattern for a baby lovey or nursery mobile?
Yes, but this written pattern is for the jellyfish topper itself. Add it to a lovey blanket or mobile structure only after the jellyfish is finished, and always follow current baby safety guidance.
This crochet jellyfish pattern gives you a soft rounded jellyfish with the same sweet shape, tiny face, gentle ruffle, and thick curled tentacles shown in the image above. Once you finish one, it is easy to make more in a whole ocean color palette for gifts, nursery decor, or a playful crochet baby pattern collection.
When you click on links to various merchants on this site and make a purchase, this may result in this site earning a commission. This does not affect the price you pay.
UBGI Gold Standard 2026
Verified for performance, SEO,
and accessibility compliance.
Photos, decorating ideas, party setups, and reader submissions are shared for inspiration only and are not intended as step-by-step decorating, construction, or DIY instructions.
About Jan | Contact | Baby Room Ideas (Blog) | Site Map | Privacy Policy | Disclosure Policy | Disclaimer | Affiliate Disclosure | Earnings Disclosure | Facebook | Pinterest
I am a participant in the Amazon Services LLC Associates Program, an affiliate advertising program designed to provide a means for us to earn fees by linking to Amazon.
Copyright © 2006-2026. All Rights Reserved.