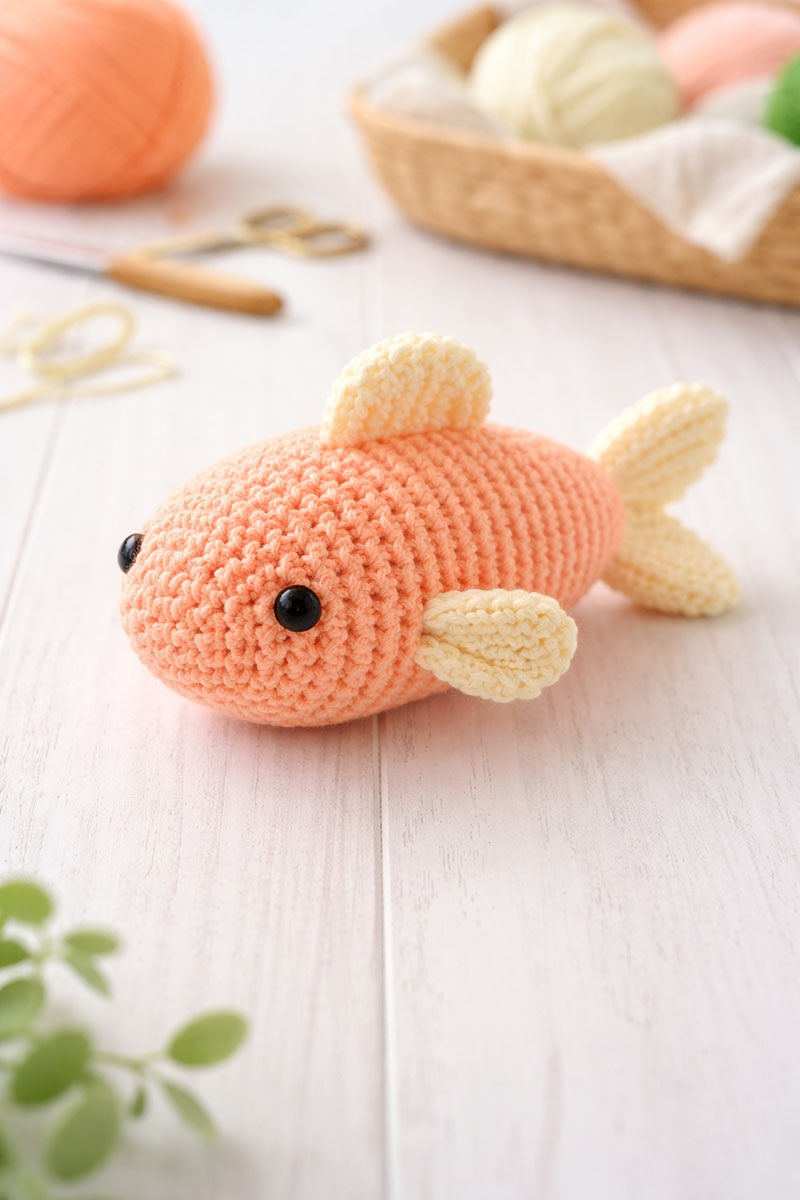
Crochet Fish Pattern to Make an Adorable Fish
This crochet fish pattern helps you make a fish that actually looks like a fish when you finish it. The shape stays fuller near the head, narrower through the middle, and tapered at the tail, so it does not turn into a round little blob halfway through. If you want a beginner-friendly project with a clear result, this pattern keeps the steps simple and the finished fish easy to recognize.
More Crochet Patterns and Nursery Ideas
Jump to what you need
Small crochet animals can go wrong fast. One extra increase and the body turns round when you wanted a clean fish shape. This crochet fish pattern keeps the form narrow through the middle, fuller near the head, and tapered at the tail so the finished piece actually reads as a fish the second you pick it up.
The best part is what happens after this one is done. Once you understand how the shaping works, it gets much easier to make a variety of ocean-dwelling sea creatures that can be used as toys as well as room decor.
That same idea also displays well in a nursery setting, especially with these fish theme baby bedding ideas that mix fish crib sheets, koi-inspired accents, fishing decor, and layered ocean colors without making the room feel overly themed.
To see how these ocean animals compare with other soft toy styles, these crochet animal lovey patterns show how the same idea carries across different animals and designs.
To use those pieces as decorations above the crib, my ocean crib mobile ideas show how to arrange fish and other sea creatures so they hang evenly and feel balanced.
That’s where the crochet jellyfish pattern, crochet sea turtle pattern, crochet octopus pattern, crochet starfish lovey pattern, and crochet whale pattern can work together as a handmade under-the-sea set for nursery shelves, baby gift baskets, mobile displays, and ocean-themed room decor.
My sea creature crochet pattern collection keeps the fish, jellyfish, octopus, turtle, whale, starfish, and other ocean animals together so the whole set is easier to plan, while the larger free baby crochet patterns collection and under the sea nursery ideas page give you more ways to carry the same look through the room.
Quick answer: This crochet fish pattern is built by increasing only at the head, holding the middle rounds steady, then decreasing in a controlled way into the tail while placing fins and features using fixed stitch positions for a consistent final result.
Do not use plastic safety eyes on a fish meant for a baby.
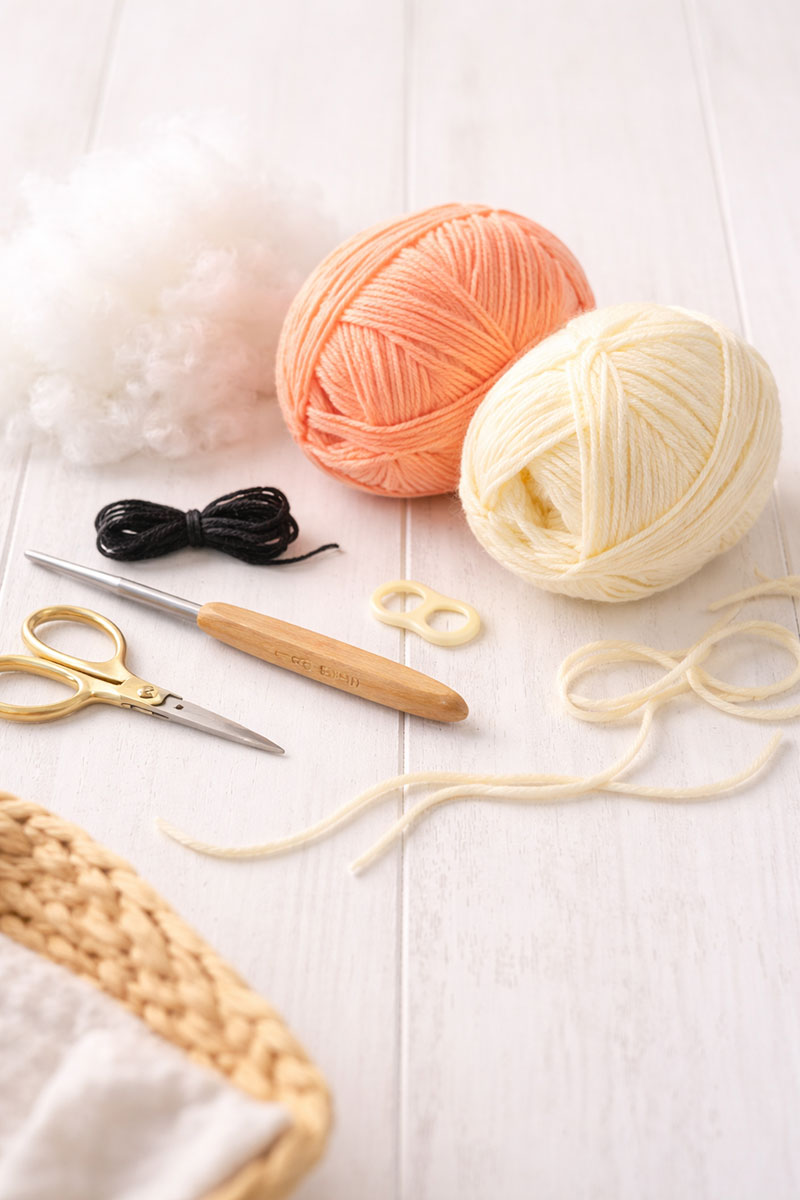
Supplies for the crochet fish pattern
Small material choices affect the final shape more than expected. Yarn that holds structure keeps the fish from collapsing once handled, and a slightly smaller hook helps maintain tight stitches.
Materials:
Worsted weight yarn in main color
Optional contrast yarn for fins
Black yarn for embroidered eyes
3.5 mm crochet hook
Polyfill stuffing
Yarn needle
Stitch marker
Scissors
Abbreviations:
MR = magic ring
sc = single crochet
inc = 2 sc in one stitch
dec = single crochet 2 stitches together
sl st = slip stitch
The first stitch of every round is the top center line of the fish. Keep a stitch marker in this position from start to finish.
How to crochet a fish step by step
Round 1: 6 sc in MR. 6
Round 2: inc in each stitch. 12
Round 3: sc, inc around. 18
Round 4: 2 sc, inc around. 24
Round 5: 3 sc, inc around. 30
Round 6: 4 sc, inc around. 36
Rounds 7–10: sc in each stitch. 36
Round 11: 4 sc, dec around. 30
Round 12: sc in each stitch. 30
Round 13: 3 sc, dec around. 24
Round 14: sc in each stitch. 24
Round 15: 2 sc, dec around. 18
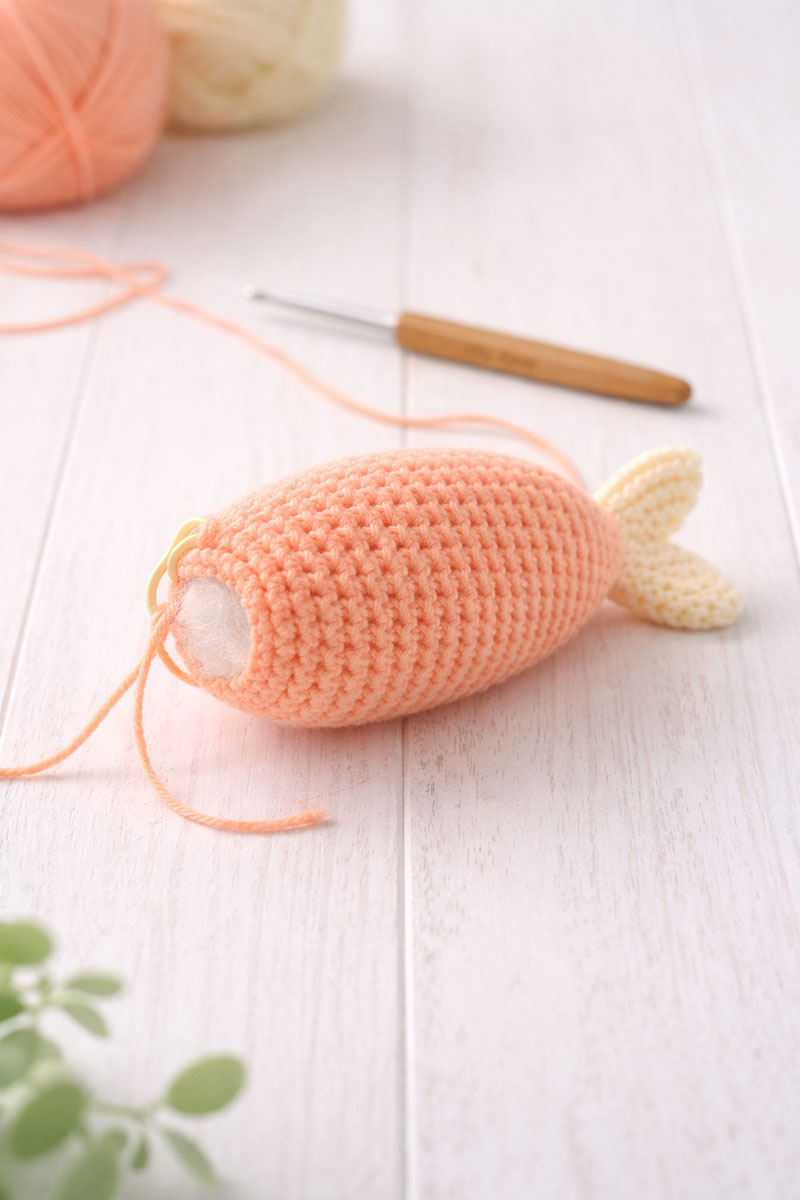
Begin stuffing the head firmly at this stage. The head should feel firm like a small stress ball.
Round 16: sc in each stitch. 18
Round 17: sc, dec around. 12
Round 18: sc in each stitch. 12
Add a small amount of stuffing to the remaining body. The tail should feel lightly filled and flexible, not firm.
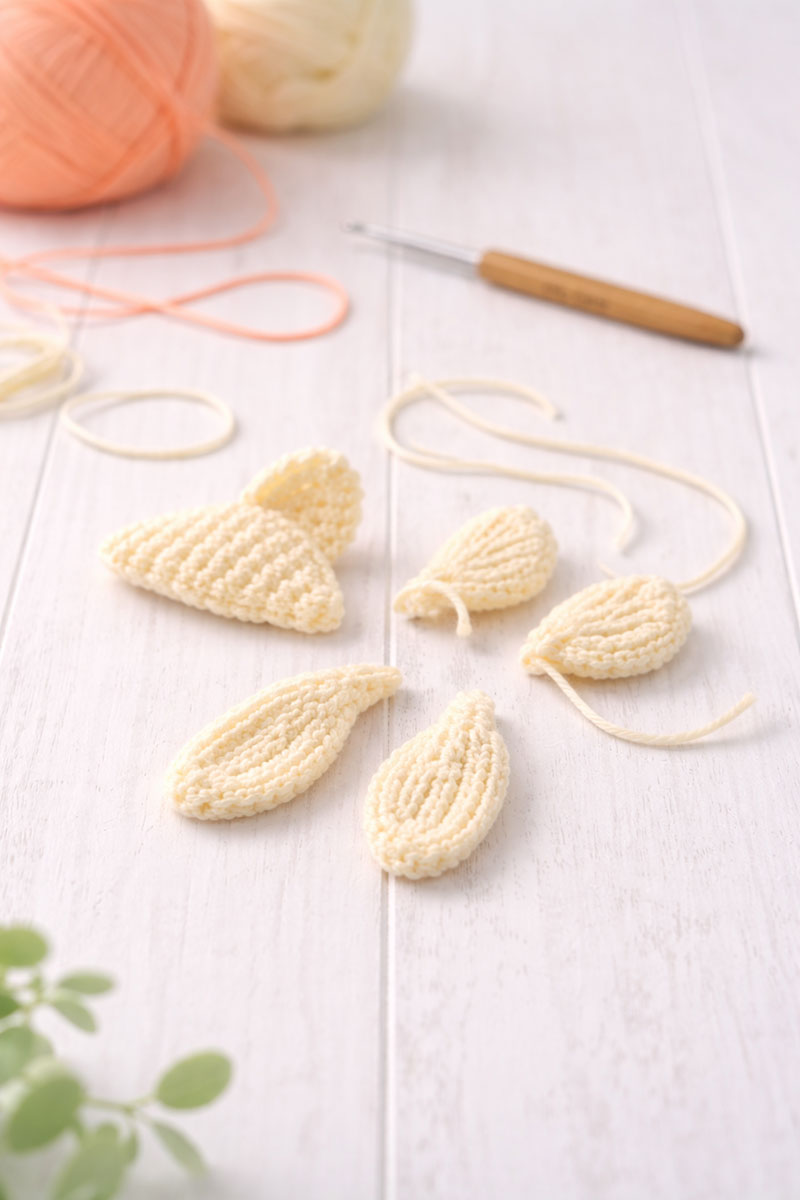
How to shape the fish body and fins
Top fin:
Ch 7. Starting in 2nd chain: sc, hdc, hdc, dc, dc, sl st. Fasten off.
Side fins, make 2:
Ch 5. Starting in 2nd chain: sc, hdc, dc, sl st. Fasten off.
Tail fin, make 2:
Ch 8. Starting in 2nd chain: sc, hdc, dc, dc, hdc, sc, sl st. Fasten off both pieces.
Exact placement guide for this crochet fish pattern
Eye placement:
Place each embroidered eye between rounds 6 and 7. Count from the center line stitch. Place one eye 2 stitches to the left and one eye 2 stitches to the right of center. This creates a fixed spacing of 4 stitches between the eyes.
Top fin placement:
Align the top fin directly along the center line. Attach it from round 8 through round 11, centered exactly over the starting stitch marker line.
Side fin placement:
Attach one fin on each side between rounds 10 and 12. Position each fin so the front edge begins 1 stitch behind the eye placement line.
Tail placement:
Insert both tail pieces into the opening at round 18. Angle each tail piece outward at approximately 30 degrees before stitching. Hold position while closing.
Closing the body:
Thread the yarn tail through the front loops of the remaining stitches. Pull tight to close. Pass the needle through the center twice to lock. Weave the yarn tail back through the body for at least 2 inches before trimming.
Finished size:
Approximately 5 inches long and 2 inches wide.
Safety eyes caution for baby gifts
If this fish is for a baby, use embroidered eyes only. Plastic safety eyes can loosen over time and create a choking risk. The U.S. Consumer Product Safety Commission recommends avoiding small detachable parts in infant items. See toy safety guidance.
Assembly and finishing steps
Sew all fins securely using tight, even stitches. Keep stitches hidden within the body structure.
The fish should feel slightly fuller in the head and lighter in the tail. That balance is what gives it the correct profile when viewed from the side.

Crochet fish pattern tips that improve the result
Keep the stitch marker aligned at the top center throughout.
Maintain consistent stitch tension across all rounds.
Do not overstuff the tail section.
Match yarn thickness across all parts.
To build a coordinated nursery theme, this fish pairs naturally with sea turtle nursery and ocean themed nursery ideas.
More crochet patterns and nursery ideas
Continue with free baby crochet patterns, or try another shape like fox crochet pattern or crochet bunny lovey pattern.
FAQ about this crochet fish pattern
Is this crochet fish pattern beginner friendly?
Yes. It uses basic stitches and fixed placement instructions.
Can I change the size?
Yes. Use thicker yarn and a larger hook.
What yarn works best?
Worsted weight yarn provides the best structure.
Can I sell finished items?
Yes. Handmade items from this pattern can be sold.
When you click on links to various merchants on this site and make a purchase, this may result in this site earning a commission. This does not affect the price you pay.
UBGI Gold Standard 2026
Verified for performance, SEO,
and accessibility compliance.
Photos, decorating ideas, party setups, and reader submissions are shared for inspiration only and are not intended as step-by-step decorating, construction, or DIY instructions.
About Jan | Contact | Baby Room Ideas (Blog) | Site Map | Privacy Policy | Disclosure Policy | Disclaimer | Affiliate Disclosure | Earnings Disclosure | Facebook | Pinterest
I am a participant in the Amazon Services LLC Associates Program, an affiliate advertising program designed to provide a means for us to earn fees by linking to Amazon.
Copyright © 2006-2026. All Rights Reserved.