Crochet Penguin Lovey Pattern Free and Easy
My free and easy crochet penguin lovey pattern is a sweet choice if you want to make a soft baby snuggler with simple stitches, an adorable little face, and a handmade look that feels special right from the start.
The small detail that makes this penguin easier for babies to hold is built right into the bottom edge, and once you see how it works, you will not want to go back to flat lovey styles.
More Free Lovey Patterns and Nursery Favorites:
Crochet Elephant Lovey Pattern
Soft yarn needed for this project
Why This Crochet Penguin Lovey Pattern Works
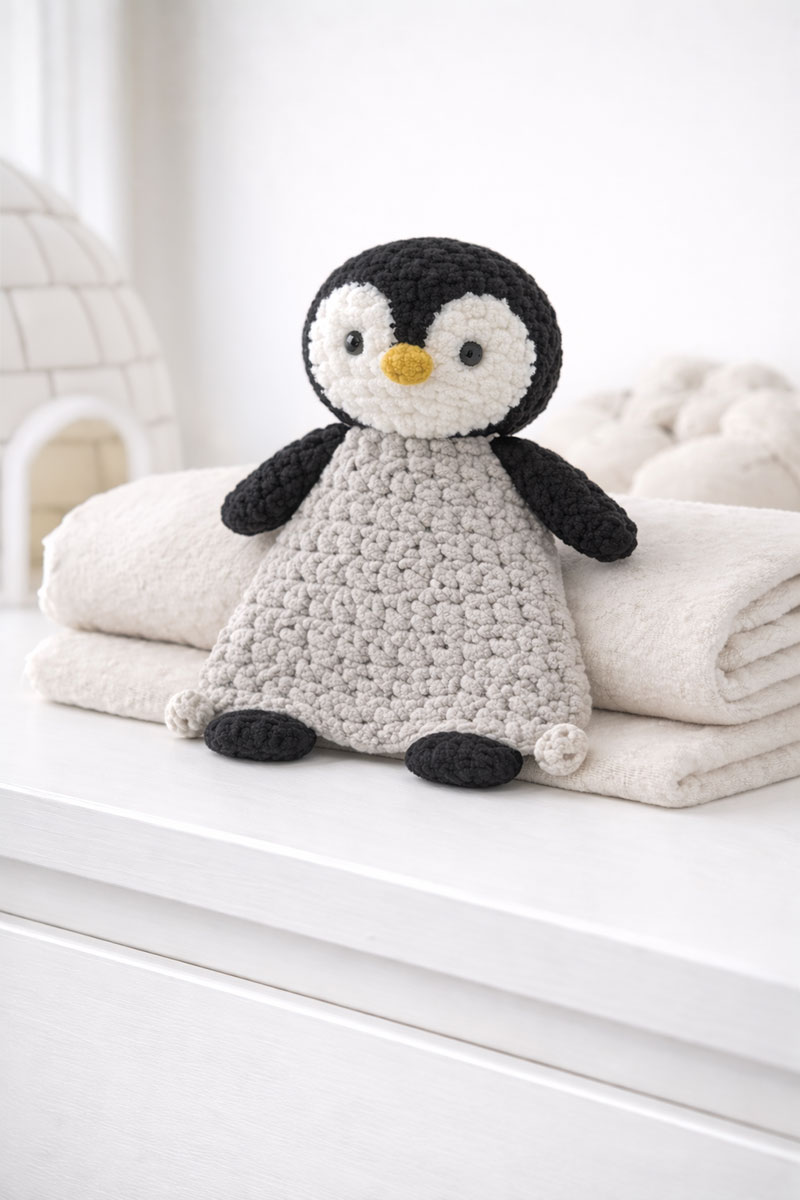
Most parents notice pretty quickly which handmade baby gifts actually get picked up and carried around. Usually it is the smaller pieces that fit one hand and do not drag extra fabric everywhere. This crochet penguin lovey pattern is built that way on purpose, with a rounded head, a short draped snuggler body, slim wings, flat feet, and four looped corners that are easy to hold.
This crochet penguin lovey pattern is designed to stay simple while still creating a finished piece that looks clean and balanced.
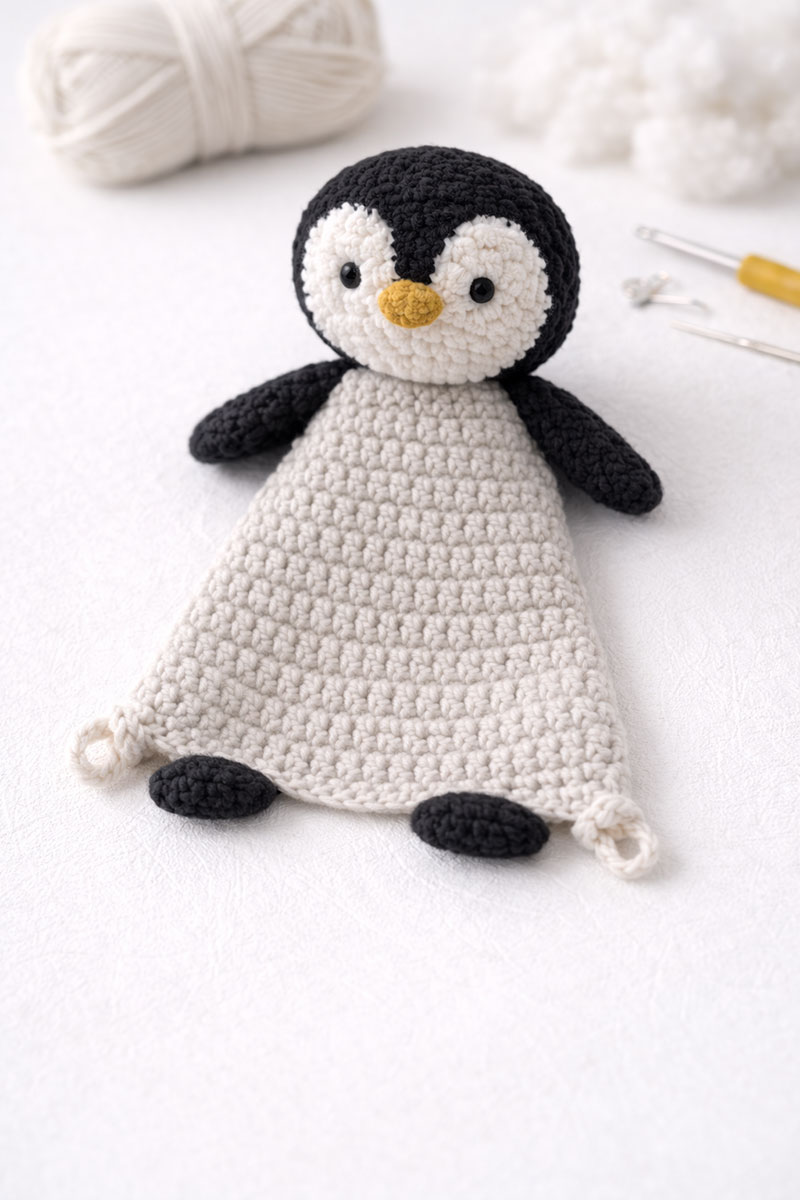
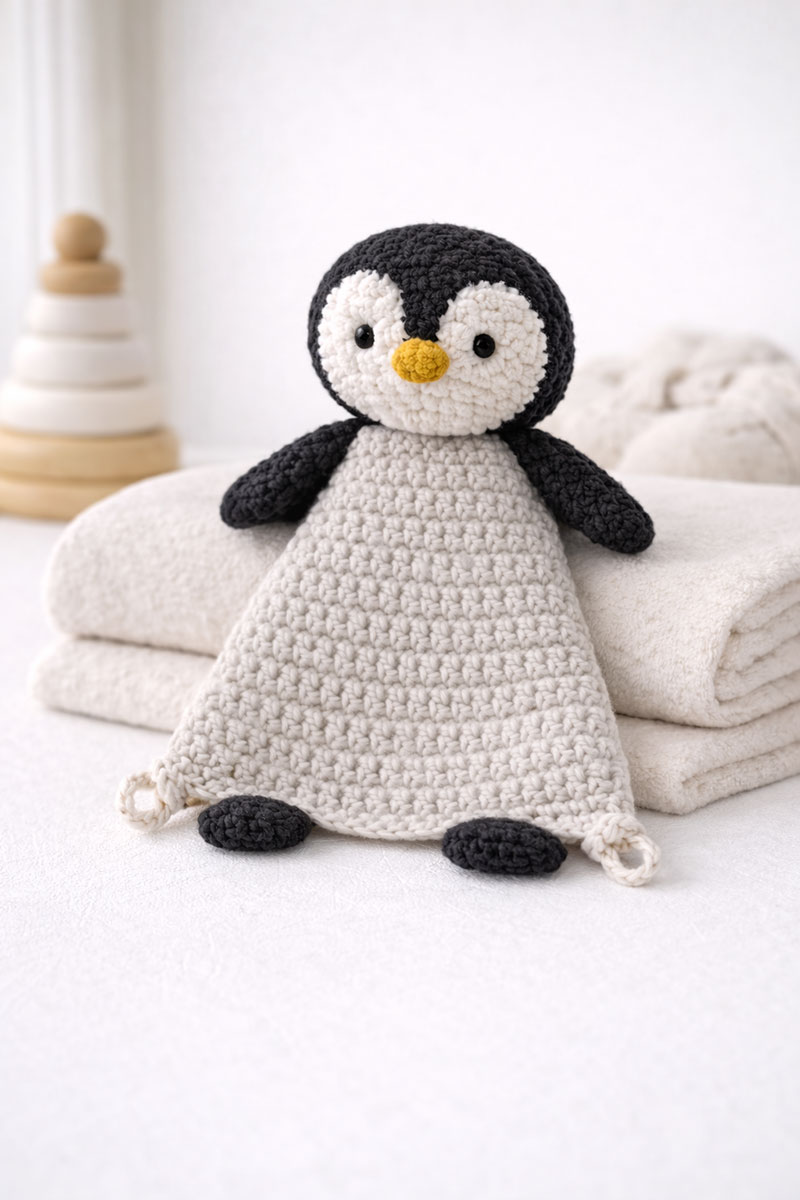
The finished penguin in the hero image is not a plush stuffed toy and it is not a granny square blanket. It is a compact crochet lovey worked with visible stitches and a body that hangs from the head in a simple tapered shape. That is what this exact pattern will create.
This is not a blanket lovey. It is a compact penguin snuggler.
If you would enjoy making small handmade baby gifts in a few different styles, my crochet bunny lovey pattern is a sweet classic option, while the crochet sea turtle pattern, crochet jellyfish pattern, and crochet fish pattern bring in a softer ocean theme. To compare all of the animal-style projects together, visit my crochet animal lovey patterns page.
My crochet cow pattern adds a country, farm themed lovey with a flatter blanket body and simple shaping that works especially well for beginner crochet baby gifts.
Quick Answer
A crochet penguin lovey pattern is a small baby comfort toy made with a crocheted penguin head and a short snuggler body worked directly from the head, making it easier to hold and carry than a full blanket lovey.
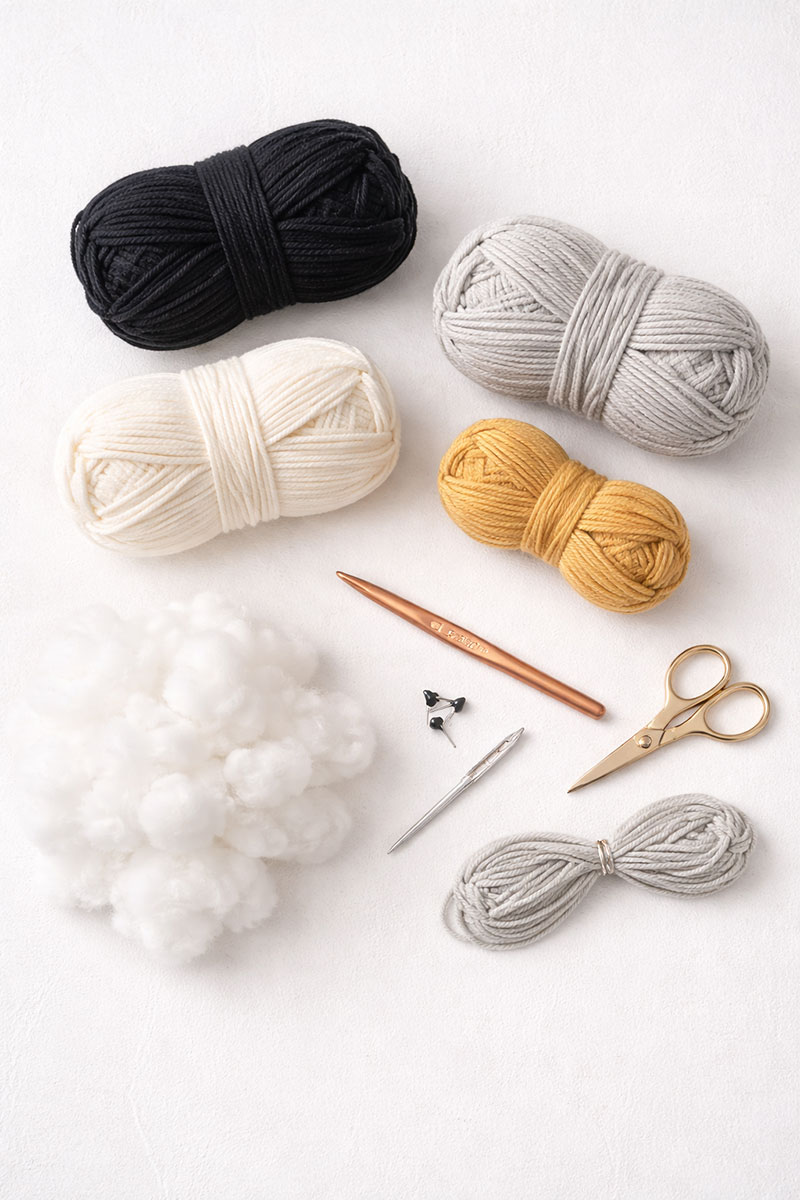
Materials for the Penguin in the Hero Image
To get the exact same penguin as is in the image on this page, use standard worsted weight yarn with clear stitch definition. Do not switch to plush yarn, blanket yarn, or chenille yarn for this version because that changes the shape and makes the body look too thick.
You will need:
• black worsted weight yarn for the head, wings, and feet
• white or very pale gray worsted weight yarn for the face patch and body
• gold or mustard worsted weight yarn for the beak
• 4.0 mm crochet hook
• polyester fiberfill for the head only
• yarn needle
• stitch marker
• scissors
Safety Note: For baby items and nursery use, embroidered eyes are a better choice because they avoid the choking risk that can come with safety eyes.
For a baby gift, stitched eyes are the better choice. For general baby sleep safety and keeping toys out of the sleep area, see safe sleep recommendations for babies.
Soft washable baby yarn for crocheted baby gifts
Pattern Notes Before You Start
Abbreviations used below are simple. ch means chain. sc means single crochet. inc means 2 sc in the same stitch. dec means single crochet 2 stitches together. sl st means slip stitch.
The head is worked in continuous rounds. The face patch, beak, wings, and feet are sewn on later. The body is worked directly into the bottom edge of the head. The four loop corners are added at the lower edge and tied into small knots to match the hero image.
My preference is to just lightly stuff the head. A head that is packed too tightly pulls the body forward and the finished lovey loses the easy drape that makes this style work so well.
Step by Step Penguin Head Pattern
With black yarn:
Round 1: Make a magic ring. Work 6 sc into ring. Pull closed. 6 sts.
Round 2: Inc in each stitch around. 12 sts.
Round 3: 1 sc, inc around. 18 sts.
Round 4: 2 sc, inc around. 24 sts.
Round 5: 3 sc, inc around. 30 sts.
Rounds 6 through 10: Sc in each stitch around. 30 sts.
Round 11: 3 sc, dec around. 24 sts.
Round 12: 2 sc, dec around. 18 sts.
Round 13: 1 sc, dec around. 12 sts.
Stuff the head lightly. It should feel rounded, not hard.
Round 14: Dec around. 6 sts.
Fasten off, leaving a tail. Thread tail through remaining front loops and pull closed.
The head should look balanced, not oversized. That size tends to feel easier to carry and hold and less awkward when the lovey is tucked into a basket or laid across a chair arm.
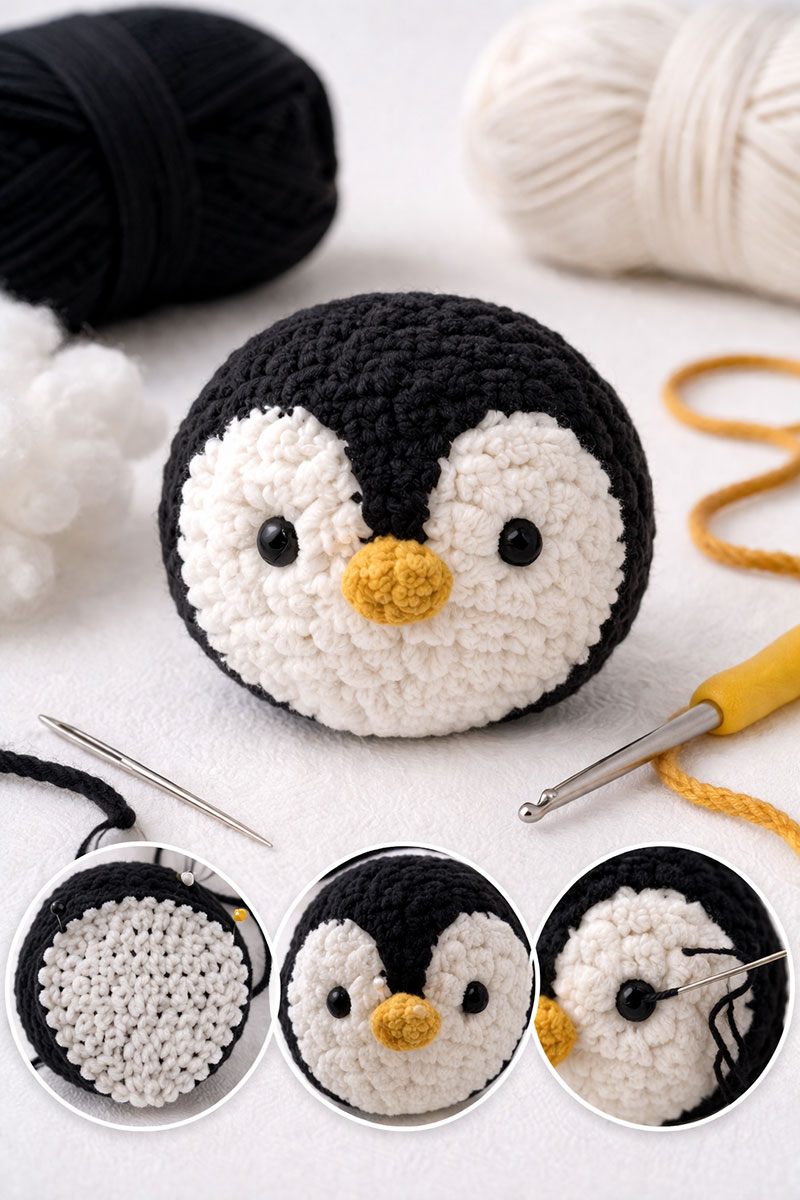
Step by Step White Face Patch
With white yarn, ch 5.
Row 1: Starting in second ch from hook, sc 3. Work 3 sc in last chain. Working back along the other side of the foundation chain, sc 2, inc in last stitch. 10 sts.
Row 2: Inc in first stitch, sc 2, inc in next 3 stitches, sc 2, inc in last 2 stitches. 16 sts.
Row 3: Sc evenly around the outer edge of the shape to smooth it. Fasten off, leaving a tail for sewing.
This creates the lower teardrop face shape you see in the hero image. It is not a plain oval, and that small difference changes the expression more than most people expect.
Step by Step Beak
With gold or mustard yarn, ch 4.
Row 1: Starting in second ch from hook, sc 3. Turn.
Row 2: Dec, sc 1. Fasten off, leaving a tail.
Fold the beak slightly and sew it to the center of the face patch.
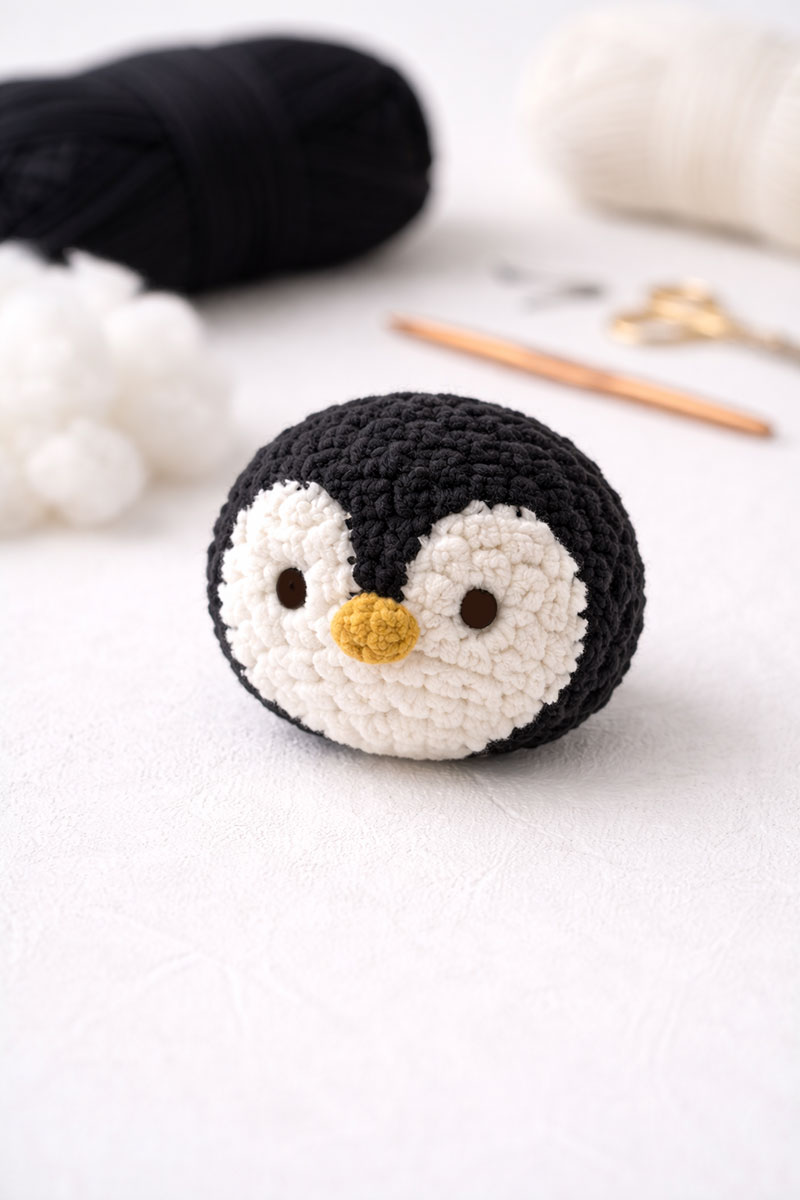
How to Add the Eyes
Sew the face patch low on the front of the head, leaving black visible above it for the crown. Embroider two small stitched eyes with black yarn. Space them a little wider apart than you might first expect. That wider placement gives the penguin the calmer look shown in the hero image.
If you like the look of smaller animal faces with stitched details, you may also like Crochet Fox Lovey Pattern.
Step by Step Wings
Make 2 wings with black yarn.
Ch 6.
Row 1: Starting in second ch from hook, sc 5. Turn.
Row 2: Dec, sc 1, dec. Turn.
Row 3: Sc 3. Fasten off, leaving a tail.
These wings are meant to stay slim and close to the body. Do not stuff them. That flatter shape is part of what keeps the hero penguin looking neat instead of bulky.
Step by Step Flat Feet
Make 2 feet with black yarn.
Ch 5.
Round 1: Starting in second ch from hook, sc 3, 3 sc in last chain. Working back along the other side, sc 2, inc in final stitch. 10 sts.
Round 2: Sc around evenly. Fasten off, leaving a tail.
Flatten each foot gently before sewing. The finished feet should read like short oval paddles, not round plush stubs.
Step by Step Snuggler Body
This is where the penguin starts to come together. The body hangs directly from the head and stays thin enough to drape, but it still has enough shape to look finished when it is on display.
Turn the head upside down. Join white or pale gray yarn evenly around the base opening.
Round 1: Work 18 sc evenly around the base of the head. Join with sl st. 18 sts.
Round 2: Ch 1, sc in each stitch around. Join. 18 sts.
Round 3: Ch 1, inc in first stitch, sc 8, inc in next stitch, sc 8. Join. 20 sts.
Round 4: Ch 1, sc in each stitch around. Join. 20 sts.
Round 5: Ch 1, inc in first stitch, sc 9, inc in next stitch, sc 9. Join. 22 sts.
Round 6: Ch 1, sc in each stitch around. Join. 22 sts.
Round 7: Ch 1, inc in first stitch, sc 10, inc in next stitch, sc 10. Join. 24 sts.
Rounds 8 through 12: Ch 1, sc in each stitch around. Join each round. 24 sts.
Now make the four loop corners.
Depending on how the lovey is positioned, you may only see two of the loop corners at a time, but the finished piece includes four evenly spaced loops around the lower edge.
Round 13: Ch 1, sc 5, ch 7, skip 1 stitch, sc 5, ch 7, skip 1 stitch, sc 5, ch 7, skip 1 stitch, sc 4, ch 7, skip 1 stitch, join with sl st.
Round 14: Ch 1, sc in each regular stitch around. Work 7 sc into each ch 7 loop. Join and fasten off.
Tie one simple overhand knot into the center of each loop. Keep the knots small and even.
The body should now have a lightly tapered drape with four looped corners at the lower edge. It should not look like a stuffed torso and it should not spread out like a blanket.
How to Assemble the Penguin
Sew the face patch onto the head first. Add the beak next. Stitch the eyes after the beak is in place so you can adjust the spacing if needed.
Sew one wing to each side where the head meets the body. Angle them slightly downward and keep them close to the body.
Sew the feet low on the front edge of the body and angle them slightly forward. That small detail helps the penguin keep the same relaxed look shown in the hero image.
Before weaving in all the ends, hold the lovey by the top of the head and let the body hang. If one wing sits higher than the other or the face leans to one side, fix it now. That last "fix" makes a bigger difference than you might think.
Why This Penguin Lovey Makes a Good Baby Gift
Some handmade gifts are mainly for display. This one has a better chance of being used because it is small enough to carry and simple enough not to feel bulky. Parents often reach for the items that fit into one hand and do not need constant rearranging, and this style fits that pattern very well.
This handmade idea also fits nicely with many popular baby nursery themes.
For decor in an ocean or beach themed direction, pairing this with the crochet octopus pattern or crochet fish pattern creates a coordinated handmade set that works especially well in ocean and under the sea themed nursery decor.
If you are building a fuller handmade gift set, a smart next stop is Baby Quilts.
easy care yarn for baby gift patterns
Crochet Penguin Lovey Pattern FAQ
Is this crochet penguin lovey pattern beginner friendly?
Yes. The stitches are basic and the shaping is manageable. The main skills are single crochet, increasing, decreasing, and sewing small parts in place.
Will this pattern make the penguin shown in the hero image?
Yes. This pattern is written to create the same style of rounded penguin head, lower face patch, slim wings, flat feet, and draped snuggler body with four looped corners shown in the hero image.
Is this a blanket lovey?
No. It is a compact snuggler body worked directly from the head. The body drapes lightly, but it is not a full blanket.
Why use worsted yarn for this version?
Worsted yarn keeps the stitches visible and helps the finished lovey look like true crochet. Plush yarn changes the shape and texture too much for this exact design.
Can I change the body color?
Yes. White or pale gray gives the closest match to the page images, but other light neutrals can also work.
When you click on links to various merchants on this site and make a purchase, this may result in this site earning a commission. This does not affect the price you pay.
UBGI Gold Standard 2026
Verified for performance, SEO,
and accessibility compliance.
Photos, decorating ideas, party setups, and reader submissions are shared for inspiration only and are not intended as step-by-step decorating, construction, or DIY instructions.
About Jan | Contact | Baby Room Ideas (Blog) | Site Map | Privacy Policy | Disclosure Policy | Disclaimer | Affiliate Disclosure | Earnings Disclosure | Facebook | Pinterest
I am a participant in the Amazon Services LLC Associates Program, an affiliate advertising program designed to provide a means for us to earn fees by linking to Amazon.
Copyright © 2006-2026. All Rights Reserved.