Free Crochet Bear Blanket Pattern for an Easy Teddy Bear Baby Blanket
By Jan Bay
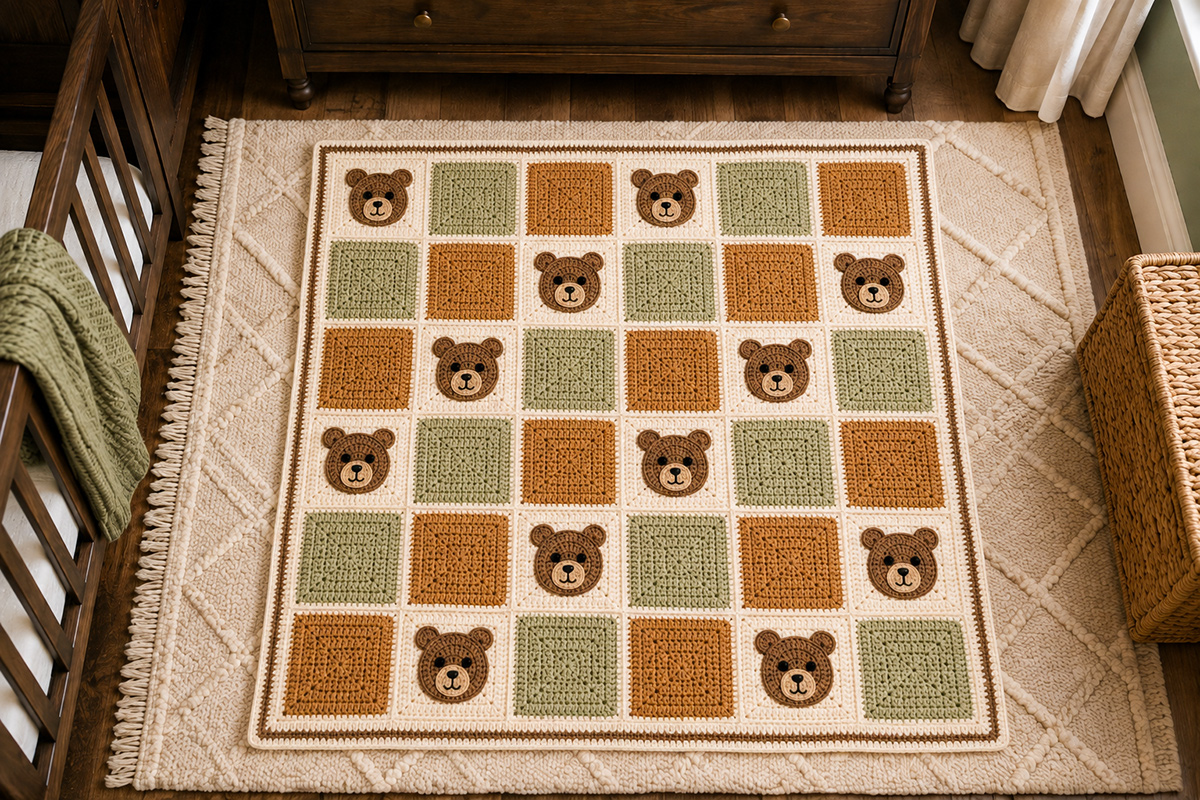
This free crochet bear blanket pattern turns simple granny squares into a cozy teddy bear baby blanket with flat bear faces, soft nursery colors and an easy repeating layout. The finished blanket makes a sweet handmade baby gift while keeping the construction approachable for crocheters who are comfortable with basic stitches and simple seaming.
Explore More Free Crochet Baby Patterns
Free Crochet Baby Blanket Patterns
Free Crochet Teddy Bear Pattern
Supplies for This Crochet Bear Blanket
Jump to a Section
Supplies for the Free Crochet Bear Blanket Pattern
This blanket uses one square construction throughout, so you do not have to learn a different base for the bear squares and the plain squares. The teddy bear faces are made separately and sewn onto selected squares after the squares are finished. That keeps the blanket flat while still giving the bears enough shape to show clearly.
The color plan for this blanket uses warm ivory for the bear-square backgrounds, muted sage and caramel for the plain squares, medium brown for the bear faces and a lighter tan for the muzzles. You can change the colors without changing the construction.
- Approximately 1,800 yards total of medium weight #4 yarn, plus a small amount for the embroidered facial features
- Approximately 650 yards warm ivory
- Approximately 425 yards muted sage
- Approximately 425 yards caramel or warm rust
- Approximately 225 yards medium brown for the bear faces and border accents
- Approximately 75 yards tan for the bear muzzles and optional ear centers
- Small amount of dark brown or black yarn or embroidery floss for the eyes, noses and mouths
- 5 mm crochet hook, or the hook size needed to match the finished square measurement
- Yarn needle for joining, sewing the bear faces in place and weaving in ends
- Scissors
- Stitch markers
- Measuring tape
- Blocking mats and rust-resistant pins, optional but helpful for making all 36 squares the same size before joining
Choose a smooth, washable yarn that lets the bear faces and square edges stay easy to see. Very fuzzy yarn can hide the embroidered features and make it harder to position the appliqué pieces evenly.
The facial features shown in this pattern are embroidered. I recommend keeping the bear faces free of plastic eyes, buttons and other small removable pieces when the blanket is being made for a baby.
Finished Size and Gauge for This Teddy Bear Baby Blanket
The pattern makes a square baby blanket that is approximately 31 1/2 inches by 31 1/2 inches after the squares are joined and the border is added.
You will make 36 squares and arrange them in a 6 by 6 layout. Each square should measure approximately 5 inches by 5 inches after Round 5 and before joining.
- Finished square: approximately 5 inches by 5 inches
- Number of squares: 36
- Bear-face squares: 12
- Plain sage squares: 12
- Plain caramel squares: 12
- Layout: 6 squares across by 6 squares down
- Blanket before border: approximately 30 inches square
- Finished blanket: approximately 31 1/2 inches square
The finished square measurement matters more than matching an exact stitch gauge. Crochet one complete square first and measure it across the center in both directions. If it is much larger than 5 inches, use a smaller hook. If it is much smaller, use a larger hook.
Try to keep all 36 squares within about 1/8 inch of one another. Small differences can usually be corrected during blocking, but noticeably different square sizes can make the joined blanket ripple or pull at the seams.
The bear face should fit comfortably inside its square with background fabric visible around the head and ears. Do not enlarge the bear until it fills the square from edge to edge. Leaving that open space is what keeps each teddy face distinct after the blanket is assembled.
Crochet Abbreviations and Pattern Notes
This pattern uses U.S. crochet terminology.
- ch = chain
- ch-sp = chain space
- dc = double crochet
- hdc = half double crochet
- sc = single crochet
- sl st = slip stitch
- st = stitch
- sts = stitches
- MR = magic ring
- inc = work 2 stitches into the same stitch
Beginning chains: A beginning ch 3 counts as the first dc when working the blanket squares. A beginning ch 1 does not count as a stitch when making the bear pieces unless the instructions specifically say otherwise.
Square corners: Each corner is worked into a ch-2 space. The corner sequence is 2 dc, ch 2, 2 dc unless another instruction is given.
Right side: Keep the right side of every square facing you when you sew on the bear pieces. This keeps the joining seams and facial details consistent across the finished blanket.
Color changes: The five rounds of each square are worked in one color. Fasten off after Round 5. The bear faces are added later, so you do not need to carry brown or tan yarn through the square itself.
Blocking: Measure the squares before you join them. If needed, lightly block them to 5 inches square and let them dry completely before assembly.
The separate free crochet bear appliqué pattern makes a full-body bear motif for other projects. The blanket below uses a smaller face-only construction so the bears fit naturally inside the 5-inch squares.
How to Crochet the Teddy Bear Granny Square for This Crochet Bear Blanket Pattern
Make 12 bear squares in warm ivory. Each square begins as the same solid granny square used elsewhere in the blanket. The bear face is added only after the square is complete.
I prefer a solid square behind an appliqué like this because there are no large open spaces beneath the face. The bear looks finished from a normal viewing distance, and the sewing stitches have plenty of fabric to catch.
Warm Ivory Square Base
Use the 5 mm hook and warm ivory yarn.
Round 1: Make a MR. Ch 3, which counts as the first dc. Work 2 dc into the ring, ch 2. *Work 3 dc into the ring, ch 2.* Repeat from * to * 2 more times. Pull the ring closed. Join with a sl st to the top of the beginning ch 3. 12 dc and 4 ch-2 corner spaces.
Round 2: Sl st in the next 2 dc and into the next ch-2 corner space. Ch 3, dc in the same corner space, ch 2, 2 dc in the same corner space. Dc in each of the next 3 dc. *(2 dc, ch 2, 2 dc) in the next ch-2 corner space. Dc in each of the next 3 dc.* Repeat from * to * 2 more times. Join with a sl st to the top of the beginning ch 3. 28 dc and 4 ch-2 corner spaces.
Round 3: Sl st across to the next ch-2 corner space. Ch 3, dc in the same corner space, ch 2, 2 dc in the same corner space. Dc in each dc across the side to the next corner. *(2 dc, ch 2, 2 dc) in the next ch-2 corner space. Dc in each dc across the next side.* Repeat from * to * around. Join with a sl st to the top of the beginning ch 3. 44 dc and 4 ch-2 corner spaces.
Round 4: Sl st across to the next ch-2 corner space. Ch 3, dc in the same corner space, ch 2, 2 dc in the same corner space. Dc in each dc across the side to the next corner. *(2 dc, ch 2, 2 dc) in the next ch-2 corner space. Dc in each dc across the next side.* Repeat from * to * around. Join with a sl st to the top of the beginning ch 3. 60 dc and 4 ch-2 corner spaces.
Round 5: Sl st across to the next ch-2 corner space. Ch 3, dc in the same corner space, ch 2, 2 dc in the same corner space. Dc in each dc across the side to the next corner. *(2 dc, ch 2, 2 dc) in the next ch-2 corner space. Dc in each dc across the next side.* Repeat from * to * around. Join with a sl st to the top of the beginning ch 3. 76 dc and 4 ch-2 corner spaces.
Fasten off and weave in the ends on the wrong side.
Measure the square through the center. It should be approximately 5 inches wide and 5 inches tall. Check the measurement again before making all 12 ivory squares. A small hook adjustment now is much easier than trying to correct 36 different-sized squares later.
Crochet the Bear Face, Ears and Muzzle
Each teddy bear is assembled from one round head, two small ears and one tan muzzle. Make all of the pieces flat. There is no stuffing in the bear faces.
You will need the following pieces for each of the 12 bear squares:
- 1 medium brown head
- 2 medium brown ears
- 1 tan muzzle
- Optional: 2 small tan inner-ear circles
Bear Head
Use medium brown yarn.
Round 1: Make a MR. Ch 1. Work 6 sc into the ring. Pull the ring closed. Join with a sl st to the first sc. 6 sc.
Round 2: Ch 1. Work 2 sc in each st around. Join with a sl st to the first sc. 12 sc.
Round 3: Ch 1. *Sc in the next st, 2 sc in the next st.* Repeat from * to * around. Join with a sl st to the first sc. 18 sc.
Round 4: Ch 1. *Sc in each of the next 2 sts, 2 sc in the next st.* Repeat from * to * around. Join with a sl st to the first sc. 24 sc.
Round 5: Ch 1. *Sc in each of the next 3 sts, 2 sc in the next st.* Repeat from * to * around. Join with a sl st to the first sc. 30 sc.
Fasten off, leaving a long tail for sewing.
The finished head should lie flat rather than forming a cup. If the circle begins to curl upward, check that no increases were missed.
Bear Ears
Make 2 in medium brown.
Round 1: Make a MR. Ch 1. Work 6 sc into the ring. Pull the ring closed. Join with a sl st to the first sc. 6 sc.
Round 2: Ch 1. Work 2 sc in each st around. Join with a sl st to the first sc. 12 sc.
Fasten off, leaving a long tail for sewing.
Only the upper portion of each ear will remain visible after the head is sewn over it. This gives the teddy a rounded ear without adding a thick raised layer around the outside of the face.
Optional Inner Ears
Make 2 in tan if you want a little more color definition.
Make a MR. Ch 1. Work 6 sc into the ring. Pull the ring closed and join with a sl st to the first sc. Fasten off, leaving a tail for sewing.
Center one tan circle on each brown ear and sew around its edge. Keep the stitches snug, but do not pull so tightly that the ear cups.
Tan Bear Muzzle
Use tan yarn.
Ch 5.
Round 1: Sc in the second ch from the hook and in each of the next 2 ch. Work 3 sc in the last ch. Rotate the foundation chain so you can work along the unused loops on the opposite side. Sc in each of the next 2 ch. Work 2 sc in the final ch. Join with a sl st to the first sc. 10 sc.
Fasten off, leaving a long tail for sewing.
The muzzle should be a small horizontal oval. Gently shape it with your fingers before sewing rather than adding another round that could make it too large for the face.
Position the Bear Pieces on the Square
Before positioning the pieces, securely weave in the short beginning tail on the wrong side of each head, brown ear and muzzle. If you added the optional inner ears, weave in their remaining tails after sewing each tan circle to its brown ear. Leave the long outer-edge tails on the head, brown ears and muzzle available for sewing those pieces to the square.
Place an ivory square right side up on a flat surface. Position the two ears first, then lay the head over the lower portion of the ears.
Center the complete bear face on the square rather than measuring from a corner. The outer edges of the ears should stay well inside the square so they do not interfere with the joining seam later.
- Position the brown ears near the upper left and upper right edges of the head, approximately at the 10 o'clock and 2 o'clock positions.
- Slip the lower third of each ear behind the head.
- Pin or mark the ears before moving the head.
- Sew the ears securely to the ivory square.
- Place the head back over the sewn ear edges.
- Center the head horizontally and vertically in the square.
- Sew around the outside edge of the head with small, even stitches.
- Place the tan muzzle across the lower center of the head.
- Sew completely around the muzzle.
Keep the sewing stitches close to the appliqué edges. Long stitches across the back of the square are more likely to catch during use and can pull the face out of shape.
Embroider the Eyes, Nose and Mouth
Add the facial features after the appliqué pieces are sewn securely to the square. Use dark brown or black yarn or embroidery floss.
For the eyes, make two short satin-stitch shapes above the muzzle. Place them at the same height and approximately 3/4 inch apart. Keep each eye compact rather than extending it into a long line.
Center the nose near the upper half of the tan muzzle. Make several short horizontal stitches until the nose has a small rounded-triangle or oval shape.
Bring one strand down from the center of the nose to form a short vertical line. Add one small curved or angled stitch to each side for the mouth.
Turn the square over after each feature and check the back. Secure and weave each thread into nearby stitches rather than carrying a long strand from one eye to the other.
The expression can change quickly if the features drift too far apart. Keeping the eyes fairly close to the muzzle gives the bear the compact teddy face that works well with these small squares.
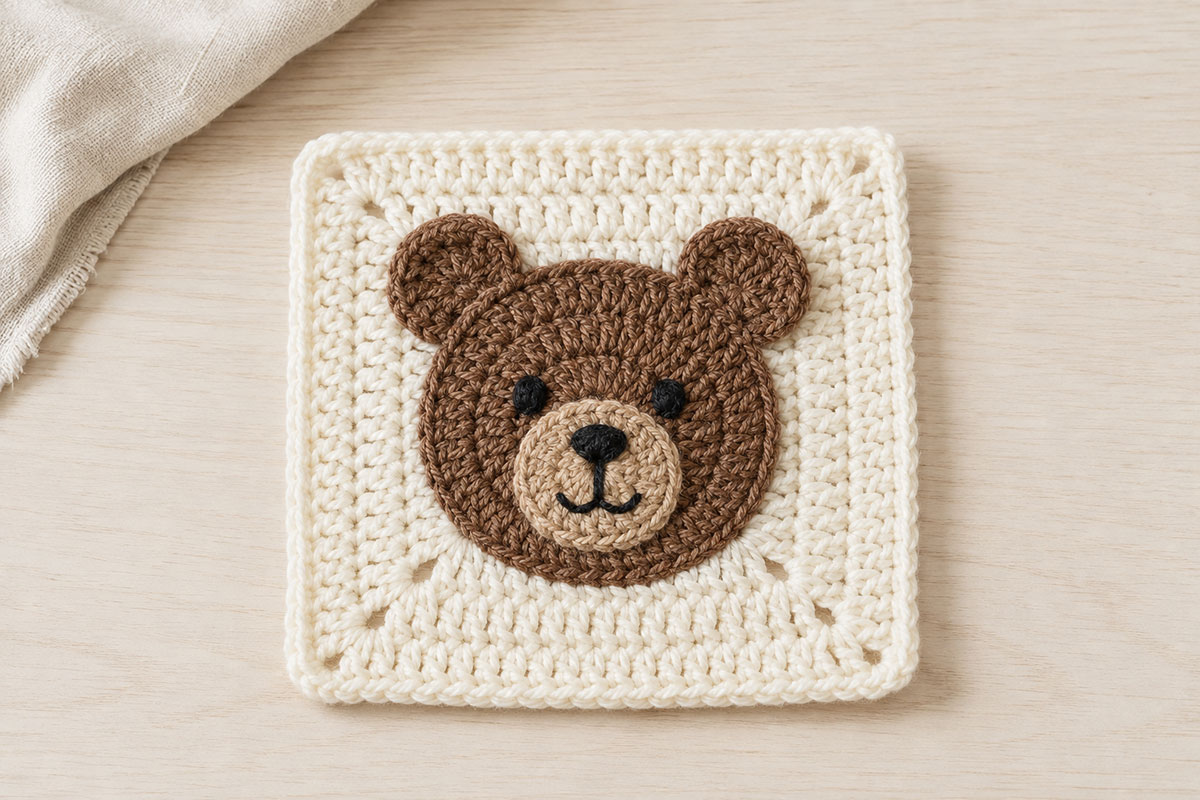
Complete all 12 bear squares before arranging the blanket. Set them beside one another and compare the faces. Minor handmade differences are natural, but correcting a noticeably tilted muzzle or uneven eye placement is easier before the squares are joined.
Make the Sage and Caramel Granny Squares
Make 12 sage squares and 12 caramel squares. Use the same five-round solid granny-square instructions given for the ivory bear-square base.
Do not add appliqués to these 24 squares.
Because the construction is identical, every square should finish with:
- 76 dc
- 4 ch-2 corner spaces
- Approximately 5 inches by 5 inches
Fasten off after Round 5 and weave in the yarn ends securely.
Before assembly, stack the squares by color and compare their edges. If one square is clearly larger or smaller, measure it before putting it into the blanket. A consistent grid gives the bear faces a neat framework and helps the border sit evenly.
Arrange the 36 Squares for the Bear Baby Blanket
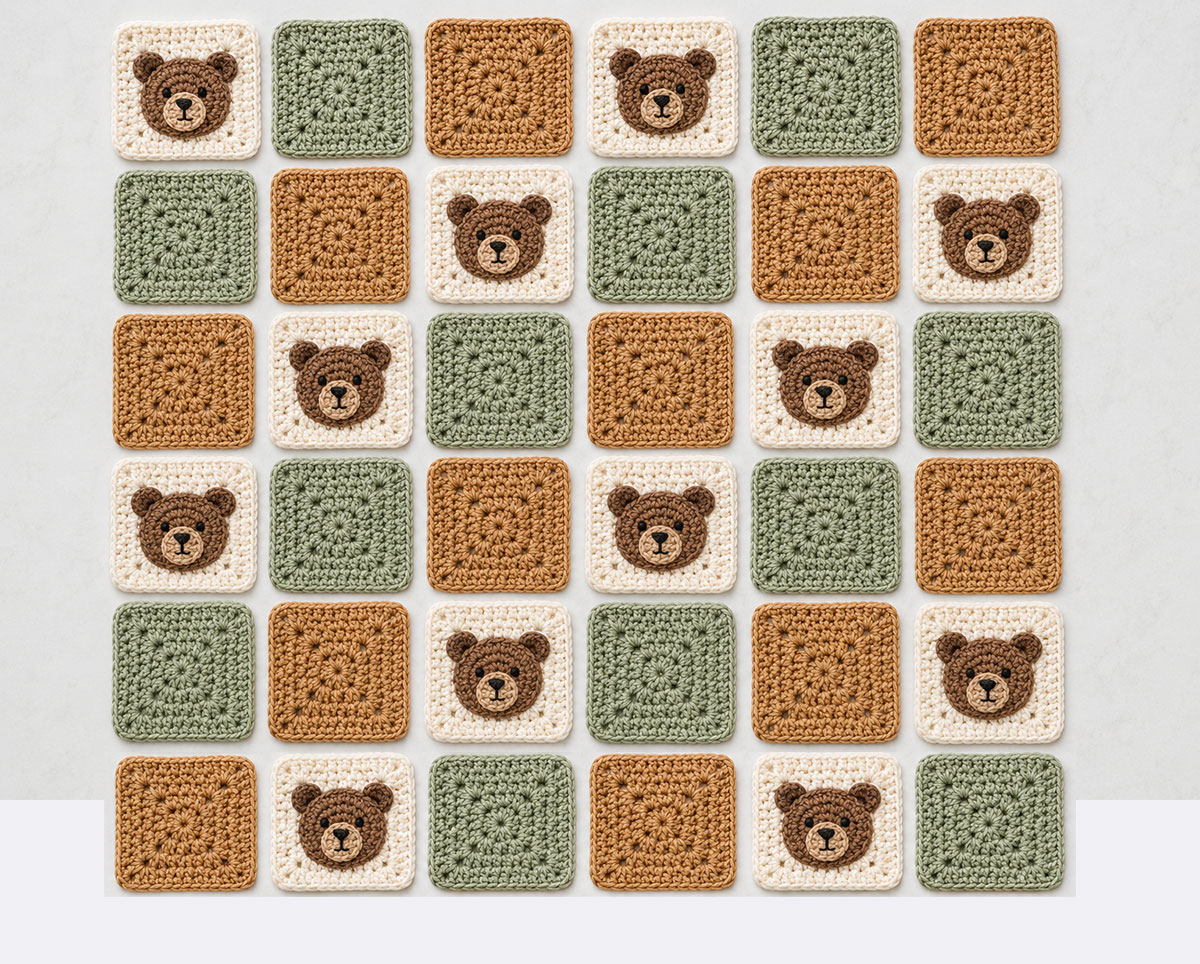
Once all 36 squares are finished, arrange them on a clean floor, bed or large table before joining anything. You should have 12 ivory teddy bear squares, 12 sage squares and 12 caramel squares.
The layout below spaces the bears across the entire blanket instead of grouping them in one section. Each row contains two bear squares, two sage squares and two caramel squares.
Arrange the squares from left to right in this order:
- Row 1: Bear, Sage, Caramel, Bear, Sage, Caramel
- Row 2: Sage, Caramel, Bear, Sage, Caramel, Bear
- Row 3: Caramel, Bear, Sage, Caramel, Bear, Sage
- Row 4: Bear, Sage, Caramel, Bear, Sage, Caramel
- Row 5: Sage, Caramel, Bear, Sage, Caramel, Bear
- Row 6: Caramel, Bear, Sage, Caramel, Bear, Sage
Step back and look at the complete arrangement before joining. The bear faces should appear evenly distributed from top to bottom, with no long run of one background color.
Turn any square that needs a small visual adjustment before sewing. The plain squares can be rotated freely. Keep every teddy face upright.
A phone photo of the finished arrangement is useful here. If the squares get moved while you work, you have an easy reference for putting each row back in order.
How to Join the Crochet Bear Blanket Squares
The squares are sewn together with a yarn needle so the front of the blanket stays fairly flat. Use warm ivory yarn for the seams. The same joining method is used between every color combination.
Before you begin, make sure all yarn tails from the individual squares have been woven in. Leave only the sewing yarn loose while you join.
Join the Squares Into Rows
- Place the first two squares in Row 1 next to each other with the right sides facing up.
- Thread approximately 30 inches of warm ivory yarn onto a yarn needle.
- Starting at one corner, insert the needle under the loop of the edge stitch that is closest to the seam between the two squares.
- Insert the needle under the corresponding loop closest to the seam on the second square.
- Continue back and forth between the two squares, matching one edge stitch with one edge stitch.
- Keep the yarn snug enough to close the seam, but do not pull hard enough to gather the edges.
- At the opposite corner, secure the yarn and weave the tail into the wrong side.
- Add the next square in the row using the same method.
- Continue until all six squares in Row 1 form one strip.
Repeat the process for Rows 2 through 6. You will have six separate strips, each containing six squares.
Lay the strips back in their original order before making the long seams. Check the bear faces again. A bear that has accidentally been turned sideways is much easier to correct before the row is attached.
Join the Six Rows
- Place Row 1 and Row 2 next to each other with right sides facing up.
- Match the corners where each square meets the next.
- Use stitch markers at those intersections if the rows tend to shift.
- Begin at one outside corner and sew the two rows together.
- Match corresponding stitches along each square edge.
- When you reach a four-square intersection, bring all four square corners together neatly before continuing.
- Continue across the entire width of the blanket without changing the square order.
- Secure the joining yarn at the opposite edge and weave in the tail.
- Attach Rows 3, 4, 5 and 6 in the same manner.
Spread the blanket flat after every long seam. If the seam draws inward, loosen the most recent stitches before continuing. If large gaps appear between the squares, tighten the joining stitches slightly.
Do not use the joining yarn to force two noticeably different square sizes together. Correct the square first. The finished grid should rest flat without having to stretch one section into place.
Crochet the Border Around the Teddy Bear Blanket
The border frames the changing square colors and gives the outside edge a more finished shape. Work the border only after all six rows are joined and every seam has been checked.
Place the blanket right side up. Begin in any corner.
Border Round 1 in Warm Ivory
Join warm ivory yarn in a corner with a sl st. Ch 1.
Work sc evenly along the first side of the blanket. Place one sc in each available stitch along the outer square edges.
Where two squares meet, keep the stitches evenly spaced across the seam. Do not add several extra stitches simply to cover the join.
Work 3 sc in each corner of the blanket.
Continue around all four sides. Join with a sl st to the first sc.
Lay the blanket flat before continuing. If the edge ruffles, there are too many stitches along that section. If the edge pulls inward, add a small number of evenly spaced stitches where needed.
Border Round 2 in Medium Brown
Fasten off the ivory and join medium brown yarn in the center sc of any corner.
Ch 2. The beginning ch 2 does not count as a stitch.
Work 3 hdc in the same center corner sc. *Work 1 hdc in each sc up to, but not including, the center sc of the next corner. Work 3 hdc in that center corner sc.* Repeat from * to * 2 more times. Work 1 hdc in each remaining sc to the starting corner. Join with a sl st to the first hdc.
Border Round 3 in Warm Ivory
Fasten off the brown and join warm ivory yarn in the center hdc of any 3-hdc corner group.
Ch 1. The beginning ch 1 does not count as a stitch.
Work 3 sc in the same center hdc. *Work 1 sc in each hdc up to, but not including, the center hdc of the next 3-hdc corner group. Work 3 sc in that center hdc.* Repeat from * to * 2 more times. Work 1 sc in each remaining hdc to the starting corner. Join with a sl st to the first sc. Fasten off.
Run your hand around the completed edge and check all four corners. Each should turn cleanly without curling forward or folding underneath the blanket.
Finish, Check and Care for the Crochet Bear Baby Blanket
Before calling the blanket finished, turn it over and inspect the back. The reverse side does not need to look identical to the front, but it should be tidy and free of loose yarn ends.
- Check every seam between the granny squares.
- Check that all 12 bear heads are sewn completely around their edges.
- Check both ears on every bear.
- Check each muzzle for loose sewing stitches.
- Gently tug each embroidered eye, nose and mouth to make sure the thread is secure.
- Weave in every remaining yarn tail.
- Trim yarn ends only after they have been woven securely through several stitches.
- Measure the finished blanket in both directions.
- Lay it flat and check that the border does not pull or ruffle.
If the blanket needs a final shape adjustment, lightly block it according to the care instructions for the yarn you used. Do not stretch the teddy faces while the blanket is damp. Shape the outside edges and square intersections instead.
Wash according to the yarn manufacturer's directions. A gentle wash and low-agitation drying method can help protect the appliqué seams and embroidered facial features.
Using a Handmade Baby Blanket Safely
A handmade blanket can be useful for supervised cuddling, stroller outings, floor time and gift-giving, but it should not be placed loose in an infant's sleep space.
The U.S. Consumer Product Safety Commission recommends keeping an infant sleep space bare, with no blankets, pillows or other soft items. You can read the current guidance on the CPSC Safe Sleep page.
If you are giving the blanket as a baby shower gift, it is worth passing that information along with it. The blanket can still be enjoyed in plenty of settings without using it as loose crib bedding.
Frequently Asked Questions About the Crochet Bear Blanket Pattern
Can I make the blanket larger?
Yes. Add complete rows and columns of 5-inch squares while continuing the three-color sequence. For example, an 8 by 8 layout uses 64 squares before the border. Keep the bear squares distributed throughout the layout rather than adding all of the extra bears along one edge.
Can I make fewer teddy bear squares?
Yes. Replace any bear square with a plain square made from the same five-round pattern. The construction and joining method do not change.
Can I use only two colors?
Yes. A simple combination such as warm ivory and medium brown gives the blanket a more traditional teddy-bear look. Keep enough contrast between the bear head and its background so the face does not disappear into the square.
Do the teddy bear faces contain stuffing?
No. The heads, ears and muzzles are flat crochet pieces. Leaving out stuffing keeps the blanket easier to fold and prevents raised stuffed faces from making one section much thicker than the rest.
Can I use plastic safety eyes on the bears?
I recommend embroidered eyes for a baby blanket. The pattern uses embroidered eyes, nose and mouth so there are no plastic facial pieces attached to the bear squares.
Do I have to block every square?
No. If your squares already measure approximately 5 inches and match one another closely, you can join them without blocking. Blocking is most useful when several squares need small shape or size corrections.
Can I make the bear squares in different shades of brown?
Yes. Several brown shades can give the blanket a collected, woodland look while the repeated face construction keeps the design coordinated. Keep the muzzle lighter than the head so the nose and mouth remain easy to see.
Turn the Bear Blanket Into a Coordinated Handmade Baby Gift
The repeated teddy faces make this blanket easy to pair with smaller bear projects without making every piece look identical. A folded blanket can become the main piece in a handmade gift set, while the free crochet bear hat pattern repeats the rounded-ear look and the free crochet teddy bear pattern adds a larger keepsake piece.
For a smaller project in the same brown and tan palette, my free crochet bear rattle pattern adds a teddy bear head, embroidered face and natural wooden ring. Leftover yarn can also be used for the crochet bear appliqué pattern, which uses a full-body bear instead of the face-only motif on this blanket.
If you want another soft comfort project rather than a toy or accessory, see the brown bear lovey pattern or the teddy bear lovey crochet pattern. Both keep the bear theme going while giving the gift set a different shape and construction.
You can also browse my free crochet baby blanket patterns collection if you want a different blanket construction while keeping the project baby-gift friendly.
Make the Blanket Your Own Without Changing the Pattern
You do not need to redesign the square to give this blanket a different personality. The easiest changes are color, bear placement and the number of appliqué squares.
For a woodland nursery, try medium brown bears with sage, rust and warm ivory squares. For a quieter traditional look, use brown bears with ivory and one muted accent color. A more playful version can use several bear shades while keeping all of the muzzles the same tan color.
If you want the teddy faces to stand out more, keep the 12 bear squares exactly as written and simplify the plain squares to two closely related colors. If you prefer a more subtle blanket, reduce the number of bear squares and replace them with plain squares made from the same five-round base.
The important part is consistency. Keep every finished square close to 5 inches, keep the bear faces within the square edges and distribute the appliqué squares across the blanket before you begin joining.
That gives you plenty of room to change the look while keeping the construction dependable.
Final Crochet Bear Blanket Pattern Check
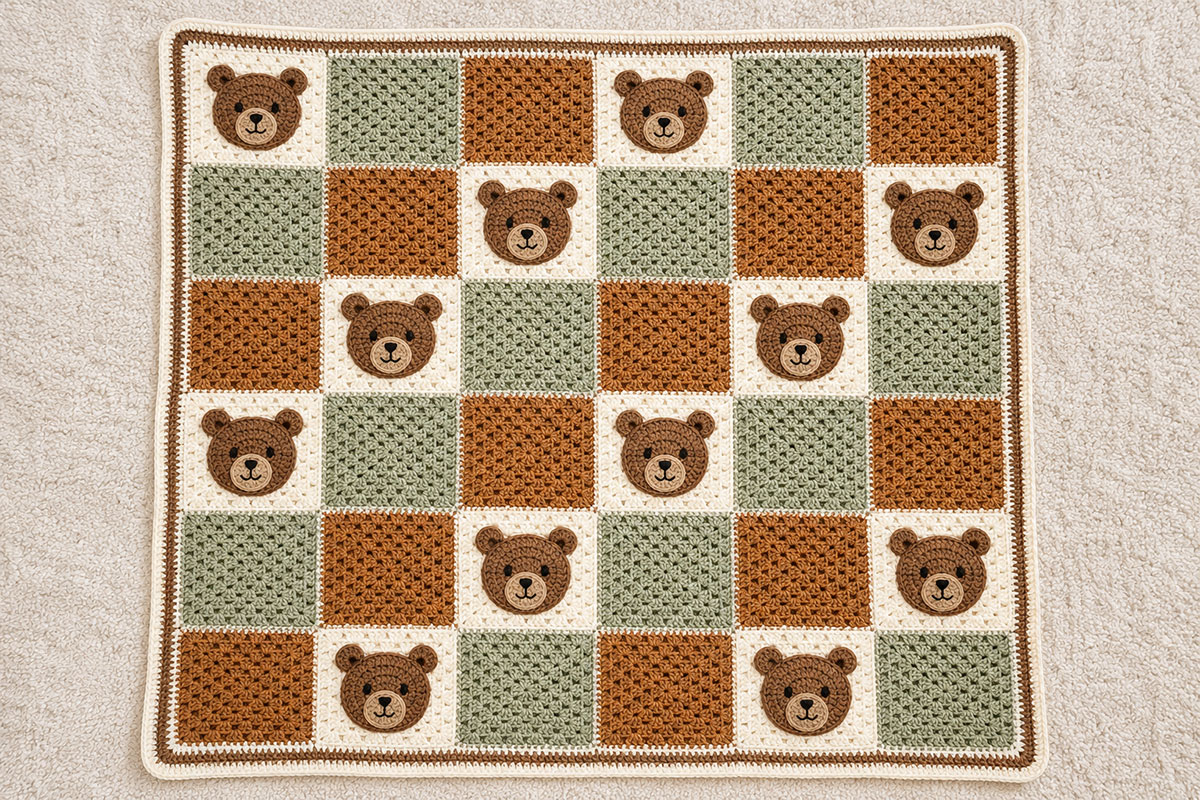
Before you put the blanket away or wrap it as a gift, spread it out one last time and look at the complete 6 by 6 grid.
The finished blanket should measure approximately 31 1/2 inches square, with 12 teddy bear faces distributed evenly among the sage and caramel squares. The three-round border should lie flat around all four sides.
Check that every bear face is securely attached, every embroidered feature is firmly anchored and no yarn tails remain loose on the back. The square intersections should meet without large gaps, and the seams should flex with the surrounding crochet rather than pulling the fabric inward.
A handmade blanket does not need every teddy face to be absolutely identical. Small differences in ear angle or embroidery give the bears character. What matters is that the construction is secure, the blanket lies comfortably flat and the repeating colors make the individual bears feel like part of one finished design.
Once those details are in place, your teddy bear blanket is ready for supervised cuddling, stroller outings, nursery display or a handmade baby gift.
When you click on links to various merchants on this site and make a purchase, this may result in this site earning a commission. This does not affect the price you pay.

UBGI Gold Standard 2026
Reviewed under the site's
editorial checklist.
Photos, decorating ideas, party setups and reader submissions are shared for inspiration unless a page is specifically presented as a pattern, tutorial, reference guide or step-by-step project. Follow the instructions, measurements, safety guidance and manufacturer directions provided for the particular project or product.
About Jan | Contact | Baby Nursery Ideas (Blog) | Site Map | Privacy Policy | Disclosure Policy | Disclaimer | Affiliate Disclosure | Earnings Disclosure | Facebook | Pinterest
I am a participant in the Amazon Services LLC Associates Program, an affiliate advertising program designed to provide a means for us to earn fees by linking to Amazon. As an Amazon Associate I earn from qualifying purchases.
Copyright © 2006-2026. All Rights Reserved.