Free Crochet Bear Appliqué Pattern for an Easy Teddy Bear Motif
By Jan Bay
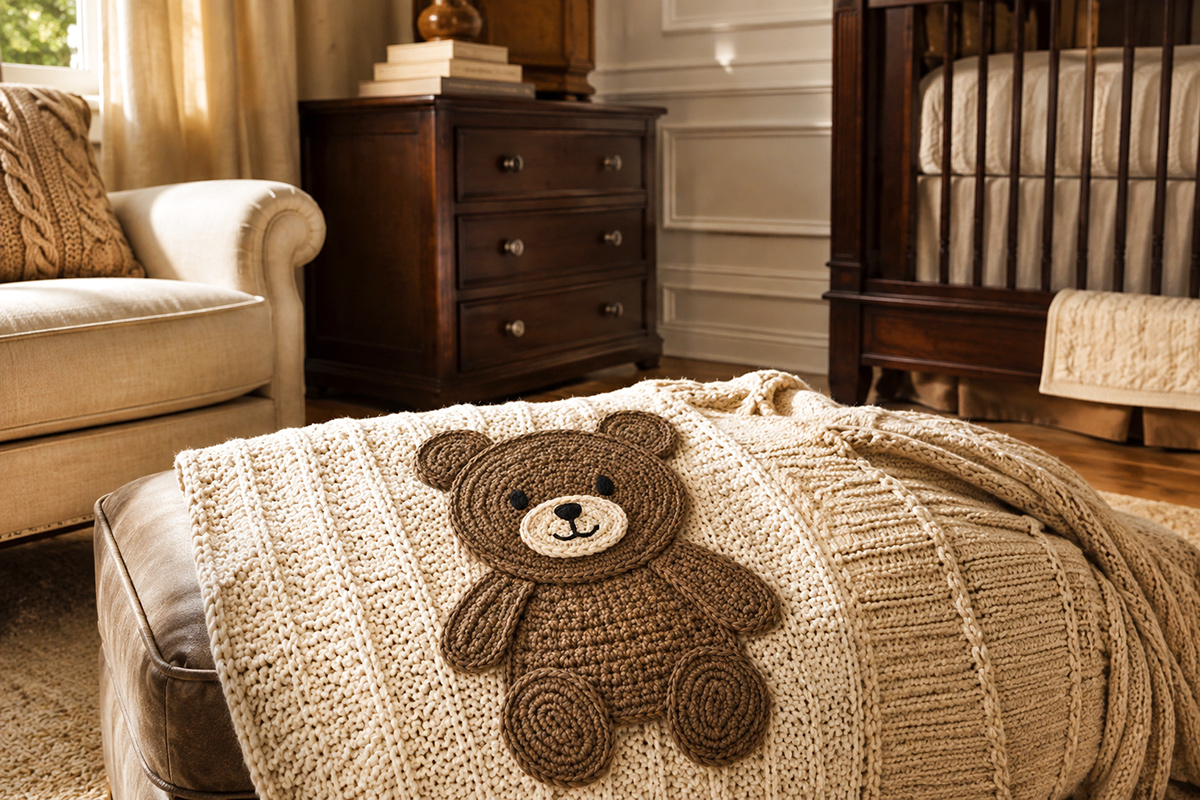
This free crochet bear applique pattern creates a flat teddy bear motif with a rounded head, small ears, cream muzzle, short flat arms, rounded feet and simple embroidered facial features. The finished bear is sized to work well on crocheted baby blankets, nursery wall hangings, banners and other handmade baby projects.
Explore More Free Crochet Bear Patterns
Free Crochet Teddy Bear Pattern
Free Crochet Bear Blanket Pattern
Supplies for This Crochet Bear Appliqué Pattern
Jump to the Crochet Bear Appliqué Pattern
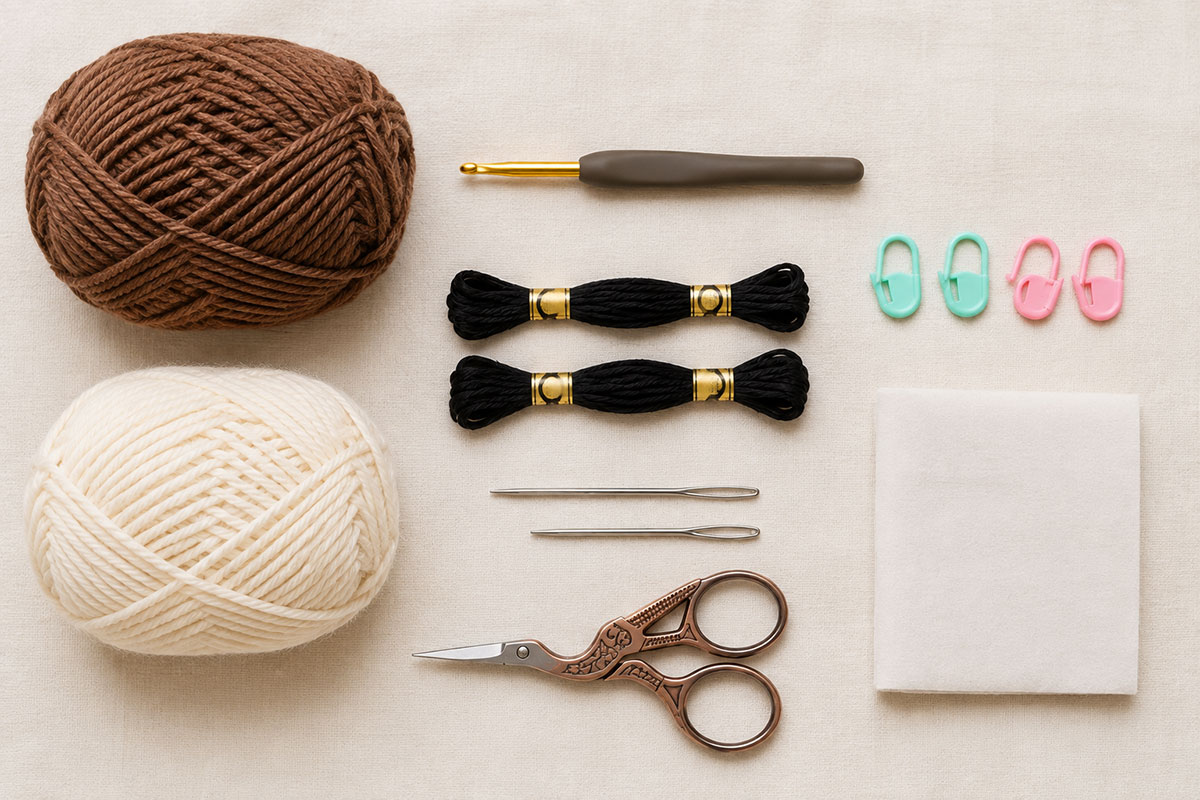
Supplies for This Free Crochet Bear Applique Pattern
This bear is made from separate flat crochet pieces, so you can position the face and limbs before sewing anything permanently. The construction also makes it easy to adjust the final expression without changing the basic bear shape.
The pattern is written in U.S. crochet terminology and uses medium-weight yarn. A smooth worsted-weight yarn gives the little muzzle, ears and paws enough definition to show clearly without making the appliqué bulky.
- Medium weight #4 yarn in medium brown: approximately 35 to 45 yards for the head, body, ears, arms and rounded feet
- Medium weight #4 yarn in cream or warm ivory: approximately 5 to 8 yards for the muzzle
- Dark brown or black embroidery floss: approximately 1 to 2 yards for the eyes, nose and mouth
- 4.0 mm (G-6) crochet hook, or the hook size needed to produce a firm flat fabric
- Yarn needle for assembly and weaving in ends
- Embroidery needle if your yarn needle is too large for the facial embroidery
- Scissors
- Ruler or tape measure
- Rustproof pins or removable stitch markers for positioning the pieces before sewing
Choose yarn colors with enough contrast for the muzzle to remain visible from several feet away. Medium brown with a cream muzzle gives the bear a familiar teddy-bear look, but the construction works equally well in tan, gray, ivory or another nursery-friendly combination.
Finished Size and Gauge
Skill level: Advanced beginner. You should already be comfortable making a magic ring, working single crochet increases and decreases, crocheting around both sides of a foundation chain, sewing flat crochet pieces together and making simple embroidered facial features.
With medium weight #4 yarn and a 4.0 mm hook at the stated gauge, the assembled bear should measure approximately 6 to 6 1/4 inches tall from the tops of the ears to the bottoms of the rounded feet. The finished width will vary with the arm angle, but expect approximately 4 1/2 to 5 1/2 inches across when the arms are positioned slightly outward.
Gauge is approximately 16 single crochet stitches and 18 rows = 4 inches. Exact gauge is not critical for an appliqué, but it does affect the finished size and proportions.
Pattern measurement note: The finished measurements on this page are expected measurements based on the stated gauge, stitch counts and assembly overlaps. Your finished size may vary slightly with yarn, hook and tension.
The body should measure close to 3 inches across at its widest point before assembly. The finished head should measure approximately 2 1/4 to 2 1/2 inches across. These two checkpoints are more useful than trying to make every small piece match an exact fraction of an inch.
If your pieces are much larger, try a smaller hook. If they are noticeably smaller, move up one hook size. Keep the fabric firm enough that the appliqué holds its outline when it is sewn onto a blanket or other project.
Crochet Abbreviations and Pattern Notes
- ch = chain
- sc = single crochet
- inc = work 2 sc in the same stitch
- dec = single crochet 2 stitches together
- sl st = slip stitch
- st = stitch
- sts = stitches
- rnd = round
- rep = repeat
The beginning ch 1 does not count as a stitch. For grouped body instructions such as Rows 5 and 6 and Rows 8 and 9, work the stated instruction once for each numbered row, making ch 1 and turning at the start of each row.
For each flat piece, choose the smoother-looking side as the front before weaving in any yarn tails. The opposite side is the back. Keep that front and back orientation consistent throughout assembly and finishing.
When you close a magic ring, pull the center snug enough to close the opening without making the piece cup. After Round 2, thread the starting tail onto a yarn needle, pass it beneath several stitches on the back of the piece, reverse direction through a different group of stitches, and weave it in securely. Do not rely only on the tightened ring to keep the center closed. All of the pieces in this pattern should remain flat.
Leave the longer yarn tails specified in the instructions. Those tails can be used to sew the pieces together, which reduces the number of extra ends that need to be woven through the finished appliqué.
Crochet the Flat Teddy Bear Body
The body begins at the lower edge, widens through the tummy and then narrows toward the shoulders. That shaping keeps the finished appliqué from looking like a stack of circles once the head and limbs are added.
With brown yarn, ch 9.
Row 1: Sc in the second ch from the hook and in each ch across. 8 sts.
Row 2: Ch 1, turn. Work 2 sc in the first st, sc in the next 6 sts, work 2 sc in the last st. 10 sts.
Row 3: Ch 1, turn. Sc in each st across. 10 sts.
Row 4: Ch 1, turn. Work 2 sc in the first st, sc in the next 8 sts, work 2 sc in the last st. 12 sts.
Rows 5 and 6: Ch 1, turn. Sc in each st across. 12 sts.
Row 7: Ch 1, turn. Dec over the first 2 sts, sc in the next 8 sts, dec over the last 2 sts. 10 sts.
Rows 8 and 9: Ch 1, turn. Sc in each st across. 10 sts.
Row 10: Ch 1, turn. Dec over the first 2 sts, sc in the next 6 sts, dec over the last 2 sts. 8 sts.
Row 11: Ch 1, turn. Sc in each st across. 8 sts.
Fasten off and weave in the yarn tail securely on the back of the body.
Lay the body flat and gently smooth the sides with your fingers. The wider portion becomes the tummy. The narrower 8-stitch edge at Row 11 is the top of the body and will sit partly behind the head.
Crochet the Round Bear Head
The head is worked as a flat circle. Keep your tension even through the increase rounds so the edge stays smooth rather than rippling.
With brown yarn, make a magic ring.
Round 1: Ch 1. Work 6 sc into the ring. Pull the ring closed and join with a sl st to the first sc. 6 sts.
Round 2: Ch 1. Work 2 sc in each st around. Join with a sl st to the first sc. 12 sts.
Round 3: Ch 1. *Sc in the next st, 2 sc in the next st.* Repeat from * to * around. Join with a sl st to the first sc. 18 sts.
Round 4: Ch 1. *Sc in each of the next 2 sts, 2 sc in the next st.* Repeat from * to * around. Join with a sl st to the first sc. 24 sts.
Round 5: Ch 1. *Sc in each of the next 3 sts, 2 sc in the next st.* Repeat from * to * around. Join with a sl st to the first sc. 30 sts.
Fasten off, leaving approximately an 18-inch tail.
The head should lie flat and measure approximately 2 1/4 to 2 1/2 inches across. If the final joining area is slightly more visible than the rest of the edge, place that portion at the bottom. The muzzle and body overlap will make it much less noticeable.
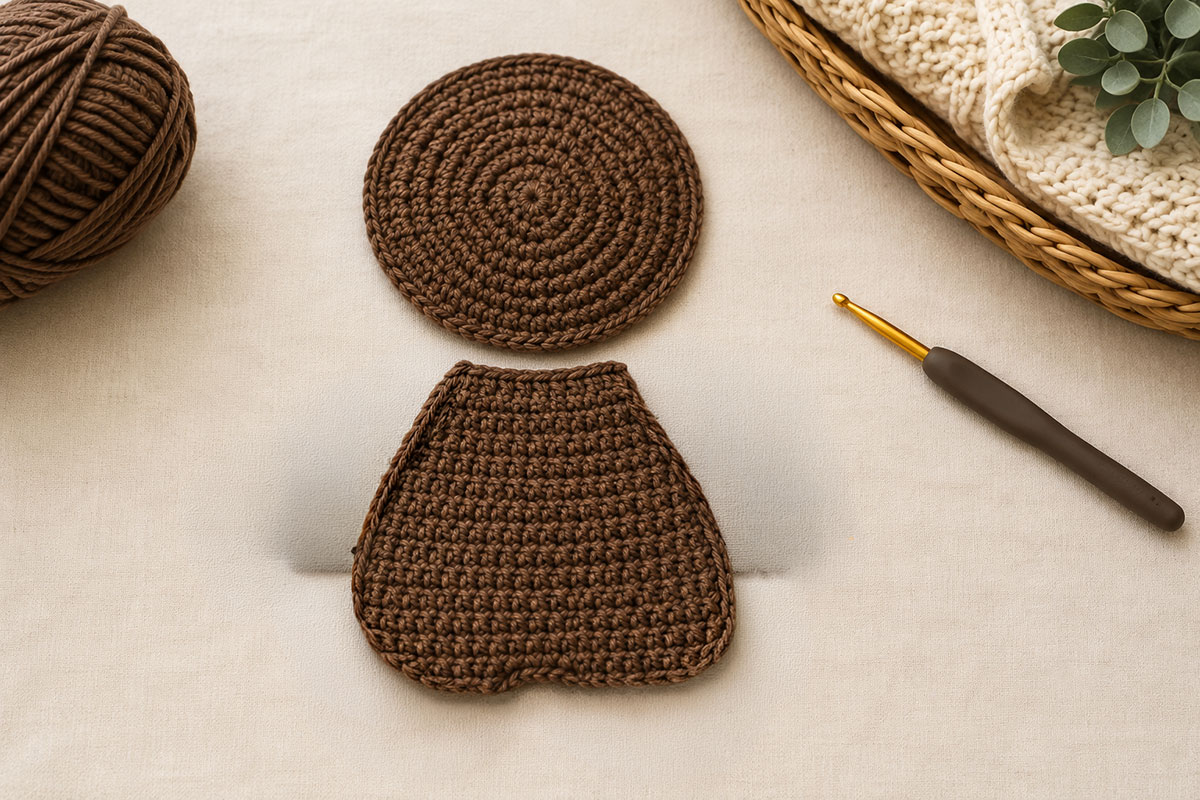
Before making the smaller pieces, place the head above the body with about 1/2 inch of overlap. You should already be able to see the basic teddy-bear proportion. If the head seems unusually large or small beside the body, correct the gauge now rather than trying to disguise the difference during assembly.
Crochet Bear Applique Pattern: Make the Ears and Muzzle
The small pieces give this flat bear its teddy-bear character. Keep both ears the same size, and make the muzzle as a low oval rather than a circle. That oval leaves enough room above it for the eyes and gives the face a softer proportion.
Make 2 Bear Ears
With brown yarn, make a magic ring.
Round 1: Ch 1. Work 6 sc into the ring. Pull the ring closed and join with a sl st to the first sc. 6 sts.
Round 2: Ch 1. Work 2 sc in each st around. Join with a sl st to the first sc. 12 sts.
Fasten off each ear, leaving a 10-inch tail for sewing.
Both ears should lie flat and measure close to 1 inch across. Place them beside each other before continuing. If one is noticeably larger, remake it rather than trying to correct the difference while sewing.
Make the Cream Bear Muzzle
With cream or warm ivory yarn, ch 6.
Round 1: Sc in the second ch from the hook and in each of the next 3 ch. Work 3 sc in the last ch. Turn the foundation chain so you can work along the opposite side. Sc in each of the next 3 unused loops. Work 2 sc in the same foundation ch that holds the first sc. Join with a sl st to the first sc. 12 sts.
Round 2: Ch 1. Work 2 sc in the first st, sc in each of the next 3 sts, 2 sc in each of the next 3 sts, sc in each of the next 3 sts, and 2 sc in each of the last 2 sts. Join with a sl st to the first sc. 18 sts.
Fasten off, leaving a 12-inch tail.
Gently shape the muzzle into an oval with your fingers. The foundation chain should run horizontally when the muzzle is placed on the bear's face.
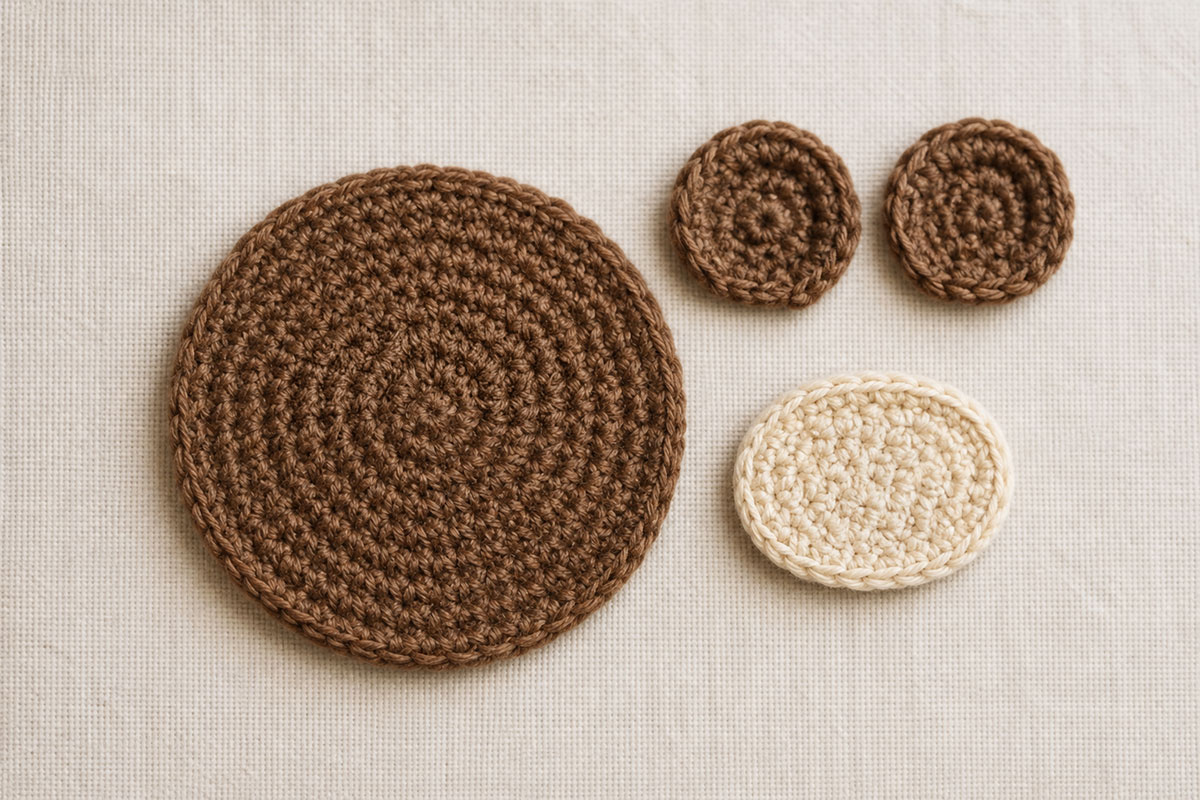
Set the muzzle on the lower half of the head without sewing it yet. Leave enough brown fabric below the muzzle for a narrow chin and enough space above it for the embroidered eyes. Moving the muzzle even a few stitches higher or lower changes the expression, so it is worth checking the placement before you pick up the yarn needle.
Crochet the Bear Arms and Rounded Feet
The arms are worked as narrow flat ovals, while the two separate rounded feet give the lower edge of the appliqué a softer teddy-bear shape. All four pieces remain completely unstuffed and are sewn partly behind the body during assembly.
The arms are worked as short narrow ovals, while the two separate rounded feet give the lower edge of the appliqué a softer teddy-bear shape. All four pieces remain flat and are sewn partly behind the body during assembly.
Make 2 Arms
With brown yarn, ch 4.
Round 1: Sc in the second ch from the hook and in the next ch. Work 3 sc in the last ch. Turn the foundation chain so you can work along the opposite side. Sc in the next unused loop. Work 2 sc in the same foundation ch that holds the first sc. Join with a sl st to the first sc. 8 sts.
Round 2: Ch 1. Work 2 sc in the first st, sc in the next st, 2 sc in each of the next 3 sts, sc in the next st, and 2 sc in each of the last 2 sts. Join with a sl st to the first sc. 14 sts.
Fasten off, leaving a 12-inch tail for sewing.
Repeat for the second arm. Place the two finished arms together and confirm that both contain 14 stitches in the final round and are the same size. Keep the foundation chain running lengthwise through each arm. Do not add stuffing.
Make 2 Rounded Feet
With brown yarn, make a magic ring.
Round 1: Ch 1. Work 6 sc into the ring. Pull the ring closed and join with a sl st to the first sc. 6 sts.
Round 2: Ch 1. Work 2 sc in each st around. Join with a sl st to the first sc. 12 sts.
Round 3: Ch 1. *Sc in the next st, 2 sc in the next st.* Repeat from * to * around. Join with a sl st to the first sc. 18 sts.
Fasten off, leaving a 12-inch tail for sewing.
Repeat for the second foot. Place the two finished feet together and confirm that both contain 18 stitches in the final round and are the same size before assembly.
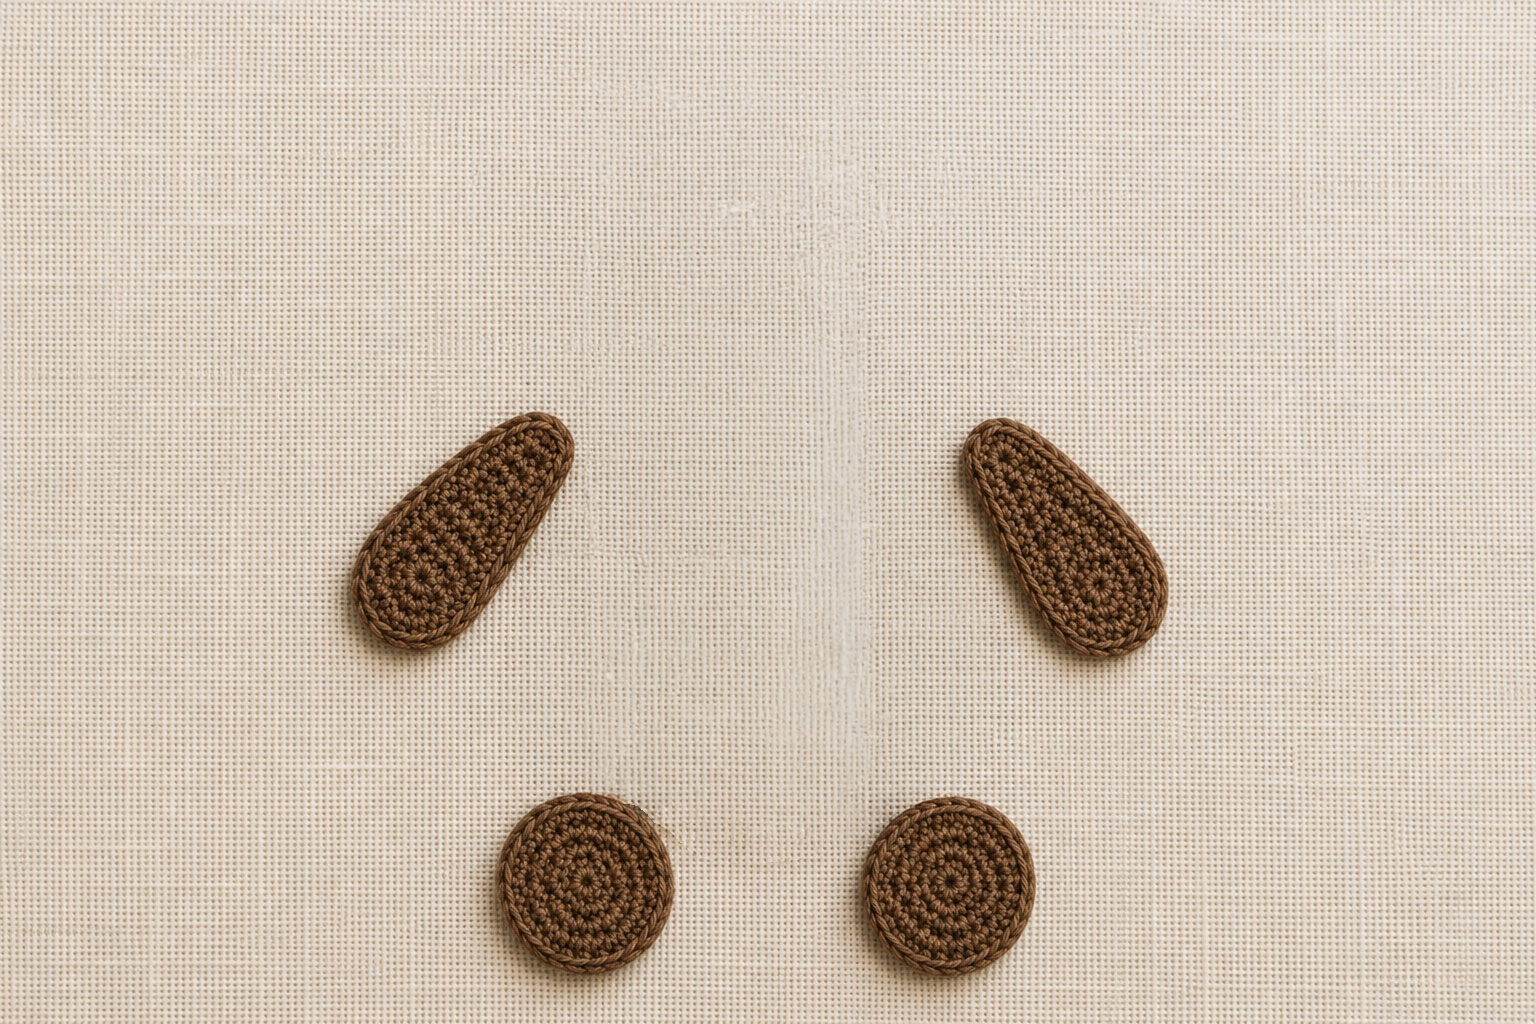
Each foot should form a compact flat circle that is slightly larger than one ear. Do not add stuffing. Smooth the circles with your fingers before assembly, but do not stretch them into long ovals.
Piece count before assembly: You should have 9 flat crochet pieces: 1 body, 1 head, 2 ears, 1 cream muzzle, 2 arms and 2 rounded feet.
Assemble the Flat Crochet Teddy Bear Appliqué
Do a complete dry layout before sewing. A few minutes spent moving the pieces now can prevent a crooked head, uneven ears or one rounded foot that sits noticeably higher than the other after everything is attached.
Set the ears and muzzle together before sewing either one down. This is one of those small placement decisions that changes the whole bear: the silhouette should already read clearly as a teddy before the embroidered eyes and nose are added.
Before sewing the pieces together, weave in the short beginning tails on the back of the body, muzzle and both arms. The magic-ring beginning tails on the head, ears and rounded feet should already be secured as described in the Pattern Notes. Leave the specified long sewing tails in place for assembly.
- Place the body first. Keep the 8-stitch Row 11 edge at the top and the wider tummy toward the bottom.
- Position the head. Center it over the body with approximately 1/2 inch of the lower head overlapping the upper body.
- Add the ears. Slide approximately the lower third of each ear behind the head. Position them near the upper left and upper right sides rather than directly on top of the head.
- Add the arms. Place one flat oval arm behind each side of the upper body. Tuck approximately the upper 1/4 inch of each arm behind the body and angle the long direction slightly downward and outward. Keep the visible portions level with each other.
- Add the rounded feet. Tuck approximately the upper 1/4 inch of each foot behind the lower body. Keep the feet level with each other and leave a small gap between them. Most of each round foot should remain visible below the tummy so the lower silhouette reads clearly as two separate teddy-bear feet.
- Position the muzzle. Center the cream oval across the lower half of the face. Keep the long direction of the oval horizontal.
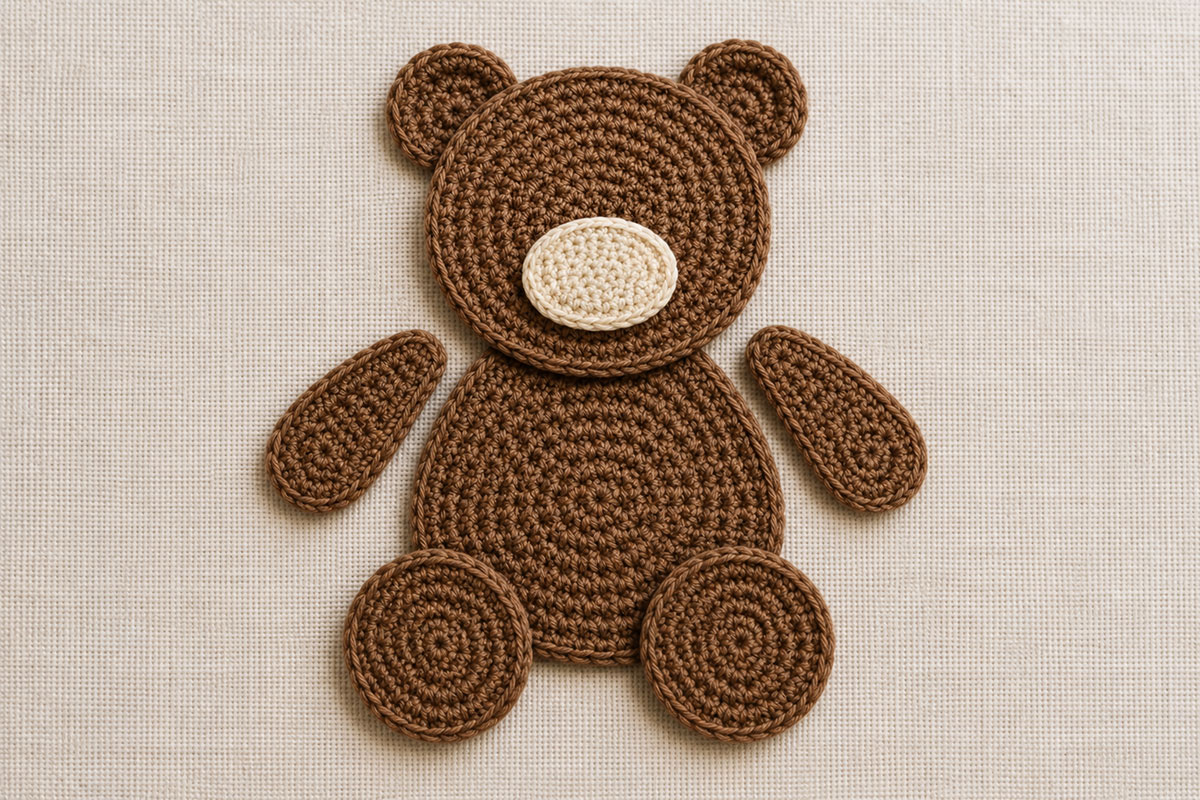
Measure the layout before sewing. The bear should be approximately 6 to 6 1/4 inches from the tops of the ears to the bottoms of the rounded feet. Depending on the arm angle, expect an overall width of approximately 4 1/2 to 5 1/2 inches. Check the bear from a little farther away, too. It is easier to spot an ear that sits too high, a foot that sits too low or an arm that angles differently when you look at the entire silhouette instead of one seam at a time.
Sew the Pieces Together
Thread a yarn needle with the tail from one ear. Sew the hidden portion of the ear securely to the back of the head with small stitches. Keep your stitches inside the edge of the head so they do not show prominently from the front. Repeat with the second ear.
Use the muzzle tail to sew around the outside edge of the cream oval. Keep the muzzle flat as you work. Do not pull the sewing yarn tightly enough to make the head pucker.
Use the head tail to sew the overlapping lower edge of the head securely to the upper body.
Sew the hidden upper end of each flat arm securely to the back of the body while keeping the visible oval flat. For each rounded foot, sew the hidden upper arc securely to the back of the lower body while keeping the visible circle flat. Add a second small securing stitch near the upper inside edge of any piece that wants to lift.
Weave in the assembly tails on the back, but leave the surface as flat as possible. Thick knots can create bumps when the appliqué is later sewn onto a blanket.
Embroider the Teddy Bear Face
The face uses embroidery rather than buttons, beads or plastic eyes. The simple stitched features also keep the front of the appliqué flat.
Thread the embroidery needle with dark brown or black embroidery floss. Start from the back of the head and bring the needle through at the first eye position.
Place the eyes approximately 1/4 to 3/8 inch above the upper edge of the muzzle. Space the centers of the eyes approximately 3/4 inch apart.
Make each eye with 3 or 4 short satin stitches placed close together. Aim for an oval approximately 1/4 inch tall. Count your stitches on the first eye so you can repeat the same number on the second.
For the nose, make several horizontal satin stitches near the upper center of the cream muzzle. Build a small rounded triangle or shallow oval approximately 3/8 inch wide.
Bring one short vertical stitch down from the center of the nose. Add one short diagonal stitch toward each side to form a simple mouth.
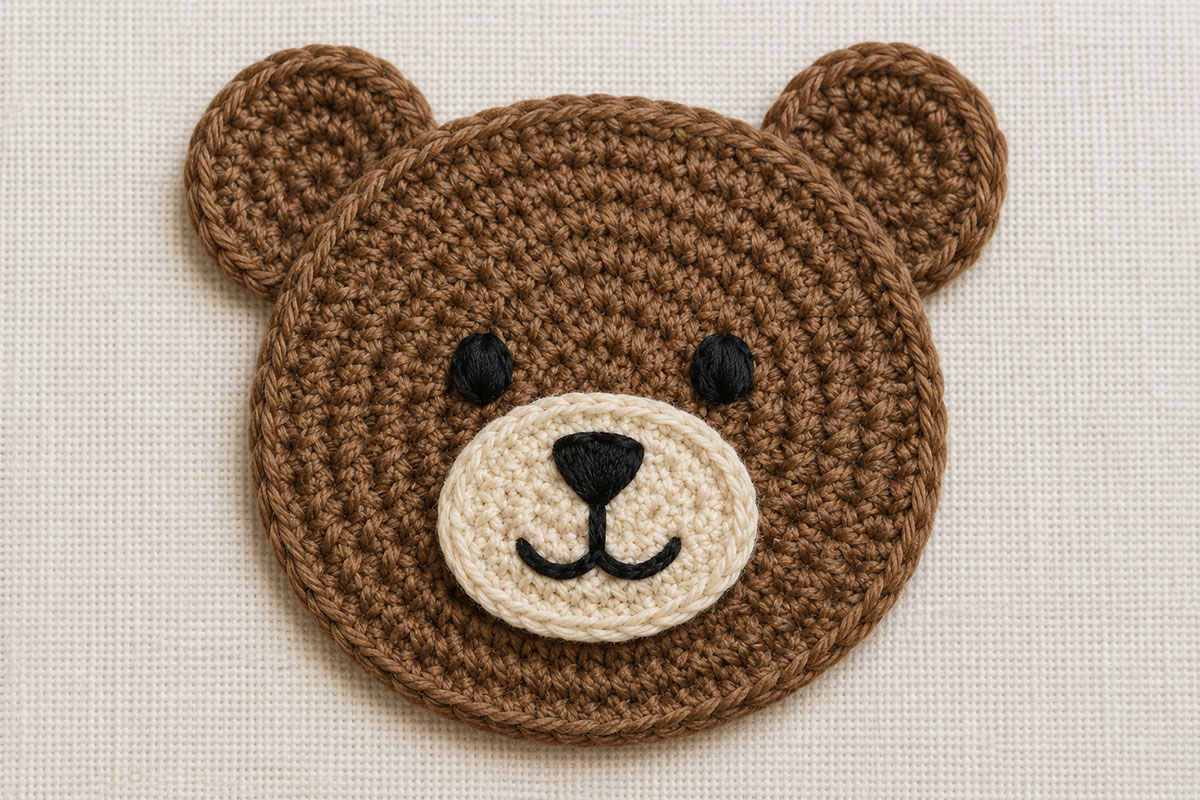
Turn the bear over and secure the embroidery ends on the back. Weave each end through several nearby stitches before trimming it. The front should show only the intended facial stitches.
If the expression looks uneven, adjust it before attaching the bear to another project. Removing two embroidery stitches is much easier while the appliqué is still separate.
How to Attach the Bear Appliqué to a Baby Blanket
A finished appliqué can be sewn to a crocheted blanket, fabric wall hanging or another handmade project. For a coordinated crochet project, the crochet bear blanket pattern gives you another way to carry the teddy-bear theme into a handmade baby gift.
Place the completed bear on the project and check the position before threading your needle. On a blanket, leave enough open space around the motif that the bear reads as a complete shape instead of running into a border or another decorative element.
- Pin the appliqué in several places with rustproof pins, or hold it with removable stitch markers if you are attaching it to crochet.
- Thread a yarn needle with yarn that matches the brown outer pieces.
- Begin at the back of the base project so the first yarn end remains hidden.
- Sew around the outer edge of the bear with small, evenly spaced stitches.
- Catch only enough of the base fabric to hold the appliqué securely. Do not pull the stitches tightly enough to gather the blanket.
- Add discreet securing stitches beneath the chin, at the shoulders and near the tops of the rounded feet. These areas can lift even when the outside edge has already been sewn.
- Check the cream muzzle. If any portion can be lifted easily, add another small stitch with matching cream yarn.
- Secure and weave in every yarn end on the back of the project.
Run your fingers around the finished bear and check every ear, limb and edge. Nothing should hang loosely from the surface. The face should contain only secure embroidery, with no detachable eyes, buttons or other small embellishments.
If you enjoy making flat animal motifs for blankets and nursery projects, the free crochet animal applique patterns collection has more designs that can be used in the same way.
Using a Handmade Bear Blanket Safely
A crochet appliqué can turn a handmade blanket into a sweet keepsake, but a decorative baby blanket is not crib bedding for an infant. The American Academy of Pediatrics recommends keeping loose blankets and other soft objects out of an infant's sleep space. You can read the current AAP safe sleep guidance at HealthyChildren.org.
For a handmade baby gift, it also makes sense to inspect the appliqué after washing. Check the outer seam, the embroidered face and every attached piece before the blanket is used again.
Care for a Project with a Crochet Bear Appliqué
Follow the washing and drying directions for the yarn and the base project. When different fibers are used together, follow the care method required by the more delicate material.
Before laundering, check that the appliqué edges are secure. After washing, reshape the bear while the project is still damp if needed and lay the appliqué flat so the ears and limbs dry in their intended positions.
Avoid ironing directly over acrylic yarn or embroidered facial features. Heat tolerance varies by fiber, so check the yarn manufacturer's care instructions before using heat.
Free Crochet Bear Appliqué Pattern FAQ
Can I make this bear appliqué with DK yarn?
Yes. DK yarn and a hook appropriate for that yarn will make a smaller bear. Make all of the pieces with the same yarn weight so the head, body and limbs keep the intended proportions.
How can I make the crochet bear appliqué larger?
The simplest method is to use a heavier yarn and an appropriately larger hook. Changing individual stitch counts can alter the proportions, so increasing the yarn and hook size together is easier than adding random rounds or rows.
Do I need to block the bear pieces?
Blocking is optional. If the pieces lie reasonably flat after crocheting, smooth and shape them by hand before assembly. If you choose to block them, use a method suitable for the fiber listed on the yarn label.
Why is my bear head curling instead of lying flat?
First check the stitch counts for all five head rounds: 6, 12, 18, 24 and 30 stitches. A missed increase can make the circle cup. Tension that is much tighter than the pattern gauge can also affect the shape.
Why is the head rippling around the edge?
Check that you did not add extra increases. The final round should contain 30 stitches. If the count is correct but the edge still ripples, your tension may be looser than the pattern gauge.
Can I use plastic safety eyes instead of embroidery?
For this flat design, embroidered eyes are the better choice. They keep the appliqué flatter and avoid adding detachable decorative parts to a project intended for a baby.
What can I make with a crochet bear appliqué?
The finished motif can be sewn onto a baby blanket, nursery wall hanging, handmade banner, fabric gift bag or other flat craft project. You can also use the same brown and cream colors alongside the free crochet teddy bear pattern to create a coordinated handmade gift.
Final Bear Appliqué Check
Before calling the project finished, compare your bear with these points:
- The finished appliqué measures approximately 6 to 6 1/4 inches tall, with the overall width varying from about 4 1/2 to 5 1/2 inches according to the arm angle.
- The head lies flat and contains 30 stitches in the final round.
- Both ears are the same size and sit at approximately the same height.
- The cream muzzle is centered horizontally on the lower half of the face.
- The embroidered eyes are similar in size and placement.
- Both arms contain 14 stitches in the final round and match in size, and both rounded feet contain 18 stitches in the final round and match in size.
- The head overlaps the body securely.
- All yarn and embroidery tails are woven in securely.
- No loose loops, detachable eyes, buttons or beads remain on the appliqué.
- All rustproof pins and removable stitch markers have been removed before the finished project is used or gifted.
- If the bear is attached to another project, every outer edge and joining point is secure.
Once those details are in place, the little bear has what it needs: a clear teddy shape, a face that reads easily, and a flat construction that can become part of the project rather than sitting heavily on top of it.
When you click on links to various merchants on this site and make a purchase, this may result in this site earning a commission. This does not affect the price you pay.

UBGI Gold Standard 2026
Reviewed under the site's
editorial checklist.
Photos, decorating ideas, party setups and reader submissions are shared for inspiration unless a page is specifically presented as a pattern, tutorial, reference guide or step-by-step project. Follow the instructions, measurements, safety guidance and manufacturer directions provided for the particular project or product.
About Jan | Contact | Baby Nursery Ideas (Blog) | Site Map | Privacy Policy | Disclosure Policy | Disclaimer | Affiliate Disclosure | Earnings Disclosure | Facebook | Pinterest
I am a participant in the Amazon Services LLC Associates Program, an affiliate advertising program designed to provide a means for us to earn fees by linking to Amazon. As an Amazon Associate I earn from qualifying purchases.
Copyright © 2006-2026. All Rights Reserved.