Free Crochet Teddy Bear Pattern for an Easy Low-Sew Plushie
By Jan Bay
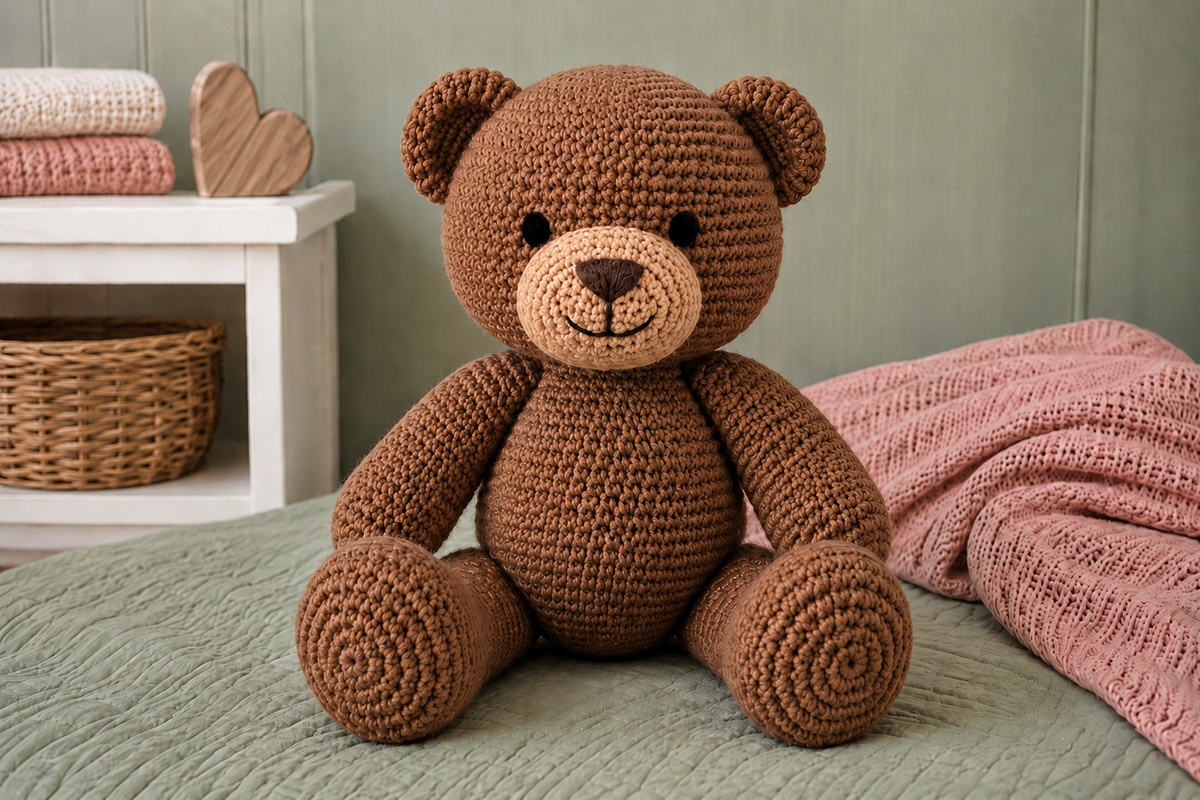
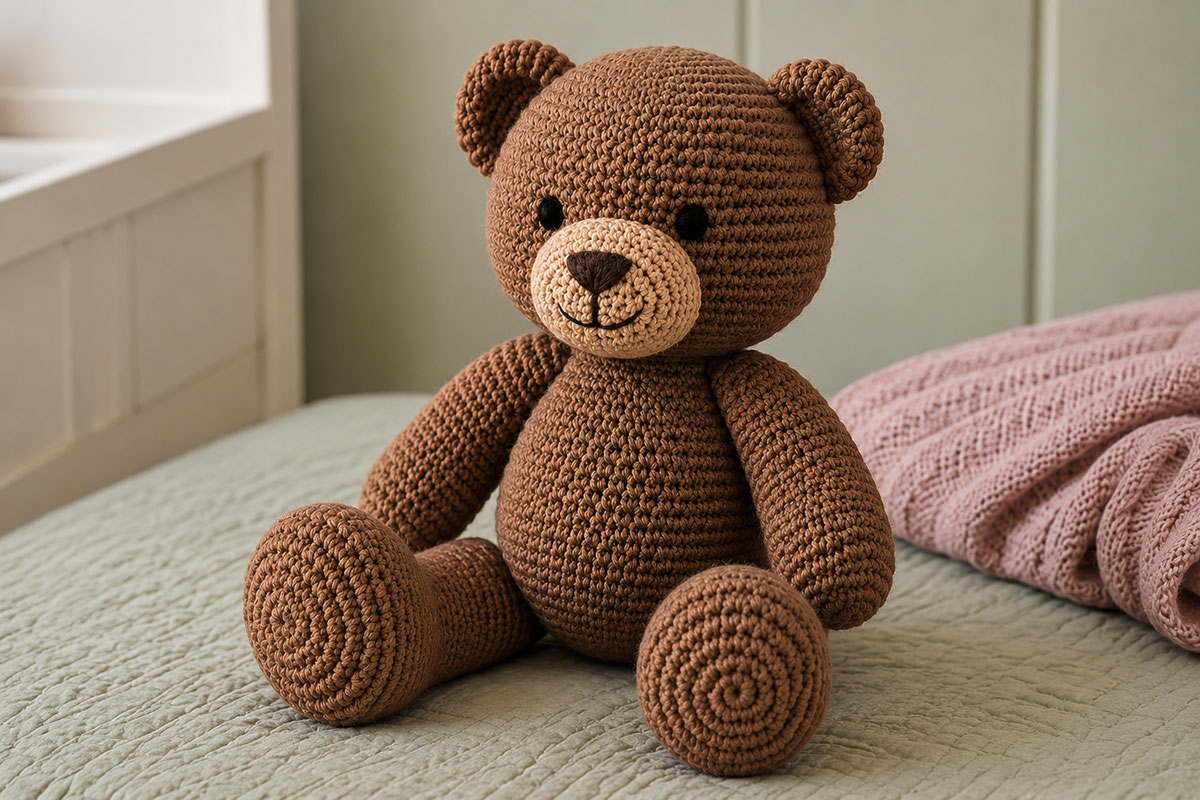
This free crochet teddy bear pattern makes a classic stuffed bear with rounded ears, a shaped muzzle, proportioned arms and legs, slightly larger paws and embroidered facial features. The low-sew construction keeps the project manageable while still giving the finished bear the familiar shape and personality of a traditional teddy.
Explore More Free Crochet Baby Patterns
See Yarn and Crochet Supplies for This Teddy Bear Pattern
Jump to a Section
Supplies for the Crochet Teddy Bear
This bear is designed for smooth medium-weight yarn rather than thick chenille. A firmly crocheted worsted yarn gives the face, rounded ears and larger paws enough definition to keep the finished project looking like a traditional teddy.
I prefer a warm medium brown for the body with a lighter tan or caramel muzzle. The contrast around the face gives the bear much more expression without adding clothing or decorative pieces.
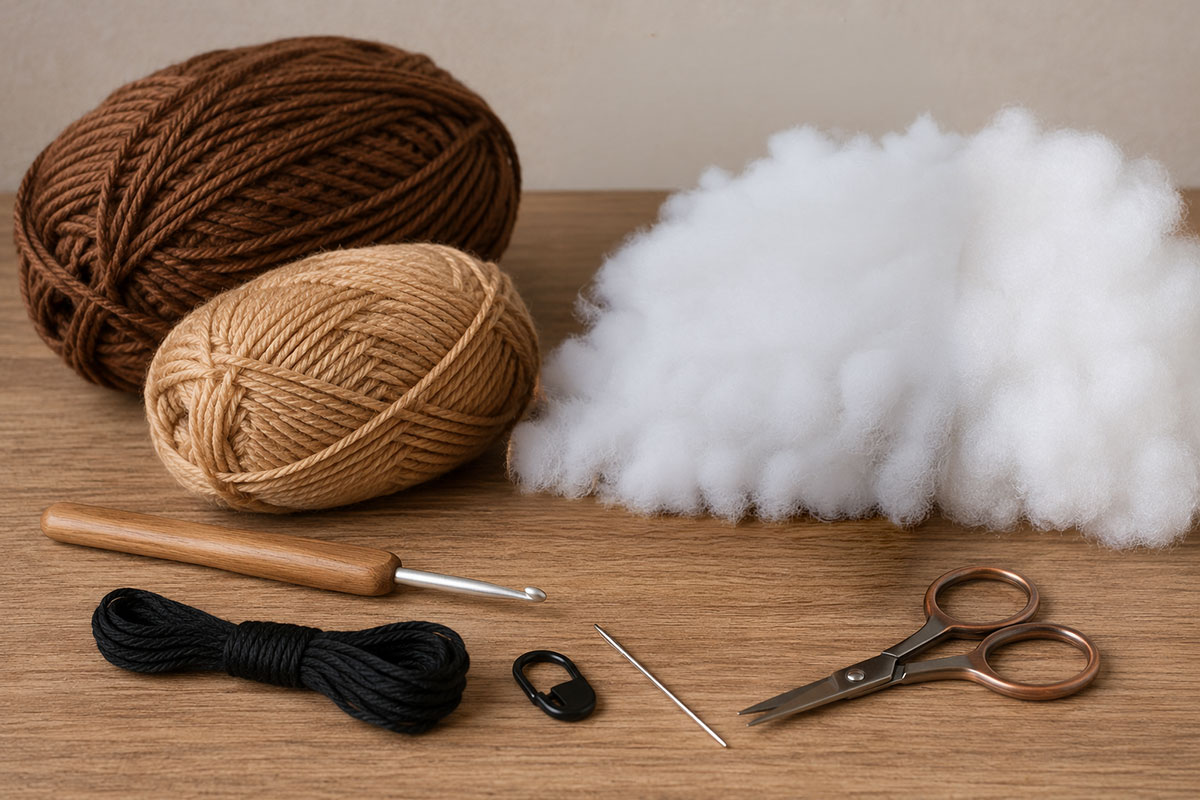
- Approximately 300 to 350 yards of worsted weight #4 yarn in medium brown for the body, head, arms, legs and ears
- Approximately 30 to 40 yards of worsted weight #4 yarn in warm tan or caramel for the muzzle
- Small amount of dark brown yarn or embroidery floss for the nose and mouth
- Black embroidery floss or thin black yarn for the eyes
- 4 mm crochet hook, or the hook size needed to make a firm fabric with no stuffing showing
- Polyester fiberfill
- Locking stitch marker
- Tapestry needle
- Scissors
- Optional straight pins for positioning the muzzle, ears and limbs before sewing
There are no plastic safety eyes or buttons in this pattern. The eyes, nose and mouth are embroidered so all of the facial details stay flat and securely stitched.
If you would rather make a bear attached to a small comfort blanket, my teddy bear lovey crochet pattern is a separate project with its own construction and finishing instructions.
Finished Teddy Bear Size and Gauge
Skill level: Comfortable beginner. You should already be able to make a magic ring, work single crochet in continuous rounds, increase, decrease and sew crochet pieces securely.
With worsted weight yarn and a 4 mm hook, the finished teddy measures approximately 13 to 14 inches from the top of the ears to the ends of the feet when the legs are extended. Seated, he is about 10 to 11 inches tall.
The exact finished size can change with yarn thickness, hook size, stuffing and personal tension. A small difference is not important as long as the crochet fabric is firm enough to hold the stuffing.
Approximate gauge: 18 single crochet stitches and 20 rows = 4 inches in single crochet.
Gauge is less important for this project than fabric density. If you can see obvious spaces between the stitches when the piece is lightly stretched, change to a smaller hook before continuing.
Stuff the bear firmly enough to hold his shape, but do not pack the fiberfill so tightly that the stitches spread apart. The head should stay rounded, the belly should remain softly plump and the paws should keep their circular shape.
Crochet Abbreviations
This pattern uses standard U.S. crochet terminology.
- magic ring = adjustable starting loop worked in the round
- ch = chain
- sc = single crochet
- inc = work 2 single crochet stitches in the same stitch
- dec = single crochet decrease over the next 2 stitches
- sl st = slip stitch
- st = stitch
- sts = stitches
- rnd = round
- rep = repeat
Work the body, head, muzzle, arms, legs and ears in continuous rounds unless the instructions say otherwise. Do not join at the end of each round. Place a locking stitch marker in the first stitch and move it up as you complete each round.
Secure every magic ring before the piece is stuffed or closed. After Round 2, pull the starting tail firmly, thread it onto the tapestry needle, weave it beneath several stitches on the inside, reverse direction through a second group of stitches and pull it snug again. Leave the secured tail inside stuffed pieces. For the unstuffed ears, weave the tail securely into the inside surface before trimming it.
For decreases, an invisible single crochet decrease gives the smoothest surface. Insert the hook through the front loop of each of the next 2 stitches, yarn over, pull through the front loops, then finish the single crochet.
Crochet Teddy Bear Pattern: Body and Head
The body and head are worked as one continuous piece. This removes the neck seam and cuts down on assembly while still allowing the bear to have a defined chest, short neck and larger rounded head.
Use the medium brown yarn.
Body
- Rnd 1: Make a magic ring and work 6 sc into the ring. (6)
- Rnd 2: Inc in each st around. (12)
- Rnd 3: *Sc in next st, inc in next st.* Rep around. (18)
- Rnd 4: *Sc in next 2 sts, inc in next st.* Rep around. (24)
- Rnd 5: *Sc in next 3 sts, inc in next st.* Rep around. (30)
- Rnd 6: *Sc in next 4 sts, inc in next st.* Rep around. (36)
- Rnd 7: *Sc in next 5 sts, inc in next st.* Rep around. (42)
- Rnd 8: *Sc in next 6 sts, inc in next st.* Rep around. (48)
- Rnds 9 through 16: Sc in each st around. (48)
- Rnd 17: *Sc in next 6 sts, dec.* Rep around. (42)
- Rnd 18: *Sc in next 5 sts, dec.* Rep around. (36)
- Rnd 19: *Sc in next 4 sts, dec.* Rep around. (30)
- Rnd 20: *Sc in next 3 sts, dec.* Rep around. (24)
- Rnds 21 and 22: Sc in each st around. (24)
Begin stuffing the lower body before the opening becomes smaller. Add the fiberfill in several small amounts instead of pushing in one large piece. Keep the lower belly rounded without making the base hard.
Do not fasten off. Continue directly into the head.
Head
- Rnd 23: *Sc in next 3 sts, inc in next st.* Rep around. (30)
- Rnd 24: *Sc in next 4 sts, inc in next st.* Rep around. (36)
- Rnd 25: *Sc in next 5 sts, inc in next st.* Rep around. (42)
- Rnd 26: *Sc in next 6 sts, inc in next st.* Rep around. (48)
- Rnd 27: *Sc in next 7 sts, inc in next st.* Rep around. (54)
- Rnd 28: *Sc in next 8 sts, inc in next st.* Rep around. (60)
- Rnds 29 through 38: Sc in each st around. (60)
- Rnd 39: *Sc in next 8 sts, dec.* Rep around. (54)
- Rnd 40: *Sc in next 7 sts, dec.* Rep around. (48)
- Rnd 41: *Sc in next 6 sts, dec.* Rep around. (42)
- Rnd 42: *Sc in next 5 sts, dec.* Rep around. (36)
- Rnd 43: *Sc in next 4 sts, dec.* Rep around. (30)
- Rnd 44: *Sc in next 3 sts, dec.* Rep around. (24)
Stuff the head before completing the final decrease rounds. Push small amounts of fiberfill toward the sides and lower front of the head so the shape stays evenly rounded. Leave the center front smooth because the separate muzzle will be sewn over that area later.
- Rnd 45: *Sc in next 2 sts, dec.* Rep around. (18)
- Rnd 46: *Sc in next st, dec.* Rep around. (12)
- Rnd 47: Dec around. (6)
Fasten off, leaving a tail. Thread the tail through the front loops of the remaining 6 stitches, pull the opening closed and secure the yarn inside the head.
When the piece is stuffed, the body should be narrower than the head with a short neck between them. The head should be broad and softly rounded rather than tall or pointed.
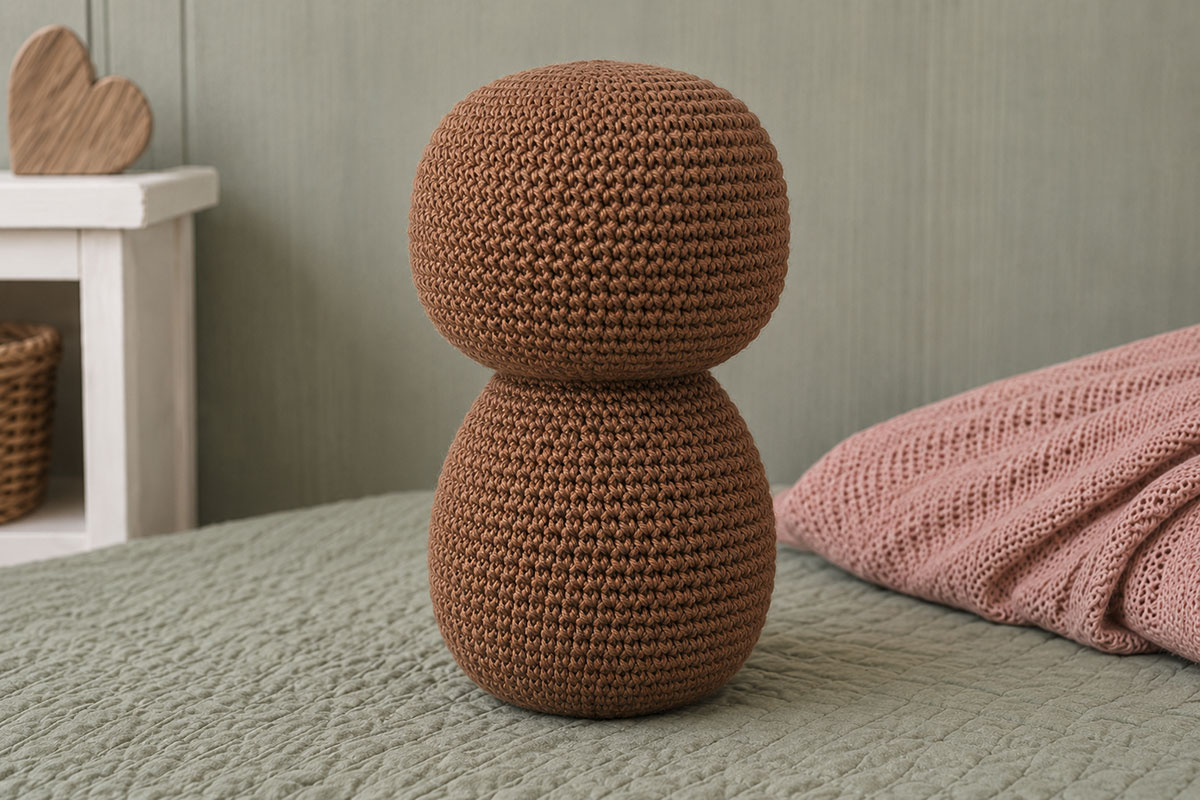
At this stage the piece may look very plain. That is expected. The lighter muzzle, lower-set ears and larger paws are what turn the basic shape into the classic teddy shown in the example image.
Crochet the Shaped Teddy Bear Muzzle
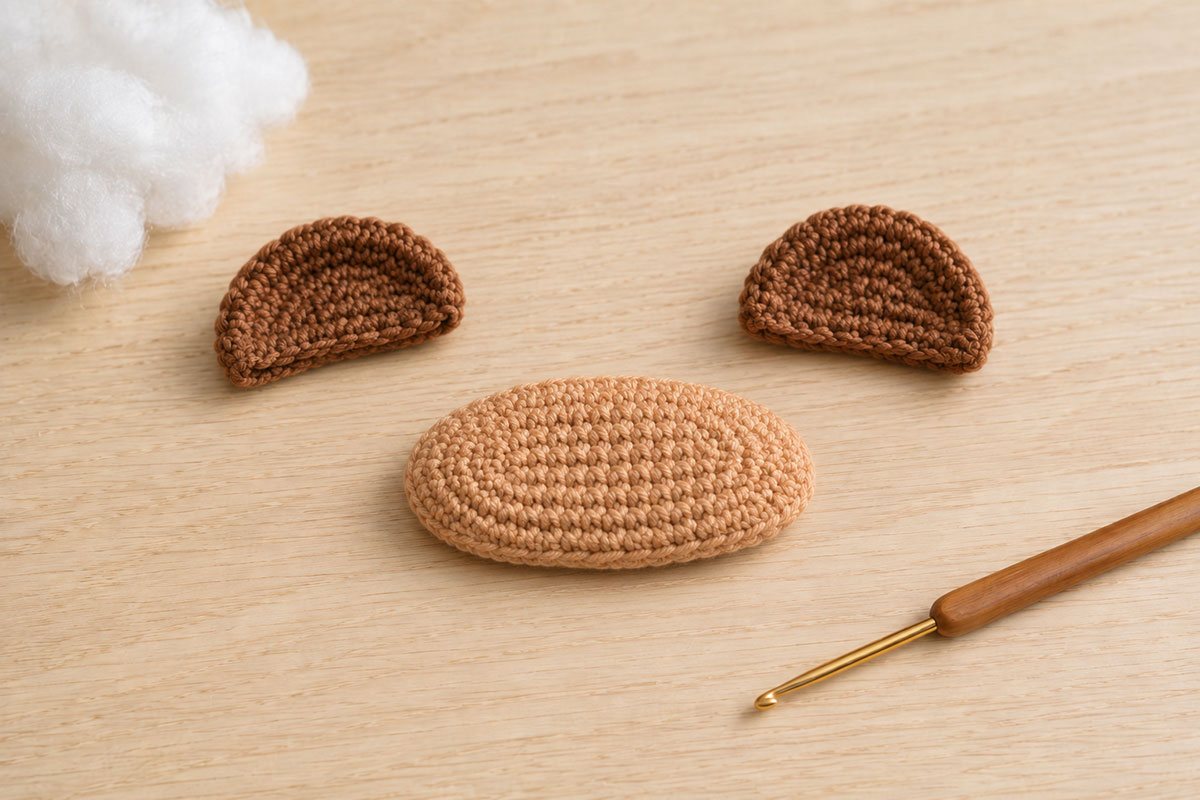
The lighter muzzle is a small detail, but it changes the whole expression of the bear. Instead of a narrow snout that projects from the face, this one is made as a wide oval and only lightly stuffed. Once it is sewn in place, it should look soft and rounded without pointing forward.
Use the warm tan or caramel yarn.
- Rnd 1: Ch 7. Beginning in the second ch from the hook, sc in the next 5 ch, work 3 sc in the last ch, continue along the opposite side of the foundation chain, sc in the next 4 ch, then work 2 sc in the last ch. (14)
- Rnd 2: Inc in the first st, sc in the next 4 sts, inc in each of the next 3 sts, sc in the next 4 sts, inc in each of the last 2 sts. (20)
- Rnds 3 and 4: Sc in each st around. (20)
Fasten off, leaving a long tail for sewing.
Add only a small amount of fiberfill. The muzzle should hold its shape but still flatten easily against the front of the head.
Before sewing, place the muzzle horizontally across the lower center of the face. Pin it in position and look at the bear from directly in front. If the muzzle looks too round, gently stretch it from side to side before you begin sewing.
The upper edge should sit below the eyes rather than crowding them. The lower edge can extend slightly onto the lower half of the head. That placement leaves enough room for the small embroidered nose and mouth while keeping the face open and friendly.
Make Two Rounded Teddy Bear Ears
The ears are made as small unstuffed cups. When they are flattened and sewn to the sides of the head, they stay rounded without becoming bulky.
Use the medium brown yarn. Make 2.
- Rnd 1: Make a magic ring and work 6 sc into the ring. (6)
- Rnd 2: Inc in each st around. (12)
- Rnd 3: *Sc in next st, inc in next st.* Rep around. (18)
- Rnds 4 and 5: Sc in each st around. (18)
Fasten off, leaving a long tail for sewing. Do not stuff the ears.
Flatten each ear gently so it forms a rounded half-cup. Do not crease it sharply. The ear should still have a little depth when viewed from the front.
Place the ears on the upper sides of the head rather than directly on top. I prefer them slightly lower because the bear looks more like a traditional teddy and less like a round amigurumi animal with ears added as an afterthought.
You can pin both ears temporarily to check that they sit at the same height and angle, but do not sew them on yet. Set the ears aside after checking the placement. Final positioning and permanent attachment are covered in the Assembly and Finishing section below.
Crochet Two Proportioned Teddy Bear Arms
The arms begin with a rounded paw and narrow slightly above it. They are long enough to rest naturally beside the belly when the bear is seated.
Use the medium brown yarn. Make 2.
- Rnd 1: Make a magic ring and work 6 sc into the ring. (6)
- Rnd 2: Inc in each st around. (12)
- Rnd 3: *Sc in next st, inc in next st.* Rep around. (18)
- Rnds 4 through 6: Sc in each st around. (18)
- Rnd 7: *Sc in next st, dec.* Rep around. (12)
- Rnds 8 through 16: Sc in each st around. (12)
Stuff the paw and lower part of the arm. Use less stuffing as you move toward the top so the shoulder remains flexible.
Do not pack the upper inch of the arm firmly. A softer shoulder allows the arm to lie against the body instead of sticking straight out.
Flatten the open end. Sc through both layers across the opening to close it with 6 sc.
Fasten off and leave a long tail for assembly.
Make the second arm the same way and compare the two before attaching them. They should be the same length, with matching rounded paws and similarly filled shoulders.
Crochet the Legs and Larger Teddy Bear Paws
The feet are deliberately larger than the arms. That little difference gives the finished bear the seated, old-fashioned teddy shape shown in the example image.
There is no separate paw pad in this version. Keeping the feet in the body color lets the lighter muzzle remain the main contrast feature on the bear.
Use the medium brown yarn. Make 2.
- Rnd 1: Make a magic ring and work 6 sc into the ring. (6)
- Rnd 2: Inc in each st around. (12)
- Rnd 3: *Sc in next st, inc in next st.* Rep around. (18)
- Rnd 4: *Sc in next 2 sts, inc in next st.* Rep around. (24)
- Rnds 5 through 7: Sc in each st around. (24)
- Rnd 8: *Sc in next 2 sts, dec.* Rep around. (18)
- Rnds 9 through 18: Sc in each st around. (18)
Stuff the large rounded foot firmly enough to hold its shape. Continue adding fiberfill through the leg, but use slightly less toward the top so the attachment area remains flexible.
As you stuff, keep the front of the foot broad and rounded. The upper leg should remain substantial rather than narrowing into a thin tube.
Flatten the open top of the leg. Sc through both layers across the opening to close it with 9 sc.
Fasten off, leaving a long tail for sewing.
Repeat for the second leg.
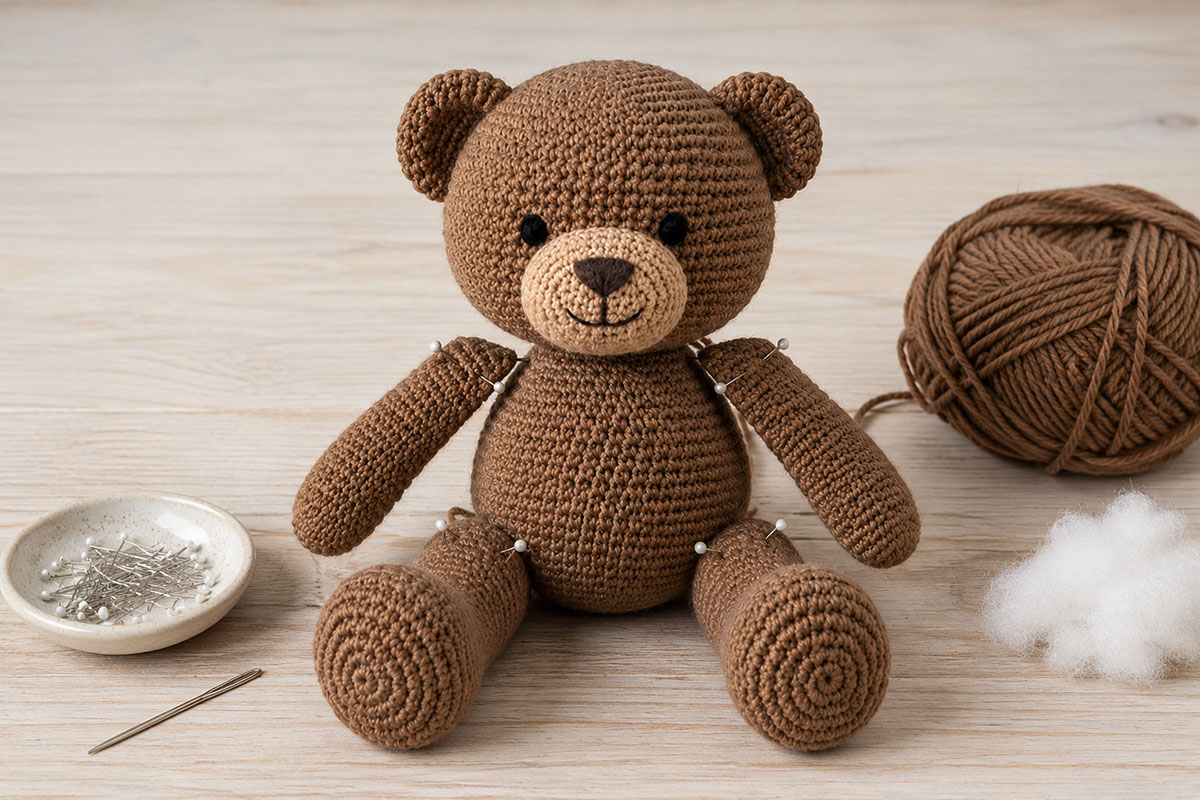
Before attaching the legs, sit the body on a flat surface and hold one leg against each lower side. Turn the large paws slightly forward. The legs should support the seated shape without hiding the lower belly.
I would leave the paws plain rather than adding a belly button or several decorative stitches. The broad feet already give the bear personality, and the simple finish keeps the attention on the embroidered face. If you want a little more detail, two or three short embroidered toe marks on each foot can be added after assembly, but they are optional.
Embroider the Teddy Bear Face
The face is where I would keep this bear simple. The lighter muzzle already gives him plenty of character, so the eyes do not need plastic parts, white highlights or extra decoration.
Use black embroidery floss or thin black yarn for the eyes. Use dark brown yarn or embroidery floss for the nose and mouth.
Before making any permanent stitches, pin the tan muzzle in place on the lower front of the head. Then mark the eye positions with short pieces of contrasting scrap yarn and look at the bear straight on. Small changes in eye spacing can completely change his expression. When the placement looks right, remove the muzzle temporarily. Embroider the eyes directly onto the head first, bringing the beginning and ending tails out in the area that will later be covered by the muzzle so they can be secured and hidden. Then embroider the nose and mouth on the separate muzzle before sewing the muzzle to the face. This order keeps the placement clear and the embroidery tails out of sight.
For each eye: make a small horizontal satin-stitched oval approximately 2 crochet stitches wide. Pass the black floss through the same area several times, laying the stitches neatly beside one another until the crochet underneath no longer shows.
Place the eyes approximately 7 to 8 stitches apart at their nearest edges. Keep them slightly above the upper edge of the muzzle and level with one another.
Do not add a white highlight stitch. A plain black satin-stitched eye has a softer handmade appearance and matches the finished bear shown on this page.
For the nose: embroider a small dark brown triangle in the upper center of the tan muzzle. Make several horizontal stitches to fill the triangle, then bring one short vertical stitch down from its center.
From the bottom of that vertical stitch, make one small curved stitch toward each side to form the mouth. Keep the smile shallow. A wide smile can make the muzzle look more cartoon-like than teddy-like.
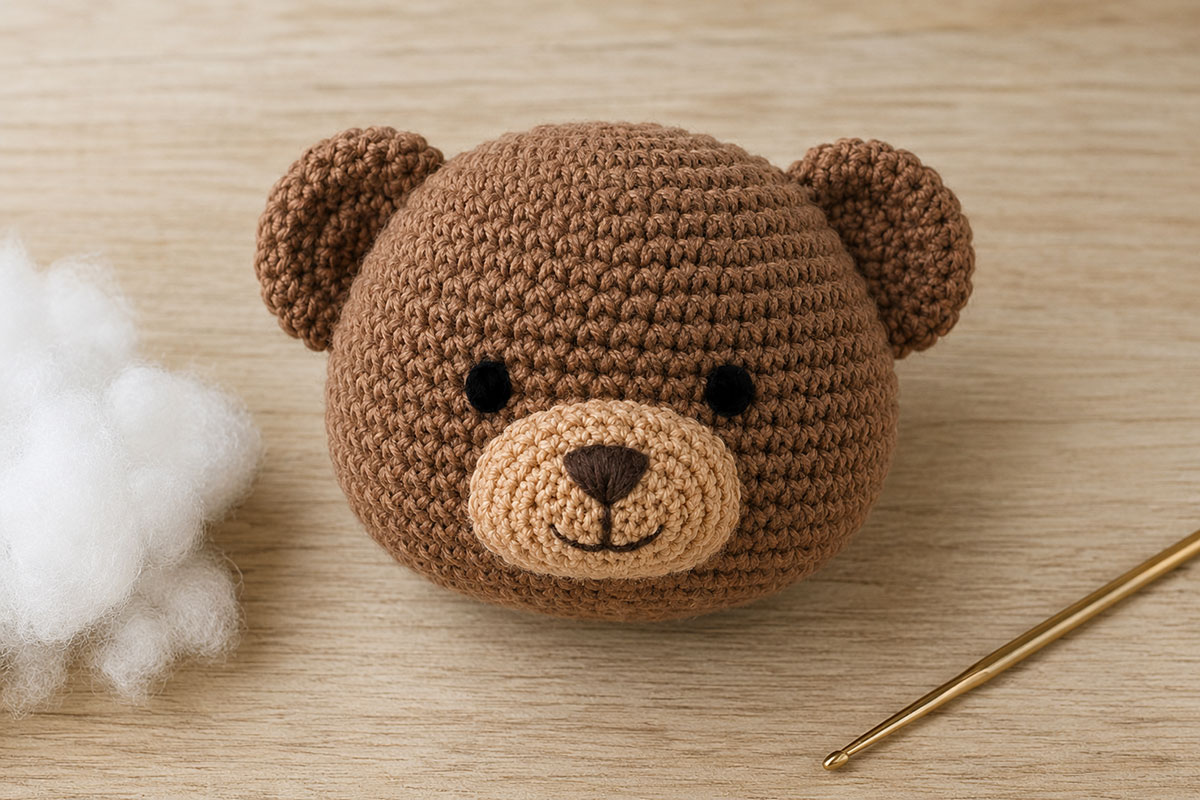
Pin the embroidered muzzle back in place before securing the final embroidery tails, then step back and check the face. The two eyes should be level, the nose should sit in the center of the muzzle and the mouth should remain small enough that the rounded muzzle is still the main feature. When the placement looks right, secure the eye tails in the area that will be covered by the muzzle and secure the nose and mouth tails inside the muzzle before continuing to assembly.
Assemble and Finish the Crochet Teddy Bear
Pin every piece before you sew. I would rather move a leg three times while it is held with pins than discover after sewing that the bear leans to one side.
1. Sew on the muzzle.
Center the tan muzzle below the embroidered eyes. Sew around the outside edge with the long yarn tail, taking small stitches through the muzzle and the head.
When about three quarters of the edge is attached, check the amount of stuffing. Add a tiny amount if the muzzle looks flat. Remove some if it projects sharply from the face. Finish sewing the opening closed and weave the tail inside the head.
2. Attach the ears.
Position the ears on the upper sides of the head with the lower edges angled slightly outward. Check the bear from the front and from above. The ears should appear balanced without sitting directly on top of the head.
Sew through the flattened base of each ear and the head several times. Secure the yarn tails inside the head.
3. Attach the arms.
Place the arms just below the neck, one on each side of the body. The rounded paws should point downward and slightly toward the front.
Sew the flattened top of each arm securely to the body. Use several passes through the same attachment area rather than relying on one line of stitches.
Because the upper arms were only lightly stuffed, they should settle naturally against the belly instead of extending stiffly away from the body.
4. Position the legs.
Sit the bear on a flat surface before sewing the legs. Place one leg on each lower side of the body and turn the large paws toward the front.
Move the legs until the bear can sit without falling backward or rolling to one side. The exact position can vary slightly with stuffing, so use the finished shape of your bear rather than counting body stitches for this step.
Sew the flattened top of each leg firmly to the lower body. Check the seated position again after attaching the first leg and before permanently sewing the second.
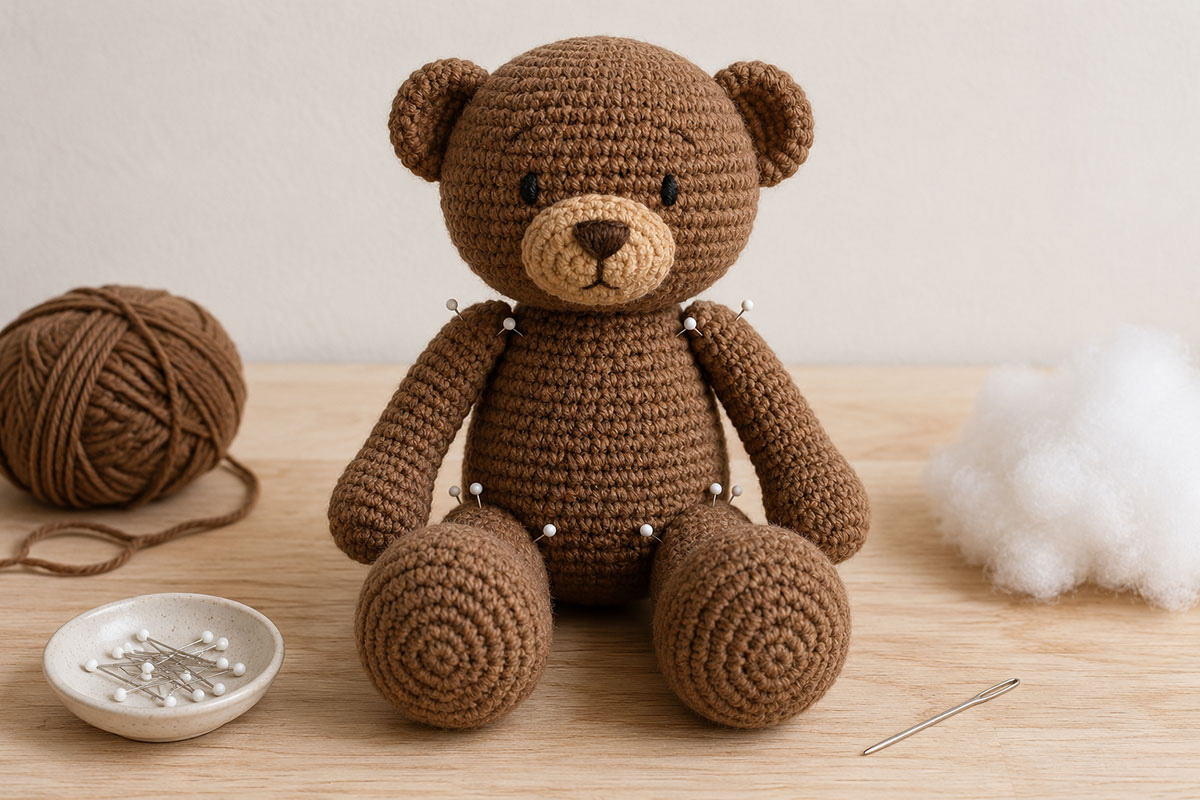
5. Finish the yarn tails.
Weave every yarn tail securely into the stuffed pieces. Pull each tail through the crochet fabric, change direction and pass it through again before trimming it close to the surface.
I would leave the belly plain. I would also leave the paws plain on the first bear. The larger feet, rounded ears and simple embroidered expression give him enough personality without making the pattern busy.
If you prefer toe marks, add two or three short dark brown stitches near the front of each paw. Keep them shallow and evenly spaced. They are decorative only and are not required for the pattern.
Check the Finished Shape Before You Call Him Done
Set the bear down and look at him from several angles. The finished teddy should have a head that is noticeably larger than the neck, a softly rounded belly, arms that lie close to the body and feet that are larger than the hand portions of the arms.
The muzzle should be wide rather than pointed. If it seems to project too far, press the stuffing toward the sides and gently flatten the center with your fingers.
Check the ears next. If one ear appears higher, a few additional stitches along its lower edge can change the angle without removing it completely.
Finally, sit the bear on a flat surface. If he tips backward, the legs may be positioned too far toward the sides. A few extra attachment stitches at the front of each leg can bring the paws forward and improve the seated position.
A handmade teddy does not need to be perfectly symmetrical to be appealing. I do want the important features to look intentional, though. Matching ear height, a centered muzzle and level eyes make a much bigger difference than trying to make every crochet stitch identical.
Choosing Yarn or Changing the Size
This pattern uses medium #4 yarn, commonly called worsted weight. The Craft Yarn Council Standard Yarn Weight System is useful if you are comparing yarn labels or substituting a different yarn.
You can make the bear somewhat larger or smaller by changing the yarn and hook together, but keep the crochet fabric dense. A larger hook with the same yarn can create gaps that allow stuffing to show.
If you substitute another #4 yarn, make a small single crochet sample first. Yarns within the same weight category can still differ in thickness and texture.
Cotton can make a firmer, more defined bear. Acrylic often makes a lighter and softer one. Either can work if the stitches remain tight and the finished fabric holds its shape.
I would not switch this particular design to very thick chenille without testing the proportions. The rounded muzzle, smaller ears and shaped feet can become less distinct when every stitch is oversized.
Using a Handmade Teddy Bear Around a Baby
Secure every embroidered feature and attachment carefully, especially if the bear will be given as a baby gift. Check the seams and yarn tails again after the project is complete.
This pattern uses embroidered facial features instead of plastic eyes or buttons, but a handmade stuffed bear is still a soft toy. Do not place it in an infant's crib, bassinet or other sleep space.
In the United States, the Eunice Kennedy Shriver National Institute of Child Health and Human Development (NICHD) recommends keeping stuffed toys and other soft objects out of a baby's sleep area. You can read its current Safe to Sleep guidance for creating a safe infant sleep environment. If you live elsewhere, follow the current safe sleep guidance from your national health authority.
For a nursery, the bear can be displayed outside the crib or given for supervised play when appropriate.
More Ways to Crochet a Bear
If you like the classic bear face but want a different type of project, the brown bear lovey pattern combines a bear design with a small comfort blanket.
You can also browse my free baby crochet patterns for more handmade baby gifts and nursery projects.
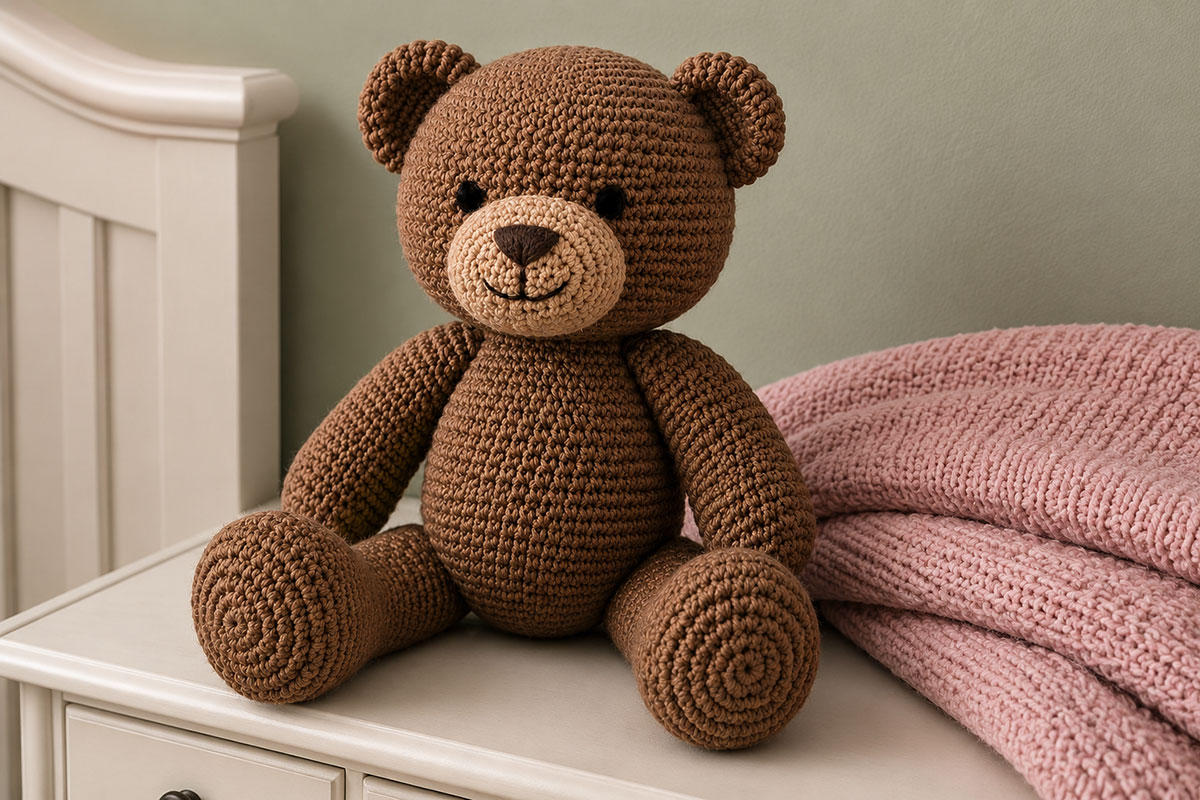
The teddy on this page is intentionally uncomplicated. The shape does the work: rounded ears, a broad muzzle, a plump body and those slightly oversized feet. That is the combination I would keep if you change the yarn or colors, because it is what makes him look like a teddy bear before you add anything else.
Frequently Asked Questions About the Crochet Teddy Bear Pattern
Is this an easy crochet teddy bear pattern?
The pattern is suitable for a comfortable beginner who can work single crochet, increases, decreases, continuous rounds and simple sewing. The body and head are worked as one piece to reduce assembly.
Do I need plastic safety eyes?
No. The eyes are embroidered with black embroidery floss or thin black yarn using satin stitches. The nose and mouth are embroidered too.
Can I use a different color for the muzzle?
Yes. A lighter muzzle gives the face more definition. Tan, caramel, light brown or another coordinating shade can work well. I would keep the contrast gentle rather than making the muzzle the brightest part of the bear.
Can I crochet the whole bear in one color?
Yes. The construction does not depend on a contrasting muzzle. If you use one color throughout, pay extra attention to the nose and eye placement because those features will provide more of the facial definition.
Why are the feet larger than the arms?
The larger paws help create a recognizable seated teddy-bear silhouette. They also give the lower half of the bear enough visual weight to balance the larger head.
Does the teddy need a belly button or embroidered toes?
No. I prefer the cleaner version shown here. Optional toe stitches can be added after assembly if you want another small detail, but neither toes nor a belly button are needed to complete the pattern.
Can I wash the finished teddy?
Follow the care instructions for the yarn and stuffing you used. Before washing, check that all limbs, ears and embroidered facial features are still firmly attached. Reshape the bear while damp if the yarn manufacturer's care directions allow washing.
Teddy Bear Pattern Notes and Troubleshooting
Before you change stitch counts, look at the stuffing and placement first. A teddy can look too narrow, too tall or slightly crooked even when the crochet counts are correct.
If the head looks too tall: move some of the stuffing toward the sides of the head and gently reshape it. The finished head should look broad and rounded rather than egg-shaped.
If the neck looks too thin: add a small amount of stuffing where the body changes into the head. Do not pack this area hard. You only need enough support to keep the head upright.
If the muzzle looks pointed: remove a little stuffing from the center and move it toward the sides. The muzzle should read as a wide teddy-bear snout when viewed from the front.
If the eyes make the bear look stern: check their spacing before reworking anything else. Eyes placed too close together can change the expression quickly. The black satin stitches should be small and simple.
If one ear looks different from the other: compare the attachment angles. The crochet pieces may be the same size even when one appears larger because it is tilted farther forward.
If the paws look too small: make sure the feet were stuffed all the way into the outer edges. The larger rounded feet are an important part of this design, so do not flatten them when attaching the legs.
If the bear will not sit: adjust the leg placement before adding more stuffing. The paws should face forward while the upper legs sit against the lower sides of the body.
There is a point where correcting every tiny difference starts taking character away instead of adding polish. I would correct anything that changes the expression, balance or recognizable teddy shape, then leave the small handmade differences alone.
Color Ideas for This Teddy Bear Crochet Pattern
The medium brown and tan combination gives this version its traditional teddy look, but the pattern does not depend on those exact colors.
A warm caramel bear with a lighter oatmeal muzzle keeps the same classic feeling. Soft gray with a pale gray muzzle gives the design a quieter nursery look, while muted rust or cinnamon can make an especially pretty autumn baby gift.
If you make the body in a very light yarn, use enough contrast in the embroidered nose and eyes that the face remains easy to see. With a dark body color, a medium tan muzzle can keep the features from disappearing into the crochet texture.
I would limit the finished bear to two main yarn colors plus the embroidery. The rounded silhouette and simple face are part of his appeal, and too many contrasting details can make a traditional teddy start to look like a novelty toy.
Make the Bear as a Handmade Baby Gift
If you want to keep working within the same bear theme, browse the free crochet bear patterns collection or pair this teddy with the crochet bear hat or crochet bear rattle for smaller matching projects.
If you would rather make another stuffed bear with a distinctly different look, compare the panda crochet pattern with the polar bear crochet pattern. Their markings, colors and proportions make them very different projects from this classic brown teddy.
A crochet teddy works well as the handmade part of a baby gift because it does not need another accessory to explain what it is. Wrap it with a baby blanket, place it beside a few practical nursery items or give it on its own.
If you want the gift to include a blanket project instead, browse the free crochet baby blanket patterns for designs that can be made in coordinating yarn colors.
For another small animal project, the crochet animal lovey patterns collection includes several blanket-and-animal combinations.
Keep removable decorations, ribbons and loose accessories separate from anything intended for a baby. The teddy itself is finished with embroidered facial details and securely sewn crochet pieces, but it should still be treated as a soft toy rather than an item for an infant sleep space.
Final Pattern Check
Before you weave in the last tail, compare the finished teddy with these points:
- The head is larger than the neck and softly rounded.
- The muzzle is wide, lightly padded and centered below the eyes.
- The black eyes are embroidered with satin stitches and contain no plastic parts.
- The ears sit on the upper sides of the head at matching angles.
- The arms are lightly stuffed near the shoulders so they rest beside the belly.
- The legs are securely attached and allow the bear to sit.
- The feet are noticeably larger than the arm paws.
- The nose and mouth are small enough that they do not dominate the face.
- All yarn tails are secured and hidden inside the crochet pieces.
If those details are in place, the finished bear should have the classic teddy shape this pattern is meant to create: round ears, a soft muzzle, a plump middle and generous paws without extra pieces competing for attention.
When you click on links to various merchants on this site and make a purchase, this may result in this site earning a commission. This does not affect the price you pay.

UBGI Gold Standard 2026
Reviewed under the site's
editorial checklist.
Photos, decorating ideas, party setups and reader submissions are shared for inspiration unless a page is specifically presented as a pattern, tutorial, reference guide or step-by-step project. Follow the instructions, measurements, safety guidance and manufacturer directions provided for the particular project or product.
About Jan | Contact | Baby Nursery Ideas (Blog) | Site Map | Privacy Policy | Disclosure Policy | Disclaimer | Affiliate Disclosure | Earnings Disclosure | Facebook | Pinterest
I am a participant in the Amazon Services LLC Associates Program, an affiliate advertising program designed to provide a means for us to earn fees by linking to Amazon. As an Amazon Associate I earn from qualifying purchases.
Copyright © 2006-2026. All Rights Reserved.