Free Christmas Village Quilt Pattern with Nine Snowy Houses
By Jan Bay
This free Christmas village quilt pattern features nine different houses on a snowy night. Each house has its own roof, windows and Christmas details. Dark navy fabric gives the houses room to stand out, while green sashing, red cornerstones and a holly border bring the village together. The pattern makes a 59-inch square quilt and includes measured cutting charts and printable appliqué templates.
More Christmas Quilt Patterns
Free Christmas Quilt Patterns Collection Gingerbread House Quilt Pattern Christmas Star Quilt Pattern Browse More Quilt Patterns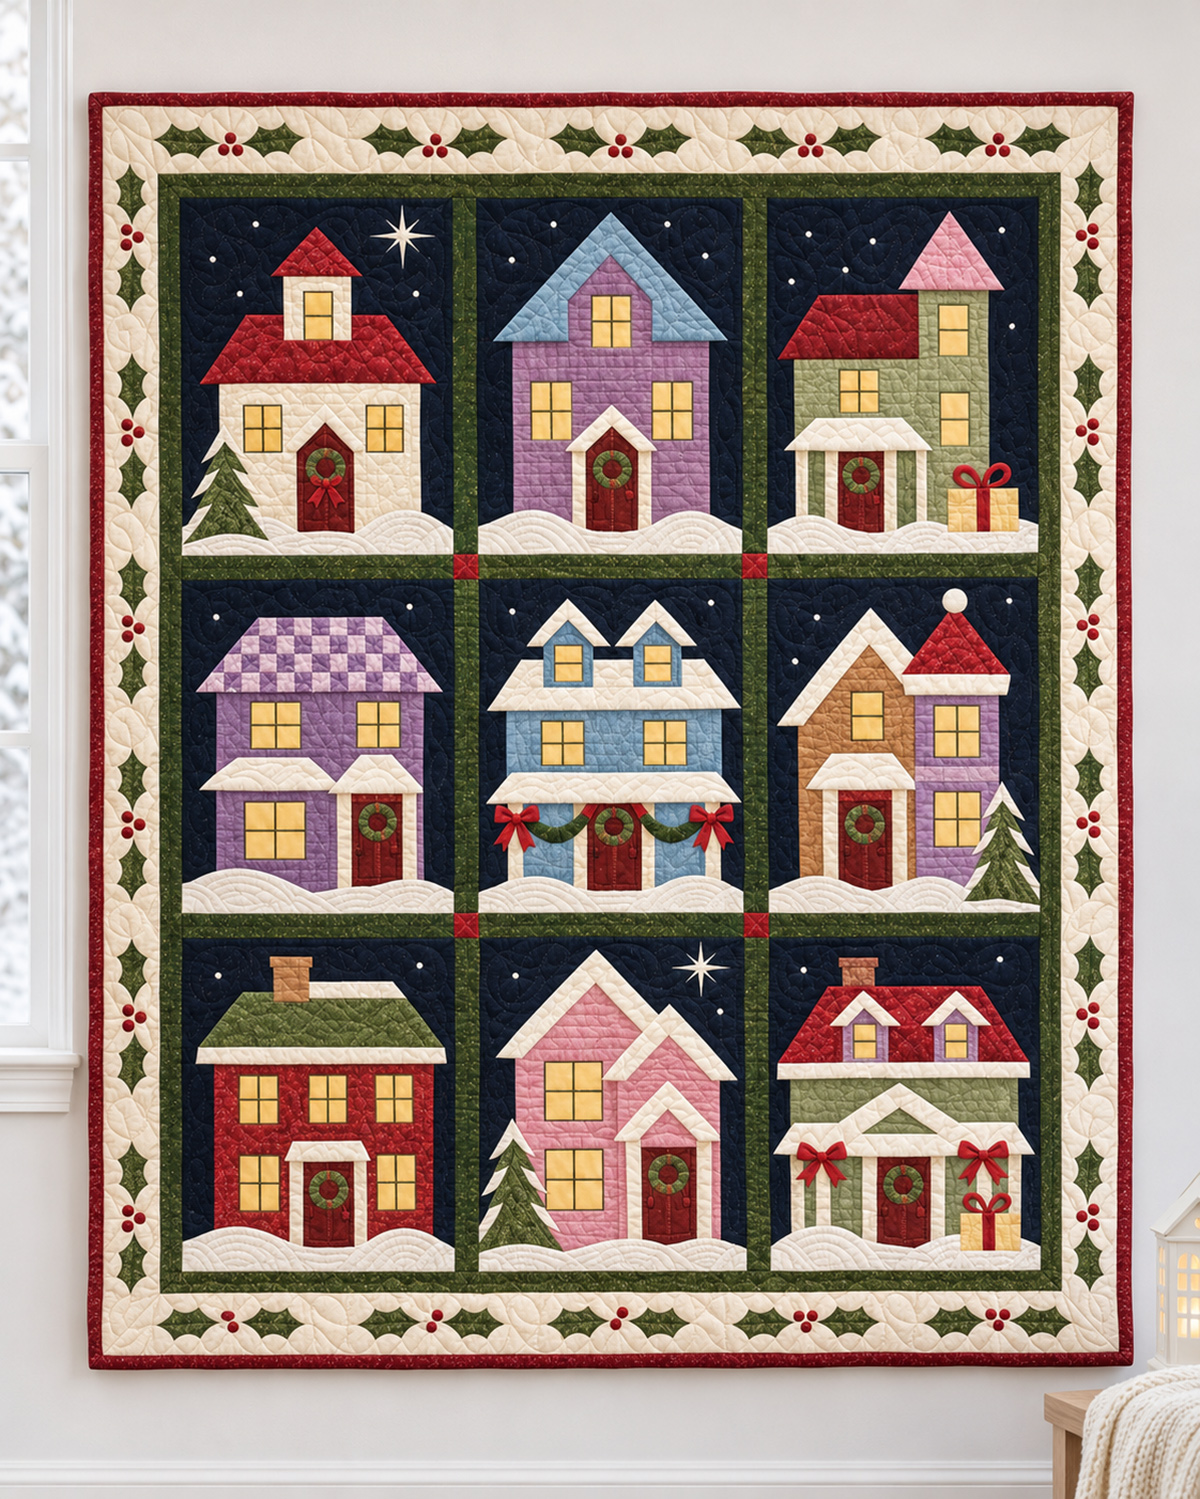
Snowy Christmas Village quilt design illustration showing the measured nine-house layout. The quilt has not yet been physically sewn or tested.
See fusible web for appliqué quilt projects
Jump to the Christmas Village Quilt Instructions
Download the Free Christmas Village Quilt Pattern and Templates
Ready to make your own snowy Christmas village? You'll need these two free PDF downloads. The first contains the complete quilt instructions, and the second has the full-size templates for all nine houses and their Christmas decorations.
- Download the Complete Christmas Village Quilt Pattern (39-page PDF) - Includes fabric requirements, cutting charts, instructions for all nine houses, embroidery details, measurements and final quilt assembly.
- Download the Full-Size Quilt Templates (122-page PDF) - Includes printable roofs, doors, windows, trees, snowbanks, wreaths, bows, holly decorations and embroidery guides.
Printing tip: Print the templates at 100% or Actual Size. Check the 1-inch test square with a ruler before cutting your fabric. Some larger pieces span several pages and must be taped together using the printed alignment marks.
Pattern note: This quilt pattern has been measured and digitally checked, but it has not been physically sewn or tested. Make a practice block and verify your measurements before cutting all your fabric.
Christmas Village Quilt Pattern: Finished Size and Skill Level
The finished Snowy Christmas Village quilt is designed to measure 59 x 59 inches. It has nine different house blocks arranged in three rows of three. Each house sits against a dark navy night sky with a snowy foreground, and no two houses are exactly alike.
I would call this an intermediate quilting project. The house walls are made with traditional patchwork, but the roofs, towers, windows and Christmas decorations use raw-edge fusible appliqué. There is also some embroidery, along with a pieced checkerboard roof on one of the houses.
- Finished quilt size: 59 x 59 inches, calculated before washing
- House blocks: Nine different designs
- Finished block size: 16 x 16 inches
- Unfinished block size: 16 1/2 x 16 1/2 inches
- Seam allowance: 1/4 inch for traditional piecing
- Construction: Patchwork, fusible appliqué and embroidery
- Skill level: Intermediate
The houses have extra dark fabric around them, especially along the sides. That space is intentional. It keeps the rooflines from crowding the green sashing and makes the village look like a collection of little houses on a snowy Christmas night.
You don't need to piece every little windowpane or make fabric circles for all those berries. The windows are simple gold fabric shapes with stitched dividers. The Christmas wreaths and tiny holly berries are embroidered, and the decorative bows have been simplified into single fabric shapes.
Although the pattern measurements and printable templates have been digitally checked, the quilt has not yet been physically sewn or tested. I'd make one complete practice block before cutting fabric for all nine houses.
Fabric and Supplies for the Snowy Christmas Village Quilt
You can use quilting cotton for the entire quilt. The houses look especially cheerful in cream, lavender, blue, pink, sage green and brick red, with yellow or gold windows that look as though someone has a light on inside.
I'd keep the background a deep navy blue and use a brighter cream for the snow. Those two fabrics do much of the work in making the little village stand out.
Background, Sashing and Border Fabrics
- 2 1/2 yards dark navy fabric for the nighttime backgrounds
- 3/4 yard dark green fabric for the sashing and inner frame
- 3/4 yard cream fabric for the outer border
- 3/4 yard red fabric for the cornerstones and binding
- 1/2 yard additional green fabric for the appliqué holly leaves
- 4 yards backing fabric, assuming at least 40 inches of usable width
- Batting measuring at least 67 x 67 inches
Fabric for the Nine Houses
The houses use several colors, but many pieces are small enough to cut from coordinated scraps. These are the conservative fabric allowances from the measured pattern.
- 1 yard white or cream snow fabric
- 3/4 yard purple fabric
- 1/2 yard cream house fabric
- 1/2 yard red roof fabric
- 1/2 yard brown or door-colored fabric
- 1/2 yard gold or yellow window fabric
- 1/2 yard green fabric for trees and other house decorations
- 1/2 yard blue fabric
- 1/2 yard sage green fabric
- 1/2 yard pink fabric
- 1/2 yard tan fabric
- 1/2 yard lavender fabric
- 1/2 yard brick-red fabric
- 1/4 yard red ribbon-colored fabric for bows and gift decorations
You can combine some of these fabrics if you want fewer colors, but add the yardages together when the same fabric is doing two jobs. Keep enough contrast between the houses, roofs and snowy trim so each building is easy to recognize.
Appliqué, Embroidery and Sewing Supplies
- Approximately 5 yards of lightweight paper-backed fusible web, 18 inches wide, according to the pattern's conservative allowance
- Red and green embroidery floss
- Matching sewing and machine embroidery thread
- Lightweight embroidery stabilizer
- Rotary cutter, cutting mat and quilting ruler
- A ruler marked in 1/16-inch increments
- A 16 1/2-inch square quilting ruler
- Fabric scissors and small embroidery scissors
- Iron and pressing surface
- Removable fabric-marking pencil or pen
- Tracing paper, printer paper and tape for assembling templates
- Sewing machine with a narrow zigzag or blanket stitch
- Hand embroidery needles
Choose a lightweight fusible web made for sewing. Heavy fusible can make the layered roofs and porch decorations stiff. A narrow zigzag or blanket stitch is used around the fabric shapes to secure their raw edges.
If you're new to this kind of appliqué, the American Quilter's Society appliqué tips offer a helpful introduction to raw-edge appliqué techniques.
The full PDF cutting charts tell you which colors and sizes to use for each house. Keep the cut pieces for Houses A through I in separate labeled groups. It'll make the assembly much easier, especially when you reach the roofs and windows.
How to Make the Nine Christmas Village Quilt Blocks
Each house begins with five fabric rectangles. The middle rectangle is the main house wall, and four navy rectangles make up the surrounding nighttime background. Once they're sewn together, you'll add the roofs, towers, windows, doors and Christmas decorations.
All nine blocks measure 16 1/2 inches square before they're joined to the sashing. Use a 1/4-inch seam for the pieced foundations. The irregular appliqué shapes are cut from their full-size templates without extra seam allowances.
Make the Five-Piece House Foundation
- Cut the five rectangles listed for your chosen house. The measurements already include patchwork seam allowances.
- With right sides together, sew the left navy rectangle to the left edge of the main wall. Add the right navy rectangle to the other side. Press both seams toward the navy fabric.
- Measure the completed wall band. It must be 16 1/2 inches wide and match the wall-cut height in that house's chart.
- Attach the top navy rectangle using a 1/4-inch seam. Press the seam toward the navy fabric.
- Attach the bottom navy rectangle and press away from the wall.
- Check that the completed foundation measures 16 1/2 x 16 1/2 inches.
- Mark a temporary finished perimeter 1/4 inch inside all four raw edges. The upper-left corner of this finished area is the starting point for the appliqué placement coordinates in the pattern PDF.
Print the templates for one house at a time. Each numbered appliqué piece has a measured position in its component chart. The measurements are taken from the finished block corner. Add 1/4 inch to the x and y positions only when measuring from the unfinished raw edges.
Trace fabric appliqué shapes in reverse onto fusible-web paper, following the PDF instructions. Transfer embroidery guides without reversing them. Place the architectural pieces in their numbered order, checking the complete arrangement before fusing.
The snowbanks extend into the left, right and bottom seam allowances. Their outside edges align with the unfinished block edges. Baste those edges 1/8 inch from the raw edge so they'll be caught when the quilt blocks are joined.
House A: Cream Cottage with a Red Roof and Tower
House A has cream walls, a broad red roof and a little tower rising above it. There's a snowy evergreen beside the front door, a wreath with a red bow and a white star in the nighttime sky.
Cut one of each foundation piece:
- Cream main wall: 9 15/16 x 7 13/16 inches
- Navy left background: 3 15/16 x 7 13/16 inches
- Navy right background: 3 5/8 x 7 13/16 inches
- Navy top background: 16 1/2 x 8 15/16 inches
- Navy bottom background: 16 1/2 x 3/4 inch
Assembly:
- Piece the five foundation rectangles. Check that the unfinished block measures 16 1/2 inches square.
- Cut the wide red roof, A02, from its full-size template. Place it above the cream wall according to the A component chart.
- Add the cream upper tower, A03, above the main roof. Cover its upper edge with the red triangular tower roof, A04.
- Cut the peaked red door, A05, and position it near the center of the lower wall. Add the white peaked door trim, A06.
- Cut the three gold windows, A07 through A09. Place A07 in the tower and the other two on opposite sides of the lower door. Stitch their printed pane dividers.
- Embroider the green wreath, A10, on the door. Use unified bow template A11-15 for one red fabric bow with an embroidered knot. You can embroider the whole bow instead.
- Add the continuous white snowbank, A16, along the bottom of the block.
- Cut the green evergreen, A17, and place it to the left of the house. Add its three white snow caps, A18 through A20.
- Embroider the eight-point star, A21, near the upper right. Add the four snow dots, A22 through A25, at their printed positions.
Check that the upper tower sits within the main roof shape and that the snowy evergreen doesn't cover the lower window. The block must still measure 16 1/2 inches square after the appliqué and embroidery.
House B: Purple Cottage with a Large Blue Gable Roof
This purple cottage has a tall blue triangular roof with a purple center gable. The upper window sits in the raised gable, while two longer windows flank the front door below.
Cut one of each foundation piece:
- Purple main wall: 9 9/16 x 9 9/16 inches
- Navy left background: 4 x 9 9/16 inches
- Navy right background: 3 15/16 x 9 9/16 inches
- Navy top background: 16 1/2 x 7 3/16 inches
- Navy bottom background: 16 1/2 x 3/4 inch
Assembly:
- Piece the five foundation rectangles and check the unfinished size.
- Cut the large blue roof, B02, and position its broad lower edge above the purple house wall.
- Add the central purple gable, B03, over the blue roof. Its pointed upper section should remain clearly visible.
- Place the red peaked door, B04, near the bottom center. Add the white peaked door trim, B05.
- Cut the upper gold window, B06, and the two taller lower windows, B07 and B08. Follow the printed window-divider guides.
- Embroider the green wreath, B09, on the door. Leave the middle open so the red door fabric remains visible.
- Add the continuous white snowbank, B10. Follow the template's shallow curved shape rather than cutting separate snow mounds.
- Embroider the four snow dots, B11 through B14, in the dark background.
Check the large blue roof and central purple gable against the numbered diagram. The purple gable should overlap the blue roof, not look like a separate little dormer.
House C: Sage Green Cottage with a Pink Tower
House C has a sage green body, a wide red roof and a tall tower with a pointed pink roof on the right. A little covered porch sits on the left, with a wrapped Christmas present beside the house.
Cut one of each foundation piece:
- Sage main wall: 9 3/8 x 9 1/8 inches
- Navy left background: 3 9/16 x 9 1/8 inches
- Navy right background: 4 9/16 x 9 1/8 inches
- Navy top background: 16 1/2 x 7 5/8 inches
- Navy bottom background: 16 1/2 x 3/4 inch
Assembly:
- Sew the five-piece foundation and check for a 16 1/2-inch square.
- Position the red main roof, C02, above the sage wall.
- Add the tall sage side tower, C03, on the right. Place its pointed pink roof, C04, above it.
- Cut the cream porch posts, C05 and C06, and position them at the front of the house.
- Place the red door, C07, between the posts. Add the white porch roof, C08, above them.
- Cut the three gold windows, C09 through C11. Put two in the tower at their separate heights and one in the main wall. Stitch the printed pane dividers.
- Embroider the green wreath, C12, on the front door.
- Add the full-width white snowbank, C13, along the lower edge.
- Cut the gold present, C14, and its narrow red ribbon strip, C15. Position them at the lower right of the block.
- Embroider the two gift-bow loops, C16 and C17, above the present.
- Add the five embroidered snow dots, C18 through C22, in the sky.
Make sure the pink tower roof stays taller than the red main roof. The gift should sit beside the porch, not in front of the doorway.
House D: Purple Cottage with a Checkerboard Roof
House D is the only building with a pieced checkerboard roof. The purple and lavender squares are made from strips before the roof is cut into its trapezoid shape. The house also has two separate snowy porch roofs and three gold windows.
Cut one of each foundation piece:
- Purple main wall: 10 7/16 x 10 13/16 inches
- Navy left background: 3 5/8 x 10 13/16 inches
- Navy right background: 3 7/16 x 10 13/16 inches
- Navy top background: 16 1/2 x 5 15/16 inches
- Navy bottom background: 16 1/2 x 3/4 inch
Piece the Checkerboard Roof
- Cut four lavender strips and four purple strips, each measuring 1 3/8 x 32 inches.
- Sew the eight strips together lengthwise in alternating colors, using 1/4-inch seams. Press the seams toward the purple strips. The completed strip set should measure 7 1/2 x 32 inches.
- Crosscut eight bands, each 1 3/8 inches wide, perpendicular to the long seams. Each band will measure 7 1/2 x 1 3/8 inches.
- Pair the bands end to end without changing the order of the colors. Join each pair with a 1/4-inch seam. You'll have four rows measuring 14 1/2 x 1 3/8 inches, each containing 16 alternating squares.
- Turn every other row end for end so the colors alternate both horizontally and vertically.
- Join the four rows using 1/4-inch seams, matching the intersections. Press the seams open to reduce bulk. The completed checkerboard panel should measure 14 1/2 x 4 inches.
- Using D02, mark the roof outline on the panel. Center the 11 13/16-inch-wide by 3 9/16-inch-high template within the checkerboard, keeping the rows horizontal.
- Apply fusible web to the wrong side as directed in the pattern. Cut the exact trapezoid along the template outline.
The checks finish at 7/8 inch square, with partial squares along the roof's angled sides. The checkerboard is intentionally a little larger than the tiny checks in the original design reference, but the roof shape itself remains the same.
Complete House D
- Piece the five foundation rectangles and check that the unfinished block measures 16 1/2 inches square.
- Place the completed checkerboard roof, D02, above the purple wall. Fuse it in position, keeping the checkerboard rows horizontal.
- Add the red door, D03, near the lower right. Place the two cream door posts, D04 and D05, on either side.
- Add the larger white porch roof, D06, to the left side. Place the smaller white porch roof, D07, above the doorway.
- Cut the two upstairs windows, D08 and D09, and the larger downstairs window, D10. Stitch the printed pane dividers.
- Embroider the green door wreath, D11, keeping the center open.
- Add the white snowbank, D12, along the bottom edge.
- Embroider the two sky dots, D13 and D14.
Check the checkerboard roof before fusing it to the background. If the strip-set seams have made the fabric bow or twist, correct that before proceeding. The left and right porch roofs must remain two separate shapes.
House E: Blue Christmas Cottage with Two Dormers
The blue cottage sits in the middle of the quilt. It has two snowy dormers, a wide front porch and Christmas garlands hanging between the porch posts. Its two red bows are now single appliqué pieces, so you won't have to cut all those tiny loops and tails separately.
Cut one of each foundation piece:
- Blue main wall: 10 9/16 x 9 7/8 inches
- Navy left background: 3 7/16 x 9 7/8 inches
- Navy right background: 3 1/2 x 9 7/8 inches
- Navy top background: 16 1/2 x 6 7/8 inches
- Navy bottom background: 16 1/2 x 3/4 inch
Assembly:
- Piece the five foundation rectangles. Check that the block measures 16 1/2 inches square.
- Add the large cream main roof, E02, above the blue wall.
- Cut the left blue dormer face, E03, and its white peaked roof, E04. Add the gold window, E05, using the printed placement measurements.
- Repeat for the right dormer with E06, E07 and E08. Check that both dormers stand above the cream main roof and that their snowy peaks are separate.
- Place the red door, E09, in the center of the lower wall. Add the two cream porch posts, E10 and E11, at the outer sides of the porch.
- Cut the two green garlands, E12 and E13. Position them across the porch front, curving down toward the doorway.
- Add the white porch snow roof, E14, above the garlands. Follow the original template so the roof retains its wide shape.
- Cut the two downstairs gold windows, E15 and E16. Stitch their four-pane dividers.
- Embroider the green wreath, E17, on the center door.
- Cut one continuous red bow from template E18-22 and another from E23-27. Place them at the two outer garland ends. Secure each bow with a narrow appliqué stitch and embroider the center knots.
- Add the white snowbank, E28, along the bottom of the block.
- Embroider the two snow dots, E29 and E30, in the night sky.
The garlands should hang below the porch roof, with one bow at each end. Keep the center door visible between them. If you prefer, you can fully embroider both bows instead of cutting red fabric.
House F: Tan Cottage with a Purple Tower
House F combines two different rooflines. The tan side has a cream gable roof, while the purple tower has a pointed red roof with a round cream finial. A little snow-covered evergreen stands beside the tower.
Cut one of each foundation piece:
- Tan main wall: 6 1/8 x 9 5/16 inches
- Navy left background: 3 7/16 x 9 5/16 inches
- Navy right background: 7 15/16 x 9 5/16 inches
- Navy top background: 16 1/2 x 7 7/16 inches
- Navy bottom background: 16 1/2 x 3/4 inch
Assembly:
- Sew the foundation rectangles together. The extra-wide navy section on the right gives you room to add the purple tower.
- Cut the upper tan gable, F02, and place it above the main tan wall.
- Add the large cream gable roof, F03, using its full-size angled template.
- Place the purple tower, F04, beside the tan section. Add the pointed red tower roof, F05, and its white snow eave, F06.
- Cut the cream circular finial, F07, and center it at the tip of the red tower roof.
- Add the red door, F08, to the tan section. Place the two cream porch posts, F09 and F10, on either side and cover them with the white porch roof, F11.
- Add the lavender horizontal band, F12, across the tower at the printed position.
- Place the three gold windows, F13 through F15. One belongs in the tan gable section and two belong in the purple tower. Stitch the window dividers.
- Embroider the green wreath, F16, on the red front door.
- Add the continuous white snowbank, F17, across the bottom.
- Cut the green evergreen, F18, and position it to the right of the purple tower. Add the three snow-cap pieces, F19 through F21.
- Embroider the two snow dots, F22 and F23.
Check that the two wall colors remain distinct and that the cream gable roof doesn't disappear behind the tower. The round finial should be centered above the pointed red roof.
House G: Red Brick Cottage with a Green Roof
The red brick cottage has a traditional two-story shape, a green roof, a chimney and five golden windows. This house has fewer overlapping gables than the others, making it a useful block for getting comfortable with the appliqué method.
Cut one of each foundation piece:
- Brick-red main wall: 11 x 10 1/8 inches
- Navy left background: 3 7/16 x 10 1/8 inches
- Navy right background: 3 1/16 x 10 1/8 inches
- Navy top background: 16 1/2 x 6 5/8 inches
- Navy bottom background: 16 1/2 x 3/4 inch
Assembly:
- Join the five foundation rectangles and press the seams toward the dark background.
- Cut the green hipped roof, G02, and position it over the red house.
- Add the narrow white snow ridge, G03, and the white lower roof eave, G04.
- Cut the chimney shaft, G05, and chimney cap, G06. Position them near the left side of the roof as shown in the numbered diagram.
- Cut the red front door, G07. Add the cream left and right door trims, G08 and G09.
- Place the short white snow canopy, G10, above the door.
- Cut the five gold windows, G11 through G15. Arrange three across the upper level and two on the lower level, one on each side of the door. Stitch the printed pane dividers.
- Embroider the green wreath, G16, on the center door.
- Cut the white snowbank, G17, and place it along the bottom.
- Embroider the two small snow dots, G18 and G19, in the sky.
Keep the green roof wide enough to extend past both sides of the red wall. The three upstairs windows should make an even-looking row, with the doorway centered below them.
House H: Pink Cottage with Overlapping Snowy Gables
House H has two overlapping pink gables, two golden windows and a red door under its own snowy roof. There's an evergreen on the left and a little star shining above the house.
Cut one of each foundation piece:
- Pink main wall: 9 15/16 x 10 3/8 inches
- Navy left background: 4 1/16 x 10 3/8 inches
- Navy right background: 3 1/2 x 10 3/8 inches
- Navy top background: 16 1/2 x 6 3/8 inches
- Navy bottom background: 16 1/2 x 3/4 inch
Assembly:
- Piece the five foundation rectangles and confirm the unfinished block size.
- Cut the tall left pink gable wall, H02, and position it above the main wall.
- Add the wide white snowy gable, H03, over the left roofline. Keep the high peak visible against the navy sky.
- Place the smaller overlapping pink gable, H04, toward the right. Add its separate white gable roof, H05.
- Cut the red door, H06, and add the cream door posts, H07 and H08.
- Add the peaked white door roof, H09, and its pink upper triangle, H10, following the original template layering.
- Cut the two gold windows, H11 and H12, and position one above the other on the left side. Stitch the window dividers.
- Embroider the green wreath, H13, on the red door.
- Place the continuous white snowbank, H14, across the lower edge.
- Cut the green evergreen, H15, and place it on the left side. Add its three white snow caps, H16 through H18.
- Embroider the eight-point star, H19, near the top right. Add the snow dots, H20 and H21.
The two large white gables need to remain separate and recognizable. Don't replace them with one plain roof. The overlapping peaks are what give this pink cottage its character.
House I: Sage Green Manor with Two Dormers
The last house has a long red roof, two dormers and a wide front porch with a snowy peaked center. Two red bows decorate the porch, and there's a Christmas present beside the steps.
Cut one of each foundation piece:
- Sage main wall: 11 5/16 x 9 1/2 inches
- Navy left background: 3 1/16 x 9 1/2 inches
- Navy right background: 3 1/8 x 9 1/2 inches
- Navy top background: 16 1/2 x 7 1/4 inches
- Navy bottom background: 16 1/2 x 3/4 inch
Assembly:
- Piece the foundation and check that it measures 16 1/2 inches square.
- Cut the chimney shaft, I02, and chimney cap, I03. Place them at the upper left of the house roof area.
- Add the wide red manor roof, I04, and the white snow eave, I05.
- Cut the left purple dormer face, I06, its snowy peaked roof, I07, and gold window, I08. Position all three using the printed component chart.
- Repeat with the right dormer, I09 through I11. Check that both dormers have their own windows and snowy roofs.
- Place the red door, I12, in the middle of the lower house wall.
- Cut the four cream porch posts, I13 through I16. Position two on the left and two on the right, following their measured spacing.
- Place the wide white porch roof and pediment, I17, above the posts. Add the sage inset triangle, I18, inside the center pediment.
- Embroider the green wreath, I19, on the red front door.
- Cut the two unified red bows, I20-24 and I25-29. Put one on each side of the porch, then embroider the center knots. The completely embroidered bow option is also included in the templates.
- Position the continuous white snowbank, I30, along the bottom.
- Cut the gold gift box, I31, and narrow red ribbon strip, I32. Place them at the lower right. Embroider the two bow loops, I33 and I34, above the gift.
- Embroider the last two snow dots, I35 and I36.
Before setting the block aside, check the dormer windows, porch posts and center pediment. The two red bows should be balanced on opposite sides of the porch, with the wreath centered on the door.
Check All Nine House Blocks
Lay the finished blocks out in their three rows before sewing them together. All nine should measure 16 1/2 inches square, including the seam allowances.
Check the rooflines, window positions and door placement against the numbered block diagrams. The snowbanks extend into the lower and side seam allowances, but the houses and trees should remain within the 16-inch finished block area.
Don't cut a block smaller to hide a measurement problem. Check the seam allowances and the effect of the appliqué stitching first. A block that has shrunk or distorted needs to be corrected before it's joined to the others.
Embroider the Christmas Wreaths, Bows, Snow and Holly
Now for the little Christmas details! The wreaths, bows, falling snow and holly berries give the village much of its personality. They're also the pieces that could become tedious if you tried to cut every tiny shape from fabric.
The pattern keeps the larger decorations as appliqué and uses embroidery for the smallest details. That way, you'll still have colorful fabric houses without having to sew dozens of little fabric circles and knots.
Prepare for Embroidery
- Finish the fabric appliqué underneath each decoration before adding embroidery.
- Transfer the embroidery guide to the right side of the fabric. Use the full-size template without reversing it.
- Place lightweight embroidery stabilizer behind the area, extending at least 1 inch beyond the design.
- Keep the fabric flat while stitching. Don't stretch it tightly in an embroidery hoop.
- Test your thread, stitch length and stabilizer on scraps made from the same fabrics.
For hand embroidery, two strands of floss work for many of the outlined details. Use two or three strands for filled areas. Secure the thread with small anchoring stitches on the wrong side, then weave the ending tail under several stitches before trimming.
Make the Nine Christmas Wreaths
Every house has a green wreath on its red door. The template shows both the outside and inside circles so you'll know exactly how large to make it.
- Transfer both wreath circles to the door fabric. Keep the opening in the center clear.
- Using two strands of green floss, work small chain stitches around the wreath. Make the chain links about 1/16 to 1/8 inch long.
- Continue with additional rows of chain stitches toward the inner circle until the band between the two circles is covered.
- For a leafy appearance, you can use small detached-chain or lazy-daisy stitches instead. Angle the leaves slightly as you work around the ring.
- Add three tiny red berries near the top of the wreath with two-wrap French knots.
- Secure the thread ends on the wrong side without carrying thread across the open center.
If you prefer fabric appliqué, the PDF also includes the original wreath-ring template. Cut the outside circle and center opening, fuse it to the door and stitch around both raw edges. Add the three embroidered berries afterward.
Use either the embroidered wreath or the fabric ring on each door. You don't need both.
Make the Five Simplified Red Bows
You'll make one bow for House A, two for House E and two for House I. Each bow has one continuous fabric outline rather than separate pieces for the loops, tails and knot.
- Find the correct unified bow template for the house you're decorating.
- Trace the outside outline onto fusible web, reversing it as directed in the template instructions.
- Fuse the web to the wrong side of red fabric. Cut the entire bow as one connected piece.
- Place the bow at its printed position and fuse it in place.
- Secure the outside edge with a narrow matching zigzag or small blanket stitch.
- Transfer the dashed center-knot guide to the front. Outline the knot with small backstitches and fill it with short red satin stitches.
Fully embroidered option: Skip the fabric bow and transfer the complete outline directly to the background. Backstitch just inside the outside line, then fill the loops and tails with closely spaced long-and-short stitches about 1/8 to 1/4 inch long. Work shorter stitches around the points and embroider the darker center knot last.
Keep the original bow sizes. The smallest bow, on House A, measures 1 1/2 x 1 3/8 inches. The other four bows have their own measured templates.
Embroider the Christmas Gift Bows
The little presents beside Houses C and I have gold fabric boxes and narrow red ribbon strips. The bow loops are embroidered rather than cut from tiny fabric pieces.
- Fuse the gold box to the block at the marked position.
- Add the narrow red fabric ribbon vertically across the box.
- Transfer the two bow-loop outlines above the ribbon.
- Backstitch the loops in red, following the printed curves.
- Secure the thread ends on the wrong side.
Embroider the Falling Snow and Stars
The dark navy background needs only a scattering of white snow dots. You don't need to fill every open space. The larger embroidered stars belong to Houses A and H.
- Transfer the star outlines and snow-dot positions from the full-size templates.
- Use white or cream embroidery thread for the stars. Follow the printed eight-point outlines with straight stitches and secure them at the center.
- Make the small snow dots with short filled stitches or closely grouped knots, keeping them within their printed guides.
- Secure all thread ends on the back.
Make the Holly Leaves and Embroidered Berries
The cream outer border has 22 holly clusters. Each cluster contains two green fabric leaves and three red berries.
You'll cut 44 green holly leaves altogether. The 66 berries are embroidered by default, so there's no need to cut 66 tiny red circles.
- Use the full-size holly-leaf template to cut 44 green fabric leaves.
- Arrange the leaves in pairs at the border positions given in the assembly instructions.
- Fuse the leaves and secure their raw edges with a small matching zigzag or blanket stitch.
- Transfer three berry circles between the leaves of each cluster. Each circle is approximately 3/8 inch across.
- Using two strands of red floss, outline each circle with backstitch. Fill it with adjoining satin stitches until the fabric underneath is covered.
- As another hand-embroidery option, fill each circle with closely grouped two-wrap French knots. Begin in the center and add more knots until the entire circle is covered.
- For machine embroidery, stabilize the border and stitch the circular outline. Fill the circle with closely spaced rows of short red stitches. Test the density on a sample before stitching the quilt.
Each berry should look like a small filled red circle, not one tiny knot sitting by itself. Keep the berries close together so they form a recognizable holly cluster.
The original fabric-circle option is included in the templates if you would rather use appliqué. For the embroidered version, you won't need those fabric circles at all.
Once the decorations are finished, press gently from the wrong side using a padded surface. Remove or trim the stabilizer according to its instructions, and check that the fabric hasn't puckered around the embroidery.
Assemble the Christmas Village Quilt and Holly Border
With the nine houses finished, you're ready to put the village together. The blocks are arranged in three rows, with narrow green sashing between them. Small red cornerstones mark the places where the horizontal and vertical sashing meet.
Cut the Sashing, Cornerstones and Borders
These measurements include the 1/4-inch seam allowances.
- 12 dark green sashing strips, 1 3/4 x 16 1/2 inches
- 4 red cornerstones, 1 3/4 x 1 3/4 inches
- 2 dark green outer side strips, 1 3/4 x 51 inches
- 2 dark green outer top and bottom strips, 1 3/4 x 53 1/2 inches
- 2 cream side borders, 3 1/2 x 53 1/2 inches
- 2 cream top and bottom borders, 3 1/2 x 59 1/2 inches
Arrange the Nine House Blocks
Lay the houses out in the following order, keeping every block upright.
| A Cream Tower |
B Purple Gable |
C Sage Tower |
| D Checker Roof |
E Blue Dormers |
F Purple Tower |
| G Brick Cottage |
H Pink Gables |
I Sage Manor |
Sew the Three House Rows
- Place one 1 3/4 x 16 1/2-inch green sashing strip between Houses A and B and another between B and C.
- Pin the edges carefully, matching the tops and bottoms of the blocks. Sew with a 1/4-inch seam and press toward the green sashing.
- Repeat with Houses D, E and F.
- Make the third row with Houses G, H and I.
Each completed house row should measure 51 x 16 1/2 inches before it is joined to the other rows.
Make the Two Horizontal Sashing Rows
- Take three green sashing strips and two red cornerstones.
- Arrange them in this order: green strip, red square, green strip, red square, green strip.
- Sew the five pieces together at their short ends with 1/4-inch seams.
- Press the seams and measure the row. It should be 51 inches long and 1 3/4 inches high.
- Make a second identical sashing row.
Join the Quilt Center
- Lay out the first house row, a horizontal sashing row, the second house row, the second sashing row and the third house row.
- Pin the first house row to the sashing row, matching the red cornerstones with the vertical green sash strips.
- Sew with a 1/4-inch seam. Continue joining the remaining rows in order.
- Press carefully toward the green sashing wherever practical.
- Measure the complete quilt center. It should be 51 x 51 inches before adding the outer frame.
If the seams don't line up, check the measurements before sewing the next row. Don't pull or stretch a shorter section to make it fit.
Add the Outer Green Frame
- Sew one 1 3/4 x 51-inch green strip to the left side and the other to the right side.
- Press the seams toward the green strips.
- Add the two 1 3/4 x 53 1/2-inch green strips across the top and bottom.
- Measure the framed quilt center. It should be 53 1/2 inches square before the cream border is attached.
Add the Cream Holly Border
- Attach the two cream strips measuring 3 1/2 x 53 1/2 inches to the left and right sides.
- Press the seams toward the cream fabric.
- Add the two cream strips measuring 3 1/2 x 59 1/2 inches to the top and bottom.
- Press and measure. The quilt top should now be 59 1/2 inches square before binding.
The cream border gives you room for the holly leaves and red berries without crowding the houses.
Place the 22 Holly Clusters
The holly border uses five clusters across the top, five across the bottom and six down each side. The corners remain plain cream.
Each full-size holly cluster occupies an area approximately 6 inches long and 1 3/4 inches high. Use the printable leaf and berry guides to keep the shapes consistent.
The following positions are measured in inches from the upper-left corner of the finished 59-inch quilt design. When measuring from the unfinished top's raw edges, add 1/4 inch to each coordinate.
- Top border: Center the five clusters at 7, 18 1/4, 29 1/2, 40 3/4 and 52 inches from the left. Their vertical centers are 1 1/2 inches from the finished top edge.
- Bottom border: Use the same five horizontal positions, with the centers 1 1/2 inches above the finished bottom edge.
- Left border: Center the six clusters 1 1/2 inches from the finished left edge. Measure down 5 1/2, 15 1/8, 24 11/16, 34 5/16, 43 7/8 and 53 1/2 inches for their centers.
- Right border: Repeat those six vertical positions, centering the clusters 1 1/2 inches from the finished right edge.
Turn the side-border holly units 90 degrees so the leaves run up and down the quilt rather than across it.
- Place the two green leaves for each cluster with their tips pointing in opposite directions.
- Check the spacing along the entire border before fusing any leaves.
- Fuse the leaves in place and stitch around their raw edges.
- Embroider the three red berries for each cluster using the printed 3/8-inch circles.
- Repeat until all 22 clusters are complete.
Layer and Quilt the Christmas Village
- Cut two backing lengths, each 72 inches long, from fabric with at least 40 inches of usable width.
- Join the backing pieces with a 1/4-inch seam and press the seam open. The joined backing measures approximately 79 1/2 x 72 inches before trimming.
- Square the backing to at least 67 x 67 inches. Cut the batting to at least the same size.
- Place the backing wrong side up. Center the batting over it, followed by the quilt top right side up.
- Smooth the layers and baste with your preferred method.
- Quilt around the houses, roofs, windows, snowy ground and border leaves as desired. Keep within the batting manufacturer's recommended quilting distance.
I'd keep the quilting in the dark sky fairly light so the navy background still gives each house plenty of breathing room. You can outline the roofs and snowbanks without adding heavy quilting over all those little windows.
Add the Red Binding
- Cut seven red binding strips, each 2 1/2 inches wide by approximately 40 inches long.
- Join the strips diagonally, trim the excess seam allowances and press the joins open.
- Fold the long binding strip in half lengthwise with wrong sides together and press.
- Square the quilt, retaining the intended outer 1/4-inch seam allowance.
- Attach the binding to the front of the quilt with a 1/4-inch seam. Miter the corners and join the binding ends diagonally.
- Fold the binding to the back and stitch it in place by hand or machine, covering the original seam.
The calculated finished quilt size is 59 x 59 inches. Quilting and washing can change the final measurement a little, so measure the quilt again after it is finished.
How to Print and Assemble the Full-Size Quilt Templates
The template PDF contains 122 pages, but you don't need to print every page at once. Start with the house you're making and print only its templates.
The larger roof pieces and snowbanks are spread across more than one sheet of paper. They're printed at actual size, with matching marks to help you put the pieces together.
Printing Instructions
- Open the full-size template PDF and select the pages for your chosen house.
- Choose US Letter paper.
- Set the print size to Actual Size or 100%. Turn off Fit to Page, Shrink to Fit and any borderless expansion settings.
- Print one page first. Measure the 1-inch test square in both directions with an accurate ruler.
- If the square doesn't measure exactly 1 inch by 1 inch, correct the printer settings before printing more pages.
Joining Large Templates
The large shapes use 6 x 8-inch tile sections with a 1/4-inch overlap in the printed drawings.
- Find the row and column labels on the template pages. R1C1 means row one, column one.
- Arrange the pages in their numbered order. Keep them upright.
- Trim one sheet along the printed dashed tile boundary.
- Overlap the adjoining sheet until the matching outlines and crosshairs line up.
- Tape the pages together without stretching or shifting them.
- Check the completed roof or snowbank against the bounding-box measurements in the pattern chart.
- Cut out the paper shape along its solid outside outline.
Don't use the physical edges of the printer paper to line up the pieces. Use the printed tile boundaries and matching marks.
Transferring the Appliqué Pieces
- Place tracing paper over the printed template and copy the cutting outline.
- Turn the tracing over before transferring the outline to the paper side of the fusible web. This gives you the necessary reversed tracing.
- Follow the fusible-web manufacturer's directions to attach the web to the wrong side of your chosen fabric.
- Cut the fabric along the traced outline. Don't add a seam allowance.
- Remove the paper backing and place the appliqué on the quilt block at the measured position.
- Check the complete arrangement before pressing the pieces permanently into place.
- Fuse as directed, then secure the raw edges with a narrow zigzag or small blanket stitch.
Embroidery guides are different. Transfer them upright, exactly as printed, without reversing the design.
Before cutting all your fabric: Assemble and measure at least one large roof template and one full-width snowbank. These are important printing checkpoints because even a small scaling error can affect the fit of the house blocks.
Christmas Village Quilt Pattern Review and Construction Checkpoints
This Snowy Christmas Village quilt pattern was prepared with measured cutting charts, individual house diagrams and full-size printable templates. The block measurements, quilt assembly calculations and digital template sizes have been checked.
The pattern has not yet been physically sewn or tested. That means the measurements are calculated, not measurements taken from a completed fabric quilt.
If you're making this quilt, I recommend checking your first block carefully before cutting fabric for the remaining eight houses.
Measurements to Check as You Sew
- Foundation blocks: Each should measure 16 1/2 x 16 1/2 inches before appliqué.
- Finished appliqué blocks: Recheck for 16 1/2 inches square after the decorative stitching.
- Three house rows: Each should measure 51 x 16 1/2 inches before joining.
- Horizontal sashing rows: Each should measure 51 x 1 3/4 inches.
- Joined nine-house center: 51 x 51 inches unfinished.
- Center with green outer frame: 53 1/2 x 53 1/2 inches unfinished.
- Top after cream borders: 59 1/2 x 59 1/2 inches unfinished.
- Expected finished design: 59 x 59 inches before any quilting or washing shrinkage.
Pay particular attention to House D's pieced checkerboard roof, the overlapping gables on House H and the dormers and porch decorations on Houses E and I. They have more layers than the simpler cottages.
After adding appliqué, check for puckering, stiff overlapping layers or any change in the block's size. Correct those problems before joining the blocks. If a seam or border is off by more than 1/8 inch, check the measurements and seam allowances rather than stretching the fabric to fit.
The finished example image on this page is a measured design illustration, not a photograph of a physically sewn sample. Your fabric choices, stitching and quilting will give your finished quilt its own handmade appearance.
Christmas Village Quilt Pattern FAQs
Is this Christmas village quilt suitable for beginners?
I'd recommend it for an intermediate quilter or someone who is already comfortable with basic patchwork and fusible appliqué. The large house pieces are straightforward, but the dormers, overlapping roofs, checkerboard roof and embroidery need more careful placement.
Do I have to print all 122 template pages?
No. Print only the pages for the house or decoration you're working on. Some large roof and snowbank pieces need several sheets taped together, while smaller components fit on individual pages. Always print at 100% scale and check the test square.
Can I use machine embroidery instead of hand embroidery?
Yes. The wreaths, berries, bows, snow dots and other small decorations can be embroidered by machine using the printed guides. Test your stitch density and stabilizer first, especially for the filled red berries. The templates also include optional fabric appliqué methods for the wreath rings and holly berries.
Can I use traditional turned-edge appliqué?
The supplied appliqué templates are designed for raw-edge fusible appliqué and do not include turned-edge seam allowances. You would need to adjust the templates and overlaps for a turned-edge method. For the quilt shown here, follow the fusible-appliqué instructions.
Will the finished quilt measure exactly 59 inches square?
The pattern is calculated to finish at 59 x 59 inches before washing. Your sewing accuracy, appliqué stitching, quilting and washing can affect the final measurement. Check the size at each stage instead of waiting until the quilt is finished.
If you'd like another project after making the village, browse the Christmas quilt patterns collection for more holiday quilting ideas.
When you click on links to various merchants on this site and make a purchase, this may result in this site earning a commission. This does not affect the price you pay.

UBGI Gold Standard 2026
Reviewed under the site's
editorial checklist.
Photos, decorating ideas, party setups and reader submissions are shared for inspiration unless a page is specifically presented as a pattern, tutorial, reference guide or step-by-step project. Follow the instructions, measurements, safety guidance and manufacturer directions provided for the particular project or product.
About Jan | Contact | Baby Nursery Ideas (Blog) | Site Map | Privacy Policy | Disclosure Policy | Disclaimer | Affiliate Disclosure | Earnings Disclosure | Facebook | Pinterest
I am a participant in the Amazon Services LLC Associates Program, an affiliate advertising program designed to provide a means for us to earn fees by linking to Amazon. As an Amazon Associate I earn from qualifying purchases.
Copyright © 2006-2026. All Rights Reserved.