Free Candy Cane Quilt Pattern – Peppermint Cottage Christmas
By Jan Bay
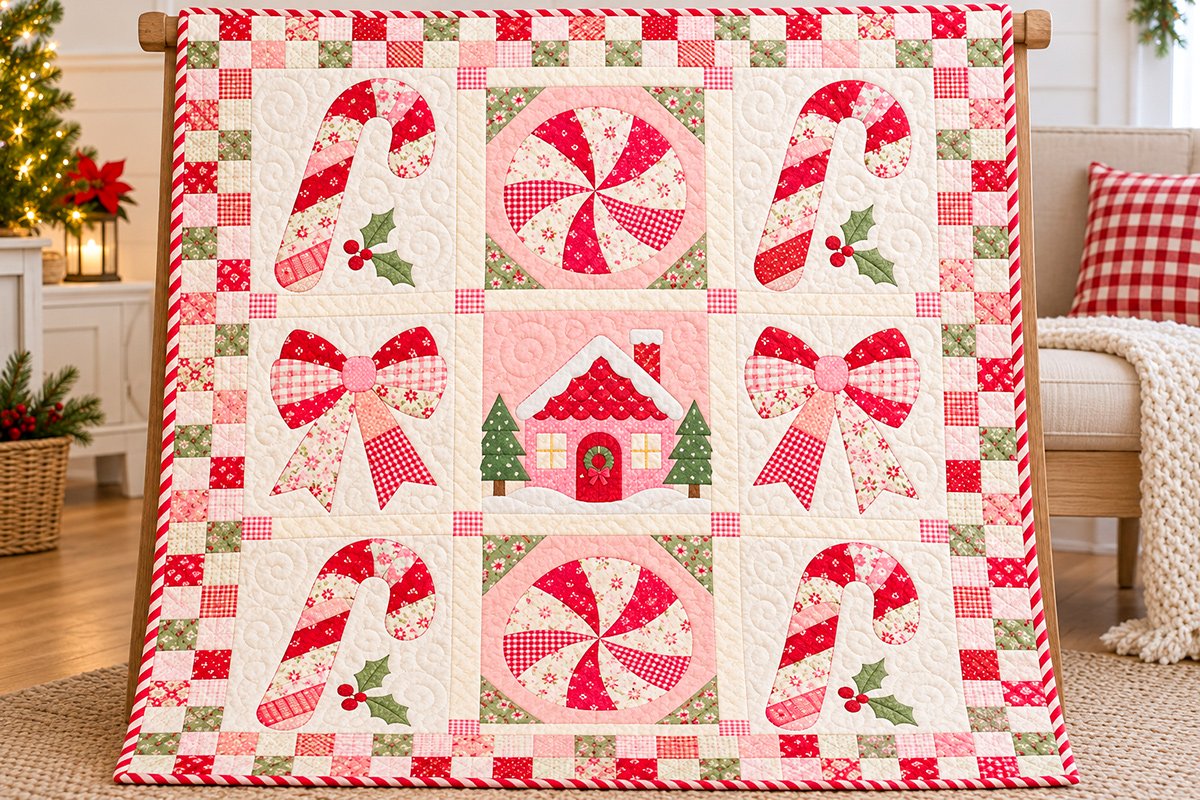
This free candy cane quilt pattern is for anyone who loves old-fashioned Christmas patchwork but wants something a little different from the usual holly berry red-and-green quilt. I'm calling it Peppermint Cottage Christmas because the little pink house in the middle reminds me of a storybook cottage dressed up for the holidays. Four striped candy canes, two peppermint pinwheels and two big patchwork bows surround it, with a checkerboard border made from cranberry reds, pale pinks, sage greens and warm cream prints. I'll show you how to make every block, put the quilt together and use the full-size templates for the shaped pieces.
Explore More Free Christmas Quilt Patterns
Gingerbread House Quilt Pattern
Christmas Tree Irish Chain Quilt Pattern
See Supplies for This Project Here.
Jump to the Peppermint Cottage Christmas Quilt Instructions
- Finished Quilt Size and Layout
- Free Printable Pattern and Templates
- Fabric and Supplies
- Complete Cutting Chart
- Printing and Preparing Templates
- Four Candy Cane Blocks
- Two Peppermint Blocks
- Two Patchwork Bow Blocks
- Pink Christmas Cottage
- Assembling the Quilt Center
- Checkerboard Border
- Quilting and Binding
- Sewing and Measurement Checks
Free Candy Cane Quilt Pattern: Size and Layout
Peppermint Cottage Christmas has nine large blocks, but you'll only be making four different designs. That's one reason I like this arrangement. Once you've worked out the first candy cane, the next three use the same pattern. The peppermint pinwheels repeat too, and the two bows share their shapes while using different fabric combinations.
The little pink cottage sits right in the middle. I would keep it there. Between the snowy roof, tiny windows and Christmas trees, it has enough detail to be interesting without needing extra decorations around it.
The quilt has a calculated finished patchwork size of 39 × 46 1/2 inches, making it a nice size for a decorative Christmas baby quilt or wall hanging. Your actual measurements may change slightly after quilting, binding and washing.
- Finished quilt: Approximately 39 × 46 1/2 inches.
- Unquilted quilt top: 39 1/2 × 47 inches, measured to the raw edges.
- Individual finished blocks: 10 1/4 × 12 3/4 inches.
- Number of blocks: Nine, consisting of four candy canes, two peppermint pinwheels, two patchwork bows and one cottage.
- Sashing: 1 1/8 inches finished in both directions.
- Checkerboard border: 3 inches finished, with two rows of 1 1/2-inch squares.
- Piecing seam allowance: 1/4 inch.
- Construction: Traditional straight-seam patchwork combined with layered raw-edge fabric appliqué and embroidery.
- Suggested skill level: Intermediate, or an experienced beginner who is comfortable with appliqué and precise cutting.
The candy canes and peppermint swirls may look as though every little colored section has been sewn into a curved patchwork seam. You don't have to do that. You'll use full-size fabric shapes, layer the colored sections over a light base and stitch around their edges. The checkerboard border and sashing are traditionally pieced.
How the Nine Quilt Blocks Are Arranged
Start with a candy cane in each corner. The peppermint pinwheels sit between the upper and lower candy canes, while the two bows frame the cottage in the center row. All four candy cane hooks point to the right.
The downloadable R3 assembly guide shows the full nine-block arrangement and individual placement maps. Follow its two different bow fabric layouts rather than making both bows identical. The original quilt picture shows the finished appearance we're working toward, while the assembly guide controls the cutting and placement measurements.
I've kept the checkerboard squares small and the cream strips between blocks fairly narrow. Those proportions are worth keeping. A wider border or heavy sashing would change the look of the quilt quite a bit.
Before you begin: The measurements and printable templates have been checked digitally, but a complete quilt has not been physically sewn from this pattern. I recommend making a sample of each block design before cutting all your fabric. You'll find specific measurements and things to check as you work through the instructions.
Free Printable Candy Cane Quilt Pattern and Templates
I've separated the instructions from the printable templates so you can keep the pattern handy while working on your quilt. The full-size candy cane, peppermint, bow and cottage pieces are included, along with placement diagrams showing exactly where everything belongs.
Download the free Peppermint Cottage Christmas pattern files:
Download the Complete Quilt Pattern and Cutting Instructions (11-page PDF)
Download the Full-Size Appliqué Templates and Assembly Guide (45-page PDF)
The second PDF combines all 24 pages of full-size appliqué templates with the 21-page assembly guide. You'll find the individual cutting shapes, block diagrams and full-size placement maps together in one file.
Printing tip: Print the templates at Actual Size or 100%, with Fit to Page turned off. Measure the printed control rectangle in both directions before cutting fabric. You only need to print each template master once and can reuse it for the repeated blocks.
The pattern has been digitally checked but hasn't been physically sewn or wash-tested. I recommend making a sample of each block design and checking the appliqué edges and measurements before cutting fabric for the whole quilt.
Fabric and Supplies for Peppermint Cottage Christmas
I'd choose the fabrics before cutting a single block. This quilt gets much of its personality from the mixture of tiny Christmas florals, ginghams, little red prints and pale pinks. You don't need a matching fabric collection, but the prints should look as though they belong together.
Keep the background warm cream rather than bright white. For the reds, I'd mix cranberry with a few cheerful Christmas-red prints. The sage green belongs mostly in the peppermint corners, holly leaves, Christmas trees and checkerboard border.
Fabric Requirements
- Warm cream or cream floral quilting cotton: 3 yards, with at least 42 inches usable width. This covers eight backgrounds, sashing, cream checkerboard squares and pale appliqué pieces.
- Blush pink quilting cotton: 1 yard for the cottage background and two peppermint background panels.
- Small red prints: 4 fat quarters, each with at least 18 × 21 inches of usable fabric.
- Red and pink gingham: 2 fat quarters.
- Small vintage floral prints: 2 fat quarters.
- Pink accent prints: 2 fat quarters.
- Muted sage green: 1/2 yard.
- Pale tan: A scrap at least 6 × 6 inches for window panes.
- Brown: A scrap at least 4 × 6 inches for tree trunks.
- Red-and-cream diagonal stripe fabric: 1/2 yard for the binding, using a diagonal stripe print suitable for straight-grain cutting.
- Paper-backed lightweight fusible web: Approximately 4 yards, at least 17 inches wide.
- Quilt backing: 3 1/4 yards of quilting cotton with at least 42 inches usable width.
- Batting: At least 48 × 56 inches, or more if your quilting method requires it.
Other Sewing Supplies
- Matching sewing and appliqué threads.
- Red, green and tan embroidery thread.
- Sewing machine and appropriate machine needles.
- Rotary cutter, cutting mat and quilting ruler.
- Small fabric scissors for curved appliqué pieces.
- Iron and pressing surface.
- Washable or removable fabric-marking tools.
- US Letter printer paper for the templates.
- Quilting pins or another suitable basting method.
The yardage calculations assume non-directional prints and the usable fabric sizes listed above. If you're choosing larger floral designs that need careful placement, buy a little extra. You may need to shift the templates around to keep a particular flower or gingham stripe where you want it.
I'd also keep a few extra scraps for practice. The little appliqué shapes are easier to work out on inexpensive fabric than on the prettiest pieces you've chosen for the finished quilt.
Cutting the Candy Cane Quilt Fabric
Cut the large backgrounds first, then reserve the fabric you'll need for the checkerboard border. I would do that before cutting the little appliqué pieces. Otherwise, it's easy to use up a favorite red print and discover you don't have enough of it left for the border.
All measurements in the chart below are raw fabric cutting sizes. They include the 1/4-inch piecing seam allowances where needed.
Backgrounds, Sashing and Cornerstones
| Fabric piece | Quantity | Cutting size |
|---|---|---|
| Cream block backgrounds | 8 | 11 1/4 × 13 3/4 in. |
| Pink cottage background | 1 | 11 1/4 × 13 3/4 in. |
| Vertical cream sashing | 6 | 1 5/8 × 13 1/4 in. |
| Horizontal cream sections | 6 | 1 5/8 × 10 3/4 in. |
| Gingham cornerstones | 4 | 1 5/8-inch squares |
The eight cream backgrounds are for four candy cane blocks, two peppermint blocks and two bows. The cottage gets the single pink background. Each peppermint block will also have a separate pink appliqué panel placed over its cream background.
Leave the background rectangles oversized while you work on the appliqué. Once the designs are stitched, trim each block to 10 3/4 × 13 1/4 inches. Don't cut them to that smaller size before doing the appliqué.
Checkerboard Border Cutting Chart
| Fabric | Quantity | Cutting size |
|---|---|---|
| Cream squares | 106 | 2 × 2 in. |
| Mixed red-print squares | 40 | 2 × 2 in. |
| Pink-print squares | 26 | 2 × 2 in. |
| Sage squares | 20 | 2 × 2 in. |
| Light floral squares | 10 | 2 × 2 in. |
| Gingham squares | 10 | 2 × 2 in. |
That's 212 checkerboard squares altogether: 106 cream and 106 assorted prints. Each one finishes at 1 1/2 inches after sewing. You can change the exact mix of prints if you prefer more pink or less sage, as long as you retain 106 printed squares and enough contrast with the cream ones.
Binding and Backing
- Binding: Cut six strips, each 2 1/2 inches wide across 42 inches of usable fabric.
- Backing: Cut two panels, each 42 × 56 inches. Join them along their 56-inch edges with a 1/2-inch seam, then trim to at least 48 × 56 inches.
- Batting: Cut a piece at least 48 × 56 inches, or larger if required for your quilting setup.
A Practical Cutting Order
From the cream yardage, cut three 13 3/4-inch-wide bands across the usable fabric width. Cut three 11 1/4-inch-wide backgrounds from each band. You'll have nine available and need eight.
Cut one 13 1/4-inch band for the twelve sashing pieces. Cut six 1 5/8-inch-wide pieces at 13 1/4 inches long and six at 10 3/4 inches long.
Cut six 2-inch-wide cream strips across the fabric width. At 42 inches usable width, each produces twenty-one 2-inch squares. Cut the required 106 squares and reserve the extras.
From the blush background fabric, cut one 13 3/4-inch band and use it for the cottage background. Reserve the remaining blush fabric for the two large peppermint panels and other pink pieces.
Cut the 106 printed border squares from the mixed Christmas fabrics. Put them in a separate labeled bag.
Cut the binding strips, then set aside the remaining fabrics for the appliqué templates.
That cutting plan leaves fabric for the appliqué pieces under the stated yardage assumptions. If you've prewashed the fabric, measure the usable width and length again before following it.
Don't cut all the appliqué fabric yet. Print the templates, check their scale and make your first sample block before cutting every duplicate. The shaped pieces need their full-size paper patterns.
How to Print and Use the Full-Size Quilt Templates
Before cutting the candy canes or peppermint swirls, get the paper patterns printed correctly. These pieces were drawn at actual size, and even a small printing change can affect how they fit together.
Open the combined 45-page Templates and Assembly Guide PDF. Pages 1 through 24 contain the full-size cutting templates. Pages 25 through 45 contain the assembly diagrams and placement maps. Select US Letter paper and print only the pages you need.
Choose Actual Size or 100% in the printer settings. Turn off Fit to Page, Shrink to Fit and automatic enlargement.
Print one page first. Each template page has a control rectangle that must measure exactly 1 inch wide × 1/2 inch high. Check both directions with a ruler.
If either measurement is wrong, change the printer settings and print again. Don't adjust the fabric cutting sizes to compensate for an incorrectly printed template.
Print the remaining pages at the same settings. Several smaller shapes share a page, while the larger pieces are divided across numbered sheets.
For a large tiled shape, match the dashed registration boxes and repeated outlines. Trim one paper edge where directed, overlap the sheets until the printed shapes line up, and tape them together.
Cut out the complete paper master only after all of its tiles have been joined. Keep that master for tracing repeated pieces.
The printed registration boxes for large cutting templates measure 7 1/4 × 8 3/5 inches. The separate full-size placement maps use quadrants measuring 5 1/8 × 6 3/8 inches. The printed outlines and matching marks control the pieces. Don't use the outside edges of your printer paper to line them up.
Getting the Appliqué Direction Right
All the templates show the finished shapes facing up, as you'll see them on the quilt. Some are turned sideways on the printed sheet to save paper, so use the placement guide to get their final position right.
For paper-backed fusible web, reverse the template before tracing it onto the paper side of the fusible. A light box or bright window makes that easier. After fusing the web to the wrong side of your chosen fabric and cutting the shape, it will face the correct way on the quilt.
All four candy cane hooks should curve to the right in the finished quilt. Don't accidentally make two mirror-image canes.
These are raw-edge appliqué templates. Cut on the printed solid outlines without adding a turn-under seam allowance. The few pieces that extend into a block seam already have their extra fabric included in the template.
Mark the Finished Area on Each Background
On each oversized 11 1/4 × 13 3/4-inch background, mark a centered rectangle measuring 10 1/4 × 12 3/4 inches. Its edges will be 1/2 inch inside the outer raw fabric edges.
Use that marked rectangle to position the full-size placement guide. The guide measures from the finished block area, not from the outside of the oversized background.
When the appliqué is complete, you'll trim the block to 10 3/4 × 13 1/4 inches, leaving exactly 1/4 inch outside the marked finished rectangle on all four sides.
Choose Your Fusible and Appliqué Stitch
I'd use a lightweight, washable paper-backed fusible web and matching thread for the fabric edges. A small zigzag or blanket stitch can hold the pieces in place while keeping the design neat.
Follow the pressing directions for the particular fusible you buy. The fabric, temperature, pressing time and pressure all matter. Pellon has a useful fusible interfacing and appliqué FAQ if you want more information about how these products behave.
Test the fusible and stitch on scraps first. Stitch around every exposed appliqué edge, including the internal color divisions. Don't depend on the fusible alone to finish the edges of a quilt that may be washed.
Make a Sample Before Cutting All Nine Blocks
Because the pattern was digitally engineered but hasn't been physically test-sewn, I recommend making one sample candy cane, one peppermint, both versions of the bow and the cottage before committing your best fabric to the whole quilt.
Check that the pieces lie flat, the stitching doesn't pull the background out of shape and the appliqué stays where the placement map shows it. Measure each block after pressing and make sure it can be trimmed to 10 3/4 × 13 1/4 inches without losing a design detail.
Pay particular attention to the bottom of the candy cane, where the appliqué comes close to the seam line. The peppermint center and small cottage decorations are worth testing too.
If a shape shifts, puckers or becomes too stiff after layering, adjust the fusible, fabric or stitching method on your sample before making the remaining blocks. Keep the approved outline and placement rather than trimming away a troublesome design detail.
Making the Four Candy Cane Quilt Blocks
These are the blocks that give the quilt its name. Each candy cane has a long striped stem, a broad rounded hook and a small holly decoration near the lower right. I'd mix the little red, cream, gingham and floral prints rather than making every colored stripe from the same fabric.
You'll make four blocks, all with the same shape and the hooks facing right.
Candy Cane Pieces for All Four Blocks
- A0: Cut 4 complete candy cane bases from light cream floral fabric.
- A1: Cut 4 from small red prints.
- A2: Cut 4 from blush or pink floral fabric.
- A3: Cut 4 from small red prints.
- A4: Cut 4 from gingham.
- A5: Cut 4 from gingham.
- A6: Cut 4 from small red prints.
- A7: Cut 4 from small red prints.
- AL1 and AL2: Cut 4 of each holly leaf from sage green.
- AB: Cut 12 red berries, three for each candy cane.
Some of the stripe IDs contain more than one separate printed shape. Keep every piece belonging to that ID together when cutting. Use the full-size A placement map to position the stripes, including those around the hook.
Step 1. Place the Candy Cane Base
Lay one cream background right side up and transfer the marked finished-block rectangle.
Trace A0 in reverse onto the paper side of the fusible web. Fuse it to the wrong side of the light cream floral fabric, then cut on the full-size outline.
Remove the paper backing and arrange the candy cane on the background according to the A placement map.
Check that the hook faces right, the rounded lower end is positioned above the finished bottom seam line, and the complete cane fits within the intended area.
Fuse the base using the manufacturer's directions. Stitch around its exposed outer edge with your chosen narrow appliqué stitch.
Leave the pale base as one complete piece. It sits beneath all the colored stripes, so you don't have to join the curved bands with piecing seams.
Step 2. Add the Patchwork Candy Cane Stripes
Prepare one set of A1 through A7 using the fabric assignments above.
Place the patches over A0 according to their numbered locations on the full-size map. A6 and A7 belong among the shaped hook patches.
Leave the light sections of the original base showing between the colored patches. Those exposed areas become the pale candy cane stripes.
Check that the colored edges meet the base outline where shown and that none of the internal pieces have been accidentally reversed.
Fuse the patches in manageable layers, working from the lower pieces to the upper ones where they overlap.
Stitch every exposed color boundary and outer arc. Secure the narrow pieces without pulling the fabric.
The A5 patch is particularly small. If your first sample shows that it puckers or gets stiff, try a narrower stitch or a lighter fusible on another scrap. I wouldn't cut that detail away simply to make the sewing faster.
Step 3. Add the Holly Leaves and Berries
Place AL1 and AL2 beside the lower part of the cane, following the printed placement guide.
Fuse and stitch both sage leaves.
Add a few green embroidered lines from the berry junction toward the leaf tips for the veins.
Position three red AB circles at the marked spots. Fuse and stitch around every berry.
Use fabric and thread only. The berries don't need beads, buttons or other separate decorations.
Step 4. Check the Candy Cane Block
Take a careful look at the lower rounded tip. In the engineered placement, it sits only about 0.11 inch above the finished bottom seam line. Make sure your appliqué stitch doesn't extend into that line or get caught when the block is joined to the sashing or border.
Press the block without stretching it. Check that the marked 10 1/4 × 12 3/4-inch finished rectangle still surrounds the design as intended, then trim the block to 10 3/4 × 13 1/4 inches.
Once the first cane has been measured and you've checked the stitching and seam clearance, make the other three in the same orientation. You can vary the small-scale prints while keeping the numbered patch shapes and their positions unchanged.
Making the Peppermint Pinwheel Quilt Blocks
I especially like these two blocks because they give the quilt a different shape between all those long candy canes. The peppermint circles have twelve curved color areas, so they look more like old-fashioned peppermint candies than ordinary patchwork pinwheels.
You'll make two identical blocks. Both have cream background strips above and below a blush pink panel, with sage triangles tucked into the pink corners.
Peppermint Pieces for Both Blocks
- BP: Cut 2 large blush background panels.
- BC1, BC2, BC3 and BC4: Cut 2 of each sage corner piece.
- B0: Cut 2 complete cream or light floral circles.
- B1 and B4: Cut 2 of each colored curved sector from gingham.
- B2, B3, B5 and B6: Cut 2 of each colored curved sector from small red prints.
The full-size B0 circle measures approximately 8 1/2 inches across. The engineered outline is 8.5075 inches in diameter, so use the printed template rather than drawing a circle with a ruler or plate.
Step 1. Add the Blush Background Panel
Lay one oversized cream background right side up and mark its centered finished rectangle.
Cut BP from blush fabric using the full-size template. The panel has small side extensions that are designed to reach into the block seam.
Position BP using the B placement map, keeping the cream background visible above and below the panel.
Fuse BP and stitch the exposed upper and lower boundaries. Leave the intended side seam extensions in place.
Step 2. Add the Sage Corners
Cut BC1, BC2, BC3 and BC4 from sage fabric. Don't substitute one corner shape for another without checking its orientation.
Position the four corners according to their individual numbers on the B placement map.
The diagonal points should face toward the center of the pink panel.
Fuse the pieces and stitch their exposed edges. The outer seam extensions will be held by the block assembly seams.
Step 3. Make the Peppermint Circle
Cut B0 from cream or pale floral fabric. Keep it in one complete piece.
Find the center of the finished block at 5 1/8 inches from the left and 6 3/8 inches from the top.
Center B0 over that point, following the full-size placement map. Fuse it to the pink panel and stitch around its outer edge.
Cut the six colored curved pieces B1 through B6. Use gingham for B1 and B4, with small red prints for the other four.
Lay the colored pieces onto the cream base in numerical order using the placement guide. Don't rotate them as though they were ordinary straight-sided quilt triangles.
Check that all six inner tips meet at the same center point, with six cream sections visible between the colored ones.
Fuse each section carefully and stitch its curved sides and outer arc.
The sections are appliquéd over one continuous circle. You aren't sewing twelve narrow curved wedges together with seam allowances. Keeping the circle whole underneath makes those sweeping curves much easier to manage.
Step 4. Check the Peppermint Center
Before making the second block, examine the point where all the colored sectors meet. Too much thread or fusible gathered at that spot can make the center bulky.
Use a scrap sample to settle on a stitch width that will secure the edges without building a hard knot. Make sure the circle remains round and lies flat after pressing.
Trim the completed block to 10 3/4 × 13 1/4 inches. Repeat the same construction for the second peppermint block, keeping the center and corner placements consistent.
Making the Two Christmas Patchwork Bow Blocks
The bows deserve a little attention because I don't want them looking like two identical decorations stamped out of the same fabric. The shapes match, but the fabric arrangements are different. That little variation is part of what makes the original quilt so pretty.
Both bows have broad rounded loops, a little round center knot and two long tails with notched ends. The red prints give them shape, while the gingham and florals keep them from looking too formal.
Bow Templates and Cutting Quantities
Make two of every bow shape listed below:
- CTL: Left tail base.
- CTLp: Left tail lower contrast panel.
- CTR: Right tail base.
- CTRp: Right tail lower contrast panel.
- CL and CR: Left and right rounded loop bases.
- CLg and CRg: Gingham loop bands.
- CLf and CRf: Light floral loop sections.
- CK: Rounded center knot.
Fabric Placement for the Two Different Bows
| Piece | Left bow | Right bow |
|---|---|---|
| CTL | Light floral A | Blush floral |
| CTLp | Light floral B | Red gingham |
| CTR | Blush floral | Light floral A |
| CTRp | Red gingham | Light floral B |
| CL / CR | Small red prints | Small red prints |
| CLg / CRg | Pink/red gingham | Pink/red gingham |
| CLf / CRf | Light vintage floral | Light vintage floral |
| CK | Small pink print | Small pink print |
Use two different pale florals for fabrics A and B. They can coordinate, but the slight difference helps the divided tails look like patchwork rather than one uninterrupted piece.
Step 1. Assemble the Bow Tails
Begin with one oversized cream background and the C placement map.
Choose the fabric assignments for the left bow first. Cut CTL and CTR using the actual-size templates.
Position the tails beneath the future loops. Their outward angles and V-shaped ends are already part of the templates, so don't turn them again to create the angle.
Fuse the two tail bases and stitch their exposed edges.
Add CTLp and CTRp over their corresponding tail bases. Align the contrast sections with the printed map and stitch the exposed edges and joins.
Step 2. Make the Rounded Bow Loops
Cut CL and CR from small red prints.
Place both loops over the upper ends of the tails, using the C placement map to keep the rounded outer edges full.
Fuse the loops and stitch the exposed outer edges.
Add CLg and CRg using the gingham fabric. Follow the marked band positions rather than trying to make the strips perfectly horizontal by eye.
Add CLf and CRf from the light floral fabric, leaving the red loop fabric visible where shown.
Stitch each exposed color division and curved edge, then press without flattening or stretching the shapes.
Step 3. Add the Center Knot
Cut CK from pink fabric using the rounded knot template.
Center it over the meeting point of the loops and tails.
Check that the knot covers those ends without hiding too much of the rounded loop shapes.
Fuse and stitch around the full knot outline.
Step 4. Make the Second Bow
Make the right bow using the same templates, but follow the right-bow fabric column in the table. Don't reverse the complete block. The shapes keep the same positions; only the fabric combinations change.
Place both bows side by side before trimming. On the left bow, the lower left tail is floral and the lower right tail is gingham. On the right bow, that arrangement is reversed.
Check the V-notched tail ends and the overlapping center knots for bunching or loose edges. Trim each completed bow block to 10 3/4 × 13 1/4 inches.
Making the Pink Christmas Cottage Quilt Block
Now for my favorite part of the quilt. The little cottage has a red scalloped roof, snowy trim, two windows, a rounded front door and a tiny wreath. Two sage Christmas trees stand beside it, with a low drift of snow along the bottom.
I'd keep the cottage fabrics fairly small in scale. A tiny floral or dotted pink print looks lovely on the walls, while a deeper red helps the roof and door stand out. The details are already in the pattern, so you don't need to add more decorations.
Cottage Appliqué Pieces
- DCH: Cut 1 red chimney.
- DCC: Cut 1 cream chimney snow cap.
- DB: Cut 1 pink cottage front.
- DR: Cut 1 red scalloped roof.
- DS: Cut 1 continuous cream roof snow trim.
- DD: Cut 1 rounded red door.
- DW: Cut 2 cream window bases.
- DP: Cut 8 pale tan window panes.
- DTK: Cut 2 brown tree trunks.
- DTL: Cut 1 left sage Christmas tree.
- DTR: Cut 1 right sage Christmas tree.
- DN: Cut 1 low cream snowbank.
- DH: Cut 1 sage wreath with an open center.
- DBW: Cut 1 small red wreath bow-loops piece.
The two windows use four separate tan panes each. The cream fabric showing between those panes forms the window frames. The wreath berries and little bow tails are embroidery, so you don't need additional fabric templates for them.
Step 1. Make the Cottage and Roof
Begin with the oversized blush pink background. Mark the centered 10 1/4 × 12 3/4-inch finished rectangle.
Place the full-size D placement map beneath the fabric or transfer its key positions with a removable marker.
Cut DCH from red fabric and position the chimney according to the map. Fuse and stitch its exposed edges.
Add the cream DCC snow cap to the chimney. Fuse and stitch around the visible edges.
Cut DB from a small-scale pink print and position the cottage front. Fuse it and stitch its exposed boundaries.
Cut DR from red fabric, preserving the scalloped lower edge. Place it over the top of the cottage front. Fuse and stitch its exposed perimeter.
Take your time cutting that scalloped roof edge. The repeated curves give the cottage much of its character, and I wouldn't replace them with one straight line.
Step 2. Add the Stitched Roof Scallops and Snow Trim
Transfer the dashed scallop lines shown inside the DR roof template. These are stitching guides, not additional cutting lines.
Use dark-red thread and a fine machine stitch or hand backstitch to follow the repeated scallop rows across the roof.
Secure the thread ends on the back. Keep the stitching even, but don't crowd it so closely that the fabric puckers.
Cut DS from cream fabric. It forms one continuous piece of snow trim along both sloping sides of the roof.
Position DS over the roof edge, allowing it to cover the upper ends of the decorative roof stitching where shown.
Fuse and stitch around the exposed inner and outer edges of the snow trim.
The roof texture comes from stitching on the red fabric. You don't need to cut a separate little fabric scallop for every row.
Step 3. Add the Front Door and Two Windows
Cut DD from the chosen red print and position the rounded doorway in the center of the cottage front. Fuse and stitch it.
Cut two DW window bases from cream fabric. Place one on each side of the door using the D map.
Fuse and stitch around the window bases.
Cut eight DP panes from pale tan fabric, four for each window.
Arrange the panes inside the cream window shapes. Leave the little cream gaps visible between them to form the cross-shaped window dividers.
Fuse and stitch around the individual panes, using a narrow stitch that won't hide the cream dividers.
I'd test one window on a scrap before doing both. The panes are small, and it's worth finding a stitch that keeps those little cream lines visible.
Step 4. Make the Two Christmas Trees
Cut two DTK trunks from brown fabric and position them on either side of the cottage.
Cut DTL and DTR from sage fabric. These are two different tree shapes, so match each one to its marked side of the cottage.
Place the trees over the trunks, leaving the tiered branches visible.
Keep the small side extensions of the trees in the raw block margin. Those portions will be caught in the assembly seams.
Fuse and stitch the visible tree edges and branches.
If your tree fabric doesn't already have tiny pale prints, add a few flat cream stitches to suggest snow. Keep them small.
Step 5. Add the Snowbank
Cut DN from cream fabric using its full-size tiled template.
Place it along the bottom of the cottage scene, covering the lower ends of the house, doorway and tree trunks as shown.
Keep its seam extensions in the raw block margin. Don't trim them off before completing the block.
Fuse and stitch the shaped upper edge of the snowbank. Its lower edge will be secured during quilt assembly.
Step 6. Make the Tiny Wreath
Cut DH from sage green fabric. Remove its center opening so that the red door fabric will show through.
Position the wreath near the upper part of the front door according to the map.
Fuse and stitch both the outside edge and the inside opening.
Add DBW, the little red fabric bow loops, at the bottom of the wreath.
Embroider the two small bow tails in red thread following the dashed guides.
Add three tiny embroidered red berries at their marked positions. Use secured satin stitches or short flat stitches.
You can stop there. I wouldn't add beads, buttons or hanging ornaments to the cottage. The little stitched wreath and windows give it plenty of detail.
Step 7. Check the Finished Cottage
Before trimming, make sure the roof scallops, snowy trim, window panes and wreath all resemble the approved quilt design. Check that the tree branches remain visible and the snowbank hasn't covered too much of the doorway.
Press carefully, paying attention to the layers around the roof. Then trim the cottage block to 10 3/4 × 13 1/4 inches, preserving the portions of the appliqué designed to extend into the seam.
If any of the little details lift, distort or pull the background fabric while you're stitching, correct that on the sample cottage before making the final block.
Assembling the Peppermint Cottage Quilt Top
Once the nine blocks are finished, the next part is straightforward patchwork. The most important thing is to keep the seam allowance consistent and make sure the bows go on the correct sides of the cottage.
I would lay everything out on a large table or clean floor before sewing the rows. That gives you a chance to check the candy cane direction, peppermint positions and bow fabrics one more time.
Step 1. Check the Nine Blocks
Every completed and trimmed block should measure 10 3/4 inches wide × 13 1/4 inches high before assembly.
Check each block with a quilting ruler. If one is smaller, don't stretch the sashing to make up the difference. Find out whether the problem came from printing, cutting, pressing or stitching before joining the pieces.
Step 2. Arrange the Three Rows
Lay out the blocks in this order, viewing the quilt from the front:
- Top row: Candy cane, peppermint pinwheel, candy cane.
- Middle row: Left-fabric bow, pink cottage, right-fabric bow.
- Bottom row: Candy cane, peppermint pinwheel, candy cane.
All candy cane hooks face right. Make sure the bows have the opposite floral and gingham placements described earlier.
Step 3. Sew the Vertical Sashing
Use the six cream strips measuring 1 5/8 × 13 1/4 inches.
For the top row, place a strip between the first candy cane and peppermint block, then a second strip between the peppermint and the other candy cane.
Sew with an accurate 1/4-inch seam allowance and press without stretching.
Repeat for the middle and bottom rows.
Each completed row must measure 33 1/2 × 13 1/4 inches, including raw seam allowances.
If you're unsure about your seam allowance, sew two 2-inch fabric strips together first. With a 1/4-inch seam, they should measure 3 1/2 inches across after pressing. It's a quick check that can save a lot of adjustment later.
Step 4. Make the Horizontal Sashing Strips
Use the six cream pieces measuring 1 5/8 × 10 3/4 inches and the four gingham cornerstones measuring 1 5/8 inches square.
For the first horizontal strip, sew cream section, gingham cornerstone, cream section, gingham cornerstone, cream section.
Use 1/4-inch seams and press carefully.
Make the second strip in the same order.
Each completed horizontal strip should measure 33 1/2 × 1 5/8 inches.
Step 5. Join the Three Rows
Place the first horizontal sashing strip between the top row and the cottage row.
Match the gingham cornerstones to the vertical cream sashing seams above and below.
Pin the ends, matching seams and center before sewing. Join with a 1/4-inch seam.
Add the second horizontal sashing strip beneath the cottage row.
Join the bottom candy cane row, again matching the cornerstones to the vertical sashing.
Press the completed center without stretching any of the blocks.
The assembled nine-block center should measure 33 1/2 inches wide × 41 inches high before adding the checkerboard border.
Measure it in several places. If the center isn't square and the sashing seams don't line up, correct those differences before making the border fit. You don't want the checkerboard pulling the quilt out of shape.
Sewing the Christmas Checkerboard Quilt Border
Now you'll add the little patchwork squares that frame the whole quilt. This border is one of the details I especially wanted to keep from the original design. The squares are small enough to feel like vintage patchwork, but you won't need complicated piecing to make them.
The border is two squares deep all the way around the quilt. Each square starts at 2 × 2 inches and finishes at 1 1/2 × 1 1/2 inches.
How Many Squares Do You Need?
You'll use 212 squares in total: 106 cream and 106 assorted Christmas prints.
The finished border layout corresponds to a grid of 26 squares across and 31 squares down. Only the outside two rows and columns are checkerboard squares. The nine-block quilt center fills the middle.
Make the following four border sections:
- Left border: 2 squares wide × 27 squares tall, using 54 squares.
- Right border: 2 squares wide × 27 squares tall, using 54 squares.
- Top border: 26 squares wide × 2 squares tall, using 52 squares.
- Bottom border: 26 squares wide × 2 squares tall, using 52 squares.
Step 1. Make the Two Side Borders
For the first row of each side border, place a cream 2-inch square on the left and a printed 2-inch square on the right.
Sew them together with a 1/4-inch seam. The unfinished pair should measure 3 1/2 inches wide × 2 inches high.
For the next row, reverse the colors, placing the printed square on the left and the cream square on the right.
Continue alternating these two arrangements until each side border has 27 pairs.
Press the seam allowances of adjacent pairs in opposite directions so the seams can nest as you join them.
Sew the 27 pairs together from top to bottom, using 1/4-inch seams.
Measure each finished side strip. It should be 3 1/2 × 41 inches, including raw seam allowances.
Make both side strips using the same checkerboard arrangement, viewed from left to right. The first pair at the top is cream, then print. The following pair reverses it.
Step 2. Attach the Side Borders
Place the left border against the left side of the assembled center, right sides together.
Match the two ends, the center and the quarter points. Pin without stretching.
Stitch with a 1/4-inch seam and press.
Repeat for the right side.
After both side borders are attached, the quilt top should measure 39 1/2 inches wide × 41 inches high.
Step 3. Piece the Top Checkerboard Border
Arrange 26 squares across for the first row, beginning with cream and alternating cream, print, cream, print until the row ends with print.
Make the second row beginning with print, then cream, continuing to alternate across the row.
Join the 26 squares in each row using 1/4-inch seams.
Press adjacent rows in opposite directions where practical.
Sew the two rows together, matching the small square intersections.
The completed top border should measure 39 1/2 × 3 1/2 inches.
Step 4. Piece the Bottom Checkerboard Border
The bottom border starts with the opposite color arrangement so the checkerboard alternation stays correct around the corners.
Arrange 26 squares across for the first bottom-border row, beginning with print, then cream, and continuing to alternate.
Make the second row beginning with cream, then print.
Sew each row together and join the two rows using 1/4-inch seams.
Check that the finished bottom border also measures 39 1/2 × 3 1/2 inches.
Step 5. Attach the Top and Bottom Borders
Lay out both border strips against the quilt before sewing. Check that the checkerboard pattern alternates correctly where the corners meet.
Attach the top border first, matching the center and both ends. Sew with a 1/4-inch seam and press.
Attach the bottom border the same way.
Press the entire quilt top and check the outside edges for ripples or uneven seams.
The unquilted quilt top should now measure 39 1/2 × 47 inches from raw edge to raw edge.
Keep those little squares as even as you can. I wouldn't stretch a border to make it reach the quilt center. If the measurements disagree, check the seams and correct the problem before quilting.
Quilting and Binding Peppermint Cottage Christmas
I'd keep the quilting fairly gentle on this design. The little florals, ginghams and appliqué shapes already have plenty going on. Broad swirls or curved quilting lines in the cream backgrounds will give it that old-fashioned quilted appearance without making every block look crowded.
Before quilting the whole piece, test your chosen quilting pattern over a sample that includes both appliqué and background fabric. You want the layers to lie flat without pulling around the candy cane curves or small cottage details.
Step 1. Prepare the Backing
Cut two backing panels, each 42 × 56 inches.
Place them right sides together along their 56-inch edges.
Join with a 1/2-inch seam and press that seam open.
Trim the backing to at least 48 × 56 inches, keeping the joined seam positioned as desired.
Prepare batting at least 48 × 56 inches, or larger if your quilting method calls for a wider margin.
That backing size leaves several inches beyond the quilt top on every side. If you're taking the quilt to a longarm quilter, check the backing and batting margins they require before trimming.
Step 2. Layer and Baste
Press the quilt top and backing, checking that there are no loose threads or lifted appliqué edges.
Lay the backing wrong side up on a clean, flat surface.
Place the batting over the backing and smooth it outward.
Center the quilt top right side up over the batting.
Baste using your preferred method, working from the center outward and keeping the layers flat.
Step 3. Quilt the Layers
You can use gentle arcs, loosely spaced swirls or other quilting lines suited to your equipment and batting. I like the idea of curves following the candy canes, with broader quilting in the cream spaces between them.
Keep the quilting from hiding the cottage window panes, wreath or scalloped roof stitching. Around the peppermint circles, use lines that complement the curved sections rather than building too much stitching at the center.
Follow the minimum and maximum quilting distances recommended for your batting. If the appliqué test sample becomes too stiff or puckers, adjust the quilting density before working across the finished quilt.
Step 4. Check the Quilt Before Binding
Once quilting is complete, lay the quilt flat and measure it again. Quilting can change the dimensions slightly, so don't assume the original 39 1/2 × 47-inch raw-top measurements will be unchanged.
Square the quilt carefully, removing as little fabric as possible. Don't cut away the checkerboard border or any of the appliqué details that come close to the seams.
Step 5. Join the Candy-Striped Binding
For the binding, I'd use a red-and-cream fabric with diagonal stripes already printed across it. That gives us the candy-stripe look without having to cut true bias strips.
Cut six strips, each 2 1/2 inches wide × approximately 42 inches long.
Place two strips right sides together at right angles, overlapping the ends to form a square.
Sew diagonally across that square. Open the strips to check that they form one continuous straight length.
Trim the diagonal seam allowance to 1/4 inch and press it open.
Repeat until all six strips have been joined into one continuous binding strip.
Fold the binding in half lengthwise, wrong sides together, and press.
Six strips give approximately 239 1/2 inches of binding before the final joining seam. The unquilted top has a calculated perimeter of 173 inches, so there's room for the corners and the final join.
If you're using a stripe fabric that must be cut on the true bias to get the diagonal effect, recalculate the fabric requirement before cutting. The six-strip quantity above is for straight-grain binding.
Step 6. Attach the Binding
Beginning away from a corner, align the raw edges of the folded binding with the raw edge of the quilt front. Leave an unsewn tail for joining the ends later.
Sew the binding to the quilt with a 1/4-inch seam.
At the first corner, stop stitching 1/4 inch before the next edge and secure the stitches.
Fold the loose binding upward at a 45-degree angle, then fold it back down along the next quilt edge, keeping the fold even with the corner.
Continue stitching along the next side. Repeat at the remaining corners.
Leave a gap when you reach the beginning. Lay the two loose binding ends flat without stretching them.
Trim the tails so their overlap equals the 2 1/2-inch binding width, unfold and join them with a diagonal seam.
Check the joined strip for twists before trimming and pressing its seam.
Finish attaching the remaining binding, then wrap the folded edge around to the quilt back.
Miter the corners neatly and sew the folded edge down so it covers the attachment seam.
Give the corners a final check and make sure the binding is securely attached along the entire edge.
The calculated quilt size is still 39 × 46 1/2 inches at the finished patchwork seam lines, but the actual outside dimensions will depend on quilting, trimming, binding and washing. Measure your completed quilt rather than assuming it must finish at one exact size.
Measurements and Sewing Checks Before You Finish
There's one thing I want to make clear about this pattern. The cutting measurements, appliqué outlines and quilt layout have been checked digitally, but the finished quilt has not been physically sewn or washed from these instructions.
That doesn't mean you can't use the pattern. It means I recommend checking the parts that depend on your printer, sewing machine, fusible web and fabric before using all your Christmas prints.
Check These Details on Your Practice Blocks
- Candy cane: Check the rounded lower tip, the small colored stripe patches, the holly leaves and the space between the cane and the bottom seam line.
- Peppermint: Check the curved sector edges, the six pieces meeting at the center and the circular shape after pressing.
- Left and right bows: Check both fabric combinations, the rounded loops, center knots and V-notched tails.
- Pink cottage: Check the roof scallop stitching, snow trim, eight window panes, small wreath opening and the tree branches that extend toward the block edges.
- All blocks: Make sure each can be trimmed to 10 3/4 × 13 1/4 inches without losing part of the design.
If you see puckering or shifting, try a different appliqué stitch width, lighter fusible or adjusted pressing method on a fresh sample. Don't force a block into the required measurements by pulling on it.
Check Your Fabric After Washing
I'd also wash a small sample made from the same fabrics, fusible and stitching you plan to use for the quilt.
Look for bleeding from the red fabrics, frayed appliqué edges, lifting, puckering or stiff areas where several layers overlap. Make any needed changes to your materials or stitching before assembling the complete quilt.
Measurement Checkpoints
| Construction stage | Expected measurement |
|---|---|
| Each completed raw block | 10 3/4 × 13 1/4 in. |
| Each assembled block row | 33 1/2 × 13 1/4 in. |
| Nine-block center with sashing | 33 1/2 × 41 in. |
| Center with side borders | 39 1/2 × 41 in. |
| Complete raw quilt top | 39 1/2 × 47 in. |
| Nominal finished patchwork field | 39 × 46 1/2 in. |
Those are the calculated construction measurements. The outside size of your completed quilt may be a little different after quilting, binding and laundering.
If you're making this quilt for a baby's room, I'd display it as a decorative wall hanging, securely mounted out of baby's reach, or use it during supervised activities. Don't place it inside a crib or use it as infant sleep bedding. The U.S. Consumer Product Safety Commission's infant sleep guidance recommends keeping blankets, quilts and other loose bedding out of an infant's sleep space.
A Few Finishing Thoughts
When you're choosing the last fabrics, don't feel that every block needs a different print. I would repeat a few of the same reds and pale pinks throughout the quilt, then bring in the ginghams and little florals where they'll show up best.
The cottage belongs in the center, with the candy canes framing the two peppermint pinwheels above and below it. I'd keep the red-and-cream striped binding as the final touch. It's a small detail, but it makes the whole quilt feel like Peppermint Cottage Christmas.
If you're in the mood for another holiday quilting project, you can browse my free Christmas quilt patterns, including the gingerbread house and Christmas tree designs.
When you click on links to various merchants on this site and make a purchase, this may result in this site earning a commission. This does not affect the price you pay.

UBGI Gold Standard 2026
Reviewed under the site's
editorial checklist.
Photos, decorating ideas, party setups and reader submissions are shared for inspiration unless a page is specifically presented as a pattern, tutorial, reference guide or step-by-step project. Follow the instructions, measurements, safety guidance and manufacturer directions provided for the particular project or product.
About Jan | Contact | Baby Nursery Ideas (Blog) | Site Map | Privacy Policy | Disclosure Policy | Disclaimer | Affiliate Disclosure | Earnings Disclosure | Facebook | Pinterest
I am a participant in the Amazon Services LLC Associates Program, an affiliate advertising program designed to provide a means for us to earn fees by linking to Amazon. As an Amazon Associate I earn from qualifying purchases.
Copyright © 2006-2026. All Rights Reserved.