Free Crochet Pumpkin Bib Pattern
By Jan Bay
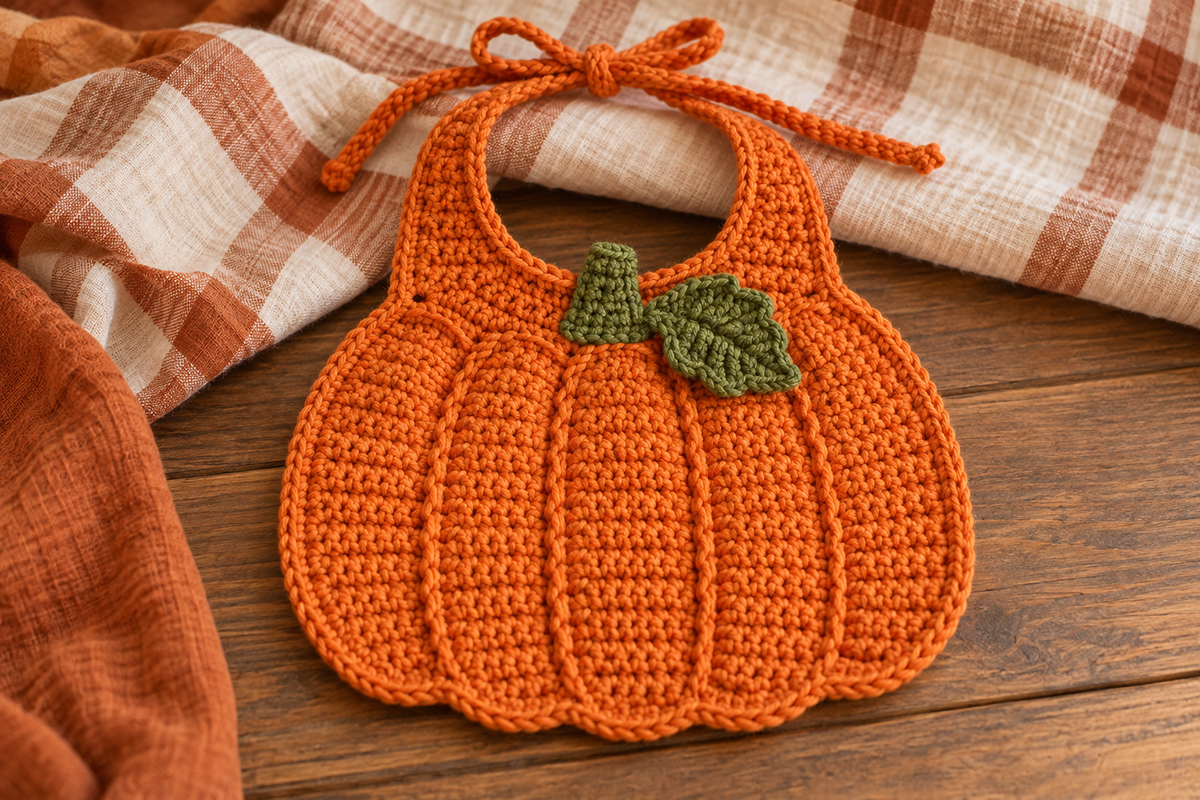
This free crochet pumpkin bib pattern will be adorable on your lil' punkin' but it's also a practical baby bib. The little fall pumpkin is stitched with lots of details including five lobes, a curved neckline, simple ties, and a green stem and leaf. And it doesn't just catch dribbles and drool! It can be used for Halloween photos, fall baby gifts and Thanksgiving outfits. I designed it without buttons, beads or other detachable decorations. Fall cuteness and simplicity at its best.
Explore More Free Crochet Baby Patterns
Free Crochet Pumpkin Rattle Pattern
Jump to:
Materials
I'd use cotton for this one. A bib is going to be washed, and the pumpkin shape looks better with a yarn that has enough body to hold those five rounded lobes instead of going floppy.
- Approximately 125 yards medium #4 worsted-weight cotton or cotton-rich yarn in pumpkin orange
- Approximately 15 yards medium #4 yarn in olive green
- 4 mm (G-6) crochet hook, or the size needed to match gauge
- Tapestry needle
- Scissors
- Locking stitch markers
- Measuring tape
If you're comparing yarn labels, the Craft Yarn Council Standard Yarn Weight System lists worsted, afghan and aran yarns in the Medium #4 category. Match the gauge below rather than relying on the number on the label alone.
Finished Size
The finished pumpkin body should measure approximately 8 to 8 1/2 inches across at its widest point and about 7 1/2 inches from the bottom of the center lobe to the base of the neckline.
With the shoulder sections attached, expect the bib to measure about 9 inches from the center bottom to the top of the shoulders, not counting the ties. The neck opening should finish approximately 3 1/4 to 3 1/2 inches wide and about 2 1/2 inches deep.
Each tie should measure approximately 9 to 10 inches long.
Those measurements are calculated from the gauge and construction plan. This pattern has not been physically test-made, so use the measurements as checkpoints while you work rather than forcing your fabric to match a stitch count if your yarn behaves differently.
Gauge
16 hdc = 4 inches.
Approximately 11 hdc rows = 4 inches.
Gauge matters here because five small differences add up quickly across five lobes. Crochet the center lobe first and check it before making the other four. It should be approximately 7 1/4 to 7 1/2 inches long and about 1 1/2 to 1 3/4 inches wide after Round 2.
If that center lobe is considerably larger, change hooks before making the remaining four pieces.
Abbreviations
US crochet terms are used throughout.
- ch = chain
- hdc = half double crochet
- sc = single crochet
- sl st = slip stitch
- st(s) = stitch(es)
- hdc2tog = half double crochet two stitches together
Pattern Notes
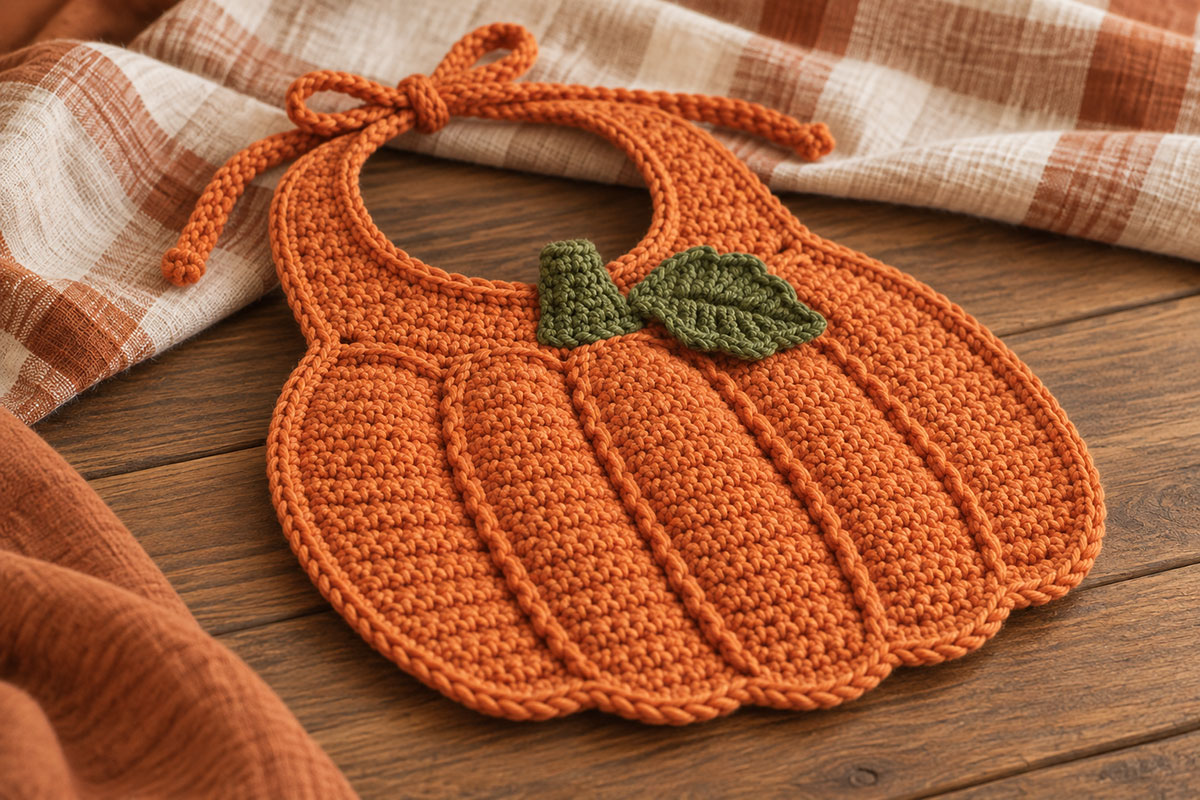
The pumpkin body is made from five separate elongated oval lobes. That isn't just a decorative choice. Joining five actual pieces is what gives the bib the raised pumpkin sections you see in the example image.
You will make nine crocheted pieces altogether: five pumpkin lobes, two shoulder pieces, one stem and one leaf. The two neck ties are worked directly from the shoulder pieces rather than made separately.
Don't substitute one flat orange bib and add four surface lines afterward. You'll lose the shape.
Work the lobes firmly but don't pull the stitches tight. Cotton can get stiff in a hurry. The fabric should hold its shape and still bend easily when the bib is worn.
The beginning chain runs through the center of each lobe. You'll crochet along one side of that chain, around the end, and back along the unused loops on the other side.
Place a marker in the center stitch of each three-stitch rounded end during Round 1. That makes the increases on Round 2 much easier to see. Remove both markers after Round 2 is complete.
Beginning chains do not count as stitches unless the instruction specifically says otherwise.
Join rounds with a slip stitch to the first hdc.
Free Crochet Pumpkin Bib Pattern Instructions
Make the center lobe first. Once its measurement looks right, the other four go quickly.
Center Pumpkin Lobe
With orange yarn, ch 24.
Round 1: Hdc in the 2nd ch from the hook. Hdc in each of the next 21 ch. Work 3 hdc in the last ch.
Rotate the work so you can crochet back along the unused loops on the opposite side of the foundation chain. Hdc in each of the next 21 loops. Work 2 hdc in the same foundation ch that holds the first hdc of the round. Join with a sl st to the first hdc. 48 hdc.
You now have three hdc grouped around each rounded end. Place a marker in the center stitch of each three-stitch end group.
Round 2: Ch 1. Work 1 hdc in every stitch along each long straight side. Across each rounded end, work 2 hdc in each of the three stitches that formed that end on Round 1. Join with a sl st to the first hdc. 54 hdc.
Fasten off, leaving a 20-inch tail for assembly.
Lay the lobe flat without stretching it. It should measure approximately 7 1/4 to 7 1/2 inches long and about 1 1/2 to 1 3/4 inches across.
Two Inner Pumpkin Lobes
Make 2.
With orange yarn, ch 23.
Round 1: Hdc in the 2nd ch from the hook. Hdc in each of the next 20 ch. Work 3 hdc in the last ch.
Rotate the work. Hdc in each of the next 20 unused loops along the opposite side of the chain. Work 2 hdc in the same foundation ch that holds the first hdc. Join with a sl st to the first hdc. 46 hdc.
Mark the center stitch at each rounded end.
Round 2: Ch 1. Work 1 hdc in every stitch along each long side. Across each rounded end, work 2 hdc in each of the three stitches that formed that end on Round 1. Join with a sl st. 52 hdc.
Fasten off, leaving a 20-inch tail on each lobe.
Two Outer Pumpkin Lobes
Make 2.
With orange yarn, ch 21.
Round 1: Hdc in the 2nd ch from the hook. Hdc in each of the next 18 ch. Work 3 hdc in the last ch.
Rotate the work. Hdc in each of the next 18 unused loops along the opposite side of the chain. Work 2 hdc in the same foundation ch that holds the first hdc. Join with a sl st to the first hdc. 42 hdc.
Mark the center stitch at each rounded end.
Round 2: Ch 1. Work 1 hdc in every stitch along each long side. Across each rounded end, work 2 hdc in each of the three stitches that formed that end on Round 1. Join with a sl st. 48 hdc.
Fasten off, leaving a 20-inch tail on each lobe.
Lay Out the Five Lobes
Put the pieces right side up in this order:
outer lobe, inner lobe, center lobe, inner lobe, outer lobe.
Let the center lobe extend about 1/4 inch lower than the inner pair. Let the outer pair sit approximately another 1/4 inch higher.
Keep the center lobe vertical, then fan the two inner lobes slightly outward and the two outer lobes outward a little farther. Do not arrange all five long center lines parallel. Maintain the narrow overlap between adjoining long edges while you adjust the fan.
Before sewing, pin or clip the five lobes together and measure across the widest part. Adjust the fan until the pumpkin body measures approximately 8 to 8 1/2 inches across without stretching the crocheted pieces.
Now look at the bottom edge. You should see one low center curve, two slightly higher curves beside it and two higher outer curves, with the five lobes forming one broad rounded pumpkin rather than five narrow strips.
If it looks like five strips lined up evenly, move them. The stagger matters.
Join the Five Pumpkin Lobes
Overlap the adjoining straight edge of each pair by approximately one stitch column. The overlap should be narrow. You want the lobe edges to rise slightly at the join, not lie one on top of another like shingles.
Thread a lobe tail onto the tapestry needle. Working from the back, whipstitch the two overlapping edges together through the back portions of the stitches.
Begin approximately 3/4 inch above the rounded bottom of the shorter lobe and stop approximately 1 inch below its upper curve.
Repeat for all four joins.
Turn the bib over after every join and look at the front. Each section should still bow very slightly forward with a visible valley between it and the next lobe.
Don't pull those seams flat. The little bit of depth is the whole point of building the pumpkin this way.
Outer Pumpkin Edging
With the front facing, join orange yarn near the upper left edge of the left outer lobe.
Ch 1. Sc evenly down the outside edge of the left outer lobe, around the five exposed lower curves and back up the outside edge of the right outer lobe. Work 1 sc in each clearly exposed edge stitch and 2 sc in a stitch only where needed to turn a rounded lower tip without pulling.
Before fastening off, lay the pumpkin flat. The edging should follow the five-lobe outline without ruffling or drawing the lobes inward. Because the four joined seams overlap by approximately one stitch column, the exact edging count can vary slightly with your joining placement. The finished body measurement is the checkpoint: approximately 8 to 8 1/2 inches across and about 7 1/2 inches from the lowest center point to the base of the neckline.
Fasten off.
Do not continue this edging across the four internal joins. Those valleys need to remain visible.
Make the Neck Opening and Ties
The shoulder pieces are separate so you can position the neckline before sewing anything permanently. That's much easier than trying to force a fixed neck opening after the pumpkin body is finished.
Left Shoulder Piece
Leave an 18-inch beginning tail for sewing, then with orange yarn, ch 9.
Row 1: Hdc in the 2nd ch from the hook and in each ch across. Turn. 8 hdc.
Rows 2-3: Ch 1. Hdc in each st across. Turn. 8 hdc.
Row 4: Ch 1. Hdc2tog, hdc in next 4 sts, hdc2tog. Turn. 6 hdc.
Rows 5-7: Ch 1. Hdc in each st across. Turn. 6 hdc.
Do not fasten off.
Tie: Ch 40. Beginning in the 2nd ch from the hook, sl st in each ch back toward the shoulder piece.
Fasten off. The long beginning tail at the foundation edge will be used to sew the shoulder to the pumpkin body.
Right Shoulder Piece
Leave an 18-inch beginning tail for sewing. Make the second shoulder piece through Row 7 exactly as the left shoulder, but do not work the tie from the last stitch of Row 7. Fasten off.
Join orange yarn in the first stitch of Row 7 at the opposite upper corner. Ch 40. Beginning in the 2nd ch from the hook, sl st in each ch back toward the shoulder piece. Fasten off.
The two ties should now leave the shoulder pieces from opposite upper corners so the right and left sides mirror one another.
Before sewing either one down, place both against the pumpkin body.
The wide eight-stitch end of each shoulder sits across the upper portion of an outer lobe and reaches slightly onto the adjacent inner lobe. Match the two pieces at the same height so the lower edges sit approximately level with one another. Angle them inward so their inside edges form a smooth U above the center lobe.
Leave approximately 3 1/4 to 3 1/2 inches between the inside edges of the shoulder pieces at the widest part of the neck opening. Before sewing, measure from the center line of the pumpkin to each shoulder. The placement should be approximately symmetrical even though the individual pumpkin lobes remain dimensional.
The bottom of the U should sit just above the top curve of the center lobe. Don't cover the center lobe with a wide orange band. Its upper curve should still be visible beneath the stem.
Pin or clip the shoulder pieces in place and check the shape from the front.
Once the neckline looks even, use the long orange tails to sew the lower 1 1/2 to 2 inches of each shoulder piece firmly to the back of the pumpkin lobes.
Weave the sewing yarn through more than one lobe where the pieces overlap. That spreads the pull from the ties across the body instead of putting all of it on one lobe.
Neckline Edging
Join orange yarn at the upper inside edge of the left shoulder.
Ch 1. Work sc evenly down the inside edge of the left shoulder, across the exposed upper edge of the center pumpkin area and up the inside edge of the right shoulder.
Fasten off.
Keep this row relaxed. A tight neckline edging will make the U opening buckle.
Crochet the Pumpkin Stem and Leaf
Stem
With olive-green yarn, ch 5.
Row 1: Sc in the 2nd ch from the hook and in each ch across. Turn. 4 sc.
Rows 2-5: Ch 1. Sc in each st across. Turn. 4 sc.
Fasten off, leaving a long sewing tail.
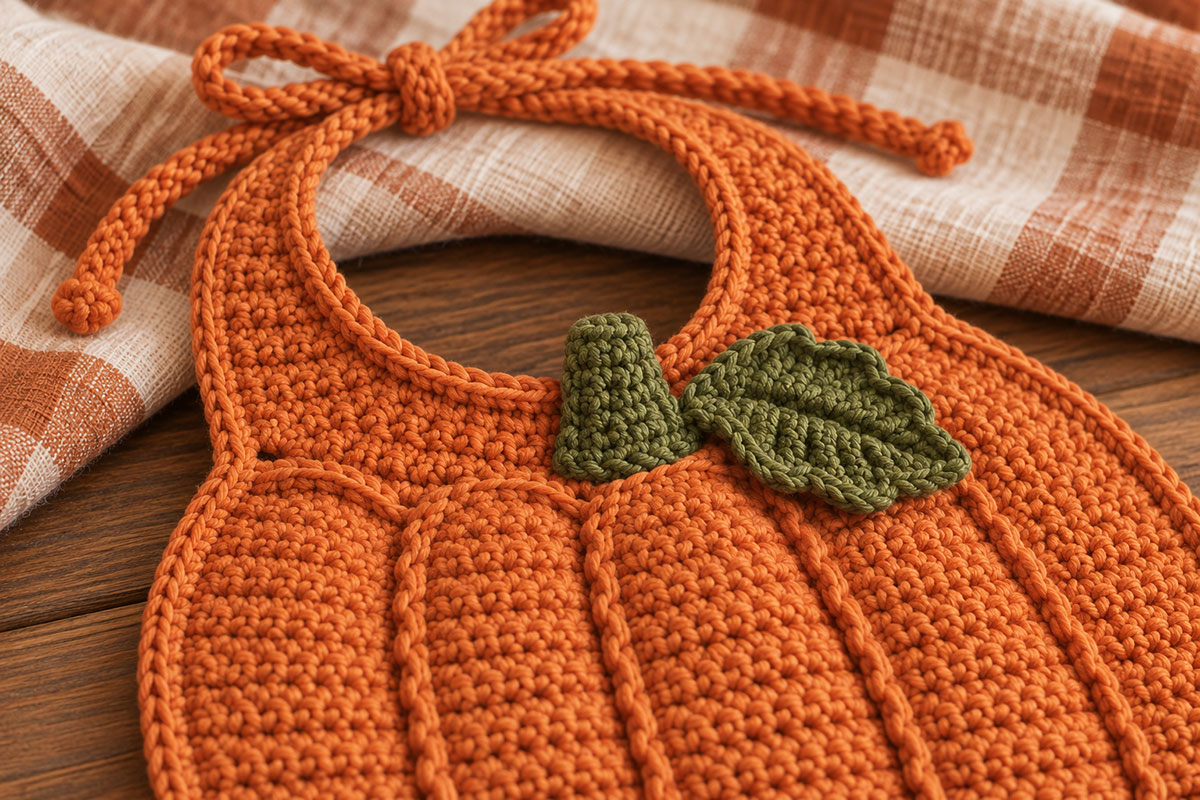
The stem should be a small upright rectangle about 1 inch wide. Sew its lower edge to the upper center of the pumpkin body, just below the deepest part of the neckline.
Let the top portion of the stem remain free so it stands slightly away from the orange body.
Leaf
With olive-green yarn, ch 9.
Beginning in the 2nd ch from the hook, work:
Sl st in next ch, sc in next ch, hdc in next ch, dc in next 2 ch, hdc in next ch, sc in next ch, 3 sc in last ch.
Rotate the foundation chain and work along the unused loops on the opposite side:
Sc in next ch, hdc in next ch, dc in next 2 ch, hdc in next ch, sc in next ch, sl st in final ch.
Join with a sl st at the pointed tip and fasten off, leaving a long sewing tail.
Pin the leaf just to the right of the stem as you look at the front of the bib, which is the wearer's left, with its point angled slightly outward. Sew along the center of the leaf and around only enough of its base to hold it securely.
Leave the outer leaf edges free. That keeps the small amount of dimension visible in the example image.
Finishing the Crochet Pumpkin Bib
Weave in every remaining end on the back of the bib. Pay particular attention to the four lobe joins, the shoulder attachments and both tie bases.
Lay the finished bib flat and shape the five lobes with your hands. The center lobe should sit forward slightly, with the two inner lobes curving beside it and the outer lobes completing the pumpkin shape.
If you wet-block it, don't stretch the bib flat enough to erase those valleys. Shape each lobe separately and let the piece dry flat.
For washing, follow the care instructions on your yarn label. Reshape the five pumpkin lobes and neckline while the bib is damp, then let it dry flat so the raised valleys and rounded pumpkin outline stay in place.
Check the ties before using the bib. Tug each one firmly where it joins the shoulder. Also check the stem and leaf for loose yarn ends. Remove every pin, clip and stitch marker before the bib is used.
This is a feeding bib, not sleepwear. Use it only while an adult is supervising the baby, and remove it after mealtime rather than leaving a tied bib on a sleeping or unattended baby.
If you like the pumpkin shape but don't need another bib, the free crochet pumpkin pattern makes a separate fall decoration. For a smaller project, there's also a free crochet pumpkin rattle pattern.
And if you're already in Halloween mode, my free crochet Halloween appliqué patterns give you several smaller projects without turning this bib into something it isn't.
I would leave the pumpkin bib exactly as it is. It doesn't need a jack-o'-lantern face, buttons or another appliqué. The five raised lobes, stem and leaf are enough.
When you click on links to various merchants on this site and make a purchase, this may result in this site earning a commission. This does not affect the price you pay.

UBGI Gold Standard 2026
Reviewed under the site's
editorial checklist.
Photos, decorating ideas, party setups and reader submissions are shared for inspiration unless a page is specifically presented as a pattern, tutorial, reference guide or step-by-step project. Follow the instructions, measurements, safety guidance and manufacturer directions provided for the particular project or product.
About Jan | Contact | Baby Nursery Ideas (Blog) | Site Map | Privacy Policy | Disclosure Policy | Disclaimer | Affiliate Disclosure | Earnings Disclosure | Facebook | Pinterest
I am a participant in the Amazon Services LLC Associates Program, an affiliate advertising program designed to provide a means for us to earn fees by linking to Amazon. As an Amazon Associate I earn from qualifying purchases.
Copyright © 2006-2026. All Rights Reserved.