Free Crochet Christmas Teddy Bear Bib Pattern
By Jan Bay
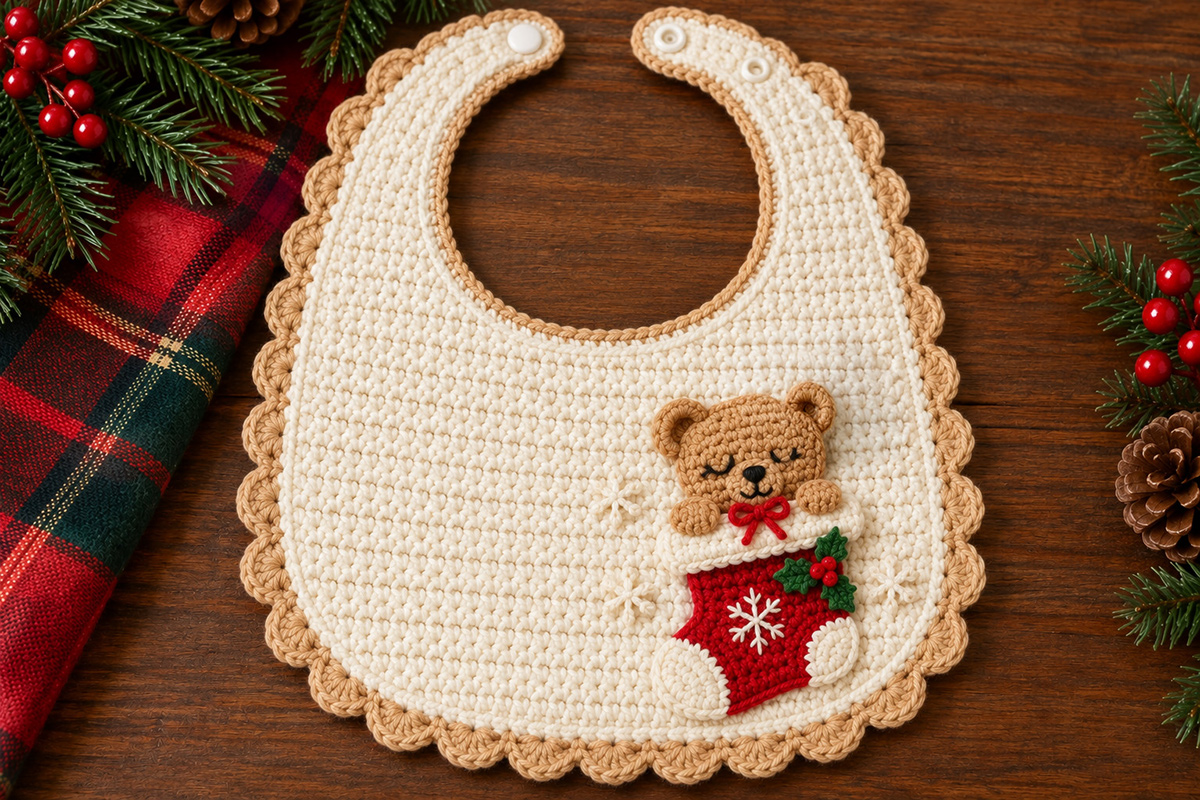
This free crochet Christmas teddy bear bib pattern features a sweet brown teddy peeking out of a cranberry-red Christmas stocking, surrounded by holly leaves, berries, and embroidered snowflakes. The roomy ivory baby bib has a generously sized neckline, soft scalloped edging, and a smaller Christmas appliqué that leaves plenty of open space across the front. I don't think there could possibly be a cuter or more festive way to catch those inevitable dribbles and drool! It's a charming handmade project for baby's first Christmas, holiday photos, or a holiday baby shower gift, and it's useful, too.
Explore More Free Crochet Baby Patterns
Free Christmas Crochet Patterns
See Supplies for This Project Here.
Jump to a Section
Materials and Supplies
I'd choose a soft, washable cotton yarn for this bib. It needs to feel comfortable against baby's clothing and skin, but it also needs enough stitch definition to show off that little teddy bear and his Christmas stocking.
You'll need:
- Soft cotton yarn in ivory for the main bib.
- Light buff or warm tan cotton yarn for the scalloped edging and teddy bear's muzzle.
- Buff-brown yarn for the teddy bear's head, ears and paws.
- Small amounts of cream yarn for the stocking cuff, heel and toe.
- Cranberry-red yarn for the Christmas stocking and teddy's bow.
- Forest-green yarn for the holly leaves.
- Small amounts of pink, dark brown and dark embroidery thread or yarn for the facial details.
- A crochet hook appropriate for your yarn and the required gauge.
- Stitch markers.
- A yarn needle with a blunt tip.
- Scissors.
- A measuring tape or ruler.
- Baby-garment snap fasteners suitable for an adjustable shoulder closure with two fastening positions, plus the reinforcement materials required by the fastener manufacturer for attachment to crocheted fabric.
For the main bib, I'd keep the stitching fairly close and even. We don't want large open spaces that let every little dribble go straight through. The bear and Christmas decorations can use smaller stitches so the appliqués stay neat without adding too much bulk.
And don't feel you need a dozen different shades of brown. One lovely buff-brown yarn, a little cream, and just enough dark yarn to embroider the face will give our teddy plenty of personality.
Yarn, Hooks and Working Gauge
For the main bib, use medium-weight (#4) washable cotton yarn and a 4 mm (G/6) crochet hook, or whichever hook produces the required gauge. Use a 3.25 mm (D/3) hook for the smaller appliqués, provided it gives you the appliqué gauge below.
Estimated yarn quantities:
- Ivory: 150 yards for the main bib.
- Buff-tan: 25 yards for the border and teddy's muzzle.
- Buff-brown: 20 yards for the bear.
- Cranberry red: 20 yards for the stocking and decorations.
- Cream: 15 yards for the stocking cuff, heel and toe.
- Forest green: 10 yards for the holly.
- Small scraps for embroidery.
These yardages are estimates, not amounts measured from a finished sample. It's sensible to have extra ivory yarn available.
Main bib gauge: 18 single crochet stitches and 18 rows = 4 inches, measured after washing, drying and relaxing the swatch.
Appliqué gauge: Approximately 22 single crochet stitches and 20 rows = 4 inches with the smaller hook.
How to check your gauge: Chain 25 and work 24 single crochet stitches across, beginning in the second chain from the hook. Chain 1 and turn after each row. Continue until you have completed 24 rows. Wash and dry the swatch according to the yarn instructions, then measure the center 4 inches without stretching it. Adjust your hook size until you obtain 18 stitches and 18 rows per 4 inches.
For the decorative pieces, make a second swatch with the smaller hook. You want firm, neat stitches without making the fabric stiff.
Pattern construction note: Use US crochet terminology throughout. When a row ends with "Turn," turn the work once, then chain 1 at the beginning of the following row unless that row specifically instructs otherwise. The turning chain never counts as a stitch. Do not add an extra turning chain or make a second turn when the row instructions already provide one. Work increases and decreases exactly where indicated.
Finished Size and Gauge
We're making a generously sized baby bib, with more room across the front and a larger, rounder neckline than the little decorative bibs you sometimes see. There's enough coverage to make it useful, while the Christmas design stays down toward the lower-right corner.
- Target finished width: 9 1/2 to 10 inches, including edging.
- Target finished length: 10 3/4 to 11 inches.
- Target inside neck opening: 3 3/4 inches across when fastened at the larger setting.
- Target neck-opening shape: circular, without sideways stretching.
- Smaller neck setting: adjustable, with its finished fit checked separately.
Important gauge note: These are our target measurements, not measurements from a physically tested sample. Before starting the bib, crochet a gauge swatch at least 5 inches square using your chosen cotton yarn and hook. Wash and dry it according to the yarn's care instructions, then count the stitches and rows across the center 4 inches. Use those measurements to check the pattern's required gauge. A different gauge can change the neckline, even if every stitch is worked correctly.
Neckline checkpoint: Measure the inside opening from side to side and from top to bottom with the fastening closed. Both measurements should be approximately 3 3/4 inches at the larger setting. Measure the actual fastening circumference separately, too. If the opening is noticeably oval, adjust the shaping before continuing with the rest of the bib.
I wouldn't skip that checkpoint. It's much easier to correct a neckline before all the Christmas decorations have been attached.
Crochet Abbreviations
The pattern uses standard US crochet terminology.
- ch: Chain
- sc: Single crochet
- hdc: Half double crochet
- dc: Double crochet
- sl st: Slip stitch
- st/sts: Stitch/stitches
- inc: Increase by working two stitches into one stitch
- dec: Decrease by combining two stitches
- sc2tog: Single crochet two stitches together. Insert the hook into the first stitch and draw up a loop. Insert the hook into the next stitch and draw up a loop. Yarn over and draw through all 3 loops on the hook. This consumes 2 stitches and produces 1 stitch.
- RS: Right side
- WS: Wrong side
- rep: Repeat
- FO: Fasten off
Free Crochet Christmas Teddy Bear Bib Pattern Instructions
The ivory bib is the foundation of the whole project. The neckline needs to sit comfortably, the lower front should be broad enough to catch dribbles, and the scalloped border should follow the outline without making the edges bunch or curl.
I'd make the main bib first and check its shape before adding any decorations. That way, we can be sure the finished Christmas appliqué won't be pulled out of place by later adjustments.
The design calls for a wide, rounded front, a curved neckline, an opening at the upper-right shoulder, and a continuous light-tan scalloped edge. The lower portion should hang below the neck opening rather than looking like a short, round collar.
Once the bib body is finished, lay it flat without stretching it. Check the overall width, length and neckline measurements. The front should be symmetrical, even though the Christmas design will sit slightly to one side.
Step 1: Crochet the Ivory Bib Body
Work the bib from the lower edge upward. We'll make the lower corners gently rounded, widen the main body, and then shape the neckline and shoulders separately.
With ivory yarn and the main hook:
Foundation: Ch 34.
Row 1 (RS): Sc in the second ch from the hook and in every remaining ch. Turn. (33 sc)
Row 2: Ch 1, 2 sc in the first st, sc in the next 31 sts, 2 sc in the last st. Turn. (35 sc)
Row 3: Ch 1, 2 sc in the first st, sc in the next 33 sts, 2 sc in the last st. Turn. (37 sc)
Row 4: Ch 1, 2 sc in the first st, sc in the next 35 sts, 2 sc in the last st. Turn. (39 sc)
Row 5: Ch 1, 2 sc in the first st, sc in the next 37 sts, 2 sc in the last st. Turn. (41 sc)
Rows 6–30: Ch 1, sc in each of the 41 sts across. Turn after each row. (41 sc per row)
Do not fasten off after Row 30.
Checkpoint: Your main panel should have 30 rows. At the required gauge, the body is approximately 9 1/8 inches wide before edging and 6 2/3 inches long. The first five rows form the gently widening lower portion.
Count the 41 stitches in Row 30 carefully. The next section uses 19 stitches for each shoulder, leaving the center 3 stitches unworked.
I'd check that count now. It's much easier than discovering an extra stitch after both shoulders are finished!
Neckline and Fastening
The neck opening is one of the most important details in this pattern. Our larger setting is designed around a round opening measuring approximately 3 3/4 inches across. A smaller fastening position can accommodate a smaller neck, but the bib must always fit the individual baby comfortably.
Use an adjustable snap closure at the upper-right shoulder instead of a decorative wooden button. Make two fastening positions so the fit can be adjusted, and choose fasteners intended for baby garments. Crochet stitches can stretch and leave gaps, so use suitable reinforcement and follow the fastener manufacturer's instructions rather than attaching snaps directly to unsupported stitches. Check that the fasteners are firmly secured, that no hard backing touches baby's skin, and that the closure opens easily for removal.
Before adding the scalloped edging, temporarily hold the back neck strap against the opposite shoulder at the proposed larger fastening position. Check the shape of the neck opening without stretching the fabric. The opening should be rounded, and both shoulders should lie flat without twisting. This is only a preliminary check; the final measurements and permanent snap installation come after the edging in Step 20.
Check the fit again after completing the neck edging. Crochet edging can make an opening smaller, so don't assume that the unfinished measurement will still be correct afterward.
Fit reminder: The bib should never fit tightly around baby's neck. Check the actual fastened circumference, fastening overlap and ease of removal. The 3 3/4-inch design target is not a substitute for checking the fit on the intended wearer.
Step 2: Shape the Two Shoulders
Place stitch markers around the center 3 stitches of Row 30. You'll have 19 stitches on either side.
Work the shoulders separately, decreasing at the neckline edge only. The outside edges remain straight. The decreases are concentrated slightly more toward the lower neckline so the opening becomes rounded rather than forming a long, pointed V. Each shoulder finishes with 11 stitches.
Shoulder A
Row 31: Ch 1, sc in the first 15 sts, then sc2tog twice over the remaining 4 shoulder stitches. Leave the center 3 sts and the remaining 19 sts unworked. Turn. (17 sc)
Row 32: Ch 1, sc2tog, sc in the next 15 sts. Turn. (16 sc)
Row 33: Ch 1, sc in the next 14 sts, sc2tog. Turn. (15 sc)
Row 34: Ch 1, sc2tog, sc in the next 13 sts. Turn. (14 sc)
Row 35: Ch 1, sc in the next 12 sts, sc2tog. Turn. (13 sc)
Row 36: Ch 1, sc2tog, sc in the next 11 sts. Turn. (12 sc)
Row 37: Ch 1, sc in each of the 12 sts. Turn. (12 sc)
Row 38: Ch 1, sc2tog, sc in the next 10 sts. (11 sc)
Fasten off, leaving a tail to weave in.
Shoulder B
With the same side of the bib facing you as when beginning Row 31, skip the 3 center stitches and join ivory yarn in the first stitch of the remaining group of 19.
Row 31: Work sc2tog twice over the first 4 stitches, then sc in the next 15 sts. Turn. (17 sc)
Row 32: Ch 1, sc in the next 15 sts, sc2tog. Turn. (16 sc)
Row 33: Ch 1, sc2tog, sc in the next 14 sts. Turn. (15 sc)
Row 34: Ch 1, sc in the next 13 sts, sc2tog. Turn. (14 sc)
Row 35: Ch 1, sc2tog, sc in the next 12 sts. Turn. (13 sc)
Row 36: Ch 1, sc in the next 11 sts, sc2tog. Turn. (12 sc)
Row 37: Ch 1, sc in each of the 12 sts. Turn. (12 sc)
Row 38: Ch 1, sc in the next 10 sts, sc2tog. Turn. (11 sc)
Do not fasten off. The working yarn will continue into the back neck strap.
Shoulder checkpoint: Both shoulder tops contain 11 stitches. The center opening begins with 3 unworked stitches at Row 30 and widens through the shoulder shaping. The calculated gap widths at Rows 31–38 are 7, 9, 11, 13, 15, 17, 17 and 19 stitch-widths, respectively. At the specified gauge, the upper gap is approximately 4.22 inches before edging. The revised shaping is intended to form a more rounded front neckline, but its finished contour and 3 3/4-inch opening must still be checked after edging and fastening.
Step 3: Crochet the Curved Back Neck Strap
The back strap completes the neckline. It will curve over the top of the opening and fasten to the opposite shoulder.
Row 39: Ch 1, sc in the first 3 sts of Shoulder B, beginning at the inner neckline edge. Leave the other 8 shoulder stitches unworked. Turn. (3 sc)
Rows 40–69: Ch 1, sc in each of the 3 sts. Turn after each row. (3 sc per row)
Fasten off. The completed strap has 31 rows, including Row 39.
Strap measurement checkpoint: At the required row gauge of 18 rows per 4 inches, the 31-row back neck strap should measure approximately 6 7/8 inches before edging or fastening. This is its calculated flat length, not the height of the finished neck opening.
The snap will sit approximately two rows back from the strap tip, leaving about 6 4/9 inches of strap length available to curve around the opening. Keep the strap flat and untwisted. Do not add extra rows automatically; the 31-row construction is our starting point for achieving the 3 3/4-inch finished neckline.
The final measurement must be taken after the neckline edging is completed and the larger fastening position is temporarily closed. If the required shape cannot be achieved, adjust the strap length one row at a time before permanently installing the snaps. Each added or removed row changes the flat strap length by approximately 2/9 inch, but not necessarily the finished opening's height by that amount.
Step 4: Prepare the Adjustable Fastening
With the bib lying flat and the front facing upward, curve the strap toward the opposite shoulder. It should form a smooth arch above the U-shaped front opening.
Prepare small, doubled pieces of tightly woven cotton fabric for reinforcing the neck strap and both adjustable fastening positions on the opposite shoulder. Do not sew the reinforcement permanently to the bib yet. The final snap locations must be confirmed after the edging and washing checks in Step 20.
Keep the prepared reinforcement pieces available. Once the final fastening positions are established, each snap must be supported by secure reinforcement attached to the wrong side of the crocheted fabric, following the fastener manufacturer's instructions. No loose fabric edges or exposed hard backing should remain against baby's skin.
Mark the adjustable snap positions: Place one half of a suitable sew-on garment snap approximately two rows back from the free end of the three-stitch-wide neck strap. Mark two positions for the matching snap halves on the opposite shoulder, initially about two stitches apart.
Position the larger setting so the strap has less overlap and forms a smooth, rounded opening. The smaller setting should have slightly more overlap, reducing the circumference without distorting the neckline. Both positions must remain on suitably reinforced fabric.
Use removable markers or temporary stitching to hold the proposed fastening positions. Do not install the snaps permanently at this stage. First complete the neckline edging in Step 20, close the larger setting temporarily, and measure the finished opening. Move the fastening marks if necessary before making permanent attachments.
The larger setting must be evaluated for the target 3 3/4-inch opening. The smaller setting must be checked independently for comfortable fit. Do not use a fastening position that twists the strap, pulls the neckline out of shape, or creates a tight opening.
Step 5: The 3 3/4-Inch Neckline Check
With the larger fastening position temporarily secured, lay the bib flat without pulling on the stitches.
Measure the inside opening horizontally at its widest point, then vertically from the top of the curved neck strap to the lowest point of the front neckline.
Required target: Both measurements should be approximately 3 3/4 inches. The goal is a rounded opening, not an opening that's stretched sideways.
At the specified gauge of 18 stitches per 4 inches, the 19-stitch upper neckline gap calculates to approximately 4.22 inches before edging. Adding one row of single crochet along each side may reduce the clear width, but the amount depends on your actual stitches and how the shoulders lie. The finished neckline must measure approximately 3 3/4 inches both horizontally and vertically with the larger fastening setting closed. The opening should also be smoothly rounded, not pointed or stretched into an oval. These measurements have not been physically verified, so check the finished shape before installing the snaps permanently. If it doesn't meet the target, the neckline shaping or edging must be corrected.
If the opening is too narrow or too wide: First confirm the main stitch gauge and the 19-stitch upper neckline gap. Check that both shoulders finish with 11 stitches and that the inside edging is only one row deep. A thicker or tighter edging can reduce the opening. If the gauge is correct but the width remains outside the target, correct the neckline shaping or edging rather than stretching the fabric.
If the opening is too tall: Check the temporary snap position and whether the strap has excess length above the neckline. Try a slightly greater fastening overlap while preserving a comfortable circumference. If that does not correct the opening, remove one strap row, rework the affected edging, and measure again.
If the opening is too short: First check whether the fastening overlap is excessive. If correcting the overlap does not help, add one strap row, rework the affected edging, and measure again. At the stated gauge, each strap row contributes approximately 2/9 inch of flat length; the actual vertical change depends on how the strap curves.
If the opening is oval or pointed: Check that both shoulder sections contain the same number of rows and decreases. Make sure the strap curves smoothly without twisting. If the front neckline remains pointed, the shoulder shaping must be corrected; changing the strap length alone will not make a pointed opening circular.
When changing the strap length: Count the actual number of completed strap rows before starting Step 20. The base pattern has 31 rows, and both the inside and outside strap edges must be adjusted if that number changes.
For the inside neckline edging, work one single crochet into each strap row-end position, followed by the 23 stitches specified for the two shaped shoulder edges and the three center neckline stitches. With the original 31-row strap, the total is 54 single crochet stitches.
For the outside strap finishing, work three single crochet stitches across the free strap tip and one single crochet into each outside strap row-end position. With the original 31-row strap, the total is 34 single crochet stitches.
Adjusted strap counts: If the strap has 30 rows, work 53 stitches along the complete inside neckline and 33 along the outside strap and tip. If it has 32 rows, work 55 stitches along the inside neckline and 35 along the outside strap and tip. Continue using the existing 11-stitch and 8-stitch shoulder-top finishing counts unless the actual shoulder construction has also been changed.
Recheck the finished neckline width, height and inside circumference after completing all edging. Do not install the snaps permanently until those measurements and the intended fit have been checked.
For now, keep the fastening positions provisional. Hold the strap in place temporarily and check the opening, but don't install the snaps permanently yet. The neck edging in Step 20 can change the finished opening. Complete that edging, check the neckline again, and only then secure the fasteners in their final positions.
There must be enough room for the individual baby's neck, and the fastening must release easily when removed by an adult. The smaller setting is optional if it would produce an unsuitable fit.
Important: These instructions provide calculated construction targets. They do not establish that a physical sample has been test-fitted or that the finished neckline measurement is guaranteed for every yarn and crocheter.
Christmas Stocking Appliqué
Our little cranberry-red stocking is what gives this bib its Christmas personality. It sits at a slight diagonal on the lower-right front, with a cream cuff across the top and matching cream details on the heel and toe.
The shape matters. We want a recognizable Christmas stocking, with a gently curved ankle, a distinct heel, and a rounded toe pointing toward the lower-left side of the bib. It shouldn't look like a straight rectangle with a white patch sewn onto the bottom.
The cream cuff needs to be wide enough for the teddy bear to peek over without hiding his face. The red stocking body also has a small embroidered ivory snowflake, with simple contrasting stitches near its edges.
Keep the stocking appliqué smaller than the bib's front panel. There's no need to cover all that lovely ivory crochet. Leaving room around the decoration is part of what makes this particular design so appealing.
Step 6: Crochet the Cranberry Christmas Stocking
Use cranberry-red yarn and the smaller crochet hook. The stocking is worked flat from the open top downward. The extra stitches added near the bottom form the projecting foot and toe.
Foundation: Ch 13.
Row 1: Sc in the second ch from the hook and across. Turn. (12 sc)
Rows 2–8: Ch 1, sc in each st across. Turn. (12 sc per row)
Row 9: Ch 1, sc in each of the 12 sts. Ch 5 and turn. (12 sc plus 5 chains)
Row 10: Sc in the second ch from the hook and in the next 3 chains, then sc in the 12 stitches across the stocking body. Turn. (16 sc)
Rows 11–13: Ch 1, sc in each st across. Turn. (16 sc per row)
Row 14: Ch 1, sc2tog, sc in the next 12 sts, sc2tog. Turn. (14 sc)
Row 15: Ch 1, sc2tog, sc in the next 10 sts, sc2tog. Turn. (12 sc)
Row 16: Ch 1, sc2tog, sc in the next 8 sts, sc2tog. Turn. (10 sc)
Row 17: Ch 1, sc in each st across. (10 sc)
Fasten off, leaving a long sewing tail.
Stocking checkpoint: The upper leg begins with 12 stitches and the foot widens to 16 stitches before tapering to 10. The added chain section forms the projecting foot.
Choose the display-facing side now: Lay the stocking flat with its original 12-stitch top edge at the top. The projecting foot must extend toward the lower-left when viewed from the front of the finished bib. If the foot extends toward the right, turn the stocking over so its opposite fabric face is uppermost. Do not rotate the stocking upside down.
Keep this chosen face upward for the stocking embroidery and final assembly. The cream toe patch belongs over the projecting foot, while the heel patch belongs on the opposite lower side. Check the orientation before attaching either patch.
Step 7: Crochet the Cream Stocking Cuff
With cream yarn, ch 14.
Row 1: Sc in the second ch from the hook and across. Turn. (13 sc)
Rows 2–3: Ch 1, sc across. Turn after Row 2. (13 sc per row)
Fasten off, leaving a sewing tail.
The cuff is slightly wider than the top of the red stocking and should overhang the edges just a little. Don't sew it down yet. The teddy's head needs to sit behind the upper cuff.
Step 8: Crochet the Cream Toe Patch
With cream yarn, ch 5.
Round 1: Work around both sides of the foundation chain to form an oval. Work 2 sc in the second chain from the hook, 1 sc in each of the next 2 chains, and 3 sc in the last chain. Rotate the work to continue along the unused loops on the opposite side of the foundation chain. Work 1 sc in each of the next 2 chain positions, then 1 sc into the remaining unused loop of the first chain position that received 2 sc. (10 sc total)
The oval now has three single crochet stitches at each rounded end and two single crochet stitches along each straight side. Do not turn or join. Continue directly into Round 2, placing a stitch marker at the beginning of the round if needed.
Round 2: Work 2 sc in each of the next 2 sts, sc in the next 2 sts, 2 sc in each of the next 3 sts, sc in the next 2 sts, and 2 sc in the last st. (16 sc)
Fasten off, leaving a tail.
Gently flatten the oval. This cream piece will cover the rounded end of the stocking toe.
Step 9: Crochet the Cream Heel Patch
With cream yarn, make a magic ring.
Round 1: Work 6 sc into the ring. Pull closed. (6 sc)
Round 2: Work 2 sc in each stitch. (12 sc)
Fasten off, leaving a sewing tail. Gently shape the circle into a small oval as you attach it to the lower-right heel area of the red stocking.
Step 10: Embroider the Stocking
Place the stocking with its chosen display-facing side upward and its projecting foot pointing toward the lower-left. With ivory yarn or embroidery thread, stitch a small six-point snowflake in the center of the visible red stocking body. Give each main arm two short branches for a Christmas snowflake appearance.
Secure the embroidery ends on the back of the stocking. Keep the stocking in this orientation when attaching it to the bib in Step 21, so the embroidered snowflake remains visible and the foot points in the intended direction.
Use short cream running stitches along the sides of the stocking for the decorative contrast stitching. Keep them evenly spaced and securely anchored on the wrong side.
Leave the stocking flat. It doesn't need stuffing.
Teddy Bear Appliqué
The teddy bear is a soft buff-brown, with round ears, a warm buff-tan muzzle, little paws resting over the stocking cuff, and a small cranberry bow beneath his chin.
Give him an embroidered face rather than plastic eyes or a separate plastic nose. His eyes should be dark and neatly stitched, with a little brown nose and a simple curved smile. Small pink embroidered cheeks finish his expression.
The finished bear belongs behind the upper edge of the stocking, with his head and paws peeking above the cream cuff. Position the pieces before sewing them down so the ears remain visible and the face stays clear of the surrounding holly decorations.
Keep the paws and muzzle low-profile, with their edges securely stitched down. There shouldn't be loose loops, dangling yarn ends or detachable decorations.
Step 11: Crochet the Buff-Brown Teddy Bear Head
Use buff-brown yarn and the smaller hook. Work in continuous rounds, moving a stitch marker to the first stitch of each new round.
Round 1: Work 6 sc into a magic ring. Pull closed. (6 sc)
Round 2: Work 2 sc in each stitch. (12 sc)
Round 3: (Sc in the next st, 2 sc in the next st) 6 times. (18 sc)
Round 4: (Sc in the next 2 sts, 2 sc in the next st) 6 times. (24 sc)
Round 5: (Sc in the next 3 sts, 2 sc in the next st) 6 times. (30 sc)
Round 6: Sc in each stitch around. (30 sc)
Sl st into the next stitch and fasten off, leaving a long sewing tail.
The head should be a flat circle with a softly rounded edge. At the proposed appliqué gauge, its calculated diameter is approximately 1 3/4 inches.
Step 12: Crochet the Teddy's Ears
Make two matching ears in buff-brown.
Round 1: Work 6 sc into a magic ring. (6 sc)
Round 2: Work 2 sc in each stitch. (12 sc)
Fasten off, leaving a sewing tail on each ear.
With dark-brown embroidery thread, stitch a small curved inner-ear marking inside each buff-brown ear to suggest the darker recessed centers shown in the finished example. Keep the markings flat and secure the thread ends on the wrong side. Do not add raised inserts or separate ear pieces.
Step 13: Crochet the Warm-Tan Muzzle
With the light buff-tan yarn used for the bib edging, make a magic ring.
Round 1: Work 6 sc into the ring. (6 sc)
Round 2: Work 2 sc in each stitch. (12 sc)
Fasten off, leaving a sewing tail.
Place the muzzle on the lower-center portion of the bear's head. Before attaching it, embroider a small dark-brown triangular nose and a short vertical line ending in a gentle curved smile.
Sew the muzzle flat against the head, securing the entire outer edge.
Step 14: Crochet the Teddy's Paws
Make two paws using buff-brown yarn.
Round 1: Work 6 sc into a magic ring. (6 sc)
Round 2: (Sc in the next st, 2 sc in the next st) 3 times. (9 sc)
Fasten off each paw, leaving a sewing tail.
These little paws will rest over the upper stocking cuff. They should look rounded, but they don't need stuffing.
Step 15: Crochet the Cranberry Bow
Use cranberry-red yarn and the smaller hook to make a slender bow with two small loops and two short tails, matching the finished example.
First loop: Ch 7. Sl st into the first chain to close the chain into a small loop.
Second loop: From the same joining point, ch 7 and sl st back into the same center chain position to form a second matching loop.
First tail: From the center joining point, ch 4 and fasten off, leaving a long sewing tail.
Second tail: Join a short new length of cranberry-red yarn at the center joining point, ch 4 and fasten off, leaving another sewing tail.
Bow checkpoint: The finished bow has two matching seven-chain loops and two four-chain tails. Arrange the loops to the left and right, with both tails pointing downward.
Position the bow beneath the teddy's chin and immediately above the cream stocking cuff. Using the sewing tails and matching thread as needed, secure the center and stitch both loops and both tails flat along their lengths. Do not leave any free-hanging chains or loops that can be lifted or pulled.
Step 16: Embroider the Teddy's Face
Use dark-brown embroidery thread or tightly twisted yarn for the eyes. Position them evenly above the muzzle, with enough space between them to give the bear a gentle expression.
Embroider the sleeping eyes: Using dark-brown embroidery thread, stitch a short, gently downward-curving line for each closed eye, using three or four small backstitches to form a smooth eyelid. Position the curves symmetrically above the muzzle, with their outer ends slightly higher than their inner ends. Add one tiny downward-pointing eyelash near the outer end of each eye if desired, matching the finished example.
Keep both eyes flat against the crocheted head. Secure the thread ends thoroughly on the wrong side before attaching the head to the bib. Do not use plastic safety eyes, beads, buttons or glued-on facial parts.
Add a small embroidered pink cheek beside each eye. Keep the stitches flat against the head.
Position the two ears behind the upper-left and upper-right sides of the head, keeping both ears symmetrical. Sew their overlapping inner edges securely to the back of the head.
Leave the remaining ear perimeters accessible for final attachment. In Step 21, when the completed head is sewn onto the bib, securely stitch the exposed outer edges of both ears flat against the bib as well. No ear edge should remain loose enough to lift or form a loop.
The teddy is now ready to peek over his Christmas stocking!
Holly, Berries and Snowflakes
I love the little finishing details on this one, especially the holly leaves and snowflakes. They make the stocking look festive without covering the entire front of the bib.
Arrange one little holly cluster beside the upper-right portion of the Christmas stocking, just below the cream cuff. Its three pointed forest-green leaves and three embroidered cranberry-red berries add a festive touch without crowding our teddy bear.
Use flat embroidery wherever possible for the smallest berries and snowflakes. You don't need raised balls or beads to make them pretty. In fact, I'd skip those completely on a bib intended for a baby.
Embroider the main ivory snowflake in the center of the stocking. Smaller embroidered snowflake details can be placed around the bear and stocking, leaving plenty of plain ivory crochet between them.
Before securing everything, step back and look at the whole bib. The bear and stocking should be the first things you notice. The holly and snowflakes are there to finish the scene, not compete with it.
Step 17: Crochet Three Holly Leaves
Use forest-green yarn and the smaller hook. Make three matching leaves for one holly cluster beside the stocking. Each leaf has a pointed tip and four small side points, giving it a recognizable holly shape.
Foundation: Ch 8.
Small picot: Ch 2, then sl st into the first of those 2 chains. This forms one small point without using another foundation-chain position.
Leaf Round: Sl st in the second ch from the hook. Sc in the next ch. In the next ch, work (hdc, small picot, hdc). Dc in the next ch. In the next ch, work (hdc, small picot, hdc). Sc in the next ch. Work 3 sc in the last ch to turn around the tip.
Continue along the opposite side of the foundation chain. Sc in the next chain position, work (hdc, small picot, hdc) in the next, dc in the next, work (hdc, small picot, hdc) in the next, sc in the next, and sl st in the final chain position. (19 main stitches, plus 4 small picots)
Fasten off, leaving a long sewing tail.
Gently flatten the leaf and shape the four picot points so they extend outward. Add a short embroidered center vein with green yarn.
When attaching the leaf to the bib, sew around its perimeter and secure all four points flat against the fabric. The points should not form loose loops that can be lifted or pulled free.
Step 18: Embroider the Holly Berries
Arrange the three holly leaves together beside the upper-right portion of the red stocking, just below the cream cuff. Position one leaf pointing upward, one extending toward the left, and the third extending downward-right, with their bases meeting beneath the berries.
Keep all three finished leaves separate for now. They will be attached in Step 21, after the bib edging, teddy and stocking are in position.
During final assembly, sew all three leaves flat against the bib and stocking, securing their complete outer edges and pointed picots. Then embroider three small rounded cranberry-red berries where the leaf bases meet, using closely packed, flat satin stitches.
Any additional tiny cranberry accents should also be embroidered during final assembly, once their placement can be checked against the finished design. Do not use beads, raised crocheted balls or loose knots.
Step 19: Add the Background Snowflakes
Plan two small embroidered snowflakes on the ivory bib near the teddy and stocking. Do not embroider them yet; their placement must be established after the main appliqués have been positioned in Step 21.
During final assembly, check the space around the attached Christmas scene and mark two suitable snowflake centers with removable markers. Keep both snowflakes clear of the scalloped border and the edges of the stocking and teddy.
Using ivory embroidery thread or fine cotton yarn, make each snowflake from three straight lines crossing at the center to form six arms. Add short branches near the ends where space allows. Keep these background snowflakes smaller than the one on the red stocking, and secure all thread ends on the wrong side.
Assembly and Finishing
Before attaching our little Christmas teddy and his stocking, finish the scalloped edging and check the bib's measurements. It's much easier to correct an edge or neckline before the decorations are sewn down.
Once the bib lies flat and the neckline has been checked, follow the assembly instructions below. Sew every appliqué securely around its exposed edges, keep the reverse side as smooth as possible, and don't leave loose yarn ends or decorative loops.
Step 20: Crochet the Buff-Tan Scalloped Border
Before sewing the Christmas decorations to the bib, complete the outer edging. This lets you correct the bib's shape without disturbing the teddy or stocking.
Use buff-tan yarn and the main crochet hook.
Border setup row: With the right side of the bib facing you, join buff-tan yarn at the outside upper corner of Shoulder A. Work 1 sc into each of the 38 row-end positions down the outside edge of Shoulder A and the main bib, continuing toward the lower corner. (38 sc)
Work 2 sc into the first lower corner space. (40 sc total)
Working along the unused loops of the foundation chain, work 1 sc into each of the 33 chain positions. Work one additional sc into the center foundation position to help the lower edge curve smoothly. (74 sc total)
Work 2 sc into the opposite lower corner space. (76 sc total)
Continue up the outside edge of the main bib and Shoulder B, working 1 sc into each of the 38 row ends. (114 sc total)
Count the border stitches: There should be 114 stitches along this outer section before adding the scallops.
Scalloped border row: Ch 1 and turn. Working back across the 114 border stitches, repeat the following sequence 19 times:
Sl st in the next st, skip 1 st, work 5 dc in the next st, skip 1 st, sl st in the next st, sc in the next st.
Each repeat uses 6 stitches and creates one scallop. (19 scallops)
Fasten off and weave in the tail.
Neckline edging: Keep the shoulder closure open while working this edging. Use buff-tan yarn and the main crochet hook. With the right side of the bib facing you, join the yarn at the free end of the back neck strap, on the edge that will face the neck.
Work 1 sc into each of the 31 row-end positions along the inside edge of the back strap, moving toward Shoulder B. (31 sc)
Continue down the shaped neckline edge of Shoulder B. Work 1 sc into each of the 8 row-end positions from Rows 38 through 31, placing a second sc in the row-end positions of Rows 36 and 33 to accommodate the shaped edge. (10 additional sc; 41 total)
Work 1 sc into each of the 3 unworked center stitches of Row 30. (44 total)
Continue up the shaped neckline edge of Shoulder A. Work 1 sc into each of the 8 row-end positions from Rows 31 through 38, placing a second sc in the row-end positions of Rows 33 and 36. (10 additional sc; 54 total)
Fasten off and weave in the tail. Keep this inside edging flat and narrow. Do not add large scallops around the inside of the neck opening or over the snap positions.
Neck edging checkpoint: This edging uses 54 single crochet stitches across the open neckline and inside strap edge. The count provides a reproducible starting construction, but the resulting inside diameter must still be checked on the actual fabric. Lay the bib flat, temporarily close the larger fastening setting, and measure the opening both horizontally and vertically. The target is 3 3/4 inches in each direction without stretching or forcing the fabric into a circle.
If the edging pulls the neckline inward or causes puckering, correct the pickup distribution or neckline shaping before permanently installing the fasteners. Recheck the opening after washing and drying.
Finish the outside of the back neck strap: With buff-tan yarn and the main hook, join at the free tip of the strap. Work 1 sc into each of the 3 stitches across the strap tip. Continue down the outside edge, working 1 sc into each of the 31 strap row-end positions toward Shoulder B. (34 sc total)
Small outer-strap scallops: Ch 1 and turn. Beginning at the Shoulder B end, work 1 sc in each of the first 2 setup stitches. Repeat the following sequence 9 times: sl st in the next stitch, work 4 dc in the next stitch, sl st in the next stitch. Work 1 sc in each of the next 2 stitches. Leave the 3 stitches across the free strap tip unworked on this scallop row. Fasten off and weave in the tail.
Outer-strap checkpoint: For the standard 31-row strap, the scallop row uses exactly 31 outside-edge setup stitches: 2 plain sc + (9 scallops × 3 stitches) + 2 plain sc = 31. The three stitches across the free strap tip remain outside this decorative row and stay flat for the reinforced snap.
If you adjusted the strap length: Keep the same nine scallops, but distribute the plain stitches as follows:
- 30 strap rows: Work 1 sc at the Shoulder B end, 9 three-stitch scallops, and 2 sc at the tip end. (1 + 27 + 2 = 30 outside-edge stitches)
- 31 strap rows: Work 2 sc at the Shoulder B end, 9 three-stitch scallops, and 2 sc at the tip end. (2 + 27 + 2 = 31 outside-edge stitches)
- 32 strap rows: Work 2 sc at the Shoulder B end, 9 three-stitch scallops, and 3 sc at the tip end. (2 + 27 + 3 = 32 outside-edge stitches)
In every version, leave the three stitches across the free strap tip without additional scallops. Check that the scallops lie flat and that the decorative edging does not interfere with the fastening. These adjusted counts apply only when the strap length has been changed.
Finish Shoulder B: Join buff-tan yarn at one end of the exposed shoulder-top edge beside the base of the back strap. Work 1 sc into each of the 8 shoulder-top stitches not used to begin the strap. (8 sc) Fasten off and weave in the tail.
Finish Shoulder A: Join buff-tan yarn at the inner end of the opposite shoulder top. Work 1 sc into each of its 11 stitches toward the outside corner. (11 sc) Fasten off and weave in the tail.
Keep all three finishing sections flat and relaxed. Do not add large decorative scallops across the closure or underneath the snaps. These finishing stitches are separate from the 54-stitch inside neckline edging and the 114-stitch outer border.
Closure checkpoint: The narrow back neck strap, its free tip, and both shoulder tops should now have finished edges. Check that the strap still curves naturally, that the snap positions have suitable reinforced fabric, and that the added edging has not distorted the neck opening.
Border checkpoint: The lower edge should curve gently, and the scallops should lie flat without gathering. If the shells cause the fabric to ruffle or pull, check the 114-stitch setup count and your tension before finishing.
Final 3 3/4-inch neckline verification: Complete both the inner neckline edging and outer finishing before permanently installing the snaps. Temporarily close the bib at the proposed larger fastening position and lay it flat without stretching.
Take these three measurements:
- Inside width: Measure horizontally across the widest part of the clear neck opening. The target is 3 3/4 inches.
- Inside height: Measure vertically from the highest inside point of the curved back strap to the lowest inside point of the front neckline. The target is 3 3/4 inches.
- Inside circumference: Follow the complete inside edge of the closed neckline using a flexible measuring tape. A truly circular opening measuring 3 3/4 inches in diameter has a calculated circumference of approximately 11 3/4 inches (11.78 inches).
Important: Check that the neckline is smoothly rounded, not simply an oval with similar horizontal and vertical measurements. The circumference provides an additional shape and fit check. These dimensions are design targets and must be confirmed on the actual finished crochet; they are not guaranteed by stitch count alone.
If the width is incorrect, recheck the stitch gauge, shoulder shaping and edging. If the height is incorrect, recheck the curved strap length and temporary fastening position. Make only one adjustment at a time and repeat all three measurements. If the opening is pointed or distorted, revise the shaping rather than trying to force it into a circle.
Wash and measure before installing the snaps: With the bib body and all edging complete, wash and dry the crocheted fabric according to the yarn manufacturer's instructions. Let it relax completely without stretching or pulling it into shape.
Temporarily secure the larger fastening position again. Measure the finished neckline horizontally, vertically and around its entire inside circumference. Our target is a smoothly rounded opening measuring approximately 3 3/4 inches across in both directions, with an inside circumference close to 11 3/4 inches.
If washing has changed the opening, correct the strap length, snap overlap or neckline construction before permanently attaching the fasteners. Recheck all three measurements after making an adjustment.
Once the washed neckline has been measured and the intended fit is suitable, mark the final snap locations on the free neck strap and opposite shoulder. Confirm that the larger setting maintains the intended rounded opening and that the smaller setting provides a comfortable alternative without twisting or tightening the strap.
Now securely attach the prepared woven-cotton reinforcement to the wrong side of the crocheted fabric at the confirmed fastening positions. Reinforce the strap snap and both matching positions on the opposite shoulder. Make sure the reinforcement supports every snap attachment point, and stitch down its edges so no loose fabric can lift or fray.
Install the garment snaps through the reinforced areas according to the fastener manufacturer's instructions. Check the actual inside circumference at both settings. Confirm that every snap is securely attached, that no rough or hard backing is exposed against baby's skin, that the closure lies flat, and that an adult can fasten and release it easily.
After attaching the Christmas decorations, complete the final washing, inspection and measurement checks in Step 22. Do not use the bib if its fastening, neckline fit or decorative attachments are unsuitable.
Step 21: Assemble the Christmas Teddy Bear Design
Lay the finished bib flat with the right side facing upward. Before sewing anything permanently, position the stocking, teddy and decorations to match the finished example.
Use the following assembly order:
- Lay the red stocking on the lower-right portion of the bib, angled slightly toward the lower-left.
- Secure the stocking body to the bib with small matching stitches around its outer edge.
- Position the teddy's head above the stocking, overlapping its top edge. Sew the head securely to the bib around its visible perimeter. Sew the exposed outer edges of both ears flat against the bib, checking that the ears remain rounded, symmetrical and firmly attached without loose lifting edges.
- Attach the cream stocking cuff across the lower part of the bear's head and upper stocking opening. Secure its entire edge.
- Attach the two buff-brown paws over the cream cuff.
- Attach the cream toe and heel pieces to the stocking.
- Position and securely sew down the cranberry bow beneath the bear's chin.
- Arrange the three holly leaves into one cluster beside the upper-right portion of the stocking. Point one leaf upward, one left, and one downward-right. Sew all three leaves flat and securely in place, including their pointed tips.
- After all crocheted appliqués are securely attached, embroider the three flat cranberry-red holly berries and the two small background snowflakes as described in Steps 18 and 19. Remove their positioning markers and secure the embroidery ends on the wrong side. The stocking snowflake was completed in Step 10 and should not be repeated.
Keep the entire Christmas design on the lower-right portion of the bib, leaving most of the ivory front uncovered. The bear's ears and head should remain clearly visible, and the stocking should have a recognizable curved foot rather than a straight rectangular bottom.
There should be no stuffing inside the bear, stocking or decorations. Each appliqué needs to lie flat and be attached securely around its exposed edges.
Step 22: Final Measurements and Finishing
Weave in every yarn tail securely. Check the back of the bib for loose threads, exposed fastener parts, or yarn loops that could catch on little fingers.
Wash and dry the bib according to the yarn instructions. Let it relax completely before measuring it.
Final measurement checklist:
- Overall width: approximately 9 1/2 to 10 inches, including edging.
- Overall length: approximately 10 3/4 to 11 inches.
- Inside neckline diameter at larger setting: approximately 3 3/4 inches, measured horizontally and vertically.
- Neckline: rounded, without puckering or twisting.
- Fastening: securely installed and adjustable.
- Stocking: recognizable heel, toe and cream cuff.
- Teddy: embroidered facial features and firmly attached appliqués.
- Decorations: flat, securely fastened and free of detachable components.
Remove every stitch marker and temporary pin before the bib is used.
If the finished neck opening has become smaller after edging, don't try to stretch it to the target measurement. Correct the fastening or neckline construction and recheck it before use.
The bib is intended for supervised wear only. Remove it before sleep and whenever an adult is not directly supervising the baby.
Baby Bib Safety and Care
As cute as this Christmas bib is, it's still something a baby will wear, so I'd keep safety ahead of decorative extras.
Use embroidered eyes, nose, cheeks and small decorative accents. Avoid beads, plastic eyes, pom-poms and anything that could become detached. Check the snap fasteners carefully and follow the manufacturer's instructions for attaching them to the crocheted fabric.
Always supervise a baby wearing a bib. Remove it before naps or nighttime sleep, and never leave it on a sleeping baby. The American Academy of Pediatrics recommends soft, absorbent cotton bibs for drooling babies and specifically advises removing bibs before sleep. You can read its guidance on drooling and baby bibs.
Wash the bib according to the yarn and fastening manufacturers' care instructions. Check all the appliqués, embroidery and fasteners after washing and before each use. If anything has worked loose, repair it before putting the bib back on baby.
And there you have it, a sweet little Christmas teddy who is ready to catch a few dribbles while looking absolutely adorable doing it!
When you click on links to various merchants on this site and make a purchase, this may result in this site earning a commission. This does not affect the price you pay.

UBGI Gold Standard 2026
Reviewed under the site's
editorial checklist.
Photos, decorating ideas, party setups and reader submissions are shared for inspiration unless a page is specifically presented as a pattern, tutorial, reference guide or step-by-step project. Follow the instructions, measurements, safety guidance and manufacturer directions provided for the particular project or product.
About Jan | Contact | Baby Nursery Ideas (Blog) | Site Map | Privacy Policy | Disclosure Policy | Disclaimer | Affiliate Disclosure | Earnings Disclosure | Facebook | Pinterest
I am a participant in the Amazon Services LLC Associates Program, an affiliate advertising program designed to provide a means for us to earn fees by linking to Amazon. As an Amazon Associate I earn from qualifying purchases.
Copyright © 2006-2026. All Rights Reserved.