Free Crochet Ghost Bib Pattern
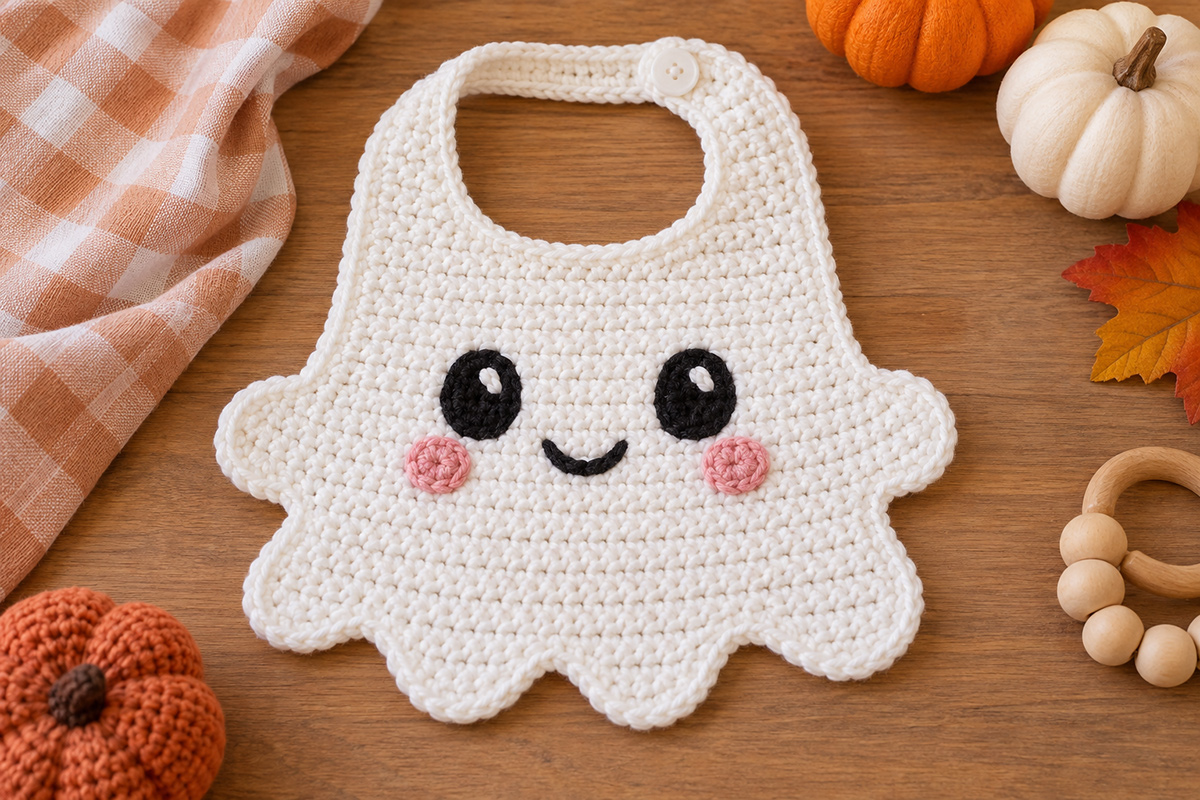
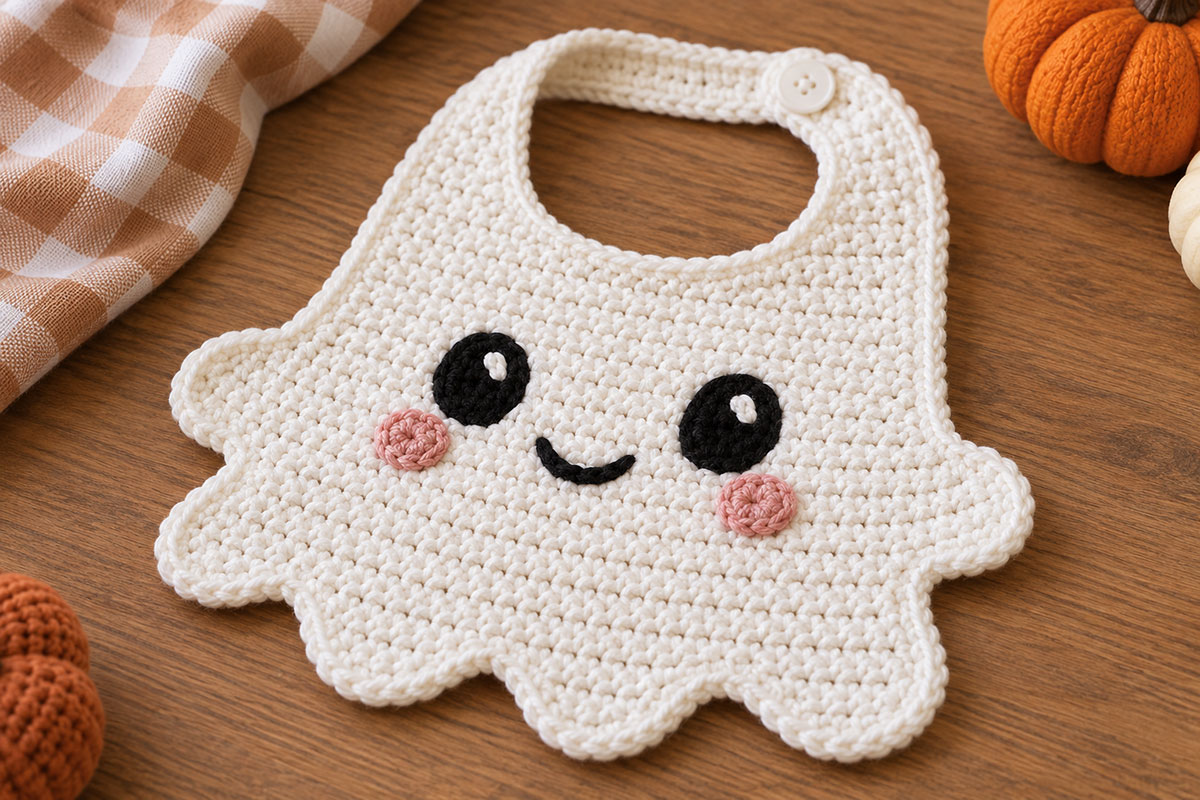
This free crochet ghost bib pattern is a practical baby bib that, when paired with a onesie, is a comfortable Halloween costume. It features a white ghost shape, rounded arms, a wavy lower edge and a sweet embroidered face. It doesn't take long to make and is a fun choice for baby's first Halloween photos, October meals or a handmade baby shower gift that will stand out in a gift basket.
Explore More Free Crochet Baby Patterns
Supplies for the Crochet Ghost Bib
I’d use a smooth cotton or cotton-blend yarn here rather than anything fuzzy. The little ghost face needs to stay crisp, and a bib is going to need washing. White does most of the work, so you only need scraps of black and pink.
- Approximately 120 yards white CYC #4 medium-weight cotton or cotton-blend yarn
- Small amount of black yarn for the eyes and smile
- Small amount of pink yarn for the cheeks
- 4.5 mm crochet hook
- One approximately 5/8-inch washable button
- Yarn needle
- Scissors
- Stitch markers
If you substitute another yarn, stay close to the same weight and check your gauge before starting. The Craft Yarn Council yarn-weight system is useful when you’re comparing labels from different brands.
Abbreviations: ch = chain, sc = single crochet, hdc = half double crochet, dc = double crochet, sl st = slip stitch, st = stitch, sts = stitches, sc2tog = single crochet two stitches together.
Turning chain: Ch 1 at the beginning of a single crochet row. The turning chain does not count as a stitch.
Skill level: Advanced beginner. You should be comfortable with single crochet, double crochet, half double crochet, increases, sc2tog decreases, slip stitches, working into a foundation chain, simple sewing and basic embroidery.
Finished Size and Gauge
At the stated gauge, the finished bib should measure about 9 1/2 inches across the main ghost body and about 11 3/4 inches across the tips of the little side arms. From the top of the closed neck strap to the bottom of the scalloped ghost edge, expect roughly 11 inches.
Gauge: 15 sc and 17 rows = 4 inches.
The neck opening is calculated to finish at about 4 1/4 inches across. Yarn, tension and how firmly you work the neckline edging can change that measurement, so check the opening before sewing on the button.
This pattern has been calculated to the stated gauge and construction, but it has not been physically test-made. If your gauge is substantially different, stop and adjust the hook before going farther. A small gauge change adds up quickly on a piece this size.
The ghost is intentionally wider through the middle than it is at the top and bottom. Don’t straighten those sides. That little bit of shaping is what gives the bib the rounded ghost silhouette instead of making it look like a rectangle with a face.
Free Crochet Ghost Bib Pattern
Work the body flat in white. The first row becomes the upper edge where the neck straps will be added later.
Ch 31.
Row 1: Sc in second ch from hook and in each ch across. Turn. (30 sts)
Row 2: Ch 1, sc in each st across. Turn. (30 sts)
Row 3: Ch 1, 2 sc in first st, sc across to last st, 2 sc in last st. Turn. (32 sts)
Row 4: Ch 1, sc in each st across. Turn. (32 sts)
Row 5: Ch 1, 2 sc in first st, sc across to last st, 2 sc in last st. Turn. (34 sts)
Row 6: Ch 1, sc in each st across. Turn. (34 sts)
Row 7: Ch 1, 2 sc in first st, sc across to last st, 2 sc in last st. Turn. (36 sts)
Rows 8-9: Ch 1, sc in each st across. Turn. (36 sts)
Row 10, first ghost arm: Ch 5. Sc in second ch from hook and in next 3 ch, then sc in each of the 36 sts across. Turn. (40 sts)
Row 11, second ghost arm: Ch 5. Sc in second ch from hook and in next 3 ch, then sc in each of the 40 sts across. Turn. (44 sts)
The two chain extensions sit on opposite sides because the work was turned between Rows 10 and 11. Once the next rows are worked, they become the short rounded projections visible at each side of the finished ghost.
Rows 12-13: Ch 1, sc in each st across. Turn. (44 sts)
Row 14: Sl st loosely across the first 4 sts. Ch 1, sc in each of the remaining 40 sts. Turn. (40 sc)
Row 15: Sl st loosely across the first 4 sts. Ch 1, sc in each of the remaining 36 sts. Turn. (36 sc)
Rows 16-17: Ch 1, sc in each st across. Turn. (36 sts)
Row 18: Ch 1, sc2tog, sc across to final 2 sts, sc2tog. Turn. (34 sts)
Rows 19-20: Ch 1, sc in each st across. Turn. (34 sts)
Row 21: Ch 1, sc2tog, sc across to final 2 sts, sc2tog. Turn. (32 sts)
Rows 22-23: Ch 1, sc in each st across. Turn. (32 sts)
Row 24: Ch 1, sc2tog, sc across to final 2 sts, sc2tog. Turn. (30 sts)
Rows 25-26: Ch 1, sc in each st across. Turn. (30 sts)
Fasten off after Row 26.
Choose the front: At this point, either side of the plain single-crochet body can be used as the right side. Choose the side you want as the front and keep that side facing you when you work the scalloped lower edge and position the face.
Side edging: Join white yarn at the upper corner of one side. Work sc evenly down the side edge, around the outside of the ghost arm and down to the lower corner. Keep the stitches relaxed so the edge stays flat. Fasten off. Repeat on the opposite side.
Scalloped ghost edge: With the right side facing, join white at the lower right corner of Row 26. Working across the 30 stitches of the lower edge, repeat the following five times: sl st in next st, skip next st, work 3 dc in each of the next 2 sts, skip next st, sl st in next st.
You should have five broad rounded ghost points across the bottom. Fasten off and weave in the ends.
If you like this little ghost but want a project you can add to blankets, hats or treat bags, the crochet ghost appliqué pattern keeps the same Halloween idea in a much smaller format.
Make the Ghost Face
The face is what keeps this from looking like an ordinary white bib with a scalloped edge. Keep the eyes fairly large and vertical, then leave plenty of white space around the smile. I wouldn’t crowd the face with more decoration.
Black eye, make 2: Ch 4.
Round 1: Work 2 sc in second ch from hook, sc in next ch, 4 sc in final ch. Continue along the unused loops on the opposite side of the foundation chain, sc in next ch and 2 sc in the final loop. Join with sl st to first sc. (10 sts)
Fasten off, leaving a long tail for sewing.
Position the eyes vertically on the upper half of the ghost body. As a starting point, center the left eye about 11 stitches in from the left edge of the 36-stitch body section and the right eye about 11 stitches in from the right edge. Their upper edges should sit around Rows 8-9.
Sew all the way around each eye with black yarn. Keep the ovals flat rather than pulling the sewing stitches tight enough to pucker the white body.
With white yarn, add one short highlight near the upper inside edge of each black eye. Use two small straight stitches at most. Knot and secure the yarn on the back.
Pink cheek, make 2: Make a magic ring. Work 6 sc into the ring and join with sl st to first sc. Pull the ring closed and fasten off, leaving a sewing tail.
Place one cheek below and slightly outside each eye. Sew around the edge with pink yarn.
Smile: Thread the yarn needle with black yarn. Embroider a small shallow curved smile between the cheeks and below the eyes. Two or three short stitches are enough. Don’t make it wide enough to run underneath the eyes.
I’d keep every facial detail in yarn. There’s no reason to add beads, safety eyes or glued pieces to a baby bib.
Crochet the Neck Strap and Button Closure
Lay the bib with Row 1 at the top. Count 7 stitches in from each upper corner and place a marker. The 16 stitches between the markers stay open and form the bottom of the neckline.
Left strap: With white yarn, join in the first stitch at the upper left corner.
Rows 1-12: Ch 1, sc in the first 7 sts. Turn. (7 sts)
Row 13, buttonhole: Ch 1, sc in first 2 sts, ch 2, skip next 2 sts, sc in final 3 sts. Turn.
Row 14: Ch 1, sc in first 2 sts, work 2 sc in ch-2 space, sc in final 3 sts. Turn. (7 sts)
Rows 15-16: Ch 1, sc in each st across. Turn. (7 sts)
Row 17, rounded end: Ch 1, sc in first st, hdc in next st, dc in next st, 3 dc in next st, dc in next st, hdc in next st, sc in final st.
Fasten off.
Right strap: Join white yarn in the 7 stitches at the opposite upper corner.
Rows 1-14: Ch 1, sc in each of the 7 sts. Turn. (7 sts)
Row 15, rounded end: Ch 1, sc in first st, hdc in next st, dc in next st, 3 dc in next st, dc in next st, hdc in next st, sc in final st.
Fasten off.
Neckline edging: Join white yarn near the top of one strap. Work sc evenly down the inside edge of that strap, across the 16 exposed stitches at the bottom of the U-shaped opening and up the inside edge of the second strap. Continue around the rounded ends and outer strap edges if they need a cleaner finish. Keep this edging loose. If it pulls the neckline inward, take it out and use fewer stitches rather than accepting a tight opening.
Overlap the longer left strap over the right strap. Use the buttonhole to determine the exact button position rather than relying on a measurement. Sew the button firmly through the right strap with several passes of matching thread or yarn, then secure it on the back.
Finishing the Crochet Ghost Bib
Weave every yarn end back through several stitches on the wrong side, changing direction once before trimming. Pay extra attention to the ends around the eyes, cheeks and button area. Those are the spots that will be handled the most.
Lightly shape the bib by hand after washing or damp blocking. Straighten the neck straps, spread the five lower scallops and ease the little side arms outward. Don’t stretch the neckline larger just to hit a measurement.
Before using the bib, tug gently on the button and each sewn facial piece. Nothing should lift away from the body. Check the button again after washing and from time to time as the bib is used.
For broader information about small parts and choking concerns in children’s products, see the U.S. Consumer Product Safety Commission small-parts guidance.
Use the bib only while an adult is supervising the baby. Remove it before naps, bedtime or any other sleep. If the button ever loosens, stop using the bib until it has been securely reattached.
The finished bib should still look like the little ghost in the example image when it’s lying flat: a broad white body, short rounded arms, five soft points along the lower edge, large dark oval eyes, pink cheeks and that tiny smile. If the arms disappear into the sides or the lower edge looks nearly straight, the shaping has been pulled too tight.
If you’re making several Halloween projects at once, the Halloween crochet patterns page keeps the seasonal projects together. You can also use the smaller motifs in the free crochet Halloween appliqué patterns collection for matching treat bags, blankets or nursery decorations.
When you click on links to various merchants on this site and make a purchase, this may result in this site earning a commission. This does not affect the price you pay.

UBGI Gold Standard 2026
Reviewed under the site's
editorial checklist.
Photos, decorating ideas, party setups and reader submissions are shared for inspiration unless a page is specifically presented as a pattern, tutorial, reference guide or step-by-step project. Follow the instructions, measurements, safety guidance and manufacturer directions provided for the particular project or product.
About Jan | Contact | Baby Nursery Ideas (Blog) | Site Map | Privacy Policy | Disclosure Policy | Disclaimer | Affiliate Disclosure | Earnings Disclosure | Facebook | Pinterest
I am a participant in the Amazon Services LLC Associates Program, an affiliate advertising program designed to provide a means for us to earn fees by linking to Amazon. As an Amazon Associate I earn from qualifying purchases.
Copyright © 2006-2026. All Rights Reserved.