Free Crochet Pumpkin Baby Booties Pattern
By Jan Bay
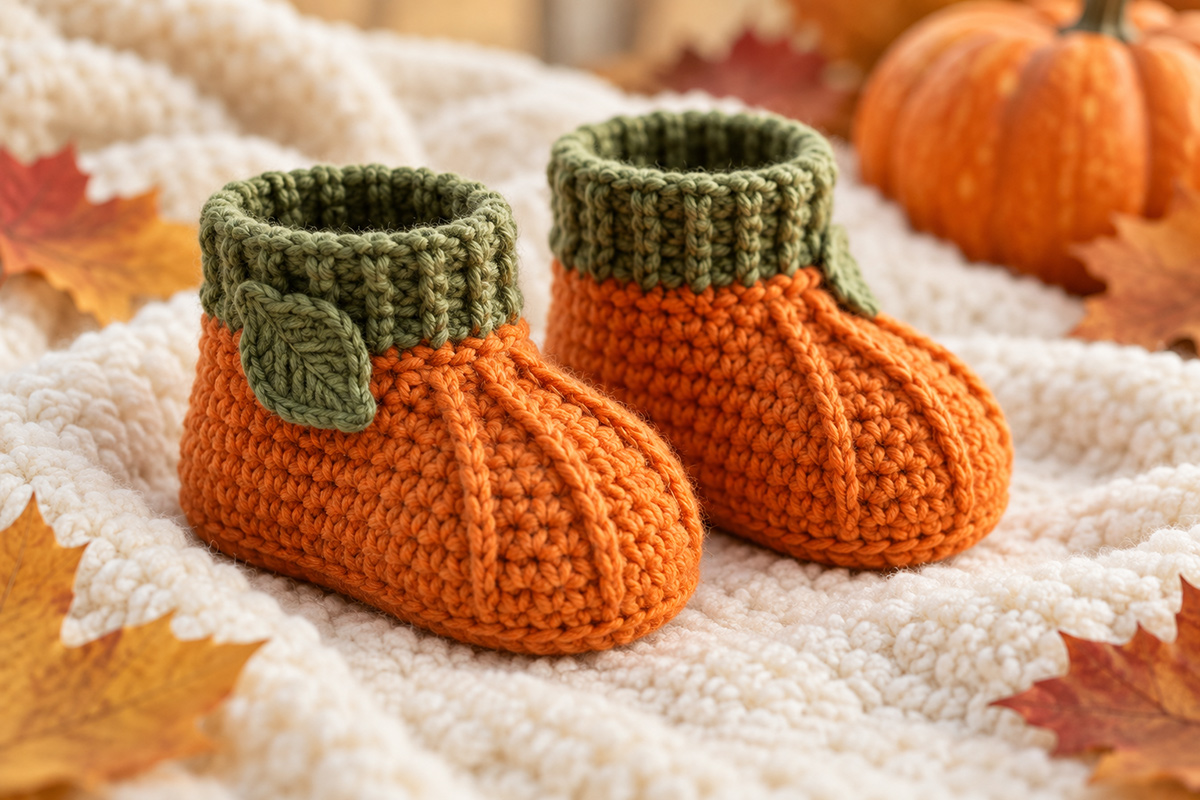
This free crochet pumpkin baby booties pattern creates a basic little crib shoe with an added touch of fall personality. They are not round, but they're still all about the pumpkin, with orange ribs across the toe, a short green cuff and one small leaf at the ankle. Soft, sweet and lightly fitted, they don't look like two pumpkins tied to baby's feet. They're eye-catching and cute, but the bootie function of keeping your lil' punkin's toes warm still comes first. They add a one-of-a-kind, custom look to a newborn fall outfit, first Thanksgiving photos or a handmade baby shower gift.
Explore More Free Crochet Baby Patterns
Free Crochet Baby Booties Pattern
Free Crochet Pumpkin Hat Pattern
Free Crochet Pumpkin Rattle Pattern
Jump to:
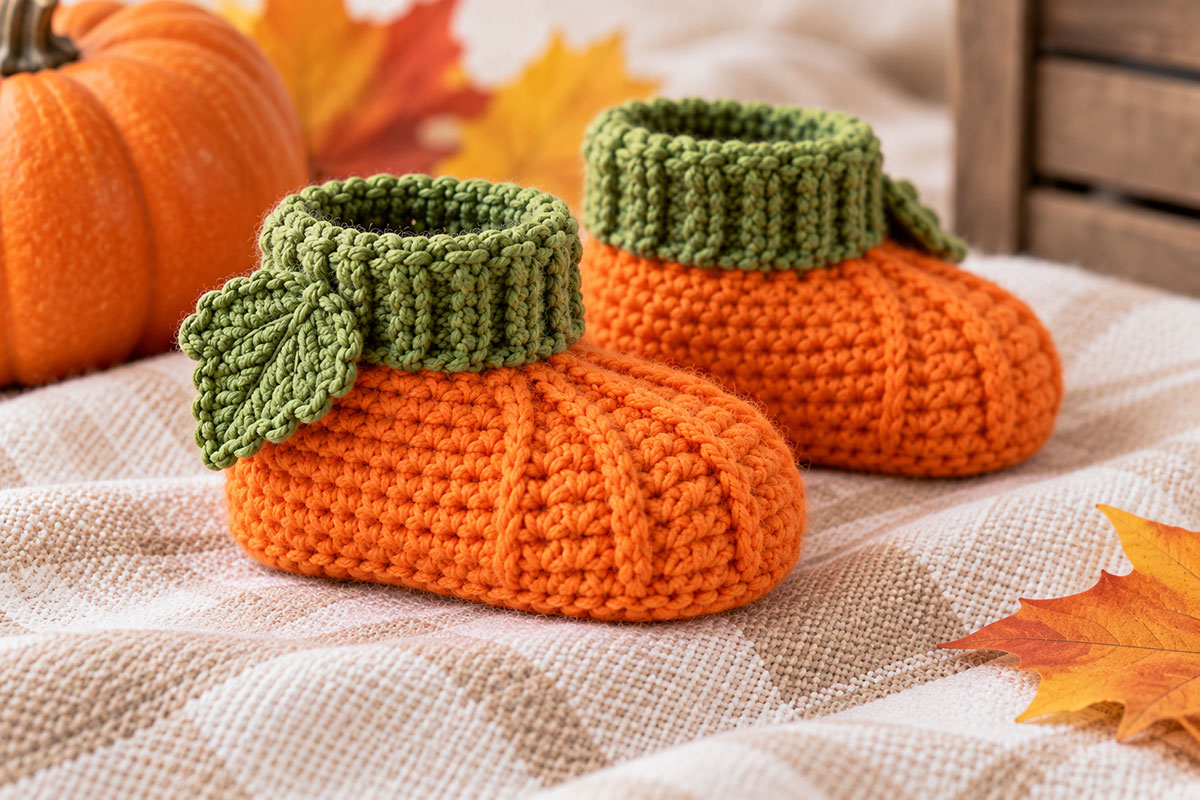
The little pumpkin details matter, but I wouldn't sacrifice the shape of the shoe to get them. The sole stays long enough to follow baby's foot, the heel comes up where it should and most of the orange upper stays fairly smooth. The pumpkin look is concentrated across the toe where four raised ribs give it just enough shape.
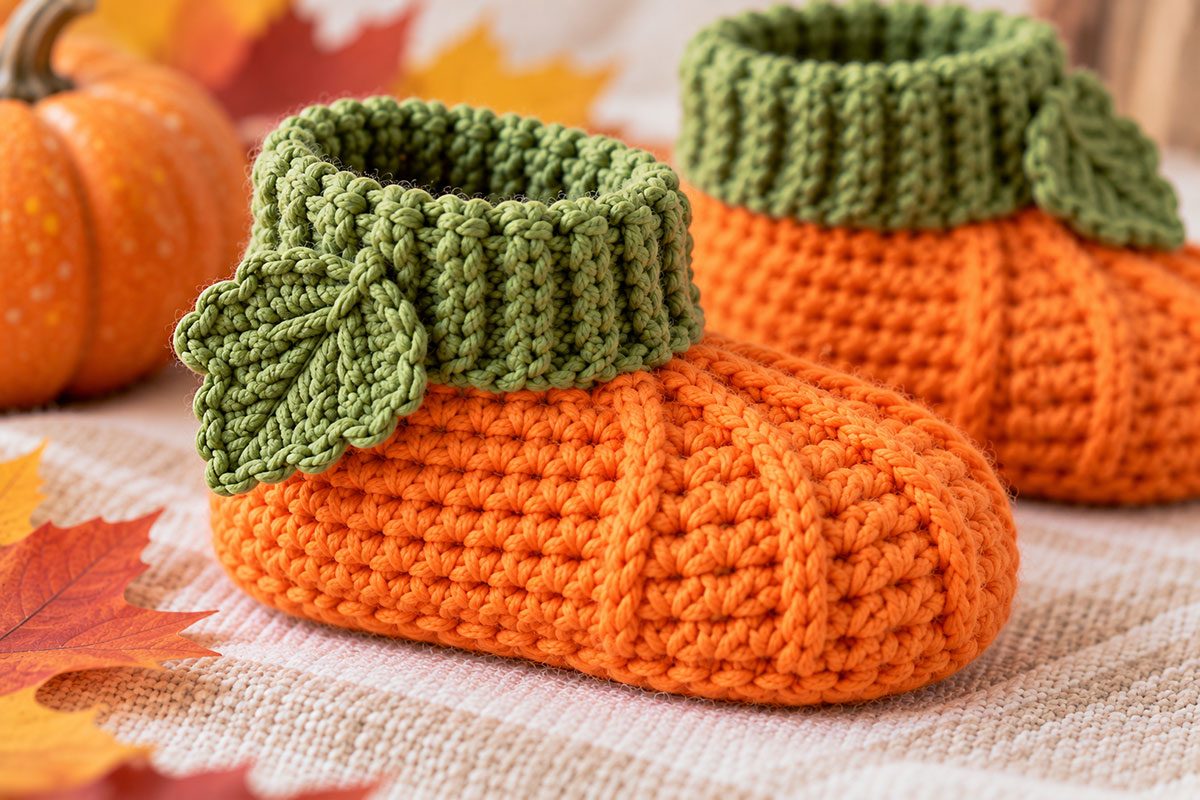
I also kept the decoration simple. One flat leaf at the outside ankle is plenty. Buttons, ties, beads and a floppy stem would add fuss without making these any cuter.
This pattern includes newborn and 0–6 month sizes. The measurements are calculated from the gauge and stitch counts below rather than taken from a physically test-made sample, so check the sole length before you build the upper. Baby feet don't all follow the calendar.
I'm using a #3 Light yarn for this pair. If you want to compare yarn labels, the Craft Yarn Council yarn weight system lists DK and light worsted in that category.
Materials for This Free Crochet Pumpkin Baby Booties Pattern
Yarn: CYC #3 Light/DK or light worsted yarn in pumpkin orange and olive green.
Approximate yarn amounts: 35 (45) yards orange and 12 (15) yards olive green for newborn (0–6 months).
Hook: 3.5 mm/E-4 crochet hook, or the hook size needed to meet gauge.
You will also need: yarn needle, scissors and removable stitch markers.
Choose a soft yarn that still has enough stitch definition to show the ribs across the toe. A very fuzzy yarn can hide the pumpkin shaping, while a stiff yarn works against the lightly fitted bootie shape.
These booties don't need stuffing, wire, elastic, buttons or any other hardware.
Sizes and Finished Measurements
The instructions are written for newborn with the 0–6 month size in parentheses.
Calculated finished sole length: approximately 3½ (4) inches / 9 (10) cm.
Opening stitch count before cuff: 24 (28) stitches.
Approximate cuff height: ¾ to 1 inch / 2 to 2.5 cm.
Gauge: 18 single crochet stitches and 20 rows = 4 inches / 10 cm.
Don't skip the sole checkpoint. After Round 2, lay the sole flat and measure from the center of the heel to the farthest point of the toe. If yours is noticeably longer or shorter than the measurement for your size, change hook size before you continue.
A little negative ease around the upper helps the bootie stay lightly fitted, but the sole itself shouldn't be shorter than baby's foot.
Crochet Abbreviations and Pattern Notes
This pattern uses US crochet terminology.
ch = chain
sc = single crochet
hdc = half double crochet
dc = double crochet
sl st = slip stitch
sc2tog = single crochet two stitches together
BLO = back loop only
st/sts = stitch/stitches
rnd = round
Chains at the beginning of rounds do not count as stitches unless the instruction says otherwise. Join each round with a slip stitch to the first stitch.
Numbers before parentheses are for newborn. Numbers in parentheses are for 0–6 months.
Use stitch markers if you need them to keep the toe shaping centered. It's much easier to move a marker than to discover three rounds later that your toe has wandered sideways.
Crochet the Sole
With orange, ch 10 (12).
Round 1: Work 2 hdc in the second ch from hook. Hdc in next 7 (9) ch. Work 6 hdc in last ch for the toe. Rotate the foundation chain so you can work along the unused loops on the opposite side. Hdc in next 7 (9) ch. Work 2 hdc in the same foundation ch that already holds the first 2 hdc. Join with sl st. 24 (28) sts.
Round 2: Ch 1. Work 2 hdc in each of the first 2 sts around the heel. Hdc in next 7 (9) sts. Work 2 hdc in each of the next 6 sts around the toe. Hdc in next 7 (9) sts. Work 2 hdc in each of the final 2 sts around the heel. Join. 34 (38) sts.
Lay the sole flat before going farther. It should look like an elongated baby-bootie sole, not a circle. The broader end is the toe and the narrower end is the heel.
The expected sole length is about 3½ (4) inches. Adjust hook size now if you need to. Don't try to fix a badly sized sole later by making the upper tighter or looser.
Crochet the Bootie Upper and Shape the Toe
Keep working in orange.
Upper Round 1: Ch 1. Working in the BLO, sc in each stitch around. Join. 34 (38) sts.
That BLO round makes a small turning ridge so the upper starts climbing away from the sole instead of continuing outward.
Upper Round 2: Ch 1. Sc in each stitch around. Join. 34 (38) sts.
Before starting the decreases, flatten the bootie with the heel seam centered at the back. The toe shaping below is centered over the opposite end.
Upper Round 3: Ch 1. Sc in first 11 (13) sts. Work [sc2tog, sc in next st] 4 times. Sc in remaining 11 (13) sts. Join. 30 (34) sts.
Upper Round 4: Ch 1. Sc in first 10 (12) sts. Work [sc2tog, sc in next st] 3 times. Sc in remaining 11 (13) sts. Join. 27 (31) sts.
Upper Round 5: Ch 1. Sc in first 10 (12) sts. Work sc2tog 3 times. Sc in remaining 11 (13) sts. Join. 24 (28) sts.
Fasten off orange.
At this point the shape should be easy to recognize as a bootie. You should have a flat sole, defined heel, smooth side walls and a rounded toe that pulls inward toward the ankle opening. If it looks like a round pumpkin pouch, something has gone off course.
Add the Raised Pumpkin Ribs Across the Toe
The ribs are crocheted directly onto the orange forefoot. They are not separate pieces, and they don't continue around the sides or heel.
Keep your surface slip stitches loose. Tight surface crochet can pull the toe inward and change the fit.
Use the center-back join as your counting point so all four ribs land in the same place on both booties.
Along Upper Round 1, count clockwise from the center-back join and place removable markers in stitches 14, 16, 19 and 21 for newborn, or stitches 16, 18, 21 and 23 for 0–6 months. These mark the lower ends of the four ribs across the forefoot.
At the ankle opening after Upper Round 5, count clockwise from the center-back join and place four more markers in stitches 9, 11, 14 and 16 for newborn, or stitches 11, 13, 16 and 18 for 0–6 months. Pair each lower marker with the marker directly above it.
For each rib, insert the hook from the right side at the lower marker. Hold the orange working yarn behind the fabric and pull up a loop. Work loose surface slip stitches upward through the orange fabric in the straightest path between that lower marker and its matching upper marker. Keep the line centered over the forefoot and stop just below the green cuff.
Fasten off securely on the inside. Repeat for the remaining three marked paths to make four raised ribs. Remove all eight rib-placement markers after the four ribs are complete.
Don't carry them onto the heel. The bootie needs a hint of pumpkin, not a complete pumpkin shell.
Crochet the Short Green Ribbed Cuff
Switch to olive green.
The cuff is worked sideways in rows so the finished ribs run vertically, just as they do in the example image.
Foundation: Ch 5.
Row 1: Sc in second ch from hook and in each remaining ch. Turn. 4 sts.
Row 2: Ch 1. Working in BLO, sc in each of the 4 sts. Turn. 4 sts.
Repeat Row 2 until you have a total of 24 (28) rows. At the stated gauge, the relaxed strip should measure approximately 4¾ (5½) inches long before seaming. A small amount of stretch is intentional so the cuff sits close to the ankle.
Before seaming, wrap the strip around the 24 (28)-stitch ankle opening. The short ends should meet with only light stretching. If the strip must be pulled hard to meet, or overlaps while relaxed, check your gauge before continuing.
Bring the first and last rows together without twisting the strip. Slip stitch or whipstitch the short edges together to form a ring. Place the seam at the back of the bootie.
With the bootie right side out, place the lower edge of the green cuff around the orange ankle opening. Match one cuff row-end to each of the 24 (28) opening stitches.
Using green, sc evenly through the cuff edge and the orange opening together all the way around. Join and fasten off.
The cuff should sit close to the ankle without turning into a tall sock. About ¾ to 1 inch is enough.
Crochet and Attach the Small Green Leaf
Make one leaf for each bootie with olive green yarn.
Ch 7.
Beginning in the second ch from hook, work sc in next ch, hdc in next ch, dc in each of next 2 ch, hdc in next ch and 3 sc in last ch.
Continue along the unused loops on the opposite side of the foundation chain. Work hdc in next ch, dc in each of next 2 ch, hdc in next ch and sc in final ch. Join with sl st to the first sc.
Fasten off, leaving a sewing tail.
Flatten the leaf with your fingers. You don't need to block a tiny piece like this unless your yarn insists on curling.
Place the leaf at the outside ankle, just above the orange upper and against the lower portion of the green cuff. Angle the tip slightly toward the side rather than straight up.
Use the yarn tail to stitch securely around the base and through the center of the leaf so the entire piece lies flat against the bootie. Don't leave the tip flapping loose.
Finishing the Pumpkin Baby Booties
Weave in every yarn end securely on the inside of the bootie. Pay particular attention to the ends from the four surface-crochet ribs and the attached leaf.
Make the second bootie the same way. You don't need separate right- and left-foot shaping. Simply place the leaf on the outside ankle of each finished bootie so the pair mirrors when they're side by side.
Set the finished pair flat and check four things: both soles are the same length, both ankle openings have the same number of stitches, the toe ribs sit in roughly the same position and every removable stitch marker has been taken out.
If one leaf has wandered toward the front or one set of ribs is noticeably crooked, fix it now. Those little details are what make the pair look intentional.
These are soft crib-style booties rather than walking shoes. Check the fit before use, make sure the leaf and all yarn ends are firmly secured, and remove the booties if they become loose enough for baby to pull off easily.
If you're putting together a full fall outfit, pair them with the free crochet pumpkin hat pattern. For a small handmade gift that doesn't need to fit, the free crochet pumpkin rattle pattern keeps the same fall theme going.
Or stop with the booties. They're cute enough to carry the outfit without covering baby from head to toe in pumpkins.
When you click on links to various merchants on this site and make a purchase, this may result in this site earning a commission. This does not affect the price you pay.

UBGI Gold Standard 2026
Reviewed under the site's
editorial checklist.
Photos, decorating ideas, party setups and reader submissions are shared for inspiration unless a page is specifically presented as a pattern, tutorial, reference guide or step-by-step project. Follow the instructions, measurements, safety guidance and manufacturer directions provided for the particular project or product.
About Jan | Contact | Baby Nursery Ideas (Blog) | Site Map | Privacy Policy | Disclosure Policy | Disclaimer | Affiliate Disclosure | Earnings Disclosure | Facebook | Pinterest
I am a participant in the Amazon Services LLC Associates Program, an affiliate advertising program designed to provide a means for us to earn fees by linking to Amazon. As an Amazon Associate I earn from qualifying purchases.
Copyright © 2006-2026. All Rights Reserved.