Free Crochet Turkey Pattern for a Cute Mini Amigurumi Turkey
By Jan Bay
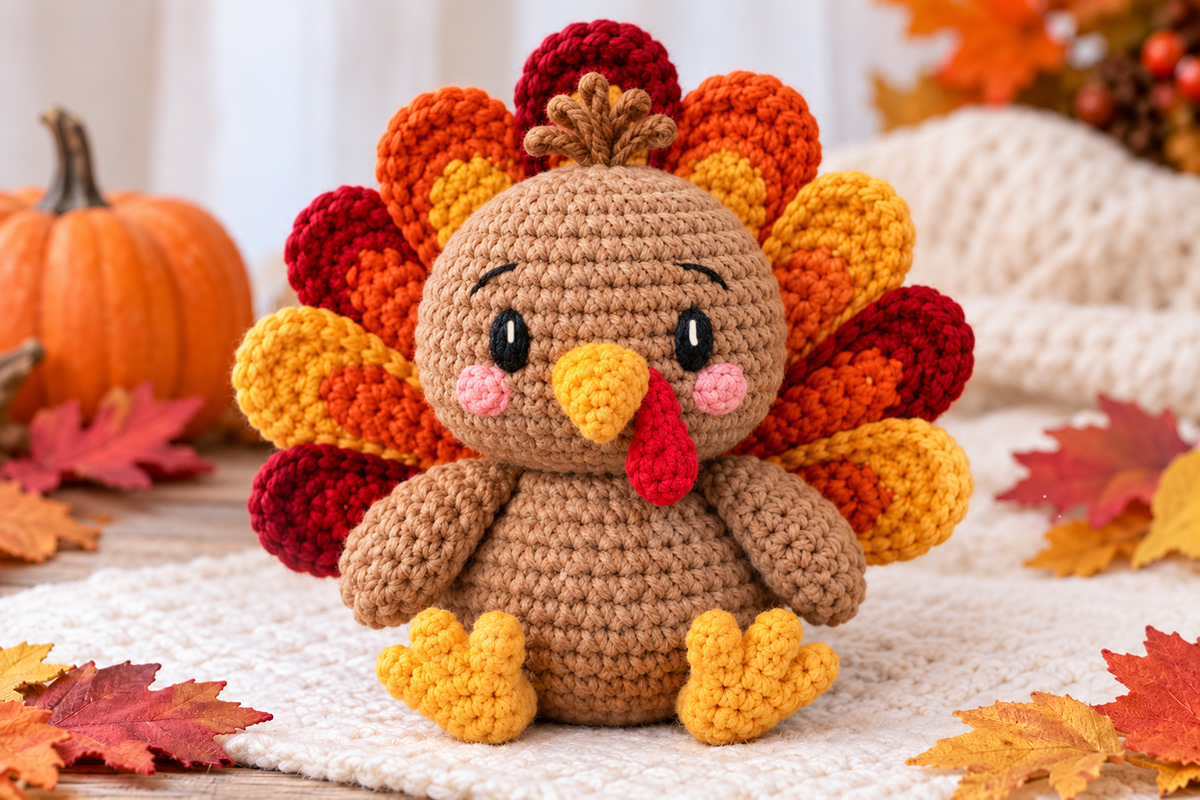
This free crochet turkey pattern makes a cute little amigurumi turkey that is just right for fall decorating, baby's first Thanksgiving photos or a handmade seasonal gift. The finished turkey has a plump little body, a colorful fan of tail feathers and a friendly embroidered face, giving you a recognizable Thanksgiving turkey that's not so difficult to make that it puts you behind on the rest of your holiday preparations. It's adorable but making the dressing for your family's Thanksgiving dinner is far more important.
Explore More Thanksgiving Crochet Patterns
Crochet Turkey Baby Booties Pattern
Crochet Turkey Diaper Cover Pattern
Worsted Weight Yarn for Crochet Amigurumi
Jump to:
Materials for This Free Crochet Turkey Pattern
This free crochet turkey pattern is designed around the finished turkey shown in the example image, so I would keep the yarn weight and hook size consistent rather than changing them on the first try. The oversized round head, compact body and full nine-feather tail all depend on a firm amigurumi fabric that holds its shape.
I would use a smooth Category 4 worsted weight yarn with good stitch definition. Tan is the main color because it is used for the head, body and both wings. The burgundy, burnt orange, golden yellow, brown, red, pink, black and white are used in smaller amounts for the tail and details.
- Category 4 worsted weight yarn in warm tan: head, body and both wings
- Burgundy yarn: tail feathers
- Burnt orange yarn: tail feathers
- Golden yellow yarn: tail feathers, beak and feet
- Medium brown yarn: looped crest
- Rich red yarn: wattle
- Soft pink yarn: cheeks
- Black yarn or embroidery thread: eyes and brows
- White yarn or embroidery thread: tiny eye catchlights
- 3.5 mm crochet hook
- Polyester fiberfill
- Yarn needle
- Embroidery needle, optional but helpful for the facial details
- Removable stitch marker
- Scissors
The tan yarn does most of the work here, so that's the color I would make sure I have the most of. The tail and facial details use considerably less yarn than the head and body. Keep the burgundy, orange and yellow fairly rich. The turkey loses a lot of its Thanksgiving personality if those colors become too pale.
I also prefer a smooth yarn over anything fuzzy or heavily textured for this pattern. The face needs clean embroidery, and the rounded tail feathers look better when you can actually see their shape.
Finished Size and Construction
Skill level: Confident beginner to intermediate. You should be comfortable working in continuous rounds, increasing and decreasing, changing colors, sewing small amigurumi pieces together and adding simple embroidered facial details.
This is a small tabletop amigurumi turkey worked with Category 4 worsted weight yarn and a 3.5 mm hook. Exact finished measurements will vary with the yarn, hook and your tension. Because this pattern has not been documented as physically test-crocheted and measured, I would rather not give you a made-up inch measurement and pretend it's exact.
What does need to stay consistent is the proportion. The head is intentionally larger than the body, the body is short and plump, and the nine-feather fan extends well beyond both sides of the body and above the head. Keep those relationships and you'll preserve the shape shown in the example image.
The pattern is worked mostly in continuous rounds. The head and body are crocheted and stuffed separately, then joined. The wings, feet, beak, wattle, cheeks and nine tail feathers are made separately and sewn in place.
The tail is not one large scalloped piece. It is built from nine individual rounded feathers arranged in two overlapping rows. That takes a little longer, but it's worth doing because the layered fan is what gives this turkey its finished shape.
The eyes are embroidered rather than made with plastic safety eyes. Each eye is worked as a small black oval with one tiny white stitched catchlight. The catchlight should look like a stitch, not a shiny plastic reflection.
Crochet Abbreviations and Pattern Notes
This pattern uses standard U.S. crochet terminology.
- ch = chain
- sc = single crochet
- hdc = half double crochet
- dc = double crochet
- sl st = slip stitch
- inc = work 2 single crochet stitches in the same stitch
- dec = single crochet decrease over the next 2 stitches
- st = stitch
- sts = stitches
- rnd = round
- FO = fasten off
- MR = magic ring
Unless a section says otherwise, work the amigurumi pieces in continuous rounds without joining at the end of each round. Place a stitch marker in the first stitch and move it up as you work.
Numbers in parentheses at the end of a round show the total stitch count after that round is complete. Check those counts before moving on. A missed increase or decrease early in the head or body can change the shape several rounds later.
Use an invisible decrease whenever possible. Insert the hook through the front loop only of each of the next two stitches, yarn over and complete the decrease. It keeps the shaping smoother and reduces the little gaps that can show around stuffed pieces.
Stuff gradually rather than waiting until the final round. The head should be firm enough to stay round, but don't pack it so tightly that the stitches spread apart. The body should feel plump and should flatten slightly at the bottom so the finished turkey can sit upright.
The tail feathers need structure more than stuffing. Keep them fairly flat and rounded so the completed fan stays behind the turkey instead of pushing forward around the head.
Keep the facial features off until the head shaping is complete. It's much easier to place the eyes, brows, cheeks, beak and wattle accurately once you can see the finished curve of the face.
Crochet the Head
Use warm tan yarn. The head is the largest stuffed piece in this pattern, and I would not reduce it to make the turkey use less yarn. That oversized round head is part of the finished design.
Rnd 1: Work 6 sc into a MR. (6)
Rnd 2: Inc in each st around. (12)
Rnd 3: [Sc in next st, inc in next st] 6 times. (18)
Rnd 4: [Sc in next 2 sts, inc in next st] 6 times. (24)
Rnd 5: [Sc in next 3 sts, inc in next st] 6 times. (30)
Rnd 6: [Sc in next 4 sts, inc in next st] 6 times. (36)
Rnd 7: [Sc in next 5 sts, inc in next st] 6 times. (42)
Rnds 8 through 16: Sc in each st around. (42)
At this point the head should have a broad rounded crown and enough depth for the low-set face. Don't add the facial features yet. Finish the shaping first so you can place everything against the actual curve of the head.
Rnd 17: [Sc in next 5 sts, dec] 6 times. (36)
Rnd 18: Sc in each st around. (36)
Rnd 19: [Sc in next 4 sts, dec] 6 times. (30)
Rnd 20: [Sc in next 3 sts, dec] 6 times. (24)
Begin stuffing firmly. Push the filling all the way into the upper curve of the head before adding more. I would shape it with my fingers as I go so it stays round instead of becoming tall or pointed.
Rnd 21: [Sc in next 2 sts, dec] 6 times. (18)
Add more stuffing, concentrating a little extra around the lower sides of the head. You want a full cheek area without creating a narrow chin.
Rnd 22: [Sc in next st, dec] 6 times. (12)
Finish stuffing. The head should be firm but still show clean, unstretched stitches.
Rnd 23: Dec around. (6)
FO, leaving a long tail. Thread the yarn tail through the front loops of the remaining 6 stitches and pull closed. Weave the end securely into the head.
Set the head aside. Do not sew it to the body yet. The tail fan is easier to position accurately while the body is still separate.
Crochet the Body
Use warm tan yarn. The body should be smaller than the head, short through the torso and full across the lower half. Keep that difference obvious. If the body grows almost as large as the head, the finished turkey will lose the proportions shown in the example image.
Rnd 1: Work 6 sc into a MR. (6)
Rnd 2: Inc in each st around. (12)
Rnd 3: [Sc in next st, inc in next st] 6 times. (18)
Rnd 4: [Sc in next 2 sts, inc in next st] 6 times. (24)
Rnd 5: [Sc in next 3 sts, inc in next st] 6 times. (30)
Rnd 6: [Sc in next 4 sts, inc in next st] 6 times. (36)
Rnds 7 through 12: Sc in each st around. (36)
The body should now look like a short rounded bowl or egg rather than a tube. If yours wants to grow tall, don't add extra plain rounds.
Rnd 13: [Sc in next 4 sts, dec] 6 times. (30)
Rnd 14: Sc in each st around. (30)
Rnd 15: [Sc in next 3 sts, dec] 6 times. (24)
Begin stuffing the body. Keep the lower portion full, but press the base gently against a flat surface as you stuff. That slight flattening helps the turkey sit instead of rolling backward onto its tail.
Rnd 16: [Sc in next 2 sts, dec] 6 times. (18)
Add more stuffing. Leave the upper center firm enough to support the large head.
Rnd 17: [Sc in next st, dec] 6 times. (12)
Finish stuffing the body. Check it from the front and side before closing. It should look plump and compact, with no obvious neck section.
Rnd 18: Dec around. (6)
FO, leaving a long sewing tail. Thread the tail through the front loops of the remaining 6 stitches and pull the opening closed, but do not weave in this tail. Leave it available for attaching the head during assembly.
Do not attach the head yet. The completed tail fan will be secured to the back of this body before the head is sewn in place.
Crochet the Wings
Make 2 in warm tan yarn.
The wings are simple rounded pieces, but their size matters. They should hang against the sides of the body and stop well above the feet. I would keep them softly dimensional rather than making them flat circles.
Rnd 1: Work 6 sc into a MR. (6)
Rnd 2: Inc in each st around. (12)
Rnd 3: [Sc in next st, inc in next st] 6 times. (18)
Rnds 4 through 6: Sc in each st around. (18)
Rnd 7: [Sc in next st, dec] 6 times. (12)
Add only a small amount of stuffing. The wing should have some thickness, but it should still flatten easily against the body.
Rnd 8: Sc in each st around. (12)
Fold the opening flat so the stitches line up in two layers. Working through both layers, sc across the opening to close it. (6)
FO, leaving a long tail for sewing.
Repeat for the second wing.
When the turkey is assembled, position each wing high on the side of the body with the closed edge toward the shoulder area and the rounded end pointing slightly downward. Don't sew them on yet. Final placement is easier after the head and tail fan establish the center line of the finished turkey.
Crochet the Tail Feathers
Make 9 tail feathers altogether. These are the pieces I would take my time with because the finished fan gives this turkey most of its personality. The feathers should be rounded and full, not pointed, and they need to overlap enough that the tail looks complete from the front.
Use burgundy, burnt orange and golden yellow yarn. Each feather begins at its rounded outer tip. For a two-color feather, work Rnds 1 through 3 in the first color, then change color before Rnd 4 and complete Rnds 4 through 10 in the second color. Carry neither color inside the feather. Cut and secure the first color after the change.
For each feather:
Rnd 1: Work 6 sc into a MR. (6)
Rnd 2: Inc in each st around. (12)
Rnd 3: [Sc in next st, inc in next st] 6 times. (18)
Change color here if this is a two-color feather.
Rnds 4 through 6: Sc in each st around. (18)
Rnd 7: [Sc in next 4 sts, dec] 3 times. (15)
Rnd 8: Sc in each st around. (15)
Rnd 9: [Sc in next 3 sts, dec] 3 times. (12)
Rnd 10: Sc in each st around. (12)
Do not firmly stuff the feather. Add only a very small amount of fiberfill if you want a little body, then flatten the piece gently so it keeps an elongated rounded shape.
Fold the opening flat so the 12 stitches line up in two layers. Working through both layers, sc across the opening to close it. (6)
FO, leaving a long sewing tail.
Make all 9 feathers before assembling the fan. They are easier to balance when you can lay every color out at once.
Arrange the feathers in two rows before sewing them together.
Taller rear row, left to right: burgundy/burnt orange, burnt orange/golden yellow, solid burgundy at center, burnt orange/golden yellow, burgundy/burnt orange.
Lower front row, left to right: golden yellow/burnt orange, burgundy/burnt orange, burgundy/burnt orange, golden yellow/burnt orange.
The first color listed is used for Rnds 1 through 3 at the rounded tip. The second color is used for Rnds 4 through 10 toward the base.
Overlap only the lower portions of the feathers. All nine rounded tips should remain visible from the front. The rear row contains 5 feathers and the lower front row contains 4. Do not add another feather behind the fan.
Before sewing anything, stand the fan behind the completed body. The center feather should line up with the middle of the turkey and the outer feathers should extend beyond both wings.
Once you like the arrangement, stitch the feather bases to one another across the lower portion of the fan. Use several secure passes through adjoining feathers so the whole tail behaves like one unit.
Set the assembled fan aside until the main assembly section.
Crochet the Beak and Wattle
The beak and wattle are small pieces, but they need enough dimension to show clearly on the oversized head. Keep the beak compact. A long beak will make the face look more like a bird than the round little turkey in the example image.
Beak
Use golden yellow yarn.
Rnd 1: Work 4 sc into a MR. (4)
Rnd 2: [Sc in next st, inc in next st] twice. (6)
Rnd 3: Sc in each st around. (6)
Rnd 4: [Sc in next 2 sts, inc in next st] twice. (8)
FO, leaving a long tail for sewing. Add just enough stuffing to help the beak keep its short triangular shape.
Wattle
Use rich red yarn.
Rnd 1: Work 5 sc into a MR. (5)
Rnd 2: Inc in each st around. (10)
Rnds 3 and 4: Sc in each st around. (10)
Rnd 5: [Sc in next 3 sts, dec] twice. (8)
Rnd 6: Sc in each st around. (8)
Flatten the upper opening slightly. Do not stuff heavily. The finished wattle should remain soft enough to hang beside the beak.
FO, leaving a long sewing tail.
Crochet the Feet
Make 2 in golden yellow yarn.
The feet are chunky and simple, with three rounded toes on each foot. They sit toward the front of the body and angle slightly outward.
Make the first toe: Ch 4. Work 3 sc in the second ch from the hook, sc in the next ch and hdc in the last ch. You are now back at the toe base. Do not fasten off.
Make the center toe: Ch 5. Work 3 sc in the second ch from the hook, sc in each of the next 2 ch and hdc in the last ch. You are now back at the toe base.
Make the third toe: Ch 4. Work 3 sc in the second ch from the hook, sc in the next ch and hdc in the last ch.
You will now have three rounded toe extensions joined at one base, with the center toe slightly longer than the two outer toes.
Working around the joined lower base of all three toes, place 8 sc evenly around the base: work 2 sc along the base of the first toe, 4 sc around the wider center-toe base and 2 sc along the base of the third toe. Join with a sl st to the first sc. (8)
Rnd 2: Sc in each st around. (8)
Rnd 3: [Sc in next 2 sts, dec] twice. (6)
Add a very small amount of stuffing to the base if needed. Leave the toes unstuffed.
Flatten the opening so the 6 stitches line up in two layers. Working through both layers, sc across the opening to close it. (3)
FO, leaving a long tail for sewing.
Make the second foot the same way.
Don't worry if the three toes are not perfectly identical. A slightly softer handmade shape suits this turkey better than three stiff little prongs.
Embroider the Face and Add the Crest
Place the head in front of you with the closing point centered at the bottom. The face should sit somewhat low on the head, leaving plenty of rounded forehead above the eyes.
Before making permanent stitches, use removable markers or short pieces of contrasting yarn to test the eye positions. I would spend an extra minute here rather than trying to fix a crooked expression after the embroidery is finished.
Eyes: Using black yarn or embroidery thread, build each eye into a small vertical oval with several closely packed satin-style stitches. The finished eyes should be larger than French knots and clearly oval rather than circular dots.
Keep both eyes the same height and approximately the same distance from the center of the face.
White catchlights: Add one tiny white stitch near the upper portion of each black eye. Keep it very small. It should read as a stitched highlight, not a plastic shine.
Brows: Using black yarn or embroidery thread, make one short curved stitch above each eye. Keep the curves light and simple.
Cheeks: Make 2 small circles in soft pink yarn.
Work 6 sc into a MR. Join with a sl st. (6)
FO, leaving a sewing tail. Pull the center ring closed and set both cheeks aside for assembly.
Crest: Use medium brown yarn. Join the yarn to a stitch at the center top of the finished head.
Ch 6 and sl st back into the same crown stitch to form the first loop. Ch 7 and sl st into the next crown stitch. Ch 8 and sl st into the next crown stitch. Ch 7 and sl st into the next crown stitch. Ch 6 and sl st into the next crown stitch.
FO and weave both ends securely into the head. You should have 5 visible loops, with the center loop slightly taller than the others.
Keep the crest compact. It should sit in front of the center tail feather rather than hiding it.
Assemble the Crochet Turkey
Before you start sewing, count the pieces. You should have 1 head, 1 body, 2 wings, 9 tail feathers, 1 beak, 1 wattle, 2 feet and 2 pink cheek circles. The 5-loop crest and embroidered facial details are added directly to the head.
Lay all the pieces out before you start sewing. The order matters because the tail needs to be secured before the head covers the upper attachment area.
1. Attach the tail fan. Center the completed nine-feather fan against the back of the body. The center burgundy feather should sit directly behind the middle of the turkey.
Sew the connected lower feather bases securely across the back of the body. Use several passes through the body fabric rather than fastening the tail at one tiny point. The fan should stand upright without folding forward.
Balance check: Set the body upright before attaching the head. If the tail pulls the body backward, do not add more stuffing to the feathers. Spread the tail attachment across a slightly wider area of the back and add a few more secure stitches through the lower feather bases and body until the fan stays upright. Press the stuffed base of the body gently against a flat surface again before continuing.
2. Attach the head. Place the large head directly on top of the body. There should be no visible narrow neck.
Pin or hold the head in position and check the turkey from the front. The face should point straight ahead and the top center tail feather should remain centered behind it.
Sew around the entire head-to-body join using the long sewing tail left on the body. Keep the head pressed firmly against the body as you work. If the head wants to tip forward, add a few additional secure stitches across the back and sides of the join until the head sits upright.
3. Attach the wings. Position one wing on each side of the upper body. The rounded ends should angle slightly downward and stay close to the body.
Sew mainly along the upper and inner edge of each wing so the lower portion keeps a little natural dimension.
4. Attach the feet. Position both feet across the lower front of the body. Leave a small space between them and angle the outer toes slightly away from the center.
Sew the closed base of each foot firmly to the body. The three toes should remain visible from the front.
5. Attach the beak. Center the golden yellow beak between and slightly below the eyes. Sew around its base, keeping the tapered point projecting forward.
6. Attach the wattle. Place the narrow end beside the lower edge of the beak and let the rounded portion hang downward. Sew only the upper section firmly so the lower part remains free.
7. Attach the cheeks. Sew one pink circle on each side of the face. Keep them below and slightly outside the eyes rather than directly underneath them.
Set the turkey upright and look at it from several angles before weaving in the final sewing tails. The head should remain centered, the body should sit without rolling backward and the two sides of the tail should look balanced.
Finishing the Free Crochet Turkey Pattern
Weave every yarn end securely into the nearest stuffed or crocheted piece and trim the excess. Run your fingers over the head and body to redistribute the stuffing if either shape became slightly flattened during assembly.
Remove every stitch marker, positioning marker and sewing pin before the project is considered finished. Check the head, body and tail attachment areas carefully so nothing temporary has been left inside or between the crocheted pieces.
Then look at the tail from the front. Separate the rounded feather tips with your fingers if they have folded behind one another. You should be able to see all nine individual feather shapes even though the bases overlap.
The feet may need a little arranging the first time you set the turkey down. Press the lower body gently against a flat surface and turn the feet slightly outward until the turkey sits naturally.
If you're making this as a decorative Thanksgiving project, you can stop there. I wouldn't add a hat, bow, scarf or other accessory. The colorful fan tail and little embroidered face already give the turkey everything it needs.
If you're giving the finished turkey to a child, inspect every sewn and embroidered part carefully and choose an age and use appropriate for the finished item. The U.S. Consumer Product Safety Commission provides information about toy safety. Embroidered eyes avoid removable plastic eye pieces, but that does not mean a handmade turkey has been tested or certified as a children's toy.
Once everything is secure, your turkey should have the same defining features as the example image: a large round tan head, smaller plump body, soft side wings, golden three-toed feet, low-set embroidered face and a full nine-feather Thanksgiving tail.
If you'd like another turkey project after this one, the crochet turkey lovey pattern keeps the same seasonal idea but turns it into a completely different baby crochet project.
When you click on links to various merchants on this site and make a purchase, this may result in this site earning a commission. This does not affect the price you pay.

UBGI Gold Standard 2026
Reviewed under the site's
editorial checklist.
Photos, decorating ideas, party setups and reader submissions are shared for inspiration unless a page is specifically presented as a pattern, tutorial, reference guide or step-by-step project. Follow the instructions, measurements, safety guidance and manufacturer directions provided for the particular project or product.
About Jan | Contact | Baby Nursery Ideas (Blog) | Site Map | Privacy Policy | Disclosure Policy | Disclaimer | Affiliate Disclosure | Earnings Disclosure | Facebook | Pinterest
I am a participant in the Amazon Services LLC Associates Program, an affiliate advertising program designed to provide a means for us to earn fees by linking to Amazon. As an Amazon Associate I earn from qualifying purchases.
Copyright © 2006-2026. All Rights Reserved.