Crochet Turkey Baby Booties Pattern
By Jan Bay
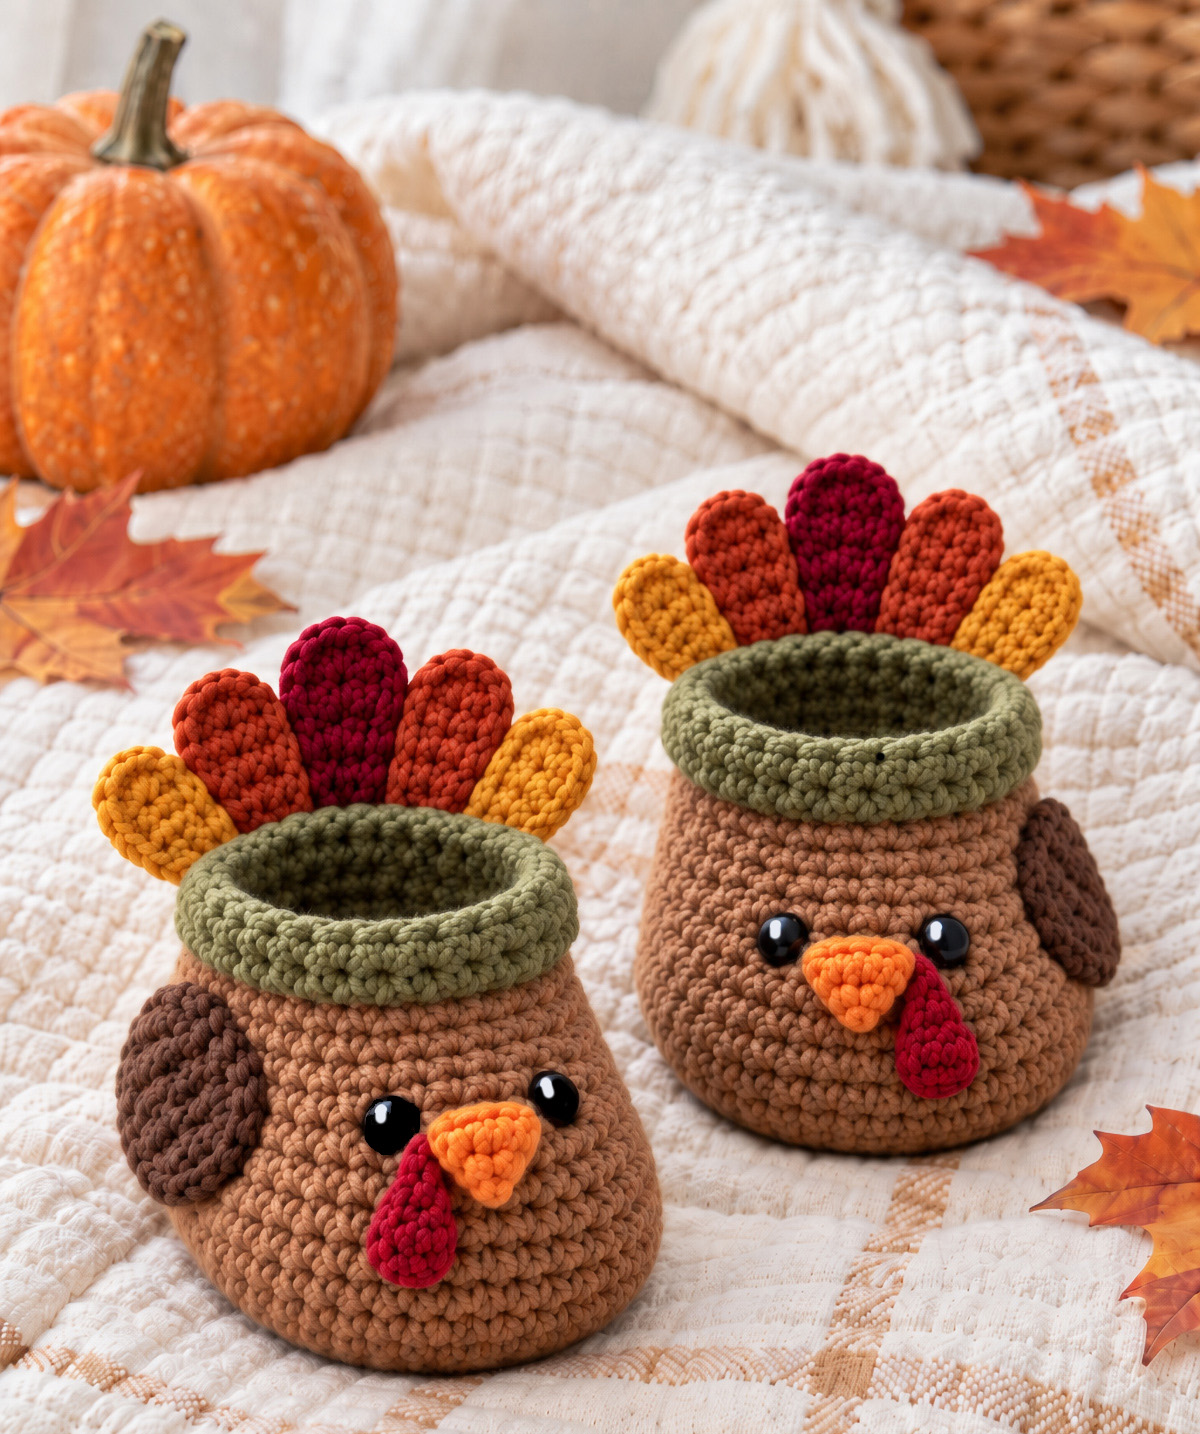
This crochet turkey baby booties pattern creates a pair of handmade baby shoes to cover your little turkey's tiny toes in a playful way for fall portraits as well as Thanksgiving photos. I designed them with warm fall colors and unmistakable little turkey details as a fun seasonal baby crochet pattern. The booties are small and finish quickly, providing lots of "gobble gobble" for your crafting buck and time, with loads of charm and personality.
Explore More Free Thanksgiving Crochet Patterns
Turkey Baby Hat Crochet Pattern
Turkey Baby Diaper Cover Pattern
Turkey Crochet Appliqué Pattern
Supplies for This Pattern
Jump to:
Supplies & Materials for the Turkey Baby Booties
I’m using worsted-weight yarn for these booties because it gives the little turkey body enough structure to hold its shape without making the finished pair feel stiff. You’ll want a fairly smooth yarn here. Very fuzzy yarn can hide the face details and make those five tail feathers lose their nice clean edges.
Yarn: Worsted weight, Category 4
Approximate yarn amounts for one pair:
Warm medium brown for the bootie bodies: 60 to 80 yards
Olive green for the cuffs: 15 to 25 yards
Dark brown for the two outer wings: 8 to 12 yards
Rust for the four rust-colored tail feathers: 12 to 18 yards
Mustard for the four mustard tail feathers: 8 to 12 yards
Deep burgundy for the two center tail feathers: 6 to 10 yards
Burnt orange for the beaks: 3 to 5 yards
Cranberry red for the wattles: 3 to 5 yards
Black yarn or embroidery floss for the eyes: small amount
White embroidery floss for the tiny eye highlights: small amount
Hook: 3.5 mm (E) crochet hook, or the hook size needed to match the gauge given below.
You’ll also need:
Yarn needle
Small sharp embroidery needle
Scissors
Stitch markers
Flexible measuring tape
A small amount of removable stuffing or scrap yarn to support the toe while you place the face, if needed
I would skip plastic safety eyes on baby booties and embroider the eyes instead. You can still get that round black-eye look by building each eye with several close satin stitches and adding one tiny white highlight stitch near the upper edge. It keeps the face very close to the example without adding a detachable hard piece.
The colors matter more than the exact yarn brand. Keep the body a warm pecan-to-medium brown, the cuff a muted olive rather than a bright green, and the feather colors in the fixed order used on the example: mustard, rust, burgundy, rust, mustard. That color sequence is part of the finished design, so I would not shuffle it around.
The same goes for the wattles. Make one for each bootie in cranberry red, but don’t attach both of them on the same side. The left bootie gets its wattle on the left side of the beak, and the right bootie gets its wattle on the right. That little mirrored detail is intentional.
Crochet Turkey Baby Booties Pattern Size & Gauge
This pattern is written for one small baby size, approximately 0 to 3 months. Baby feet vary quite a bit, so use the sole measurement as your real checkpoint rather than relying on age alone.
Expected finished sole length: approximately 3 3/4 inches
Expected finished sole width: approximately 1 3/4 to 1 7/8 inches at the widest point
Expected height: approximately 2 1/4 inches from the sole to the top of the olive cuff, not including the tail feathers
Expected relaxed ankle opening: approximately 5 to 5 1/4 inches around
Gauge: 18 single crochet stitches and approximately 20 rows or rounds = 4 inches in single crochet
The dimensions above are calculated targets based on the stitch counts and gauge. This exact pattern has not been physically test-made yet, so don't force the next step if your sole is coming out noticeably larger or smaller. Check it after Round 2. You want it close to 3 3/4 inches long before you start building the sides.
If your sole is too large, go down a hook size. If it's too small, go up a hook size. I would adjust the hook before changing stitch counts because those counts also control the placement of the toe shaping.
Abbreviations & Pattern Notes
US crochet terms are used throughout.
ch = chain
sc = single crochet
hdc = half double crochet
dc = double crochet
sl st = slip stitch
st or sts = stitch or stitches
sc2tog = single crochet 2 stitches together
BLO = back loop only
Chain 1 at the beginning of a round does not count as a stitch unless the instructions specifically say otherwise.
The bootie rounds are joined. Join each round with a slip stitch to the first stitch of that round, then chain 1 before beginning the next round.
Make two identical brown bootie bodies and two identical olive cuffs. The pair becomes a true left and right set when you attach the wings and wattles on opposite sides.
Left and right in this pattern are from the baby's perspective when the booties are being worn. The left bootie goes on the baby's left foot and the right bootie goes on the baby's right foot.
Keep a stitch marker at the beginning of each round. The join at the back of the bootie gives you a useful reference point for centering the toe. Round 5 uses six decreases across the front, and Round 6 uses eight more decreases across that same centered toe section. Keep both groups centered rather than letting the shaping drift toward either side.
The finished booties are not stuffed. A little scrap yarn or removable stuffing can be slipped into the toe while you position the face, but take it back out when you're finished.
Main Bootie Pattern
Make 2 with warm medium-brown yarn.
Chain 14.
Round 1: Sc in the second ch from the hook and in each of the next 11 ch. Work 5 sc in the last ch. Turn the foundation chain so you can work along the unused loops on the opposite side. Sc in the next 11 ch. Work 2 sc in the same foundation ch that holds your first sc. Join with a sl st to the first sc. 30 sts.
You should now have a long narrow oval with the fuller curve at the toe end.
Round 2: Ch 1. Work 2 sc in the first st, sc in the next 11 sts, 2 sc in each of the next 5 sts, sc in the next 11 sts, and 2 sc in each of the final 2 sts. Join. 38 sts.
Stop here for your first measurement. The sole should be close to 3 3/4 inches long and approximately 1 3/4 to 1 7/8 inches across the widest part. A small difference is fine. If the sole is off by roughly 1/2 inch, correct your hook size or gauge before continuing.
Round 3: Ch 1. Working in the BLO, sc in each st around. Join. 38 sts.
That back-loop round makes the little ridge where the sole turns upward into the bootie body.
Round 4: Ch 1. Sc in each st around. Join. 38 sts.
Round 5: Ch 1. Sc in the first 13 sts. Sc2tog 6 times across the centered front of the toe. Sc in the remaining 13 sts. Join. 32 sts.
Look straight down at the bootie before continuing. The six decreases should form one centered curve across the toe rather than pulling the shaping toward either side.
Round 6: Ch 1. Sc in the first 8 sts. Sc2tog 8 times across the centered toe section. Sc in the remaining 8 sts. Join. 24 sts.
Check the shape again here. The toe should now be rounded and the ankle should taper inward without looking pinched.
Round 7: Ch 1. Sc in each st around. Join. 24 sts.
Fasten off the brown yarn and weave in the end.
At this point the bootie should have the shape we want: a rounded toe, a gently tapered ankle and enough room at the opening that it doesn't look pinched. Don't add another brown round just to make it taller. The lower ankle is one of the details that keeps this pair looking like baby booties rather than little crochet tubes.
Olive Green Cuff
With olive-green yarn and the back of the bootie facing you, join the yarn near the center back of the opening.
Cuff Round 1: Ch 1. Hdc in each st around. Join with a sl st to the first hdc. 24 sts.
Cuff Round 2: Ch 1. Working in the BLO, hdc in each st around. Join. 24 sts.
Fasten off and weave in the end.
Don't cinch the final join tightly. The cuff should stay softly oval and open, just like the finished pair in the example image. The second round gives it that heavier rolled-looking edge without actually folding the cuff over and making the ankle bulky.
Make the second bootie the same way.
Crochet the Five Turkey Tail Feathers
Each bootie gets exactly five tail feathers. That means you'll make ten feathers for the pair.
For each bootie, make:
2 small mustard feathers
2 medium rust feathers
1 large deep-burgundy center feather
The three sizes give the fan its subtle graduation. The burgundy feather is tallest, the two rust feathers step down slightly, and the mustard feathers are the shortest outer pair.
Small Mustard Feather, make 4 total:
Ch 6. Sc in the second ch from the hook, hdc in the next ch, dc in each of the next 2 ch, and work 5 dc in the last ch. Continue down the unused loops on the opposite side of the foundation chain. Dc in each of the next 2 ch, hdc in the next ch and sc in the final ch. Join with a sl st to the first sc. 13 sts.
Fasten off, leaving a long tail for sewing.
Medium Rust Feather, make 4 total:
Ch 7. Sc in the second ch from the hook, hdc in the next ch, dc in each of the next 3 ch, and work 5 dc in the last ch. Continue along the opposite side. Dc in each of the next 3 ch, hdc in the next ch and sc in the final ch. Join. 15 sts.
Fasten off, leaving a long sewing tail.
Large Burgundy Center Feather, make 2 total:
Ch 8. Sc in the second ch from the hook, hdc in the next ch, dc in each of the next 4 ch, and work 5 dc in the last ch. Continue along the opposite side. Dc in each of the next 4 ch, hdc in the next ch and sc in the final ch. Join. 17 sts.
Fasten off, leaving a long sewing tail.
Gently flatten each feather with your fingers. You want a plump rounded feather, not a sharply pointed leaf. There's no need to aggressively block these.
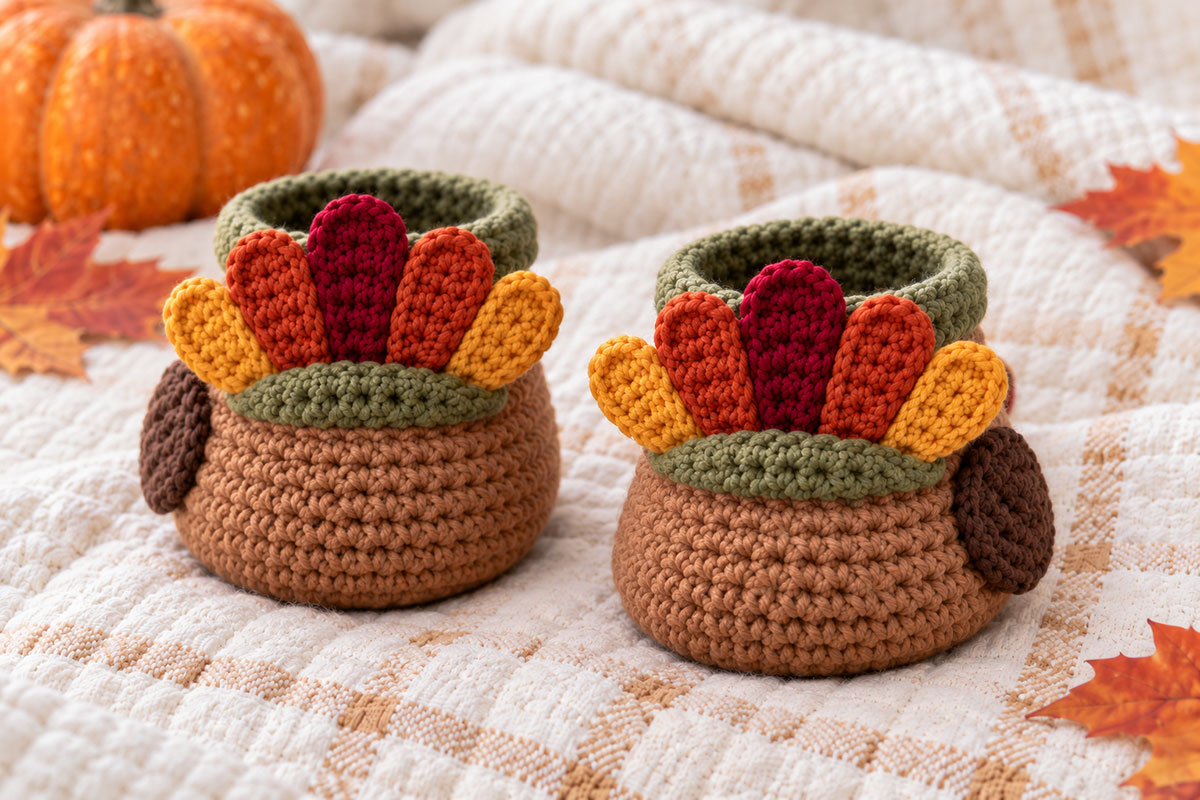
Lay out one complete fan before sewing anything down. Looking at the bootie from the back, the permanent color order is mustard, rust, burgundy, rust, mustard.
The bottom edges should overlap slightly so there aren't big gaps between the feathers, but don't stack them so deeply that the five individual shapes disappear.
Crochet the Dark Brown Side Wings
Make 2 with dark-brown yarn.
Ch 6.
Sc in the second ch from the hook, hdc in the next ch, dc in each of the next 2 ch, and work 5 dc in the last ch.
Continue along the unused loops on the opposite side of the foundation chain. Dc in each of the next 2 ch, hdc in the next ch and sc in the final ch. Join with a sl st. 13 sts.
Fasten off, leaving a long tail for sewing.
Each bootie gets only one wing, and the wing belongs on the outer side of the foot. On the left bootie it goes on the left outer side. On the right bootie it goes on the right outer side.
Position the wing lengthwise along the brown body with its narrower end angled slightly toward the ankle and its rounded end pointing toward the toe. Keep it below the olive cuff and far enough back that it doesn't crowd the face.
Sew all the way around the wing securely. I wouldn't leave the edge loose on a baby bootie just to make it look more dimensional. The shape itself gives us enough definition.
Beak, Embroidered Eyes & Mirrored Wattles
The faces should match, but the wattles should mirror one another. That's deliberate.
Orange Beak, make 2:
Ch 3.
Row 1: Sc in the second ch from the hook and in the next ch. 2 sts.
Ch 1 and turn.
Row 2: Sc2tog. 1 st.
Fasten off, leaving a long sewing tail.
The finished piece is a tiny triangle. When you sew it on, secure the broad top edge and the two upper corners but don't flatten the center completely against the bootie. Let the point project just a little so the beak has the soft dimensional look shown in the example.
Beak size check: Before sewing the beak in place, hold it against the front of the bootie between the marked eye positions. It should read clearly as a small turkey beak without disappearing into the brown stitches. If your beak looks noticeably too small because of your yarn or tension, remake it with the same yarn using a slightly larger hook. Keep the two beaks matched in size.
Red Teardrop Wattle, make 2:
Ch 5.
Sl st in the second ch from the hook, sc in the next ch, hdc in the next ch and work 5 hdc in the last ch.
Continue along the unused loops on the opposite side. Hdc in the next ch, sc in the next ch and sl st in the final ch.
Fasten off, leaving a sewing tail.
You'll have a narrow upper end and a fuller rounded lower end. During assembly, sew only the narrow upper portion beside the beak so the rounded end hangs naturally like the little red teardrop in the finished booties.
Face placement:
Do not attach the face pieces yet. You'll add them after the tail feathers and wings are securely sewn in place.
Fold the bootie gently so the center-back join sits directly opposite the center of the toe, then mark that center-front line. The eyes will sit symmetrically about 2 stitches to either side of that line, with the orange beak centered between and slightly below them.
The wattles are intentionally mirrored. On the left bootie, the red wattle will hang on the left side of the beak. On the right bootie, it will hang on the right side of the beak.
Set the two beaks and two wattles aside with the booties until assembly.
Before assembly, you should have 18 crocheted pieces total:
2 brown bootie bodies with the olive cuffs already worked onto them
4 small mustard tail feathers
4 medium rust tail feathers
2 large burgundy center tail feathers
2 dark-brown wings
2 orange beaks
2 cranberry-red wattles
The embroidered eyes are added directly to the booties, so they are not included in that piece count.
Assembly & Finishing
Finish the tail fan before attaching the wings and face. It's much easier to get the feathers centered while the rest of the bootie is still uncluttered.
1. Center the burgundy feather. Use the center-back joining line as your reference. Center the large burgundy feather directly over that line with its lower third against the brown back of the bootie immediately below the olive cuff. The rounded top should rise clearly behind the cuff.
Sew the lower third of the feather securely to the brown bootie body. Keep the upper portion free so it still reads as an individual feather, and avoid sewing through the olive cuff so the ankle opening can keep its stretch.
2. Add the two rust feathers. Place one on each side of the burgundy feather. Let their inside edges overlap the center feather slightly, with their tops finishing a little lower than the burgundy center. Sew the lower third of each rust feather securely to the brown bootie body immediately below the cuff, leaving the upper portions free.
3. Add the mustard outer feathers. Place one mustard feather at each outside edge of the fan. Their tops should step down slightly from the rust feathers. Sew the lower third of each mustard feather securely to the brown bootie body immediately below the cuff, leaving the upper portions free.
Step back and check the entire fan before finishing those sewing tails. From the back you should see exactly five distinct rounded feathers in this order: mustard, rust, burgundy, rust, mustard.
4. Attach the wings. Sew one dark-brown wing to the outer side of each bootie. Do not put wings on both sides of either bootie.
5. Finish the face. Place the two eyes symmetrically about 2 stitches to either side of the center-front line. Position them at the same height on both booties, with enough room below for the orange beak.
Using black yarn or embroidery floss, build each eye with several short satin stitches until it forms a small vertical oval. Secure the thread on the inside of the bootie. Add one tiny white stitch near the upper outer portion of each black eye for the pinpoint highlight shown in the finished design.
Center the orange beak between and slightly below the eyes. Sew the broad upper edge and two upper corners securely, but don't flatten the center completely. Let the point project slightly so the beak keeps its soft dimensional shape.
Attach each wattle by sewing only its narrow upper end beside the beak. On the left bootie, place the wattle on the left side of the beak. On the right bootie, place it on the right side of the beak. Let the rounded lower portion hang free.
Compare the two booties side by side before securing the final yarn tails. The eyes and beaks should sit at the same height, while the wattles should mirror one another.
6. Weave in every remaining end. Bring yarn tails to the inside, weave through several stitches in more than one direction and trim. Run your fingers around the inside afterward. You don't want a stiff knot or long yarn tail sitting against a baby's foot.
7. Shape the pair. Use your fingers to round the toes, open the cuffs and spread the tail feathers evenly. If the booties were flattened while you worked on them, a little removable stuffing can help shape the toes for a few minutes. Take all of it out before the booties are worn.
When they're finished, the two booties should match in height, toe shape, cuff opening and five-feather fan, but the outer wings and red wattles should clearly identify a left and a right bootie.
Final check: Remove every stitch marker and any scrap yarn or temporary stuffing used for shaping. Check the inside of each bootie for loose yarn tails, bulky knots or anything that could rub against the baby's foot. Tug gently on each feather, wing, beak and wattle to make sure every decorative piece is securely attached.
Baby Safety Notes
I prefer embroidered eyes for this pattern rather than beads, buttons or plastic safety eyes. The little black ovals and tiny white highlight stitches give us the look we want without intentionally adding hard detachable eye pieces to a baby bootie.
Secure every feather, wing, beak and wattle firmly and check those attachments before each use. Stop using the booties if yarn breaks, stitching loosens or any decorative piece begins pulling away from the body.
These are soft decorative baby booties, not protective footwear and not walking shoes. Don't add hard beads, bells or other loose embellishments to the finished pair.
The U.S. Consumer Product Safety Commission has additional information about small parts and choking hazards in children's products.
As with any handmade baby accessory, use the booties with attentive adult supervision and remove them if the baby begins pulling or chewing on the decorative pieces.
Turkey Baby Booties FAQ
What size are these crochet turkey booties?
This version is written as an approximately 0-to-3-month baby size with a calculated finished sole length of about 3 3/4 inches. Measure the baby's foot when possible and compare it with the finished sole rather than relying only on age.
Can I make the turkey booties larger?
You can, but I wouldn't simply grab a much larger hook and call it another size. That changes the density of the fabric as well as the dimensions. A properly graded larger version should add length to the sole and then adjust the sole circumference, toe decreases and ankle opening together. This pattern is written for the one size above rather than pretending an ungraded variation has been tested.
Can I use safety eyes instead of embroidery?
I wouldn't for this baby project. The embroidered black eyes with tiny white highlights already reproduce the finished look well, and there isn't a good reason to add hard eye components here.
Do all five turkey feathers have to be different sizes?
There are three sizes rather than five. The burgundy center feather is the tallest, the two rust feathers are medium and the two mustard feathers are shortest. That small graduation gives the fan its tidy shape without making it fussy to crochet.
Can I change the tail feather colors?
Of course, if you're making the booties for yourself. For the pair shown here, though, the fixed mustard, rust, burgundy, rust, mustard sequence is part of the design. I'd keep it if you want your finished booties to match the example.
Why are the red wattles on opposite sides?
Because these aren't meant to be two identical little turkey heads. The left bootie carries its wattle to the left of the beak and the right bootie carries it to the right. Together with the outer-side wings, that mirrored placement gives the pair a proper left-and-right look.
Are these booties suitable for a baby who is walking?
No. They're soft crochet booties intended as a seasonal baby accessory. The soles aren't designed as supportive or slip-resistant walking footwear.
When you click on links to various merchants on this site and make a purchase, this may result in this site earning a commission. This does not affect the price you pay.

UBGI Gold Standard 2026
Reviewed under the site's
editorial checklist.
Photos, decorating ideas, party setups and reader submissions are shared for inspiration unless a page is specifically presented as a pattern, tutorial, reference guide or step-by-step project. Follow the instructions, measurements, safety guidance and manufacturer directions provided for the particular project or product.
About Jan | Contact | Baby Nursery Ideas (Blog) | Site Map | Privacy Policy | Disclosure Policy | Disclaimer | Affiliate Disclosure | Earnings Disclosure | Facebook | Pinterest
I am a participant in the Amazon Services LLC Associates Program, an affiliate advertising program designed to provide a means for us to earn fees by linking to Amazon. As an Amazon Associate I earn from qualifying purchases.
Copyright © 2006-2026. All Rights Reserved.