Free Turkey Bib Crochet Pattern for a Cute Thanksgiving Baby Bib
By Jan Bay
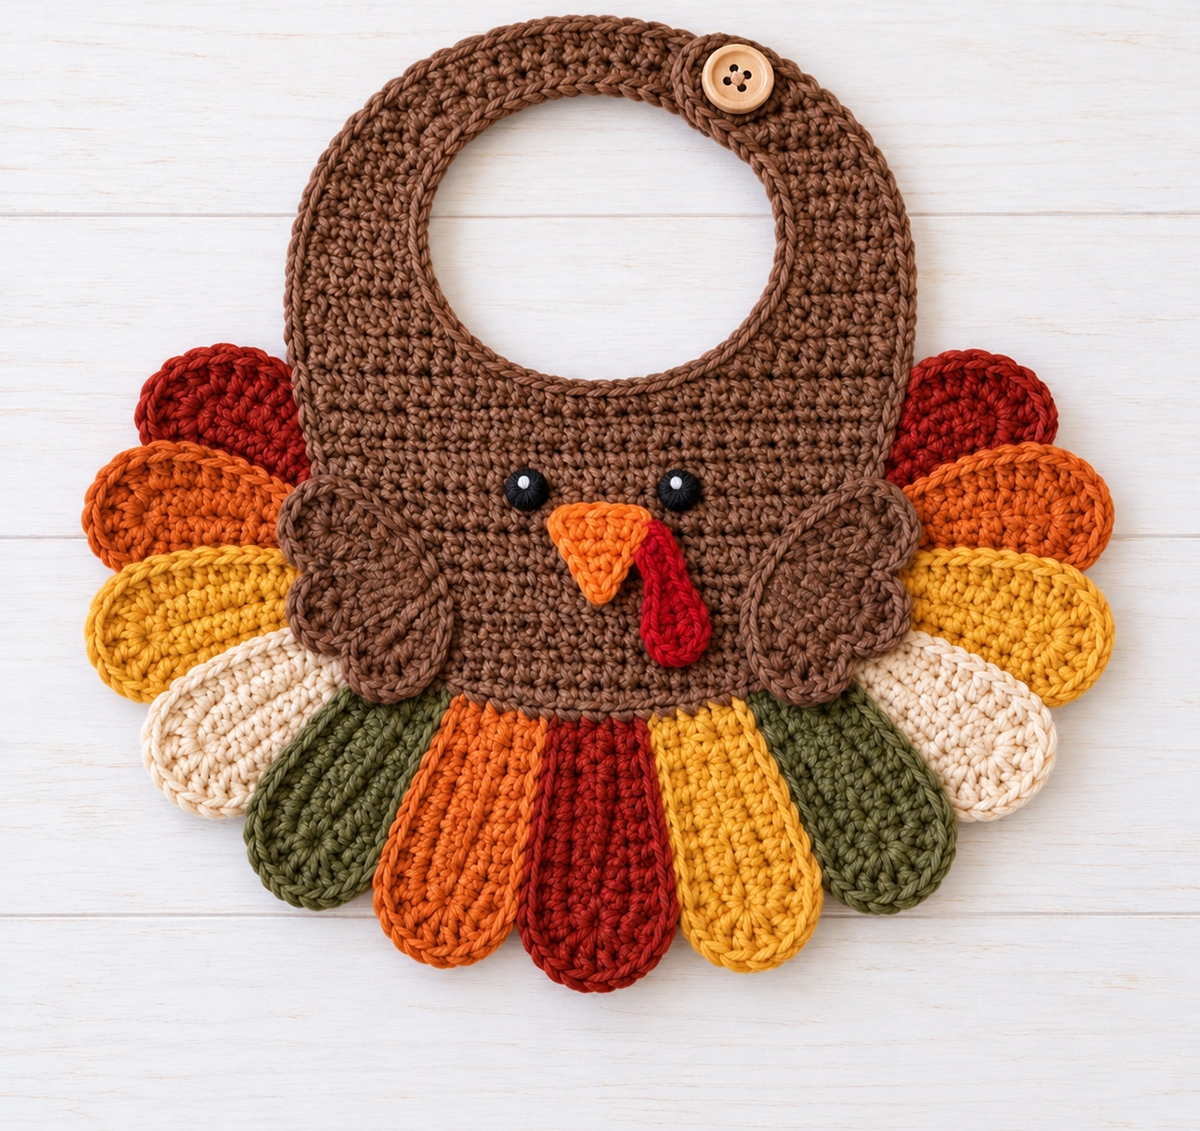
This turkey bib crochet pattern makes a colorful handmade Thanksgiving baby bib with an unmistakable little turkey design that turns an everyday mealtime essential into something special for baby's first Thanksgiving. The free pattern will walk you through crocheting the bib, shaping the turkey details and finishing the piece so it is comfortable, practical and cute enough for your little gobbler to wear for Thanksgiving photos.
Explore More Free Crochet Baby Patterns
100% Cotton Yarn for This Project
Jump to the Turkey Bib Pattern
Materials & Supplies
I’d use worsted weight cotton for this bib. The turkey has quite a few little pieces, but you don’t need a full skein of every feather color. Brown is the only color you’ll use a lot of.
Yarn: Category 4 medium worsted weight 100% cotton yarn
Hook: 4.0 mm crochet hook, or the size needed to meet gauge
Skill level: Advanced beginner. You should be comfortable with basic crochet stitches, simple increases and decreases, working around both sides of a foundation chain, sewing on appliqué pieces and basic embroidery.
Colors:
- Brown: approximately 100 yards for the bib body, neck straps and wings
- Deep red: approximately 25 yards for feathers and the wattle
- Burnt orange: approximately 25 yards for feathers and the beak
- Mustard gold: approximately 25 yards for feathers
- Cream: approximately 15 yards for feathers
- Olive green: approximately 15 yards for feathers
- Black yarn or embroidery floss: small amount for the eyes
- White yarn or embroidery floss: tiny amount for the eye catch lights
You’ll also need a yarn needle, scissors, stitch markers and one approximately 3/4 inch washable button for the neck closure.
The yardages above are calculated working amounts for the pattern rather than amounts measured from a physically completed sample. If you’re using scraps for the feathers, you need very little of each accent color.
Crochet Abbreviations Used
ch = chain
sc = single crochet
hdc = half double crochet
dc = double crochet
sl st = slip stitch
st = stitch
sts = stitches
sc2tog = single crochet 2 stitches together
sc3tog = single crochet 3 stitches together
rnd = round
Chains used for turning do not count as stitches unless the instructions specifically say otherwise.
Pattern note: This pattern was developed to reproduce the finished turkey bib design shown above and the stitch counts, gauge and expected measurements have been mathematically checked against that design. It has not been physically test-crocheted, so the finished measurements are identified as expected rather than test-confirmed.
Finished Size & Gauge
This is designed as a baby size Thanksgiving bib, not a long toddler feeding bib. The feather fan gives it a much wider finished appearance than the brown bib body itself.
Gauge: 16 single crochet stitches and 18 rows = 4 inches.
Expected finished measurements:
- Brown bib body: approximately 8 inches wide
- Brown body to shoulder split: approximately 4 1/2 inches high
- Overall brown bib including neck straps: approximately 8 3/4 to 9 inches high
- Buttoned neck opening: approximately 13 1/2 to 14 inches around
- Individual tail feather: approximately 3 1/2 inches long and 1 1/2 inches wide
- Finished turkey bib including feather fan: approximately 12 to 12 1/2 inches wide and 10 1/2 to 11 inches high
Those dimensions are calculated from the stitch counts and gauge. They haven’t been confirmed against a physically crocheted sample yet, so check your gauge before you start the body. That’s the part where a difference of several stitches per inch can noticeably change the neck and overall bib size.
The appliqué pieces are more forgiving. If a feather comes out a little longer or shorter while still matching the proportions shown in the finished example, there’s no reason to chase gauge on every small piece.
Turkey Bib Crochet Pattern: Make the Bib Body
The brown body and both neck straps are worked as one continuous base. I prefer that construction here because there’s no seam across the shoulder area and the wide brown straps stay visually connected to the turkey body shown in the finished example.
Work back and forth in rows. Ch 1 and turn at the end of each row.
Foundation: Ch 29.
Row 1: Sc in the 2nd ch from the hook and in each ch across. 28 sts.
Row 2: Ch 1, turn. Work 2 sc in the first st, sc in each st across to the last st, 2 sc in the last st. 30 sts.
Row 3: Ch 1, turn. Work 2 sc in the first st, sc in each st across to the last st, 2 sc in the last st. 32 sts.
Rows 4 through 20: Ch 1, turn. Sc in each st across. 32 sts.
At gauge, the piece should now measure about 8 inches across and a little under 4 1/2 inches high. The slight increase through the first three rows rounds the lower corners instead of leaving you with a perfectly square brown panel.
Divide for the Neck
Lay the piece flat with Row 20 at the top. The 32 stitches will now be divided like this:
9 stitches for the first shoulder + 14 unworked center stitches + 9 stitches for the second shoulder = 32 stitches.
Place a marker after stitch 9 and another marker after stitch 23. The 14 stitches between the markers form the bottom of the neck opening.
First Neck Strap
Row 21: Ch 1, turn. Sc in the first 9 sts. Leave the remaining stitches unworked. 9 sts.
Rows 22 through 25: Ch 1, turn. Sc in each of the 9 sts. 9 sts.
Row 26: Ch 1, turn. Sc2tog over the first 2 sts, sc in each of the next 6 sts, 2 sc in the final st. 9 sts.
Rows 27 through 31: Ch 1, turn. Sc in each of the 9 sts. 9 sts.
Row 32: Ch 1, turn. Sc2tog over the first 2 sts, sc in each of the next 6 sts, 2 sc in the final st. 9 sts.
Rows 33 through 37: Ch 1, turn. Sc in each of the 9 sts. 9 sts.
Row 38: Ch 1, turn. Sc2tog over the first 2 sts, sc in each of the next 6 sts, 2 sc in the final st. 9 sts.
Rows 39 and 40: Ch 1, turn. Sc in each of the 9 sts. 9 sts.
Fasten off.
The strap should measure approximately 4 1/4 to 4 1/2 inches from the shoulder split, depending on your row gauge. The three shaping rows gradually angle the strap toward the center of the neck without changing its 9-stitch width.
Second Neck Strap
With the front of the bib facing you and Row 20 at the top, skip the 14 center neck stitches. Join brown yarn in the next stitch.
Row 21: Ch 1. Sc in that stitch and in the remaining 8 sts across. 9 sts.
Rows 22 through 25: Ch 1, turn. Sc in each of the 9 sts. 9 sts.
Row 26: Ch 1, turn. Work 2 sc in the first st, sc in each of the next 6 sts, sc2tog over the final 2 sts. 9 sts.
Rows 27 through 31: Ch 1, turn. Sc in each of the 9 sts. 9 sts.
Row 32: Ch 1, turn. Work 2 sc in the first st, sc in each of the next 6 sts, sc2tog over the final 2 sts. 9 sts.
Rows 33 through 37: Ch 1, turn. Sc in each of the 9 sts. 9 sts.
Row 38: Ch 1, turn. Work 2 sc in the first st, sc in each of the next 6 sts, sc2tog over the final 2 sts. 9 sts.
Rows 39 and 40: Ch 1, turn. Sc in each of the 9 sts. 9 sts.
Do not fasten off yet.
Finish the Brown Edge
After completing Row 40 of the second neck strap, ch 1. You will work one continuous edging around the neckline, straps and outside of the bib.
Work 18 sc evenly down the 20 row ends along the inside edge of the second neck strap. Ch 1 to turn the corner.
Work 1 sc in each of the 14 unworked stitches across the bottom of the neck opening. 14 sc. Ch 1 to turn the corner.
Work 18 sc evenly up the 20 row ends along the inside edge of the first neck strap. Ch 1 to turn the corner.
Work 1 sc in each of the 9 stitches across the end of the first strap. 9 sc. Ch 1 to turn the corner.
Work 36 sc evenly down the 40 row ends along the outside edge of the first strap and the side of the bib body. Ch 1 to turn the lower corner.
Work 1 sc in each of the 28 foundation stitches across the bottom edge. 28 sc. Ch 1 to turn the lower corner.
Work 36 sc evenly up the 40 row ends along the opposite side of the bib body and second neck strap. Ch 1 to turn the corner.
Work 1 sc in each of the 9 stitches across the end of the second strap. 9 sc. Ch 1 and join with a sl st to the first edging sc.
The completed edging contains 168 sc plus the eight ch-1 corner spaces. Fasten off.
The edging should lie flat without becoming a decorative border. If your edging puckers noticeably even though the stitch counts are correct, check your gauge before changing the pattern counts.
Orientation note: From this point forward, choose the side of the brown bib you want to use as the front and keep that side consistent through the remaining instructions. With the front facing you and the neck opening at the top, the button loop will be on the left strap and the button will be on the right strap.
Make the Button Loop
Lay the bib with the front facing you and the neck opening at the top. Join brown yarn at the end of the strap on the left side of the bib. This strap will overlap beneath the right strap when the bib is buttoned.
Ch 7, then sl st into the same edge point to form a loop. Fasten off.
Before securing the yarn ends permanently, slip the loop over your 3/4 inch button. It should pass over the button without stretching hard but should not be loose enough to fall off. If your button is a different size, change the number of chains rather than forcing the loop to fit.
Leave the button itself off for now. It is easier to place it accurately after the feather fan and other pieces are assembled.
Crochet the Turkey Tail Feathers
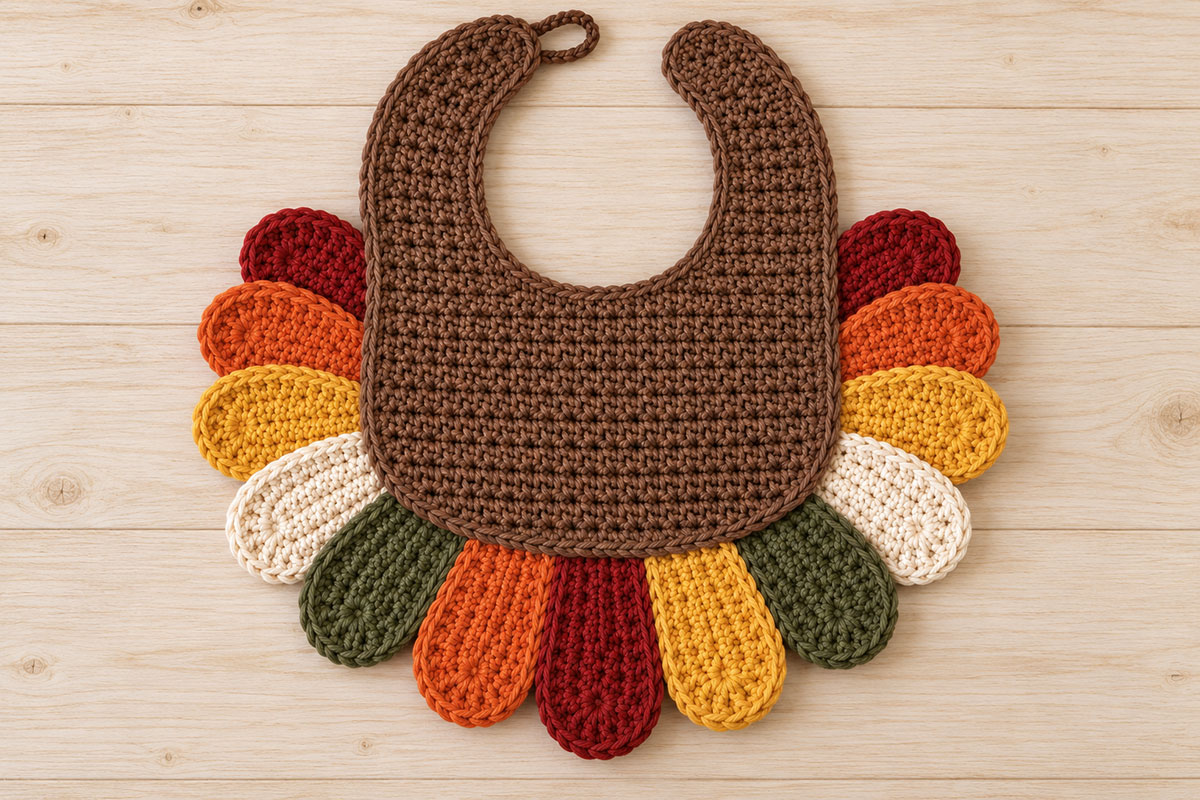
The tail is what makes this look unmistakably like a turkey instead of a brown bib with a face on it. There are 13 separate feathers in the finished design, and they’re sewn behind the bib rather than joined into one solid fan.
Make every feather from the same pattern. Changing the colors and angles gives the fan its layered look.
Tail Feather Pattern
Ch 10.
Round 1: Work 2 sc in the 2nd ch from the hook. Sc in each of the next 7 ch. Work 5 sc in the last ch.
Rotate the work so you can crochet along the unused loops on the opposite side of the foundation chain. Sc in each of the next 7 ch. Work 3 sc in the same foundation chain where the first 2 sc were made. Join with a sl st to the first sc. 24 sts.
You now have 5 stitches curving around each end with 7 straight stitches along each side.
Round 2: Ch 1. Work 2 sc in the first st, sc in the next st. Sc in each of the next 7 sts.
Across the next 5 sts at the rounded end, work: 2 sc in the next st, sc in the next st, 2 sc in the next st, sc in the next st, 2 sc in the next st. Sc in each of the next 7 sts.
You now have 3 sts remaining before the round join. Work 2 sc in the next st, sc in the next st, then 2 sc in the final st. Join with a sl st to the first sc. 30 sts.
Fasten off, leaving an approximately 12 inch tail for sewing.
The feather should be an elongated rounded oval, not a pointed leaf. Lightly shape it with your fingers before assembly.
Make 13 Feathers in These Colors
Deep red: 3
Burnt orange: 3
Mustard gold: 3
Cream: 2
Olive green: 2
That gives you all 13.
Lay Out the Feather Fan Before Sewing
Put the brown bib face down. Arrange the feathers behind it with only the rounded outer portions showing. The color order below is given as you are looking at the back of the bib.
Starting at the upper left side and working downward, use:
Deep red, burnt orange, mustard gold, cream, olive green.
Across the lower center, from left to right as you look at the back, use:
Mustard gold, deep red, burnt orange.
Then work upward along the right side with:
Olive green, cream, mustard gold, burnt orange, deep red.
When the bib is turned to the front, the three lower center feathers will read from left to right as burnt orange, deep red and mustard gold, matching the finished design.
The center deep red feather should extend slightly lower than the two feathers beside it. The side feathers gradually rotate upward as they move toward the shoulders.
Overlap neighboring feathers slightly. You want a full fan without hiding so much of each feather that the color disappears.
Once you like the arrangement, pin or temporarily tack the feathers in place. Sew the inner end of each feather securely to the back of the brown bib. Keep your sewing inside the brown body so the attachment stitches don’t show from the front.
Don’t sew the entire length of every feather to the bib. Securing the inner portion while leaving the visible ends free gives the tail the little bit of dimension shown in the finished design.
Wings, Beak, Wattle & Embroidered Eyes
Once the feather fan is secure, turn the bib face up. The rest of the turkey is built on the front, starting with the wings.
Crochet the Wings
Make 2 in brown.
Ch 8.
Beginning in the 2nd ch from the hook, work a sl st in the first ch.
Work 5 hdc in the next ch. Sl st in the next ch.
Work 6 dc in the next ch. Sl st in the next ch.
Work 7 dc in the next ch. Sl st in the final ch.
Rotate the piece. Working back along the unused loops on the opposite side of the foundation chain, work 1 sc in each of the 7 unused foundation-chain loops. 7 sc along the straight inner edge. Join with a sl st to the first sl st.
Fasten off, leaving a long tail for sewing.
The three rounded sections form the layered feather shape of the wing. They should sit one below another rather than spreading out like a flower.
Position one wing on each lower side of the brown body. Angle the rounded lobes slightly downward and inward. Sew along the straighter inner edge and around the upper portion of each wing, leaving the rounded outer lobes with a little movement.
Crochet the Beak
With burnt orange, ch 6.
Row 1: Sc in the 2nd ch from the hook and across. 5 sts.
Row 2: Ch 1, turn. Sc2tog, sc in the next st, sc2tog. 3 sts.
Row 3: Ch 1, turn. Work sc3tog across the 3 sts. 1 st.
Fasten off, leaving a long sewing tail.
Position the wide edge of the triangle beneath the eyes with the point facing down. Sew around the outside edge, keeping the little triangle flat.
Crochet the Wattle
With deep red, ch 7.
Work 1 sc in the 2nd ch from the hook, hdc in each of the next 4 ch and 5 hdc in the last ch.
Rotate the piece and work along the opposite side of the foundation chain. Hdc in each of the next 4 ch, then sc in the remaining foundation ch. Join with a sl st to the first sc. 15 sts.
Fasten off, leaving a sewing tail.
Position the wattle beside the lower part of the beak so it hangs downward. Sew the upper portion securely to the bib while allowing the rounded lower end to remain dimensional.
Embroider the Eyes
Use black yarn or embroidery floss. Do not use safety eyes or beads for this design.
Place the eyes approximately 1 1/2 to 1 3/4 inches apart from center to center, with the beak centered between them.
Build each eye with several short satin style stitches until you have a compact black oval about 3/8 inch across. Keep the two eyes the same size.
With white yarn or embroidery floss, add one tiny stitch near the upper portion of each black eye. That single white stitch is the catch light shown in the finished example. Keep it small. You don’t want a large white pupil.
Secure all embroidery ends firmly on the back of the bib.
Assembly & Finishing
Set the bib flat and look at the whole turkey before you weave in the last ends. This is the easiest time to straighten a feather that has rotated too far or move a wing a little before everything is permanently secured.
Check that:
- all 13 tail feathers are firmly attached
- the deep red center feather hangs slightly lower than the feathers beside it
- both wings sit at roughly the same height
- the beak is centered between the eyes
- the wattle hangs beside the beak rather than directly covering it
- the embroidered eyes are even
- each eye has one small white stitched catch light
Add the Button
With the front of the bib facing you, overlap the left strap beneath the right strap without twisting them. With a flexible measuring tape, measure around the inside edge of the closed neck opening. Adjust the overlap until the opening measures approximately 13 1/2 to 14 inches around, then mark the point on the right strap where the button loop naturally reaches it.
Sew the button to the right strap at that marked point using multiple secure passes of strong thread or matching yarn. Knot and bury the ends securely.
Check the button every time the bib is used. A loose button or other detached part can become a choking hazard. The U.S. Consumer Product Safety Commission has documented infant bib recalls involving fasteners that detached, so this isn’t a place to rush the finishing.
Remove every temporary pin and any temporary tacking thread used during feather placement. Weave in every remaining yarn end. Trim only after you’re satisfied that each end is securely buried.
If the cotton pieces need a little help settling into place, lightly dampen the bib and shape it flat. Don’t stretch the neck opening or flatten the dimensional wings and wattle.
Now you should have the same basic construction shown in the finished example: the brown one piece bib and neck, a 13 feather autumn fan behind it, brown wings on the front, and the embroidered turkey face centered above the tail.
Care Instructions
Check the yarn label before washing because care instructions can vary even among cotton yarns. For a bib like this, I’d choose a washable cotton from the beginning. Thanksgiving dinner and a bib are not exactly a keep-it-pristine combination.
Before each use, check the button, wings, beak, wattle and feathers. Stop using the bib if a component becomes loose until it has been repaired securely.
Use the bib only while the baby is awake and supervised, and remove it before naps or nighttime sleep. The American Academy of Pediatrics specifically advises removing bibs before sleep in its guidance on managing baby drooling. You can read that guidance at HealthyChildren.org.
After washing, reshape the feathers while the bib is damp and let it dry completely before storing it.
If you’d like another baby size project after this one, the crochet baby bib pattern gives you another bib style, while the Thanksgiving crochet patterns page keeps all of the seasonal projects together.
Or keep going with baby projects. There are more ideas in the free baby crochet patterns collection.
When you click on links to various merchants on this site and make a purchase, this may result in this site earning a commission. This does not affect the price you pay.

UBGI Gold Standard 2026
Reviewed under the site's
editorial checklist.
Photos, decorating ideas, party setups and reader submissions are shared for inspiration unless a page is specifically presented as a pattern, tutorial, reference guide or step-by-step project. Follow the instructions, measurements, safety guidance and manufacturer directions provided for the particular project or product.
About Jan | Contact | Baby Nursery Ideas (Blog) | Site Map | Privacy Policy | Disclosure Policy | Disclaimer | Affiliate Disclosure | Earnings Disclosure | Facebook | Pinterest
I am a participant in the Amazon Services LLC Associates Program, an affiliate advertising program designed to provide a means for us to earn fees by linking to Amazon. As an Amazon Associate I earn from qualifying purchases.
Copyright © 2006-2026. All Rights Reserved.