Free Crochet Turkey Diaper Cover Pattern for Babies
By Jan Bay
This free crochet turkey diaper cover pattern turns a simple baby cover into a fun Thanksgiving project with a warm brown base, colorful turkey feathers and playful fall details. Make it for a baby's first Thanksgiving photos, pair it with the matching turkey hat or use it as a handmade seasonal gift.
Explore More Free Crochet Baby Patterns
Supplies for This Crochet Turkey Diaper Cover
Jump to:
Materials
The brown diaper cover is deliberately simple. I want the turkey tail to do the talking here, so you don't need fancy stitches or a long list of colors for the body.
Yarn: Worsted weight #4 acrylic or acrylic blend yarn. Pick something soft enough for baby clothing but firm enough that the feathers don't collapse against the back of the cover.
You'll need:
• Warm medium brown for the diaper cover
• Burnt orange for Feathers 1 and 3
• Olive brown or muted olive for Feathers 2 and 8
• Rust red for Feathers 4, 6 and 9
• Mustard or golden yellow for Feathers 5 and 7
Calculated brown yarn estimates:
Newborn: approximately 90 to 115 yards
0 to 3 months: approximately 110 to 135 yards
3 to 6 months: approximately 130 to 160 yards
6 to 12 months: approximately 150 to 185 yards
You'll only need small amounts of the feather colors. Scraps are fine as long as they're the same general yarn weight and produce a similar fabric.
Those yardages are calculated estimates rather than physically measured totals from a test-made sample.
Hook: 5 mm crochet hook, or the hook size needed to match gauge.
You'll also need:
• Yarn needle
• Scissors
• Stitch markers
• Straight pins or locking stitch markers for arranging the feathers
• Flexible measuring tape
This pattern uses medium #4 yarn. If you're comparing yarn labels, the Craft Yarn Council yarn weight system is a useful reference.
Finished Sizes
This crochet turkey diaper cover pattern is written in four baby sizes. The measurements below are calculated from the stated stitch and row gauge rather than taken from a physically test-crocheted sample.
Newborn: approximately 13 3/4 inches around the finished waist, 16 inches around the widest part and about 11 1/2 inches from back waist through the crotch to front waist
0 to 3 months: approximately 14 3/4 inches around the waist, 17 1/4 inches around the widest part and about 12 3/4 inches through the rise
3 to 6 months: approximately 16 inches around the waist, 18 1/4 inches around the widest part and about 14 inches through the rise
6 to 12 months: approximately 17 1/4 inches around the waist, 19 1/2 inches around the widest part and about 15 1/4 inches through the rise
Those are finished garment measurements. A diaper adds bulk, so don't choose the size by age alone. If you can measure over the diaper the baby will actually wear, use that measurement.
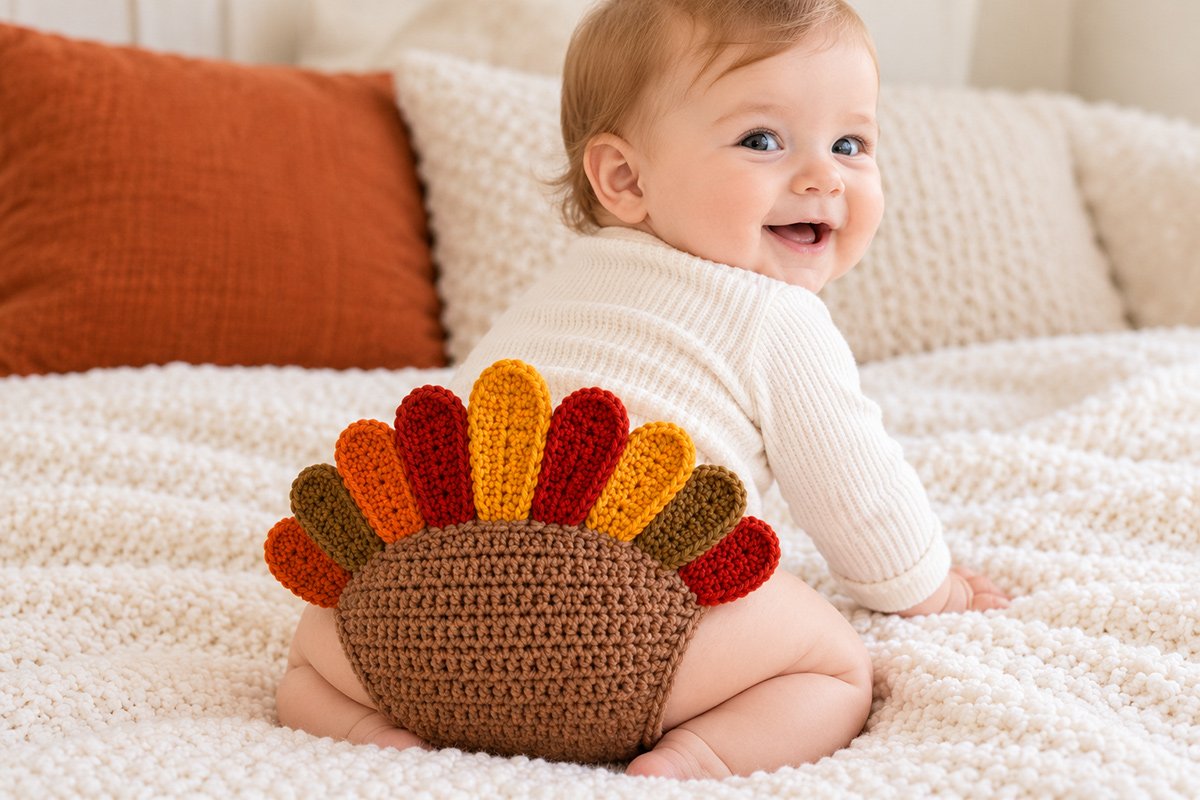
The finished cover in the example image is a pull-on style with a plain brown front and the entire turkey tail attached across the back. There is no turkey face on the front.
Gauge
14 hdc stitches = approximately 4 inches
10 hdc rows = approximately 4 inches
Check both parts of the gauge because this project depends on width and rise. If your stitch gauge is off, the waist and hip measurement will change. If your row gauge is off, the diaper cover may come out too short or too long from front to back.
I'd change the hook size before changing the stitch counts. Once the brown cover fits correctly, the feather placement is much easier to get right.
Abbreviations
This pattern uses U.S. crochet terminology.
The turning ch 1 does not count as a stitch.
ch = chain
sc = single crochet
hdc = half double crochet
dc = double crochet
tr = treble crochet
sl st = slip stitch
st = stitch
sts = stitches
inc = increase, work 2 hdc in the same stitch
hdc2tog = half double crochet 2 together, decrease 1 stitch
RS = right side
WS = wrong side
Unless the instructions say otherwise, ch 1 and turn at the end of each row.
Free Crochet Turkey Diaper Cover Pattern
The brown cover is worked flat in one long piece from the back waist, down over the seat, through the crotch and up to the front waist. After the shaping is finished, the upper side edges are sewn together. That leaves the tapered center section open for the two leg openings.
Keep the first end of the piece labeled BACK. The turkey feathers will eventually be attached there.
After completing the first row, place a removable marker on the side of the fabric facing you. Treat that marked side as the RS for the rest of the pattern.
Starting stitch counts:
Newborn: ch 25. Hdc in second ch from hook and across. 24 sts
0 to 3 months: ch 27. Hdc in second ch from hook and across. 26 sts
3 to 6 months: ch 29. Hdc in second ch from hook and across. 28 sts
6 to 12 months: ch 31. Hdc in second ch from hook and across. 30 sts
Ch 1 and turn after every row. The turning chain does not count as a stitch.
Back shaping, Row 2: Work 2 hdc in first stitch, hdc across to the last stitch, 2 hdc in last stitch.
Newborn: 26 sts
0 to 3 months: 28 sts
3 to 6 months: 30 sts
6 to 12 months: 32 sts
Row 3: Work 2 hdc in first stitch, hdc across to last stitch, 2 hdc in last stitch.
Newborn: 28 sts
0 to 3 months: 30 sts
3 to 6 months: 32 sts
6 to 12 months: 34 sts
You've reached the widest part of the back.
Work even in hdc:
Newborn: work 1 row even
0 to 3 months: work 2 rows even
3 to 6 months: work 3 rows even
6 to 12 months: work 4 rows even
Place a marker in the center of the last straight row. This marks the center back and gives you a reference point for Feather 5 later.
Begin crotch shaping. On each of the next 9 rows, hdc2tog over the first 2 stitches, hdc across to the last 2 stitches, then hdc2tog over the last 2 stitches.
Each decrease row removes 2 stitches.
After 9 decrease rows you should have:
Newborn: 10 sts
0 to 3 months: 12 sts
3 to 6 months: 14 sts
6 to 12 months: 16 sts
That's the narrow crotch section.
Work the crotch even:
Newborn: 3 rows
0 to 3 months: 4 rows
3 to 6 months: 5 rows
6 to 12 months: 6 rows
Now begin widening the front.
Front shaping: On each of the next 9 rows, work 2 hdc in the first stitch, hdc across to the last stitch, then 2 hdc in the last stitch.
After those 9 increase rows you should be back to:
Newborn: 28 sts
0 to 3 months: 30 sts
3 to 6 months: 32 sts
6 to 12 months: 34 sts
Work even in hdc:
Newborn: work 1 row even
0 to 3 months: work 2 rows even
3 to 6 months: work 3 rows even
6 to 12 months: work 4 rows even
Now narrow the front back to the waist width.
Next row: Hdc2tog over first 2 stitches, hdc across to last 2 stitches, hdc2tog over last 2 stitches.
Next row: Repeat the decrease row once more.
You should now have:
Newborn: 24 sts
0 to 3 months: 26 sts
3 to 6 months: 28 sts
6 to 12 months: 30 sts
Work 1 final row of hdc even. Fasten off, leaving enough yarn to weave in securely.
Finish the Leg Openings and Waist
Lay the piece flat with the right side facing you and the section marked BACK at the top.
Fold the front section upward so the front waist edge meets the back waist edge. The narrow crotch section should fold naturally underneath.
Match the upper side edges. The straight back section and straight front section were worked with the same number of rows, so the side seams should meet without stretching one side to fit the other.
Using brown yarn and a yarn needle, sew the left upper side seam from the waist downward to the point where the back crotch decreases begin. Repeat on the right side.
Do not continue sewing into the tapered section. Those openings are the legs.
Turn the cover right side out.
Waist edging: Join brown yarn at one side seam.
Round 1: Ch 1. Sc once in each stitch around the entire waist. Join with sl st to first sc.
You should have:
Newborn: 48 sc
0 to 3 months: 52 sc
3 to 6 months: 56 sc
6 to 12 months: 60 sc
Round 2: Ch 1. Sc in each stitch around. Join and fasten off.
Don't pull the waist edging tight while you crochet. It needs enough stretch to go over the diapered hips.
Leg edging: Join brown yarn at the lower part of one leg opening.
Work sc evenly around the opening. Along the hdc row ends, use approximately 3 sc for every 2 row ends. That gives the edge enough stitches to lie flat without making it ruffle.
Expected leg edging counts are approximately:
Newborn: about 32 sc per leg opening
0 to 3 months: about 33 sc per leg opening
3 to 6 months: about 35 sc per leg opening
6 to 12 months: about 36 sc per leg opening
Join with a sl st and fasten off. Repeat around the second leg opening using the same stitch distribution.
The two openings should look alike. If one edge ripples, you've added too many stitches. If it pulls inward or cups, you need a few more.
Crochet the Nine Turkey Feathers
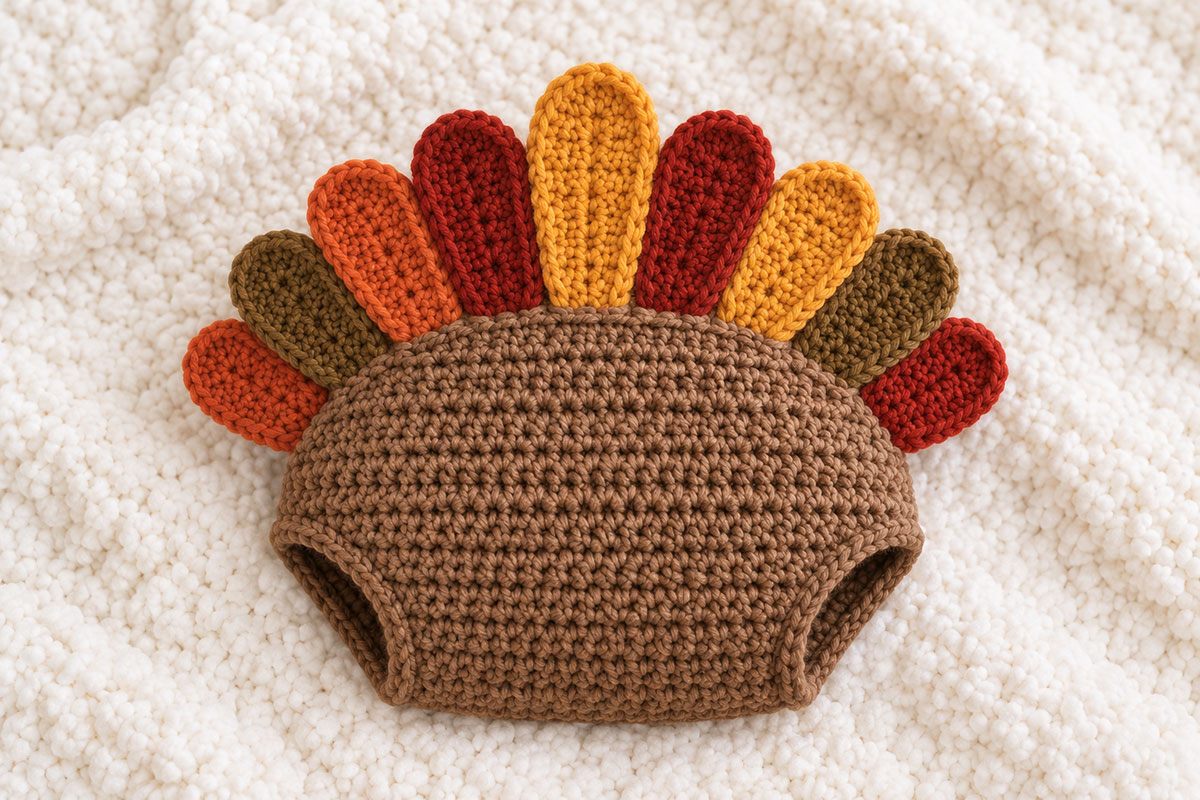
The turkey tail is the whole point of this cover, so I'm keeping the count and arrangement fixed. There are exactly nine individual feathers.
Looking straight at the BACK of the finished diaper cover, arrange them from left to right in this order:
Feather 1: burnt orange, short
Feather 2: olive brown, short medium
Feather 3: burnt orange, medium
Feather 4: rust red, tall
Feather 5: mustard or golden yellow, tallest center feather
Feather 6: rust red, tall
Feather 7: mustard or golden yellow, medium
Feather 8: olive brown, short medium
Feather 9: rust red, short
The color arrangement is intentionally a little uneven. Keep it that way if you want to reproduce the example.
For newborn and 0 to 3 month covers: use the smaller feather sizes.
For 3 to 6 month and 6 to 12 month covers: use the full feather sizes.
Leave a long sewing tail on every feather.
Short Feather, full size
Ch 8. Beginning in the second chain from the hook, work sc, hdc, dc, tr, dc, hdc, then 5 dc in the final chain.
Continue along the unused loops on the opposite side of the foundation chain: hdc, dc, tr, dc, hdc, sc. Sl st at the base and fasten off.
Short Feather, smaller size: Ch 7. Beginning in the second chain from the hook, work sc, hdc, dc, tr, dc, then 5 dc in the final chain. Continue down the opposite side with dc, tr, dc, hdc, sc. Sl st at the base and fasten off.
Short Medium Feather, full size
Ch 9. Beginning in the second chain from the hook, work sc, hdc, dc, tr, tr, dc, hdc, then 5 dc in the final chain.
Continue down the opposite side: hdc, dc, tr, tr, dc, hdc, sc. Sl st at the base and fasten off.
Short Medium Feather, smaller size: Use the full size Short Feather instructions.
Medium Feather, full size
Ch 10. Beginning in the second chain from the hook, work sc, hdc, dc, tr, tr, tr, dc, hdc, then 5 dc in the final chain.
Continue down the opposite side: hdc, dc, tr, tr, tr, dc, hdc, sc. Sl st at the base and fasten off.
Medium Feather, smaller size: Use the full size Short Medium Feather instructions.
Tall Feather, full size
Ch 11. Beginning in the second chain from the hook, work sc, hdc, dc, tr, tr, tr, tr, dc, hdc, then 5 dc in the final chain.
Continue down the opposite side: hdc, dc, tr, tr, tr, tr, dc, hdc, sc. Sl st at the base and fasten off.
Tall Feather, smaller size: Use the full size Medium Feather instructions.
Tallest Center Feather, full size
Ch 12. Beginning in the second chain from the hook, work sc, hdc, dc, tr, tr, tr, tr, tr, dc, hdc, then 5 dc in the final chain.
Continue down the opposite side: hdc, dc, tr, tr, tr, tr, tr, dc, hdc, sc. Sl st at the base and fasten off.
Tallest Center Feather, smaller size: Use the full size Tall Feather instructions.
Gently shape each finished feather into a rounded oval. Don't pull it into a narrow point. The feathers in the example are broad and soft with rounded tops.
Attach the Turkey Tail to the Diaper Cover
Do not start sewing feathers on until all nine are made. Lay out the entire fan first.
Place the diaper cover with the BACK facing you and the waistband at the top.
Feather 5 goes directly over the center-back marker. Its base should sit across the last straight back row just before the crotch decreases begin.
Place Feathers 4 and 6 immediately beside Feather 5. Let their bases sit about one row lower.
Add Feathers 3 and 7 next, with their bases another row lower.
Place Feathers 2 and 8 next.
Finish with Feathers 1 and 9 at the outside edges. Those two should sit lowest and wrap farther toward the sides of the cover.
That stepped placement is important. If all nine feather bases sit in one straight line, the tail will look like a flat row instead of the rounded fan shown in the example image.
Pin everything before sewing.
The center golden feather should be the highest point. The rust feathers on either side should finish slightly lower, and the remaining feathers should step down toward the outside edges.
Overlap the lower feather bases slightly if needed, but keep the rounded tops separate so all nine feathers remain visible.
Using the long sewing tail from each feather, stitch the lower third firmly to the brown cover. Leave the upper portion free.
Don't sew through the diaper cover so tightly that the brown fabric puckers. The cover should stay soft and flexible beneath the feather fan.
After all nine are attached, look at the cover from directly behind and from both sides. The outside feathers should wrap lower around the sides while Feather 5 stays centered.
The FRONT of the diaper cover stays plain brown. Don't add a face, beak, eyes or wattle to the front. The turkey tail is the finished design feature on this project.
Choosing the Right Diaper Cover Size
Choose this one by the baby's diapered measurements whenever you can. A cloth diaper, disposable diaper and different clothing layers can change the fit quite a bit.
Measure around the waist where the top of the cover will sit. Then measure around the fullest part of the diapered bottom.
Compare those measurements with the finished sizes above before you begin the feather assembly.
You want enough room for the diaper without making the waistband so loose that the finished turkey tail pulls the back of the cover downward.
If the brown cover doesn't fit correctly, fix that before you add the feathers. Sewing the feathers tighter will not correct a sizing problem.
If you're between two sizes, I'd pay the most attention to the diapered hip measurement and the front-to-back rise. Those two measurements determine whether the cover actually sits comfortably around the diaper.
Finishing and Safety Check
Weave in every loose end securely on the wrong side of the cover.
Remove every straight pin, stitch marker and temporary placement marker.
Run your fingers around both leg openings and the waistband. The edging should lie flat without a tight corded feeling and without loose loops.
Give each of the nine feathers a gentle tug at the base. None should pull away from the brown cover.
Check the inside where the feathers are sewn on. Trim and secure any yarn tails that could rub against the baby's clothing or skin.
The cover should sit flat across the front, curve around the diaper and show the full feather fan across the back without the center feather pulling the waistband downward.
Follow the care instructions for the yarn you used. After washing, reshape the brown cover and straighten the feathers while they're damp, then lay the piece flat to dry.
This is a dress-up diaper cover and photo outfit. Remove it before sleep and whenever the baby is unattended.
Frequently Asked Questions
Can I make the turkey diaper cover without the feathers?
You can, but then it becomes a plain brown diaper cover rather than the finished turkey design shown here. The nine-feather fan is the feature that turns this into the Thanksgiving version.
Can I change the feather colors?
Yes. If you want the finished cover to stay close to the example image, keep the same mix of burnt orange, olive brown, rust red and golden mustard. If you're using the pattern as a starting point for your own version, I'd keep the nine-feather count and graduated heights even if you change the palette.
Can I make all nine feathers the same size?
You can, but the tail will look flatter and more uniform. This design depends on the tallest center feather and the gradually shorter feathers toward the sides.
Can I add a turkey face to the front?
You can modify the pattern, but the finished design shown here keeps the front plain brown. I'd leave it that way. The tail is already doing plenty, and adding a second focal point changes the look quite a bit.
Can I use cotton yarn?
Yes, as long as you can match the gauge and the finished fabric has enough stretch for a diaper cover. Cotton can behave differently from acrylic, so check the actual finished measurements before you sew on the feathers.
More Fall Crochet Projects for Baby
If you're making a Thanksgiving set, the easiest companion project is the crochet turkey hat pattern. It uses the same fall palette and nine-feather idea, so the two pieces feel coordinated without being identical.
If you're looking for more baby hat ideas, browse the free baby crochet hat patterns hub.
The crochet turkey lovey pattern gives you another turkey project without turning the whole set into matching clothing.
If you want to mix turkey and pumpkin pieces instead, try the free crochet pumpkin hat pattern or the crochet pumpkin diaper cover pattern.
You can also browse the free baby crochet patterns page for more handmade baby projects.
One Last Look at the Finished Turkey Diaper Cover
The finished cover should still look simple from the front. The brown diaper cover provides the shape and fit, while the turkey tail carries the color and personality across the back.
Before you call it finished, check the details that define this version: nine separate rounded feathers, the golden center feather highest, progressively shorter feathers toward the sides, the fixed fall color arrangement and a plain brown front.
Keep those pieces in balance and the cover will follow the same overall design shown in the example image.
When you click on links to various merchants on this site and make a purchase, this may result in this site earning a commission. This does not affect the price you pay.

UBGI Gold Standard 2026
Reviewed under the site's
editorial checklist.
Photos, decorating ideas, party setups and reader submissions are shared for inspiration unless a page is specifically presented as a pattern, tutorial, reference guide or step-by-step project. Follow the instructions, measurements, safety guidance and manufacturer directions provided for the particular project or product.
About Jan | Contact | Baby Nursery Ideas (Blog) | Site Map | Privacy Policy | Disclosure Policy | Disclaimer | Affiliate Disclosure | Earnings Disclosure | Facebook | Pinterest
I am a participant in the Amazon Services LLC Associates Program, an affiliate advertising program designed to provide a means for us to earn fees by linking to Amazon. As an Amazon Associate I earn from qualifying purchases.
Copyright © 2006-2026. All Rights Reserved.