Free Crochet Turkey Applique Pattern
By Jan Bay
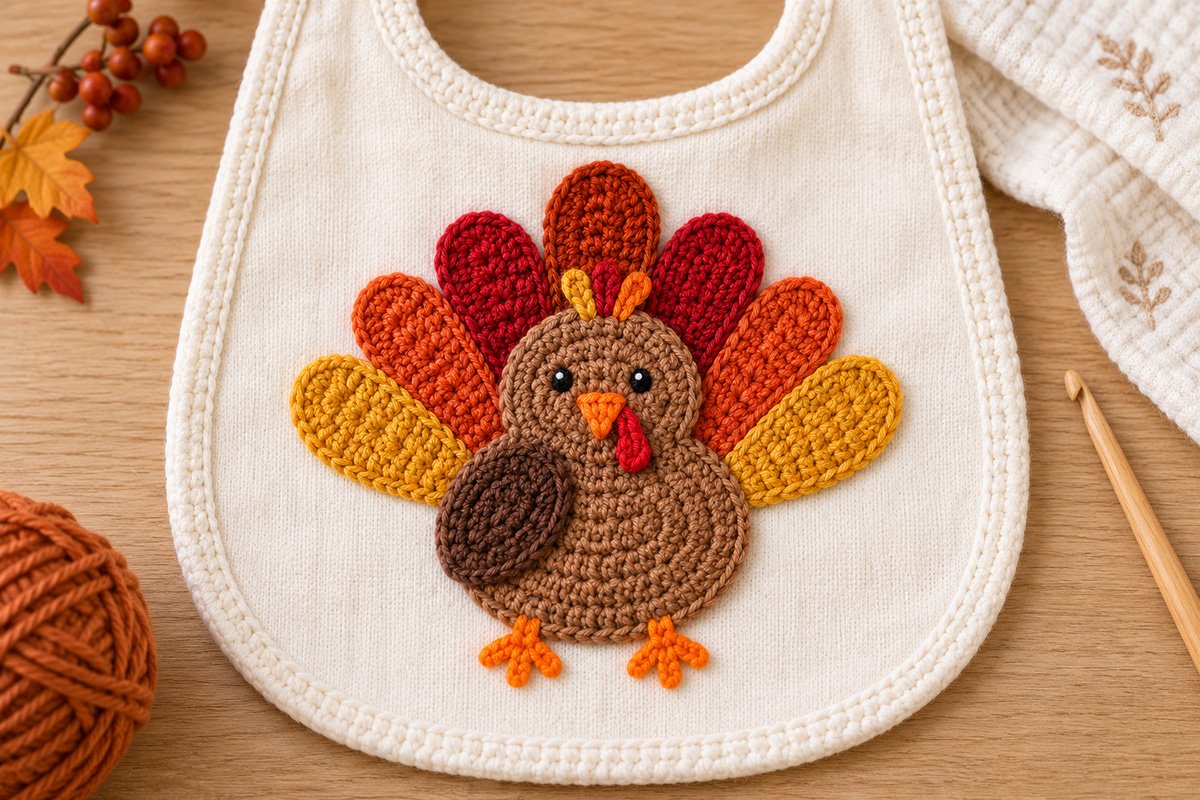
I wanted this free crochet turkey applique pattern to work from early fall right through Thanksgiving, especially on baby projects that need a little something more than another pumpkin. The turkey is flat enough to sew onto bibs, blankets, burp cloths, baby clothing or nursery decorations, but those seven tail feathers give him plenty of sass and class.
Explore More Free Thanksgiving Crochet Patterns
Turkey Baby Hat Crochet Pattern
Supplies for This Crochet Turkey Appliqué
Jump to:
Supplies for This Crochet Turkey Applique Pattern
I'd use a smooth worsted-weight cotton or cotton-blend yarn for this one. The pieces need enough body to hold their shapes after they're sewn down, especially those seven individual tail feathers. A fuzzy yarn would hide too much of the shaping, so I'd skip it here.
Yarn: Worsted-weight yarn, category 4, in the following colors:
- Warm medium brown for the head and body, approximately 25 to 30 yards
- Dark brown for the wing, approximately 6 to 8 yards
- Mustard for 2 outer tail feathers and part of the crest, approximately 10 to 12 yards
- Burnt orange for 2 tail feathers and part of the crest, approximately 10 to 12 yards
- Cranberry red for 2 tail feathers, the wattle and part of the crest, approximately 10 to 12 yards
- Deep rust for the single center tail feather, approximately 5 to 7 yards
- Orange for the beak and feet, approximately 5 yards
- Black embroidery floss or smooth black yarn for the eyes
- A tiny amount of white embroidery floss for the eye highlights
Hook: 4.0 mm crochet hook, or the size needed to make a firm, flat fabric without large gaps.
You'll also need:
- Yarn needle
- Embroidery needle if you're using embroidery floss for the eyes
- Scissors
- Blocking pins and a blocking mat, optional but helpful for arranging the seven feathers evenly before assembly
Gauge: About 17 single crochet stitches and 18 rows = 4 inches using the recommended yarn and hook. Exact gauge isn't critical for an appliqué, but it does affect the finished size. More important, keep the stitches firm enough that the finished pieces lie flat and keep their outlines.
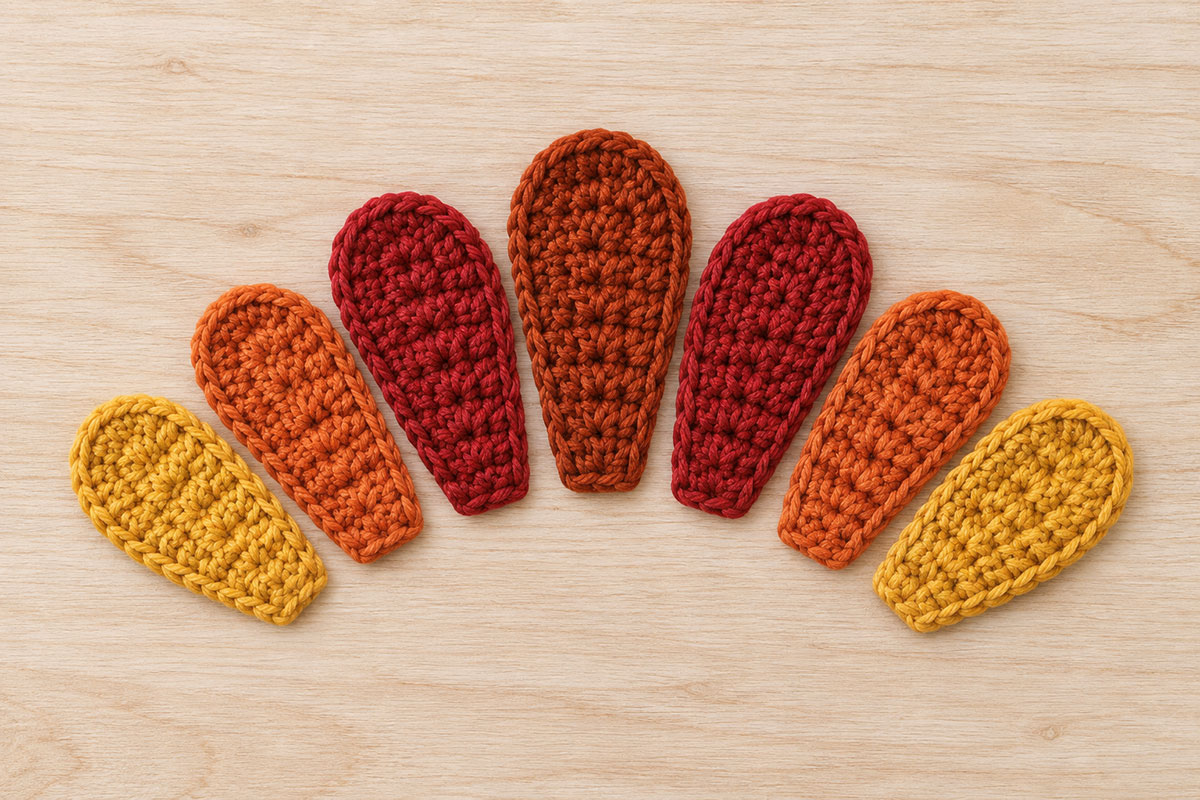
The finished example uses seven separate tail feathers in a fixed color order. From left to right they are mustard, burnt orange, cranberry, deep rust, cranberry, burnt orange and mustard. Don't substitute a single scalloped fan if you want the finished appliqué to match the example. The separate graduated feathers are one of the details that gives this turkey its shape.
Finished Size and Construction Notes
At the gauge listed above, the finished crochet turkey applique is expected to measure about 6 1/2 to 7 inches wide across the tail and about 5 1/2 to 6 inches tall from the top of the center feather to the bottom of the feet. Those measurements are calculated from the stitch counts and planned assembly, not taken from a physically test-made sample, so check your measurements as you work if the exact finished size matters.
The turkey is built in layers. The seven tail feathers go down first. The brown body covers their lower ends, the head overlaps the top of the body, and the feet tuck behind the lower body edge. Embroider the face and attach the beak and wattle while the head is still separate, then add the wing during final assembly.
Keep the tail arrangement fixed if you want your turkey to match the example. There are exactly seven feathers, and the center one is the tallest. The feathers get a little shorter as they move toward each side. That gradual change matters. Seven feathers all the same height won't give you the same fan shape.
This pattern uses U.S. crochet terminology. If you need to check a standard crochet abbreviation, the Craft Yarn Council crochet abbreviations list is a handy reference.
Crochet Abbreviations
- ch = chain
- sc = single crochet
- hdc = half double crochet
- dc = double crochet
- sl st = slip stitch
- st = stitch
- sts = stitches
- inc = work 2 single crochet in the same stitch
- sc2tog = single crochet 2 stitches together
- MR = magic ring
Pattern note: Beginning chains do not count as stitches unless the instructions say otherwise.
Crochet the Turkey Body
The body is a plump oval instead of a circle. That gives us the fuller lower half shown in the example and leaves enough room for the little dark wing without crowding the face.
With warm medium brown, ch 9.
Round 1: Work 2 sc in the second ch from the hook. Sc in each of the next 6 ch. Work 4 sc in the last ch. Turn the foundation chain so you can work along the unused loops on the opposite side. Sc in each of the next 6 loops. Work 2 sc in the same foundation ch that holds the first 2 sc. Join with a sl st. 20 sts.
Round 2: Work 2 sc in each of the first 2 sts. Sc in each of the next 6 sts. Work 2 sc in each of the next 4 sts. Sc in each of the next 6 sts. Work 2 sc in each of the final 2 sts. Join. 28 sts.
Round 3: [Sc in next st, 2 sc in next st] twice. Sc in each of the next 6 sts. [Sc in next st, 2 sc in next st] 4 times. Sc in each of the next 6 sts. [Sc in next st, 2 sc in next st] twice. Join. 36 sts.
Round 4: Sc in each st around. Join. 36 sts.
Fasten off, leaving a long tail for sewing. Lay the body flat and gently shape it into an oval. The broader ends created by the increases should sit at the top and bottom rather than at the sides.
Dark Brown Wing
The example has one dark brown wing. Keep it to one. Adding a matching wing on the other side would change the look we locked in.
With dark brown, ch 7.
Starting in the second ch from the hook, work 1 sl st, 1 sc, 1 hdc, 1 dc and 1 dc. Work 5 dc in the last ch.
Turn the foundation chain and work along the opposite side. Work 1 dc, 1 dc, 1 hdc, 1 sc and 1 sl st.
Fasten off with a long tail for sewing.
The finished wing should look like a small rounded teardrop. Don't sew it on yet. Its final position is easier to judge after the body and head are together.
Crochet the Turkey Head
With warm medium brown, make an MR.
Round 1: Work 6 sc in the ring. Join with a sl st. 6 sts.
Round 2: Work 2 sc in each st around. Join. 12 sts.
Round 3: [Sc in next st, 2 sc in next st] 6 times. Join. 18 sts.
Round 4: [Sc in each of the next 2 sts, 2 sc in next st] 6 times. Join. 24 sts.
Fasten off, leaving a long sewing tail.
Gently flatten the head into a neat circle. Don't stretch it into an oval. The round head against the fuller oval body is part of the finished turkey's silhouette.
Make the Three Color Crest
The little crest contains exactly three short loops, one mustard, one cranberry and one burnt orange. Keep them small. They should peek over the head rather than turn into another tail fan.
With mustard, insert the hook through a stitch near the top left of the head. Pull up a loop, ch 4 and sl st back into the same insertion point. Fasten off and secure the ends on the back.
Repeat just to the right with cranberry.
Repeat once more with burnt orange.
Arrange the three loops so they spread slightly instead of stacking directly on top of one another.
Crochet the Seven Graduated Turkey Tail Feathers
This is the part I wouldn't change. The seven separate feathers and their graduated heights give the turkey much more character than one big scalloped semicircle.
You'll make four feather sizes. The two outer mustard feathers are the shortest. The two burnt orange feathers are a little taller. The two cranberry feathers are taller again. The single deep rust center feather is the tallest.
The lower ends will eventually be hidden behind the body, so don't worry if those ends aren't perfectly rounded. Concentrate on keeping the visible tops smooth.
Outer Mustard Feathers, Make 2
With mustard, ch 9.
Round 1: Work 2 sc in the second ch from the hook. Sc in each of the next 6 ch. Work 4 sc in the last ch. Turn and work along the unused loops on the opposite side of the foundation chain. Sc in each of the next 6 loops. Work 2 sc in the same foundation ch that holds the first 2 sc. Join with a sl st. 20 sts.
Round 2: Work 2 sc in each of the first 2 sts. Sc in each of the next 6 sts. Work 2 sc in each of the next 4 sts. Sc in each of the next 6 sts. Work 2 sc in each of the final 2 sts. Join. 28 sts.
Fasten off, leaving a sewing tail.
Burnt Orange Feathers, Make 2
With burnt orange, ch 10.
Round 1: Work 2 sc in the second ch from the hook. Sc in each of the next 7 ch. Work 4 sc in the last ch. Turn and work along the unused loops on the opposite side. Sc in each of the next 7 loops. Work 2 sc in the same foundation ch that holds the first 2 sc. Join. 22 sts.
Round 2: Work 2 sc in each of the first 2 sts. Sc in each of the next 7 sts. Work 2 sc in each of the next 4 sts. Sc in each of the next 7 sts. Work 2 sc in each of the final 2 sts. Join. 30 sts.
Fasten off, leaving a sewing tail.
Cranberry Feathers, Make 2
With cranberry, ch 11.
Round 1: Work 2 sc in the second ch from the hook. Sc in each of the next 8 ch. Work 4 sc in the last ch. Turn and work along the opposite side. Sc in each of the next 8 loops. Work 2 sc in the same foundation ch that holds the first 2 sc. Join. 24 sts.
Round 2: Work 2 sc in each of the first 2 sts. Sc in each of the next 8 sts. Work 2 sc in each of the next 4 sts. Sc in each of the next 8 sts. Work 2 sc in each of the final 2 sts. Join. 32 sts.
Fasten off, leaving a sewing tail.
Deep Rust Center Feather, Make 1
With deep rust, ch 12.
Round 1: Work 2 sc in the second ch from the hook. Sc in each of the next 9 ch. Work 4 sc in the last ch. Turn and work along the opposite side. Sc in each of the next 9 loops. Work 2 sc in the same foundation ch that holds the first 2 sc. Join. 26 sts.
Round 2: Work 2 sc in each of the first 2 sts. Sc in each of the next 9 sts. Work 2 sc in each of the next 4 sts. Sc in each of the next 9 sts. Work 2 sc in each of the final 2 sts. Join. 34 sts.
Fasten off, leaving a sewing tail.
Before sewing anything together, arrange all seven feathers on a flat surface in this exact order from left to right:
Mustard, burnt orange, cranberry, deep rust, cranberry, burnt orange, mustard.
Center the deep rust feather first. Place the cranberry feathers beside it slightly lower, then the burnt orange feathers slightly lower again, and finish with the mustard feathers at the outer edges. Let the lower ends overlap a little. The fan should be symmetrical even though the individual feathers overlap.
Crochet the Beak, Wattle and Feet
Orange Beak
With orange, ch 4.
Row 1: Sc in the second ch from the hook and in each of the next 2 ch. 3 sts. Ch 1 and turn.
Row 2: Sc2tog, sc in the final st. 2 sts. Ch 1 and turn.
Row 3: Sc2tog. 1 st.
Fasten off, leaving a sewing tail.
Turn the little triangle so the three stitch edge is at the top and the point faces down.
Red Wattle
With cranberry red, ch 4.
Starting in the second ch from the hook, work 1 sc, 1 hdc and 3 dc in the final ch. Turn the foundation chain and work along the opposite side with 1 hdc and 1 sc.
Fasten off, leaving a sewing tail.
The wattle should curve naturally into a small comma or teardrop shape. Don't stretch it straight. It sits just under one side of the beak in the finished design.
Orange Feet, Make 2
Each foot has a short leg and three little toes. Leave about a 12-inch starting tail before making the slip knot. You'll use that starting tail to sew the top of the leg to the body later.
With orange, ch 5 for the leg.
For the first toe, ch 4. Sl st in the second ch from the hook and in each of the next 2 ch to return to the base of the toe.
For the center toe, ch 3. Sl st in the second ch from the hook and in the next ch to return to the same base.
For the third toe, ch 4. Sl st in the second ch from the hook and in each of the next 2 ch to return to the same base.
Fasten off at the toe base and weave in that end. Keep the 12-inch starting tail at the opposite end of the leg for assembly.
Repeat for the second foot.
Spread the three toes gently with your fingers. They don't need to sit perfectly straight. The slightly open three-toed shape is what you see in the finished example.
Embroider the Turkey's Eyes
Do the face before sewing the head permanently to the body. It's much easier to hide the embroidery ends on the back while you can still turn the head over.
Position the two eyes evenly on the lower half of the head with enough room between them for the beak. Aim for about 5/8 inch between the centers of the eyes on a head worked to the expected size.
Using black embroidery floss or smooth black yarn, make several short satin stitches side by side for each eye. Keep them small and oval rather than making large black circles.
Add one tiny white embroidery stitch near the upper portion of each black eye for the little highlight shown in the example.
There are no plastic safety eyes or buttons on this turkey.
Set the orange beak between and slightly below the eyes. Sew across its upper edge and around the sides, leaving the pointed tip directed downward.
Place the red wattle immediately beside and slightly below the beak on the viewer's right side, as shown in the finished turkey. Only one wattle is used. Let its lower end curve naturally rather than sewing every millimeter completely flat.
Assemble the Crochet Turkey Applique
Your turkey uses 14 crocheted components in all: 1 body, 1 head, 1 dark brown wing, 7 tail feathers, 1 beak, 1 wattle and 2 feet. At this point the beak and wattle should already be sewn to the head. The three crest loops are worked directly into the head, so they are not counted as separate components.
Lay everything out before you pick up the yarn needle. A few minutes spent arranging the feathers now will save you from having to unpick them later.
1. Arrange the tail. Place the deep rust center feather vertically. Add one cranberry feather on each side, positioning their tops slightly lower. Add the burnt orange feathers next, then the mustard outer feathers. Keep the color order fixed.
2. Check the fan. The lower portions of the feathers can overlap because the body will cover them. Keep the visible upper portions separate enough that you can still see seven individual rounded feather shapes.
3. Tack the feathers together. Once the fan looks right, use the sewing tails to tack the overlapping lower sections together. You don't need to sew all the way around every feather. The body will stabilize the center of the fan.
4. Add the feet. Place the two orange feet behind the lower edge of the body with the three toes extending below it. Leave a small gap between the feet. Sew the upper leg sections securely to the back of the body.
5. Position the body. Center the warm brown oval over the lower portion of the tail fan. The body should hide the feather bases while leaving plenty of each feather visible above and around the sides. Using the body sewing tail, stitch the body securely to the feather bases only where the pieces overlap. Leave the exposed lower and side edges of the body free until the finished appliqué is sewn to its final project.
6. Add the head. Center the head above the body and overlap the upper edge of the body by about 1/2 inch. Using the head sewing tail, stitch the lower 1/2-inch overlapped portion of the head securely to the body. Leave the remaining outer edge of the head free until the finished appliqué is sewn to its final project. Keep the crest free at the top.
7. Add the wing. Place the single dark brown teardrop wing on the viewer's left side of the body. Angle the narrow end slightly upward toward the head and the rounded end toward the lower outside edge of the body. Sew around the entire wing edge.
8. Check the face. Make sure the beak remains centered between the eyes and the red wattle hangs on the viewer's right side. Straighten the three crest loops if they were caught under the head while you were sewing.
9. Weave in every end. Work the yarn tails securely through stitches on the back of the applique and trim the excess.
If you're using the turkey as a separate appliqué, it should now hold together as one unit. Position it on the bib, blanket, clothing or other project. Thread a yarn needle with matching yarn or strong coordinating sewing thread and sew the exposed outer edges of the seven feathers, body, head and feet securely to the base fabric with small, even stitches. Secure the thread well on the back of the project and trim the excess. The wing, beak and wattle should already be firmly sewn to the crochet pieces beneath them.
If you're sewing the turkey onto something for a baby, sew around the appliqué securely instead of relying on glue. Pay particular attention to the crest, wattle, wing, toes and outer edges of the feathers since those are the easiest places for a loose edge to catch.
Before you call it finished, check all seven feathers, both feet, the wing, beak, wattle and crest for loose edges. Weave in any remaining yarn ends and make sure every blocking pin has been removed.
If you add the applique to a baby blanket or another soft item, keep that item out of an infant's sleep space. The U.S. Consumer Product Safety Commission safe sleep guidance recommends a bare infant sleep space with only a fitted sheet.
Ways to Use Your Crochet Turkey Applique
I like this turkey best when it actually becomes part of something. An appliqué is cute on its own, but it's even better when used as a decoration for a special baby project. It has a purpose, a reason to be there.
A plain bib is an easy choice. Put the turkey low enough that the tail fan doesn't crowd the neckline and let the full seven-feather shape show. If you're making several bibs, I wouldn't add much more decoration. The turkey already has plenty going on.
You could also sew it onto the corner of a stroller blanket, a burp cloth with a fabric panel sturdy enough to support crochet, a Thanksgiving baby outfit or a little nursery banner. For a blanket, I'd keep the turkey near a corner or lower edge rather than dropping one giant motif into the middle.
If you'd rather make another animal appliqué next, you'll find more ideas in my free crochet animal applique patterns. And if you want to keep going with the Thanksgiving turkey set, the crochet turkey lovey pattern uses the same warm fall character in a completely different project.
Keep one thing in mind if you change the colors. The shape can still read as a turkey without the exact palette, but the graduated seven-feather fan is worth keeping. That's the detail I'd leave alone.
Tips for Keeping the Turkey Applique Flat
Because this design has seven separate feathers layered behind the body, the back can get bulky if every yarn tail is knotted in the same place. Spread the woven-in ends across the back instead of piling them all into the center.
If one feather wants to curl, lightly block it before final assembly. Shape it with your fingers, pin it flat and let it dry completely before sewing the fan together.
The body and head should stay flat without stuffing. Don't add fiberfill. This is an applique, not a small amigurumi turkey.
If you're sewing it onto fabric, use small, even stitches around the outer edges of the body, head, feathers, wing and feet. You don't have to catch every crochet stitch, but don't leave large unsecured sections that can lift away from the fabric.
How to Change the Size
The easiest way to make a smaller or larger turkey is to change the yarn weight and hook together instead of rewriting all of the stitch counts.
For a smaller applique, try a DK-weight yarn with a smaller hook that still gives you a firm fabric. For a larger turkey, move up to a heavier yarn and a hook that keeps the stitches neat and fairly tight.
I would resize every piece together. Don't make a larger body and leave the feathers at the original size or the proportions will change quickly.
If you're adding the turkey to a bib, check the available space before you start. You want room around the feather fan so it doesn't run into the neckline or disappear over the side edges.
Color Changes and Variations
You can change the fall colors without changing the construction. Rust, pumpkin, cranberry, mustard, olive and warm brown all work well together.
I would keep enough contrast between neighboring feathers that the seven-piece fan stays easy to see. If all seven feathers are nearly the same shade, you lose one of the best parts of the design.
You can also use this turkey on a cream, tan, soft brown or muted fall fabric background. I would avoid putting it on a busy print. The little face, wing and feather shapes need some breathing room.
If you're making a matching Thanksgiving baby set, this applique can coordinate nicely with the crochet turkey hat pattern, crochet turkey diaper cover pattern and crochet turkey lovey pattern without making every piece look exactly the same.
More Free Crochet Patterns to Make Next
If you're building a Thanksgiving baby set, the turkey baby hat, turkey diaper cover and turkey lovey are the natural next projects.
If you want more small motifs instead, head over to the crochet animal applique patterns. That's where I'd go next if you're looking for another flat design you can sew onto a bib, blanket or nursery project.
When you click on links to various merchants on this site and make a purchase, this may result in this site earning a commission. This does not affect the price you pay.

UBGI Gold Standard 2026
Reviewed under the site's
editorial checklist.
Photos, decorating ideas, party setups and reader submissions are shared for inspiration unless a page is specifically presented as a pattern, tutorial, reference guide or step-by-step project. Follow the instructions, measurements, safety guidance and manufacturer directions provided for the particular project or product.
About Jan | Contact | Baby Nursery Ideas (Blog) | Site Map | Privacy Policy | Disclosure Policy | Disclaimer | Affiliate Disclosure | Earnings Disclosure | Facebook | Pinterest
I am a participant in the Amazon Services LLC Associates Program, an affiliate advertising program designed to provide a means for us to earn fees by linking to Amazon. As an Amazon Associate I earn from qualifying purchases.
Copyright © 2006-2026. All Rights Reserved.