Free Crochet Turkey Lovey Pattern
By Jan Bay
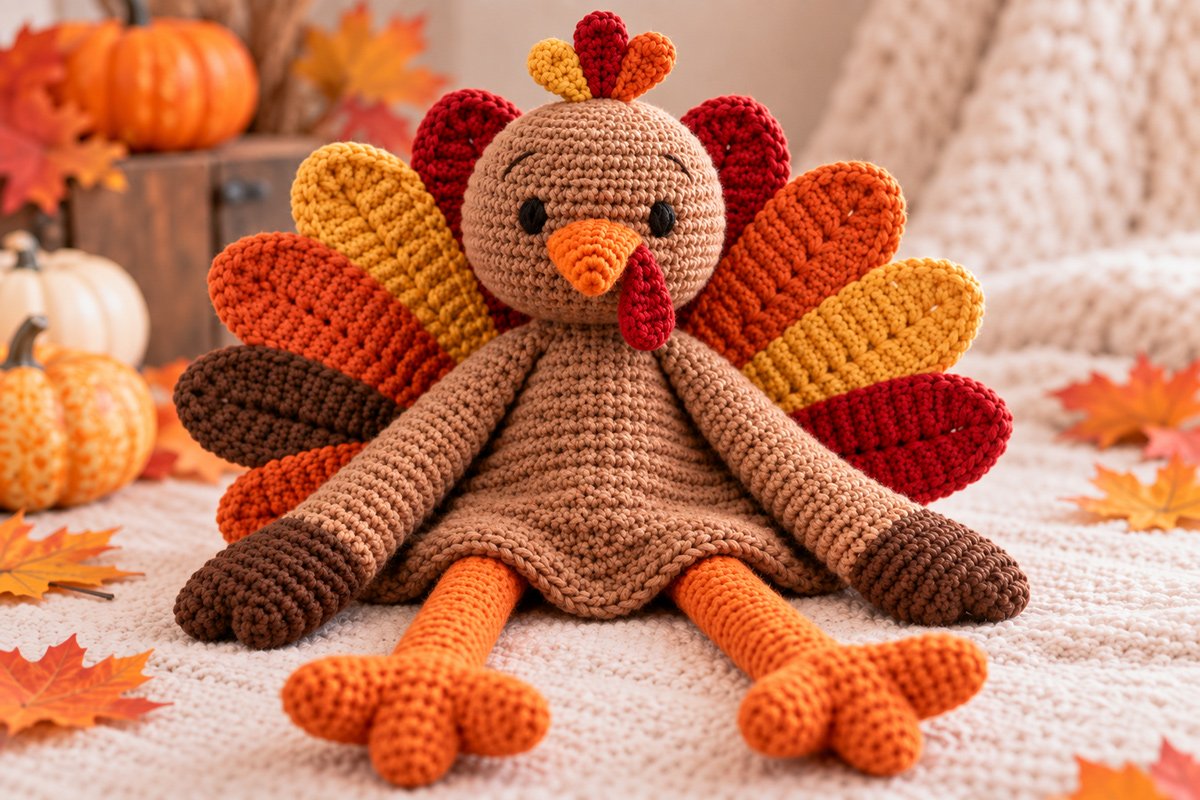
This free crochet turkey lovey pattern brings the "gobble" into Thanksgiving cuddles. The pattern turns the classic bird into a long legged, floppy snuggler with long arms to match, embroidered features and a full fan of colorful fall tail feathers. It is a fun seasonal baby gift and a different way to crochet a turkey. This is definitely not just another small amigurumi figure; this bird has class and a style all its own.
Explore More Free Crochet Baby Patterns
Supplies for This Crochet Turkey Lovey
Worsted Weight Yarn for Crochet Projects
Choose warm fall colors that match the pattern: medium brown, dark brown, orange, rust, mustard gold and deep red.
Jump to:
Supplies for This Crochet Turkey Pattern
I would keep the yarn fairly simple for this turkey. The shape and that big feather fan are doing most of the work, so you don't need a dozen specialty yarns competing with them.
Yarn: Worsted weight #4 yarn in the following colors:
- Medium warm brown for the head, body and upper arms: approximately 260 to 300 yards
- Dark brown for the arm ends and tail feathers: approximately 45 to 55 yards
- Orange for the legs, feet, beak, crest and tail feathers: approximately 85 to 100 yards
- Rust for the tail feathers: approximately 35 to 45 yards
- Mustard gold for the crest and tail feathers: approximately 35 to 45 yards
- Deep red for the wattle, crest and tail feathers: approximately 35 to 45 yards
- Small amount of black yarn or embroidery floss for the eyes
The yardages above are calculated allowances for the finished size in this pattern rather than amounts measured from a physically completed sample. Give yourself a little extra in the medium brown and orange. Those are the two colors you don't want to run short on halfway through.
Hook: 4 mm (G-6) crochet hook, or the hook size needed to obtain the gauge below.
Other supplies:
- Polyester fiberfill for the head, lightly stuffed upper body, dark brown arm ends, legs, toes and beak
- Yarn needle
- Stitch marker
- Scissors
- Flexible tape measure
- Straight pins or locking stitch markers for positioning pieces before sewing
Worsted weight yarn is commonly classified as medium weight #4. If you are substituting yarn and want to check the weight category, the Craft Yarn Council yarn weight system is a useful reference.
Do not use plastic safety eyes for this lovey. The finished turkey shown here has black embroidered satin-stitch eyes, and the instructions below keep them that way.
Baby use note: Treat this handmade lovey as a supervised comfort item, not an infant sleep-space item. The U.S. Consumer Product Safety Commission recommends keeping an infant's sleep space bare except for a fitted sheet. You can read the current CPSC safe sleep guidance.
Expected Finished Size
Using worsted weight yarn and the gauge given below, the finished turkey is expected to measure approximately 25 to 27 inches from the top of the head crest to the ends of the feet when laid flat.
The round head is expected to finish at about 5 1/2 inches across. Each arm measures about 11 to 12 inches long, including the dark brown end. The orange legs are about 9 1/2 to 10 inches long before the feet, with each three-toed foot adding roughly 3 inches.
The flattened snuggler body is approximately 10 inches wide at its broadest point and 9 inches long from the base of the head to the lower center point.
The finished tail fan spans approximately 16 to 17 inches across behind the turkey. The individual feathers are intentionally large. That fan is what keeps this fellow looking like a turkey instead of a brown bird with orange feet.
These are calculated finished measurements for the pattern and may vary with yarn, hook size and individual tension.
Crochet Abbreviations
- ch = chain
- sc = single crochet
- hdc = half double crochet
- dc = double crochet
- sl st = slip stitch
- inc = work 2 single crochet stitches in the same stitch
- dec = single crochet 2 stitches together
- st/sts = stitch/stitches
- rnd/rnds = round/rounds
- FO = fasten off
Gauge: Approximately 16 sc and 17 rounds = 4 inches in firmly worked single crochet.
Exact gauge matters most for keeping the head, limbs and body in proportion to one another. If your stitches are substantially larger, the tail fan can become enormous very quickly. If they are much smaller, the head will lose some of the broad, rounded look shown in the example.
Pattern Notes for the Turkey Snuggler Lovey
The head, arms and legs are worked primarily in continuous rounds unless the instructions say otherwise. Place a marker in the first stitch of each round and move it up as you work.
The turkey is built as a true floppy snuggler rather than a conventional stuffed animal. The head is stuffed firmly enough to hold its round shape. The upper part of the body receives only light stuffing, then the lower body is left much flatter so it can drape the way it does in the example image.
The arms are long and loose with dark brown ends. The legs are deliberately long and narrow, with separate three-toed feet at the bottom. Don't shorten them simply because they look exaggerated while you're making the individual pieces. Those proportions are part of the finished design.
The tail is made from separate elongated feathers and assembled into a broad fan behind the body. The feathers are not one large striped semicircle. Keeping them separate gives the finished turkey the layered feather shapes shown in the example.
The facial details are simple. Use black yarn or embroidery floss to make compact satin-stitch eyes. The orange beak and red wattle are crocheted separately and sewn to the face. There are no plastic eyes, buttons or glued facial pieces.
The three small feathers on top of the head are also separate crocheted pieces. They are mustard, deep red and orange, with the red feather centered slightly higher than the other two.
Unless a different instruction is given, leave a long sewing tail when fastening off pieces that will be attached later. Pin or hold every major piece in position before sewing. On a project with this many long pieces, moving an attachment point by even an inch can change the whole expression and balance of the turkey.
Pattern status: The stitch counts and measurements in this pattern are calculated to reproduce the finished design shown on this page. The pattern has not been physically test crocheted.
Free Crochet Turkey Lovey Pattern: Turkey Head
Make the head first. It gives you a useful scale check before you put time into the rest of the turkey. The finished head should be round and approximately 5 1/2 inches across, not narrow or egg shaped.
Use medium warm brown yarn and the 4 mm hook. Work in continuous rounds.
Rnd 1: Make a magic ring and work 6 sc into the ring. (6)
Rnd 2: Inc in each st around. (12)
Rnd 3: *Sc in next st, inc in next st.* Repeat around. (18)
Rnd 4: *Sc in next 2 sts, inc in next st.* Repeat around. (24)
Rnd 5: *Sc in next 3 sts, inc in next st.* Repeat around. (30)
Rnd 6: *Sc in next 4 sts, inc in next st.* Repeat around. (36)
Rnd 7: *Sc in next 5 sts, inc in next st.* Repeat around. (42)
Rnd 8: *Sc in next 6 sts, inc in next st.* Repeat around. (48)
Rnd 9: *Sc in next 7 sts, inc in next st.* Repeat around. (54)
Rnd 10: *Sc in next 8 sts, inc in next st.* Repeat around. (60)
Rnd 11: *Sc in next 9 sts, inc in next st.* Repeat around. (66)
Rnd 12: *Sc in next 10 sts, inc in next st.* Repeat around. (72)
Rnds 13 through 23: Sc in each st around. (72)
Before beginning the decreases, mark the center front of the head. The embroidered eyes will sit across approximately Rnds 18 through 20, with the centers about 1 1/4 inches apart.
Use black yarn or embroidery floss and make each eye with several compact satin stitches laid vertically over approximately 2 rounds. Keep the shape softly oval. The eyes shown in the finished turkey are embroidery only. Don't add plastic eyes or white plastic highlights.
Rnd 24: *Sc in next 10 sts, dec.* Repeat around. (66)
Rnd 25: *Sc in next 9 sts, dec.* Repeat around. (60)
Rnd 26: *Sc in next 8 sts, dec.* Repeat around. (54)
Rnd 27: *Sc in next 7 sts, dec.* Repeat around. (48)
Rnd 28: *Sc in next 6 sts, dec.* Repeat around. (42)
Rnd 29: *Sc in next 5 sts, dec.* Repeat around. (36)
Rnd 30: *Sc in next 4 sts, dec.* Repeat around. (30)
Stuff the head firmly now, shaping it into a broad sphere as you go. Add stuffing around the sides rather than pushing all of it into the center. That keeps the face broad like the finished turkey.
Rnd 31: *Sc in next 3 sts, dec.* Repeat around. (24)
Rnd 32: *Sc in next 2 sts, dec.* Repeat around. (18)
Add the last bit of stuffing.
Rnd 33: *Sc in next st, dec.* Repeat around. (12)
Rnd 34: Dec around. (6)
FO, leaving a long tail. Thread the tail through the remaining 6 stitches, pull closed and secure.
Crochet the Beak and Wattle
The orange beak is a small cone. It needs enough shape to project from the face, but it shouldn't become a long bird bill.
Beak, orange yarn
Rnd 1: Make a magic ring and work 4 sc into the ring. (4)
Rnd 2: Sc in each st around. (4)
Rnd 3: Inc in each st around. (8)
Rnd 4: Sc in each st around. (8)
Rnd 5: *Sc in next st, inc in next st.* Repeat around. (12)
Rnd 6: Sc in each st around. (12)
FO, leaving a long sewing tail. Add only a pinch of stuffing. Flatten the open base slightly before sewing so the beak sits cleanly against the face.
Center the beak between the eyes with its upper edge approximately one round below the bottom of the embroidered eyes.
Wattle, deep red yarn
Ch 10.
Beginning in the second ch from the hook, work 1 sc, 2 hdc, 4 dc and 1 hdc. Work 4 hdc into the final ch.
Continue along the opposite side of the foundation chain. Work 1 hdc, 4 dc, 2 hdc and 1 sc. Sl st to the first sc.
FO, leaving a sewing tail.
The wattle stays flat and unstuffed. Sew its narrow upper end just beneath the beak and slightly toward the viewer's right, allowing the rounded end to hang freely as it does in the example image.
Make the Three Head Feathers
The little crest is made from three separate flat feathers. The center red feather stands slightly taller, with mustard on the viewer's left and orange on the viewer's right.
Side feathers, make 2: Make one in mustard gold and one in orange.
Ch 7.
Beginning in the second ch from the hook, work 1 sc, 2 hdc and 2 dc. Work 5 dc into the last ch.
Continue along the opposite side of the foundation chain. Work 2 dc, 2 hdc and 1 sc. Sl st to the first sc.
FO, leaving a long tail.
Deep red center feather:
Ch 9.
Beginning in the second ch from the hook, work 1 sc, 2 hdc, 4 dc. Work 5 dc into the last ch.
Continue along the opposite side of the foundation chain. Work 4 dc, 2 hdc and 1 sc. Sl st to the first sc.
FO, leaving a long tail.
Do not stuff these pieces. The red feather should stand upright at the center. Angle the mustard and orange feathers slightly outward so the three pieces form the small fan shown at the top of the head.
Crochet the Floppy Snuggler Body
The body is made from two matching panels. That gives us the broad, floppy shape in the finished turkey without turning him into a fully stuffed doll.
Make 2 panels in medium warm brown.
Ch 13.
Row 1: Sc in second ch from hook and across. Ch 1, turn. (12)
Row 2: Inc in first st, sc across to last st, inc in last st. Ch 1, turn. (14)
Rows 3 through 15: Repeat Row 2. Your stitch counts will increase by 2 stitches on each row, ending Row 15 with 40 sts.
Rows 16 through 25: Sc across. Ch 1, turn. (40)
Row 26: Dec over first 2 sts, sc across to last 2 sts, dec. Ch 1, turn. (38)
Rows 27 through 37: Repeat Row 26, including ch 1 and turn after each row. Row 37 ends with 16 sts.
Row 38: Dec over first 2 sts, sc across to last 2 sts, dec. (14)
FO both panels and weave in the ends. The panels will be joined later with a separate length of medium brown yarn.
Each panel should measure approximately 10 inches across at the widest point and about 9 inches from top to bottom at the stated gauge.
Before joining the panels, use medium brown yarn to work a loose line of surface slip stitches straight down the center of the front panel. Start near the center of Row 1 and end near the center of Row 38. Keep the stitches relaxed. That subtle raised line reproduces the center detail visible on the finished body.
Do not join the two panels yet. The arms and tail are easier to position while you can still work with the front and back separately. The legs are attached later to the lower back of the assembled body.
Make the Long Floppy Arms
Make 2. Start with dark brown for the rounded ends, then change to medium brown.
Rnd 1: Make a magic ring and work 6 sc into the ring. (6)
Rnd 2: Inc around. (12)
Rnd 3: *Sc in next st, inc in next st.* Repeat around. (18)
Rnd 4: *Sc in next 2 sts, inc in next st.* Repeat around. (24)
Rnds 5 through 9: Sc around. (24)
Rnd 10: *Sc in next 2 sts, dec.* Repeat around. (18)
Change to medium warm brown.
Rnds 11 through 48: Sc around. (18)
Stuff only the dark brown end lightly. Leave the long brown section unstuffed so the arm hangs and folds rather than sticking straight out.
Flatten the open upper end and sc through both layers to close it with 9 sc.
FO, leaving a long sewing tail.
Each finished arm should measure approximately 11 to 12 inches. If your gauge is correct but an arm is significantly shorter than that, check your row height before making the second one.
Crochet the Long Legs and Three-Toed Feet
The legs are orange and intentionally long. The feet are built from three separate rounded toes so they match the exaggerated three-toed shape in the finished turkey.
Legs, make 2 in orange:
Rnd 1: Make a magic ring and work 6 sc into the ring. (6)
Rnd 2: Inc around. (12)
Rnd 3: *Sc in next st, inc in next st.* Repeat around. (18)
Rnds 4 through 41: Sc around. (18)
Lightly stuff the leg. Use just enough fiberfill to keep the tube rounded. It still needs to bend easily.
Flatten the upper end and close through both layers with 9 sc. FO, leaving a long tail for attaching the leg to the body.
Toes: Make 6 total, 3 for each foot.
For each foot, make one center toe as follows:
Rnd 1: Make a magic ring and work 6 sc. (6)
Rnd 2: Inc around. (12)
Rnds 3 through 10: Sc around. (12)
Rnd 11: Dec around. (6)
Add a small amount of stuffing. FO and close the remaining opening.
For each foot, make two side toes the same way, but work only Rnds 3 through 8 before completing the decrease round. The side toes are slightly shorter than the center toe.
Arrange the three toes in a fan. Point the longer center toe straight forward and angle the two shorter toes outward by roughly 30 to 35 degrees.
Sew the closed upper ends of the three toes securely together. Center the closed starting end of the leg over that join and sew it firmly to the toe cluster, covering as much of the toe join as possible.
Repeat for the second foot. Check them beside each other before attaching the legs to the body. Both center toes should point in the same direction and the side toes should mirror one another.
Crochet the Large Turkey Tail Feathers
The tail is the feature I wouldn't shrink. Nine separate feathers make the broad fan shown in the finished turkey. They stay flat and unstuffed so the fan can sit behind the body without becoming heavy.
Make 9 feathers in this color order when viewed from the front, left to right:
- Orange
- Dark brown
- Rust
- Mustard
- Deep red
- Deep red
- Orange
- Mustard
- Deep red
For each feather:
Ch 23.
Rnd 1: Hdc in second ch from hook and in next 20 ch. Work 3 hdc in last ch. Continue along the opposite side of the foundation chain and hdc in next 20 ch. Work 2 hdc into the same foundation ch that already holds the first hdc. Join with sl st to the first hdc. Sl st in the next st to reposition at the beginning of the first straight side. This repositioning sl st does not count as a stitch. (46)
Rnd 2: Ch 1; this ch does not count as a stitch. Hdc in the same st as the repositioning sl st and in next 19 sts. Work 2 hdc in each of next 3 sts. Hdc in next 20 sts. Work 2 hdc in each of final 3 sts. Join with sl st to the first hdc. (52)
Rnd 3: Ch 1; this ch does not count as a stitch. Hdc in the same st as the join and in next 19 sts. *Hdc in next st, 2 hdc in next st.* Repeat from * to * 3 times. Hdc in next 20 sts. *Hdc in next st, 2 hdc in next st.* Repeat from * to * 3 times. Join with sl st to the first hdc. (58)
FO and weave in the working end.
Using the same color, work a loose line of surface slip stitches along the center of each feather from the base toward the rounded tip. Stop about 1/2 inch before the tip. That center ridge gives each piece more of the feathered look shown in the example without adding another layer.
With the stated worsted weight yarn and 4 mm hook, each feather is expected to finish roughly 6 1/2 to 7 inches long and about 2 1/2 inches wide. Your exact size may vary because the feathers are worked mainly in half double crochet rather than the single crochet used for the pattern gauge.
Tail backing strip:
With medium brown, ch 37.
Row 1: Sc in second ch from hook and across. Ch 1, turn. (36)
Rows 2 through 5: Sc across. Ch 1, turn. (36)
Row 6: Sc across. (36)
FO and weave in the end.
Lay the 9-inch backing strip horizontally. Arrange the 9 feathers across it in the color order above. Feather 5, the deep red feather, is the true center feather. Place Feather 6, also deep red, immediately to its right and slightly lower.
Overlap the lower 1 to 1 1/2 inches of the feather bases substantially so all 9 attachment points fit across the backing strip. Space the centers of the feather bases approximately 1 inch apart. Let the upper portions spread away from one another as you angle the feathers outward into the fan.
Feather 5 should sit highest. Feather 6 should sit nearly as high beside it. Step the remaining feathers gradually lower as you work toward both outer edges. The completed fan should spread to approximately 16 to 17 inches across.
Using a separate length of medium brown yarn, sew each feather securely to the backing strip across its lower 1 to 1 1/2 inches. Add a second line of stitching through the overlapping bases. Keep the upper portions and tips free so they can spread into the fan.
Before assembly, you should have 28 crocheted pieces: 1 head, 1 beak, 1 wattle, 3 head feathers, 2 body panels, 2 arms, 2 legs, 6 toes, 9 tail feathers and 1 tail backing strip.
Assemble the Turkey Lovey
Lay everything out before you sew. With the long limbs and large tail, an attachment point that is a little off can make the whole turkey lean to one side.
1. Attach the tail to the back body panel.
Center the tail backing strip horizontally on the back panel with the top edge of the strip approximately 3 inches below the top edge of the body. At this level the widening body panel is broad enough to support the full 9-inch backing strip. Feather 5 should line up with the center of the body and rise behind the future head position.
Sew the backing strip firmly to the back panel along its top and bottom edges. Keep the loose upper portions of the feathers free from the body so they can spread into the layered fan.
2. Position the arms.
Lay the front body panel face up. Place one flattened arm end at each upper side, approximately 1 inch below the top corner of the panel.
Angle each arm downward slightly. The dark brown ends should fall near the lower sides of the body when the turkey is sitting.
Baste the flattened arm ends to the edge of the front panel.
3. Join the body panels.
Place the back panel behind the front panel with the edges aligned and the tail extending away from the back.
With the front panel facing you and the two panels aligned, join medium brown yarn at one upper side. Sc through both layers around the outside edge, working 1 sc in each stitch across the top and bottom edges and 1 sc into the end of each row along the side edges. Work through the basted arm ends when you reach them. The complete outside edge contains 102 possible joining positions: 12 across the top, 38 down one side, 14 across the bottom and 38 up the other side.
Stop with approximately 13 joining positions still unworked near one upper side. At the stated gauge, that leaves an opening of about 3 inches for stuffing. Do not fasten off yet.
Add a modest amount of stuffing to the upper third of the body, concentrating it beneath the head position. Gradually taper the stuffing as you move downward. Leave the lower half mostly flat.
Continue the single-crochet join across the remaining 13 positions to close the opening. Join to the first sc and fasten off.
4. Attach the legs.
Turn the assembled body so the back faces you. Position the two flattened 9-sc leg ends across the lower back of the body with the orange leg tubes pointing straight down beyond the lower edge. Place the legs close to the center rather than at the side seams, with the center of each leg approximately 1 1/4 to 1 1/2 inches to either side of the body center line.
Keep the two legs nearly parallel, angling them outward only slightly. The finished legs should appear to emerge from beneath the lower center of the body when the turkey is viewed from the front.
Using the long orange sewing tail from each leg, sew the complete flattened 9-sc upper edge firmly to the back body panel. Work through each of the 9 closed leg stitches and into the body fabric directly behind it. Sew back across the attachment once more for reinforcement, then secure and weave in the yarn tail.
5. Attach the head.
Center the head over the top of the body. The lower portion of the head should overlap the upper body by about 1 inch.
Pin it from several angles before sewing. Check that the eyes and beak face straight forward and that the center of the feather fan lines up behind the center of the head.
Sew the head to the body with medium brown yarn, working around the base of the head twice for a secure join.
6. Attach the crest.
Sew the deep red feather upright at the top center of the head. Add the mustard feather on the viewer's left and orange on the viewer's right. Angle both side feathers outward slightly.
The three feather bases should meet closely enough that no large gap shows between them.
7. Recheck the face.
Make sure the beak is centered between the embroidered eyes and the wattle hangs freely from the viewer's right side of the beak.
If the head shifted while you were attaching it, correct that now rather than trying to compensate by moving the crest or tail.
Finishing the Crochet Turkey Lovey
Weave in every remaining yarn end securely. Pay particular attention to the limb attachments, tail backing strip, beak and crest. Those areas take more handling than a decorative appliqué would.
Spread the turkey flat and arrange the tail feathers into their fan shape. Feather 5, the center deep red feather, sits highest. Feather 6 sits nearly as high beside it, with the remaining feathers stepping down toward the outer edges. If your yarn tolerates blocking, you can lightly shape the flat feathers according to the yarn manufacturer's care instructions. Don't stretch them longer.
Check the legs and feet next. The center toe on each foot should point forward, with the two shorter toes spreading to the sides. Adjust the toe joins with a few extra stitches if one foot twists.
The long medium brown sections of the arms should hang freely because they were left unstuffed. The dark brown ends should feel lightly padded rather than firm. At this stage, don't add any more stuffing to the arms.
Give the embroidered eyes a final check. They should be compact black satin-stitch ovals with no loose loops. Since this project is intended as a lovey, I would keep the face exactly as shown and skip plastic safety eyes, buttons and glued decorations.
Before calling him finished, remove every straight pin, locking stitch marker and piece of temporary basting yarn. Check the head, limbs, toes, crest, beak, wattle and tail one more time for loose yarn ends or unsecured joins.
The finished turkey should have a firmly shaped round head, a lightly filled upper torso, a mostly flat lower snuggler body, long floppy arms, long orange legs, oversized three-toed feet and that broad nine-feather tail behind him.
That's the whole bird. And yes, the tail is supposed to be that noticeable. A turkey's tail is not quite as impressive as a peacock's but you have to admit, it's pretty close.
When you click on links to various merchants on this site and make a purchase, this may result in this site earning a commission. This does not affect the price you pay.

UBGI Gold Standard 2026
Reviewed under the site's
editorial checklist.
Photos, decorating ideas, party setups and reader submissions are shared for inspiration unless a page is specifically presented as a pattern, tutorial, reference guide or step-by-step project. Follow the instructions, measurements, safety guidance and manufacturer directions provided for the particular project or product.
About Jan | Contact | Baby Nursery Ideas (Blog) | Site Map | Privacy Policy | Disclosure Policy | Disclaimer | Affiliate Disclosure | Earnings Disclosure | Facebook | Pinterest
I am a participant in the Amazon Services LLC Associates Program, an affiliate advertising program designed to provide a means for us to earn fees by linking to Amazon. As an Amazon Associate I earn from qualifying purchases.
Copyright © 2006-2026. All Rights Reserved.