Free Crochet Turkey Hat Pattern for Babies
By Jan Bay
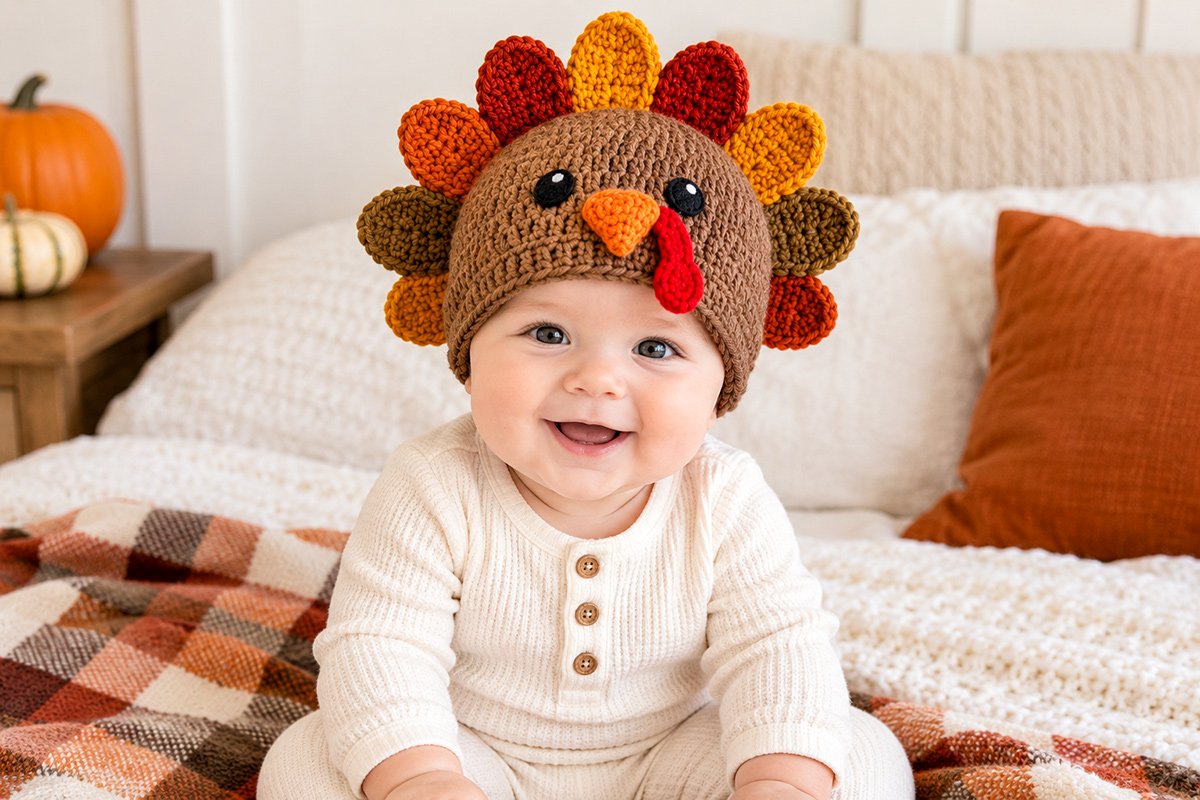
This free crochet turkey hat pattern is not just any baby hat designed to keep baby's head warm. This is a fun crochet project that adds a whole new dimension to holiday portraits. The warm brown cap, cheerful turkey face and colorful feathers make a memorable photo prop for a baby's first Thanksgiving portrait. Your little gobbler will look absolutely adorable.
Explore More Free Crochet Baby Patterns
Supplies for This Crochet Turkey Hat
Jump to:
Materials
I’m keeping the yarn choices fairly simple for this turkey hat. The brown cap does most of the work, and the feathers give you the color. You do not need nine different yarn colors just because there are nine feathers. Repeating a few good fall shades keeps the finished hat looking pulled together instead of busy.
Yarn: Worsted weight #4 acrylic or acrylic blend yarn is a practical choice for this pattern. Choose a yarn that gives you a firm enough fabric to hold the turkey face and feathers without making the hat stiff.
You’ll need:
• Warm medium brown for the hat body
• Mustard yellow for feathers
• Burnt orange for feathers and the beak
• Rust red for feathers
• Olive brown or muted olive for feathers
• Red for the wattle
• A small amount of black embroidery floss or black yarn for the eyes
• A very small amount of white embroidery floss for the eye highlights
Estimated yarn amounts:
Newborn: about 55 to 70 yards brown plus small amounts of the accent colors
0 to 3 months: about 65 to 80 yards brown plus small amounts of the accent colors
3 to 6 months: about 75 to 90 yards brown plus small amounts of the accent colors
6 to 12 months: about 85 to 105 yards brown plus small amounts of the accent colors
Those are calculated estimates rather than physically measured yarn totals. The feathers use very little yarn individually, so scraps from other fall projects should be plenty for most of the accent colors.
Hook: 5 mm crochet hook, or the size needed to match gauge.
You’ll also need:
• Yarn needle
• Small embroidery needle if you are using embroidery floss for the eyes
• Scissors
• Stitch marker
• Straight pins or locking stitch markers for temporary placement
• Flexible measuring tape
Do not use plastic safety eyes or buttons for the turkey face. The example hat uses stitched eyes with tiny white highlights, and I’m keeping that feature exactly as shown.
Finished Sizes
This pattern is written in four baby sizes. The measurements below are the intended finished hat measurements based on the gauge and stitch counts used in the pattern.
Newborn: approximately 12 1/2 inches around unstretched, about 5 inches tall
0 to 3 months: approximately 13 3/4 inches around unstretched, about 5 1/2 inches tall
3 to 6 months: approximately 14 3/4 inches around unstretched, about 6 inches tall
6 to 12 months: approximately 16 inches around unstretched, about 6 1/2 inches tall
The hat is meant to stretch gently for a snug fit. Crochet fabric varies quite a bit from one yarn and one crocheter to another, so measure the actual hat as you go instead of relying on the age label alone.
The turkey feathers sit around the upper crown and back of the hat. There are exactly nine feathers in the finished design. The center feather is the tallest, and the feathers become slightly shorter as they move toward each side. That graduated fan is one of the details I would not change. It gives the hat its shape without making the crown look like a row of identical tabs.
Gauge
14 half double crochet stitches = approximately 4 inches
10 half double crochet rounds or rows = approximately 4 inches
Check your gauge before you get too far into the hat. If your stitches are larger, the finished hat will be larger. If they are smaller, the hat will come out smaller.
I’d adjust the hook size before changing stitch counts. The face pieces and feather placement are written to match the finished proportions of the example hat, so keeping the hat body close to the intended measurements makes the rest of the pattern fit much more cleanly.
Abbreviations
This pattern uses U.S. crochet terminology.
The turning ch 1 used for the beak does not count as a stitch.
ch = chain
sc = single crochet
hdc = half double crochet
dc = double crochet
tr = treble crochet
sl st = slip stitch
st = stitch
sts = stitches
inc = increase, work 2 stitches in the same stitch
dec = decrease
rnd = round
rep = repeat
Unless a step says otherwise, the hat body is worked in continuous rounds. Use a stitch marker to mark the first stitch of each round and move it up as you work. That little marker saves a lot of recounting later.
Free Crochet Turkey Hat Pattern
Start with the brown hat. The turkey face and feathers are added after the beanie is finished, so don't start sewing anything on yet.
The hat is worked from the top down in continuous rounds. Keep the beginning of each round marked. I would treat that marker as the center back of the finished hat. That gives us one reliable reference point when it's time to place the face and the nine feathers.
Round 1: Make a magic ring. Work 8 hdc into the ring. Do not join. Place marker in the first stitch. 8 sts
Round 2: Work 2 hdc in each stitch around. 16 sts
Round 3: *Hdc in next stitch, 2 hdc in next stitch.* Repeat around. 24 sts
Round 4: *Hdc in next 2 stitches, 2 hdc in next stitch.* Repeat around. 32 sts
Round 5: *Hdc in next 3 stitches, 2 hdc in next stitch.* Repeat around. 40 sts
Newborn only, Round 6: *Hdc in next 9 stitches, 2 hdc in next stitch.* Repeat 4 times. 44 sts
0 to 3 months, 3 to 6 months and 6 to 12 months, Round 6: *Hdc in next 4 stitches, 2 hdc in next stitch.* Repeat 8 times. 48 sts
0 to 3 months: Stop increasing here. Continue with the body rounds below.
3 to 6 months, Round 7: *Hdc in next 11 stitches, 2 hdc in next stitch.* Repeat 4 times. 52 sts
6 to 12 months, Round 7: *Hdc in next 5 stitches, 2 hdc in next stitch.* Repeat 8 times. 56 sts
Body rounds: Work 1 hdc in each stitch around with no further increases, continuing to move the beginning-of-round marker up as you work.
Continue until the hat measures approximately:
Newborn: 4 1/2 inches from the center top of the crown
0 to 3 months: 5 inches
3 to 6 months: 5 1/2 inches
6 to 12 months: 6 inches
Measure straight down from the center top of the crown to the working edge. Don't stretch the fabric while you measure it.
The stitch counts give calculated finished circumferences close to the sizes listed earlier when the pattern gauge is maintained. Your actual yarn and tension can move those measurements a little, so the finished measurement matters more than the age printed beside it.
Lower edge, Round 1: Sc in each stitch around.
Lower edge, Round 2: Sc in each stitch around. Sl st into the next stitch, fasten off and weave in the end.
Those two single crochet rounds give the hat the narrow, neat lower edge shown in the example image. I wouldn't add a deep ribbed band here. It would change the look of the finished hat quite a bit.
Make the Crochet Turkey Face
Keep the face small. The feathers are already giving this hat plenty of personality, and a huge beak or wattle would take it straight into costume territory. The example has a compact face with quite a bit of brown hat still showing around it.
Lay the hat flat with the center back marker at the back. The point directly opposite that marker is the center front. Mark that spot temporarily with a scrap of yarn.
Eye placement:
Place the two eye centers approximately:
Newborn: 1 1/2 inches above the lower edge and about 1 1/4 inches apart
0 to 3 months: 1 3/4 inches above the lower edge and about 1 1/2 inches apart
3 to 6 months: 2 inches above the lower edge and about 1 3/4 inches apart
6 to 12 months: 2 1/4 inches above the lower edge and about 2 inches apart
Keep both eyes level with each other and centered around the center front mark.
Embroidered eyes: Using black embroidery floss or a short length of black yarn, work several closely packed satin stitches to form a small rounded oval for each eye. Aim for about 3/8 inch across on the two smaller sizes and no more than about 1/2 inch across on the larger sizes.
Add one or two tiny white stitches near the upper part of each black eye for the little highlights shown in the example. Secure all embroidery ends firmly on the inside of the hat.
There are no plastic safety eyes on this design.
Orange beak:
Ch 2.
Row 1: Work 2 sc in the second chain from the hook. Ch 1 and turn. 2 sts
Row 2: Work 2 sc in each stitch. Ch 1 and turn. 4 sts
Row 3: Sc in each stitch across. 4 sts
Fasten off, leaving a long sewing tail.
The starting end forms the point of the beak and the four stitch edge forms the top. Pin the beak between and slightly below the eyes with the point facing down.
Before sewing the entire edge flat, pinch the middle of the beak forward just a little. Sew the upper edge and sides securely while allowing that center to stand slightly away from the hat. You only need a little dimension. Don't stuff it.
Red wattle:
Ch 6.
Beginning in the second chain from the hook, work 2 sc in the first chain, sc in the next chain, hdc in the next, dc in the next and 5 dc in the final chain.
Turn the work so you can crochet back along the unused loops on the opposite side of the starting chain. Work dc in the next loop, hdc in the next, sc in the next and 2 sc in the final loop. Sl st at the base.
Fasten off, leaving a long tail.
This makes the small curved teardrop shape shown on the finished hat. Attach only the narrow upper end beside the beak so the rounded lower portion hangs naturally.
Place the wattle on the wearer's left side of the beak. From the front, it will appear on the right side of the turkey's face, just as it does in the example image.
Crochet the Nine Turkey Feathers
The feather fan is the detail I want kept consistent from one hat to the next. There are exactly nine separate feathers. The center feather is tallest, then the heights step down as the fan moves toward the sides.
The colors also have a fixed order. Looking at the finished hat from the front, work from the lower left side of the fan across the crown to the lower right side:
Feather 1: burnt orange, short
Feather 2: olive brown, short medium
Feather 3: burnt orange, medium
Feather 4: rust red, tall
Feather 5: mustard or golden yellow, tallest center feather
Feather 6: rust red, tall
Feather 7: mustard or golden yellow, medium
Feather 8: olive brown, short medium
Feather 9: rust red, short
The colors aren't perfectly mirrored. Keep that. The slight asymmetry is part of the finished look.
For newborn and 0 to 3 month hats: use the smaller feather sizes noted below.
For 3 to 6 month and 6 to 12 month hats: use the full feather sizes.
For every feather, fasten off leaving a long sewing tail for assembly.
Short Feather, full size
Ch 5. Beginning in the second chain from the hook, work sc, hdc, dc, then 5 dc in the last chain.
Continue down the unused loops on the opposite side of the foundation chain: dc, hdc, sc. Sl st at the base. Fasten off with a long sewing tail.
Short Feather, smaller size: Ch 4. Work sc, hdc and 5 dc in the final chain. Continue down the opposite side with hdc, sc. Sl st at the base and fasten off.
Short Medium Feather, full size
Ch 6. Beginning in the second chain from the hook, work sc, hdc, dc, dc, then 5 dc in the final chain.
Continue down the opposite side: dc, dc, hdc, sc. Sl st at the base and fasten off.
Short Medium Feather, smaller size: Use the full size Short Feather instructions.
Medium Feather, full size
Ch 7. Beginning in the second chain from the hook, work sc, hdc, dc, tr, dc, then 5 dc in the final chain.
Continue down the opposite side: dc, tr, dc, hdc, sc. Sl st at the base and fasten off.
Medium Feather, smaller size: Use the full size Short Medium Feather instructions.
Tall Feather, full size
Ch 8. Beginning in the second chain from the hook, work sc, hdc, dc, tr, tr, dc, then 5 dc in the final chain.
Continue down the opposite side: dc, tr, tr, dc, hdc, sc. Sl st at the base and fasten off.
Tall Feather, smaller size: Use the full size Medium Feather instructions.
Tallest Center Feather, full size
Ch 9. Beginning in the second chain from the hook, work sc, hdc, dc, tr, tr, tr, dc, then 5 dc in the final chain.
Continue down the opposite side: dc, tr, tr, tr, dc, hdc, sc. Sl st at the base and fasten off.
Tallest Center Feather, smaller size: Use the full size Tall Feather instructions.
As you finish each feather, gently shape it into a rounded leaf rather than stretching it into a long point. The five double crochets worked around the end of the starting chain make the rounded top visible in the example.
Don't block the feathers flat and wide. They should have enough body to stand behind the crown while still looking soft.
Assemble the Turkey Hat
Don't sew the feathers on one at a time without arranging the whole fan first. Pin all nine in place and look at the hat from the front. This is much easier than discovering after number eight that the whole fan has wandered to one side.
Turn the hat so the face is pointing away from you and the center back marker is facing you.
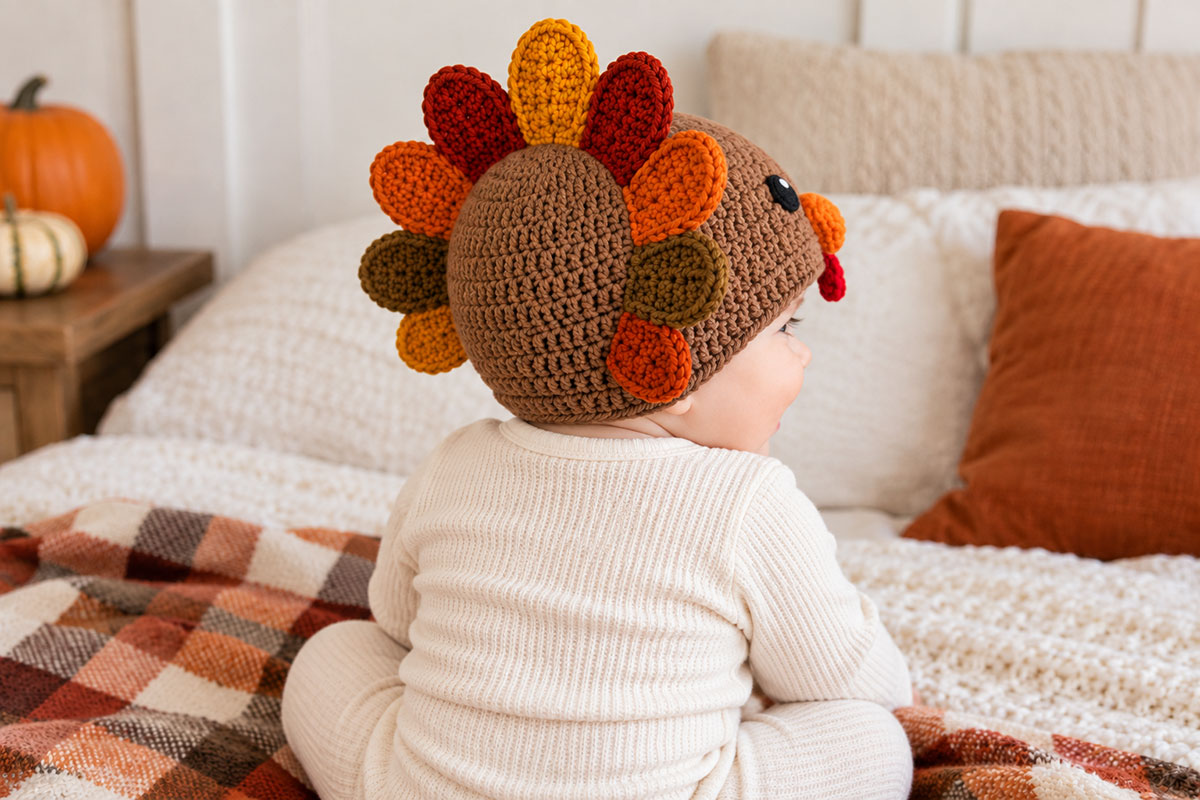
Because the feathers are numbered while looking at the hat from the front, the order reverses when you look at the back. From the back, Feather 9 is at your left, Feather 5 is centered and Feather 1 is at your right.
Place Feather 5, the tallest golden yellow feather, at the center back. Its base should sit near the transition between the increased crown and the straight body of the hat.
Place Feathers 4 and 6 immediately to either side. Their tops should finish just below the top of Feather 5.
Add Feathers 3 and 7 next, then Feathers 2 and 8.
Finish with Feathers 1 and 9 at the outer edges of the fan. Let those outer feathers sit slightly lower on the sides of the crown. That is what gives the finished fan its rounded turkey tail shape instead of making it look like a straight row across the top.
Before sewing, check the hat from the back and both sides. The outer feathers should wrap lower around the sides of the cap than the center feathers, while the center feather remains the highest point of the fan.
The bases can overlap slightly. The feather tops should remain separate and easy to see.
Once you're happy with the fan, sew each feather firmly to the hat through the lower portion of the feather. I would secure roughly the bottom third rather than stitching all the way to the rounded top. The free upper portion can then stand naturally behind the crown.
Keep the sewing stitches small and work through the hat fabric without pulling tightly enough to pucker the brown cap.
Check the hat again from the front before weaving in the final tails. You should see a graduated fan with the golden center feather highest, the two rust feathers beside it and progressively shorter feathers moving toward both sides.
Now check the face. The beak should be centered between the eyes, the red wattle should fall from the wearer's left side of the beak, and neither piece should pull the front of the hat out of shape.
Weave in every remaining yarn and embroidery end securely on the inside.
Choosing the Right Baby Hat Size
Age is only a starting point for choosing a hat size. If you can measure the baby's head, use that measurement instead.
Measure around the widest part of the head, passing the tape above the eyebrows and around the fullest part at the back. Keep the tape comfortably snug rather than pulling it tight.
The finished hat should be a little smaller than the actual head measurement because the crochet fabric stretches. You don't want so much negative ease that the face stretches sideways or the feather fan gets pulled out of shape.
The Craft Yarn Council head circumference chart is also useful when you need general sizing guidance rather than a measurement for one particular baby.
If you're between sizes, I would compare your actual finished circumference to the baby's head before adding the turkey face. It's much easier to adjust the brown hat while it's still plain.
Don't try to fix a hat that's too large by sewing the face and feathers more tightly. Fix the hat size itself.
Turkey Hat Pattern Tips
Keep the feathers firm. If your feather motifs are floppy, try making them with slightly tighter tension before changing the design. They need enough structure to show behind the crown.
Lay out the entire face before sewing. Mark both eye positions first, then pin the beak and wattle in place. A quarter inch can make a surprising difference on a baby hat.
Keep the center feather centered. Use the beginning of round marker as your center back reference. Once Feather 5 is right, build the rest of the fan outward from it.
Don't add more feathers. Nine is intentional. The graduated nine feather fan gives the hat a full turkey tail without burying the brown crown.
Don't enlarge the wattle. The little curved red teardrop is enough. A long, heavy wattle can pull forward and compete with the baby's face.
Skip plastic eyes. The black satin stitched eyes with their tiny white highlights are part of this design, and there isn't any reason to replace them with hard pieces.
If you'd like another fall hat after this one, my free crochet pumpkin baby hat pattern gives you a completely different look without leaving the fall theme.
You can also pair the hat with the crochet turkey lovey pattern. I would coordinate the colors, but I wouldn't try to make the two projects identical. The hat's nine feather crown is its own design feature.
And if you're putting together a whole fall baby set, the crochet pumpkin diaper cover pattern is another project you can mix into the same seasonal group.
Frequently Asked Questions
Can I use cotton yarn for the turkey hat?
Yes, provided you can match the gauge and the finished fabric has enough stretch for a comfortable hat. Cotton can behave differently from acrylic, so I would make a gauge swatch before committing to the finished size.
Can I make all nine feathers the same size?
You can, but it won't reproduce the example hat. This design uses graduated feathers with the center feather tallest and progressively shorter feathers toward the sides.
Can I change the feather colors?
Of course. If you want the finished hat to match this pattern's example, keep the mustard yellow, olive brown, burnt orange and rust red arrangement given above. If you're using the pattern as a starting point for your own color version, I'd still keep the graduated nine feather construction.
Why are the turkey's eyes embroidered instead of crocheted circles or safety eyes?
The small satin stitched eyes are lighter and flatter against the hat, and they reproduce the face shown in the example without adding hard plastic pieces.
Can I add earflaps?
You can modify the hat, but earflaps aren't part of this finished design. They would noticeably change the silhouette. If your goal is to reproduce the example, stop after the two narrow single crochet edging rounds.
Before Baby Wears the Hat
Give the finished hat one last inspection before you put it on a baby. Remove every straight pin, temporary stitch marker and placement marker. Tug gently on each feather, the beak and the wattle to make sure every piece is sewn down securely. Check the inside too. There shouldn't be any long yarn tails, loose embroidery ends or bulky knots that could rub against the baby's head.
The embroidered eyes should stay flat against the brown hat. The beak is slightly dimensional, but it isn't stuffed, and the wattle is attached securely at its narrow upper end.
I would also check the fit again after all nine feathers are attached. They shouldn't make the hat tip backward or pull the crown out of shape. If they do, the first thing to check is whether the feather bases were sewn too high or whether too much of each feather was left unsupported.
This is a dress-up hat, photo hat and cool-weather accessory. Remove it before sleep and whenever a baby is unattended.
Washing and Reshaping the Turkey Hat
Follow the care instructions for the yarn you used. Because this hat has sewn-on feathers and embroidered details, I would use a gentle wash rather than treating it like an ordinary plain beanie.
After washing, reshape the brown cap while it's damp. Then straighten the nine feathers with your fingers and restore the graduated fan before laying the hat flat to dry.
Pay particular attention to the center feather. It should remain the tallest point in the fan, with the remaining feathers stepping down toward the sides.
Don't stretch the feather motifs while they're wet. Their rounded proportions are part of the design.
More Fall Crochet Projects for Baby
If you're making this for Thanksgiving, you can build a little group of fall projects without making every piece look exactly alike.
The crochet turkey lovey pattern keeps the turkey theme going in a completely different form. I would coordinate a few of the yarn colors and stop there. The nine-feather crown belongs to this hat.
For another wearable fall project, try the free crochet pumpkin hat pattern. It has its own ribbed pumpkin shape, stem, leaf and vine, so the two hats don't feel like the same pattern with different decorations.
You can also make the crochet pumpkin diaper cover pattern if you want another handmade piece for fall photos or a seasonal baby outfit.
One Last Look at the Finished Turkey Hat
The finished hat should still read as a simple brown baby beanie first. The turkey face stays compact on the front, and the feather fan adds the fun at the crown without swallowing the whole hat.
Before you call it finished, look for the details that define this particular design: nine separate rounded feathers, a taller center feather, gradually shorter feathers toward the sides, the fixed fall color arrangement, small embroidered eyes with white highlights, a compact orange beak and the little red teardrop wattle beside it.
Be careful to check as you go and keep those details intact so the finished hat follows the same design shown in the example image. It's easier to correct things early than wait until the last stitch. In fact, if there is one takeaway that I would like for you to have, that's it. Get in the habit of correcting as you go.
When you click on links to various merchants on this site and make a purchase, this may result in this site earning a commission. This does not affect the price you pay.

UBGI Gold Standard 2026
Reviewed under the site's
editorial checklist.
Photos, decorating ideas, party setups and reader submissions are shared for inspiration unless a page is specifically presented as a pattern, tutorial, reference guide or step-by-step project. Follow the instructions, measurements, safety guidance and manufacturer directions provided for the particular project or product.
About Jan | Contact | Baby Nursery Ideas (Blog) | Site Map | Privacy Policy | Disclosure Policy | Disclaimer | Affiliate Disclosure | Earnings Disclosure | Facebook | Pinterest
I am a participant in the Amazon Services LLC Associates Program, an affiliate advertising program designed to provide a means for us to earn fees by linking to Amazon. As an Amazon Associate I earn from qualifying purchases.
Copyright © 2006-2026. All Rights Reserved.