Crochet Deer Lovey Pattern for a Woodland Doe and Fawn Lovey Blanket
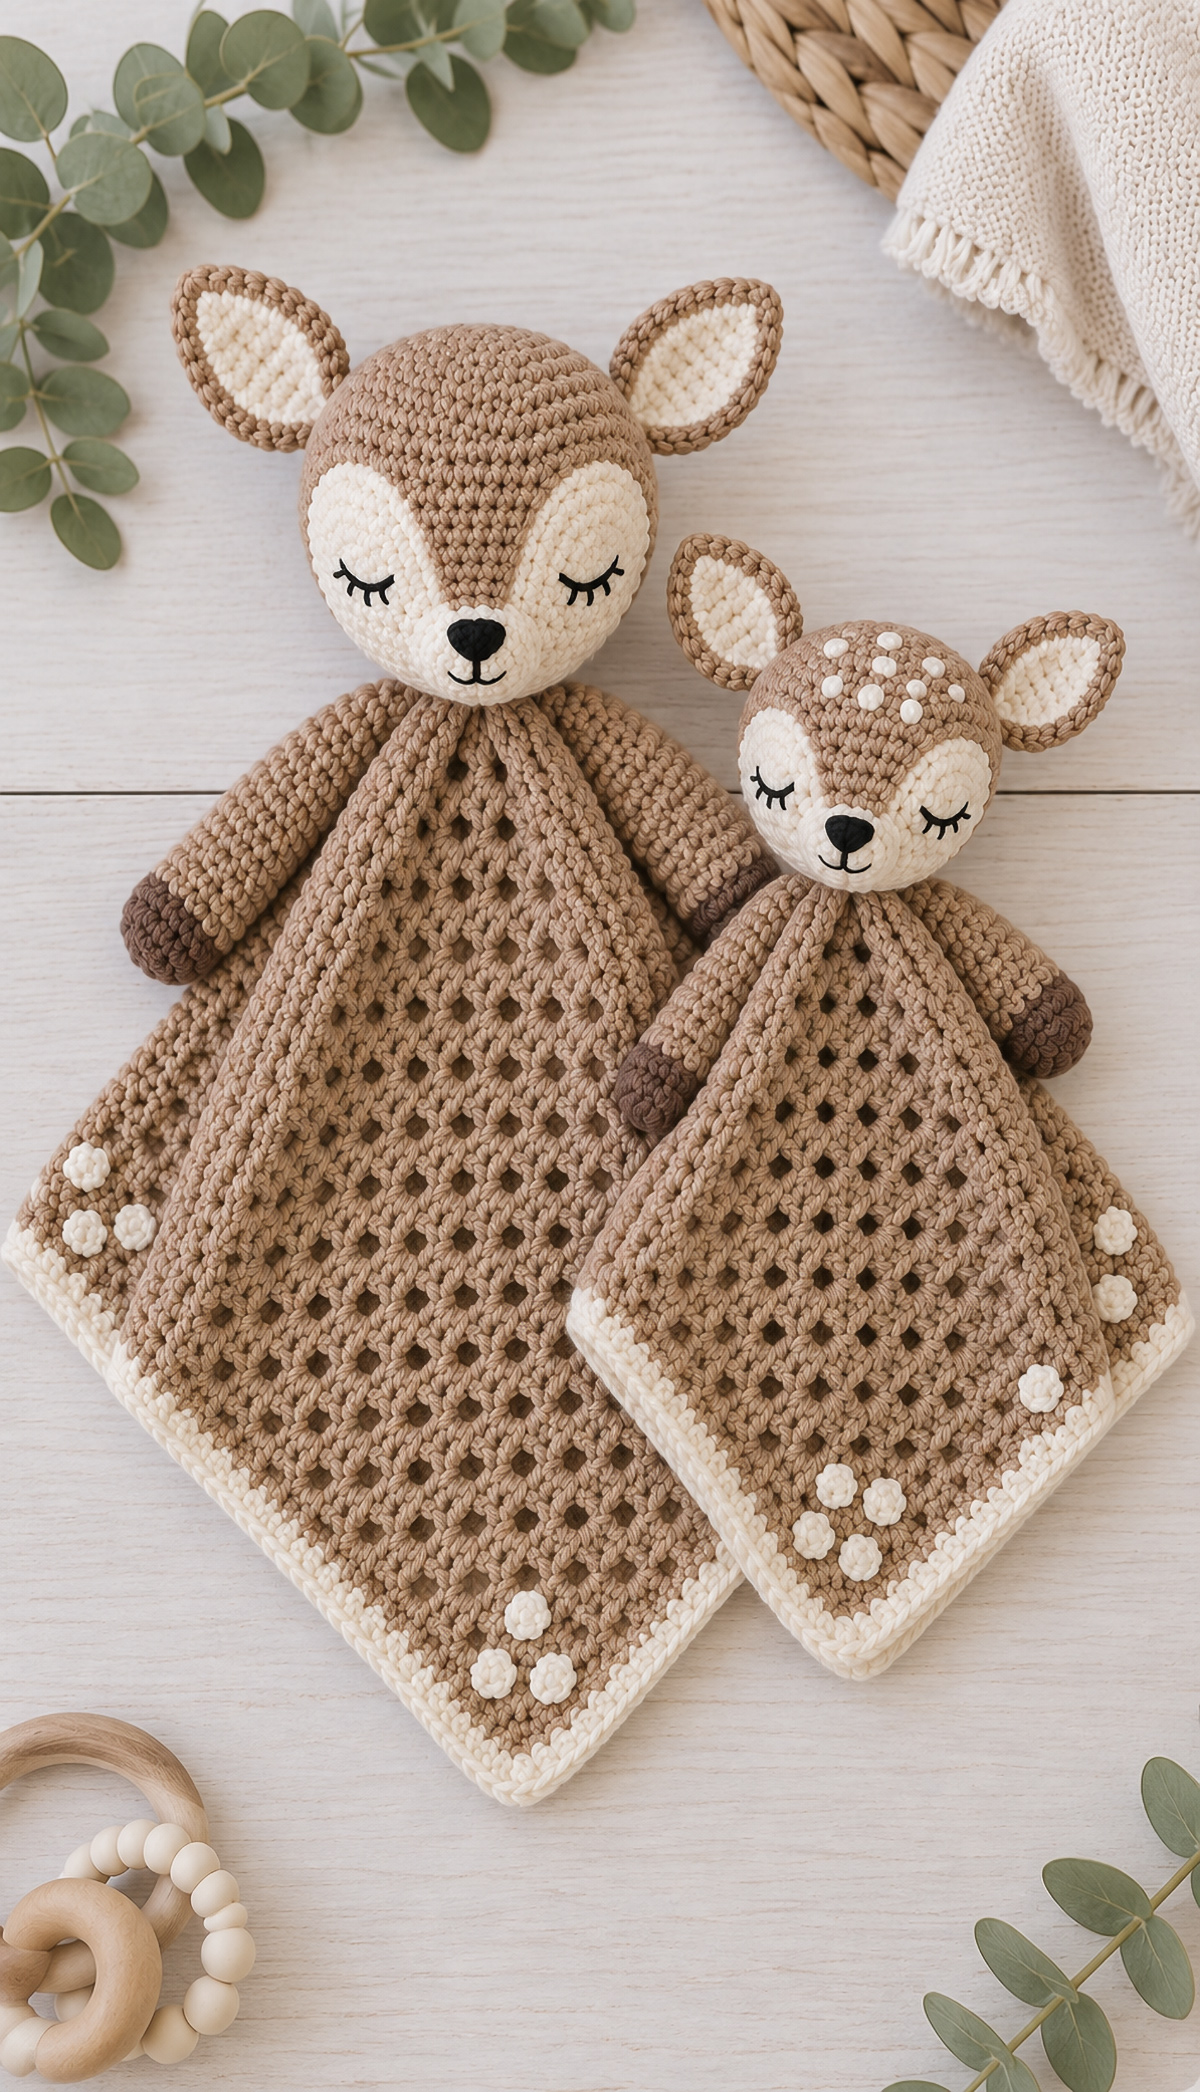
This crochet deer lovey pattern creates a woodland doe and fawn lovey blanket with simple deer details and a design that fits naturally into a woodland nursery. I like this project because it does more than make another stuffed animal; it gives a baby gift, a nursery accent and a little handmade woodland keepsake all in one pattern.
More woodland crochet and nursery ideas:

Supplies for this deer lovey pattern:
Baby Yarn in the Correct Weight for Crochet Lovey Patterns
Materials
- Worsted weight baby yarn in tan
- Worsted weight baby yarn in cream
- Small amount of dark brown embroidery floss for eyes and nose
- Small amount of darker brown yarn for hooves
- 4.0 mm crochet hook for blankets
- 3.5 mm crochet hook for heads, ears, cream face panels, arms, tails and spots
- Polyfill stuffing
- Yarn needle
- Stitch marker
- Straight pins
- Scissors
Finished Size
- Woodland doe lovey: approximately 15 to 16 inches tall
- Woodland fawn lovey: approximately 11 to 12 inches tall
Measure each finished lovey from the top of the head to the lower blanket point. The doe is intentionally larger than the fawn. Finished measurements may vary with yarn thickness, tension, blocking and the amount of blanket fabric overlapped behind the head.
Skill level: Advanced beginner. This pattern uses continuous rounds, increases, decreases, flat pieces worked around both sides of a starting chain, joined granny-square rounds, embroidery and sewn assembly.
Gauge and fabric checkpoint: An exact gauge is not required, but the head and arm stitches must be tight enough that stuffing does not show through. The granny squares should lie flat without heavy rippling or cupping. Use a smaller hook if stuffed pieces have visible gaps, or adjust the blanket hook if the granny squares do not lie flat.
This crochet deer lovey pattern is built as a doe and fawn set rather than a single amigurumi deer. The larger version gives the crochet deer pattern its woodland doe look, while the smaller version turns the same idea into a baby fawn lovey.
If you only want one finished project from this crochet deer lovey pattern, make the fawn version first. It is smaller, faster and easier to finish before making the larger doe from the same crochet deer pattern.
If you want a flat fawn motif instead of a full lovey, use my crochet deer applique pattern for baby blankets, nursery decor and handmade woodland gifts.
Abbreviations
- MR = magic ring
- ch = chain
- sl st = slip stitch
- sc = single crochet
- hdc = half double crochet
- dc = double crochet
- inc = 2 sc in the same stitch
- dec = single crochet 2 stitches together
- st = stitch
- sts = stitches
- FO = fasten off
The heads, arms and tails are worked in continuous rounds. Use a stitch marker to mark the first stitch of each round. The cream face panels are worked as flat ovals around both sides of a starting chain. The blanket spots and forehead spots are joined only where a slip-stitch join is specifically written.
Stitch-count note: A beginning ch 1 does not count as a stitch. The beginning ch 3 in each granny-square round counts as the first dc. Slip stitches used to join a round or move into a corner space do not count as stitches.
Secure magic-ring centers: After completing at least two rounds of each stuffed piece, pull the starting tail firmly to close the magic ring. Thread the tail onto a yarn needle, weave it beneath several stitches on the inside of the piece, then reverse direction through a different group of stitches to secure it. Do this before stuffing and closing the heads, arms and tails. For the small flat forehead and blanket spots, secure the starting tail on the wrong side before sewing the spot in place. Check that each center stays closed when gently pulled. Do not leave loose starting tails or rely only on tightening the magic ring.
Baby Safety Note
This crochet deer pattern is written for a baby lovey. Embroider all facial features. Do not use safety eyes, buttons, beads, glued embellishments or other detachable decorations.
This handmade lovey is for supervised, awake use only. Do not place it in a crib, bassinet, play yard or other infant sleep space, and do not leave it with a sleeping or unattended baby.
Before every use, check the head, ears, arms, tail, spots and embroidered features. Remove the lovey from use if any seam, yarn end or attached piece becomes loose, worn or damaged.
Keep every detail securely stitched, washable and free of long loose yarn ends. For current infant sleep and product-safety guidance, visit the U.S. Consumer Product Safety Commission Safe Sleep page.
No plastic eyes, buttons, beads or glued decorations belong on this baby lovey.
Crochet Deer Lovey Pattern: Woodland Doe Head
Use tan yarn and a 3.5 mm hook.
- Round 1: 6 sc in MR. (6)
- Round 2: inc in each st around. (12)
- Round 3: [sc in next st, inc] 6 times. (18)
- Round 4: [sc in next 2 sts, inc] 6 times. (24)
- Round 5: [sc in next 3 sts, inc] 6 times. (30)
- Round 6: [sc in next 4 sts, inc] 6 times. (36)
- Round 7: [sc in next 5 sts, inc] 6 times. (42)
- Rounds 8-13: sc in each st around. (42)
- Round 14: [sc in next 5 sts, dec] 6 times. (36)
- Round 15: [sc in next 4 sts, dec] 6 times. (30)
- Round 16: [sc in next 3 sts, dec] 6 times. (24)
- Round 17: [sc in next 2 sts, dec] 6 times. (18)
Stuff the head firmly enough to hold a round shape, but do not pack it so tightly that the stitches stretch open.
- Round 18: [sc in next st, dec] 6 times. (12)
- Round 19: dec 6 times. (6)
FO, leaving a tail. Thread the tail through the front loops of the final 6 stitches, pull closed and weave in.
Checkpoint: The doe head should be round and plain with no forehead spots. If it looks pointy at the bottom, remove a little stuffing and reshape it before closing.
Woodland Fawn Head
Use tan yarn and a 3.5 mm hook.
- Round 1: 6 sc in MR. (6)
- Round 2: inc in each st around. (12)
- Round 3: [sc in next st, inc] 6 times. (18)
- Round 4: [sc in next 2 sts, inc] 6 times. (24)
- Round 5: [sc in next 3 sts, inc] 6 times. (30)
- Round 6: [sc in next 4 sts, inc] 6 times. (36)
- Rounds 7-11: sc in each st around. (36)
- Round 12: [sc in next 4 sts, dec] 6 times. (30)
- Round 13: [sc in next 3 sts, dec] 6 times. (24)
- Round 14: [sc in next 2 sts, dec] 6 times. (18)
Stuff the head. Keep the shape round and slightly smaller than the doe head.
- Round 15: [sc in next st, dec] 6 times. (12)
- Round 16: dec 6 times. (6)
FO, leaving a tail. Thread the tail through the front loops of the final 6 stitches, pull closed and weave in.
Checkpoint: The fawn head should be smaller than the doe head and round enough to hold the forehead spots later.
Cream Face Panels for the Two-Tone Deer Face
The finished doe and fawn each have two cream face panels rather than one small cream muzzle. These elongated panels create the two-tone deer face shown in the finished design. Make two matching panels for each deer. Keep them flat and do not stuff them.
Larger Doe Face Panels
Make 2 in cream with a 3.5 mm hook. Work in continuous rounds around both sides of the starting chain.
- Round 1: ch 8. Sc in 2nd ch from hook, sc in next 5 ch, 3 sc in last ch. Working along the other side of the starting chain, sc in next 5 ch, 2 sc in last ch. (16)
- Round 2: inc in first st, sc in next 5 sts, inc in each of next 3 sts, sc in next 5 sts, inc in each of next 2 sts. (22)
- Round 3: sc in each st around. (22)
FO, leaving a long tail for sewing. Do not stuff.
Face-panel math check: Round 1 creates 16 stitches. Round 2 adds 6 stitches, bringing the count to 22. Round 3 keeps the count at 22.
Shape checkpoint: Each doe panel should be a flat elongated oval. The long dimension will run diagonally from the upper cheek toward the center of the nose when the face is assembled.
Smaller Fawn Face Panels
Make 2 in cream with a 3.5 mm hook. Work in continuous rounds around both sides of the starting chain.
- Round 1: ch 6. Sc in 2nd ch from hook, sc in next 3 ch, 3 sc in last ch. Working along the other side of the starting chain, sc in next 3 ch, 2 sc in last ch. (12)
- Round 2: inc in first st, sc in next 3 sts, inc in each of next 3 sts, sc in next 3 sts, inc in each of next 2 sts. (18)
- Round 3: sc in each st around. (18)
FO, leaving a long tail for sewing. Do not stuff.
Face-panel math check: Round 1 creates 12 stitches. Round 2 adds 6 stitches, bringing the count to 18. Round 3 keeps the count at 18.
Shape checkpoint: The fawn panels should have the same elongated oval shape as the doe panels but remain noticeably smaller.
Ears
Each deer has two layered ears with a tan outer ear and a smaller cream inner ear. The ears are worked around both sides of a short starting chain instead of being narrowed sharply in rows. This gives the finished ears a broader rounded deer-ear shape with a gently curved tip.
Pattern correction: This ear construction replaces the earlier tapered-row version. The revised stitch counts and construction have been checked, but this corrected ear section has not yet been physically test-crocheted.
For every ear below, work into the unused loops along the opposite side of the starting chain when instructed. Slip stitches used to join do not count as stitches. For each ear piece, the side facing you when you complete Round 1 and make the slip-stitch join is the right side. Keep that side facing up when assembling the layered ears.
Larger Doe Outer Ears
Make 2 in tan with a 3.5 mm hook.
- Ch 6.
- Round 1: Sc in 2nd ch from hook, hdc in next ch, dc in next 2 ch, 5 dc in last ch. Working along the unused loops on the opposite side of the starting chain, dc in next 2 ch, hdc in next ch, 3 sc in final ch. Sl st to first sc. (15 sts)
FO, leaving a long tail for sewing.
Shape checkpoint: The outer ear should be a flat rounded leaf or deer-ear shape. One end will be broader and more rounded from the 5 dc group, while the lower edge remains wide enough to attach securely to the head. It should not look like a narrow triangle.
Larger Doe Inner Ears
Make 2 in cream with a 3.5 mm hook.
- Ch 5.
- Round 1: Sc in 2nd ch from hook, hdc in next ch, dc in next ch, 4 dc in last ch. Working along the unused loops on the opposite side of the starting chain, dc in next ch, hdc in next ch, 3 sc in final ch. Sl st to first sc. (12 sts)
FO, leaving a long tail for sewing.
Center one cream inner ear on the right side of each tan outer ear. Keep a visible tan margin around the cream piece, with the rounded ends pointing in the same direction.
Using the cream sewing tail, whip stitch the inner ear securely to the outer ear. Do not stretch either piece while sewing.
Doe ear checkpoint: The finished ear should remain broad through the lower half and curve into a rounded upper end. The cream center should sit flat inside the tan outer ear.
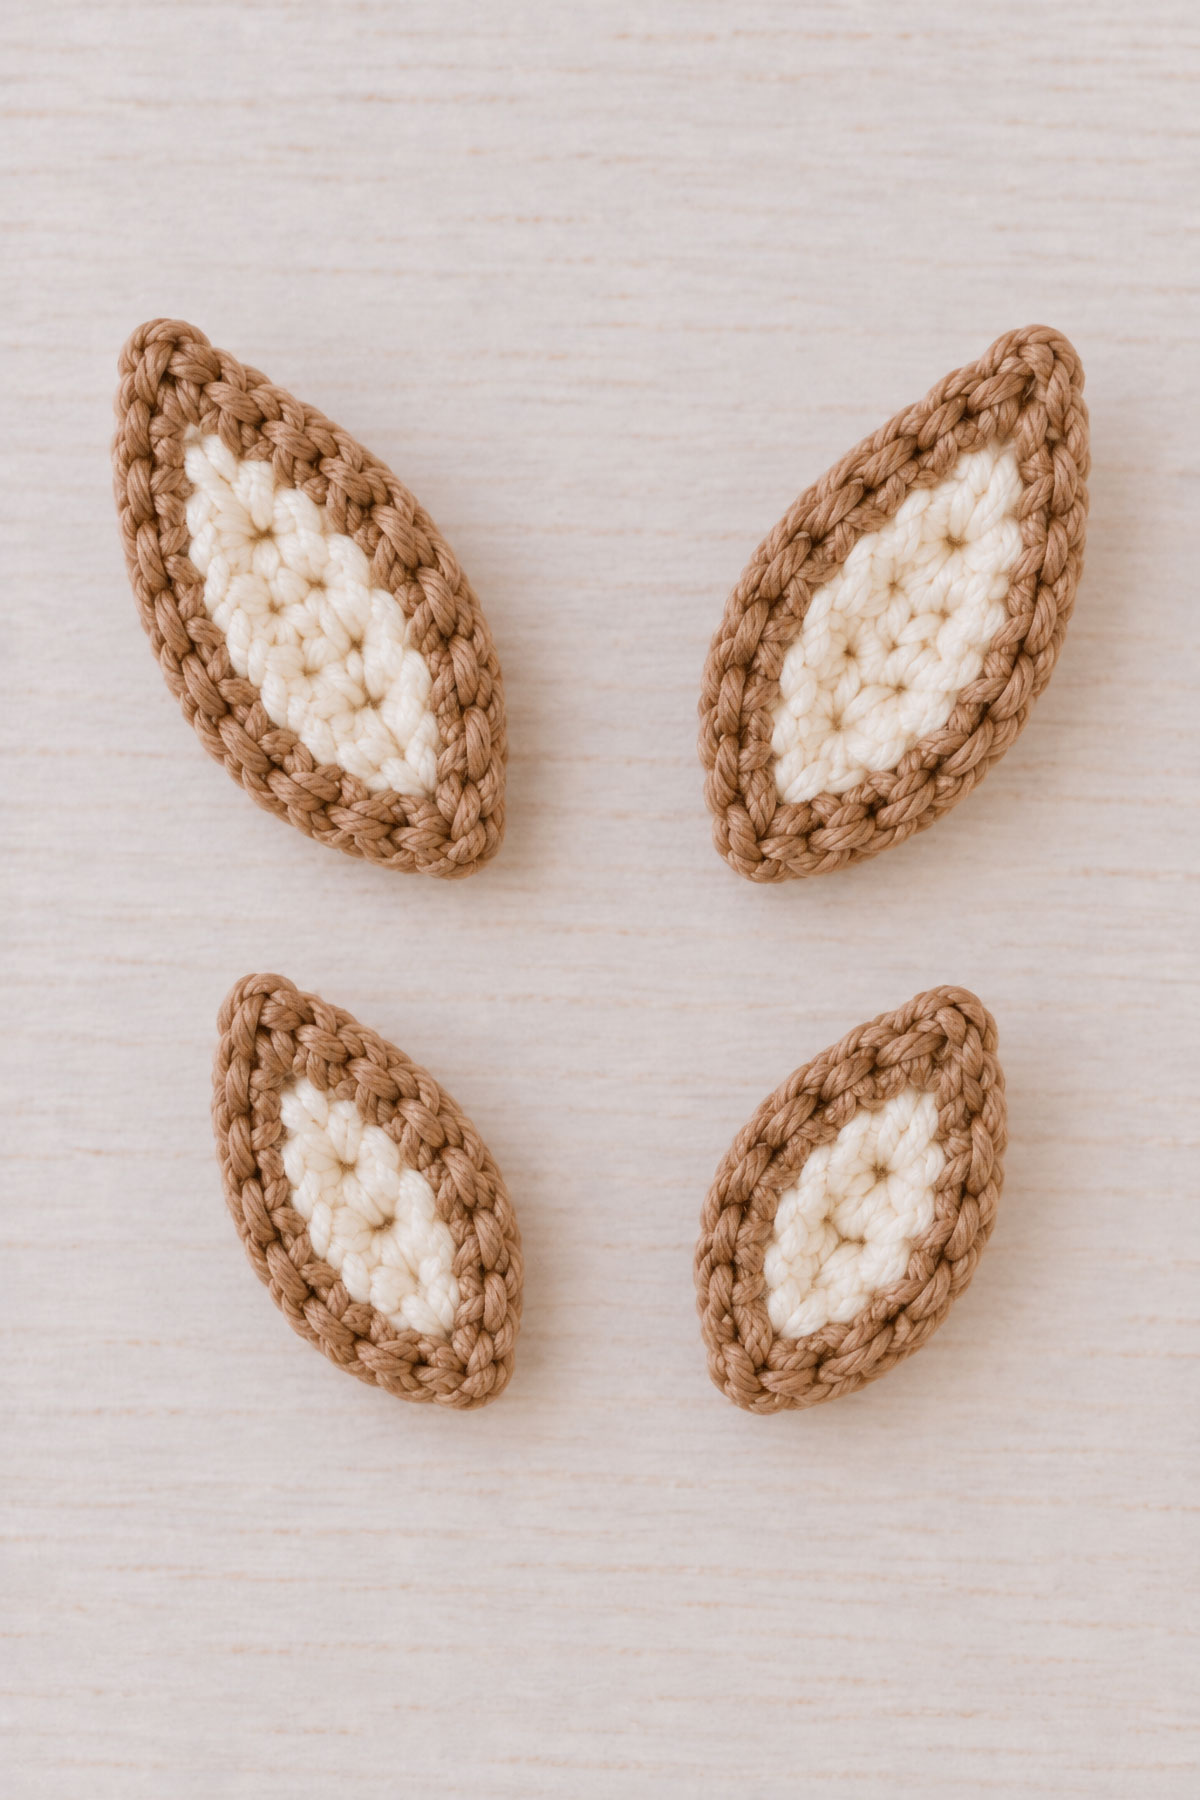
Smaller Fawn Outer Ears
Make 2 in tan with a 3.5 mm hook.
- Ch 5.
- Round 1: Sc in 2nd ch from hook, hdc in next ch, dc in next ch, 4 dc in last ch. Working along the unused loops on the opposite side of the starting chain, dc in next ch, hdc in next ch, 3 sc in final ch. Sl st to first sc. (12 sts)
FO, leaving a long tail for sewing.
Shape checkpoint: The fawn outer ear should have the same rounded deer-ear shape as the doe ear but should be noticeably smaller. It should be broad near the attachment edge and gently rounded at the upper end rather than sharply pointed.
Smaller Fawn Inner Ears
Make 2 in cream with a 3.5 mm hook.
- Ch 4.
- Round 1: Sc in 2nd ch from hook, hdc in next ch, 4 dc in last ch. Working along the unused loops on the opposite side of the starting chain, hdc in next ch, 3 sc in final ch. Sl st to first sc. (10 sts)
FO, leaving a long tail for sewing.
Center one cream inner ear on the right side of each tan outer ear. Leave an even tan margin visible around the cream piece.
Using the cream sewing tail, whip stitch the inner ear securely to the outer ear. Do not pull tightly enough to cup or distort either piece.
Fawn ear checkpoint: The completed fawn ears should look like smaller versions of the doe ears: broad at the lower edge, softly rounded toward the top and clearly different from long rabbit ears.
Arms
The arms are simple tubes with darker hooves. Stuff only the lower half. Leave the upper half unstuffed so it can be flattened and sewn securely to the blanket.
Color-change note: At the end of Round 3, begin the final single crochet with the darker brown yarn. Before completing the stitch, drop the darker brown yarn and finish the final yarn-over with tan. Cut and secure the darker brown yarn, then continue Round 4 with tan.
Larger Doe Arms
Make 2. Begin with darker brown yarn and a 3.5 mm hook.
- Round 1: 6 sc in MR. (6)
- Round 2: [sc in next st, inc] 3 times. (9)
- Round 3: sc in each st around. (9)
- Round 4: Change to tan. Sc in each st around. (9)
- Rounds 5-13: sc in each st around. (9)
Stuff the lower half only. Leave the upper half unstuffed. Flatten the top opening, placing the unmatched ninth stitch at one folded side edge. Sc through both layers across 4 paired sts to close the opening. If a small gap remains at the folded side edge, close it with one whip stitch using the sewing tail.
FO, leaving a long tail for sewing.
Arm math check: The doe arm increases from 6 to 9 stitches and remains at 9 stitches through the full arm length.
Visual checkpoint: The finished doe arm should measure approximately 4 inches long from hoof to shoulder.
Smaller Fawn Arms
Make 2. Begin with darker brown yarn and a 3.5 mm hook.
- Round 1: 6 sc in MR. (6)
- Round 2: [sc in next 2 sts, inc] 2 times. (8)
- Round 3: sc in each st around. (8)
- Round 4: Change to tan. Sc in each st around. (8)
- Rounds 5-10: sc in each st around. (8)
Stuff the lower half only. Leave the upper half unstuffed. Flatten the top opening so 4 stitches lie along the front and 4 stitches lie along the back. Sc through both layers across 4 paired sts to close.
FO, leaving a long tail for sewing.
Arm math check: The fawn arm increases from 6 to 8 stitches and remains at 8 stitches through the full arm length. This keeps it slightly narrower than the 9-stitch doe arm.
Checkpoint: The arms should remain soft and flexible near the shoulder. A flat upper edge makes them easier to place evenly along the sides of the blanket.
Visual checkpoint: The finished fawn arm should measure approximately 3 inches long from hoof to shoulder.
Larger Doe Granny Lovey Blanket
Use tan yarn and a 4.0 mm hook.
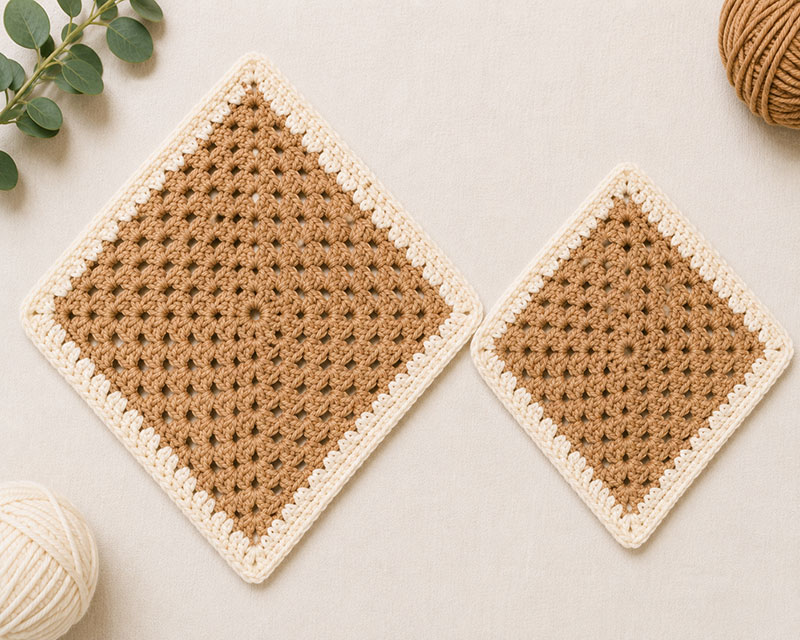
The blanket is a granny square that will be turned on point during assembly. The beginning ch 3 counts as the first dc of each round. Each corner is worked as 3 dc, ch 2, 3 dc. Work each side cluster into the open space between the cluster groups from the previous round.
- Round 1: ch 4 and sl st to the first ch to form a ring. Ch 3, 2 dc in the ring, ch 2, [3 dc in the ring, ch 2] 3 times. Sl st to the top of the beginning ch 3. (4 granny clusters)
- Round 2: sl st in each of the next 2 dc and into the first corner ch-2 space. Ch 3, 2 dc, ch 2 and 3 dc in the same corner space. Work 3 dc, ch 2 and 3 dc in each of the next 3 corner spaces. Sl st to the top of the beginning ch 3. (8 granny clusters)
- Round 3: sl st in each of the next 2 dc and into the first corner ch-2 space. Ch 3, 2 dc, ch 2 and 3 dc in the same corner space. [Work 3 dc in the next side space. Work 3 dc, ch 2 and 3 dc in the next corner space] 3 times. Work 3 dc in the final side space. Sl st to the top of the beginning ch 3. (12 granny clusters)
- Round 4: sl st in each of the next 2 dc and into the first corner ch-2 space. Ch 3, 2 dc, ch 2 and 3 dc in the same corner space. [Work 3 dc in each of the next 2 side spaces. Work 3 dc, ch 2 and 3 dc in the next corner space] 3 times. Work 3 dc in each of the final 2 side spaces. Sl st to the top of the beginning ch 3. (16 granny clusters)
- Round 5: sl st in each of the next 2 dc and into the first corner ch-2 space. Ch 3, 2 dc, ch 2 and 3 dc in the same corner space. [Work 3 dc in each of the next 3 side spaces. Work 3 dc, ch 2 and 3 dc in the next corner space] 3 times. Work 3 dc in each of the final 3 side spaces. Sl st to the top of the beginning ch 3. (20 granny clusters)
- Round 6: sl st in each of the next 2 dc and into the first corner ch-2 space. Ch 3, 2 dc, ch 2 and 3 dc in the same corner space. [Work 3 dc in each of the next 4 side spaces. Work 3 dc, ch 2 and 3 dc in the next corner space] 3 times. Work 3 dc in each of the final 4 side spaces. Sl st to the top of the beginning ch 3. (24 granny clusters)
- Round 7: sl st in each of the next 2 dc and into the first corner ch-2 space. Ch 3, 2 dc, ch 2 and 3 dc in the same corner space. [Work 3 dc in each of the next 5 side spaces. Work 3 dc, ch 2 and 3 dc in the next corner space] 3 times. Work 3 dc in each of the final 5 side spaces. Sl st to the top of the beginning ch 3. (28 granny clusters)
- Round 8: sl st in each of the next 2 dc and into the first corner ch-2 space. Ch 3, 2 dc, ch 2 and 3 dc in the same corner space. [Work 3 dc in each of the next 6 side spaces. Work 3 dc, ch 2 and 3 dc in the next corner space] 3 times. Work 3 dc in each of the final 6 side spaces. Sl st to the top of the beginning ch 3. (32 granny clusters)
FO and weave in the tan yarn end.
Large blanket math check: The granny square gains 4 clusters per round. After Round 8, the blanket has 32 total clusters, with 8 clusters along each side when the corner clusters are counted.
Visual checkpoint: Lay the blanket flat before adding the border. All four corners should form clean right angles. If the blanket cups upward, loosen your tension. If it ripples heavily, tighten your tension or use a smaller hook.
Cream Border for Larger Doe Blanket
Join cream yarn in any corner ch-2 space.
- Border Round 1: ch 1; the beginning chain does not count as a stitch. Work 3 sc in the same corner space. Along the first side, work 1 sc in each dc and 1 sc in each open space between granny clusters. Work 3 sc in the next corner space. Repeat around the remaining sides and corners. Sl st to the first sc.
- Border Round 2: Ch 1; this chain does not count as a stitch. Work 1 sc in each stitch around, except at each corner. In the center stitch of each previous 3-sc corner group, work 3 sc total instead of the usual 1 sc. Join with sl st to the first sc and FO. (144 sc)
Border stitch check: Border Round 1 has 136 sc: 31 sc along each side plus 3 sc in each of the four corners. Border Round 2 has 144 sc with the standard 3-sc corners.
Checkpoint: The blanket should lie flat after the border. If the corners pull inward, undo Border Round 2 and work 5 sc instead of 3 sc in each marked center-corner stitch. Five stitches preserve a single center stitch for each corner and produces 152 sc in Border Round 2.
Smaller Fawn Granny Lovey Blanket
Use tan yarn and a 4.0 mm hook.
The fawn blanket is made with the same granny-square construction as the doe blanket but stops after Round 6. The beginning ch 3 counts as the first dc of each round.
- Round 1: ch 4 and sl st to the first ch to form a ring. Ch 3, 2 dc in the ring, ch 2, [3 dc in the ring, ch 2] 3 times. Sl st to the top of the beginning ch 3. (4 granny clusters)
- Round 2: sl st in each of the next 2 dc and into the first corner ch-2 space. Ch 3, 2 dc, ch 2 and 3 dc in the same corner space. Work 3 dc, ch 2 and 3 dc in each of the next 3 corner spaces. Sl st to the top of the beginning ch 3. (8 granny clusters)
- Round 3: sl st in each of the next 2 dc and into the first corner ch-2 space. Ch 3, 2 dc, ch 2 and 3 dc in the same corner space. [Work 3 dc in the next side space. Work 3 dc, ch 2 and 3 dc in the next corner space] 3 times. Work 3 dc in the final side space. Sl st to the top of the beginning ch 3. (12 granny clusters)
- Round 4: sl st in each of the next 2 dc and into the first corner ch-2 space. Ch 3, 2 dc, ch 2 and 3 dc in the same corner space. [Work 3 dc in each of the next 2 side spaces. Work 3 dc, ch 2 and 3 dc in the next corner space] 3 times. Work 3 dc in each of the final 2 side spaces. Sl st to the top of the beginning ch 3. (16 granny clusters)
- Round 5: sl st in each of the next 2 dc and into the first corner ch-2 space. Ch 3, 2 dc, ch 2 and 3 dc in the same corner space. [Work 3 dc in each of the next 3 side spaces. Work 3 dc, ch 2 and 3 dc in the next corner space] 3 times. Work 3 dc in each of the final 3 side spaces. Sl st to the top of the beginning ch 3. (20 granny clusters)
- Round 6: sl st in each of the next 2 dc and into the first corner ch-2 space. Ch 3, 2 dc, ch 2 and 3 dc in the same corner space. [Work 3 dc in each of the next 4 side spaces. Work 3 dc, ch 2 and 3 dc in the next corner space] 3 times. Work 3 dc in each of the final 4 side spaces. Sl st to the top of the beginning ch 3. (24 granny clusters)
FO and weave in the tan yarn end.
Small blanket math check: After Round 6, the fawn blanket has 24 total clusters, with 6 clusters along each side when the corner clusters are counted.
Cream Border for Smaller Fawn Blanket
Join cream yarn in any corner ch-2 space.
- Border Round 1: ch 1; the beginning chain does not count as a stitch. Work 3 sc in the same corner space. Along the first side, work 1 sc in each dc and 1 sc in each open space between granny clusters. Work 3 sc in the next corner space. Repeat around the remaining sides and corners. Sl st to the first sc.
- Border Round 2: Ch 1; this chain does not count as a stitch. Work 1 sc in each stitch around, except at each corner. In the center stitch of each previous 3-sc corner group, work 3 sc total instead of the usual 1 sc. Join with sl st to the first sc and FO. (112 sc)
Border stitch check: Border Round 1 has 104 sc: 23 sc along each side plus 3 sc in each of the four corners. Border Round 2 has 112 sc.
Checkpoint: The blanket should lie flat after the border. Turn the finished square so one corner points upward and the opposite corner points downward to create the diamond-shaped lovey blanket.
Right-side orientation: Because the granny-square rounds are not turned, the side facing you while crocheting is the right side. Keep this side facing forward when positioning the spots, arms and head. The tail is attached to the wrong side at the back.
Block before assembly: Lightly block both finished blankets before attaching the spots, head, arms or tail. Shape each square evenly, straighten all four points and allow it to dry completely before continuing.
Tails
The tails are small, but they help the finished loveys look more like deer.
Doe Tail
Use tan yarn and a 3.5 mm hook.
- Round 1: 6 sc in MR. (6)
- Round 2: sc in each st around. (6)
Add only a tiny pinch of stuffing so the tail remains soft. FO, leaving a long tail for sewing.
Fawn Tail
Use tan yarn and a 3.5 mm hook.
- Round 1: 5 sc in MR. (5)
- Round 2: sc in each st around. (5)
Leave the tail unstuffed or add only a tiny pinch of stuffing. FO, leaving a long tail for sewing.
Tail checkpoint: Each tail should form a small, shallow cup rather than a tightly stuffed ball. Flatten the open edge slightly before sewing.
Blanket Spots
The cream spots near the lower blanket corners are optional. They add fawn-style markings while leaving the upper portion of each lovey clear for the head and arms.
Blanket Spot
Use cream yarn and a 3.5 mm hook.
- Round 1: 6 sc in MR. (6)
- Round 2: inc in each st around. (12)
- Sl st to the first sc.
FO, leaving a long tail for sewing.
Make 10-14 spots for the doe blanket and 6-8 spots for the fawn blanket. Use fewer spots if your yarn produces larger circles.
Lay the blanket flat with one corner pointing downward. Arrange the spots loosely across the lower third of the blanket, placing approximately half near the lower-left side and half near the lower-right side. Leave visible tan space between the spots rather than arranging them in straight rows.
Pin every spot before sewing. Position each spot mainly over a solid granny cluster rather than directly over an open space. Using the cream sewing tail, stitch through the outer loops of the spot and the solid double-crochet stitches beneath it. Keep the sewing tension even so the spot lies flat without gathering or stretching the blanket.
Placement checkpoint: Keep all blanket spots below the midpoint of the diamond. The spots should remain clear of the head attachment area, arms, border and bottom corner.
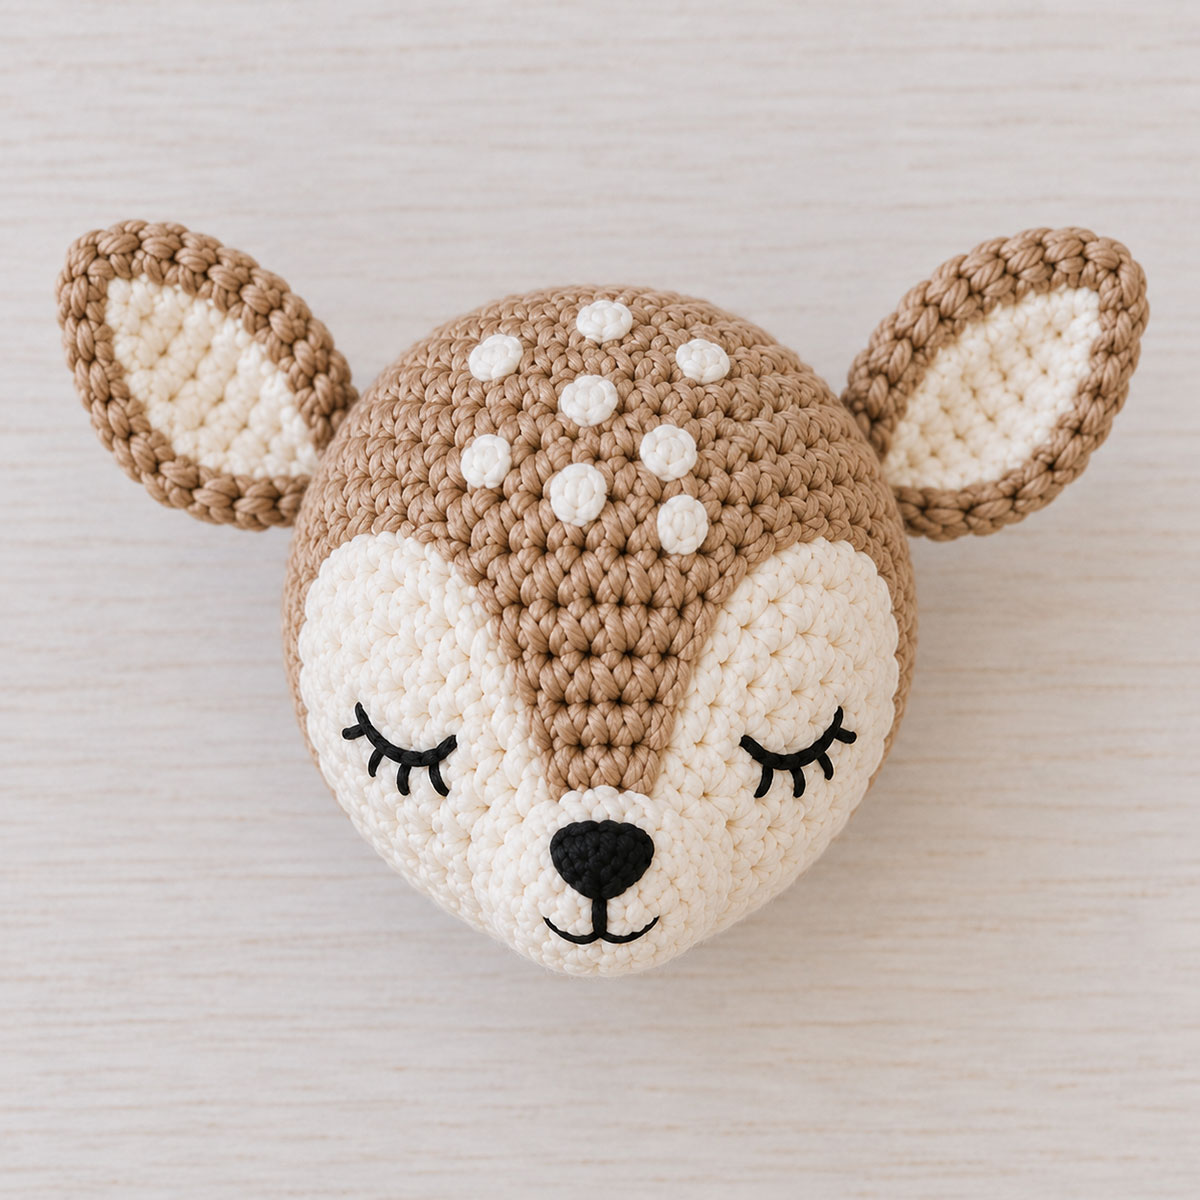
Fawn Forehead Spots
Only the smaller fawn receives forehead spots. The larger doe head remains plain.
Forehead Spot
Use cream yarn and a 3.5 mm hook.
- Round 1: 6 sc in MR. (6)
- Sl st to the first sc.
FO, leaving a long tail for sewing.
Make 8 spots. Do not work an increase round. Keeping each spot at 6 stitches makes it small enough to scatter across the fawn’s upper forehead without covering the eyes or crowding the ears.
Flatten each spot and set it aside. Do not sew the forehead spots to the head yet. Complete the cream face panels, eyes and nose first so the spots can be positioned accurately between the finished eye line and the temporarily pinned ears.
Two-Tone Deer Face Assembly
The cream face panels create the distinctive two-tone doe and fawn faces shown in the finished design. Position both panels before sewing either one permanently so the two sides remain balanced.
Pin the Cream Face Panels and Ears for Placement
Work on one deer head at a time. Before positioning the cream panels, temporarily pinch the lower edge of each ear into the same shallow fold described later under Sew the Ears, then pin both ears in their approximate final positions. Do not sew the fold yet. This lets you judge the width and balance of the face using the ears in their finished shape.
Doe Face Panel Placement
- Place one cream panel on each side of the front of the doe head.
- Turn each elongated oval diagonally so its upper end angles outward toward the eye and its lower end angles inward toward the nose.
- Position the upper portions of the panels around Rounds 8-9.
- Position the lower inner portions around Rounds 13-15.
- Leave approximately 2-3 tan stitches visible between the upper inner edges of the two panels.
- Bring the lower inner ends together at the center front. Allow them to overlap by approximately 1-2 stitches where the nose will be embroidered.
- Mirror the two panels so the face looks balanced from the front.
Fawn Face Panel Placement
- Place one smaller cream panel on each side of the front of the fawn head.
- Angle the panels inward in the same wide-V arrangement used for the doe.
- Position the upper portions around Rounds 7-8.
- Position the lower inner portions around Rounds 11-13.
- Leave approximately 2 tan stitches visible between the upper inner edges.
- Bring the lower inner ends together at the center front with approximately 1 stitch of overlap where the nose will be embroidered.
Placement checkpoint: Do not arrange the two panels horizontally like one wide muzzle. They should sweep diagonally from the upper cheeks toward the center of the lower face. From the front, the pair should create the cream two-tone deer markings shown in the finished design.
Sew the Cream Face Panels to the Head
Leave both panels pinned while checking the face from the front, top and both sides. Adjust them until the upper ends sit at the same height and the lower ends meet at the center.
Sew the first panel in place using its long cream yarn tail. Whip stitch around the complete outer edge, catching one head stitch beneath each sewing stitch. Keep the panel flat and do not add stuffing.
Sew the second panel in the same way. At the lower center, allow the second panel to overlap the first by the amount established during pinning. Stitch through both cream layers and the head where they overlap so the center remains secure.
Checkpoint: Both panels should lie flat without puckering. The cream markings should be symmetrical enough to read as a pair while still leaving a narrow strip of tan visible between them above the nose.
Embroider the Sleepy Eyes
Use dark brown embroidery floss. The sleepy eyes are embroidered across the upper portion of the cream face panels rather than on the plain tan head.
Doe Eye Placement
- Place one eye across the upper third of each cream panel, approximately level with Rounds 9-10 of the head.
- Keep the two eyes level with one another.
- Each eye should be approximately 3-4 stitches wide.
- Add two or three short lashes at the outer end if desired.
Fawn Eye Placement
- Place one eye across the upper third of each smaller cream panel, approximately level with Rounds 8-9.
- Keep the two eyes level.
- Each eye should be approximately 3 stitches wide.
- Add two short lashes at the outer end if desired.
Secure and bury all embroidery-floss ends inside the head.
Eye checkpoint: The eyes should sit visibly on the cream panels with tan yarn remaining between the two sides of the upper face.
Embroider the Nose and Mouth
Using dark brown embroidery floss, embroider a small triangle nose directly over the lower center where the two cream face panels meet.
- Doe nose width: approximately 3/8 inch
- Fawn nose width: approximately 1/4 inch
Add one short vertical stitch directly below the center of the nose to suggest the mouth. Secure and bury all embroidery-floss ends inside the head.
Checkpoint: The nose should cover the small center overlap between the cream panels without becoming oversized. From the front, the cream panels should appear to flow inward toward the nose rather than forming a separate round muzzle.
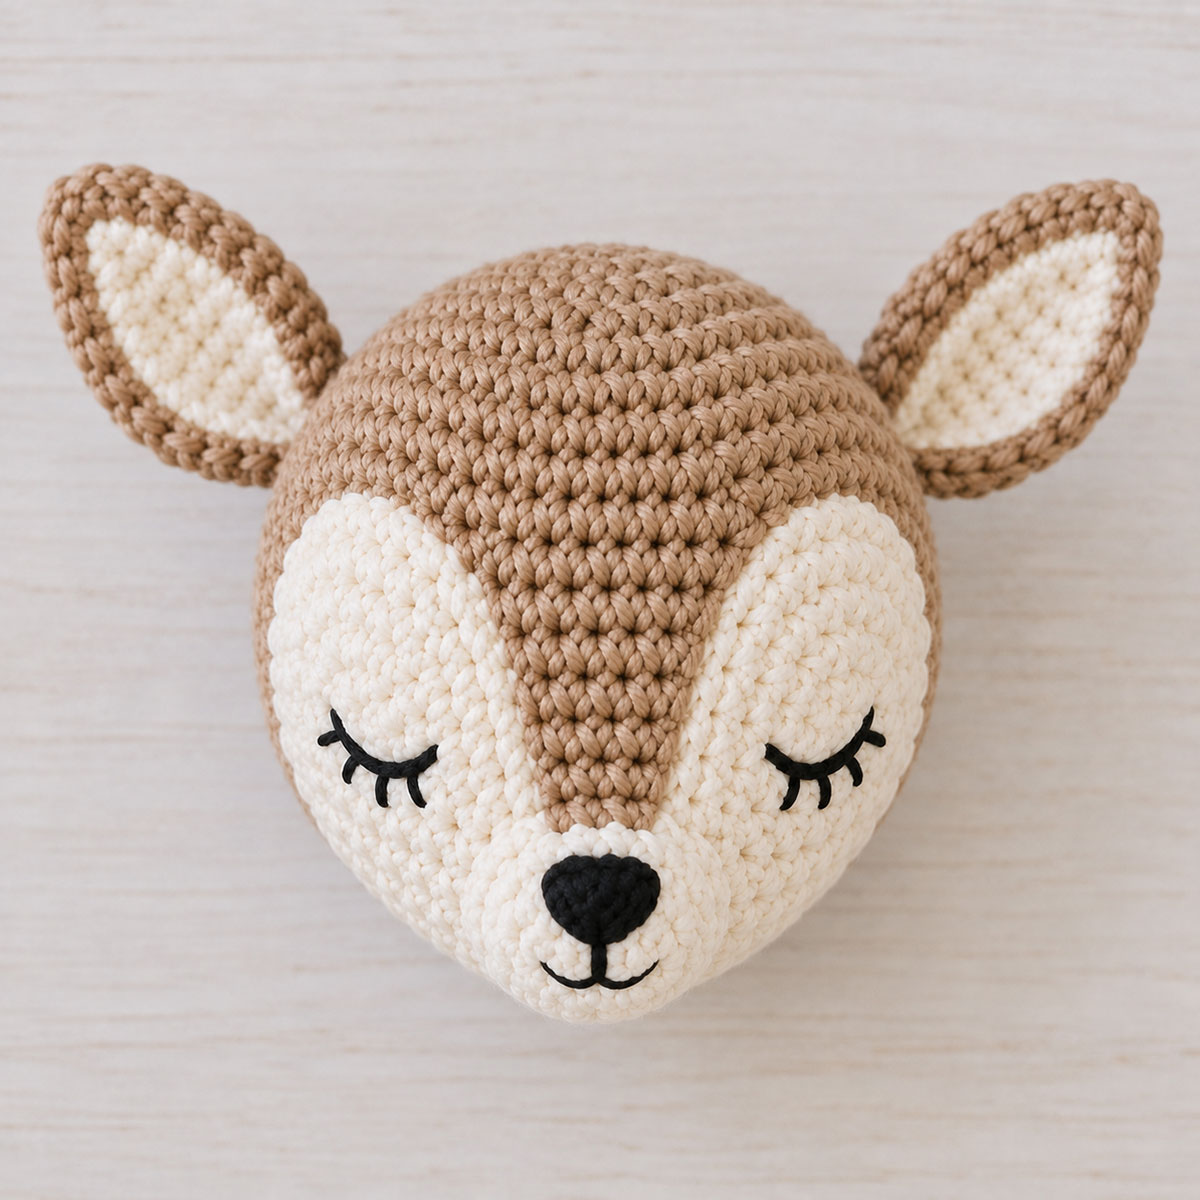
Sew the Fawn Forehead Spots
Temporarily pinch the lower edge of each fawn ear into the shallow final fold, then pin the ears between Rounds 4-8 and angle them slightly outward. Do not sew the folds or attach the ears permanently yet.
Arrange the eight cream forehead spots in a loose irregular scatter between the pinned ears and above the embroidered eyes. Spread them across the upper tan forehead rather than placing them in straight rows. Leave visible tan space between every spot and keep the lower spots clear of the cream face panels. Pin all eight spots in place before sewing any of them.
Placement checkpoint: Check all eight pinned spots from the front before sewing. They should remain above the eye line, clear of the future ear seams and separated by visible tan yarn. Reposition any spot that crowds an ear, eye or cream face panel.
Using each cream sewing tail, stitch through the outer loops of the spot and the head stitches beneath it. Keep the sewing tension even so the spot lies flat without gathering or distorting the head.
Remove the temporary ear pins after all eight spots are secure.
Before assembly, compare each deer head with the finished design. The finished look depends on the diagonal placement of the two cream face panels, the ear angle, eye placement and fawn spots as much as the basic head shape.
This crochet deer lovey pattern should read as a deer lovey first and a blanket second. If the head looks too bear-like, move the ears higher before sewing.
Before final assembly, temporarily pin the ears, head, arms and tail in their planned positions and check the whole lovey from the front and back. Then sew the pieces permanently in the order below.
The smaller fawn in this crochet deer pattern should look related to the larger doe, not like a separate animal.
Final Assembly
Sew the Ears
Before attaching each ear, pinch the lower edge very slightly so the two lower corners move toward one another. Overlap only about one stitch-width and secure the fold with one or two small stitches. Do not fold the ear in half. The goal is a shallow natural cup while keeping most of the ear open and rounded.
Doe Ear Placement
- Pin the ears between Rounds 5-10.
- Angle them outward with the cream inner ears facing slightly forward.
- Position the ears symmetrically on each side of the head and check the placement from the front before sewing.
Fawn Ear Placement
- Pin the ears between Rounds 4-8.
- Angle them outward with the cream inner ears facing slightly forward.
- Position the ears symmetrically on each side of the head and check the placement from the front before sewing.
Using the long tan sewing tail left at the lower edge of each outer ear, whip stitch through both ear layers and the head across the folded ear base. Make a second secure pass across each ear base for durability, then secure the yarn and bury the end inside the head.
Ear placement checkpoint: Viewed from the front, both ears should project outward from the sides of the head rather than standing straight upward. The rounded upper portion should remain open and visible after attachment.
Sew the Head to the Blanket
Lay the blanket flat with the right side facing up. Turn it so one corner points upward. The upper blanket point must overlap the lower portion of the head rather than sitting only beneath it.
Doe Head Placement
- Center the doe head over the upper blanket point.
- Slide the blanket point approximately 1½ inches behind the lower portion of the head.
- From the front, the blanket point should be hidden behind the head and the head should remain centered over the blanket.
Fawn Head Placement
- Center the fawn head over the upper blanket point.
- Slide the blanket point approximately 1 inch behind the lower portion of the head.
- From the front, the blanket point should be hidden behind the head and the head should remain centered over the blanket.
Pin the head securely through the overlapped blanket area. Check the placement from the front, back and both sides before sewing.
Using a long strand of tan yarn and a yarn needle, sew the blanket to the lower third of the head. Work the first pass in a wide curved line across the front half of the overlapped area, catching several head stitches and solid blanket stitches with each sewing stitch.
Turn the lovey over and work a second curved pass across the back half of the attachment area. Do not sew only through the tip of the blanket or the final round of the head.
Secure the yarn, bury the yarn ends inside the head and remove all pins.
Attachment checkpoint: Hold the lovey by the blanket and gently move it from side to side. The head should remain upright without leaning, twisting or pulling away from the upper blanket point. Add reinforcing stitches through the lower sides of the head and the overlapped blanket area if any movement remains.
Sew the Arms
- Position one arm on each upper side of the blanket.
- Begin about 1 inch below the head on the doe blanket.
- Begin about 3/4 inch below the head on the fawn blanket.
- Keep the closed shoulder edge flat against the blanket.
Pin both arms before sewing either one. Check that they hang at the same height, then sew securely through the closed shoulder edge and the solid blanket stitches beneath it.
Sew the Tails
- Sew each tail to the back side of its blanket.
- Position the doe tail about 1 inch above the bottom point.
- Position the fawn tail about 3/4 inch above the bottom point.
- Keep the tail slightly to one side so it remains visible when the lovey is viewed from the front or side.
Sew around the flattened open edge of each tail. Keep all stuffing enclosed and bury the yarn tail securely.
Final assembly checkpoint: Hold the finished lovey by the blanket and gently shake it. The head should remain upright, the ears should stay symmetrical, the arms should hang evenly and every attached piece should remain secure.
Final Finishing and Safety Inspection
Weave in every remaining yarn end securely through several stitches. Trim the ends only after confirming that they cannot pull free. Remove all straight pins and stitch markers.
Inspect the head, ears, both cream face panels, arms, tails, blanket spots and forehead spots. Gently tug each attached piece to confirm that the seams remain secure and that no stuffing or loose yarn ends are visible.
Launder the loveys according to the yarn manufacturer’s instructions. Reshape the heads, ears, arms and blanket points while damp, then allow every part to dry completely before use or gifting.
Repeat the seam and attachment inspection after washing. Remove the lovey from use if any yarn end, embroidered feature, seam or attached piece becomes loose or damaged.
After finishing this crochet deer lovey pattern, check the face from the front, side and top. A few extra sewing stitches can correct leaning before the lovey is gifted.
If the finished animal starts to look more like a bear than a deer at this point, check the ear placement. Higher ears angled outward give the head a clearer deer silhouette, while lower ear placement can change the look of the face.
Deer stand out in a woodland forest nursery too, and my deer nursery ideas show how fawn details, deer wall art, bedding, color and rustic woodland accents can work together in the baby's room.
If you want to make a deer to add to your holiday decorations rather than a lovey, my free crochet reindeer pattern makes a seated stuffed reindeer that can be finished with or without the optional red Christmas nose may be exactly what you are looking for.
If you just want a woodland deer with a soft, flatter body with no blanket base or red nose, my whitetail buck deer crochet snuggler pattern should be on your "to make" list with its antlers, long floppy limbs and small brown hooves.
The crochet animal lovey pattern collection makes it easy to compare this deer with fox, bear, bunny and other nursery-friendly animals before choosing the next handmade gift.
I recently designed another deer to coordinate specifically with the newer winter woodland animal set. The winter woodland deer lovey crochet pattern is just the ticket for a project that feels warm for the winter months.
Australian animal themes can use the same handmade nursery-gift approach, and my crochet koala lovey pattern creates a bear that adds a unique eucalyptus-inspired option beside woodland deer projects.
If you are making this crochet deer lovey pattern as a nursery accent, the doe and fawn should look handmade but still neat enough to display.
Keep this crochet deer lovey pattern simple for baby use. Embroidered features are safer and cleaner than plastic eyes or loose decorations.
Troubleshooting
The Head Wobbles
The blanket point may not overlap enough of the lower head, or the attachment passes may be too narrow. Add reinforcing stitches through the overlapped blanket area and the lower sides of the head.
The Blanket Curls
Your tension is probably too tight. Block the blanket lightly and work the border corners a little looser.
The Blanket Ripples
Your tension may be too loose. A smaller hook usually fixes this.
The Ears Look Uneven
Count the head rounds before pinning. Both ears should begin on the same round and sit the same distance from the outer edge of the cream face panels.
The Fawn Spots Look Crowded
Reposition the eight spots slightly farther apart. Keep all eight above the eye line and clear of the ears and cream face panels, with visible tan yarn between the spots.
The Arms Twist
Flatten the closed shoulder edge completely before sewing. A flat shoulder sits more naturally against the blanket.
The Lovey Looks More Like a Bear Than a Deer
First check the ears. Move them slightly higher on the head and angle them outward if necessary. Then check the cream face panels. They should angle inward toward the nose in a wide V rather than sitting horizontally across the lower face like one round muzzle.
Finished Design Check: The larger doe should have a plain tan forehead with no spots. The smaller fawn should have eight small cream forehead spots scattered across the upper tan forehead. Both deer should have two elongated cream face panels angled inward toward the nose, embroidered sleepy eyes positioned on the cream panels, layered tan-and-cream ears, small tails and diamond-shaped granny blankets with cream borders. The cream blanket spots are optional.
Size Check: The finished doe lovey should measure approximately 15-16 inches tall. The finished fawn lovey should measure approximately 11-12 inches tall. The doe should be noticeably larger than the fawn when placed side by side.
Frequently Asked Questions About This Crochet Deer Pattern
Is this crochet deer pattern suitable for beginners?
This project is best for an advanced beginner who is comfortable with single crochet, double crochet, increases, decreases, working around both sides of a starting chain, basic embroidery and sewing crocheted pieces together.
Can I make only the fawn from this crochet deer pattern?
Yes. The smaller fawn works well as a standalone lovey and requires less yarn and time than making both deer.
Can I use blanket yarn instead of worsted weight yarn?
You can use blanket yarn, but the finished project will be much larger and the stated finished sizes and placement measurements will no longer apply. Use a hook appropriate for your yarn while keeping the stuffed pieces dense enough that stuffing does not show. Keep the written stitch counts and shaping the same, then adjust the placement of the facial features, ears and blanket attachments to suit the larger pieces.
Are safety eyes recommended for this crochet deer pattern?
No. Since this project is designed as a baby lovey, embroider all facial features and do not add plastic eyes, buttons, beads or glued decorations.
How much yarn does this crochet deer pattern require?
The amount depends on the yarn brand, skein yardage and individual tension. The two blankets and larger doe use most of the tan yarn, so have an additional skein available if your chosen skeins have limited yardage.
What nursery themes work well with this crochet deer pattern?
This crochet deer pattern fits naturally into woodland nurseries, forest animal themes, rustic nursery designs and deer-themed baby rooms.
When you click on links to various merchants on this site and make a purchase, this may result in this site earning a commission. This does not affect the price you pay.

UBGI Gold Standard 2026
Reviewed under the site's
editorial checklist.
Photos, decorating ideas, party setups and reader submissions are shared for inspiration unless a page is specifically presented as a pattern, tutorial, reference guide or step-by-step project. Follow the instructions, measurements, safety guidance and manufacturer directions provided for the particular project or product.
About Jan | Contact | Baby Nursery Ideas (Blog) | Site Map | Privacy Policy | Disclosure Policy | Disclaimer | Affiliate Disclosure | Earnings Disclosure | Facebook | Pinterest
I am a participant in the Amazon Services LLC Associates Program, an affiliate advertising program designed to provide a means for us to earn fees by linking to Amazon. As an Amazon Associate I earn from qualifying purchases.
Copyright © 2006-2026. All Rights Reserved.