Free Crochet Raccoon Appliqué Pattern with Striped Tail
By Jan Bay
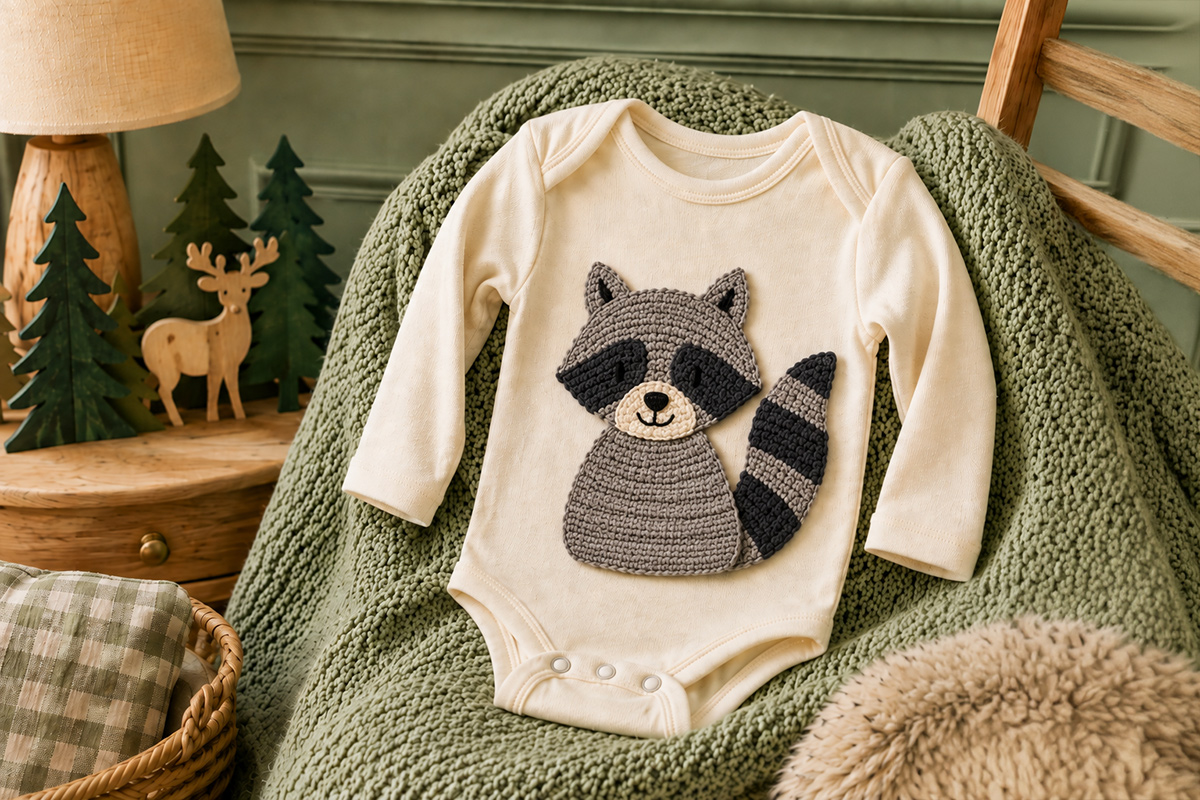
This free crochet raccoon appliqué pattern makes a flat little woodland raccoon with pointed ears, a dark eye mask, cream muzzle and big striped tail. The raccoon can be used as a decoration for a baby blanket, bath towel, hat, nursery decoration or other crochet projects when you want the look of a raccoon without making a stuffed animal.
Explore More Free Crochet Baby Patterns
Crochet Animal Appliqué Patterns
Crochet Supplies
Supplies for the Crochet Raccoon Appliqué Pattern
This raccoon is made from a handful of flat pieces, and you don't need much yarn. I'd use a smooth yarn that shows the edges of the mask and tail clearly. Fuzzy yarn can blur the very details that make the animal look like a raccoon.
- Worsted weight yarn in medium gray, approximately 35 yards
- Worsted weight yarn in dark charcoal, approximately 20 yards
- Worsted weight yarn in cream or soft ivory, approximately 5 yards
- Black embroidery floss for the eyes, nose and mouth
- 3.5 mm (E/4) crochet hook
- Yarn needle
- Embroidery needle
- Scissors
- Stitch marker or small scrap of contrasting yarn
- Rustproof pins, optional but helpful for arranging the pieces before sewing
Keep the gray and charcoal yarns the same weight. The charcoal should be dark enough to make the raccoon mask obvious but not so close to black that the black embroidered eyes disappear into it.
There are no plastic safety eyes, buttons or separate paw pieces in this design. The eyes, nose and mouth are embroidered, and the finished raccoon stays flat.
Finished Size and Gauge
With worsted weight yarn and a 3.5 mm hook, the finished raccoon is expected to measure about 5 3/4 to 6 1/4 inches tall from the tips of the ears to the bottom of the body. At the stated gauge, the head reaches about 4 inches across at its widest point and the body about 3 1/2 inches.
The tail has 27 rows. At 18 rows per 4 inches, that calculates to about 6 inches from the wide base to the tip through the center of the piece. The outside of the curve will be a little longer. Once the tail is positioned beside the body, the entire appliqué is expected to measure about 6 to 6 1/2 inches across.
Gauge: About 16 single crochet stitches and 18 rows = 4 inches.
Exact gauge isn't critical for an appliqué, but it does affect the proportions. Work the head, body and tail with the same yarn weight and hook so they stay in scale with each other.
These are calculated and expected measurements based on the stitch counts and stated gauge. They are not measurements from a physically test-made sample, so your finished size may vary with yarn and tension.
The head, body, ears, mask pieces and tail are all worked flat. Turn at the end of each row unless the instructions say otherwise.
Abbreviations
- ch: chain
- sc: single crochet
- inc: work 2 sc in the same stitch
- dec: single crochet decrease over the next 2 stitches
- sl st: slip stitch
- st/sts: stitch/stitches
- RS: right side
If you run into a crochet abbreviation you don't recognize, the Craft Yarn Council crochet abbreviations guide is a handy reference for standard U.S. crochet terminology.
Crochet the Shaped Raccoon Head
Instead of starting with a round circle, this head gets wider through the cheeks and then narrows toward the muzzle. That change matters. It gives the finished face the broader, slightly pointed raccoon shape before we add a single facial detail.
Use medium gray yarn.
Foundation: Ch 11.
Row 1: Sc in the second ch from the hook and across. (10 sts)
Row 2: Ch 1 and turn. Inc in first st, sc in next 8 sts, inc in last st. (12 sts)
Row 3: Ch 1 and turn. Sc across. (12 sts)
Row 4: Ch 1 and turn. Inc in first st, sc in next 10 sts, inc in last st. (14 sts)
Row 5: Ch 1 and turn. Sc across. (14 sts)
Row 6: Ch 1 and turn. Inc in first st, sc in next 12 sts, inc in last st. (16 sts)
Rows 7 and 8: For each row, ch 1 and turn. Sc across. (16 sts)
Row 9: Ch 1 and turn. Dec over first 2 sts, sc in next 12 sts, dec over last 2 sts. (14 sts)
Row 10: Ch 1 and turn. Dec over first 2 sts, sc in next 10 sts, dec over last 2 sts. (12 sts)
Row 11: Ch 1 and turn. Dec over first 2 sts, sc in next 8 sts, dec over last 2 sts. (10 sts)
Row 12: Ch 1 and turn. Dec over first 2 sts, sc in next 6 sts, dec over last 2 sts. (8 sts)
Fasten off and leave a long tail for assembly.
Lay the piece flat with Row 1 at the top. The sides should widen through the upper half of the face and then angle inward toward the bottom. Don't stretch it into a circle while blocking. We want those cheek angles to remain visible.
Crochet the Raccoon Eye Mask, Muzzle and Ears
The mask should cover a good portion of the middle of the face. Tiny oval patches make a raccoon look more like a bear wearing eye patches, so these pieces are deliberately wider and more angular.
Make 2 Charcoal Mask Pieces
Use dark charcoal yarn.
Row 1: Ch 3. Sc in the second ch from the hook and in the next ch. (2 sts)
Row 2: Ch 1 and turn. Inc in each st. (4 sts)
Row 3: Ch 1 and turn. Inc in first st, sc in next 2 sts, inc in last st. (6 sts)
Row 4: Ch 1 and turn. Sc across. (6 sts)
Row 5: Ch 1 and turn. Dec over first 2 sts, sc in next 2 sts, dec over last 2 sts. (4 sts)
Row 6: Ch 1 and turn. Dec twice. (2 sts)
Fasten off, leaving a yarn tail for sewing. Make the second mask piece the same way.
These pieces will be turned sideways during assembly, so don't judge them by how they look sitting upright. The narrow ends point toward the center of the face and the wider portions sweep toward the outer cheeks.
Make 2 Ears
Use medium gray yarn.
Row 1: Ch 2. Work 2 sc in the second ch from the hook. (2 sts)
Row 2: Ch 1 and turn. Inc in each st. (4 sts)
Row 3: Ch 1 and turn. Inc in first st, sc in next 2 sts, inc in last st. (6 sts)
Row 4: Ch 1 and turn. Sc across. (6 sts)
Fasten off and leave a tail for sewing. Make the second ear the same way.
We'll add a few charcoal embroidery stitches inside each ear later instead of crocheting separate inner-ear pieces.
Make 1 Cream Muzzle
Use cream or soft ivory yarn.
Rnd 1: Ch 4. Sc in the second ch from the hook and in the next ch. Work 3 sc in the last ch. Continue along the opposite side of the foundation chain, sc in the next ch, then work 2 sc in the same ch where you made your first sc. (8 sts)
Join with a sl st to the first sc and fasten off. Leave a yarn tail for sewing.
Keep the muzzle small. The dark mask and tapered cheek shape should still be the first things you see when you look at the face.
Crochet the Rounded Raccoon Body
The body is a simple pear shape, narrower where it meets the head and broader through the lower half. There are no hands, feet, side panels or separate paw pieces. Keep it plain. The shaped face and striped tail already give the raccoon plenty of character.
Use medium gray yarn.
Foundation: Ch 9.
Row 1: Sc in the second ch from the hook and across. (8 sts)
Row 2: Ch 1 and turn. Inc in first st, sc in next 6 sts, inc in last st. (10 sts)
Row 3: Ch 1 and turn. Sc across. (10 sts)
Row 4: Ch 1 and turn. Inc in first st, sc in next 8 sts, inc in last st. (12 sts)
Rows 5 and 6: For each row, ch 1 and turn. Sc across. (12 sts)
Row 7: Ch 1 and turn. Inc in first st, sc in next 10 sts, inc in last st. (14 sts)
Rows 8 through 12: For each row, ch 1 and turn. Sc across. (14 sts)
Row 13: Ch 1 and turn. Dec over first 2 sts, sc in next 10 sts, dec over last 2 sts. (12 sts)
Row 14: Ch 1 and turn. Sc across. (12 sts)
Fasten off and leave a long yarn tail for assembly.
Lay the body flat with Row 1 at the top and Row 14 at the bottom. At the stated gauge, the top edge is about 2 inches wide, the broad lower section reaches about 3 1/2 inches, and the bottom finishes at about 3 inches. That slight taper at the bottom keeps the outline rounded without narrowing it back into another small end.
That's the whole body. No paws are needed.
Crochet the Curved Striped Raccoon Tail
The tail is intentionally large. A little straight striped strip isn't enough for this design. We want a tail that sweeps upward beside the raccoon and is recognizable even when the finished appliqué is seen from across the room.
The tail is worked from the wide base toward the tip. The shaping happens only on odd-numbered rows so the decrease stays on the same physical edge of the work.
Use medium gray yarn to begin. Before making the foundation chain, leave an 18-inch starting yarn tail. You'll use this tail later to sew the wide base of the raccoon tail behind the body.
At each color change, fasten off the current color and join the new color at the edge where the next row begins. Don't carry the unused yarn from stripe to stripe across the back of the tail. Leave a short yarn tail at each change to weave in later.
Foundation: Ch 11.
Row 1: Sc in the second ch from the hook and across. (10 sts)
Place a stitch marker on the edge where you began Row 1. That marked side is the inside curve of the tail. Every odd-numbered row begins at that edge.
Row 2: Ch 1 and turn. Sc across. (10 sts)
Row 3: Ch 1 and turn. Dec over first 2 sts, sc in next 7 sts, inc in last st. (10 sts)
Change to charcoal.
Row 4: Ch 1 and turn. Sc across. (10 sts)
Row 5: Ch 1 and turn. Dec over first 2 sts, sc in next 7 sts, inc in last st. (10 sts)
Row 6: Ch 1 and turn. Sc across. (10 sts)
Row 7: Ch 1 and turn. Dec over first 2 sts, sc in next 8 sts. (9 sts)
Row 8: Ch 1 and turn. Sc across. (9 sts)
Change to medium gray.
Row 9: Ch 1 and turn. Dec over first 2 sts, sc in next 6 sts, inc in last st. (9 sts)
Row 10: Ch 1 and turn. Sc across. (9 sts)
Row 11: Ch 1 and turn. Dec over first 2 sts, sc in next 6 sts, inc in last st. (9 sts)
Row 12: Ch 1 and turn. Sc across. (9 sts)
Change to charcoal.
Row 13: Ch 1 and turn. Dec over first 2 sts, sc in next 7 sts. (8 sts)
Row 14: Ch 1 and turn. Sc across. (8 sts)
Row 15: Ch 1 and turn. Dec over first 2 sts, sc in next 5 sts, inc in last st. (8 sts)
Row 16: Ch 1 and turn. Sc across. (8 sts)
Change to medium gray.
Row 17: Ch 1 and turn. Dec over first 2 sts, sc in next 5 sts, inc in last st. (8 sts)
Row 18: Ch 1 and turn. Sc across. (8 sts)
Row 19: Ch 1 and turn. Dec over first 2 sts, sc in next 6 sts. (7 sts)
Row 20: Ch 1 and turn. Sc across. (7 sts)
Change to charcoal.
Row 21: Ch 1 and turn. Dec over first 2 sts, sc in next 4 sts, inc in last st. (7 sts)
Row 22: Ch 1 and turn. Sc across. (7 sts)
Row 23: Ch 1 and turn. Dec over first 2 sts, sc in next 5 sts. (6 sts)
Row 24: Ch 1 and turn. Sc across. (6 sts)
Row 25: Ch 1 and turn. Dec over first 2 sts, sc in next 4 sts. (5 sts)
Row 26: Ch 1 and turn. Sc across. (5 sts)
Row 27: Ch 1 and turn. Dec over first 2 sts, sc in next 3 sts. (4 sts)
Remove the stitch marker from the inside edge. Fasten off at the tip and weave in that yarn end. Keep the 18-inch starting tail at the wide gray base for assembly.
The alternating decrease-and-increase rows shift the fabric toward the outer edge while the later decreases narrow the tip. The finished tail should have a gentle sweep rather than sitting perfectly straight.
If your tail curves in the opposite direction from the one you want, that's fine. Put it on the other side of the body during assembly. There is no right or left raccoon.
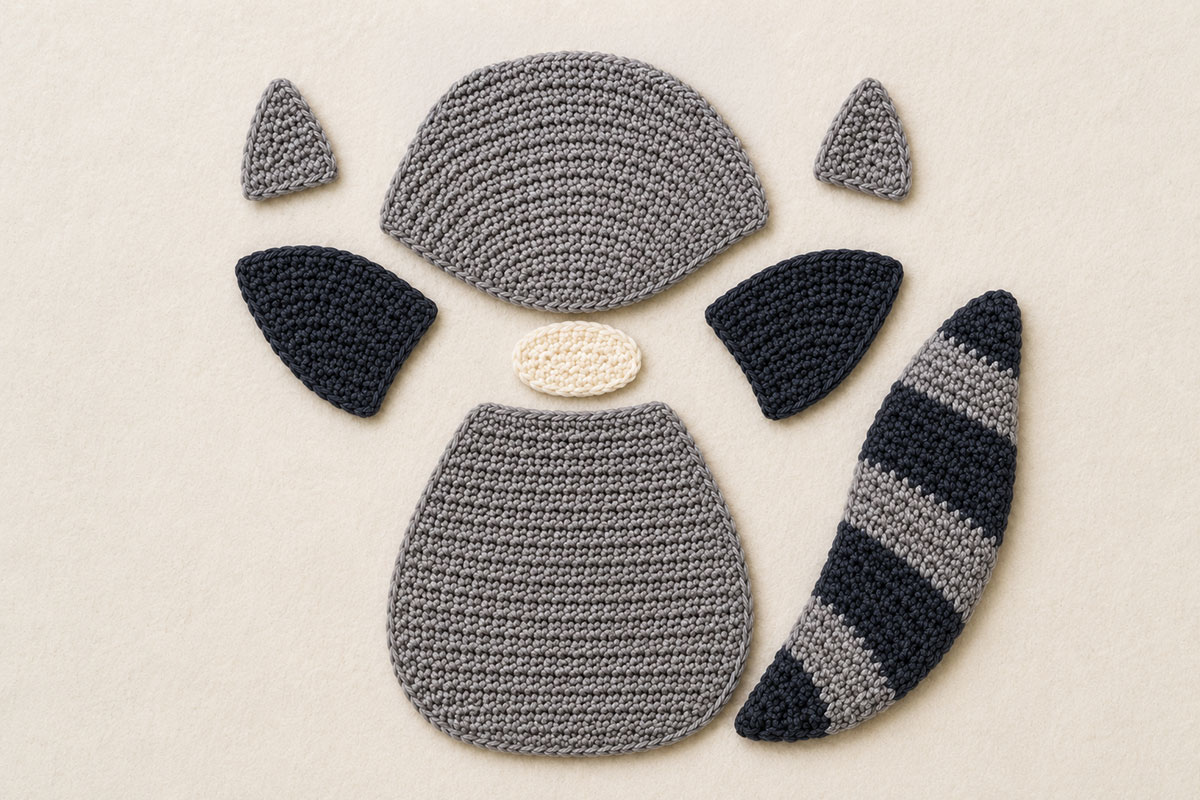
Piece check before assembly: You should now have 8 crocheted pieces: 1 shaped gray head, 1 gray body, 1 striped tail, 2 gray ears, 2 charcoal mask pieces and 1 cream muzzle. If you have those eight pieces, you're ready to put the raccoon together.
Assembly and Embroidery
Pin the pieces together before you sew anything permanently. The face depends on placement more than extra decoration, so a quarter-inch adjustment can be worth making.
1. Position the tail. Lay the body upright. Put the wide gray base of the tail behind one side of the body with about 3/4 to 1 inch hidden underneath. Let the curved tail sweep outward and then upward beside the raccoon.
The tail should reach roughly to the middle or upper half of the head. Don't tuck so much of it behind the body that the first stripe disappears.
2. Sew the tail to the body. Use the long gray yarn tail at the base. Stitch securely around the portion hidden behind the body. Leave the rest of the tail free so its curved outline stays visible.
3. Attach the head. Center the shaped head above the body. Overlap the bottom of the head over the top of the body by about 1/2 inch.
Check the silhouette before sewing. The head should be noticeably wider than the top of the body. Sew across the overlapping area with gray yarn.
4. Add the ears. Place one pointed ear behind each upper corner of the head. Hide the lower row of each ear behind the head and angle the points slightly outward.
Sew the hidden lower edges securely to the back of the head.
5. Position the mask. Turn the two charcoal mask pieces sideways.
Place the narrow inner end of one patch slightly to the left of center and the narrow inner end of the second patch slightly to the right of center. Leave about 1/4 inch of gray visible between them.
Angle the wider outer ends slightly downward toward the cheek edges. The two pieces should form a broad raccoon mask across the middle of the face rather than two upright diamonds.
Pin both pieces. Stand back and look at the face before sewing them down. If it looks more like a bear than a raccoon, widen the mask toward the cheeks.
Sew around each mask piece with matching charcoal yarn.
6. Add the muzzle. Center the cream oval below the gap between the mask pieces. Let its upper edge overlap the lower inner edges of the charcoal patches slightly.
Sew around the muzzle with matching cream yarn.
7. Embroider the eyes. Thread an embroidery needle with black embroidery floss.
Make one short vertical satin-stitched eye on each charcoal mask patch. Use several close parallel stitches to form each eye. Keep the eyes open and narrow rather than making horizontal sleepy-eye lines.
Place both eyes at the same height and slightly toward the inner half of each mask patch.
8. Embroider the nose. Make a small black satin-stitched oval or softly triangular nose near the upper middle of the cream muzzle.
9. Add the mouth. Bring one short straight stitch down from the center of the nose. Add one small stitch curving or angling to each side.
Keep the mouth tiny. The mask and tail should remain the focal details.
10. Finish the ears. Use charcoal yarn or embroidery floss to make two or three short straight stitches inside each gray ear. Leave a gray border showing around the stitches.
11. Finish and inspect the appliqué. Weave in every yarn and embroidery end securely on the back. Remove all positioning pins and make sure no stitch marker remains in the tail.
Run your fingers around the head, ears, mask pieces, muzzle, body and tail base and check that every sewn edge is secure. If you're attaching the raccoon to a baby blanket, baby clothing or another item that will be handled and washed, sew around the outer edges rather than relying on a few widely spaced anchor stitches.
Keep the facial details embroidered as written and skip buttons, beads and other detachable pieces. Check the appliqué again after laundering and repair any loose edge before giving the item back to a baby.
If you add the raccoon to a baby blanket, keep the blanket out of an infant's sleep space. The U.S. Consumer Product Safety Commission safe sleep guidance recommends a bare infant sleep space with only a fitted sheet.
Mini Raccoon Variation
The easiest way to make the whole raccoon smaller is to change the yarn and hook rather than rewrite individual pieces.
Use sport weight yarn with a 2.75 mm hook and follow the same stitch counts. Because sport weight yarns vary and this version has its own gauge, I wouldn't promise an exact finished measurement without making a gauge swatch first.
Keep the gray, charcoal and cream yarns the same weight so every piece shrinks in the same proportion. If you need the appliqué to fit a particular space, crochet the head first and measure it before making the remaining pieces.
Don't remove random rows from only the head or body. That would leave the mask, muzzle, ears and tail out of proportion.
The mini version makes sense for a hat, small bag, narrow blanket border or garland. I'd use the standard version when the raccoon needs to be the main motif.
Ways to Use the Raccoon Appliqué
The finished raccoon can be sewn onto a crochet baby blanket, nursery wall hanging, handmade bag, basket panel or another flat project. The big tail gives it enough presence that you don't need to surround it with extra little pieces just to make the animal recognizable.
If you're building a woodland set, pair it with the crochet fox appliqué pattern, crochet deer appliqué pattern or crochet bunny appliqué pattern.
You can also browse the crochet animal appliqué patterns if you want more flat animal motifs that can be used on the same type of project.
If what you want is a three-dimensional raccoon instead, use the free crochet raccoon pattern. I wouldn't try to add stuffing to this one. Its shaped head, flat body and curved tail are designed specifically to work as an appliqué.
Frequently Asked Questions About the Crochet Raccoon Appliqué Pattern
Why is the raccoon head worked in rows instead of rounds?
Rows make it easier to control the width of the cheeks and narrow the lower face. A simple round circle is easier to crochet, but it doesn't give this raccoon the same recognizable head shape.
Can I leave off the cream muzzle?
You can, but you'll need to embroider the nose directly onto the gray head. I prefer the small cream muzzle because it separates the nose from the charcoal mask without covering too much of the face.
Can I make the raccoon without hands and feet?
Yes. This pattern is designed without separate hands or feet. The body stays simple so the shaped face and large striped tail do the work.
Why does the tail use shaping rows instead of a straight striped rectangle?
The decrease-and-increase rows move the fabric gradually toward the outside edge, while later decreases taper the tip. That gives the tail a curved silhouette instead of a straight strip that has to be forced into position during assembly.
Can I put the tail on the opposite side?
Yes. Mirror the assembly and attach the wide end behind the other side of the body. Nothing else in the pattern needs to change.
Can I use acrylic yarn?
Yes. Smooth worsted weight acrylic, cotton or an acrylic blend can all work. Keep the gray, charcoal and cream yarns close to the same thickness so the pieces remain proportional.
Can I make just the raccoon face?
Yes. Crochet the shaped head, ears, mask pieces and muzzle, then complete the facial embroidery. Skip the body and tail. That gives you a smaller raccoon-face appliqué for projects where the full animal would be too large.
Can I sew the finished appliqué onto fabric?
Yes. Pin it in place first and sew around the outer edges with small secure stitches. Matching sewing thread can work well on woven fabric because it adds less bulk than worsted yarn.
When you click on links to various merchants on this site and make a purchase, this may result in this site earning a commission. This does not affect the price you pay.

UBGI Gold Standard 2026
Reviewed under the site's
editorial checklist.
Photos, decorating ideas, party setups and reader submissions are shared for inspiration unless a page is specifically presented as a pattern, tutorial, reference guide or step-by-step project. Follow the instructions, measurements, safety guidance and manufacturer directions provided for the particular project or product.
About Jan | Contact | Baby Nursery Ideas (Blog) | Site Map | Privacy Policy | Disclosure Policy | Disclaimer | Affiliate Disclosure | Earnings Disclosure | Facebook | Pinterest
I am a participant in the Amazon Services LLC Associates Program, an affiliate advertising program designed to provide a means for us to earn fees by linking to Amazon. As an Amazon Associate I earn from qualifying purchases.
Copyright © 2006-2026. All Rights Reserved.