Free Crochet Reindeer Pattern for a Cute Stuffed Reindeer
By Jan Bay
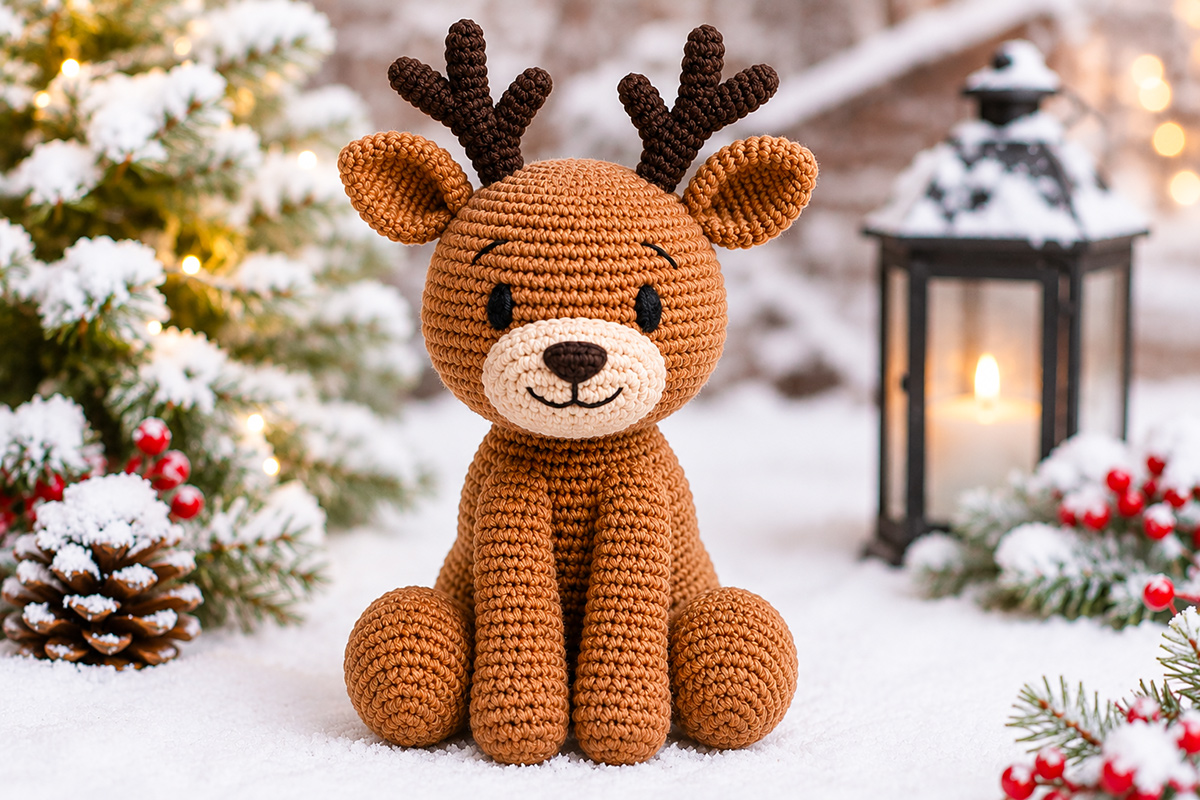
This free crochet reindeer pattern makes a soft brown stuffed reindeer with a cream muzzle, shaped ears, crocheted antlers and an optional red nose for Christmas. The finished design still looks like a recognizable reindeer without the red nose, so you can make either a classic woodland deer or a more festive Christmas version.
Explore More Free Crochet Patterns
See Crochet Supplies for This Reindeer Pattern
Jump to:
Free Crochet Reindeer Pattern: Materials and Finished Size
This reindeer is crocheted in separate pieces and sewn together at the end. The head and body use simple continuous rounds, while the muzzle, ears and antlers add the details that make the finished animal read clearly as a reindeer rather than a plain brown woodland animal.
I recommend a smooth worsted-weight yarn for this project. Very fuzzy yarn can hide the shaping around the muzzle, ears and antler branches, which are the features doing most of the visual work.
Materials
- Approximately 150 yards of medium brown worsted-weight yarn, Craft Yarn Council size 4
- Approximately 30 yards of light tan or cream worsted-weight yarn for the muzzle and inner-ear details
- Small amount of slightly deeper tan worsted-weight yarn if you want the optional darker muzzle edge
- Approximately 20 yards of dark brown worsted-weight yarn for the antlers
- Small amount of red worsted-weight yarn if you want the red-nosed variation
- Small amount of black embroidery floss or smooth black yarn for the eyes and mouth
- 3.5 mm crochet hook, or the hook size needed to make a firm fabric
- Polyester fiberfill
- Yarn needle with a blunt tip
- Stitch marker
- Scissors
- Several straight pins or locking stitch markers for positioning pieces before sewing
Yardage note: The yarn quantities above are planning estimates based on the stitch counts and typical worsted-weight yarn use. They are not presented as measured consumption from a physically tested sample. Keep some extra yarn available, especially if your tension is loose or you change the size of any piece.
Do not use plastic safety eyes for the version shown on this page. The eyes are embroidered with black floss so the face stays soft and there are no hard eye pieces to pull loose.
Expected Finished Size
The measurements here are expected dimensions based on the stated reference gauge and written round counts. They are not presented as measurements taken from a physically tested sample.
With worsted-weight yarn and a 3.5 mm hook, expect the seated reindeer to measure roughly 9 1/2 to 10 1/2 inches from the bottom of the body to the top of the head and roughly 10 1/2 to 11 1/2 inches to the antler tips. Antler angle, stuffing and individual round height can change the final height.
The 15-round front legs should finish at roughly 3 1/2 to 4 inches long at the stated reference gauge. The 12-round back legs are shorter and fuller so the reindeer has a rounded seated shape instead of four identical straight legs.
Treat these measurements as planning checkpoints. Yarn thickness, hook size, tension and stuffing can all change the finished dimensions. The more important checkpoint is that the crochet fabric stays dense enough to contain the fiberfill without visible gaps.
Yarn Color Suggestions
A medium chestnut or warm brown makes a classic reindeer. Use a lighter tan for the muzzle so the face has enough contrast to show clearly in photographs and from across a room. Dark brown antlers give the upper part of the head definition without requiring wire or another stiff insert.
You can also make the body in gray-brown, taupe or soft oatmeal if you prefer a quieter woodland look. Keep some contrast between the body and muzzle. When those two colors are too similar, the nose and mouth lose definition.
Abbreviations
- ch = chain
- sc = single crochet
- inc = work 2 single crochet stitches in the same stitch
- dec = single crochet decrease over the next 2 stitches
- sl st = slip stitch
- st = stitch
- sts = stitches
- MR = magic ring
The pattern uses US crochet terminology.
Pattern Notes
- Work every piece written in rounds as a continuous spiral unless the instructions say otherwise. Work the ears flat in turned rows.
- Place a stitch marker in the first stitch of each round and move it up as you work.
- The number in parentheses at the end of a round is the total stitch count after completing that round.
- The ch 1 at the beginning of Ear Rows 2 through 7 is a turning chain only and does not count as a stitch.
- After working Round 1 of a piece that begins with a magic ring, pull the ring closed firmly. Secure the starting tail through the back of several Round 1 stitches and leave the remaining tail inside the piece.
- Before assembly, weave in any starting tail that is not being saved for sewing. This includes the starting tails on the muzzle and both ears.
- For every dec in this pattern, use an invisible single crochet decrease through the front loops of the next 2 stitches.
- Stuff gradually rather than pushing all of the fiberfill into a piece at the end.
- Do not overstuff the muzzle or antlers. They need enough filling to hold their shapes without becoming round and bulky.
- Leave long sewing tails on pieces that will be attached later.
Piece count: Before assembly, the core pattern should give you 16 crocheted pieces: 1 head, 1 muzzle, 1 body, 2 front legs, 2 back legs, 1 tail, 2 ears, 2 main antler stems, 2 short antler branches and 2 long antler branches. The optional red nose increases the total to 17 pieces.
Gauge
Exact gauge is not critical for this stuffed project, but the fabric should be dense. For planning, use an estimated reference gauge of about 4 single crochet stitches per inch and 4 rounds per inch with the recommended yarn and hook. This is a reference estimate rather than a measurement from a physically tested swatch.
If you can easily see fiberfill through the finished crochet, change to a smaller hook before continuing. If the stitches are so tight that inserting the hook becomes difficult, move up one hook size.
Before You Start Crocheting
Keep the head, ears, muzzle and antlers close together while you work. Those pieces need to look proportional as a group. A very large muzzle can make the face look more like a bear, while tiny ears and oversized antlers can make the head look top-heavy.
The antlers in this pattern are intentionally soft. Each one is crocheted from yarn and lightly filled rather than shaped around craft wire. That gives the reindeer a softer finish and avoids adding a rigid point inside the antler.
Finish the face near the end, after the head, body, ears and antlers are in place. Seeing the complete silhouette makes it easier to judge the muzzle position and eye spacing before you commit to the final facial stitches.
How to Crochet the Head and Muzzle for the Free Crochet Reindeer Pattern
The head begins at the top and widens gradually through the forehead and cheeks. Do not make the lower half perfectly round. The decreases near the bottom help create a slightly narrower neck area so the finished head sits neatly on the body.
Crochet Reindeer Head
Use medium brown yarn.
- Round 1: Work 6 sc into a MR. (6)
- Round 2: Inc in each st around. (12)
- Round 3: [Sc in next st, inc in next st] 6 times. (18)
- Round 4: [Sc in next 2 sts, inc in next st] 6 times. (24)
- Round 5: [Sc in next 3 sts, inc in next st] 6 times. (30)
- Round 6: [Sc in next 4 sts, inc in next st] 6 times. (36)
- Rounds 7 through 12: Sc in each st around. (36)
- Round 13: [Sc in next 4 sts, dec] 6 times. (30)
- Round 14: Sc in each st around. (30)
- Round 15: [Sc in next 3 sts, dec] 6 times. (24)
- Round 16: Sc in each st around. (24)
Begin stuffing the head. Fill the crown and sides first, then add smaller amounts toward the lower part of the head. Shape the stuffing with your fingers as you work so the forehead stays rounded without making the lower face too wide.
- Round 17: [Sc in next 2 sts, dec] 6 times. (18)
- Round 18: Sc in each st around. (18)
Add enough stuffing to make the head firm but still easy to press slightly between your fingers. The muzzle will add volume to the front later, so there is no need to push the stuffing forward to create a projecting face.
Fasten off and leave a long tail for sewing the head to the body.
Check the Head Shape Before Continuing
Set the head upright with the opening at the bottom. The widest area should be around the forehead and upper cheeks. The lower edge should be noticeably narrower.
If the head looks unusually tall, press the stuffing outward into the sides rather than adding more. If it looks flat across the front, redistribute the filling instead of trying to correct the shape with an oversized muzzle.
A reindeer face can lose its character quickly when every feature is made large. Give the antlers room to be noticed later. The muzzle should support the face, not take it over.
Crochet the Light Tan Muzzle
The muzzle is made as a shallow oval rather than a stuffed ball. Use light tan or cream yarn.
- Round 1: Ch 6. Starting in the second ch from the hook, sc in next 4 ch, work 3 sc in the last ch. Continue along the opposite side of the foundation chain, sc in next 3 ch, then work 2 sc in the last ch. (12)
- Round 2: Inc in first st, sc in next 3 sts, inc in each of next 3 sts, sc in next 3 sts, inc in each of last 2 sts. (18)
- Round 3: Sc in next st, inc in next st, sc in next 3 sts, [sc in next st, inc in next st] 3 times, sc in next 3 sts, [sc in next st, inc in next st] 2 times. (24)
- Round 4: Sc in each st around. (24)
Fasten off and leave a long sewing tail.
The finished muzzle has 24 stitches around its outer edge. Its exact width and height will vary with yarn and tension, so use placement as the better checkpoint. It should cover the center of the lower face without extending all the way to the sides of the head.
Shape the Muzzle Without Making It Bulky
Place a very small amount of fiberfill behind the muzzle when you attach it. Think of the filling as support rather than stuffing. You want a gentle curve across the front, not a round projection.
Before sewing, place the muzzle against the head with its lower edge about two rounds above the bottom opening. Pin the center top and center bottom first. Then check both sides.
Look at the head straight on before you sew. The muzzle should be centered beneath the future eye position and should leave visible brown crochet on both sides.
Do not sew the muzzle in place yet. Keeping it removable at this stage makes it easier to position the eyes, nose and mouth accurately in the face section later.
Optional Darker Muzzle Edge
If you want a little more definition between a pale muzzle and a medium brown head, change to a slightly deeper tan for Round 4. On the final yarn-over of the last stitch of Round 3, complete that stitch with the deeper tan yarn. Cut the original light tan yarn, leaving a tail about 4 inches long, then work all 24 stitches of Round 4 in the new color. Weave the cut light tan tail securely into the back of the muzzle before assembly. Keep the color change subtle. A dark outline around the entire muzzle can make the face look more graphic than the soft stuffed reindeer shown in this pattern.
Set the finished head and muzzle aside. Do not attach the ears or antlers yet. They are easier to position after the body establishes the finished proportions of the reindeer.
Crochet the Reindeer Body and Legs
The body is worked from the bottom upward. It begins with a broad rounded base, stays full through the middle and then narrows toward the neck. The finished body should look substantial enough to support the head without becoming a long cylinder.
Crochet Reindeer Body
Use medium brown yarn.
- Round 1: Work 6 sc into a MR. (6)
- Round 2: Inc in each st around. (12)
- Round 3: [Sc in next st, inc in next st] 6 times. (18)
- Round 4: [Sc in next 2 sts, inc in next st] 6 times. (24)
- Round 5: [Sc in next 3 sts, inc in next st] 6 times. (30)
- Round 6: [Sc in next 4 sts, inc in next st] 6 times. (36)
- Round 7: [Sc in next 5 sts, inc in next st] 6 times. (42)
- Rounds 8 through 14: Sc in each st around. (42)
- Round 15: [Sc in next 5 sts, dec] 6 times. (36)
- Rounds 16 and 17: Sc in each st around. (36)
- Round 18: [Sc in next 4 sts, dec] 6 times. (30)
- Rounds 19 and 20: Sc in each st around. (30)
- Round 21: [Sc in next 3 sts, dec] 6 times. (24)
- Round 22: [Sc in next 2 sts, dec] 6 times. (18)
Stuff the body before fastening off. Fill the bottom first and press the fiberfill toward the sides. Continue adding small amounts as you move upward.
Keep the lower half pleasantly rounded, but do not pack the neck opening so tightly that it becomes hard to sew. The last 18 stitches will be joined directly to the 18-stitch opening at the bottom of the head.
Fasten off and leave a long sewing tail.
Front Legs
Make two using medium brown yarn.
- Round 1: Work 6 sc into a MR. (6)
- Round 2: Inc in each st around. (12)
- Rounds 3 through 15: Sc in each st around. (12)
Stuff the lower two-thirds of each leg lightly. Leave the upper inch softer so the leg can lie smoothly against the body.
Do not pack the legs until they become rigid. A little softness at the top makes the finished reindeer sit more naturally.
Fasten off each leg and leave a long sewing tail.
Back Legs
The back legs are fuller than the front legs. That difference is deliberate. It gives the seated reindeer a rounded haunch instead of four identical straight legs.
Make two using medium brown yarn.
- Round 1: Work 6 sc into a MR. (6)
- Round 2: Inc in each st around. (12)
- Round 3: [Sc in next st, inc in next st] 6 times. (18)
- Rounds 4 through 6: Sc in each st around. (18)
- Round 7: [Sc in next st, dec] 6 times. (12)
- Rounds 8 through 12: Sc in each st around. (12)
Stuff the rounded lower portion firmly enough to hold its shape. Add less filling toward the open edge.
Fasten off each leg and leave a long sewing tail.
Tail
Use medium brown yarn.
- Round 1: Work 6 sc into a MR. (6)
- Round 2: Inc in each st around. (12)
- Round 3: Sc in each st around. (12)
- Round 4: [Sc in next st, dec] 4 times. (8)
- Round 5: Sc in each st around. (8)
Add only a pinch of stuffing. The tail should be a small rounded shape rather than another leg-sized piece.
Fasten off and leave a long sewing tail.
Before moving on, set the body between the completed legs without sewing anything together. The front legs should look narrower and longer, while the back legs should provide more visual weight near the bottom of the body. That small difference helps the finished animal read as a seated reindeer from both the front and side.
How to Crochet Reindeer Ears and Soft Antlers
The ears and antlers carry much of the character in this project. Keep the ears modest and place the antlers high on the head. If both are oversized, the face can disappear beneath them.
Crochet Reindeer Ears
Make two using medium brown yarn. The ears are worked flat in rows.
- Row 1: Ch 2. Work 3 sc in the second ch from the hook. (3)
- Row 2: Ch 1 and turn. Inc in first st, sc in next st, inc in last st. (5)
- Row 3: Ch 1 and turn. Inc in first st, sc in next 3 sts, inc in last st. (7)
- Row 4: Ch 1 and turn. Sc across. (7)
- Row 5: Ch 1 and turn. Sc across. (7)
- Row 6: Ch 1 and turn. Dec, sc in next 3 sts, dec. (5)
- Row 7: Ch 1 and turn. Dec, sc in next st, dec. (3)
Fasten off and leave a long tail.
Treat the Row 7 edge as the base and the Row 1 end as the tip. Bring the two outer stitches of Row 7 toward each other behind the center stitch, then use the long tail to make two small stitches through the folded base. Do not fold the entire ear. Only the Row 7 edge needs shaping.
If you want a lighter inner-ear detail, thread a yarn needle with tan yarn and make two or three long surface stitches through the center of each brown ear. Keep the tan stitches well inside the outer edge so they look like an inner-ear marking rather than a border. After the last surface stitch, tie the yarn ends together on the back of the ear, weave both ends into the ear fabric and trim them before attaching the ear.
Crochet Reindeer Antlers
Each antler is made from one main stem and two smaller branches. Make two complete sets.
The antlers do not require craft wire. Narrow crocheted tubes and light filling give them enough shape for this stuffed reindeer while keeping them soft.
Main Antler Stem
Use dark brown yarn.
- Round 1: Work 6 sc into a MR. (6)
- Rounds 2 through 8: Sc in each st around. (6)
Fasten off and leave a long tail for attaching the antler to the head.
Add a very narrow amount of fiberfill. A blunt yarn needle or the end of a crochet hook can help guide the filling into the tube. Do not force in enough fiberfill to stretch the stitches.
Short Antler Branch
Make one for each antler.
- Round 1: Work 6 sc into a MR. (6)
- Rounds 2 through 4: Sc in each st around. (6)
Fasten off and leave a sewing tail. Add only enough filling to keep the branch from collapsing.
Long Antler Branch
Make one for each antler.
- Round 1: Work 6 sc into a MR. (6)
- Rounds 2 through 5: Sc in each st around. (6)
Fasten off and leave a sewing tail. Fill lightly.
Assemble Each Antler
Lay the main stem on a flat surface with the closed tip pointing upward.
Center the open end of the longer branch against the side of the main stem across Rounds 4 and 5. Angle the branch outward and slightly upward. Beginning at the underside of the branch, whip stitch through each of the 6 stitches around the branch opening and into the adjacent fabric of the main stem. Continue around the entire opening until you return to the starting point. Secure the yarn and bury the tail inside the antler.
Center the open end of the shorter branch against the same side of the stem across Rounds 6 and 7. Angle it outward and slightly upward, with a small space between the two branches. Whip stitch through all 6 stitches around the branch opening and into the adjacent stem fabric, returning to the starting point before securing and burying the yarn tail.
Repeat for the second antler, reversing the branch direction so the finished pair mirrors each other.
Place both completed antlers above the head before sewing them on. Check them from the front as well as from the side. They do not have to be mathematically identical, but their height and overall spread should be close.
If an antler bends forward, remove a little filling before you add more. More stuffing can make a narrow antler heavy rather than making it stand straighter.
How to Assemble the Crochet Reindeer
Assembly is easier if you pin every major piece before making permanent stitches. Start with the head and body, then add the legs. Leave the face, ears and antlers adjustable until the basic silhouette looks right.
Attach the Head to the Body
Both openings have 18 stitches, so align the 18 head stitches with the 18 body stitches and center the head over the body.
Start at the back of the neck. Using either long brown sewing tail, whip stitch through one head stitch and the corresponding body stitch at a time. Continue through 14 paired stitches.
Pause with 4 paired stitches still open and check the neck for a hollow area. Add a small amount of fiberfill if necessary. Do not force a large wad of stuffing into the neck because excess filling can push the head upward and distort the seam.
Whip stitch through the final 4 paired stitches, return to the starting point, secure the yarn and bury the tail inside the body. Thread the unused second brown sewing tail onto the yarn needle, pass it deeply through the stuffed head or body and trim it so the cut end withdraws inside.
Position the Front Legs
Pin the front legs to the lower front of the body. Place their upper edges approximately around Body Rounds 8 through 11.
Keep a small space between the legs rather than sewing them together at the center. Viewed from the front, each leg should descend from its own side of the lower chest.
Check the reindeer from the side. The front legs can angle slightly forward, but they should not project horizontally away from the body.
Beginning at the inside edge of each front leg, whip stitch through one stitch at the open top of the leg and the adjacent body fabric. Continue around the entire 12-stitch leg opening until you return to the starting point. If the attachment still moves too freely, make a second pass around the same seam before securing and burying the yarn tail.
Position the Back Legs
Place each back leg on the lower side of the body, approximately around Body Rounds 5 through 10. The rounded portion should sit beside the body and slightly behind the front leg.
Pin both back legs before sewing either one permanently. Set the reindeer on a flat surface and check whether the body sits evenly.
If the reindeer tips to one side, adjust the leg placement now. Moving one back leg by even a single round can correct the balance without changing the pattern.
Beginning at the inside edge of each back leg, whip stitch through each of the 12 stitches around the open leg edge and into the adjacent body fabric. Continue around the complete opening and return to the starting point. Secure the yarn only after the leg sits firmly against the body.
Attach the Tail
Center the tail on the back of the body around Rounds 8 through 10. Angle it slightly upward.
Starting at the underside of the tail, whip stitch through each of the 8 stitches around the open tail edge and into the adjacent body fabric. Continue until you return to the starting point. If the tail sticks straight out, make one additional anchoring stitch through its lower edge and into the body before securing and burying the yarn tail.
Pin the Ears and Antlers
Place the ears on opposite sides of the upper head, approximately around Head Rounds 6 through 8. Angle the pointed ends slightly outward.
Place the antlers higher, approximately around Head Rounds 4 through 6. Each antler should sit a little closer to the center of the head than its corresponding ear.
Look at the complete arrangement before sewing. There should be visible space between the ears and antlers. Crowding all four pieces together makes the top of the head difficult to read.
Using each ear's yarn tail, whip stitch through each of the 3 stitches along the folded Row 7 base and into the adjacent head fabric. Return to the starting edge with one final anchoring stitch, then secure and bury the tail inside the head. For each antler, whip stitch through all 6 stitches around the open bottom of the main stem and into the adjacent head fabric. Continue until you return to the starting point, then secure and bury the yarn tail.
For extra stability, make one discreet anchoring stitch from the lower side of each antler into the head about one round above the base. Do not pull that stitch tightly enough to bend the antler.
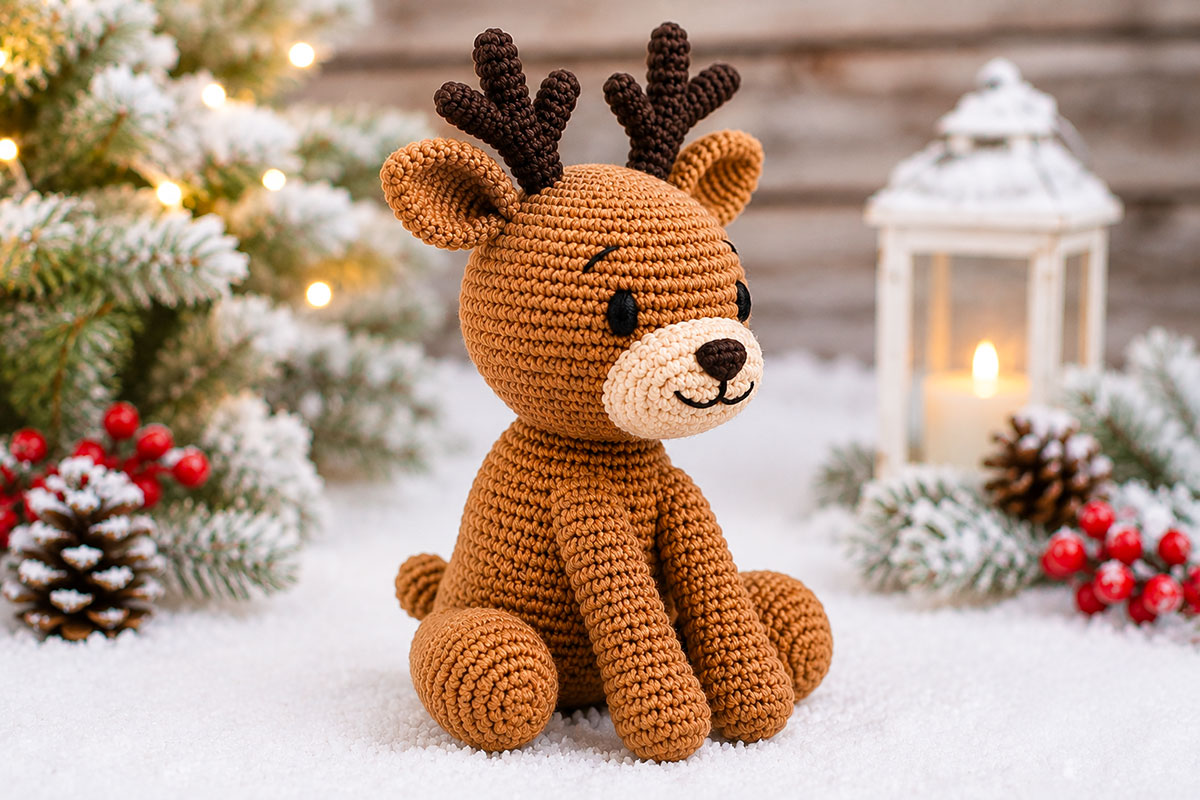
A three-quarter view is useful at this stage because it reveals problems that are easy to miss from straight ahead. Check that the head sits over the center of the body, the back legs support the seated shape and neither antler leans far forward.
If the body and head look balanced now, leave them alone. Small handmade differences between the right and left sides are much less distracting than repeatedly moving pieces in pursuit of perfect symmetry.
Embroider the Reindeer Face and Attach the Muzzle
Finish the face after the head, body, ears and antlers are assembled. With the whole reindeer in front of you, it is easier to judge how large the facial features need to be.
Position the Muzzle
Center the tan muzzle on the lower front of the head with the longer side of the oval running from left to right across the face. Its lower edge should sit approximately two rounds above the neck seam, with the upper edge reaching toward the middle of the face.
Pin the top, bottom and both sides.
Turn the reindeer sideways before sewing. The muzzle should project only slightly beyond the brown head.
Start at the lower center of the muzzle. Using the long tan yarn tail, whip stitch through each muzzle edge stitch and the adjacent head fabric. Continue around the 24-stitch edge until 4 stitches remain unsewn.
Place a small amount of fiberfill beneath the center of the muzzle and spread it with your fingertips so it forms a shallow curve rather than one round lump.
Whip stitch through the final 4 edge stitches, return to the starting point, secure the yarn and bury the tail inside the head.
Embroider the Eyes
Use black embroidery floss or smooth black yarn. Cut a length about 24 inches long so there is enough yarn for both eyes, the starting tail, the return path and final burial.
Insert the needle at the lower back of the head close to the neck seam and bring it out at the first eye position. Leave a 3-inch tail at the starting point. Place the eye centers approximately between Head Rounds 9 and 10, with about 7 stitches between the centers. The exact spacing can shift slightly with your tension, so use the muzzle as the final guide.
Each eye is made from several short vertical satin stitches worked into the same small area. Aim for a small vertical oval about two rounds high.
Make the first eye, then make only one or two stitches of the second eye. Look at the face before completing it. This makes it much easier to correct the spacing if the second eye started too far inward or outward.
After the second eye is complete, bring the working end back out beside the original 3-inch tail near the neck seam. Tie the two ends securely together. Thread both ends onto the needle, pass them deeply through the stuffed head and bring them out several inches away. Pull gently, trim close to the crochet surface and allow the cut ends to withdraw into the stuffing.
Do not add plastic safety eyes to the version shown here. Embroidered eyes keep the face soft and avoid detachable eye pieces.
Embroider the Classic Nose
Cut about 24 inches of dark brown yarn or black embroidery floss. Insert the needle at the lower back of the head near the neck seam and bring it out at the upper center of the tan muzzle. Leave a 3-inch tail at the starting point.
Make several horizontal satin stitches for the nose, gradually shortening the stitches as you move downward to form a small rounded triangle.
Keep the nose relatively small. It should occupy the center of the muzzle without covering most of the tan area.
Add the Mouth
After the nose is complete, bring the working yarn out at the bottom center of the nose. Make one vertical stitch about 1/2 inch downward.
Add one small curved or diagonal stitch to each side at the bottom of the vertical stitch.
Keep the mouth close to the nose. A long mouth line changes the expression and makes the lower face look stretched.
After the mouth is complete, bring the working end back out beside the original 3-inch tail near the neck seam. Tie the two ends securely together. Thread both ends onto the needle, pass them deeply through the stuffed head and bring them out several inches away. Pull gently, trim close to the crochet surface and allow the cut ends to withdraw into the stuffing.
Check the Finished Expression
Set the reindeer several feet away before deciding that the face needs another stitch. Small features can look sparse while you are holding the head in your hands but read clearly once you see the whole animal.
If you have to choose where to spend extra time, spend it on eye spacing and muzzle placement. Those two details affect the expression more than adding extra decoration.
If you enjoy the deer shape but want a flatter project with a blanket-style body, the crochet deer lovey pattern is another way to use the woodland theme without repeating this stuffed construction.
To make a different, but just as lovable, style of deer that is flatter and more flexible than this stuffed reindeer, use my whitetail buck deer crochet snuggler pattern that will be very appealing to hunters as well as nature lovers.
For a Christmas-specific version with the same softer snuggler style, use my crochet reindeer snuggler lovey pattern. Little ones absolutely adore that red nose.
Optional Red-Nosed Crochet Reindeer Variation
You can turn the same pattern into a festive red-nosed reindeer without changing the head, body or antlers. Complete the embroidered face as written, then cover the dark embroidered nose with the small crocheted red nose below. The dark stitches underneath act as a placement guide and should be completely hidden after attachment.
Crochet the Red Nose
Use red worsted-weight yarn.
- Round 1: Work 6 sc into a MR. (6)
- Round 2: Inc in each st around. (12)
- Round 3: Sc in each st around. (12)
- Round 4: Dec over the next 2 sts 6 times. (6)
Add a very small amount of fiberfill through the remaining 6-stitch opening. Leave those 6 stitches open because they form the base that will be sewn to the muzzle.
Fasten off and leave a long sewing tail.
Center the red nose on the upper half of the tan muzzle so it completely covers the embroidered dark nose without covering the mouth. Starting at the underside, whip stitch through each of the 6 stitches around the open base of the red nose and into the muzzle fabric. Continue until you return to the starting point, then secure and bury the yarn tail. Do not attach a pompom or another loosely fastened decoration in place of the crocheted nose.
Keep the Rest of the Reindeer Simple
The red nose already gives the project a clear Christmas character, so the reindeer does not need several additional holiday decorations to make the idea understandable.
Keep the red nose as the only added Christmas detail. That preserves the clean reindeer shape and avoids adding a removable accessory around the neck.
The brown-nosed version has a woodland look that works beyond Christmas, while the red nose changes the same basic pattern into an unmistakably festive reindeer. You do not need to crochet two different animals to get both effects.
For more animal and seasonal projects, browse the free baby crochet patterns collection.
Final Inspection Before You Use or Gift the Reindeer
Remove every straight pin, locking stitch marker and temporary positioning marker before the reindeer is used, displayed or given as a gift. Check the work surface too. Small tools are easy to overlook after several separate pieces have been assembled.
Tug gently on both ears, both antlers, all four legs, the tail, the muzzle and the red nose if you used it. Check every embroidered feature and every buried yarn tail. Reinforce anything that shifts, opens or exposes stuffing.
A stuffed crochet reindeer is not a crib accessory. Keep it out of an infant's crib, bassinet, play yard and other sleep spaces. If the reindeer will be handled by a baby or young child, use it only while the child is awake and supervised. In the United States, the U.S. Consumer Product Safety Commission recommends a bare infant sleep space with only a fitted sheet. See the U.S. Consumer Product Safety Commission Safe Sleep guidance.
The finished reindeer should contain no craft wire, plastic safety eyes, buttons, beads, bells, pins or other detachable decorations.
Free Crochet Reindeer Pattern FAQ
Can a beginner make this free crochet reindeer pattern?
Yes, if you are comfortable working single crochet in continuous rounds, increasing, decreasing and sewing pieces together. The antlers require several small parts, but they use the same basic stitches as the rest of the reindeer.
Do the crochet reindeer antlers need wire?
No. The antlers in this pattern are narrow crocheted tubes with light filling. The branches are sewn to the main stems, so no craft wire is required.
Can I crochet the reindeer with bulky yarn?
Yes, but the finished animal will be larger and you will need more yarn and stuffing. Choose a hook that produces a dense fabric with your yarn. Keep in mind that the antlers will also become thicker, so their proportions may need adjustment.
How can I make the crochet stitches tight enough to hide the stuffing?
Use a hook slightly smaller than you might choose for a garment made with the same yarn. If fiberfill shows between the stitches, reduce the hook size before making the remaining pieces rather than pulling every stitch excessively tight.
Why are the back legs different from the front legs?
The front legs are narrow and longer, while the back legs have a rounded lower section. The different shapes help create a seated animal silhouette and give the lower body more support.
Can I make a crochet deer instead of a Christmas reindeer?
Yes. Use the dark embroidered nose instead of the crocheted red nose. The brown body, tan muzzle, folded ears and branching antlers make the same core pattern work as a woodland deer without changing the construction.
Can I use plastic safety eyes?
No. Use the embroidered eyes given in this pattern. This keeps the finished face consistent with the example and avoids adding separate plastic eye pieces. The U.S. Consumer Product Safety Commission provides additional information about small parts in toys and children's products.
How should I wash the finished crochet reindeer?
Follow the care instructions for the yarn you used. For a stuffed handmade project, gentle hand washing and air drying can help preserve the embroidered face, antler shape and sewn seams. Make sure the center is completely dry before storing it.
What should I check before giving the reindeer as a gift?
Inspect every sewn seam and embroidered feature. Tug gently on the ears, antlers, legs, tail, muzzle and the crocheted red nose if you used it. Trim and bury yarn tails securely. Do not add buttons, beads, bells or other detachable decorations.
Can I make the reindeer smaller?
The easiest method is to use a lighter yarn and a hook sized for that yarn while following the same stitch counts. Reducing individual rounds can change the proportions of the head, muzzle and legs, so changing yarn weight is simpler than rewriting every piece.
Why does my reindeer look more like a bear?
Check the muzzle, ears and antlers first. A very round or heavily stuffed muzzle can create a bear-like face. Keep the muzzle shallow, place the ears toward the upper sides of the head and give the antlers enough space to remain clearly visible.
A finished reindeer does not need dozens of decorative details to be recognizable. A clear silhouette, a shallow muzzle, well-spaced eyes and those branching antlers do most of the work.
When you click on links to various merchants on this site and make a purchase, this may result in this site earning a commission. This does not affect the price you pay.

UBGI Gold Standard 2026
Reviewed under the site's
editorial checklist.
Photos, decorating ideas, party setups and reader submissions are shared for inspiration unless a page is specifically presented as a pattern, tutorial, reference guide or step-by-step project. Follow the instructions, measurements, safety guidance and manufacturer directions provided for the particular project or product.
About Jan | Contact | Baby Nursery Ideas (Blog) | Site Map | Privacy Policy | Disclosure Policy | Disclaimer | Affiliate Disclosure | Earnings Disclosure | Facebook | Pinterest
I am a participant in the Amazon Services LLC Associates Program, an affiliate advertising program designed to provide a means for us to earn fees by linking to Amazon. As an Amazon Associate I earn from qualifying purchases.
Copyright © 2006-2026. All Rights Reserved.