Free Whitetail Crochet Buck Deer Snuggler Lovey Pattern
By Jan Bay
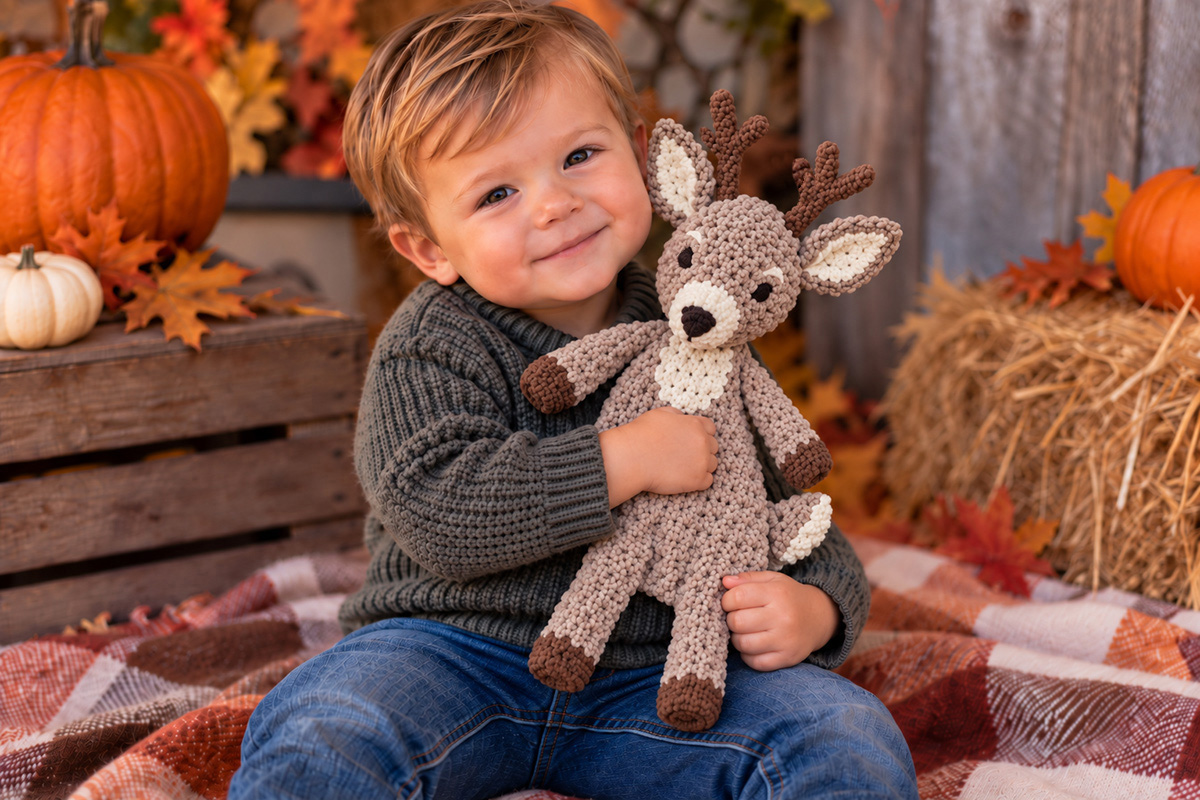
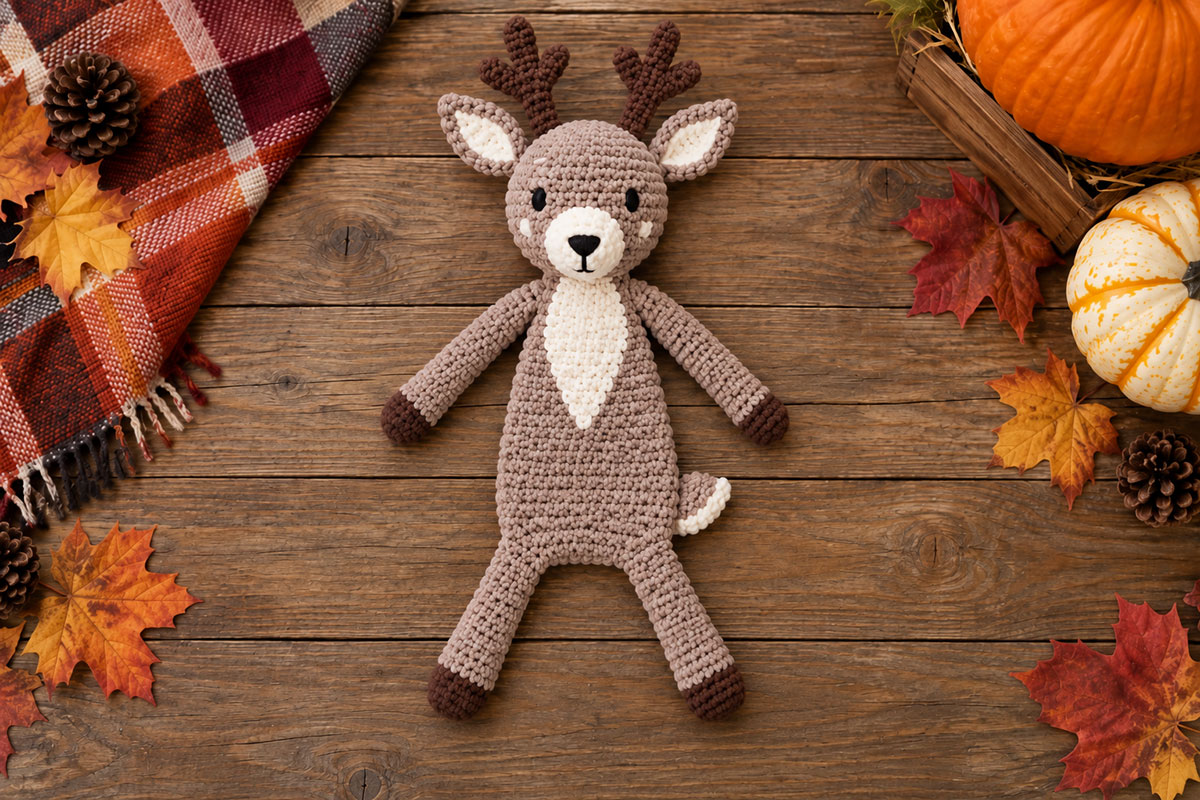
This free whitetail crochet buck deer snuggler lovey pattern makes a soft woodland deer with a stuffed head, small brown antlers, long floppy arms and legs and a flatter body that folds naturally instead of feeling like a stiffer stuffed animal. The buck is crocheted with gray-taupe chenille yarn, cream face details and brown hooves to give the buck a gentle woodland look that works especially well for a handmade baby gift or forest nursery theme.
Explore More Free Crochet Baby Patterns
Crochet Baby Snuggler Patterns
Yarn for This Buck Deer Snuggler Lovey
Jump to the Pattern Section You Need
Finished Size – measurements and proportions Materials – yarn, hook and supplies Gauge – keeping the snuggler proportions right Buck Head and Muzzle – shape the whitetail face Ears and Antlers – pointed ears and branched antlers Snuggler Body – make the flatter floppy torso Arms, Legs and Hooves – four floppy limbs with lightly stuffed hooves Whitetail Details – chest patch, markings and white-tailed deer tail Assembly – put the buck snuggler togetherCrochet Buck Deer Snuggler Lovey Pattern Size and Shape
This buck is meant to land somewhere between a stuffed animal and a flatter security lovey. The head has enough stuffing to hold the whitetail face and antlers in shape, but the middle of the body stays much softer and flatter. I don't want a round, firmly stuffed belly here. The long floppy shape is part of what makes him a snuggler.
At the gauge used for this pattern, the finished buck should measure about 17 to 18 inches from the top of his head to the bottom of his hooves, or about 20 to 21 inches if you include the antlers. The body itself should be about 8 inches long and about 7 inches across at its widest point.
The finished head should be about 5 to 5 1/2 inches across. The arms are expected to finish at about 5 inches long, while the legs are about 6 inches long including the brown hoof sections. I kept the legs a little shorter in proportion to the torso on purpose. That gives the buck the softer, more balanced shape shown in the example instead of four very long legs hanging from a small body.
The body is made from separate front and back panels rather than crocheted as a firmly stuffed tube. Once they're joined, use only a thin layer of filling between them. You're looking for a finished center thickness of roughly 1 to 1 1/2 inches when the lovey is lying naturally. It should flatten easily under your hand and fold when it's picked up.
The hooves get only a small amount of filling too. They need enough to give the brown ends some shape, but they shouldn't turn into round balls. The finished hoof sections should stay fairly flat and should flow into the narrower arms and legs without a big bump.
The whitetail details are built into the pattern rather than added as an afterthought. He has a longer cream muzzle, a white throat and chest patch, pointed ears, brown branched antlers and a small tail with a cream-white underside. Those features are what separate this buck from my crochet doe and fawn deer lovey pattern, which has a different finished shape and deer design.
The finished measurements are calculated from the stitch counts and gauge rather than taken from a test-made sample, so yours may vary a little depending on the chenille yarn and how tightly you crochet. The proportions matter more than hitting every measurement to the quarter inch.
Materials for the Buck Deer Snuggler Lovey
Taupe chenille yarn: Plan on about 140 to 160 yards of #6 super bulky chenille yarn for the head, body panels, arms, legs, outer ears and tail.
Cream chenille yarn: About 25 to 30 yards for the longer muzzle, inner ears, throat and chest patch, facial markings and white underside of the tail.
Brown chenille yarn: About 30 to 35 yards for the antlers and the smaller brown hoof sections.
Black embroidery floss: A small amount for the embroidered eyes and nose. I would use all six strands together so the stitches don't disappear into the chenille.
6 mm crochet hook: Use this for the head, muzzle, ears, body, arms, legs, hooves, chest patch and tail.
5 mm crochet hook: Use the smaller hook for the antlers. The tighter fabric helps those narrow pieces hold their shape without adding wire.
Polyester fiberfill: About 3 to 4 ounces should be plenty. Most of it goes into the head. The body gets only a thin layer, and the brown hoof ends need just enough to keep them from collapsing completely.
You'll also need: A yarn needle with a large eye, scissors, stitch markers and a few removable markers or pins for positioning the pieces before sewing.
The yarn amounts are estimates, and chenille yardage can vary quite a bit between brands. I'd rather have a little yarn left than come up short.
There are no plastic safety eyes, buttons, wire or pipe cleaners in this pattern. The eyes and nose are embroidered, and the antlers get their shape from tight crochet instead of anything hidden inside them. If you're making the buck for a young child, it's also worth reading the U.S. Consumer Product Safety Commission guidance on small parts and checking every sewn piece carefully before the lovey is used.
For a baby, use the snuggler during awake, supervised time only. Keep it out of cribs, bassinets, play yards and other infant sleep spaces. The CPSC Safe Sleep guidance recommends keeping those sleep spaces bare except for a fitted sheet.
Gauge for the Crochet Buck Deer Snuggler
Using the 6 mm hook, aim for about 8 single crochet stitches and 9 rows across 4 inches.
Gauge matters more here than it does on a little applique. It controls the size of the head and, more importantly, how dense the chenille fabric is. If you can easily see filling between the stitches, go down a hook size even if that makes the finished buck a little smaller.
Don't loosen the body stitches just because we're keeping that section flatter. The softness comes from using very little stuffing between the panels, not from making loose crochet fabric.
The antlers are deliberately worked more tightly with the 5 mm hook. They should stay soft enough for a lovey but firm enough to keep the branched shape without wire.
Pattern Notes and Abbreviations
This pattern uses U.S. crochet terms.
ch = chain
sc = single crochet
sl st = slip stitch
inc = work 2 single crochet stitches in the same stitch
dec = single crochet 2 stitches together
st/sts = stitch/stitches
rnd = round
The head, muzzle, arms, legs and antler pieces are worked in continuous rounds unless I specifically tell you otherwise. Put a stitch marker in the first stitch of each round and move it up as you work. The brown hoof sections are worked as the first two rounds of each arm and leg, so they are not separate pieces.
The two body panels, outer and inner ears, chest patch and both tail pieces are worked flat in rows. A turning chain does not count as a stitch.
Before assembly, you should have 21 crocheted pieces: 1 head, 1 muzzle, 2 outer ears, 2 inner ears, 2 main antler stems, 2 long antler branches, 2 short antler branches, 2 body panels, 2 arms, 2 legs, 1 chest patch, 1 taupe tail piece and 1 cream tail underside.
Numbers in parentheses at the end of a round or row are the stitch count you should have after completing that round or row. Check those counts as you go. Chenille hides stitches very well, and finding a missed increase five rounds later isn't much fun.
If your chenille doesn't like being pulled into a tight magic ring, chain 2 and work the first-round stitches into the second chain from the hook instead. Either start is fine as long as you can close the center securely.
Buck Head and Longer Deer Muzzle
The head is the firmly stuffed part of the snuggler. Keep the crochet dense and fill it enough to hold its shape, but don't stretch the stitches until you can see fiberfill through them.
Head in taupe
Rnd 1: Make a magic ring and work 6 sc into the ring. (6)
Rnd 2: Inc in each st around. (12)
Rnd 3: *Sc in next st, inc in next st.* Repeat around. (18)
Rnd 4: *Sc in next 2 sts, inc in next st.* Repeat around. (24)
Rnd 5: *Sc in next 3 sts, inc in next st.* Repeat around. (30)
Rnd 6: *Sc in next 4 sts, inc in next st.* Repeat around. (36)
Rnds 7 through 11: Sc in each st around. (36)
Before you start decreasing, choose the front of the head. Put removable markers where the two eyes will go between Rnds 8 and 9. Place the centers of the eyes about 7 stitches apart.
Using black embroidery floss, make each eye with 5 or 6 short satin stitches worked closely together. Keep the eyes fairly small and slightly vertical rather than making large black circles. Secure the floss ends firmly inside the head while you can still reach them through the opening.
For the little cream facial markings shown on the finished buck, add two short cream stitches just below and slightly outside each eye. Keep them small. They're accents, not another large face patch.
Rnd 12: *Sc in next 4 sts, dec over next 2 sts.* Repeat around. (30)
Rnd 13: *Sc in next 3 sts, dec over next 2 sts.* Repeat around. (24)
Rnd 14: *Sc in next 2 sts, dec over next 2 sts.* Repeat around. (18)
Start stuffing the head firmly now. Push filling into the upper sides and around the face, but keep checking that the head stays rounded rather than becoming lumpy.
Rnd 15: *Sc in next st, dec over next 2 sts.* Repeat around. (12)
Add the last of the stuffing before the opening gets too small.
Rnd 16: Dec around. (6)
Fasten off, leaving a long tail. Thread the tail through the remaining 6 stitches, pull the opening closed and secure it. Keep the remaining yarn tail for attaching the head to the body later.
Longer cream muzzle
The muzzle is an oval rather than a round patch. When you sew it onto the head, turn the long direction vertically. That's what gives the buck a more deer-like face instead of the short round muzzle you might use on a teddy bear.
With cream yarn, ch 6.
Rnd 1: Starting in the second ch from the hook, sc in the next 4 ch, work 3 sc in the last ch. Turn the foundation chain so you can work along the unused loops on the opposite side. Sc in the next 3 ch, then work 2 sc in the last ch. (12)
Rnd 2: Inc in the first st, sc in the next 3 sts, inc in each of the next 3 sts, sc in the next 3 sts, inc in each of the last 2 sts. (18)
Rnd 3: Sc in each st around. (18)
Fasten off, leaving a long sewing tail.
Position the muzzle vertically on the lower front of the head. The upper edge should sit just below the eyes, around Rnd 9, with the lower end reaching toward Rnds 12 to 13. Pin or hold it in place and check the face from the front before sewing.
Sew around most of the muzzle edge, leaving about 1 inch open. Add only enough fiberfill to lift the muzzle away from the face. Don't pack it into a round ball.
Before closing the muzzle, use black embroidery floss to satin stitch a small nose across the lower third of the cream muzzle. Make the upper edge a little wider than the bottom so it has a soft triangular shape. Add one short straight stitch down from the center of the nose. Secure the floss ends firmly on the inside of the muzzle and bury the ends so they cannot pull free. Then finish sewing the remaining muzzle opening securely to the head.
Pointed Ears and Branched Brown Antlers
The ears stay completely flat. Each one has a taupe outer piece with a smaller cream piece sewn on top. The narrow pointed shape is deliberate. It helps the finished head read as a whitetail buck instead of giving him broad rounded teddy-bear ears.
Outer ear, make 2 in taupe
Row 1: Ch 2. Work 2 sc in the second ch from the hook. (2)
Row 2: Ch 1 and turn. Inc in each st. (4)
Row 3: Ch 1 and turn. Sc across. (4)
Row 4: Ch 1 and turn. Inc in first st, sc in next 2 sts, inc in last st. (6)
Rows 5 through 7: Ch 1 and turn. Sc across. (6)
Fasten off, leaving a long tail for attaching the ear to the head.
Inner ear, make 2 in cream
Row 1: Ch 2. Work 2 sc in the second ch from the hook. (2)
Row 2: Ch 1 and turn. Inc in each st. (4)
Rows 3 through 5: Ch 1 and turn. Sc across. (4)
Fasten off, leaving a sewing tail.
Center one cream inner ear on each taupe outer ear with the narrow ends pointing in the same direction. Sew the cream piece flat to the taupe piece, leaving a visible taupe border around it.
Don't stuff the ears. Pin them to opposite sides of the head with the wide Row 7 edge against the head around Rnds 5 through 7. Angle the pointed tips slightly outward and upward. Sew the full base of each ear securely to the head.
Brown antlers, make 2 matching sets
Switch to the 5 mm hook for the antlers. Each antler is made from one main stem and two separate short branches. None of these pieces is stuffed, and there is no wire inside them.
Main antler stem, make 2
Rnd 1: With brown yarn, make a magic ring and work 5 sc into the ring. (5)
Rnds 2 through 8: Sc in each st around. (5)
Fasten off, leaving a long tail for attaching the stem to the head.
Long antler branch, make 2
Rnd 1: Make a magic ring and work 5 sc into the ring. (5)
Rnds 2 through 4: Sc in each st around. (5)
Fasten off, leaving a sewing tail.
Short antler branch, make 2
Rnd 1: Make a magic ring and work 5 sc into the ring. (5)
Rnds 2 through 3: Sc in each st around. (5)
Fasten off, leaving a sewing tail.
For each antler, use the sewing tail from the longer branch to sew all the way around its 5-stitch open base to one side of the main stem around Rnds 4 to 5. Stitch through every base stitch so no part of the branch opening is left loose. Attach the shorter branch the same way around Rnds 6 to 7. Angle both branches outward so you end up with a main upright stem and two smaller tines. Repeat for the second antler, reversing the direction of the branches so the finished pair mirrors each other.
Pin the completed antlers to the top of the head between roughly Rnds 3 and 5, one on each side of the center line. Leave enough room between them that they don't crowd the ears. Check the buck from the front before sewing. Both antlers should sit at about the same height and angle.
Sew around the entire base of each antler stem several times. Because we're not using wire, that firm sewn base is what keeps the antlers upright while still leaving them soft.
Make the Flatter Snuggler Body
The body is made from two matching taupe panels. This is what keeps the middle of the buck flatter and floppier instead of turning him into a firmly stuffed animal.
Don't stuff either panel while you're crocheting. We'll put only a thin layer of fiberfill between them during assembly.
Body panel, make 2 in taupe
Row 1: Ch 11. Starting in the second ch from the hook, sc across. (10)
Row 2: Ch 1 and turn. Inc in first st, sc in next 8 sts, inc in last st. (12)
Row 3: Ch 1 and turn. Inc in first st, sc in next 10 sts, inc in last st. (14)
Rows 4 through 14: Ch 1 and turn. Sc across. (14)
Row 15: Ch 1 and turn. Dec over first 2 sts, sc in next 10 sts, dec over last 2 sts. (12)
Row 16: Ch 1 and turn. Dec over first 2 sts, sc in next 8 sts, dec over last 2 sts. (10)
Rows 17 and 18: Ch 1 and turn. Sc across. (10)
Treat the Row 1 edge as the top of the body where the head will be attached and the Row 18 edge as the lower end where the legs will be attached. Put a removable marker in the Row 1 edge of each panel so you can keep the orientation straight during assembly.
Fasten off the first panel. On the second panel, leave a long sewing tail.
Each panel should be about 8 inches long and about 7 inches across the widest part at the stated gauge. The upper and lower ends are narrower, while the middle stays broad enough to give the lovey a soft, graceful torso.
Lay the two panels together and check the shape before you go any farther. The body should look elongated with gently curved sides. If yours is turning into a short wide oval, your row gauge is probably tighter than the pattern gauge.
The finished body isn't supposed to stand away from the table like a stuffed belly. Once assembled, it should lie fairly flat and bend easily when you pick it up.
Crochet the Arms, Legs and Small Brown Hooves
All four limbs stay mostly unstuffed. Only the little brown hoof ends get a pinch of fiberfill. That's enough to give them some shape without creating the round, heavy feet you see on a stuffed animal.
The arms and legs use the same narrow 6-stitch tube. The legs simply have a few more rounds so they're longer.
Arms, make 2
Start with brown yarn.
Rnd 1: Make a magic ring and work 6 sc into the ring. (6)
Rnd 2: Sc in each st around. (6)
Put a very small pinch of fiberfill into the brown section now. Keep it flat between your fingers. If it feels like a little ball, take some filling back out.
Change to taupe yarn.
Rnds 3 through 11: Sc in each st around. (6)
Do not stuff the taupe portion.
Flatten the open end so that 3 stitches sit across the front and 3 across the back. Fasten off, leaving a long tail for sewing.
Each arm should finish at about 5 inches long.
Legs, make 2
Start with brown yarn.
Rnd 1: Make a magic ring and work 6 sc into the ring. (6)
Rnd 2: Sc in each st around. (6)
Add the same small pinch of fiberfill to the hoof section. Don't push stuffing up into the leg.
Change to taupe yarn.
Rnds 3 through 14: Sc in each st around. (6)
Leave the taupe leg unstuffed.
Flatten the open end and fasten off with a long sewing tail.
The legs should finish at about 6 inches long including the brown hooves.
Before assembly, lay all four limbs beside the body. The brown ends should be small compared with the length of the taupe sections, and the legs should be only about an inch longer than the arms.
If a hoof looks too round, fix it now. Pull out some filling and flatten it gently between your fingers. The finished buck looks better with small soft hoof ends than with four heavy feet hanging from the body.
Add the White Chest Patch and Whitetail
The white markings are part of what gives this buck his whitetail look. Keep them simple. A cream throat and chest patch plus the light underside of the tail is enough.
Chest patch in cream
Row 1: Ch 3. Starting in the second ch from the hook, sc across. (2)
Row 2: Ch 1 and turn. Inc in each st. (4)
Row 3: Ch 1 and turn. Inc in first st, sc in next 2 sts, inc in last st. (6)
Rows 4 through 6: Ch 1 and turn. Sc across. (6)
Row 7: Ch 1 and turn. Dec over first 2 sts, sc in next 2 sts, dec over last 2 sts. (4)
Row 8: Ch 1 and turn. Dec twice. (2)
Fasten off, leaving a long sewing tail.
Center the patch on the front body panel with the narrow Row 1 end pointing toward the head. The widest part should sit across the upper middle of the chest.
Sew the patch completely flat. Do not stuff it.
I would position the top of the cream patch close enough to the head that the white looks like it continues down from the throat instead of floating in the middle of the belly.
Whitetail outer piece in taupe
Row 1: Ch 3. Starting in the second ch from the hook, sc across. (2)
Row 2: Ch 1 and turn. Inc in each st. (4)
Rows 3 through 5: Ch 1 and turn. Sc across. (4)
Row 6: Ch 1 and turn. Dec twice. (2)
Row 7: Ch 1 and turn. Dec over the remaining 2 sts. (1)
Fasten off, leaving a long tail.
White tail underside in cream
Row 1: Ch 2. Work 1 sc in the second ch from the hook. (1)
Row 2: Ch 1 and turn. Work 2 sc in the st. (2)
Rows 3 and 4: Ch 1 and turn. Sc across. (2)
Row 5: Ch 1 and turn. Dec over the 2 sts. (1)
Fasten off, leaving a sewing tail.
Center the cream piece on the taupe tail, leaving taupe showing along both sides and at both ends. Sew the cream piece completely flat to the taupe piece.
Don't stuff the tail. It should stay soft and flat.
Position the wider end of the tail on the back body panel about 2 inches above the lower edge. Angle the pointed end slightly toward one side so the cream underside can still be seen when the buck is lying down or being held.
Sew only the upper inch or so of the tail to the body. Leave the rest loose so it can flop naturally.
Assemble the Buck Deer Snuggler Lovey
I would assemble this one in a particular order so you don't end up fighting with the limbs and tail after the body is closed.
1. Finish the front and back body panels first.
The cream chest patch should already be sewn to the front panel, and the tail should already be attached to the back panel.
Lay the panels side by side and make sure the wider middles and narrower ends match.
2. Attach the arms.
Place one arm at each upper side of the back body panel, centered across Rows 5 through 7. Let the unstuffed taupe length extend beyond the body edge and angle slightly downward. Lay the flattened open end about 1 inch onto the inside surface of the panel.
Sew across the full 3-stitch flattened end more than once. Position the second arm as a mirror of the first so both arms begin at the same height and the brown hoof ends point away from the body.
3. Attach the legs.
Position one leg at each lower corner of the back body panel with the taupe leg extending below the body. Lay each flattened open end about 1 inch onto the inside surface of the panel. Each flattened leg end is 3 stitches wide. Leave about 2 inches of the lower body edge between the two leg attachment points.
Sew across the full flattened end of each leg more than once. Check that both legs begin at the same height before moving on.
Check the buck laid flat before moving on. You should now have two arms coming from the upper sides and two slightly longer legs coming from the lower edge.
4. Join the body panels.
Place the front panel over the back panel with the outer sides facing out. Match Row 1 to Row 1 and Row 18 to Row 18.
Using taupe yarn and a yarn needle, whipstitch the two panels together around the outside edge. Sew through both layers and through the limb attachment areas as you reach them. That second line of stitching helps reinforce the arms and legs.
Leave about a 4-inch opening along one side.
Add a thin, even layer of fiberfill between the panels. Start with much less than you think you'll need.
Spread the filling with your fingers so there aren't any big lumps. The body should have a little softness between the layers, but it should still flatten easily when you press it.
Check the body from the side. About 1 to 1 1/2 inches of relaxed thickness is enough.
Once you're happy with the shape, finish sewing the opening closed and secure the yarn.
5. Attach the head.
Center the head over the narrow top edge of the body. The cream chest patch should line up beneath the muzzle.
Set roughly the lower third of the head against the upper body rather than balancing the head on a tiny point. That larger contact area keeps the finished head from wobbling.
Using the long taupe yarn tail from the head, sew through the body and the lower head stitches all the way across the attachment area.
Work back across the same area a second time. Then turn the buck over and add several reinforcing stitches along the back of the neck connection.
The head should still move a little because the body is soft, but it shouldn't flop backward on a loose seam.
6. Check the ears and antlers.
Look at the finished buck straight on. The pointed ears should angle slightly outward, and the two brown antlers should mirror each other.
If one antler leans too far forward or backward, add one or two small securing stitches at its base rather than trying to stuff it. The antlers stay unstuffed and wire-free.
7. Check every attachment.
Give each arm, leg, ear, antler and the tail a firm tug with your hand. If anything shifts at the seam, sew it again before the snuggler is used.
Check the embroidered eyes and nose too. There shouldn't be any loose loops of floss that little fingers can catch.
Remove every stitch marker, removable marker and positioning pin before use. Weave in and secure any remaining yarn ends so nothing temporary is left inside or attached to the finished snuggler.
Once he's assembled, the finished buck should have a fully shaped head, four floppy limbs, small lightly stuffed hooves and a much flatter middle body. The middle should still flatten easily under your hand and fold naturally when the buck is picked up. The floppy center is what gives this pattern the snuggler lovey shape we're after.
Before You Finish the Snuggler
Lay the buck flat one last time and compare the two sides. The arms don't have to fall at exactly the same angle, but they should be the same length. Check the legs the same way.
Then look at the face. The longer cream muzzle should sit vertically below the embroidered eyes, the pointed ears should frame the antlers, and the cream chest patch should visually continue the lighter coloring down the front of the buck.
I wouldn't add more decoration. No buttons, beads, bows or hard pieces are needed. The whitetail markings and branched antlers already give him plenty of character.
If you'd rather make a more traditional security-blanket style deer, my crochet doe and fawn deer lovey pattern uses a different construction. For more soft animal projects with this longer cuddle shape, browse the crochet baby snuggler patterns.
When you click on links to various merchants on this site and make a purchase, this may result in this site earning a commission. This does not affect the price you pay.

UBGI Gold Standard 2026
Reviewed under the site's
editorial checklist.
Photos, decorating ideas, party setups and reader submissions are shared for inspiration unless a page is specifically presented as a pattern, tutorial, reference guide or step-by-step project. Follow the instructions, measurements, safety guidance and manufacturer directions provided for the particular project or product.
About Jan | Contact | Baby Nursery Ideas (Blog) | Site Map | Privacy Policy | Disclosure Policy | Disclaimer | Affiliate Disclosure | Earnings Disclosure | Facebook | Pinterest
I am a participant in the Amazon Services LLC Associates Program, an affiliate advertising program designed to provide a means for us to earn fees by linking to Amazon. As an Amazon Associate I earn from qualifying purchases.
Copyright © 2006-2026. All Rights Reserved.