Free Crochet Apple Lovey Pattern
By Jan Bay
This free crochet apple lovey pattern makes a soft baby snuggler with an attached security blanket body and a cheerful apple head. The pattern includes the apple shaping, stem, leaf, embroidered face and all the steps needed to put the finished lovey together.
Explore More Free Crochet Baby Patterns

Yarn for This Crochet Apple Lovey
Worsted Weight Yarn for the Apple Lovey
Choose red yarn for the apple, green for the leaf, brown for the stem and a coordinating color for the blanket body.
Jump to the Crochet Apple Lovey Pattern
Crochet Apple Lovey Pattern at a Glance
The finished lovey has a soft square blanket body topped with a lightly stuffed apple head. A small dip at the top of the head, a short brown stem and one green leaf give it a clear apple shape instead of leaving it looking like a plain red ball.
Pattern Details
- Skill level: Confident beginner
- Crochet terms: Standard U.S. crochet terms
- Finished blanket size: About 14 inches square
- Finished apple head: About 4 1/2 inches wide
- Yarn weight: Worsted weight, category 4
- Blanket hook: 5 mm, size H-8
- Apple and small pieces hook: 4 mm, size G-6
- Construction: The blanket is worked from the center outward. The apple head, stem and leaf are made separately and sewn together.
- Special techniques: Working in joined rounds, basic increases and decreases, simple embroidery and hand sewing
Gauge is not critical for the blanket, but the apple head should be crocheted firmly enough that the stuffing does not show between the stitches. Changing the yarn, hook size or tension will change the finished measurements.

The square blanket body is large enough for little hands to hold without turning the project into a full baby blanket.
Yarn, Hook and Supplies
You do not need a long list of specialty supplies for this apple lovey. The two hook sizes help the blanket stay soft while keeping the stuffed apple head firm enough to hold its shape.
- Blanket yarn: About 300 yards of worsted-weight, category 4 yarn in cream, oatmeal or another light coordinating color
- Apple yarn: About 90 yards of worsted-weight, category 4 yarn in red
- Leaf yarn: About 12 yards of worsted-weight, category 4 yarn in green
- Stem yarn: About 6 yards of worsted-weight, category 4 yarn in brown
- Face yarn: A small amount of black or dark brown yarn for the embroidered eyes and mouth
- Blanket hook: 5 mm, size H-8 crochet hook
- Apple, stem and leaf hook: 4 mm, size G-6 crochet hook
- Stuffing: A small amount of washable polyester fiberfill
- Other supplies: Yarn needle, scissors, locking stitch marker, straight pins and a flexible measuring tape
Choose a smooth yarn that lets you see each stitch clearly. Very fuzzy yarn can hide the shaping around the top of the apple and make the small leaf harder to work.
The yardage above allows a little extra for joining, embroidery and normal differences in tension. A larger hook, looser stitches or a wider border will use more blanket yarn.
The yarn labels should all show the same weight category even when the colors come from different lines. The Craft Yarn Council yarn weight system explains the numbered categories printed on many yarn labels.
For a lovey intended for a baby, embroider the facial details with yarn. Buttons, beads and removable plastic pieces are not included in this pattern.

A light blanket color keeps the red apple easy to see, but soft green, pale gold or warm gray can work just as well.
Crochet Stitch Abbreviations
There are no fancy stitches tucked into this apple lovey. The blanket uses double crochet, while the apple head is worked in single crochet so the stuffing stays covered.
- ch: chain
- dc: double crochet
- hdc: half double crochet
- sc: single crochet
- sl st: slip stitch
- st or sts: stitch or stitches
- sp: space
- inc: work 2 single crochet stitches in the same stitch
- dec: single crochet 2 stitches together
- MR: magic ring
- rep: repeat
Single crochet decrease: Insert the hook into the next stitch and pull up a loop. Insert the hook into the following stitch and pull up another loop. Yarn over and pull through all three loops on the hook.
Pattern Notes Before You Begin
- The pattern uses standard U.S. crochet terms.
- The blanket is worked in joined rounds from the center outward.
- The side facing you while you work the blanket rounds is the right side.
- The beginning chain 3 counts as the first double crochet unless a step says otherwise.
- The apple head is worked in a continuous spiral. Do not join the rounds.
- Place a locking stitch marker in the first stitch of each apple-head round and move it up as you work.
- Numbers in parentheses show the stitch count at the end of a round.
- Instructions inside brackets are repeated the number of times shown.
- Stuff the apple a little at a time. Packing in too much fiberfill can stretch the stitches and flatten the shaping.
- Leave long yarn tails on the head, stem and leaf so there is enough yarn for assembly.
The blanket and apple head are made separately. Finish the blanket first, then center the completed head over the blanket’s center ring before sewing. That order makes it much easier to check the placement from every side.
Crochet the Square Lovey Blanket
The blanket begins with four small corner spaces and grows outward like a classic granny square. Work with the 5 mm hook and the blanket color. Do not turn after any round.
Keep the chain spaces easy to see. Each chain-1 space along a side receives one group of three double crochet stitches on the following round. Each chain-2 corner receives two groups of three double crochet stitches with a chain 2 between them.
Round 1: Make a magic ring. Ch 3, which counts as the first dc. Work 2 dc in the ring, ch 2, then repeat [3 dc in the ring, ch 2] 3 more times. Join with a sl st in the top of the beginning ch 3. Pull the ring closed. (12 dc and 4 corner ch-2 spaces)
Round 2: Sl st in each of the next 2 dc and into the next corner ch-2 sp. Ch 3, 2 dc, ch 2 and 3 dc in the same corner sp. Ch 1. Repeat [(3 dc, ch 2, 3 dc) in the next corner ch-2 sp, ch 1] 3 times. Join with a sl st in the top of the beginning ch 3. (24 dc, 4 corner ch-2 spaces and 4 ch-1 spaces)
Round 3: Sl st in each of the next 2 dc and into the next corner ch-2 sp. Ch 3, 2 dc, ch 2 and 3 dc in the same corner sp. Ch 1, work 3 dc in the next ch-1 sp, then ch 1. Repeat [(3 dc, ch 2, 3 dc) in the next corner ch-2 sp, ch 1, 3 dc in the next ch-1 sp, ch 1] 3 times. Join with a sl st in the top of the beginning ch 3. (36 dc, 4 corner ch-2 spaces and 8 ch-1 spaces)
Round 4: Sl st in each of the next 2 dc and into the next corner ch-2 sp. Ch 3, 2 dc, ch 2 and 3 dc in the same corner sp.
Repeat the following steps around the first three sides:
- Ch 1 and work 3 dc in each ch-1 sp along the side, placing ch 1 between the 3-dc groups.
- Ch 1 before reaching the corner.
- Work 3 dc, ch 2 and 3 dc in the next corner ch-2 sp.
Work across the last side in the same way. Ch 1 after the final 3-dc group and join with a sl st in the top of the beginning ch 3. (48 dc, 4 corner ch-2 spaces and 12 ch-1 spaces)
Rounds 5 through 10: Repeat Round 4. Each new round adds one more 3-dc group to every side.
The stitch totals at the end of these rounds are:
- Round 5: 60 dc, 4 corner ch-2 spaces and 16 ch-1 spaces
- Round 6: 72 dc, 4 corner ch-2 spaces and 20 ch-1 spaces
- Round 7: 84 dc, 4 corner ch-2 spaces and 24 ch-1 spaces
- Round 8: 96 dc, 4 corner ch-2 spaces and 28 ch-1 spaces
- Round 9: 108 dc, 4 corner ch-2 spaces and 32 ch-1 spaces
- Round 10: 120 dc, 4 corner ch-2 spaces and 36 ch-1 spaces
After Round 10, the blanket should measure close to 13 1/2 inches across before the edging. A small difference is fine. The important point is that it lies flat and the four sides match.
Finish the Blanket Edge
Round 11: Sl st in each of the next 2 dc and into the next corner ch-2 sp. Ch 1. The chain does not count as a stitch. Work 3 sc in the same corner sp.
Work 1 sc in every dc and 1 sc in every ch-1 sp along the first side. Work 3 sc in the next corner ch-2 sp. Continue in this manner around the blanket. Join with a sl st in the first sc. (168 sc)
Fasten off and weave in the yarn tail securely.
The finished blanket should measure about 14 inches square. If an edge begins to pull inward, check that no chain-1 spaces were skipped. If a corner looks rounded instead of square, make sure all three single crochet stitches were placed in the corner space.
It is worth spreading the blanket out on a flat surface before moving on. A missed side space is much easier to correct now than after the apple head has been attached.

The center-out construction makes it easy to check the shape as each round is completed.
Crochet the Apple Head
Use the 4 mm hook and red yarn. The head is worked in a continuous spiral from the top down. Keep the stitch marker in the first stitch of each round so the beginning does not wander.
Round 1: Make a magic ring and work 6 sc in the ring. Pull the ring closed. (6 sc)
Round 2: Inc in each stitch around. (12 sc)
Round 3: Repeat [1 sc in the next st, inc in the next st] 6 times. (18 sc)
Round 4: Repeat [1 sc in each of the next 2 sts, inc in the next st] 6 times. (24 sc)
Round 5: Repeat [1 sc in each of the next 3 sts, inc in the next st] 6 times. (30 sc)
Round 6: Repeat [1 sc in each of the next 4 sts, inc in the next st] 6 times. (36 sc)
Round 7: Repeat [1 sc in each of the next 5 sts, inc in the next st] 6 times. (42 sc)
Round 8: Repeat [1 sc in each of the next 6 sts, inc in the next st] 6 times. (48 sc)
Rounds 9 through 15: Work 1 sc in each stitch around. (48 sc after every round)
Round 16: Repeat [1 sc in each of the next 6 sts, dec over the next 2 sts] 6 times. (42 sc)
Round 17: Repeat [1 sc in each of the next 5 sts, dec over the next 2 sts] 6 times. (36 sc)
Round 18: Repeat [1 sc in each of the next 4 sts, dec over the next 2 sts] 6 times. (30 sc)
Round 19: Repeat [1 sc in each of the next 3 sts, dec over the next 2 sts] 6 times. (24 sc)
Pause here and begin adding fiberfill. Press small pieces of stuffing against the sides rather than pushing one large clump into the center. The head should feel evenly filled while still giving slightly when squeezed.
Embroider the Apple Face
Flatten the head gently and choose the side that looks smoothest for the face. Keep the beginning-of-round line toward the back.
Using black or dark brown yarn, embroider two small vertical eyes across Rounds 11 and 12. Place the eyes about 7 stitches apart. Make two or three passes for each eye, keeping the yarn snug without pulling the crochet fabric inward.
Embroider a small curved mouth between Rounds 14 and 15. Secure the embroidery tails inside the head before continuing.
Round 20: Repeat [1 sc in each of the next 2 sts, dec over the next 2 sts] 6 times. (18 sc)
Add more stuffing around the lower half of the head. Check the face from the front before closing the remaining rounds.
Round 21: Repeat [1 sc in the next st, dec over the next 2 sts] 6 times. (12 sc)
Round 22: Dec around. (6 sc)
Fasten off, leaving a yarn tail at least 36 inches long. Thread the tail through the front loop of each remaining stitch and pull the opening closed. Keep the remaining tail for shaping the apple and sewing the head securely to the blanket.
Shape the Apple
Thread the long yarn tail onto the yarn needle. Insert the needle through the bottom center of the head and bring it out beside the magic ring at the top.
Move the needle one stitch over, then pass it back through the center of the head and out through the bottom. Pull gently until a small dip forms at the top. The indentation should be deep enough to hold the stem without squeezing the head into two separate sections.
Repeat the pass once more if the shape needs a little more definition. Secure the yarn at the bottom with several small stitches, but do not cut the remaining tail. It will be used later to sew the head to the blanket.
Set the completed head on the center of the blanket. It should sit upright without tipping sharply to one side. A head that leans may have uneven stuffing, which can still be adjusted before the stem and leaf are attached.

The long yarn tail passes through the closed, stuffed head and pulls the top down just enough to form the apple indentation.
Crochet the Apple Stem and Leaf
The stem and leaf are small pieces, but they do a lot of the work when it comes to making the head look like an apple. Keep the stitches firm and leave long yarn tails for sewing.
Crochet the Brown Stem
Use the 4 mm hook and brown yarn.
Row 1: Ch 7. Work 1 sc in the second ch from the hook and in each remaining ch. (6 sc)
Row 2: Ch 1 and turn. Work 1 sc in each stitch across. (6 sc)
Fasten off, leaving a yarn tail about 12 inches long.
Fold the narrow strip in half lengthwise. Thread the long tail onto the yarn needle and begin whipstitching at the end where the tail starts. Sew the two long edges together toward the opposite end. Use the end where the sewing finishes as the bottom of the stem, and keep the remaining tail for attaching it to the apple. The finished stem should be about 2 inches long.
Do not stuff the stem. Flatten the lower half slightly so it can be sewn securely into the dip at the top of the apple.
Crochet the Green Apple Leaf
Use the 4 mm hook and green yarn.
Leaf: Ch 9.
Beginning in the second ch from the hook, work:
- 1 sl st in the first ch
- 1 sc in the next ch
- 1 hdc in the next ch
- 1 dc in each of the next 2 chs
- 1 hdc in the next ch
- 1 sc in the next ch
- 3 sc in the last ch
Continue along the unused loops on the opposite side of the foundation chain. Work:
- 1 sc in the next ch
- 1 hdc in the next ch
- 1 dc in each of the next 2 chs
- 1 hdc in the next ch
- 1 sc in the next ch
- 1 sl st in the final ch
Fasten off, leaving a yarn tail about 12 inches long. The leaf has 17 stitches around its outer edge.
Thread a short piece of green yarn onto the yarn needle and make one straight stitch from the base of the leaf toward the pointed end. This creates a simple center vein. Secure both ends on the back of the leaf.
Attach the Stem and Leaf to the Apple
Place the lower end of the stem inside the indentation at the top of the apple. Sew around the base of the stem several times, catching the crochet stitches on the head without passing the needle through the entire apple.
Give the stem a gentle tug before securing the yarn. It should remain upright without pulling the top of the head out of shape.
Place the leaf beside the stem with its pointed end angled slightly outward. Sew the lower third of the leaf to the apple. Leave the outer portion free so it does not look pressed flat against the head.
After the stem and leaf are sewn securely, make a small anchoring stitch near the base of each piece. Pass the needle through the stuffed apple head and bring it out 1 to 2 inches away. Pull the yarn gently, trim it close to the crochet surface and allow the cut end to settle inside the head.

Sew only the base of the leaf in place so the pointed end keeps a natural lifted shape.
Assemble the Crochet Apple Lovey
Before sewing anything to the blanket, turn the apple head so the face points in the same direction as one corner. This gives the finished lovey a clear front and keeps the face from looking as though it is turned toward a side edge.
Lay the blanket flat with the right side facing up. Place the bottom of the apple directly over the center ring. Check the distance from the head to all four corners. A small shift at the center becomes much easier to see when the blanket is viewed as a whole.
Use straight pins or locking stitch markers to hold the head in place at four evenly spaced points.
Sew the Apple Head to the Blanket
Thread the long red yarn tail from the bottom of the apple onto the yarn needle.
Bring the needle through a solid stitch near the center of the blanket, then pass it through a stitch along the lower edge of the apple head. Continue sewing around the base with small, evenly spaced whipstitches.
Catch stitches from approximately Rounds 20 and 21 of the apple head. This creates a secure attachment area without pulling the rounded sides down against the blanket.
Do not sew through only the open chain spaces in the blanket. Catch the tops or posts of the nearby double crochet stitches so the seam has enough support.
After every few stitches:
- Check that the apple is still centered.
- Make sure the face remains pointed toward the chosen front corner.
- Keep the thread firm without gathering the blanket.
- Look underneath to make sure long loops are not forming on the back.
Continue around the entire base, then make a second pass through any area that moves when the head is gently tilted. A few extra stitches at the front, back and both sides will help the head remain upright.
Secure the yarn beneath the apple with two or three small stitches. Draw the remaining tail through the stuffed head and bring it out several inches away. Pull gently, trim the yarn close to the surface and allow the cut end to settle inside.
Check the Finished Shape
Lift the lovey by each corner and watch the center. The head should remain centered without making the blanket pucker around it.
Set the lovey flat again and check these final details:
- The apple head sits upright rather than leaning sharply.
- The center of the blanket remains flat around the seam.
- The stem is secure and does not pull away from the head.
- The leaf is attached firmly at its base.
- No yarn tails or loose embroidery loops are visible.
- The four blanket corners remain the same length.
If the blanket gathers around the apple, remove the tightest attachment stitches and sew them again with less tension. The seam needs to hold the head securely, but it should not draw the center of the blanket into a cup.

Pinning the head at four points keeps the face correctly positioned while the base is sewn to the blanket.
Apple Lovey Color Variations
Red is the easiest color choice to recognize at a glance, but the same pattern can make several kinds of apples. Keep the yarn weight and hook sizes the same so the finished pieces still match the listed measurements.
- Green apple: Use fresh green yarn for the head, dark green for the leaf and brown for the stem.
- Golden apple: Choose warm yellow or muted gold yarn with an olive-green leaf.
- Deep red apple: Use burgundy or brick red for a softer fall color scheme.
- Two-tone apple: Change from red to a slightly darker red for the last several rounds of the head.
Cream gives the blanket a simple background, but it is not the only option. Pale green, oatmeal, warm gray and soft golden yellow can all work without competing with the apple face.
Very busy variegated yarn may hide the eyes, mouth and shaping at the top of the head. A solid or lightly heathered yarn keeps those small details easier to see.
The leaf can also be made in a second shade of green. Follow the same instructions without changing the stitch count. A darker center vein adds definition without adding another sewn piece.
For a matching fall set, pair this lovey with the free pumpkin crochet blanket pattern.
The same red, green and golden colors can also be carried into simple fall baby shower decorations when the lovey will be displayed with the gifts.
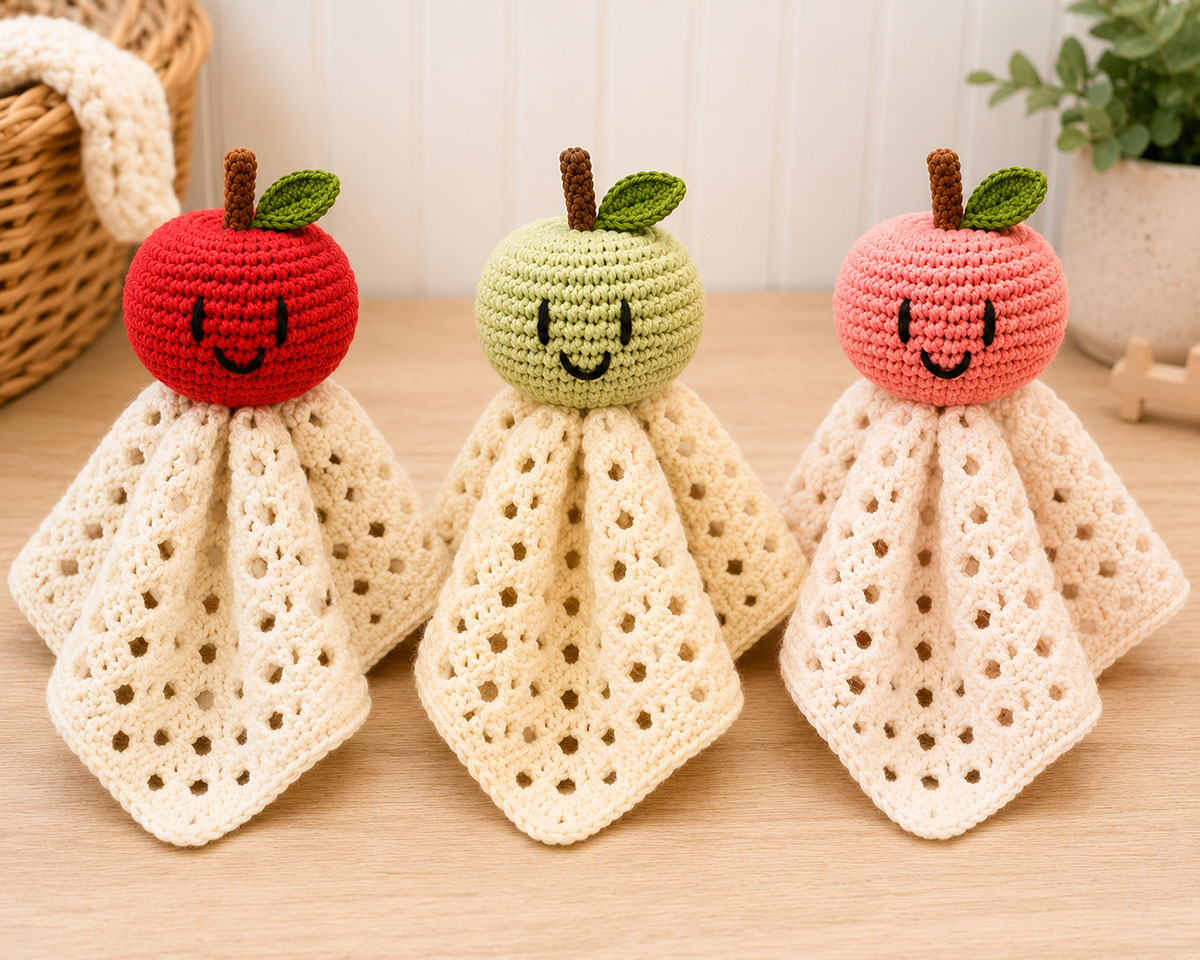
Red, green and golden yarn create three different looks without changing the pattern instructions.
Fixing Common Apple Lovey Shape Problems
Small changes in tension can make the apple or blanket look a little different from the example image. Check the stitch counts first. A missed increase, decrease or chain space can change the shape more than expected.
The Apple Head Looks Too Round
A plain round head may not read clearly as an apple. Make sure the shaping yarn passes from the bottom center to the top center and is pulled tightly enough to form a visible dip.
Add one more shaping pass through the center if needed. Pull gradually and stop before the sides begin to pinch inward.
The stem should sit inside the top indentation rather than on the rounded surface beside it. Angling the leaf away from the stem also helps define the apple shape.
The Stuffing Shows Between the Stitches
The apple head needs firm single crochet stitches. If the filling is visible, try one of these corrections:
- Remove a little stuffing.
- Use a smaller hook when remaking the head.
- Choose smooth stuffing and add it in small pieces.
- Keep the working yarn snug during the decrease rounds.
Do not add red fabric or loose yarn beneath the stitches to hide gaps. Correcting the tension or reducing the stuffing gives a neater finish.
The Apple Head Leans After Assembly
Check that the bottom of the head is centered over the blanket’s starting ring. Add several attachment stitches on the side opposite the lean.
Avoid pulling only one side of the seam tightly. Work around the base in small sections so the tension remains even.
Uneven stuffing can also cause the head to tip. Gently move the filling inside the head toward the side that appears flatter.
The Blanket Ripples or Flares
Rippling often means the stitches are loose or the chain spaces are larger than needed. It can also happen when extra groups are accidentally added along a side.
Count the 3-dc groups before continuing:
- Round 2 has 2 groups on each side.
- Round 3 has 3 groups on each side.
- Each following round adds exactly 1 group to every side.
A light ripple may settle after the blanket is gently shaped. A pronounced wave should be corrected before the head is attached.
The Blanket Pulls Inward
An edge that curves inward may contain a missed ch-1 space or a skipped 3-dc group. Check all four sides and compare their group counts.
Make sure each corner contains 3 dc, ch 2 and 3 dc. A missing corner group can shorten two adjoining sides at once.
During the final edging round, work one single crochet in every double crochet and every ch-1 space. Skipping the spaces will make the border too tight.
The Leaf Curls Too Much
A slight curl gives the leaf some movement. If it rolls into a tube, the foundation chain may be too tight.
Remake the starting chain with a relaxed tension, or use the larger hook for the chain only. Return to the 4 mm hook for the stitches around it.
Lay the finished leaf flat and smooth it with your fingers before sewing. Attach only the lower third so the tip remains free.
Crochet Apple Lovey Pattern Questions
Is this apple lovey suitable for a beginner?
A confident beginner should be able to make it. The pattern uses chains, slip stitches, single crochet, half double crochet and double crochet. You will also need to increase, decrease, sew small pieces together and embroider the face.
The blanket is a good place to settle into the project because its rounds follow a steady repeat. The apple head needs closer counting, especially during the increase and decrease rounds.
Can I begin the apple without a magic ring?
Yes. Ch 2 and work 6 sc in the second chain from the hook. Continue with Round 2 as written.
This method may leave a small opening at the top. Use the beginning yarn tail to draw that opening closed before attaching the stem.
Can I make the lovey blanket larger?
Continue repeating the blanket round before adding the single crochet edging. Every added round places one more 3-dc group along each side.
Remember that the listed edging count of 168 sc applies only when the blanket ends after ten granny-square rounds. Each additional granny-square round adds 12 double crochet stitches and 4 chain-1 spaces, so the final edging count will also increase.
A larger blanket uses more yarn and puts more weight beneath the apple head. Keep the head centered and reinforce the attachment seam if you add several rounds.
Can cotton yarn be used for the apple lovey?
Smooth worsted-weight cotton can be used, but it may feel firmer and heavier than acrylic yarn. Cotton also shows uneven tension clearly, so check the apple head as you work.
Use the same yarn weight for all parts of the project. Mixing a light cotton blanket with a much heavier apple yarn can make the head pull at the center.
Can I use safety eyes instead of embroidered eyes?
This pattern is written with embroidered eyes and a stitched mouth. The embroidery keeps the face soft and avoids adding separate plastic pieces.
Keep the stitches compact, secure the yarn ends inside the head and check that no loose loops remain around the eyes or mouth.
Why does my apple look like a red ball?
Check the top indentation first. The shaping strand should pass through the center of the stuffed head and pull the top down just enough to form a visible dip.
The stem belongs inside that dip, with the leaf sewn beside it. Those three details create the apple outline. Pull the shaping strand gradually because too much tension can divide the head into two rounded sections.
How should the finished lovey be washed?
Follow the care directions on the yarn label. When the yarn permits machine washing, place the lovey inside a mesh laundry bag and use a gentle cycle. Hand washing is another practical choice when you want to limit pulling on the stem, leaf and attachment seam.
Reshape the apple and blanket while damp, then allow the entire project to dry fully. Check the embroidered face, stem, leaf and head seam after washing.
Can an infant sleep with the apple lovey?
A handmade lovey is not an infant sleep product. Keep it out of a crib, bassinet, play yard or other infant sleep space. The U.S. Consumer Product Safety Commission advises keeping pillows, blankets, toys and other soft objects out of a baby’s sleep area.
The CPSC Safe Sleep information explains how to prepare a bare infant sleep space. Save the apple lovey for supervised cuddling, play, photographs or nursery display, then put it away before sleep.
More Free Crochet Baby Patterns to Make Next
The apple lovey fits neatly into my fall crochet patterns collection, but it does not have to stay packed away when autumn is over. Change the colors, leave off seasonal props in photographs and it becomes a cheerful handmade gift for an apple-themed nursery, teacher family or little one with a bright red room accent.
Its warm red, cream, green and golden colors also coordinate with many of the palettes shown in these fall nursery room ideas.
Browse the free baby crochet patterns for more blankets, loveys, baskets and handmade baby projects. The complete free baby patterns collection also includes sewing, quilting and other project ideas.
For another small blanket project with a character head, browse the crochet animal lovey patterns. That collection makes it easier to compare shapes before choosing the next face, ears or blanket style to crochet.
The free pumpkin crochet blanket pattern is a natural companion for an autumn baby gift. For a playful October project, the free crochet ghost pattern uses simple shaping and embroidered details.
Finished handmade pieces also need a place to go. The free crochet basket patterns include roomy nursery storage designs that can hold blankets, yarn or folded baby items.
Before putting the apple lovey away or giving it as a gift, check the head seam, stem, leaf and embroidered face one final time. A few careful finishing stitches make the project look neater and help every small piece stay where it belongs.
Turn the Apple Lovey Into a Finished Baby Gift
The lovey is small enough to give on its own, but it can also become the handmade piece in a simple baby gift set. Fold the blanket into a loose square with the apple head resting on top so the face, stem and leaf stay visible.
To turn the gift into a coordinated apple-themed set, pair the lovey with a handmade apple crib quilt made from my free pattern, which includes printable normal and mirrored appliqué templates.
A few easy pairings include:
- A plain cotton sleeper in cream, red or soft green
- A board book with an orchard, farm or autumn theme
- A coordinating burp cloth
- A handwritten card with the yarn care instructions
- The matching pumpkin crochet baby blanket for a larger fall gift
Avoid tying ribbon tightly around the apple head. A shallow gift box or reusable basket protects the stem and leaf better than a narrow gift bag.
Smaller apple-themed items can be arranged beside it using the simple packaging and presentation ideas featured with these fall baby shower favors.
The red apple colors also fit naturally with a red apple baby shower theme. For more seasonal food, decorations and planning ideas, browse the fall baby shower ideas. Keep the wrapping simple so the handmade apple remains the first thing the recipient sees.
Add a small care card that lists the yarn fiber, washing directions and the reminder to reshape the apple while damp. That little bit of information saves the recipient from having to guess later.
Give the Finished Apple Lovey One Last Check
Set the lovey on a flat surface and look at it from the front, back and both sides. Small finishing details are easier to catch before the project is washed, wrapped or photographed.
- Count all four blanket sides to confirm that they match.
- Check that the center stays flat beneath the apple head.
- Gently tug the stem and leaf to make sure the sewing is secure.
- Run a finger around the base of the head and look for loose attachment stitches.
- Check the back of the blanket for hanging yarn loops or ends.
- Make sure the embroidered eyes and mouth have no loose strands.
- Press the stuffing into any flat spots without stretching the crochet fabric.
- Remove every straight pin and locking stitch marker before the lovey is used, displayed or given as a gift.
- Confirm that every yarn tail has been woven in and trimmed.
The apple should feel softly filled, not packed hard. The blanket should drape from the center without pulling into folds around the head.
A tiny tilt in the leaf or a slightly curved stem gives the apple some character. There is no need to keep adjusting those pieces until they look stiff and perfectly matched.
Once everything is secure, the crochet apple lovey is ready for supervised play, nursery display or gifting. More small blanket projects can be found in the crochet animal lovey pattern collection.
When you click on links to various merchants on this site and make a purchase, this may result in this site earning a commission. This does not affect the price you pay.

UBGI Gold Standard 2026
Reviewed under the site's
editorial checklist.
Photos, decorating ideas, party setups and reader submissions are shared for inspiration unless a page is specifically presented as a pattern, tutorial, reference guide or step-by-step project. Follow the instructions, measurements, safety guidance and manufacturer directions provided for the particular project or product.
About Jan | Contact | Baby Nursery Ideas (Blog) | Site Map | Privacy Policy | Disclosure Policy | Disclaimer | Affiliate Disclosure | Earnings Disclosure | Facebook | Pinterest
I am a participant in the Amazon Services LLC Associates Program, an affiliate advertising program designed to provide a means for us to earn fees by linking to Amazon. As an Amazon Associate I earn from qualifying purchases.
Copyright © 2006-2026. All Rights Reserved.