Free Apple Quilt Pattern with Printable Appliqué Templates
By Jan Bay
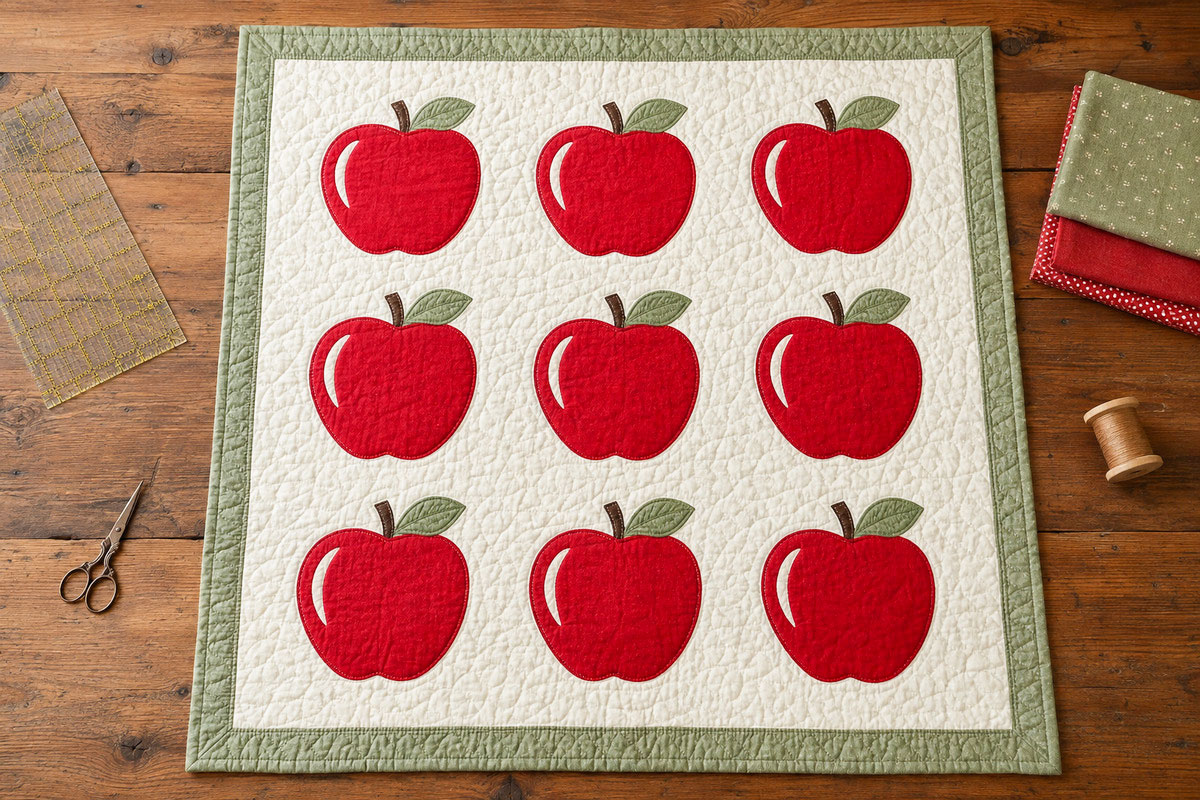
This free apple quilt pattern makes a 36 × 45-inch appliqué crib quilt with nine apples arranged in a 3 × 3 grid. The four-page PDF contains full-size normal and mirrored templates for every apple body, leaf, stem and curved highlight. I wrestled with Inkscape until every piece fit on ordinary US Letter paper, because a free pattern stops feeling free when it asks you to enlarge, tile and guess.
Explore More Baby Quilt Patterns
Baby Quilt Patterns and Crib Quilt Ideas
Easy Baby Quilt Patterns for Beginners

See the recommended quilting supplies for this apple appliqué quilt
Jump to the Apple Quilt Pattern
Quilt Size and Pattern Details
Printable Apple Appliqué Templates
Make the Apple Appliqué Blocks
Apple Quilt Size and Pattern Details
This apple quilt pattern finishes at 36 × 45 inches and features nine matching apple appliqués arranged in three even rows. Each apple is made from four simple pieces: the apple body, leaf, stem and curved highlight. Repeating the same motif keeps the quilt looking polished without asking you to cut a collection of complicated shapes.
The finished size falls within the smaller range explained in my crib quilt size guide. It is a useful size for a nursery wall hanging, decorative crib display, supervised floor time or a handmade baby shower gift.
This is not an apple core quilt pattern. It is a nine-block apple appliqué quilt made by fusing and stitching fabric shapes onto one background panel. There are no curved apple-core seams to piece.
| Finished quilt size | 36 × 45 inches |
| Center design area | 32 × 41 inches |
| Finished border | 2 inches |
| Apple arrangement | 3 × 3 grid with nine apples |
| Apple body size | 6.5 × 6 inches |
| Leaf size | 2.25 × 1.25 inches |
| Stem size | 0.5 × 1.5 inches |
| Highlight size | 0.5 × 1.75 inches |
| Appliqué method | Fusible raw-edge appliqué |
| Skill level | Confident beginner |
| Piecing seam allowance | ¼ inch |
You will cut nine apple bodies, nine leaves, nine stems and nine highlights. The printable file includes both normal and mirrored templates, so you can choose the version that matches your preferred appliqué method.
Nine apples give the quilt its country personality, while the clean grid keeps it from wandering into kitchen-decor territory. The curved highlight may be the smallest piece in the pattern, but it keeps the apple bodies from reading as nine heavy red shapes.
Materials and Supplies for the Apple Quilt
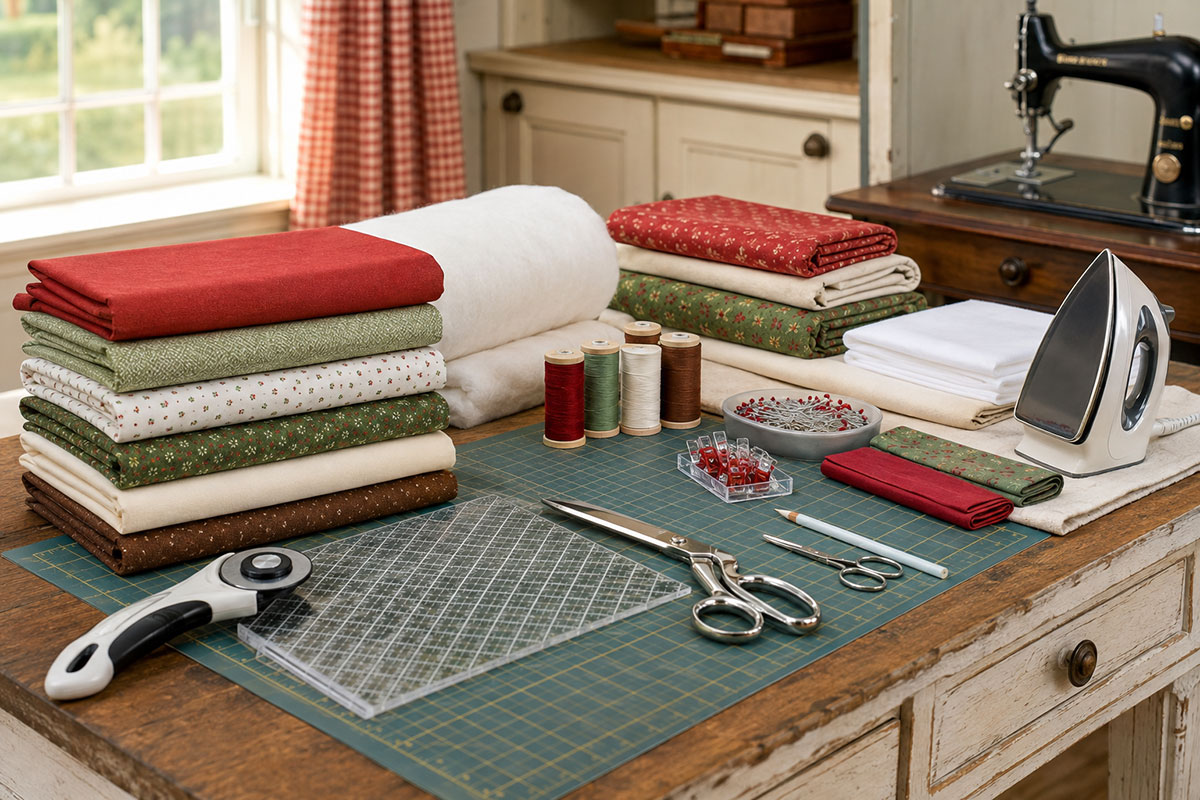
Quilt-weight cotton is the easiest fabric to manage for this pattern because it cuts cleanly, presses neatly and gives the appliqué pieces enough structure to hold their shapes. My baby fabrics guide explains how quilting cotton compares with flannel, muslin and other fabrics used for nursery projects.
The amounts below include a little extra for straightening edges, tracing the appliqué pieces and correcting a cutting mistake. Wash, dry and press the cotton fabrics before cutting if you expect to wash the finished quilt.
Fabric
- 1¼ yards quilt-weight cotton for the center background
- ½ yard coordinating cotton for the border
- ½ yard red cotton for nine apple bodies
- ¼ yard green cotton for nine leaves
- ¼ yard brown cotton for nine stems
- ¼ yard light pink, pale red or white cotton for nine curved highlights
- 1½ yards cotton backing fabric, at least 44 inches wide
- ½ yard cotton for the binding
Red apples are easy to recognize, but the pattern does not depend on one color combination. A mix of red, rosy pink and soft green apple bodies can make the grid feel scrappier. Keeping all nine stems and leaves consistent will help the varied apples look like one planned collection.
Batting and Appliqué Supplies
- One crib-size package of low-loft batting, cut to at least 40 × 49 inches
- 1 yard lightweight paper-backed fusible web
- Coordinating cotton sewing thread for piecing
- Thread matching the apple body, leaf, stem and highlight fabrics
- Thread for machine quilting
Low-loft cotton or cotton-blend batting keeps the finished quilt flexible and allows the apple shapes to remain clear after quilting. For help comparing fiber content, loft and washability, see my crib quilt batting guide.
Tools
- Sewing machine
- Rotary cutter and cutting mat
- Acrylic quilting ruler
- Sharp fabric scissors
- Small scissors for cutting appliqué curves
- Iron and ironing surface
- Pressing cloth
- Washable fabric marker or chalk pencil
- Quilting pins or fabric clips
- Safety pins, spray baste or another preferred quilt-basting method
- Walking foot for straight-line quilting, if available
- Open-toe or appliqué foot, if available
You do not need specialty apple fabric. Solids, tiny checks, small dots and tone-on-tone prints all show the curved apple outlines clearly. Large novelty prints can lose their best details inside a 6.5-inch shape, so check the design placement before tracing and cutting all nine bodies.
Apple Quilt Fabric Cutting Guide
Cut the large quilt pieces first and set them aside before working on the appliqués. Labeling the center panel, borders, backing and binding as you cut them will keep similar-looking rectangles from being mixed up later.
Background and Border Pieces
- Cut one center background rectangle measuring 32½ × 41½ inches.
- Cut two side border strips measuring 2¼ × 41½ inches.
- Cut two top and bottom border strips measuring 2¼ × 36 inches.
These measurements include ¼-inch seam allowances. After the borders are attached, the quilt top will measure approximately 36 × 45 inches. Each finished border will be approximately 2 inches wide.
Apple Appliqué Pieces
- Cut 9 apple bodies measuring 6.5 × 6 inches.
- Cut 9 leaves measuring 2.25 × 1.25 inches.
- Cut 9 stems measuring 0.5 × 1.5 inches.
- Cut 9 curved highlights measuring 0.5 × 1.75 inches.
The appliqué templates are full size and do not include a turned-edge seam allowance. Use them as printed for fusible raw-edge appliqué. If you prefer needle-turn appliqué, add your preferred turning allowance around each shape before cutting the fabric.
Backing, Batting and Binding
- Cut the backing fabric to at least 40 × 49 inches.
- Cut the batting to at least 40 × 49 inches.
- Cut five binding strips measuring 2½ inches by the usable width of the fabric.
The extra batting and backing extend beyond the quilt top during quilting. Do not trim them to the finished quilt size before the layers are quilted and squared.
Choose the Correct Template Direction
Tracing a shape onto the paper side of fusible web reverses the finished appliqué when the fabric is turned right side up. Use the mirrored template when you want the finished fabric piece to face the same direction as the normal drawing. Use the normal template when you want the finished piece to face the opposite direction.
For a quilt that matches the finished example, trace all nine sets from the same template direction. Keep the leaves and curved highlights facing consistently throughout the 3 × 3 grid.
Before cutting fabric: Print the template PDF at Actual Size or 100% and measure the test square. It must measure exactly 1 × 1 inch.
Download the Printable Apple Appliqué Templates
The printable PDF contains four US Letter pages with full-size appliqué outlines. You do not need to enlarge the apple body or piece several sheets together. Each shape fits on its assigned page and includes a cutting label.
Free Apple Quilt Appliqué Template PDF
Includes normal and mirrored apple bodies, leaves, stems and highlights.
What Is Included in the PDF
- Page 1: Normal apple body outline labeled APPLE BODY, CUT 9
- Page 2: Normal stem, leaf and curved highlight outlines, each labeled CUT 9
- Page 3: Mirrored apple body outline labeled MIRRORED APPLE BODY, CUT 9
- Page 4: Mirrored stem, leaf and curved highlight outlines, each labeled CUT 9
Every page includes print instructions and a one-inch test square. The outlines are approximately 0.5 mm wide, making them easy to trace without adding a thick border to the finished fabric piece.
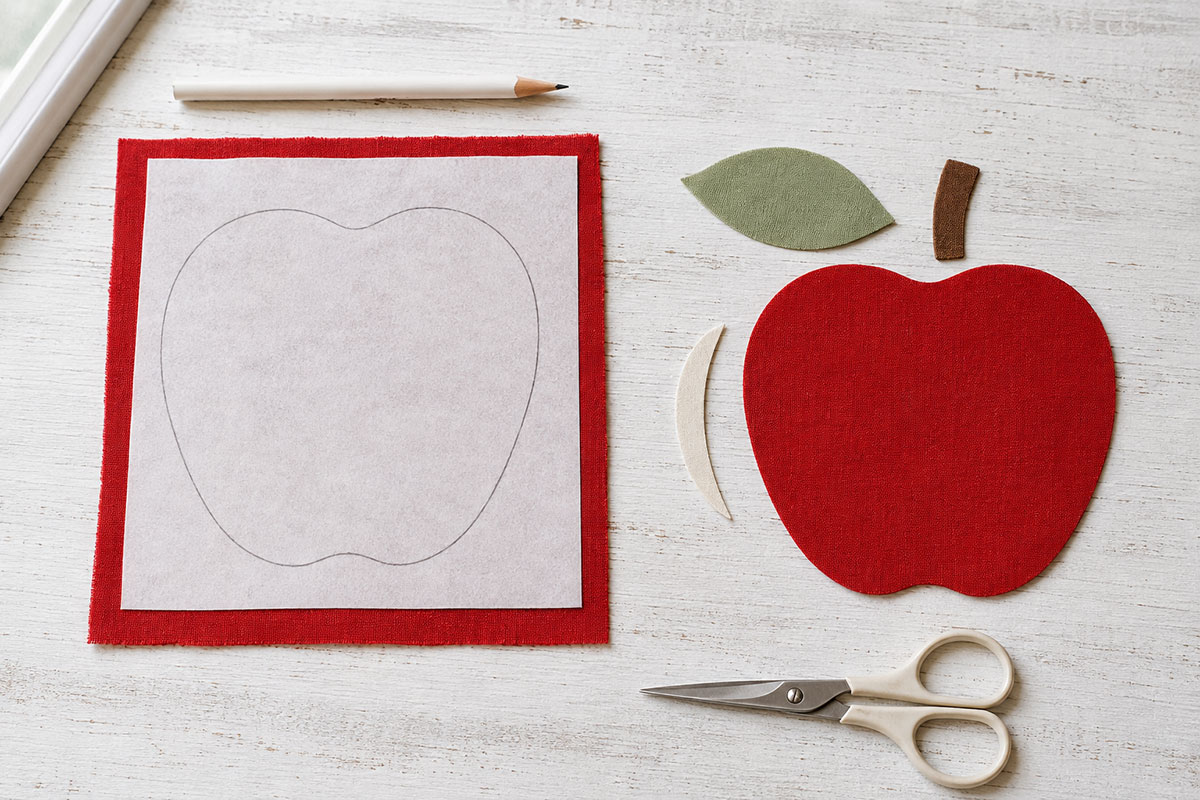
How to Use the Templates with Fusible Web
- Choose the normal or mirrored version of each appliqué piece.
- Place the fusible web with its paper side facing up.
- Trace the apple body, leaf, stem and highlight onto the paper.
- Repeat until you have nine complete sets.
- Leave a small amount of space between the traced shapes.
- Rough-cut around each shape without cutting directly on the traced line.
- Fuse each rough-cut shape to the wrong side of its chosen fabric according to the fusible web manufacturer’s directions.
- Let the pieces cool completely.
- Cut directly on the traced outlines.
- Keep each apple body with its leaf, stem and highlight until you are ready to arrange the blocks.
Do not peel away the paper backing while the pieces are still warm. Letting the fusible web cool helps the adhesive remain attached to the fabric instead of lifting with the paper.

Make the Nine Apple Appliqué Motifs
Prepare all nine apple sets before placing anything on the quilt background. Working assembly-line style keeps the stem, leaf and highlight positions consistent, and it gives you a chance to compare the apples before any adhesive becomes permanent.
If this is your first appliqué project, the repeating shapes make this pattern a comfortable next step after the simpler projects in my easy baby quilt patterns collection.
Prepare Nine Complete Sets
- Lay all nine apple bodies right side up.
- Place one stem, one leaf and one curved highlight beside each apple body.
- Check that every fabric piece has fusible web attached to its wrong side.
- Trim away any adhesive extending beyond the fabric edges.
- Keep the paper backing attached.
- Compare all nine sets and decide which direction every leaf and highlight will face.
Do not fuse the pieces together on a pressing sheet. Keep them separate until the center background has been marked. The apple body, stem, leaf and highlight will be positioned and fused directly onto that background.
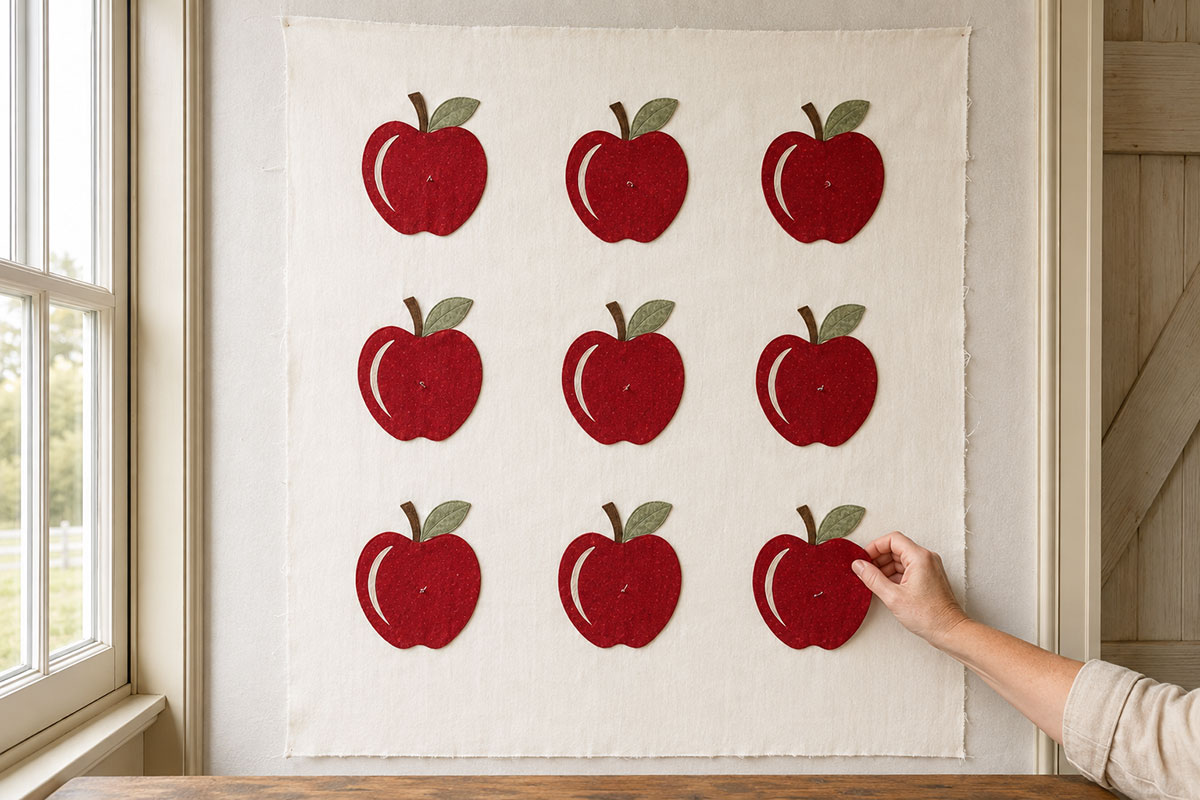
Use the Featured Apple Arrangement
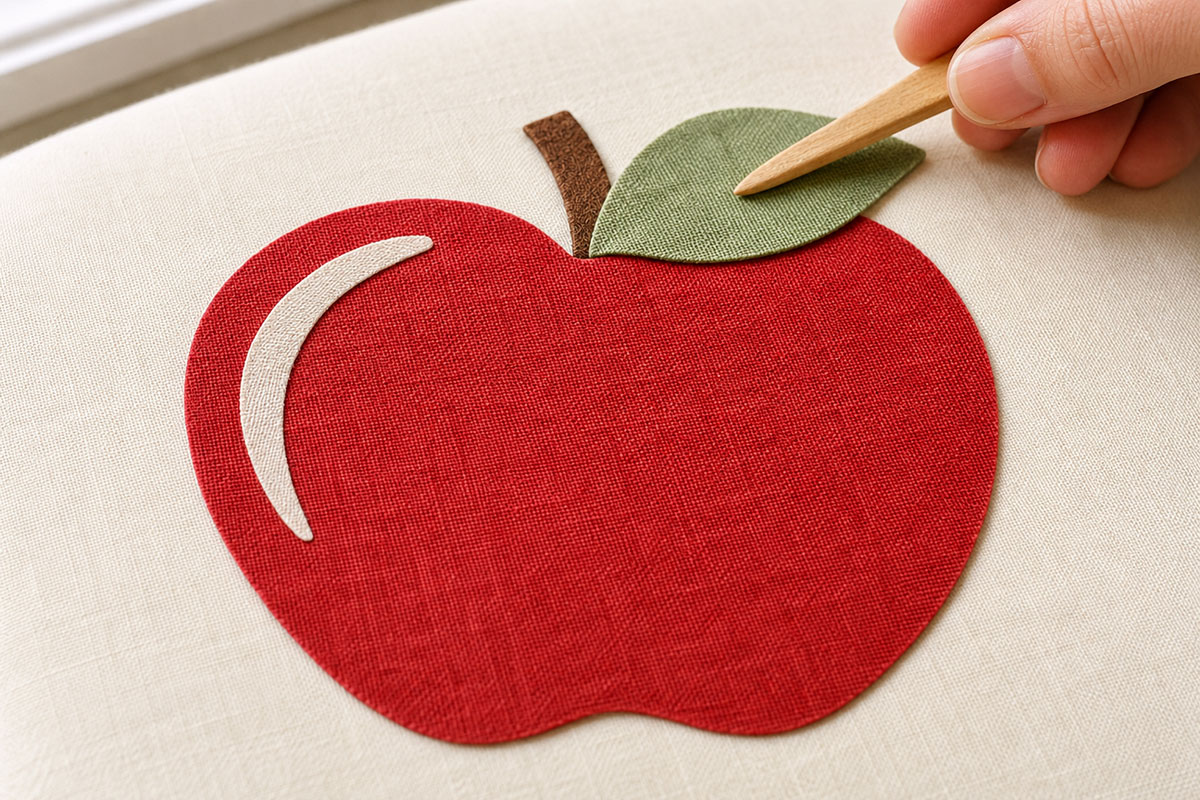
The finished example uses an upright stem, a leaf angled outward from the stem and a curved highlight inside the upper portion of the apple. Keep the highlight approximately ¾ inch inside the apple’s outer edge, with its top about 1 to 1¼ inches below the highest curve.
I included normal and mirrored pages because fusible web reverses a traced shape, and that little surprise can spoil an otherwise simple afternoon of sewing. For a quilt that matches the example, use the same direction for all nine highlights and position the leaves as shown in the layout image.
Arrange the Nine Apples in a 3 × 3 Grid
Work with the 32½ × 41½-inch center background before attaching the borders. The extra ¼ inch around each edge is the seam allowance, leaving a finished center area of 32 × 41 inches.
Spread the pressed background on a large table or clean floor with the right side facing up. Use a removable fabric marker to make small placement crosses. Short marks are easier to remove than full lines drawn across the fabric.
Mark the Three Columns
Measure from the left raw edge of the background and make vertical center marks at:
- 6½ inches
- 16¼ inches
- 26 inches
Mark the Three Rows
Measure from the top raw edge of the background and make horizontal center marks at:
- 7¾ inches
- 20¾ inches
- 33¾ inches
The nine places where the row and column marks meet are the centers of the apple bodies. These measurements provide even side spacing while leaving room above each apple for its stem and leaf.
Position the Nine Apple Designs
- Center one apple body over each marked intersection.
- Check the spaces between all nine apple bodies before adding the smaller pieces.
- Tuck the lower ¼ to ½ inch of each stem behind the top dip of its apple body.
- Place one leaf beside each stem with approximately ¼ inch overlapping the stem or apple body.
- Place each curved highlight inside the upper portion of its apple body.
- Check that no stem or leaf enters the border seam allowance.
- Stand several feet away and compare the rows, columns and smaller pieces.
- Make all placement corrections before removing any paper backing.
Fuse the Pieces to the Background
- Begin with the center apple.
- Lift its pieces one at a time and remove the paper backing.
- Return the stem, apple body, leaf and highlight to their approved positions.
- Fuse them according to the fusible web manufacturer’s time and temperature directions.
- Continue with the middle apple in the top and bottom rows.
- Fuse the remaining six apples while preserving the approved spacing.
- Lift and lower the iron instead of sliding it across the narrow pieces.
- Let the entire panel cool while it remains flat.
- Check every edge and repress only where the adhesive has not bonded.
Working from the center outward protects the grid you already approved. Do not try to correct spacing while a fused piece is still hot.
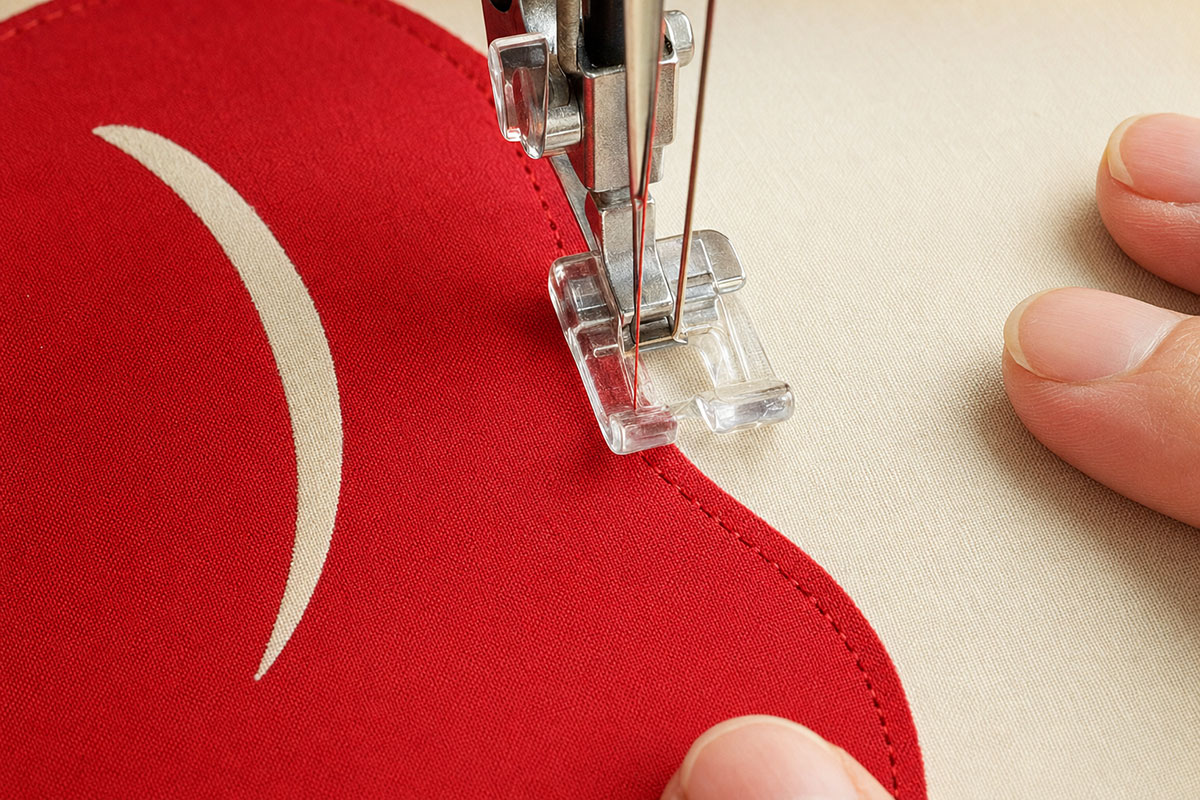
Stitch a Straight Outline Around Every Appliqué
The featured quilt uses a short straight outline stitch around every visible raw edge. Fusible web holds the fabric in position, while the stitching gives the apples a clean drawn edge and helps secure them during washing.
Set Up the Stitch
- Use a straight stitch approximately 2 to 2.5 mm long.
- Choose thread that matches the appliqué fabric.
- Position the stitching approximately ⅛ inch inside the raw edge.
- Test the stitch on a fused scrap before sewing the quilt center.
Stitch Each Apple in Layering Order
- Stitch around the visible edges of the stem.
- Stitch around the apple body.
- Stitch around the leaf.
- Stitch around both edges of the curved highlight.
- Secure the thread ends before moving to the next apple.
The portion of stem hidden behind the apple body does not need a separate line of stitching.
Sew Smooth Curves
- Lower the needle into the fabric before beginning a curve.
- Sew slowly for several stitches.
- Stop with the needle down when the fabric needs to turn.
- Raise the presser foot slightly.
- Pivot the fabric a very small amount.
- Lower the presser foot and continue stitching.
Several small pivots make a rounder outline than one sharp turn. The top dip and bottom indentation need the smallest movements.
Prevent Ripples
If the background begins to ripple, test a slightly lower upper-thread tension on scrap fabric. A lightweight tear-away stabilizer can support the background while the curves are stitched. Remove it gently after the appliqués are secured.
Press the completed center panel from the back with a pressing cloth. Set the iron down and lift it rather than scrubbing it across the stitched edges.
For more shapes that use the same basic appliqué skills, browse these printable animal quilt block patterns.
Add the Borders, Quilt the Layers and Bind the Apple Quilt
Attach the Side Borders
- Place one 2¼ × 41½-inch border strip along each long side of the appliquéd center panel with right sides together.
- Match the top and bottom raw edges.
- Pin or clip the strips in place without stretching them.
- Sew each side border with a ¼-inch seam allowance.
- Press the seams toward the border fabric.
Attach the Top and Bottom Borders
- Place one 2¼ × 36-inch border strip across the top edge with right sides together.
- Match the ends of the border strip with the outer edges of the side borders.
- Pin and sew with a ¼-inch seam allowance.
- Repeat along the bottom edge.
- Press both seams toward the border fabric.
The completed quilt top should measure approximately 36 × 45 inches. Measure through the center in both directions instead of relying only on the outer edges. If the top is slightly uneven, correct the border alignment before adding the batting and backing.
Make the Quilt Sandwich
- Press the backing fabric and place it right side down on a large flat surface.
- Smooth the backing until it lies flat without pulling it out of shape.
- Place the batting over the backing.
- Center the quilt top over the batting with its right side facing up.
- Check that batting and backing extend beyond every edge of the quilt top.
- Baste the three layers together with safety pins, quilting spray or long temporary stitches.
- Work from the center toward the edges while basting so wrinkles are pushed outward.
Quilt Around the Apple Design
A simple quilting plan lets the appliqué remain easy to see. Begin near the center of the quilt and work outward, smoothing the layers frequently.
- Quilt approximately ¼ to ½ inch outside each apple body to echo its curved shape.
- Add straight vertical lines between the three apple columns.
- Add straight horizontal lines between the three rows.
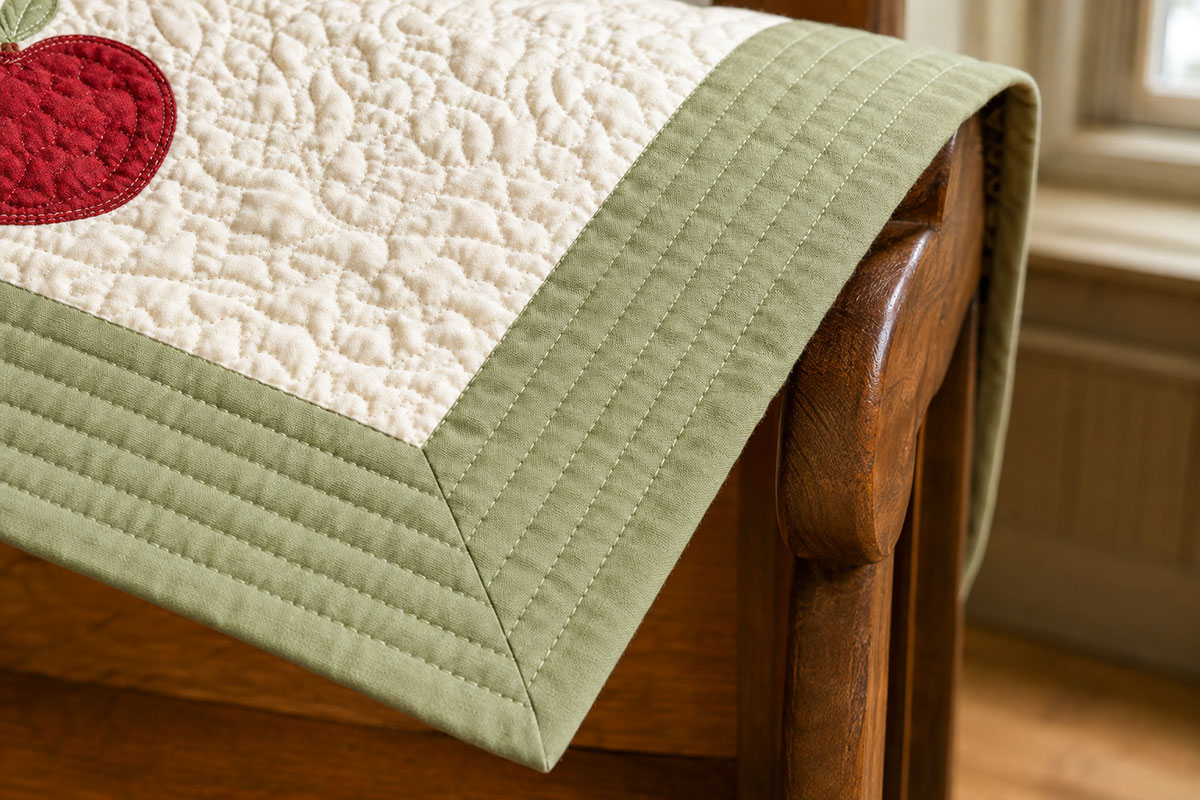
- Quilt through the border with one or two straight lines that follow its rectangular shape.
Check the batting package for its maximum recommended distance between quilting lines. Add more background quilting if the batting requires closer stitching.
Roll or loosely fold the portion of the quilt that must pass through the sewing machine. Avoid forcing a tight bundle through the machine opening because that can pull the stitched lines away from their marked paths.
Square the Quilted Layers
- Lay the quilt flat after all quilting is complete.
- Use a long acrylic ruler to check each side.
- Trim the batting and backing even with the quilt top.
- Check that each corner forms a 90-degree angle.
- Measure the quilt once more before attaching the binding.
Prepare the Binding
- Join the five 2½-inch binding strips end to end with diagonal seams.
- Trim each joining seam to ¼ inch.
- Press the joining seams open.
- Fold the long binding strip in half lengthwise with wrong sides together.
- Press the folded strip carefully without stretching it.
Bind the Quilt
- Leave an unsewn binding tail approximately 8 inches long.
- Match the binding’s raw edges with the raw edge on the front of the quilt.
- Sew with a ¼-inch seam allowance.
- Stop ¼ inch before each corner and create a mitered fold.
- Continue around all four sides.
- Join the beginning and ending tails without twisting the binding.
- Finish sewing the remaining opening.
- Fold the binding over the raw edge to the back of the quilt.
- Clip it in place and finish by hand or machine.
Give the finished binding a light press, paying special attention to the corners. The binding should lie flat without pulling the quilt edges inward or leaving loose folds along the back.
Print the Apple Templates at the Correct Size
The appliqué pieces are already drawn at their finished full size. Printer scaling can quietly change every measurement, so print and check one page before using ink and paper for the complete file.
Recommended Print Settings
- Paper size: US Letter, 8.5 × 11 inches
- Orientation: Portrait or Automatic
- Scale: Actual Size or 100%
- Pages: Print all four pages
- Color setting: Black and white is acceptable
Do not select Fit, Fit to Page, Shrink Oversized Pages or Scale to Fit. Those settings may make the templates look correct while changing the actual dimensions of the appliqué pieces.
Check the One-Inch Test Square
- Print one template page at Actual Size or 100%.
- Place a ruler directly across the printed test square.
- Confirm that the square measures exactly 1 × 1 inch.
- If it is too large or too small, return to the Print window.
- Turn off every automatic resizing option.
- Print the test page again.
- Continue with the remaining pages only after the square is correct.
Measure the printed template pieces if you want a second check. The apple body should measure 6.5 inches wide by 6 inches high. The leaf should measure 2.25 × 1.25 inches, the stem 0.5 × 1.5 inches and the curved highlight 0.5 × 1.75 inches.
Keep a Master Copy
Set aside one clean printed copy instead of cutting every page apart. Trace from the master onto fusible web, freezer paper or template plastic. A protected master is especially useful if you later want to make another apple block, repair a damaged appliqué or reuse the motif for a wall hanging.
Apple Quilt Pattern Questions
Is this apple quilt pattern suitable for beginners?
Yes. A confident beginner who can sew a ¼-inch seam and follow basic fusible appliqué directions should be able to complete the quilt. The apple body has broad curves, and the same four-piece motif is repeated nine times. Practice the straight outline stitch on fused scrap fabric before beginning the quilt center.
What size is the finished apple quilt?
The finished quilt measures approximately 36 × 45 inches. It has a 32 × 41-inch center design area surrounded by a finished 2-inch border.
Are the apple appliqué templates full size?
Yes. The templates print at full size on standard US Letter paper. Print at Actual Size or 100% and measure the one-inch test square before tracing the pieces.
Why are normal and mirrored templates included?
Fusible web reverses a traced shape when the fabric is turned right side up. Providing both directions lets you control which way each leaf, stem and highlight faces in the finished quilt.
Can I make all nine apples different colors?
Yes. Red, pink, burgundy, yellow and green apple bodies can share the same grid. Repeating one leaf fabric, one stem fabric and one border fabric will help a mixed-color version look coordinated.
Can I use hand appliqué instead of fusible appliqué?
Yes. Add your preferred turning allowance around each template before cutting the fabric. Baste or pin the pieces securely, then use a small blind stitch to attach them to the background.
Can I resize the apple templates?
Yes, but resize every appliqué piece by the same percentage so the body, leaf, stem and highlight remain proportional. Enlarging the apples may require more space between the rows and columns. Reducing them will create wider areas of open background.
Can one apple become a separate quilt block?
Yes. Center one complete apple motif on a background square large enough to provide seam allowance and open space around the leaf and stem. Individual apple blocks can be used for a small wall hanging, table runner, tote pocket or mixed appliqué quilt.
How should I wash the finished quilt?
Check the care instructions for every fabric, batting and fusible product used in the quilt. For washable cotton materials, use cool water, a gentle cycle and mild detergent. Dry on low heat or lay the quilt flat to dry. Washing the finished quilt separately the first time makes it easier to check for color bleeding.
Can the quilt be placed inside a crib while a baby sleeps?
No. Use the quilt for nursery display, supervised floor time or another age-appropriate purpose. The American Academy of Pediatrics advises keeping quilts, blankets and other loose bedding out of an infant’s sleep area. Review the current AAP safe sleep recommendations before setting up a crib.
Must I use the mirrored templates?
Use the mirrored templates when tracing onto paper-backed fusible web if you want the finished fabric pieces to face the same direction as the normal drawings. Use one direction consistently if you want the finished quilt to match the example.
May I share or sell the printable templates?
The written pattern and printable templates are provided for personal use. Do not upload, reproduce, redistribute or sell the instructions or template files. Finished quilts made individually from the pattern may be given as gifts or sold in small handmade quantities.
Nine red apples are enough to give a nursery a warm country note, but the orderly grid keeps the finished quilt crisp. When you are ready for another handmade project, browse my complete collection of baby quilt patterns and crib quilt ideas.
When you click on links to various merchants on this site and make a purchase, this may result in this site earning a commission. This does not affect the price you pay.

UBGI Gold Standard 2026
Reviewed under the site's
editorial checklist.
Photos, decorating ideas, party setups and reader submissions are shared for inspiration unless a page is specifically presented as a pattern, tutorial, reference guide or step-by-step project. Follow the instructions, measurements, safety guidance and manufacturer directions provided for the particular project or product.
About Jan | Contact | Baby Nursery Ideas (Blog) | Site Map | Privacy Policy | Disclosure Policy | Disclaimer | Affiliate Disclosure | Earnings Disclosure | Facebook | Pinterest
I am a participant in the Amazon Services LLC Associates Program, an affiliate advertising program designed to provide a means for us to earn fees by linking to Amazon. As an Amazon Associate I earn from qualifying purchases.
Copyright © 2006-2026. All Rights Reserved.