Free Crochet Acorn Storage Basket Pattern with Oak Leaves in 3 Sizes
By Jan Bay
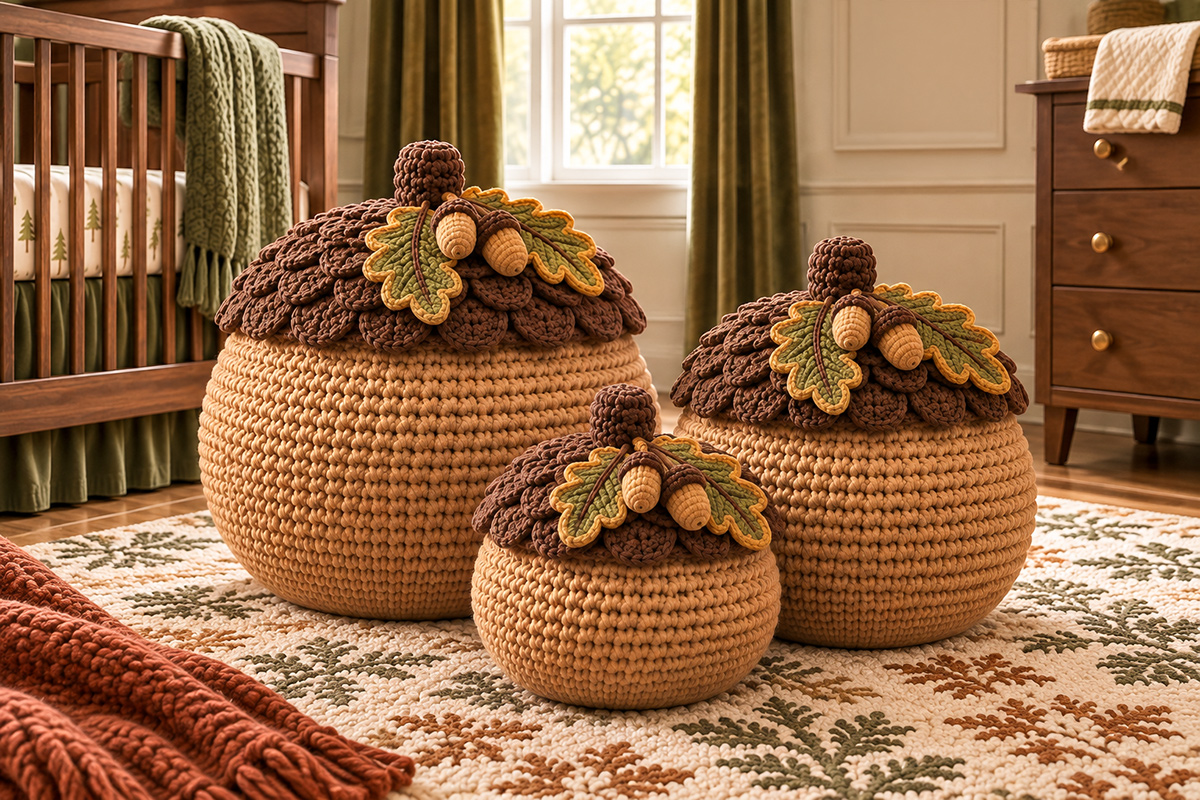
This free crochet acorn storage basket pattern features three oversized baskets for nursery organization as well as enhancing the decor in a baby's woodland-themed room. Each basket has a plump, rounded tan body, a removable walnut-brown cap with overlapping scalloped layers, a short, straight crocheted twig stem and a pair of crocheted oak leaves. Make the small, medium, or large size to organize baby blankets, diapers, changing supplies, and other lightweight nursery essentials while adding a handmade woodland accent to the room.
More Free Crochet Basket & Woodland Patterns
Crochet Pumpkin Storage Basket Pattern
Free Large Crochet Storage Basket Pattern
See Supplies for This Project Here.
Jump to the Free Crochet Acorn Basket Pattern
Crochet Acorn Storage Basket Pattern: Finished Sizes and Gauge
These aren't little tabletop acorns. The large basket is meant for folded baby blankets, the medium one works for extra diapers and changing supplies, and the small one is handy for washcloths, burp cloths and other lightweight things you want to keep together.
All three have the same rounded shape. The large basket simply uses more rounds to build its width and height, while the smallest one keeps the proportions compact enough to sit in front of the other two.
Expected Finished Measurements
| Measurement | Large | Medium | Small |
|---|---|---|---|
| Maximum body width | 19 in. | 15 1/4 in. | 11 1/2 in. |
| Body height | About 12 in. | About 9 in. | About 6 in. |
| Flat base diameter | 11 1/2 in. | 9 1/2 in. | 6 3/4 in. |
| Cap foundation diameter | 17 1/4 in. | 14 1/4 in. | 11 1/2 in. |
These measurements are calculated from the stitch counts and working gauge. They are targets for checking your progress, not measurements taken from finished, physically tested samples. The layered caps and short stems add height above the basket bodies.
Working Gauge
Use firm single crochet with one strand of 5 mm braided cotton cord and a 10 mm hook as your starting combination.
Target gauge: 8 single crochet stitches and 8 rows measure 4 inches (10 cm).
Make a swatch before starting. Chain 13, work 12 single crochet stitches across, and continue for 12 rows. Measure the center without pulling or stretching it.
If your stitches are wider than the target, try a smaller hook. If they're narrower, try a larger one. The fabric needs to be dense enough to help the basket stand upright without making every stitch a struggle.
Pay attention to the firmness as well as the numbers. Soft, stretchy cord can match the gauge and still produce floppy basket walls. I'd choose the firmer cord rather than make the whole basket and hope it stiffens up later.
Yarn and Supplies for the Crochet Acorn Baskets
For these oversized baskets, I prefer firm cotton cord to ordinary worsted-weight yarn. The baskets need substantial stitches, and the layered brown lids need enough body to keep their shape.
The Craft Yarn Council yarn-weight guide places super bulky yarn in category 6, with crochet-hook recommendations that include our proposed 10 mm hook. Cotton cord isn't always classified exactly like conventional yarn, so check the cord diameter and your own gauge instead of relying on the weight label alone.
Materials List
- Firm 5 mm braided cotton cord or low-stretch equivalent in toasted tan for the basket bodies and lid undersides
- Matching firm cord in dark walnut brown for the textured acorn caps and short stems
- Medium-weight #4 olive-green cotton yarn for the large oak leaves
- Lighter coordinating olive-green yarn for the scaled medium and small leaves
- Mustard-gold yarn for the oak leaf edging
- Medium-brown yarn for the oak leaf veins and stems
- 10 mm crochet hook for the baskets, adjusting to meet gauge
- 4.0 mm, 3.5 mm and 3.0 mm hooks for the different leaf sizes
- Large blunt yarn needle for cotton cord
- Smaller yarn needle for attaching leaves and embroidering veins
- Removable stitch markers and measuring tape
- Sharp scissors and optional sewing clips
- Optional smooth-edged flexible plastic canvas for concealed base and lid reinforcement
How Much Cotton Cord Will You Need?
These are substantial baskets, and I wouldn't buy cord for the entire set based on an untested yardage estimate. The amount depends on the cord's construction, your gauge and the yarn used for all those scalloped brown caps.
Start with a 12-stitch by 12-row single-crochet swatch using your chosen tan cord. Measure how much cord the swatch consumes. That's 144 single crochet stitches, which gives you a useful starting point for estimating the basket bodies.
For the brown caps, make one seven-double-crochet scallop using the actual brown cord and hook. Measure its cord consumption separately. The complete pattern contains 60 scallops for the large cap, 42 for the medium and 27 for the small.
Allow additional cord for the lid foundations, double-layer bases, fitting collars, stems, seams and weaving in ends. Calculate your shopping quantity from the measured samples before committing to the full set.
Use cord from the same manufacturer and thickness throughout each basket. A change in cord firmness or gauge can alter the rounded shape and removable lid fit.
For the six oak leaves, use the free crochet fall leaf pattern already available on the site. It includes the olive-green oak leaf with gold edging and brown veins shown on these baskets. You won't need to make the little matching acorn appliqué for this project.
Crochet Stitches, Abbreviations and Pattern Notes
This pattern uses U.S. crochet terminology. The baskets are worked in continuous rounds, so you'll need a stitch marker to keep track of where each round begins.
- MR = magic ring
- ch = chain
- sc = single crochet
- sl st = slip stitch
- sc2tog = single crochet two stitches together
- inc = work 2 single crochet stitches into the same stitch
- BLO = back loop only
- FLO = front loop only
- hdc = half double crochet
- dc = double crochet
- RS = right side
- WS = wrong side
- st(s) = stitch(es)
- rnd = round
- rep = repeat
Important pattern notes:
- Use continuous rounds unless the instructions specifically tell you to join or turn.
- Move the beginning-of-round marker after every round.
- Beginning chains do not count as stitches.
- Work through both loops unless BLO or FLO is specified.
- The numbers in parentheses give the stitch count at the end of a round.
- Every basket uses two matching base circles joined together before the body is worked.
- Keep the right side of the basket fabric facing outward.
- Use the same gauge for all three basket bodies and their matching lids.
Don't skip the stitch counts on the shaping rounds. A few extra stitches can change the opening enough that your removable lid won't sit correctly.
Crochet the Acorn Basket Base and Rounded Body
Start with the base, not the decorative cap. The base establishes the size of the basket, and the shaping rounds above it produce the plump acorn silhouette in the finished example.
We're using a double-layer bottom for each size. It adds thickness beneath the contents and gives the lower edge a more substantial finish. An optional enclosed insert can add further support if your cord is flexible.
Step 1: Crochet the Flat Base Circles
Use toasted-tan cord and your 10 mm hook.
Make two identical base circles for each basket. The large size stops after Round 12, the medium after Round 10 and the small after Round 7.
Round 1: Make a magic ring and work 6 sc into it. Pull closed. (6 sts)
Round 2: Work 2 sc in each stitch around. (12 sts)
Round 3: [Sc in next st, inc in next st] 6 times. (18 sts)
Round 4: [Sc in next 2 sts, inc] 6 times. (24 sts)
Round 5: [Sc in next 3 sts, inc] 6 times. (30 sts)
Round 6: [Sc in next 4 sts, inc] 6 times. (36 sts)
Round 7: [Sc in next 5 sts, inc] 6 times. (42 sts)
Small basket: Stop after Round 7. Fasten off and make your second matching circle.
Round 8: [Sc in next 6 sts, inc] 6 times. (48 sts)
Round 9: [Sc in next 7 sts, inc] 6 times. (54 sts)
Round 10: [Sc in next 8 sts, inc] 6 times. (60 sts)
Medium basket: Stop after Round 10. Fasten off and make your second matching circle.
Round 11: [Sc in next 9 sts, inc] 6 times. (66 sts)
Round 12: [Sc in next 10 sts, inc] 6 times. (72 sts)
Large basket: Stop after Round 12. Fasten off and make your second matching circle.
Step 2: Join the Two Base Circles
Place the matching circles together with their wrong sides touching. Their outer edges should line up, and both should lie flat without obvious cupping or ruffling.
Before joining, weave in the starting tails. If you're using an enclosed base insert, cut a flexible, smooth-edged circle slightly smaller than the crocheted base and place it between the layers. Bind or smooth any cut edges so nothing sharp can work through the stitches.
With tan cord, insert the hook through both loops of one outer stitch on each matching circle. Work 1 sc through both layers. Repeat around, matching one stitch from each circle.
- Large base joining round: 72 sc
- Medium base joining round: 60 sc
- Small base joining round: 42 sc
Don't count this joining round as the first basket-body round. Leave the working yarn attached and begin the body instructions for your chosen size below.
Step 3: Large Acorn Basket Body
The large basket begins with 72 stitches around its joined base. Eight increase rounds gradually widen the body to 120 stitches. The rounds between increases give those growing sides room to rise instead of spreading outward like a shallow bowl.
Round 1: [Sc in next 11 sts, inc] 6 times. (78 sts)
Round 2: Sc in each stitch around. (78 sts)
Round 3: [Sc in next 12 sts, inc] 6 times. (84 sts)
Round 4: Sc in each stitch around. (84 sts)
Round 5: [Sc in next 13 sts, inc] 6 times. (90 sts)
Round 6: Sc in each stitch around. (90 sts)
Round 7: [Sc in next 14 sts, inc] 6 times. (96 sts)
Round 8: Sc in each stitch around. (96 sts)
Round 9: [Sc in next 15 sts, inc] 6 times. (102 sts)
Round 10: Sc in each stitch around. (102 sts)
Round 11: [Sc in next 16 sts, inc] 6 times. (108 sts)
Round 12: Sc in each stitch around. (108 sts)
Round 13: [Sc in next 17 sts, inc] 6 times. (114 sts)
Round 14: Sc in each stitch around. (114 sts)
Round 15: [Sc in next 18 sts, inc] 6 times. (120 sts)
Rounds 16–24: Sc in each stitch around for 9 complete rounds. (120 sts per round)
Round 25: [Sc in next 18 sts, sc2tog] 6 times. (114 sts)
Round 26: Sc in each stitch around. (114 sts)
Round 27: [Sc in next 17 sts, sc2tog] 6 times. (108 sts)
Round 28: Sc in each stitch around. (108 sts)
Round 29: [Sc in next 16 sts, sc2tog] 6 times. (102 sts)
Round 30: Sc in each stitch around. (102 sts)
Round 31: [Sc in next 15 sts, sc2tog] 6 times. (96 sts)
Round 32: Sc in each stitch around. (96 sts)
Finish with 1 sl st in the next stitch. Fasten off and weave the cord end securely into the inside of the rim.
Large basket checkpoint: The widest section contains 120 stitches, and the finished opening contains exactly 96 stitches. At the target gauge, the intended maximum diameter is approximately 19 inches and the intended body height is about 12 inches. Confirm the actual height and rounded shape before making the lid.
Step 4: Medium Acorn Basket Body
The medium basket begins with 60 stitches around the joined base. Six increase rounds bring the widest section to 96 stitches. Three decrease rounds shape the shoulders and leave 78 stitches at the opening.
Round 1: [Sc in next 9 sts, inc] 6 times. (66 sts)
Round 2: Sc in each stitch around. (66 sts)
Round 3: [Sc in next 10 sts, inc] 6 times. (72 sts)
Round 4: Sc in each stitch around. (72 sts)
Round 5: [Sc in next 11 sts, inc] 6 times. (78 sts)
Round 6: Sc in each stitch around. (78 sts)
Round 7: [Sc in next 12 sts, inc] 6 times. (84 sts)
Round 8: Sc in each stitch around. (84 sts)
Round 9: [Sc in next 13 sts, inc] 6 times. (90 sts)
Round 10: Sc in each stitch around. (90 sts)
Round 11: [Sc in next 14 sts, inc] 6 times. (96 sts)
Rounds 12–17: Sc in each stitch around for 6 complete rounds. (96 sts per round)
Round 18: [Sc in next 14 sts, sc2tog] 6 times. (90 sts)
Round 19: Sc in each stitch around. (90 sts)
Round 20: [Sc in next 13 sts, sc2tog] 6 times. (84 sts)
Round 21: Sc in each stitch around. (84 sts)
Round 22: [Sc in next 12 sts, sc2tog] 6 times. (78 sts)
Rounds 23–24: Sc in each stitch around for 2 complete rounds. (78 sts per round)
Finish with 1 sl st in the next stitch. Fasten off and weave in the end.
Medium basket checkpoint: The widest section contains 96 stitches, and the opening contains 78 stitches. The intended maximum diameter is approximately 15 1/4 inches, with an intended body height of about 9 inches at the target gauge.
Step 5: Small Acorn Basket Body
The smallest basket begins with 42 stitches around the joined base. Five increase rounds create its rounded middle, followed by two decrease rounds that bring the opening back to 60 stitches.
Round 1: [Sc in next 6 sts, inc] 6 times. (48 sts)
Round 2: Sc in each stitch around. (48 sts)
Round 3: [Sc in next 7 sts, inc] 6 times. (54 sts)
Round 4: Sc in each stitch around. (54 sts)
Round 5: [Sc in next 8 sts, inc] 6 times. (60 sts)
Round 6: Sc in each stitch around. (60 sts)
Round 7: [Sc in next 9 sts, inc] 6 times. (66 sts)
Round 8: Sc in each stitch around. (66 sts)
Round 9: [Sc in next 10 sts, inc] 6 times. (72 sts)
Rounds 10–13: Sc in each stitch around for 4 complete rounds. (72 sts per round)
Round 14: [Sc in next 10 sts, sc2tog] 6 times. (66 sts)
Round 15: Sc in each stitch around. (66 sts)
Round 16: [Sc in next 9 sts, sc2tog] 6 times. (60 sts)
Round 17: Sc in each stitch around. (60 sts)
Finish with 1 sl st in the next stitch. Fasten off and weave in the end.
Small basket checkpoint: The widest section contains 72 stitches, and the opening contains 60 stitches. The intended maximum diameter is approximately 11 1/2 inches, with an intended body height of about 6 inches at the target gauge.
Check the Acorn Shape Before Making the Lids
Set all three baskets on a level surface and look at their outlines. Each one should sit firmly on its flat base, swell outward through the middle and narrow again near the opening.
If the walls lean or collapse, check the cord firmness and gauge first. Don't try to correct a soft basket by reducing the opening even further. That would make the lid difficult to remove without solving the real problem.
The openings also need to stay round. If you've stretched one while working the final rows, reshape it gently by hand and measure across the center before starting its cap.
Crochet the Layered Scalloped Acorn Lids
Now for those big, textured brown caps. I wouldn't replace these with plain round lids. The overlapping scallops are what give our baskets their distinctive acorn look, especially with the oak leaves tucked around the stems.
Each lid has a brown outer foundation, a tan underside and a short fitting collar that slips inside the basket opening. The decorative scallops are crocheted directly onto the outer foundation using front loops deliberately left available during construction.
Make the foundation first. Add the scalloped layers after the lid has been assembled.
Step 1: Crochet the Brown Outer Cap Foundation
Use dark-walnut cotton cord and the same hook size used for the basket body.
Work in continuous rounds. On the rounds marked BLO, work only through the back loops so the front loops of the previous round remain available for attaching the decorative scallops.
Round 1: Make a magic ring and work 6 sc into it. (6 sts)
Round 2: Inc in each stitch around. (12 sts)
Round 3: [Sc in next st, inc] 6 times. (18 sts)
Round 4: [Sc in next 2 sts, inc] 6 times. (24 sts)
Round 5: [Sc in next 3 sts, inc] 6 times. (30 sts)
Round 6: [Sc in next 4 sts, inc] 6 times. (36 sts)
Round 7: Working BLO, [sc in next 5 sts, inc] 6 times. (42 sts)
Round 8: [Sc in next 6 sts, inc] 6 times. (48 sts)
Round 9: [Sc in next 7 sts, inc] 6 times. (54 sts)
Round 10: Working BLO, [sc in next 8 sts, inc] 6 times. (60 sts)
Round 11: [Sc in next 9 sts, inc] 6 times. (66 sts)
Round 12: [Sc in next 10 sts, inc] 6 times. (72 sts)
Small cap: Work one additional round in BLO, placing 1 sc in each of the 72 stitches. (72 sts) Fasten off. This leaves the front loops of Round 12 available for the final scalloped tier.
For the medium and large caps, continue:
Round 13: Working BLO, [sc in next 11 sts, inc] 6 times. (78 sts)
Round 14: [Sc in next 12 sts, inc] 6 times. (84 sts)
Round 15: [Sc in next 13 sts, inc] 6 times. (90 sts)
Medium cap: Work one additional round in BLO, placing 1 sc in each of the 90 stitches. (90 sts) Fasten off.
For the large cap, continue:
Round 16: Working BLO, [sc in next 14 sts, inc] 6 times. (96 sts)
Round 17: [Sc in next 15 sts, inc] 6 times. (102 sts)
Round 18: [Sc in next 16 sts, inc] 6 times. (108 sts)
Round 19: Working BLO, sc in each stitch around. (108 sts)
Fasten off the large cap foundation.
Step 2: Crochet the Plain Tan Cap Underside
Make one plain foundation circle in toasted-tan cord for the underside of each lid. This backing supports the outer foundation and gives the cap a neat finish underneath.
Use the flat-circle instructions from the basket-base section, continuing as follows:
- Large cap underside: Work through Round 18, finishing with 108 stitches.
- Medium cap underside: Work through Round 15, finishing with 90 stitches.
- Small cap underside: Work through Round 12, finishing with 72 stitches.
For the additional rounds beyond Round 12, continue the same six-increase sequence:
Round 13: [Sc in next 11 sts, inc] 6 times. (78 sts)
Round 14: [Sc in next 12 sts, inc] 6 times. (84 sts)
Round 15: [Sc in next 13 sts, inc] 6 times. (90 sts)
Round 16: [Sc in next 14 sts, inc] 6 times. (96 sts)
Round 17: [Sc in next 15 sts, inc] 6 times. (102 sts)
Round 18: [Sc in next 16 sts, inc] 6 times. (108 sts)
Fasten off and weave in the center tail. The backing circle will be joined to the corresponding brown outer foundation after the fitting collar and stem are prepared.
Step 3: Make the Inset Fitting Collar
The collar is a separate crocheted band attached underneath the lid. It sits inside the basket opening and helps keep the cap centered.
Use tan cord. Work the band flat first, then join its short ends to make a ring.
Large cap collar:
Chain 91. Row 1: Sc in the second chain from the hook and each remaining chain. (90 sts)
Rows 2–3: Ch 1, turn and sc in each stitch across. (90 sts per row)
Medium cap collar:
Chain 73. Row 1: Sc in the second chain from the hook and each remaining chain. (72 sts)
Rows 2–3: Ch 1, turn and sc in each stitch across. (72 sts per row)
Small cap collar:
Chain 55. Row 1: Sc in the second chain from the hook and each remaining chain. (54 sts)
Rows 2–3: Ch 1, turn and sc in each stitch across. (54 sts per row)
For each collar, fasten off with a long sewing tail. Bring the two short ends together without twisting the band. Whipstitch them securely to form a continuous ring.
Lay the tan underside of the lid with its right side facing you. Locate the stitches of the appropriate earlier round:
- Large underside: Round 15, containing 90 stitches
- Medium underside: Round 12, containing 72 stitches
- Small underside: Round 9, containing 54 stitches
Mark six equally spaced positions on that round. Match the long foundation edge of the collar to the marked circle, distributing the stitches evenly.
With matching tan cord, sew the collar's foundation edge to the corresponding stitch bodies around that circle. Pick up secure horizontal bars on the underside of the crocheted foundation rather than pulling stitches out of shape. Work around the entire collar, matching one band stitch to each marked-round stitch.
The collar should project approximately 1 1/2 inches below the lid backing. It will be slightly smaller in circumference than the basket opening.
Step 4: Assemble the Double-Layer Lid
Before closing the two cap layers, attach the crocheted stem to the center of the brown outer foundation using the stem instructions in the next section. Secure its sewing ends on the hidden side of that foundation.
Place the brown foundation and tan underside together with their wrong sides touching. The brown side faces up and the tan underside with its collar faces down.
If you need additional cap support, fit a flexible, smooth-edged plastic-canvas disc between the layers. It should sit inside the outer stitching without reaching the joining seam. The larger cap may particularly benefit from enclosed reinforcement because of the weight of its scalloped layers.
Use dark-brown cord and join the matching outer edges by working 1 sc through corresponding stitches of both circles.
- Large cap: 108 joining stitches
- Medium cap: 90 joining stitches
- Small cap: 72 joining stitches
Match the centers and quarter points before joining. If using an insert, keep it centered and fully enclosed. Finish with a slip stitch, fasten off and hide the end between the layers.
Try the plain assembled cap on its matching basket now. The inset collar should slide inside the opening, while the wider cap rests on top. Check that the opening stays round and that you can lift the cap without dragging the basket upward.
Step 5: Crochet the Overlapping Scalloped Cap Layers
Each decorative scallop is a little rounded fan made with seven double crochets. These fans are worked into the exposed front loops of selected foundation rounds.
Make the outermost tier first and then work toward the center. The inner scallops can lie over the roots of the outer ones, giving the cap its overlapping acorn-scale appearance.
One scallop repeat: Slip stitch into the first designated exposed front loop, skip the next 2 front loops, work 7 dc into the following front loop, then skip the next 2 front loops. Each repeat uses exactly six foundation loops and creates one rounded scallop.
With the brown side of the cap facing up, make a slip knot on your hook. Insert the hook into the first designated exposed front loop and work 1 sl st. This joining slip stitch counts as the anchoring slip stitch of your first scallop. Do not work an additional slip stitch before beginning the repeat.
Skip the next 2 exposed front loops, work 7 dc into the following front loop, then skip the next 2 front loops. For each remaining scallop, slip stitch into the next available front loop and repeat the same six-loop sequence.
Begin the outermost tier at the beginning-of-round position. For the next tier inward, begin three exposed front loops farther around the circle. Alternate between these two starting positions for the remaining tiers to stagger the scallops.
After the last seven-double-crochet fan, leave the final 2 foundation front loops unused and join with a slip stitch into the first anchoring slip stitch. This closes the scalloped ring without adding another fan or changing the foundation-loop count.
Fasten off and weave the end securely into the brown foundation without catching the tan underside. Repeat for each tier, following the existing scallop counts for your basket size.
Large cap, five scalloped tiers:
- Foundation Round 18: 108 exposed loops, 18 scallops
- Foundation Round 15: 90 exposed loops, 15 scallops
- Foundation Round 12: 72 exposed loops, 12 scallops
- Foundation Round 9: 54 exposed loops, 9 scallops
- Foundation Round 6: 36 exposed loops, 6 scallops
Medium cap, four scalloped tiers:
- Foundation Round 15: 90 exposed loops, 15 scallops
- Foundation Round 12: 72 exposed loops, 12 scallops
- Foundation Round 9: 54 exposed loops, 9 scallops
- Foundation Round 6: 36 exposed loops, 6 scallops
Small cap, three scalloped tiers:
- Foundation Round 12: 72 exposed loops, 12 scallops
- Foundation Round 9: 54 exposed loops, 9 scallops
- Foundation Round 6: 36 exposed loops, 6 scallops
Work each tier as a separate continuous ring of scallops. Don't chain between the fans. The skipped loops make room for the seven double crochets to spread into rounded shapes.
After all the tiers are complete, use your fingers to settle the scallops so they overlap naturally. If a fan twists or stands upright, secure its center underside to the neighboring foundation with a few discreet brown stitches. Keep the outer lobes visible.
Compare the finished cap with the example image. You want a thick-looking, layered brown surface with the widest scallops around the lower edge. The top should remain clear enough to accommodate the stem and oak leaves.
Don't stitch the scallops into the tan backing. Keep their attachment within the brown foundation so the cap underside stays neat.
Crochet the Short Acorn Stems and Oak Leaf Decorations
Every acorn gets a short, straight brown stem and two crocheted oak leaves. I prefer the leaves close to the stem, with their tips resting across the scalloped cap. That looks more natural than sewing them halfway down the basket or letting them stick straight up.
Make the Short Brown Acorn Stems
Use the same dark-brown cord used for the caps. The stems are narrow crocheted tubes with closed tops and open bases. Make one for each basket.
Large basket stem:
Round 1: Make a magic ring and work 8 sc into it. Pull the ring closed. (8 sts)
Rounds 2–5: Sc in each stitch around. (8 sts per round)
Fasten off with a long sewing tail.
Medium basket stem:
Round 1: Make a magic ring and work 8 sc into it. (8 sts)
Rounds 2–4: Sc in each stitch around. (8 sts per round)
Fasten off with a long sewing tail.
Small basket stem:
Round 1: Make a magic ring and work 6 sc into it. (6 sts)
Rounds 2–3: Sc in each stitch around. (6 sts per round)
Fasten off with a long sewing tail.
Keep the stems short and blunt. They should resemble little acorn twigs, not long handles.
Shape each tube into a straight cylinder. If your cord is firm enough, you may not need any filling. If the stem collapses, place a short, tightly rolled piece of matching cotton fabric inside before attaching it. Sew the fabric filling in place so it cannot slip out.
Center the stem over the first round of its brown cap foundation. Sew every stitch around the open stem base securely to the foundation, keeping the stem upright. Pass the attachment yarn through the foundation and secure the ends on its hidden side before joining the lid layers.
The stem is decorative. Because these oversized caps may be heavy, lift each finished lid from underneath its outer edge rather than relying on the stem alone.
Make Two Crocheted Oak Leaves for Each Basket
Use the free fall crochet leaf pattern for all six oak leaves. Follow the oak-leaf instructions, including the olive-green center, rounded lobes, mustard-gold edging, brown veins and crocheted stem.
The original leaf pattern uses worsted-weight yarn and a 4.0 mm hook. That size makes sense on the large acorn, but I would scale the leaves down on the other two baskets so the decorations don't swallow the smaller lids.
- Large basket: Make two oak leaves using medium-weight #4 yarn and a 4.0 mm hook. Aim for approximately 7–8 inches long including the leaf stem.
- Medium basket: Make two leaves using DK-weight #3 yarn and a 3.5 mm hook. Aim for approximately 5 1/2–6 1/2 inches long.
- Small basket: Make two leaves using fine or sport-weight #2 yarn and a 3.0 mm hook. Aim for approximately 4 1/2–5 1/2 inches long.
The medium and small measurements are sizing targets, not verified results for those yarn substitutions. Check your first leaf against the lid before making its partner. If it's too large, try finer yarn and a compatible smaller hook while keeping the original leaf stitch counts.
Keep the same colors throughout the three sizes. The muted olive green and gold edging give the oak leaves enough contrast against the dark-brown caps without competing with the acorn shape.
Attach the Oak Leaves at the Base of Each Stem
Position the two leaves with their brown stems meeting at the base of the upright acorn stem.
Angle one leaf slightly toward the left and the other toward the right. Let their rounded lobes spread across the upper portion of the cap. A little overlap is fine, but the two leaves shouldn't lie directly on top of one another.
For the smallest basket, position the leaves before fastening either one down. You want the oak-leaf outlines visible without covering nearly all the brown scallops.
Using matching brown yarn and a yarn needle, secure both leaf stems firmly beside the acorn stem. Keep the crocheted leaf stems flat against the cap rather than wrapping them upward around the twig.
Continue stitching along the lower portion of each leaf's center vein, then add discreet attachment stitches beneath several outer lobes. The leaf edges can retain a little texture, but they shouldn't hang loose or flap freely.
A note about the decorations: Do not add small crocheted decorations to any storage basket that a baby or young child could reach or play with. These embellishments are intended only for decorative baskets displayed securely out of children's reach.
For baskets displayed out of reach, you can make the oak leaves using my free crochet fall leaf pattern and the miniature acorns using the Woodland Squirrel Lovey Crochet Pattern. The photographed design features two oak leaves and two small acorns on each lid. Sew all decorations securely in place.
Assemble, Stabilize and Finish the Acorn Storage Baskets
With the basket bodies, removable caps, stems and leaves completed, you're ready to put the set together.
Check the Removable Lid Fit
Place each cap on its matching basket with the tan fitting collar inside the opening.
The collar should slide into the basket without forcing the sides outward. The wider cap rests over the top and conceals the basket opening.
Check three things:
- The cap sits level without tilting noticeably to one side.
- The collar fits inside the basket opening without stretching the rim.
- The cap can be removed by lifting beneath its edge without pulling the basket upward.
If the collar fits too tightly, compare its actual circumference with the opening before making any changes. A small hook adjustment or a remade collar may be necessary. If the fit is much too loose, check whether your basket opening stretched during the final rounds.
Don't force an oversized collar into the opening. It will distort the basket and may make the lid difficult to remove.
Shape the Rounded Bodies
Set each empty basket on a level surface. Gently round the sides with your hands and straighten the upper opening.
The bottom should remain flat against the floor, while the middle of the body forms the widest part. The upper few rounds curve inward to create the acorn's rounded shoulders.
If the basket develops a crease, check whether the stitches are pulling unevenly or whether the cord is too soft to support the shape. Don't stretch the basket over a rigid form just to disguise a construction problem.
Finish the Scalloped Caps
Lay each cap on its basket and arrange the brown scallops so they overlap rather than bunching into one thick ridge.
Check every layer for loose yarn ends. Secure any scallop that twists forward with a few discreet matching stitches beneath its center.
Make sure the oak leaves remain flat enough that the stems and scalloped layers are still visible. The gold edging should outline both leaves clearly.
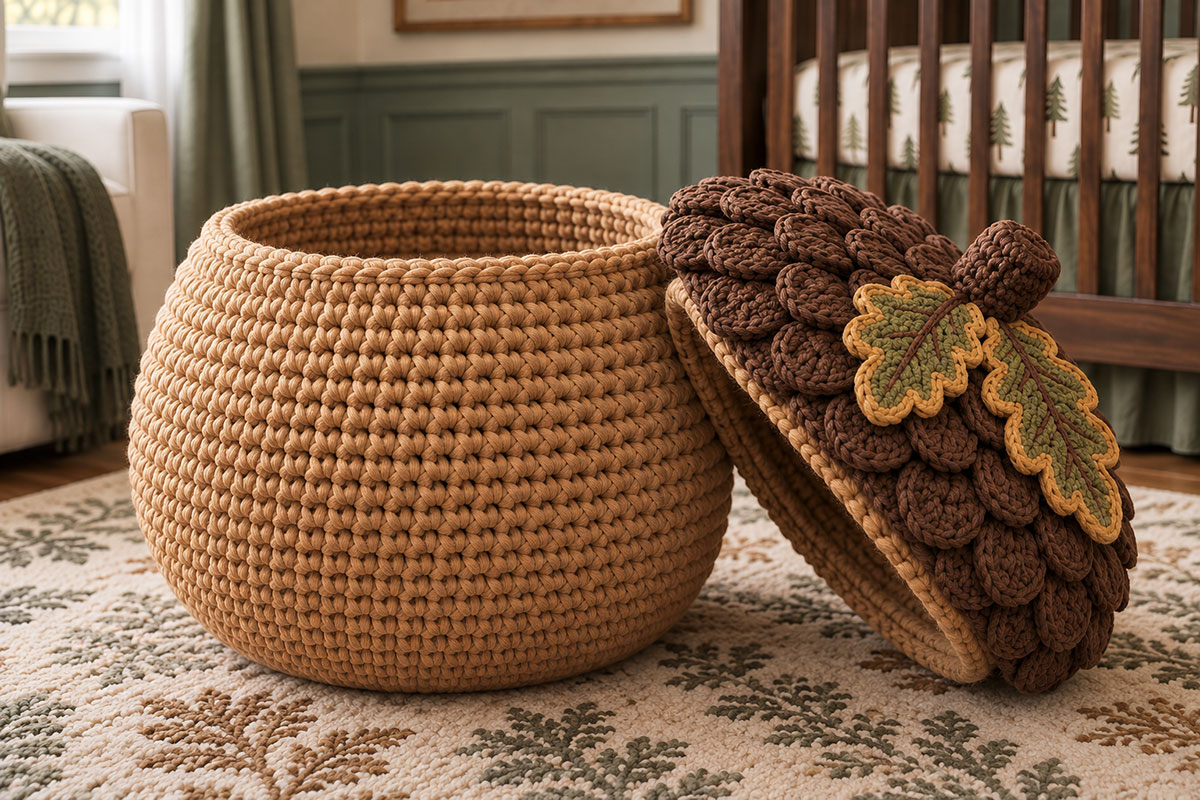
The removable cap gives you access to the storage space inside. It's also worth making sure the opening is comfortable to reach into before deciding what to keep in each basket.
Weave In and Secure Every Yarn End
Use a blunt needle to bury the thick cord ends inside the crocheted fabric. Secure the finishing tails by passing them through several neighboring stitches and changing direction before trimming.
Check the underside of the caps and the inside of each basket. Remove all temporary stitch markers, sewing clips and any blocking pins. There shouldn't be any dangling ends, exposed reinforcement or loose decorative attachments.
If you used a flexible insert, it must remain completely enclosed. Any insert that shifts, protrudes through the stitches or develops a sharp edge needs to be corrected before the basket is used.
Using the Acorn Baskets in a Nursery
I would keep the large basket for lightweight folded blankets, the medium basket for spare changing supplies and the small one for washcloths or extra burp cloths. They're decorative storage containers, not toy boxes or seats.
Place them on a stable floor surface where they won't be pulled over or climbed on. Keep the baskets, removable lids and any decorative attachments outside the crib and away from a baby's sleep space. Don't use the lids as toys, and don't leave young children to handle the heavy baskets or caps unsupervised.
A soft, dry cloth is a simple starting point for removing dust. If the cord needs cleaning, follow the manufacturer's care guidance. Baskets containing enclosed reinforcement may not be suitable for machine washing or soaking.
You can also make just one size if that's all the room needs. A large acorn basket beside a nursery chair makes a statement on its own, and a small matching one gives the room a coordinated touch without filling every corner.
Pattern review note: The stitch counts, shaping sequences and intended dimensions have been reviewed mathematically. This pattern has not been physically test-crocheted, and the actual lid fit, structural firmness and decorative proportions still require a finished-sample check.
When you click on links to various merchants on this site and make a purchase, this may result in this site earning a commission. This does not affect the price you pay.

UBGI Gold Standard 2026
Reviewed under the site's
editorial checklist.
Photos, decorating ideas, party setups and reader submissions are shared for inspiration unless a page is specifically presented as a pattern, tutorial, reference guide or step-by-step project. Follow the instructions, measurements, safety guidance and manufacturer directions provided for the particular project or product.
About Jan | Contact | Baby Nursery Ideas (Blog) | Site Map | Privacy Policy | Disclosure Policy | Disclaimer | Affiliate Disclosure | Earnings Disclosure | Facebook | Pinterest
I am a participant in the Amazon Services LLC Associates Program, an affiliate advertising program designed to provide a means for us to earn fees by linking to Amazon. As an Amazon Associate I earn from qualifying purchases.
Copyright © 2006-2026. All Rights Reserved.