Free Crochet Pumpkin Storage Basket Pattern Set in 3 Sizes
By Jan Bay
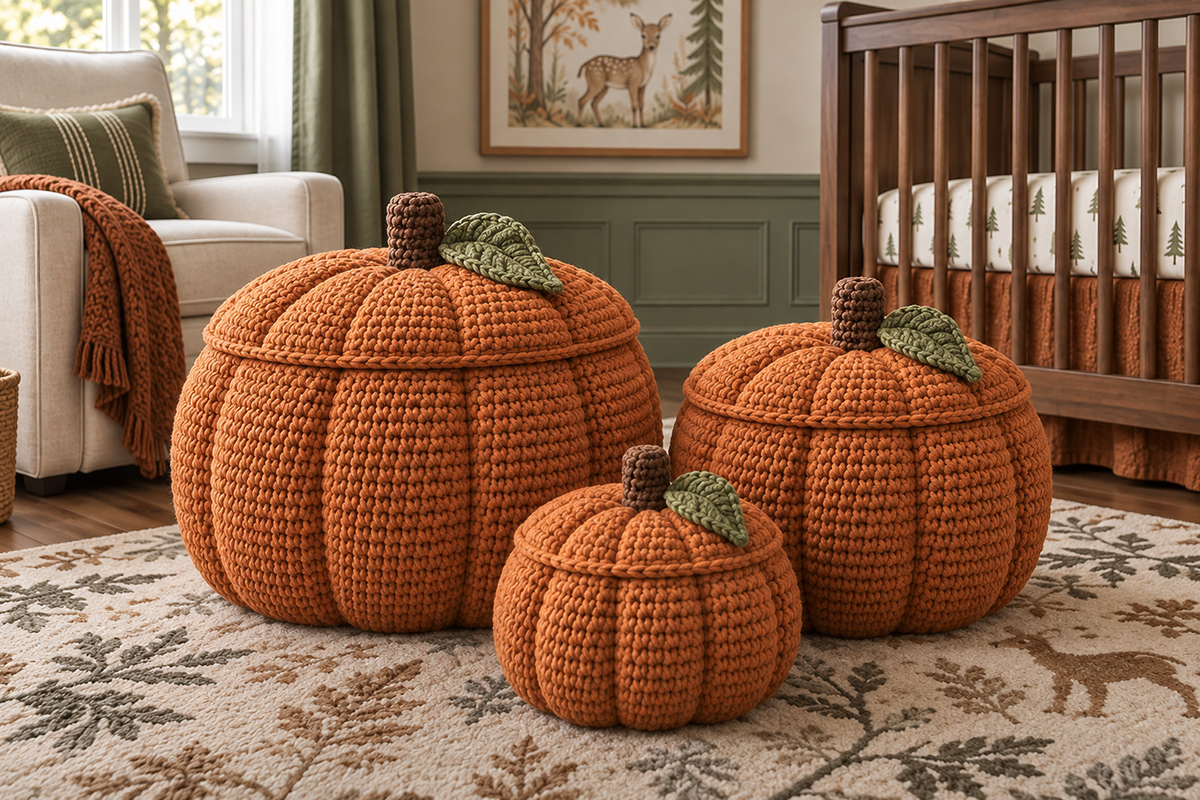
This free crochet pumpkin storage basket pattern creates a set with three useful sizes instead of just one decorative pumpkin. Make the small, medium and large baskets as a coordinated nesting set to organize baby socks, changing supplies, diapers, rolled blankets and other lightweight nursery essentials. The baskets feature classic pumpkin shaping, a short brown stem and a simple green leaf, keeping the finished set cute enough to use for fall decorations while getting some useful storage at the same time. That sounds like a huge win to me.
Explore More Free Crochet Basket & Pumpkin Patterns
See Firm Cotton Cord for These Pumpkin Baskets
Jump to:
About the Pumpkin Storage Basket Set
Abbreviations and Special Stitches
How the Pumpkin Basket Construction Works
Crochet Pumpkin Storage Basket Pattern: What Makes This Set Different
I wanted these to look like pumpkins first and storage baskets second, but I didn't want to give up the usefulness that made the project worth making in the first place. That's why each of the three baskets gets its own fitted pumpkin lid instead of a stem stuck onto an open rim.
The lids are removable, gently rounded and finished with a centered brown stem and one olive green leaf. Eight shaped sections continue from the basket body across the lid so the whole thing reads as one pumpkin when it's closed.
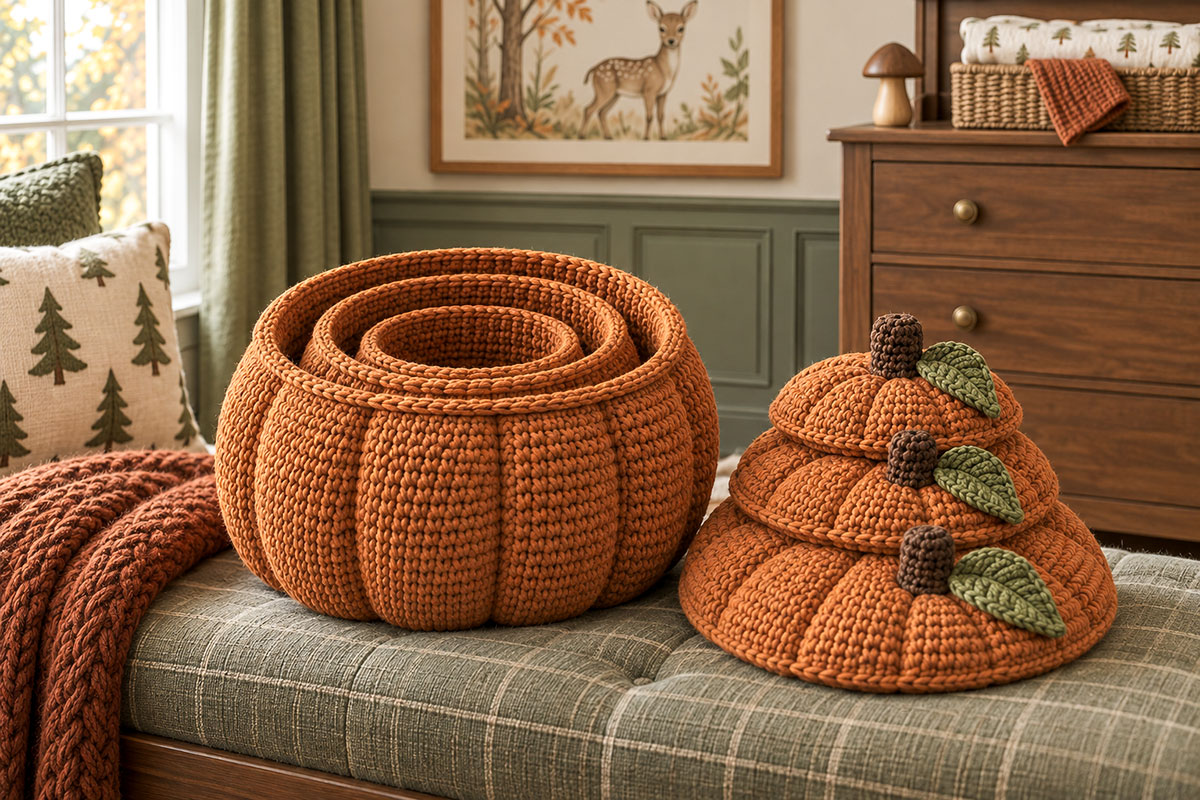
Take the lids off and you still have three practical baskets for socks, diapers, changing supplies, rolled blankets or other lightweight nursery storage. The small basket nests inside the medium one, and the medium basket nests inside the large one. Stack the three lids separately and the whole set takes up much less room when you're not using it.
I would make the complete set if you're using these for fall decorating because the size change is a big part of the look. You can make just one size, though. Each basket and lid has its own finished stitch count, so you don't have to guess how many rounds to add or subtract.
If you'd rather make an open basket without the pumpkin lid, my free crochet basket patterns page has more basket ideas, including larger everyday storage styles.
Pattern status: This pattern has been mathematically drafted to reproduce the design shown in the example image, but it has not been physically test-crocheted. Finished measurements and cord amounts are therefore expected measurements and estimated usage rather than measurements taken from a completed test sample.
Expected Finished Sizes
The measurements below are calculated from a target gauge of 8 single crochet stitches and 8 rows per 4 inches. The row gauge is used as the vertical gauge for the basket rounds. Pumpkin shaping and the firmness of your cord can change the finished measurements slightly.
Small basket: about 9 inches across the basket body and 6 inches high without the lid. Before shaping, the lid edge is expected to measure about 9 inches across. The radial shaping will draw the visible lid width inward slightly. With the shaped lid and stem in place, expect an overall height of about 8 3/4 inches.
Medium basket: about 12 3/4 inches across the basket body and 8 inches high without the lid. Before shaping, the lid edge is expected to measure about 12 3/4 inches across. The radial shaping will draw the visible lid width inward slightly. With the shaped lid and stem in place, expect an overall height of about 11 1/4 inches.
Large basket: about 16 1/2 inches across the basket body and 10 inches high without the lid. Before shaping, the lid edge is expected to measure about 16 1/2 inches across. The radial shaping will draw the visible lid width inward slightly. With the shaped lid and stem in place, expect an overall height of about 13 3/4 inches.
At the stated gauge, the unshaped lid edge extends about 5/8 inch past the narrowed basket opening on each side. Once the radial shaping is tightened, the lid draws inward into the rounded pumpkin cap shown in the example image. A short crocheted lip underneath the lid drops inside the opening to help keep the lid centered instead of letting it slide around on top.
Finished crochet piece count for the complete set: 12 pieces. You'll make three basket bodies, three lids, three stems and three leaves.
Materials and Supplies
Main material: 5 mm braided cotton cord in warm pumpkin orange.
Estimated orange cord allowance: about 160 yards for the small basket and lid, 280 yards for the medium basket and lid, and 450 yards for the large basket and lid. If you're making the complete set, I would allow about 890 yards so you have some room for gauge swatching and finishing. These are calculated purchasing allowances, not physically measured yarn usage.
Stem: about 15 yards total of 5 mm braided cotton cord in medium brown for all three stems.
Leaves: about 20 yards total of 5 mm braided cotton cord in muted olive green for all three leaves.
Lid shaping: about 15 yards of thinner matching orange cotton cord or sturdy matching cotton yarn. A cord around 2 mm works well here because it stays hidden underneath the lids and is easier to draw through the crochet fabric than the full 5 mm basket cord.
Hooks: 10 mm crochet hook for the orange basket bodies and lids. Use an 8 mm hook for the stems and leaves so those pieces stay compact.
Also needed: locking stitch markers, scissors, flexible tape measure and a large blunt yarn or lacing needle that will handle the cord you're using.
Skill level: Intermediate. You'll need to be comfortable working in continuous and joined rounds, crocheting around stitch posts, decreasing and sewing shaped pieces securely.
Terminology: US crochet terms.
You don't need plastic canvas, buttons, handles or decorative hardware. The firm cord, tight gauge and fitted lid do the structural work.
Gauge and Basket Structure
Target gauge: 8 sc = 4 inches and 8 rows = 4 inches using 5 mm braided cotton cord and the 10 mm hook.
Before starting a basket, make a flat single crochet swatch at least 12 stitches wide and 12 rows high. Measure across the center 4 inches rather than along the outside edges. You should have about 8 single crochet stitches across 4 inches and 8 rows vertically over 4 inches.
The fabric should feel firm and should not collapse easily when you hold the swatch upright. If your stitches are much looser than the target gauge, try a smaller hook. If the fabric is so tight that you're fighting to get the hook into every stitch, move up a hook size and check the gauge again.
Use the row gauge as the vertical checkpoint for the basket rounds. After 4 completed wall rounds, the wall should measure about 2 inches vertically. Checking here gives you a chance to correct your gauge before you've used most of the cord.
Gauge matters more here than it does on a decorative stuffed pumpkin. A floppy gauge changes the basket diameter, the lid fit and whether the walls can support themselves.
Abbreviations and Special Stitches
ch: chain
sl st: slip stitch
sc: single crochet
hdc: half double crochet
dc: double crochet
tr: treble crochet
inc: work 2 sc in the same stitch
invdec: invisible single crochet decrease
BLO: back loop only
bpsc: back post single crochet
MR: magic ring
Invisible decrease: Insert the hook through the front loop of the next stitch, then through the front loop of the following stitch. Yarn over and pull through both front loops. Yarn over again and pull through the 2 loops on your hook.
Back-loop decrease: Insert the hook into the back loop of the next stitch, yarn over and pull up a loop. Insert the hook into the back loop of the following stitch, yarn over and pull up a loop. Yarn over and pull through all 3 loops on the hook. This decreases 2 stitches to 1 while leaving the front loops unused for the lid hinge.
Back post single crochet: Insert the hook from back to front and then back again around the post of the next stitch from the previous round. Yarn over, pull up a loop, yarn over and pull through both loops. The bpsc counts as one stitch.
Reverse single crochet: Work single crochet in the opposite direction from your normal working direction, inserting the hook into the next stitch behind the hook. Yarn over, pull up a loop, yarn over and pull through both loops. Continue around without turning the work.
The back post stitches are important. They form eight recessed vertical lines around each basket so the spaces between them round outward like pumpkin sections instead of leaving you with a plain orange cylinder.
How the Pumpkin Basket Construction Works
All three basket bases begin with the same flat-circle increase sequence. The small basket stops after Round 8, the medium after Round 12 and the large after Round 16. After the base turns upward, the first shaped wall round adds one stitch to each of the eight pumpkin sections. This makes the middle of the basket wider than the base. A matching decrease round near the top brings the opening back to the base stitch count and creates the rounded pumpkin silhouette shown in the example image.
The lids use the same flat-circle sequence but continue one regular increase round beyond their matching basket bases. Work the small lid through Round 9, the medium lid through Round 13 and the large lid through Round 17. Then work the final two-increase lid round given for that size. That last round begins the gentle cupping of the lid while leaving a stitch count that divides evenly into eight pumpkin sections.
Work the flat circles in a continuous spiral. Place a marker in the first stitch of every round and move it up as you work.
For all basket wall rounds, ch 1 at the beginning of the round. The ch 1 does not count as a stitch. Keep the right side facing you, do not turn, and join each completed wall round with a sl st to the first sc.
Work the lid top and inner lip in a continuous spiral unless the instructions say otherwise. After completing Inner Lip R2, fold the lip toward the wrong side of the lid along the BLO hinge and shape it downward with your fingers before checking the fit inside the basket opening.
R1: Work 6 sc in MR. (6)
R2: Inc in each stitch around. (12)
R3: (Sc in next st, inc in next st) 6 times. (18)
R4: Sc in next st, inc in next st, (sc in next 2 sts, inc in next st) 5 times, sc in final st. (24)
R5: (Sc in next 3 sts, inc in next st) 6 times. (30)
R6: Sc in next 2 sts, inc in next st, (sc in next 4 sts, inc in next st) 5 times, sc in final 2 sts. (36)
R7: (Sc in next 5 sts, inc in next st) 6 times. (42)
R8: Sc in next 3 sts, inc in next st, (sc in next 6 sts, inc in next st) 5 times, sc in final 3 sts. (48)
R9: (Sc in next 7 sts, inc in next st) 6 times. (54)
R10: Sc in next 4 sts, inc in next st, (sc in next 8 sts, inc in next st) 5 times, sc in final 4 sts. (60)
R11: (Sc in next 9 sts, inc in next st) 6 times. (66)
R12: Sc in next 5 sts, inc in next st, (sc in next 10 sts, inc in next st) 5 times, sc in final 5 sts. (72)
R13: (Sc in next 11 sts, inc in next st) 6 times. (78)
R14: Sc in next 6 sts, inc in next st, (sc in next 12 sts, inc in next st) 5 times, sc in final 6 sts. (84)
R15: (Sc in next 13 sts, inc in next st) 6 times. (90)
R16: Sc in next 7 sts, inc in next st, (sc in next 14 sts, inc in next st) 5 times, sc in final 7 sts. (96)
R17: (Sc in next 15 sts, inc in next st) 6 times. (102)
R18: Sc in next 8 sts, inc in next st, (sc in next 16 sts, inc in next st) 5 times, sc in final 8 sts. (108)
The staggered increase placement on alternating rounds keeps the base rounder than stacking every increase directly above the increase from the previous round.
Small Pumpkin Storage Basket
Expected basket size: about 9 inches across and 6 inches high before adding the lid.
Basket base: Work the common flat-circle instructions through R8. You should have 48 stitches.
At the end of R8, sl st to the first stitch to close the spiral. Ch 1. From this point forward, work in joined rounds. The beginning ch 1 does not count as a stitch.
Wall transition round: Working BLO, sc in each stitch around. Join with sl st. (48)
You now have eight exact 6-stitch sections around the base.
Wall R1: Ch 1. (Sc in next 4 sts, inc in next st, bpsc around the next stitch) 8 times. Join. (56)
This increase round widens every pumpkin section by one stitch so the middle of the basket rounds outward from the narrower base.
Wall R2 through R7: Ch 1. (Sc in next 6 sts, bpsc around the next stitch) 8 times. Join. Keep every bpsc directly above the groove stitch below it. (56)
Wall R8: Ch 1. (Sc in next 4 sts, invdec over next 2 sts, bpsc around the next stitch) 8 times. Join. (48)
Wall R9 through R10: Ch 1. (Sc in next 5 sts, bpsc around the next stitch) 8 times. Join. (48)
Top edge: Ch 1. Work reverse single crochet evenly around all 48 stitches. Join and fasten off.
The transition round, ten shaped wall rounds and top edge give an expected wall height of about 6 inches at the stated gauge. The lower increase and upper decrease create the rounded pumpkin body shown in the example image while leaving a flatter base for stability.
Small lid: Begin again with pumpkin orange cord. Work the common flat-circle instructions through R9. (54)
Lid R10: (Sc in next 26 sts, inc in next st) 2 times. (56)
The 56-stitch outside edge is calculated at about 9 inches across before the lid is shaped.
Inner Lip R1: Working in the back loops only, (sc in next 5 sts, back-loop decrease over next 2 sts) 8 times. (48)
Inner Lip R2: (Sc in next 10 sts, invdec over next 2 sts) 4 times. (44)
Fasten off. Fold the two lip rounds toward the wrong side of the lid. The 44-stitch lower edge is slightly smaller than the 48-stitch basket opening so the lip can sit inside without pushing the rim outward.
Before weaving in the lid tail permanently, set the lid on the basket. The lip should enter the opening without being forced and the lid should stay centered.
Medium Pumpkin Storage Basket
Expected basket size: about 12 3/4 inches across and 8 inches high before adding the lid.
Basket base: Work the common flat-circle instructions through R12. You should have 72 stitches.
At the end of R12, sl st to the first stitch to close the spiral. Ch 1 and begin joined rounds.
Wall transition round: Working BLO, sc in each stitch around. Join. (72)
You now have eight exact 9-stitch sections around the base.
Wall R1: Ch 1. (Sc in next 7 sts, inc in next st, bpsc around the next stitch) 8 times. Join. (80)
Wall R2 through R10: Ch 1. (Sc in next 9 sts, bpsc around the next stitch) 8 times. Join. Keep every groove aligned vertically. (80)
Wall R11: Ch 1. (Sc in next 7 sts, invdec over next 2 sts, bpsc around the next stitch) 8 times. Join. (72)
Wall R12 through R14: Ch 1. (Sc in next 8 sts, bpsc around the next stitch) 8 times. Join. (72)
Top edge: Ch 1. Work reverse single crochet evenly around all 72 stitches. Join and fasten off.
The finished wall is expected to measure about 8 inches high at gauge. The lower increase and upper decrease give the basket rounded pumpkin shaping while keeping the opening at 72 stitches for the fitted lid.
Medium lid: With pumpkin orange cord, work the common flat-circle instructions through R13. (78)
Lid R14: (Sc in next 38 sts, inc in next st) 2 times. (80)
The 80-stitch outside edge is calculated at about 12 3/4 inches across before the lid is shaped.
Inner Lip R1: Working in the back loops only, (sc in next 8 sts, back-loop decrease over next 2 sts) 8 times. (72)
Inner Lip R2: (Sc in next 16 sts, invdec over next 2 sts) 4 times. (68)
Fasten off, fold the lip toward the wrong side of the lid and check the 68-stitch lower edge inside the 72-stitch basket opening before weaving in the final tail.
Large Pumpkin Storage Basket
Expected basket size: about 16 1/2 inches across and 10 inches high before adding the lid.
Basket base: Work the common flat-circle instructions through R16. You should have 96 stitches.
At the end of R16, sl st to the first stitch to close the spiral. Ch 1 and begin joined rounds.
Wall transition round: Working BLO, sc in each stitch around. Join. (96)
You now have eight exact 12-stitch sections around the base.
Wall R1: Ch 1. (Sc in next 10 sts, inc in next st, bpsc around the next stitch) 8 times. Join. (104)
Wall R2 through R14: Ch 1. (Sc in next 12 sts, bpsc around the next stitch) 8 times. Join. Keep every groove aligned vertically. (104)
Wall R15: Ch 1. (Sc in next 10 sts, invdec over next 2 sts, bpsc around the next stitch) 8 times. Join. (96)
Wall R16 through R18: Ch 1. (Sc in next 11 sts, bpsc around the next stitch) 8 times. Join. (96)
Top edge: Ch 1. Work reverse single crochet evenly around all 96 stitches. Join and fasten off.
The finished wall is expected to measure about 10 inches high at gauge. The lower increase and upper decrease create the fuller pumpkin body shown in the example image while preserving the 96-stitch opening required by the fitted lid.
Large lid: With pumpkin orange cord, work the common flat-circle instructions through R17. (102)
Lid R18: (Sc in next 50 sts, inc in next st) 2 times. (104)
The 104-stitch outside edge is calculated at about 16 1/2 inches across before the lid is shaped.
Inner Lip R1: Working in the back loops only, (sc in next 11 sts, back-loop decrease over next 2 sts) 8 times. (96)
Inner Lip R2: (Sc in next 22 sts, invdec over next 2 sts) 4 times. (92)
Fasten off, fold the lip toward the wrong side of the lid and check the 92-stitch lower edge inside the 96-stitch basket opening before weaving in the final tail.
Crochet the Stems and Leaves
Use the 8 mm hook for the stems and leaves. The smaller hook keeps these pieces tighter than the basket fabric and helps the stems stand upright. Work each stem in continuous rounds, placing a marker in the first stitch and moving it up as you work. Do not stuff the stems. Because the stems use a smaller hook than the baskets, the inch measurements given below are approximate target proportions rather than measurements calculated from the basket gauge. Follow the stem round counts first and use the stated height as a visual checkpoint.
Small stem:
R1: With brown cord, work 6 sc in MR. (6)
R2: Sc around. (6)
R3: Sc in next 2 sts, inc in next st, sc in next 2 sts, inc in final st. (8)
R4: Sc around. (8)
Fasten off with a long sewing tail. The expected finished height is about 1 1/2 inches. Tuck the starting tail inside the stem before attaching it.
Medium stem:
R1: With brown cord, work 6 sc in MR. (6)
R2 through R3: Sc around. (6)
R4: Sc in next 2 sts, inc in next st, sc in next 2 sts, inc in final st. (8)
R5: Sc around. (8)
Fasten off with a long sewing tail. The expected finished height is about 1 3/4 inches.
Large stem:
R1: With brown cord, work 6 sc in MR. (6)
R2 through R4: Sc around. (6)
R5: Sc in next 2 sts, inc in next st, sc in next 2 sts, inc in final st. (8)
R6: Sc around. (8)
Fasten off with a long sewing tail. The expected finished height is about 2 inches.
Small olive leaf: Ch 8. Starting in the second ch from the hook, work sl st, sc, hdc, dc, hdc, sc, sl st. Ch 2 at the end of the foundation chain. Continue along the unused loops on the opposite side of the foundation chain and work sl st, sc, hdc, dc, hdc, sc, sl st. Fasten off, leaving a long tail.
Medium olive leaf: Ch 9. Starting in the second ch from the hook, work sl st, sc, hdc, dc in next 2 ch, hdc, sc, sl st. Ch 2. Work back along the opposite side with sl st, sc, hdc, dc in next 2 ch, hdc, sc, sl st. Fasten off with a long tail.
Large olive leaf: Ch 10. Starting in the second ch from the hook, work sl st, sc, hdc, dc, tr, dc, hdc, sc, sl st. Ch 2. Work back along the opposite side with sl st, sc, hdc, dc, tr, dc, hdc, sc, sl st. Fasten off with a long tail.
Use the long leaf tail to sew the base of the leaf to the lid immediately beside the stem, passing through the first 2 stitches of the leaf and 2 adjacent stitches of the lid. Then make 2 small anchoring stitches through the center chain of the leaf, one about one-third of the way along the leaf and one about two-thirds of the way along it. Leave the outer edges free so the leaf can lie naturally across the pumpkin top. Secure and bury the tail on the underside of the lid.
Finish and Shape the Pumpkin Lids
The basket bodies get their eight grooves from the stacked back post stitches. The lids need the same eight-section look, but the shaping lines are hidden underneath so the top stays clean.
Place each lid right side up first and divide its outside edge into eight equal sections. The small lid has 7 stitches per section, the medium lid has 10 stitches per section and the large lid has 13 stitches per section. Place a marker at all eight division points.
Turn the lid over.
Number the eight edge markers 1 through 8. Pair the opposite markers as 1 with 5, 2 with 6, 3 with 7 and 4 with 8. You'll use four shaping strands, with each strand forming two opposite groove lines.
Cut four 24-inch strands for the small lid, four 30-inch strands for the medium lid or four 36-inch strands for the large lid. These lengths allow enough cord to cross the full lid, leave usable tails at both ends and still give you room to secure and bury the ends.
Working on the underside of the lid, leave about 5 inches of tail at Marker 1. Pass the shaping cord under the underside bar of the marked stitch and continue toward the center, catching one underside bar in each successive crochet round. Continue across the center and out through the corresponding rounds to the opposite Marker 5, leaving another usable tail at that edge.
Repeat between Markers 2 and 6, 3 and 7, and 4 and 8. You should now have four straight shaping strands crossing at the center and eight evenly spaced radial lines.
Turn the lid right side up. Pull the ends of the four strands a little at a time, moving around the lid instead of tightening one strand completely. For the small lid, aim for a gentle center rise of about 1 1/4 inches above the outside edge. Aim for about 1 1/2 inches on the medium lid and about 1 3/4 inches on the large lid.
Stop as soon as the eight sections rise evenly and the lid has the broad, softly rounded pumpkin top shown in the example image. Secure each strand end firmly around an underside edge bar, then bury the remaining tails where they won't interfere with the fitted lip.
Center the brown stem directly over the middle of the lid and sew all the way around its 8-stitch base. Give it a gentle tug before you bury the tail. It shouldn't wobble.
Set the olive leaf beside the stem at a slight angle and stitch it securely as described above. Keep the leaf restrained. One leaf is plenty.
Repeat for all three lids, then put each lid on its matching basket and check the whole silhouette. The eight body grooves and eight lid sections should visually continue into one another. Rotate the lid slightly if needed so the divisions line up neatly.
Final check: Remove every temporary stitch marker. Make sure all cord tails are securely buried, each stem is firmly attached around all 8 base stitches, each leaf is secure at its attachment points, the lid lips sit inside their matching basket openings without being forced, and no shaping cord is visible from the top of a lid.
Nesting the Three Pumpkin Storage Baskets
Remove all three lids before nesting the baskets. The small basket should sit comfortably inside the medium one, and the medium basket should then fit inside the large one.
At the stated gauge, the expected outside diameters are about 9 inches, 12 3/4 inches and 16 1/2 inches. That leaves several inches of diameter difference between sizes instead of making the nesting fit unnecessarily tight.
The heights step up at the same time, from about 6 inches to 8 inches to 10 inches. The smaller basket shouldn't stick awkwardly above the larger one when they're nested.
Stack the three removable lids separately. Put the large lid on the bottom, medium in the middle and small on top.
I like having three sizes because each one can do a different job. The small basket is a good spot for socks, bows or little changing-table supplies. The medium size can handle diapers, wipes or burp cloths. Save the large one for rolled blankets, lightweight toys or bulkier nursery supplies.
If you need a single basket with much more open storage space, the free large crochet basket pattern is a better choice. I would keep this set for the project where the pumpkin look matters just as much as the storage.
Care Instructions
Check the care instructions for the exact cotton cord you use because braided cords can have different fiber blends and washing recommendations.
For routine cleaning, spot cleaning is the least disruptive to the basket shape. If your cord manufacturer allows hand washing, reshape the basket and lid while they're damp and let them air dry completely before stacking or nesting them.
Don't store the baskets nested while they're damp. Give the thick crochet fabric time to dry all the way through first.
If a lid loses a little of its dome after cleaning, reshape the eight sections with your hands while the cord is slightly damp and let the lid dry sitting flat on its fitted lip.
Using the Pumpkin Baskets in a Nursery
These are storage baskets and seasonal decorations, not toys, bassinets or sleep products. Keep them out of a crib, bassinet, play yard or other infant sleep space.
The U.S. Consumer Product Safety Commission recommends keeping an infant sleep space bare except for a fitted sheet. You can read the current CPSC safe sleep guidance here.
Check the stems and leaves occasionally and repair them if any attachment stitches loosen. Store small items inside the baskets according to the age and reach of the child using the room.
Frequently Asked Questions
Can I make only one pumpkin basket?
Yes. Each size has its own finished basket count and matching lid instructions. You don't have to make all three.
Do I have to make the lids?
No, but I would make them for this particular design. The lid is what turns the basket silhouette into a convincing pumpkin and gives the stem a natural place to go. Without it, you'll have a useful orange pumpkin-inspired basket, but it won't look like the finished set shown on this page.
Why use 5 mm braided cotton cord instead of regular yarn?
The baskets need enough body to support their own walls and hold the pumpkin sections. Ordinary soft yarn can make the larger sizes much slouchier. If you substitute another material, make a gauge swatch and make sure the fabric can stand upright before committing to the large basket.
Can I use T-shirt yarn?
You can experiment with it, but I wouldn't expect the measurements or lid fit to remain the same. T-shirt yarn stretches much more than firm braided cotton cord and can vary quite a bit in thickness.
What if my fitted lid is too tight?
Check your gauge first. If the lid top measures correctly but the finished inner lip is still too snug, work one additional adjustment round with 4 evenly spaced invisible decreases: (sc in next 9 sts, invdec) 4 times for the small lid (40 sts); (sc in next 15 sts, invdec) 4 times for the medium lid (64 sts); or (sc in next 21 sts, invdec) 4 times for the large lid (88 sts). A slightly smaller lip gives you more clearance inside the opening.
What if the lid is too loose?
Undo Inner Lip R2 and stop after Inner Lip R1. That leaves 48 stitches on the small lid, 72 on the medium or 96 on the large, matching the stitch count around its basket opening and giving the lip a snugger fit.
Why don't the lids nest with the baskets?
The lids are wider than the basket openings by design, so they can't stay attached while the baskets nest. Remove them and stack the lids separately. I think that's a fair trade for getting the finished pumpkin shape.
Has this crochet pumpkin storage basket pattern been physically tested?
Not yet. The stitch counts, eight-section shaping, calculated dimensions, lid overhang and nesting clearances have been worked out mathematically to reproduce the design shown in the example image, but the pattern has not yet been physically test-crocheted. If you make the set, keep the gauge and lid-fit checkpoints in place rather than skipping them.
If you want another fall project after the baskets are finished, you can also make the free crochet pumpkin pattern for a smaller decorative pumpkin.
For a wider mix of pumpkin projects, browse my pumpkin craft ideas.
When you click on links to various merchants on this site and make a purchase, this may result in this site earning a commission. This does not affect the price you pay.

UBGI Gold Standard 2026
Reviewed under the site's
editorial checklist.
Photos, decorating ideas, party setups and reader submissions are shared for inspiration unless a page is specifically presented as a pattern, tutorial, reference guide or step-by-step project. Follow the instructions, measurements, safety guidance and manufacturer directions provided for the particular project or product.
About Jan | Contact | Baby Nursery Ideas (Blog) | Site Map | Privacy Policy | Disclosure Policy | Disclaimer | Affiliate Disclosure | Earnings Disclosure | Facebook | Pinterest
I am a participant in the Amazon Services LLC Associates Program, an affiliate advertising program designed to provide a means for us to earn fees by linking to Amazon. As an Amazon Associate I earn from qualifying purchases.
Copyright © 2006-2026. All Rights Reserved.