Free Crochet Fox Basket Pattern for an XXL Woodland Nursery Storage Basket
By Jan Bay
This free crochet fox basket pattern makes an XXL woodland animal theme nursery storage basket with securely embroidered fox features with forest charm. This page provides the fox-specific pieces, measurements, placement and attachment instructions that give the basket (created using the pattern linked below) its personality.
Explore More Free Crochet Basket Patterns
Make the XXL Master Basket First
XXL Woodland Owl Basket Pattern

Turn the XXL crochet basket into a piece of handmade woodland fox decor and a helpful nursery organization tool.
Jumbo Cotton Rope Yarn for Large Crochet Storage Baskets
Jump to the Fox Basket Pattern Instructions
Finished Measurements and Gauge
Abbreviations and Pattern Conventions
Inner-Ear Pattern and Assembly
Skill level: Intermediate. This pattern uses shaped flat panels, single-crochet decreases, double-layer ear assembly, mirrored feature placement, large appliqué attachment and embroidery worked over thick basket fabric.
Before You Begin the Free Crochet Fox Basket Pattern
This page contains the fox features only. Complete the full XXL crochet basket pattern, including its reinforced base, walls, rim and two structural side handles, before making or attaching the ears and face pieces.
The finished fox design uses four outer-ear panels, two cream inner-ear panels, two separate cream cheek panels and directly embroidered facial features. The orange section between the cheeks is the original basket wall. It is not a separate muzzle piece.
The eyes are embroidered directly onto the rust basket wall. Use cream or ivory embroidery floss for the eye outlines and highlights and black embroidery floss for the eye centers. The built-up nose is worked with heavy matte black embroidery thread through the rust basket wall and the slightly overlapped inner tips of the two cream cheek panels. Do not use plastic safety eyes, buttons, glued felt or loose embellishments. The completed design should remain soft, firmly attached and suitable only as a decorative nursery-storage basket.
Before attaching anything, locate the center front by measuring halfway between the two side-handle attachment areas. Mark that point with a removable stitch marker. The ears, eyes, cheek panels and nose will all be centered from that reference point.
Keep the reinforced upper rim smooth and level while pinning the pieces. The fox features should not pull the rim downward, cover either handle opening or cause the basket wall to pucker.

Complete and check all fox pieces before sewing them to the finished XXL basket.
Materials and Supplies
- One completed XXL crochet basket in rust, cinnamon or muted burnt-orange yarn
- Additional basket yarn in the main rust color for four outer-ear panels
- Matching cream or ivory yarn for two inner-ear panels and two cheek panels
- Black cotton embroidery floss for the eye centers
- Cream or ivory cotton embroidery floss for the eye outlines and small highlights
- Black basket yarn or heavy matte black embroidery thread for the nose
- Hook that produces the firm feature gauge listed below
- Large blunt-tip yarn needle suitable for the basket yarn
- Embroidery needle with an eye large enough for the cream floss, black floss and heavy matte black nose thread; use a suitable blunt yarn needle if testing black basket yarn for the nose
- Removable stitch markers
- Flexible measuring tape
- Rustproof pins, locking stitch markers or sewing clips for positioning the pieces
- Scissors
- Blocking mat and rustproof pins, if light shaping is needed
Do not add wire, plastic canvas, rigid inserts or glued reinforcements to the ears. Their structure comes from the dense gauge, double-layer construction and secure attachment along the lower edge.

Use the same type of yarn as the master basket so the fox pieces share its weight, texture and structure.
Estimated Yarn Quantities for the Fox Features
These estimates cover the fox pieces only. They do not include the yarn required to make the master basket.
- Main rust yarn: approximately 150 to 180 yards for four outer-ear panels, joining and attachment
- Cream or ivory yarn: approximately 90 to 120 yards for two inner-ear panels and two cheek panels
- Black cotton embroidery floss: one full skein for the eye centers
- Cream or ivory cotton embroidery floss: one full skein for the eye outlines and highlights
- Heavy matte black embroidery thread: enough to embroider and build up one nose approximately 1 1/2 inches wide by 1 inch high
These quantities are generous planning allowances rather than exact usage totals. Jumbo cotton rope yarn varies greatly in thickness, weight and yards per skein, so actual use may be lower. Keep a small amount of each color after assembly for future repairs.
Leave practical sewing tails as the pieces are completed. Fasten off and weave in the tails on all four outer-ear panels because the panels will be joined in pairs with separate lengths of rust yarn. After joining each completed ear, weave in both joining tails. Cut a separate rust yarn strand approximately 60 inches long when it is time to attach each ear to the basket. Leave approximately 30 to 36 inches on each inner-ear panel and at least 48 inches on each cheek panel. For jumbo rope yarn or especially thick, tightly twisted yarn, leave approximately 60 inches on each cheek panel. A longer strand is easier to manage than joining new yarn midway around a structural seam or large appliqué.
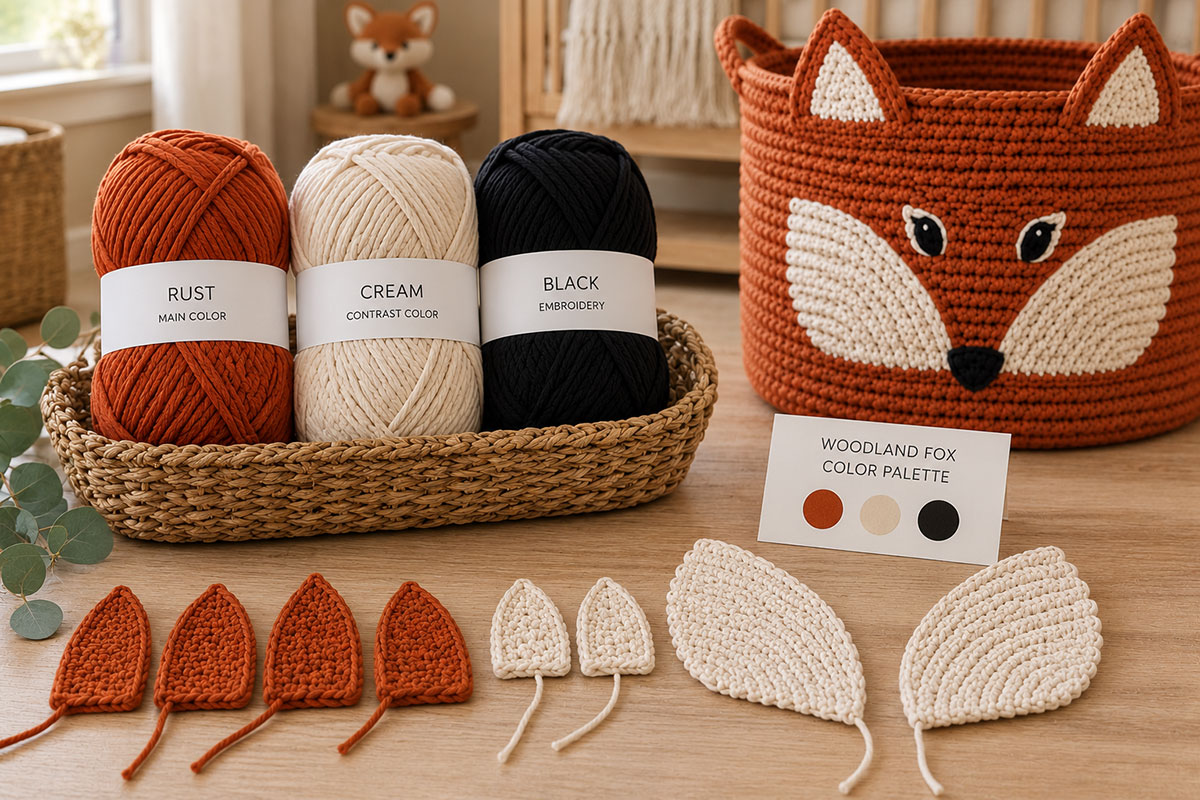
Warm rust, soft cream and a small amount of matte black create a recognizable woodland fox without covering the basket structure.
Finished Fox Feature Measurements and Gauge
Measure the pieces while they are lying flat and without stretching them. Small differences can be corrected during light blocking, but matching pieces should be very close in size before assembly begins.
| Fox feature | Approximate finished size |
|---|---|
| Outer-ear panel before joining | Approximately 7 inches across the lower edge by 6 1/2 inches high |
| Completed double-layer ear after joining | Approximately 7 to 7 1/2 inches across the base by 6 3/4 to 7 inches high, depending on joining tension |
| Inner-ear panel | 4 1/2 inches high by 3 1/2 inches wide at the base |
| Each cream cheek panel | About 8 1/2 inches wide by 6 inches at the deepest point |
| Each finished embroidered eye, including cream outline | About 1 1/4 inches wide by 3/4 inch high |
| Built-up embroidered nose | About 1 1/2 inches wide by 1 inch high |
Feature Gauge
8 single crochet stitches and 8 rows = 4 inches in single crochet, measured before assembly.
The fabric should be firm, dense and able to hold its shape without showing large gaps. Use the hook size needed to obtain this gauge. Depending on the yarn and personal tension, that may be one hook size smaller than the hook used for the basket body.
Gauge matters most for the ears. A loose ear fabric may fold forward or curl at the point. If the ear panel feels floppy, use a smaller hook rather than adding wire or a rigid insert.

Check the matching ears and cheek panels together before attaching them to the basket.
Abbreviations and Pattern Conventions
- ch — chain
- RS — right side
- sc — single crochet
- sc2tog — single crochet two stitches together
- sc3tog — single crochet three stitches together
- sl st — slip stitch
- st or sts — stitch or stitches
- WS — wrong side
The turning chain does not count as a stitch unless the instructions specifically state otherwise. Turn the work after each row. Stitch counts appear in parentheses at the end of rows where the number of stitches changes.
Make matching left and right pieces with the same yarn, hook and tension. Count the rows rather than judging the size by sight alone. Before joining layered pieces, place them together with their edges aligned and confirm that their pointed tips and lower corners match.
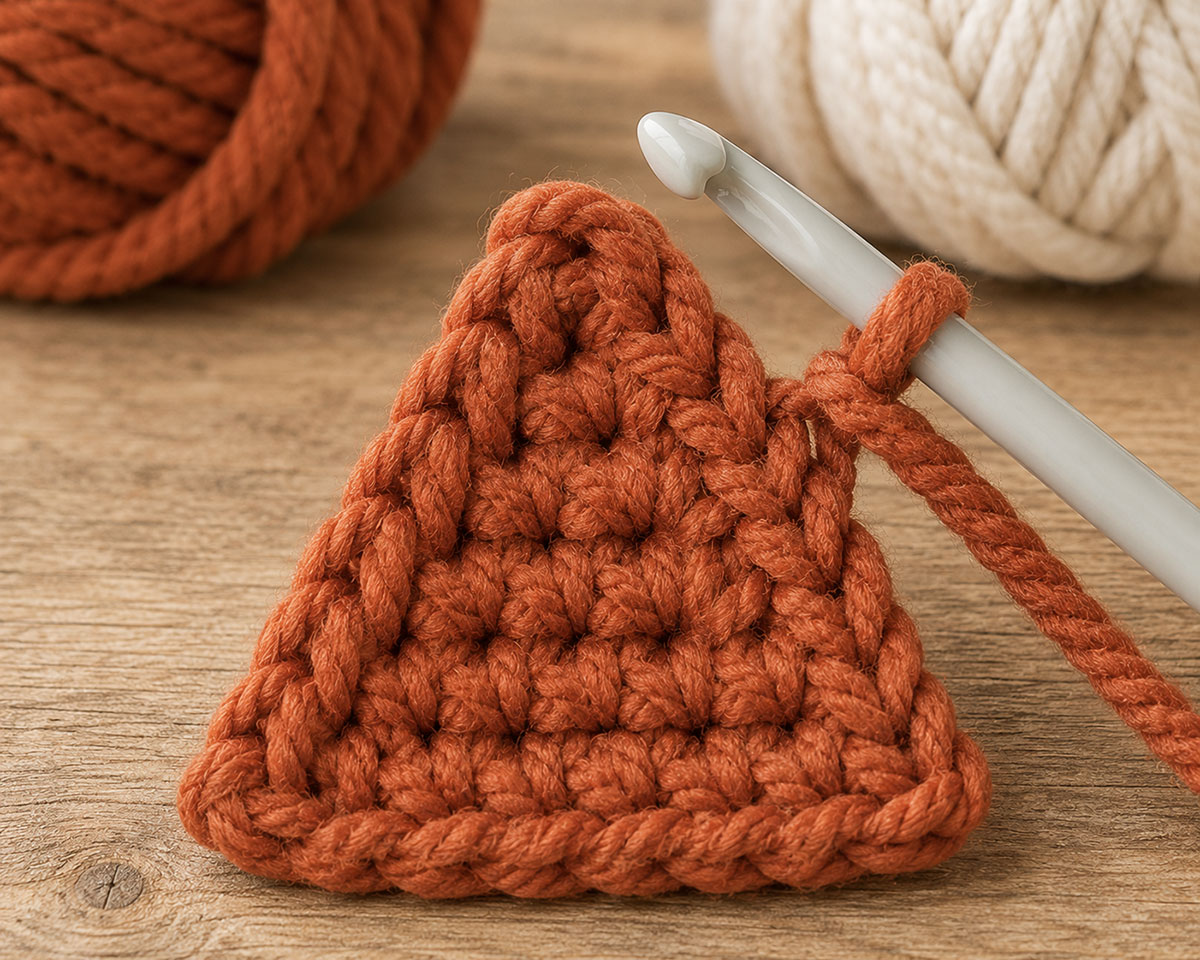
Firm single crochet fabric and evenly placed decreases give the fox ears their clean triangular shape.
Crochet Fox Ear Pattern
The fox ears are shorter and wider than the ears used on the bunny basket. Each completed ear is made from two rust-colored outer panels joined together for a firm double layer. Make four matching outer panels in all: two front panels and two back panels.
The inner-ear pieces will be sewn to the two front panels before the front and back layers are joined.
Outer Fox Ear Panel
Make 4 in the main rust color.
Ch 15.
Row 1: Sc in the second ch from the hook and in each ch across. (14 sts)
Row 2: Ch 1, turn. Sc2tog, sc in the next 10 sts, sc2tog. (12 sts)
Row 3: Ch 1, turn. Sc in each st across. (12 sts)
Row 4: Ch 1, turn. Sc2tog, sc in the next 8 sts, sc2tog. (10 sts)
Row 5: Ch 1, turn. Sc in each st across. (10 sts)
Row 6: Ch 1, turn. Sc2tog, sc in the next 6 sts, sc2tog. (8 sts)
Row 7: Ch 1, turn. Sc in each st across. (8 sts)
Row 8: Ch 1, turn. Sc2tog, sc in the next 4 sts, sc2tog. (6 sts)
Row 9: Ch 1, turn. Sc in each st across. (6 sts)
Row 10: Ch 1, turn. Sc2tog, sc in the next 2 sts, sc2tog. (4 sts)
Row 11: Ch 1, turn. Sc in each st across. (4 sts)
Row 12: Ch 1, turn. Sc2tog twice. (2 sts)
Row 13: Ch 1, turn. Sc2tog. (1 st)
Fasten off all four outer-ear panels and weave in their starting and ending tails. The panels will be joined in pairs with separate lengths of rust yarn. Weave in the joining tails after each ear is completed because separate rust yarn strands will be used for final attachment.
Outer-Ear Checkpoint
Lay all four panels together before proceeding. At the stated gauge, each panel should measure approximately 7 inches across the lower edge and 6 1/2 inches from the lower edge to the pointed tip.
The lower edges, pointed tips and decrease rows should match. Remake any panel that is noticeably wider, shorter or looser than the others. Small differences become more obvious after the ears are joined and placed side by side on the basket.
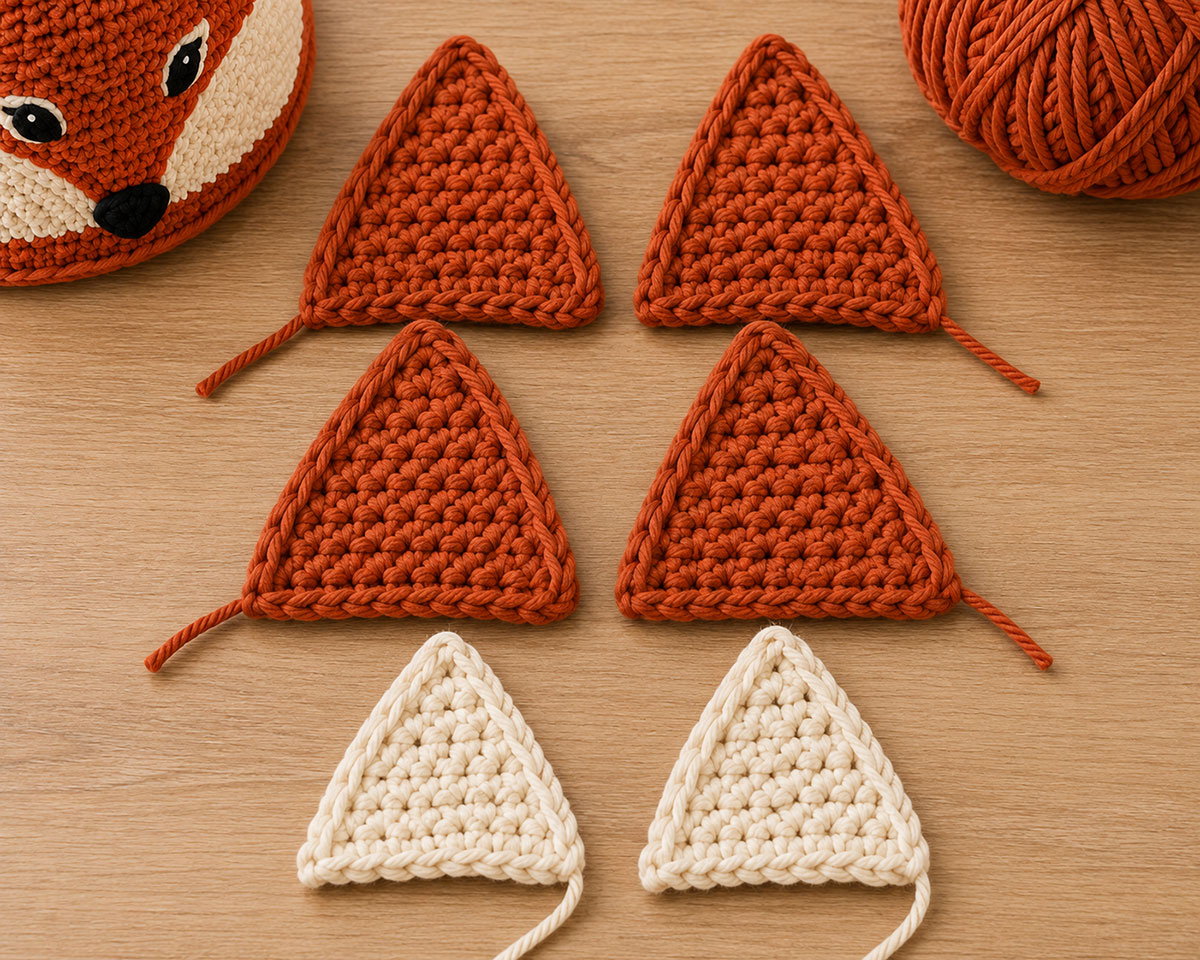
The four rust outer-ear panels should match in height, width, stitch density and pointed shape.
Inner-Ear Pattern and Assembly
Each cream inner-ear panel is sewn to the right side of one rust outer-ear panel. These decorated rust panels become the fronts of the completed fox ears.
Cream Inner-Ear Panel
Make 2 in cream or ivory.
Ch 8.
Row 1: Sc in the second ch from the hook and in each ch across. (7 sts)
Row 2: Ch 1, turn. Sc in each st across. (7 sts)
Row 3: Ch 1, turn. Sc in each st across. (7 sts)
Row 4: Ch 1, turn. Sc2tog, sc in the next 3 sts, sc2tog. (5 sts)
Row 5: Ch 1, turn. Sc in each st across. (5 sts)
Row 6: Ch 1, turn. Sc in each st across. (5 sts)
Row 7: Ch 1, turn. Sc2tog, sc in the next st, sc2tog. (3 sts)
Row 8: Ch 1, turn. Sc in each st across. (3 sts)
Row 9: Ch 1, turn. Sc3tog, working the three remaining stitches together as one decrease. (1 st)
Fasten off at the pointed tip, leaving a sewing tail approximately 30 to 36 inches long so there is enough yarn to sew around the complete panel, add the extra securing stitches and weave in the remaining end. Before positioning the inner-ear panel, weave the short starting tail at the lower foundation edge securely into the WS of the cream fabric in two directions and trim it.
Attach the Inner-Ear Panels
Place one cream panel on the RS of one rust outer-ear panel. Position its lower edge approximately 3/4 inch above the rust panel’s lower edge. Center the cream panel so that a consistent rust border remains along both sloping sides.
Thread the cream sewing tail through the yarn needle. Sew around the entire cream panel with small whipstitches, passing through the rust panel without pulling hard enough to gather it. Add an extra securing stitch at the pointed tip and at both lower corners.
On the WS of the rust panel, weave the remaining cream tail beneath several stitches in one direction, reverse direction and weave beneath several more stitches. Trim only after the tail is securely buried.
Repeat for the second front ear panel. Compare the two decorated panels side by side and correct the placement before assembling the double-layer ears.
Join Each Fox Ear
Pair each decorated front panel with one plain back panel. Place the front and back panels together with the WS facing each other so the cream inner-ear panel faces outward. Align the lower edge, both sloping sides and the pointed tip.
Join both ears in the same direction relative to their decorated fronts so the visible edging matches. With the decorated front facing you, begin at the same corresponding lower corner on both ears. A right-handed crocheter should begin at the lower-right corner and work across the lower edge toward the lower-left corner. A left-handed crocheter should begin at the lower-left corner and work across toward the lower-right corner. Use the same starting corner and working direction for both ears.
- Work 14 sc across the complete lower edge.
- Work 13 sc up the first sloping side, placing one sc in each of the 13 row ends.
- Work 3 sc into the single stitch at the pointed tip.
- Pause and confirm that the front and back panels are still aligned and that the pointed tip lies flat rather than cupping forward.
- Work 13 sc down the second sloping side, placing one sc in each of the 13 row ends.
- Sl st in the first joining sc. (43 joining sts when 3 sc are used at the tip)
Fasten off and weave both joining tails securely between the ear layers or beneath several joining stitches before trimming them. Do not reserve either joining tail for attaching the ear to the basket.
Repeat the same joining direction and stitch placement for the second ear. Place the two completed ears side by side with the decorated fronts facing you. Designate one as the left ear and one as the right ear as they will appear when the basket is viewed from the front. Mark the inner lower corner of each ear with a removable stitch marker. A separate rust yarn strand will be added at each marked corner during final attachment.
Do not stuff the ears. Smooth each completed ear flat and check that the joining stitches have not caused the edges to ripple, cup or flare. Each completed ear should measure approximately 7 to 7 1/2 inches across the base and 6 3/4 to 7 inches high, depending on joining tension.
If the three joining stitches at the pointed tip make the ear look rounded or cause it to cup forward, remove those tip stitches and work 2 tightly spaced sc into the single tip stitch instead. This alternate version has 42 joining stitches rather than 43. Use the same tip treatment and final joining count on both ears so their finished shapes match.
Place the two completed ears together and confirm that their bases, pointed tips, finished height and stitch density match before attaching either ear to the basket. The double layers should feel firm enough to stand without wire or a plastic insert.
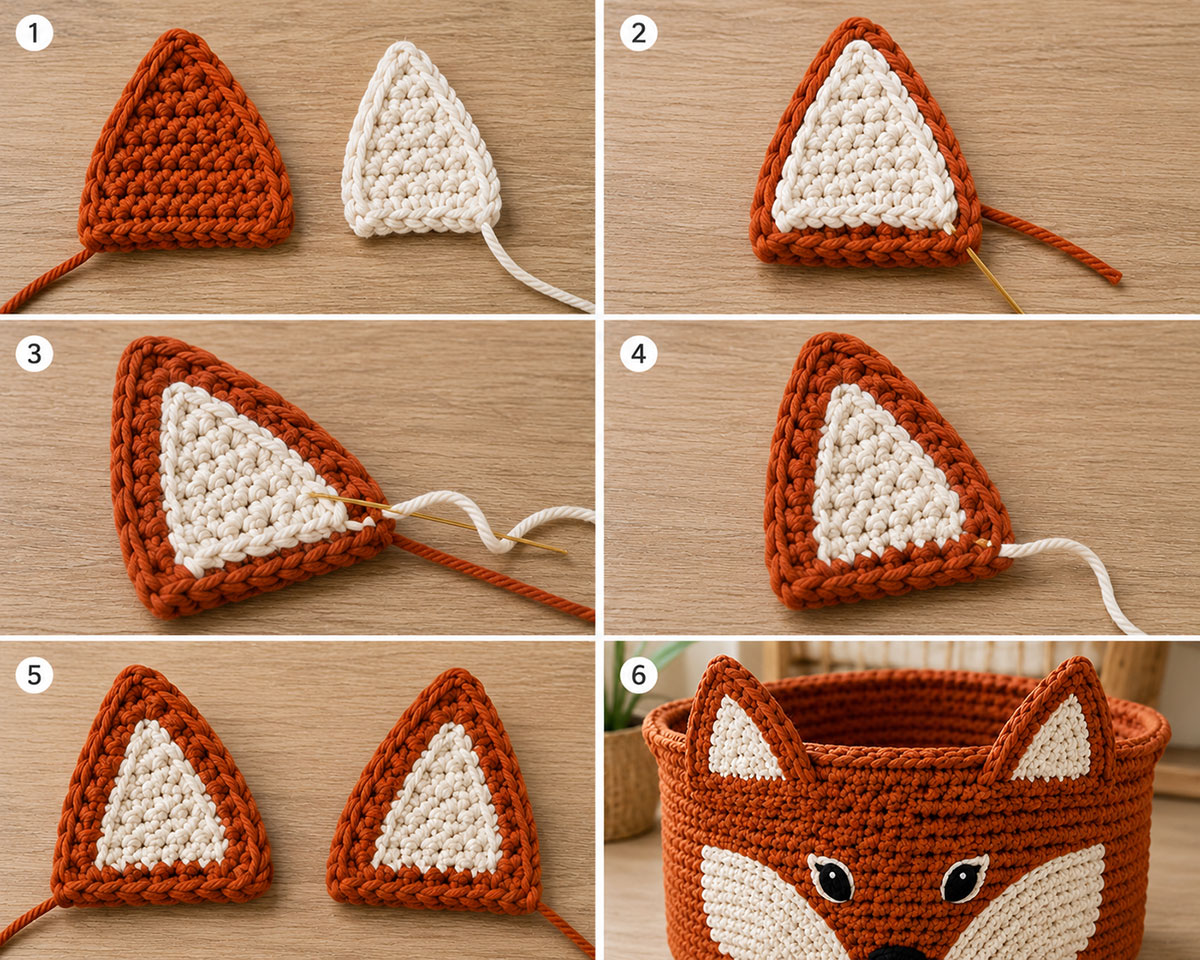
Sew each cream inner-ear panel to a rust front panel before joining the front and back ear layers.
Crochet Fox Cheek Panels
The fox face uses two separate cream cheek panels. Each panel begins at the narrow point that will sit near the nose and gradually widens toward the outside of the face.
The panels are made from the same instructions. The 2-stitch foundation end forms the narrow inner point beside the nose, and the 6-stitch final edge forms the broader outer end of the cheek. Because the increases and decreases are worked evenly at both ends of the rows, either long edge may face upward. Choose the preferred visible surface for both panels, then rotate the panels in opposite directions so their narrow points face one another and they form matching left and right cheeks.
Cream Cheek Panel
Make 2 in cream or ivory.
Ch 2.
Row 1: Work 2 sc in the second ch from the hook. (2 sts)
Row 2: Ch 1, turn. Work 2 sc in each st across. (4 sts)
Row 3: Ch 1, turn. Sc in each st across. (4 sts)
Row 4: Ch 1, turn. Work 2 sc in the first st, sc in each st to the last st, work 2 sc in the last st. (6 sts)
Row 5: Ch 1, turn. Sc in each st across. (6 sts)
Row 6: Ch 1, turn. Work 2 sc in the first st, sc in each st to the last st, work 2 sc in the last st. (8 sts)
Row 7: Ch 1, turn. Sc in each st across. (8 sts)
Row 8: Ch 1, turn. Work 2 sc in the first st, sc in each st to the last st, work 2 sc in the last st. (10 sts)
Row 9: Ch 1, turn. Sc in each st across. (10 sts)
Row 10: Ch 1, turn. Work 2 sc in the first st, sc in each st to the last st, work 2 sc in the last st. (12 sts)
Rows 11–14: Ch 1, turn. Sc in each st across. (12 sts)
Row 15: Ch 1, turn. Sc2tog, sc in the next 8 sts, sc2tog. (10 sts)
Row 16: Ch 1, turn. Sc2tog, sc in the next 6 sts, sc2tog. (8 sts)
Row 17: Ch 1, turn. Sc2tog, sc in the next 4 sts, sc2tog. (6 sts)
Fasten off at the broad 6-stitch outer edge, leaving a sewing tail at least 48 inches long. For jumbo rope yarn or any yarn that is especially thick or tightly twisted, leave approximately 60 inches. The tail must be long enough to sew around the complete panel, add the final securing stitch and weave the remaining end securely in two directions. Before positioning the cheek panel, weave the short starting tail at the narrow 2-stitch foundation point securely into the WS of the cream fabric in two directions and trim it.
Lightly smooth or block each panel without stretching it. Each finished cheek should measure approximately 8 1/2 inches from the narrow 2-stitch foundation end to the broader outer edge and approximately 6 inches across its widest section.
Cheek-Panel Checkpoint
Place the two panels together with their narrow starting points aligned. Confirm that their widest sections and curved outer ends match.
Do not sew the panels to each other. The orange basket wall must remain visible between them to form the center of the fox face.
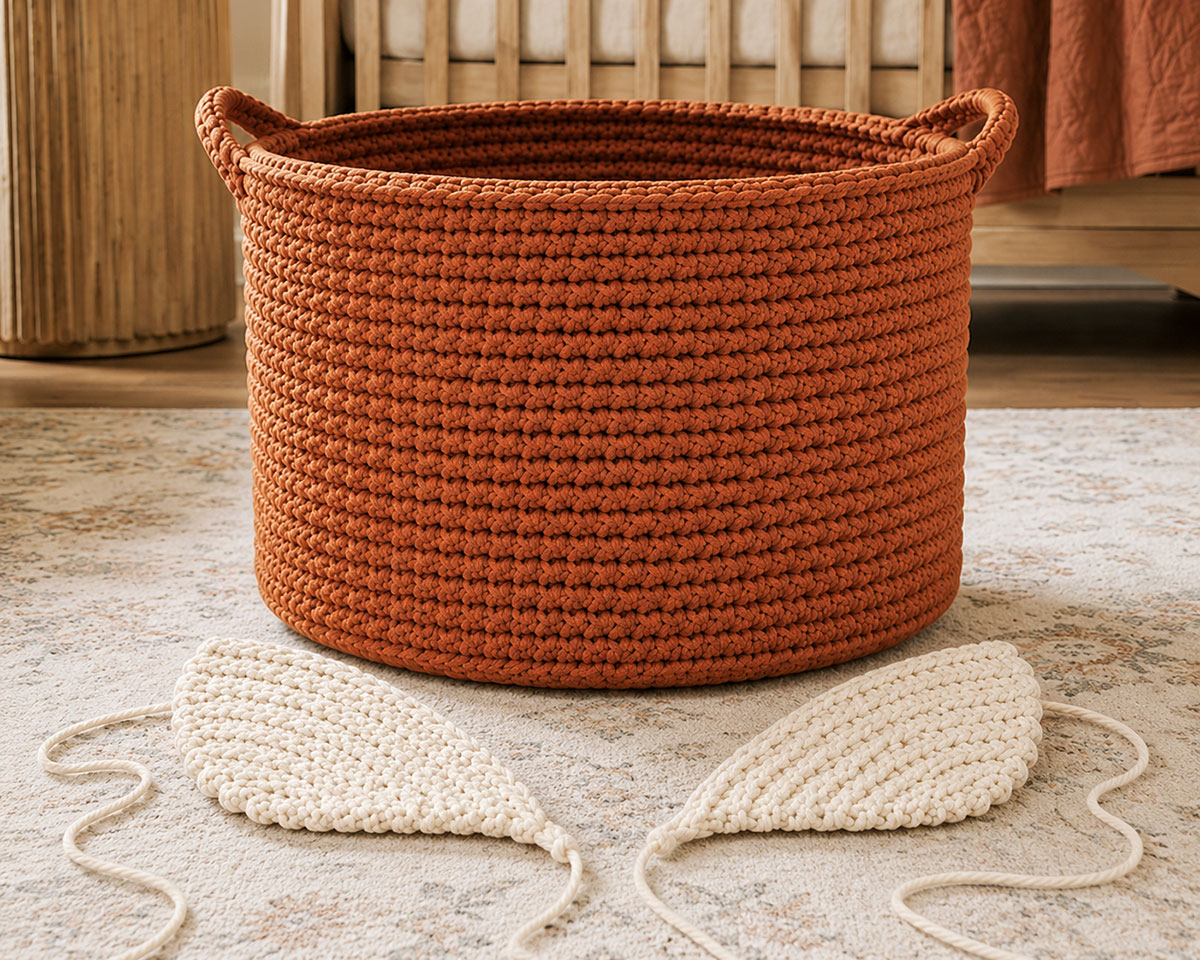
The matching cream panels are rotated in opposite directions so their narrow points meet near the embroidered nose while the same preferred surface remains visible.
Embroidered Fox Eyes and Nose
Read this embroidery method now, but do not begin stitching the facial features yet. Temporarily position the cheek panels and follow the measurements in the Fox Feature Placement section first. Permanently attach both cheek panels before returning to these instructions to embroider the eyes and nose.
The eyes are embroidered directly onto the rust basket wall with cream outlines, black satin-stitched centers and small cream highlights. The built-up black nose is embroidered through the rust basket wall and the slightly overlapped inner tips of the two cream cheek panels. None of these features is a separate crocheted appliqué, and plastic safety eyes, buttons and glued felt are not used.
Embroider the Eyes
Use all six strands of cream or ivory cotton embroidery floss to mark a horizontally oriented almond-shaped outline for each open eye. Each finished eye, including its cream outline, should measure approximately 1 1/4 inches wide by 3/4 inch high.
Work small cream backstitches around the marked almond shape. Keep the two outlines level and equal in height, width and distance from the center-front line.
Before adding the black centers, set the basket upright and view it from several feet away. Correct either cream outline now if the eyes differ in height, width, angle or spacing. The coarse basket stitches leave limited room for adjustment after the centers are filled.
Thread all six strands of black cotton embroidery floss. Fill the inside of each cream outline with closely packed black satin stitches, passing through and around the strands of the basket stitches as needed. Work additional passes until the rust basket yarn no longer shows through.
Use a short length of cream floss to add one small satin-stitched highlight near the upper inside edge of each black eye. Keep both highlights equal in size and position.
Work with floss lengths no longer than approximately 24 inches to reduce tangling and abrasion. Keep all stitches smooth and compact, with no raised loops that could catch on stored items. Leave the working ends temporarily unsecured on the inside of the basket until the eyes, highlights and nose have been completed and the full face has passed the final alignment check. Hold each loose end with a removable sewing clip or a loose temporary knot that can be opened without cutting the thread.
Embroider the Nose
Use heavy matte black embroidery thread to mark a small rounded triangle approximately 1 1/2 inches wide and 1 inch high. Center it over the rust basket wall and the slightly overlapped inner tips of the two cream cheek panels. Black basket yarn may be used only if it passes through the layered fabric without abrading the yarn or distorting the surrounding stitches. The nose is embroidered directly through the basket and cheek edges and is not a separate crocheted appliqué.
Outline the rounded triangle with small backstitches. Fill the shape with closely packed satin stitches. Add a second layer only as needed to cover the rust basket yarn and create a slightly raised surface. Stop if the surrounding basket stitches begin to spread, pull inward or lose their shape.
Add short stitches around the outer edge as needed to smooth the rounded triangular shape. Keep the stitches compact and free of loose loops. Leave the working end temporarily unsecured on the inside of the basket until the complete face has been inspected and any needed corrections have been made. Hold the loose end with a removable sewing clip or a loose temporary knot that can be opened before final weaving-in.
Do not embroider the eyes or nose until the cheek panels have first been temporarily positioned, checked for symmetry and then permanently attached. The cream pieces establish the face proportions and make it easier to place the embroidered features accurately.

The open eyes and rounded triangular nose are embroidered directly onto the basket with dense black satin stitches.
Fox Feature Placement
Complete the master basket, including the reinforced rim and both structural side handles, before positioning the fox features. Place the empty basket on a level surface and gently shape it into an even circle.
Mark the Center Front
Locate the two side-handle attachment areas. Measure along the front of the basket from the inside edge of one handle attachment to the inside edge of the other. Divide that measurement in half and place a removable stitch marker at the center front.
Use the vertical column of stitches beneath this marker as the center line for the entire fox face. Check the center from several feet away before attaching any pieces. A misplaced center marker will make every feature appear crooked even when the individual measurements match.
Position the Fox Ears
Place the lower edge of each completed ear approximately 1/2 inch below the lower edge of the reinforced rim. The ears should sit on the front of the basket between the handles and should not wrap over the rim.
Position the inner lower corner of each completed ear approximately 1 inch to the left or right of the center-front line. Allow the actual completed base of each ear to extend outward naturally without stretching or compressing it.
- The inner lower corners should be equal distances from the center-front line.
- The outer lower corners should also be equal distances from the center-front line, although the exact measurement will depend on the finished width of the joined ears.
- The midpoint of each ear base should be the same distance from the center-front marker.
- The two pointed tips should be equal distances from the center marker.
- Both ears should lean outward only slightly and at matching angles.
- The ear bases must remain clear of both structural handle openings.
Clip or pin the ears in place without sewing them yet. View the basket from the front, both sides and from above. Adjust the ears until their height, spacing and angle match.
Position the Cream Cheek Panels
Place the two cream panels below the eyes with their narrow starting points directed toward the center front. Rotate the panels in opposite directions rather than turning either panel front-to-back. Keep the same preferred surface facing outward on both pieces so the visible stitch texture matches.
Position the narrow inner points approximately 1 1/4 inches apart. The midpoint of this space should align with the center-front marker. The finished 1 1/2-inch-wide nose will extend slightly over the inner tip of each cream cheek panel.
- The highest outer edge of each cream panel should begin approximately 5 1/2 inches below the reinforced rim.
- The narrow inner point should sit approximately 10 1/2 inches below the rim.
- The widest outer section should extend toward the side without reaching either handle attachment.
- The lower edges should follow the curve of the basket without touching the reinforced base.
Temporarily secure the panels with locking stitch markers or rustproof pins. Smooth each piece from the narrow inner point toward the outer edge. Do not stretch the cream panels to force them into position.
Mark the Eyes and Nose
With the cheek panels temporarily positioned, mark the center of each eye approximately 7 1/4 inches below the reinforced rim and approximately 2 inches to either side of the center-front line.
Mark the center of the finished nose on the center-front line approximately 11 inches below the reinforced rim. Center the 1 1/2-inch-wide, 1-inch-high nose across the 1 1/4-inch space between the cheek points so that each outer edge overlaps the inner tip of a cream panel by approximately 1/8 inch. The upper portion of the nose should align with the cheek points, and the embroidery may pass through both the rust basket wall and the overlapped cream panel edges.
Step back and check the complete face before sewing. The eyes should be level, the nose should be centered and the cream panels should form matching curves on both sides.
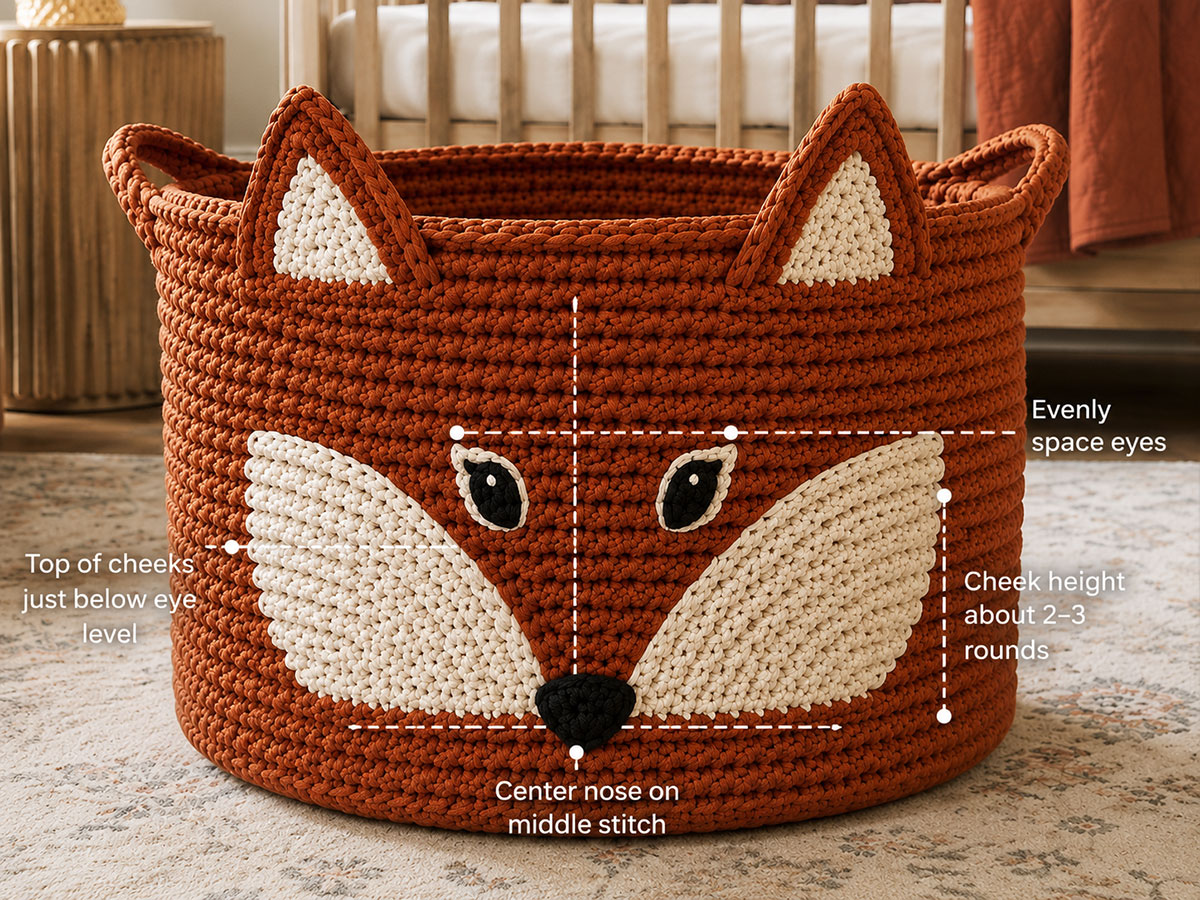
Temporarily position every fox feature and check the complete face before beginning permanent attachment.
Attach the Fox Ears and Face Pieces
Use a blunt-tip yarn needle with the long cream sewing tails left on the cheek panels and with separate rust yarn strands for attaching the ears. Keep the basket upright and lightly supported while sewing so the wall retains its natural curve.
Attach the Cream Cheek Panels
Attach the cheek panels before embroidering the eyes and nose. This makes it possible to adjust the final embroidery placement to the actual position of the cream pieces.
- Begin at the corner of the 6-stitch final edge where the long sewing tail exits.
- Use small whipstitches in cream yarn, passing through the edge stitches of the panel and through the basket wall.
- Work along the first long edge from the broad outer end toward the narrow 2-stitch foundation point.
- Add one additional securing stitch around the narrow inner point without pulling it out of shape.
- Continue along the opposite long edge toward the broad outer end.
- Sew across the 6-stitch final edge until you return to the starting corner, then add one final securing stitch.
Keep the cream yarn relaxed while sewing. After every few inches, smooth the basket wall and confirm that the stitches are not gathering the panel or pulling the basket inward.
Repeat for the second cheek panel. Stop before securing and trimming the sewing tail, then compare the two sides. Correct any uneven curve while the final few attachment stitches can still be removed easily.
Secure each yarn tail on the inside of the basket by weaving it beneath several basket stitches in one direction, reversing direction and weaving through several more stitches. Trim only after the tail is firmly buried.
Embroider the Eyes and Nose
Recheck the marked eye and nose positions after the cheek panels are sewn. Adjust the markings if needed so the eyes remain level and the nose is centered between the cream panels.
Embroider the two open eyes and the rounded triangular nose using the satin-stitch method described above. Keep all knots and woven ends on the inside of the basket.
Before securing the embroidery threads permanently, set the basket upright and view the face from several feet away. Confirm that the eyes are level and equal in size, the cream highlights match and the nose is centered across the cheek points. Remove and restitch any feature that is noticeably uneven or misplaced.
Once the complete face is correctly aligned, secure every embroidery end on the inside of the basket by weaving it beneath several basket stitches in one direction, reversing direction and weaving beneath several more stitches.
Run your fingertips over the completed embroidery. The surface should feel smooth, with no long loops, loose strands or raised ends that could snag stored blankets or clothing.
Attach the Fox Ears
Return both ears to their marked positions. Confirm that the reinforced rim remains level and that neither ear interferes with a handle opening.
- Cut a separate rust yarn strand approximately 60 inches long and thread it through the yarn needle.
- Begin at the marked inner lower corner of the ear, leaving an approximately 6-inch starting tail on the inside of the basket for later weaving-in.
- Sew the complete lower joining edge from the inner corner to the outer corner, attaching it to the basket wall approximately 1/2 inch below the lower edge of the reinforced rim.
- Work through both layers of the ear and through the ordinary basket wall with closely spaced whipstitches.
- At the outer lower corner, work two or three discreet anchoring stitches upward through both ear layers and the basket wall for no more than approximately 1/2 inch along the outer sloping side. Stop before the stitches reach any part of the reinforced rim.
- Work back down through the same short section of the outer sloping side so the yarn returns to the outer lower corner.
- From the outer lower corner, work a second line of small securing stitches toward the inner lower corner approximately 1/4 inch above the first attachment line. Pass through the lower portion of both ear layers and the ordinary basket wall, keeping the complete second line below the reinforced rim.
- When the second line reaches the inner lower corner, add two or three discreet anchoring stitches upward for no more than approximately 1/2 inch along the inner sloping side. Stop before the stitches reach any part of the reinforced rim.
The second line of stitching creates a broad attachment area that helps the ear stand without wire. Keep the base seams and short side anchors entirely in the ordinary basket wall below the reinforced rim. Do not stitch through any part of the reinforced rim, and do not pull the sewing yarn tightly enough to flatten or gather the basket wall.
After the first ear is firmly attached, secure both the 6-inch starting tail and the remaining working tail on the inside of the basket. Weave each tail beneath several basket stitches in one direction, reverse direction and weave beneath several more stitches. Trim only after both tails are firmly buried.
Repeat the attachment and tail-finishing process for the second ear. Compare the two ears after every few stitches so one does not gradually become lower or more sharply angled than the other.
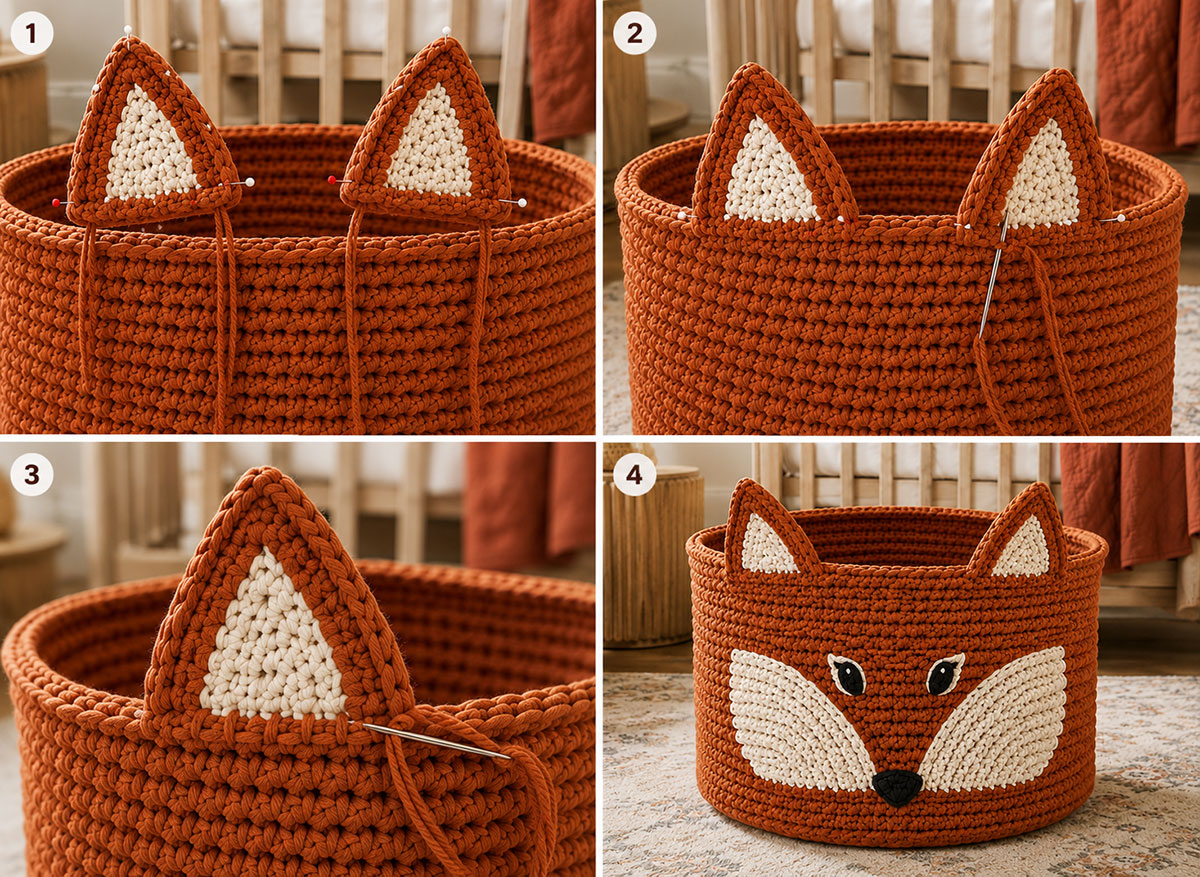
A double row of attachment stitches below the reinforced rim helps each fox ear remain upright without wire or plastic.
Shape the Completed Fox Basket
Shape the finished basket by hand rather than wet-blocking the complete piece. Smooth the walls, level the rim and press the base flat against the floor. Adjust the ears gently from their lower attachment areas instead of pulling on their pointed tips.
Final Assembly Checkpoints
Place the finished basket on a level floor and complete each of these checks before using it for nursery storage.
- The basket sits flat without rocking or leaning.
- The reinforced rim remains level and has not been pulled downward by the ears.
- Both structural side handles remain completely open and usable.
- The two ears match in height, width and outward angle.
- The ear bases are firmly attached with no visible gaps.
- The cream inner-ear panels lie flat without loose corners.
- The cheek panels form matching curves and do not pucker the basket wall.
- The orange center section remains visible between the two cream panels.
- The embroidered eyes are level and securely filled.
- The embroidered nose is centered and has no loose strands.
- All yarn and embroidery tails are securely woven into the inside wall.
- No pins, clips or temporary stitch markers remain in the basket.
If one ear leans farther forward than the other, add a few small anchoring stitches along its lower back edge. If the rim begins to dip, remove the tightest attachment stitches and resew them with less tension rather than trying to reshape the basket by force.

Check the finished fox from the front and both sides to confirm that the face is balanced and the structural handles remain clear.
Optional Woodland Fox Colorways
The same feature pattern can be used with other woodland fox palettes without changing the stitch counts or finished measurements.
- Classic red fox: muted burnt orange basket, cream face panels, rust ears and black embroidery
- Soft woodland fox: cinnamon basket, oatmeal face panels, cocoa inner ears and dark brown embroidery
- Arctic-inspired fox: soft ivory basket, pale gray face panels, charcoal inner ears and black embroidery
Maintain enough contrast between the basket wall and face panels for the fox features to remain easy to see. Very similar colors can make the muzzle disappear in photographs and from across the nursery.
Finishing and Nursery-Storage Safety
This crochet fox basket is intended for decorative nursery storage. It is not a toy, seat, step, carrier or sleep product.
For current guidance about keeping cribs, bassinets and other infant sleep spaces clear, review the U.S. Consumer Product Safety Commission’s safe sleep guidance.
- Keep the basket outside the crib, bassinet and every infant sleep space.
- Do not allow a child to climb, sit, stand or pull up on the basket.
- Do not lift or drag the basket by its decorative ears or face pieces.
- Use only the two structural side handles when repositioning a lightly filled basket.
- Support the reinforced base with both hands when carrying heavier contents.
- Do not overload the basket with objects that distort the rim or side walls.
- Inspect the ears, cheek panels and embroidery regularly.
- Repair loose stitches or damaged pieces before returning the basket to use.
The basket works best for lightweight nursery items such as folded blankets, burp cloths, soft clothing or packaged supplies. Keep small loose objects, cords and other unsuitable items out of a child’s reach.
Frequently Asked Questions
Do I need to crochet the entire basket from this page?
No. This page contains only the fox-specific features. Complete the XXL master crochet basket pattern first, including its reinforced rim and structural side handles.
Are the cream face sections separate crochet pieces?
Yes. The left and right cream cheek panels are crocheted separately and sewn securely around their complete outer edges. The orange section between them is the original basket wall.
Are the fox eyes and nose crocheted appliqués?
No. The cream eye outlines, black eye centers and small cream highlights are embroidered directly onto the basket wall. The built-up black nose is embroidered through the rust basket wall and the slightly overlapped inner tips of the two cream cheek panels. This keeps the features securely integrated and eliminates separate eye or nose appliqués.
Can I use plastic safety eyes?
No. Plastic safety eyes are not used for this nursery-storage basket. Embroidered features are softer and avoid adding hard plastic pieces that could loosen from the thick basket fabric.
Can I add wire to make the ears stand?
No wire or rigid plastic insert is needed. The ears receive their structure from the firm gauge, double-layer panels, joined edges and broad lower attachment area.
Why are the ears attached below the reinforced rim?
Attaching the ears to the basket wall below the rim helps preserve the rim’s level shape and keeps the structural handle openings clear. The rim should not be folded, covered or pulled downward by decorative pieces.
Can the fox ears be used as handles?
No. The ears are decorative. Use only the two structural side handles to reposition a lightly filled basket, and support the base when carrying anything heavier.
Can I add a crochet fox tail?
A tail is not included in this version because it would add bulk to the back of the basket and could be mistaken for a handle. The pointed ears, cream face panels and embroidered features are enough to make the basket recognizable as a fox.
Troubleshooting the Finished Crochet Fox Basket
Most small finishing problems can be corrected without removing every fox feature. Set the empty basket on a level surface, look at it from several feet away and identify the specific piece that is pulling the design out of balance.
One Fox Ear Leans Forward
Add three or four small anchoring stitches along the lower back edge of the leaning ear. Pass through both ear layers and the basket wall, keeping the stitches close to the existing attachment line.
Do not pull the pointed tip backward or stitch the ear to the reinforced rim. The correction should come from strengthening the lower attachment area.
The Two Ears Sit at Different Heights
Measure from the reinforced rim to each pointed tip. If the difference is caused by placement rather than shaping, remove only the lower attachment stitches from the lower ear and reposition its base.
If the ear panels themselves are different sizes, remaking the smaller or larger ear will produce a cleaner result than stretching one to match the other.
The Cream Cheek Panels Pucker
Puckering usually means the sewing yarn was pulled too tightly. Remove the stitches from the affected section, smooth the basket wall and resew the panel with relaxed, evenly spaced whipstitches.
Do not stretch the cream panel while attaching it. The panel should lie naturally against the curve of the basket.
The Fox Face Looks Crooked
Check the center-front marker first. Measure from that center line to each eye, each narrow cheek point and each outer edge of the cream panels.
A difference of even 1/2 inch can be noticeable on a large, symmetrical face. Correct the piece that is out of position instead of shifting several properly placed features.
The Reinforced Rim Dips Near an Ear
Remove the tightest ear-attachment stitches and resew them through the basket wall below the rim with less tension. The decorative ear should not pull, fold or gather the reinforced upper edge.
The Embroidered Eyes Look Uneven
Compare the height, width and distance from the center line. A small amount of black floss can be added to the narrower eye with additional satin stitches.
If one eye is clearly misplaced, remove that embroidery carefully and restitch it. Adding more stitches cannot correct an eye that sits noticeably higher or farther from the center than the other.
The Nose Does Not Cover the Center Neatly
Add short satin stitches around the outer edge of the nose to smooth its rounded triangular shape. Keep the finished nose centered across the 1 1/4-inch space between the cream cheek points, with approximately 1/8 inch of the nose overlapping the inner tip of each cheek panel.
Do not enlarge the nose beyond the planned slight overlap. It should cover only the inner tips of the cheek panels and should not extend deeply across the cream sections or make the face look heavy.

Measure from the center front and reinforced rim when checking the ears, cream cheek panels and embroidered features.
Once the ears stand evenly, the face is centered and the rim remains level, the fox basket is complete. Use it with the same practical care as the original XXL basket, and inspect the decorative attachment points whenever the basket is emptied or rearranged.
Explore the Complete Crochet Basket Series
XXL Master Crochet Basket Pattern
XXL Woodland Owl Basket Pattern
When you click on links to various merchants on this site and make a purchase, this may result in this site earning a commission. This does not affect the price you pay.

UBGI Gold Standard 2026
Reviewed under the site's
editorial checklist.
Photos, decorating ideas, party setups and reader submissions are shared for inspiration unless a page is specifically presented as a pattern, tutorial, reference guide or step-by-step project. Follow the instructions, measurements, safety guidance and manufacturer directions provided for the particular project or product.
About Jan | Contact | Baby Nursery Ideas (Blog) | Site Map | Privacy Policy | Disclosure Policy | Disclaimer | Affiliate Disclosure | Earnings Disclosure | Facebook | Pinterest
I am a participant in the Amazon Services LLC Associates Program, an affiliate advertising program designed to provide a means for us to earn fees by linking to Amazon. As an Amazon Associate I earn from qualifying purchases.
Copyright © 2006-2026. All Rights Reserved.