Free Fall Crochet Leaf Pattern and Acorn Appliqué Set
By Jan Bay
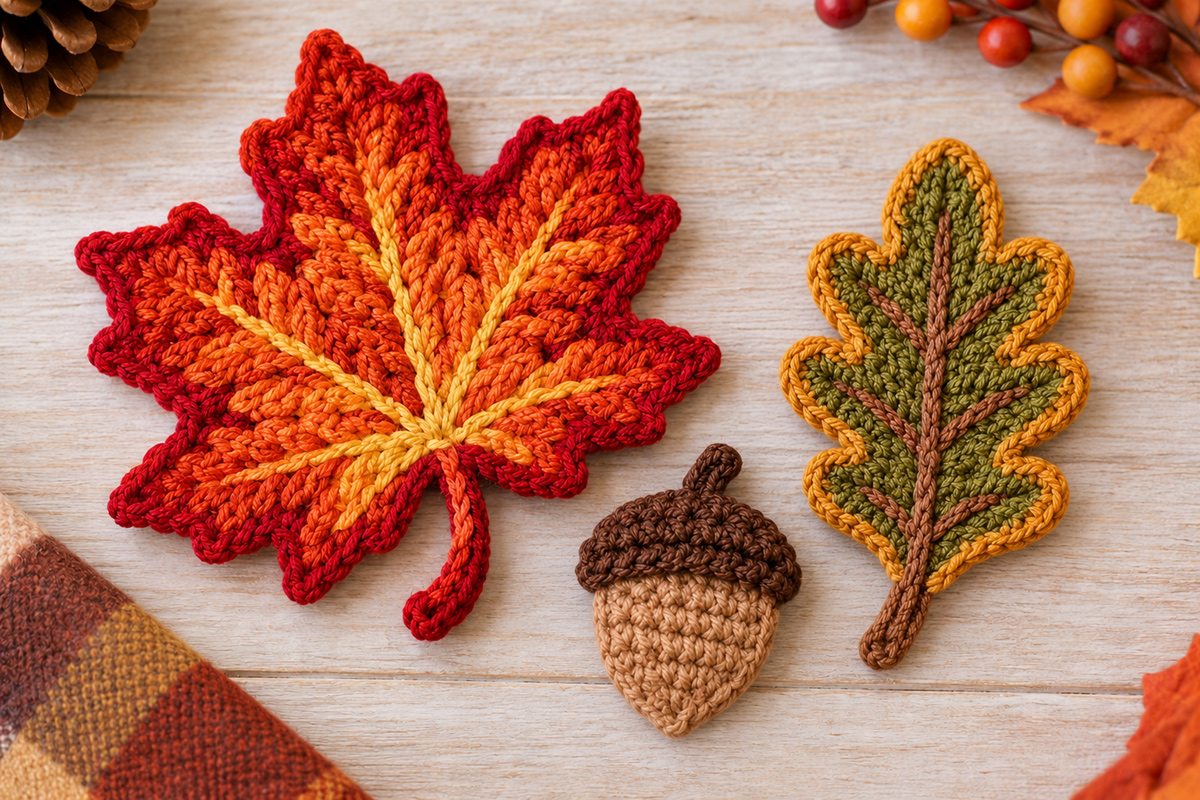
This free fall crochet leaf pattern collection gives you a coordinated set of seasonal appliqués to pick from, including a favorite of fall, the maple-style leaf, plus an oak-style leaf with a matching crochet acorn to decorate baby blankets, hats, bags, garlands and other autumn projects.
Explore More Free Crochet Patterns
Crochet Animal Appliqué Patterns
Crochet Yarn and Supplies for this Project
Jump to the Pattern
Materials & Supplies
I’m using medium-weight yarn for this set because it gives the leaves enough body to hold their shape without making the appliqués stiff or bulky. Cotton or a cotton-rich yarn is my first choice when you want the veins and edges to show clearly.
You don’t need full skeins for any of these. If you already have a basket of fall-colored worsted-weight scraps, start there.
Yarn: Medium weight #4 yarn in the following colors:
For the maple leaf, allow approximately 45 yards of a subtly variegated burnt-orange and rust yarn for the leaf body and stem, 18 yards of deep rust or red for the continuous outer edging and 12 yards of golden yellow for the raised vein work. In the maple instructions below, “burnt orange” refers to this variegated body yarn.
For the oak leaf, allow approximately 20 yards of olive green, 10 yards of mustard or muted gold and 8 yards of medium brown for the center vein, side veins and stem.
For the acorn, allow approximately 12 yards of tan or caramel for the nut body and 10 yards of dark brown for the textured cap and stem.
Hook: G/6 (4.0 mm) crochet hook
Also needed: yarn needle, small sharp scissors, removable stitch markers and rustproof blocking pins.
Skill level: Intermediate. You should be comfortable with basic increases and decreases, working into row ends, joining yarn in specific stitches, surface slip stitch, BLO stitches and simple appliqué assembly.
The three motifs are worked as flat appliqués. Do not stuff the acorn. Its rounded shape comes from the crochet shaping itself, while the finished piece stays flat enough to sew onto another project.
Expected Finished Sizes
Using medium-weight #4 yarn and a 4.0 mm hook, the expected finished sizes are approximately:
Maple leaf: expected to finish approximately 6 1/2 to 7 inches across at the widest points and about 7 1/2 to 8 inches from the tip of the center lobe to the end of the stem after light blocking.
Oak leaf: expected to finish approximately 7 to 8 inches long including the stem and about 3 1/2 to 4 inches across the widest pair of lobes.
Acorn: expected to finish approximately 3 1/2 to 4 inches tall including the stem and about 2 1/4 to 2 1/2 inches across the cap.
The maple dimensions are calculated from the written construction and stated working gauge. The oak leaf and acorn dimensions are expected size ranges based on their written construction rather than measurements taken from physically test-made samples. Your finished size can shift with yarn choice and tension, but keep the same size relationship between the three pieces: the maple leaf should be clearly largest and broadest, the oak leaf narrower, and the acorn the smallest motif in the set.
Gauge
Maple leaf working gauge: approximately 15 sc and 16 rows = 4 inches in firm single crochet after light blocking.
The maple leaf dimensions below are calculated from that gauge and the locked stitch structure. They are expected measurements, not measurements taken from a physically test-made sample.
Exact gauge is not critical for these appliqués because they do not have to fit a body measurement. What matters more is using a firm, even tension so the points, lobes and veins stay clearly defined.
If your stitches are loose enough that the leaves flop or the lobe shapes disappear, move down one hook size. If the fabric curls tightly and is difficult to block flat, move up one hook size.
Keep the same yarn weight and hook size for all three motifs if you want them to retain the proportions shown in the example image.
Abbreviations
This pattern uses U.S. crochet terminology. If you need to check a stitch abbreviation, the Craft Yarn Council crochet abbreviations are a handy reference.
ch = chain
dc = double crochet
hdc = half double crochet
sc = single crochet
sc2tog = single crochet 2 stitches together
sc3tog = single crochet 3 stitches together
sl st = slip stitch
st(s) = stitch(es)
sp = space
tr = treble crochet
BLO = back loop only
RS = right side
WS = wrong side
Pattern Notes Before You Start
The maple leaf, oak leaf and acorn are all made as flat appliqués. Keep your stitches firm enough that the points and lobes hold their shape, but don't crochet so tightly that the pieces refuse to lie flat.
Turning chains do not count as stitches unless the instructions specifically say otherwise.
The maple leaf begins with a 10-stitch center ring. All five orange lobes and the stem are worked directly from that center, so there are no separate leaf pieces to sew together. A continuous deep-rust edging defines the outside shape, and the golden-yellow vein work is added last.
The oak leaf follows a different construction so it doesn't simply look like a rounded version of the maple leaf. Its lobes stay softer, narrower and more evenly spaced.
Keep the acorn flat. There is no stuffing anywhere in this pattern.
The maple color placement is fixed: subtly variegated burnt-orange and rust yarn for the leaf body and stem, deep rust or red for the outside edging and golden yellow for the raised vein work. The body variation should remain irregular rather than forming hard stripes.
Fall Crochet Leaf Pattern: Maple Leaf
The maple leaf is the largest motif in this set. The burnt-orange body is made as one assembled crochet piece with all five lobes and the stem worked directly into the same center ring. Nothing is sewn together. You will fasten off and rejoin the orange yarn between lobes so every section can be worked in the correct direction.
The finished leaf has exactly five principal lobes: one tall center lobe, two medium upper side lobes and two smaller lower side lobes. After the orange body is complete, one continuous deep-rust edging defines the entire silhouette. Golden-yellow surface crochet creates the center vein and four branch veins shown in the example image.
Maple Leaf Center Ring
With burnt orange, make a magic ring.
Ch 1 and work 10 sc into the ring. Pull the ring closed firmly and join with a sl st in the first sc. 10 sc. Fasten off.
Number the center-ring stitches 1 through 10 clockwise.
The five lobes use the center-ring stitches in these pairs:
Center lobe: stitches 1 and 2
Upper right lobe: stitches 3 and 4
Lower right lobe: stitches 5 and 6
Lower left lobe: stitches 7 and 8
Upper left lobe: stitches 9 and 10
The stem will be worked from the underside of the center ring between the two lower lobes.
Center Maple Lobe
Join burnt orange in center-ring stitch 1.
Row 1: Ch 1, sc in stitch 1 and sc in stitch 2. Turn. 2 sts.
Row 2: Ch 1, 2 sc in each st across. Turn. 4 sts.
Row 3: Ch 1, 2 sc in first st, sc in next 2 sts, 2 sc in last st. Turn. 6 sts.
Row 4: Ch 1, 2 sc in first st, sc in next 4 sts, 2 sc in last st. Turn. 8 sts.
Row 5: Ch 1, 2 sc in first st, sc in next 6 sts, 2 sc in last st. Turn. 10 sts.
Rows 6 and 7: Ch 1, sc in each of the 10 sts across. Turn. 10 sts.
Row 8: Ch 1, sc2tog, sc in next 6 sts, sc2tog. Turn. 8 sts.
Row 9: Ch 1, sc in each of the 8 sts across. Turn. 8 sts.
Row 10: Ch 1, sc2tog, sc in next 4 sts, sc2tog. Turn. 6 sts.
Row 11: Ch 1, sc2tog, sc in next 2 sts, sc2tog. Turn. 4 sts.
Row 12: Ch 1, sc2tog twice. Turn. 2 sts.
Row 13: Ch 1, sc2tog. 1 st.
Fasten off.
Upper Right Maple Lobe
Join burnt orange in center-ring stitch 3.
Row 1: Ch 1, sc in stitch 3 and sc in stitch 4. Turn. 2 sts.
Row 2: Ch 1, 2 sc in each st across. Turn. 4 sts.
Row 3: Ch 1, 2 sc in first st, sc in next 2 sts, 2 sc in last st. Turn. 6 sts.
Row 4: Ch 1, 2 sc in first st, sc in next 4 sts, 2 sc in last st. Turn. 8 sts.
Rows 5 and 6: Ch 1, sc in each of the 8 sts across. Turn. 8 sts.
Row 7: Ch 1, sc2tog, sc in next 4 sts, sc2tog. Turn. 6 sts.
Row 8: Ch 1, sc in each of the 6 sts across. Turn. 6 sts.
Row 9: Ch 1, sc2tog, sc in next 2 sts, sc2tog. Turn. 4 sts.
Row 10: Ch 1, sc2tog twice. Turn. 2 sts.
Row 11: Ch 1, sc2tog. 1 st.
Fasten off.
Lower Right Maple Lobe
Join burnt orange in center-ring stitch 5.
Row 1: Ch 1, sc in stitch 5 and sc in stitch 6. Turn. 2 sts.
Row 2: Ch 1, 2 sc in each st across. Turn. 4 sts.
Row 3: Ch 1, 2 sc in first st, sc in next 2 sts, 2 sc in last st. Turn. 6 sts.
Rows 4 and 5: Ch 1, sc in each of the 6 sts across. Turn. 6 sts.
Row 6: Ch 1, sc2tog, sc in next 2 sts, sc2tog. Turn. 4 sts.
Row 7: Ch 1, sc in each of the 4 sts across. Turn. 4 sts.
Row 8: Ch 1, sc2tog twice. Turn. 2 sts.
Row 9: Ch 1, sc2tog. 1 st.
Fasten off.
Lower Left Maple Lobe
Join burnt orange in center-ring stitch 7.
Repeat Rows 1 through 9 of the Lower Right Maple Lobe, working the first row into center-ring stitches 7 and 8.
Fasten off.
Upper Left Maple Lobe
Join burnt orange in center-ring stitch 9.
Repeat Rows 1 through 11 of the Upper Right Maple Lobe, working the first row into center-ring stitches 9 and 10.
Fasten off.
Maple Leaf Stem
With the RS facing, join burnt orange in center-ring stitch 6, directly between the two lower lobes.
Row 1: Ch 1, sc in center-ring stitch 6 and sc in center-ring stitch 7. Turn. 2 sts.
Rows 2 through 14: Ch 1, sc in each of the 2 sts across. Turn. 2 sts.
Row 15: Ch 1, sc2tog. 1 st.
Fasten off.
The orange maple body is now complete. Before adding the border, count five lobes and check their relative sizes. The center lobe has 13 rows, each upper side lobe has 11 rows and each lower side lobe has 9 rows. The stem has 15 rows.
Deep-Rust Maple Leaf Edging
The deep-rust edging is worked as one continuous border around the stem and all five lobes. Work exactly 1 sc into each row end. Do not add extra sc stitches to make the outline look fuller.
To create the smaller pointed teeth shown between the five principal maple-lobe tips, add ch-2 picots while working the red edging. To make each picot, ch 2 and sl st in the first ch; the picot does not change the sc count.
On each lower lobe, make one picot after the 4th sc on the way up and one after the 4th sc on the way down.
On each upper side lobe, make one picot after the 4th and 8th sc on the way up, then repeat those placements on the way down.
On the center lobe, make one picot after the 4th and 9th sc on the way up, then repeat those placements on the way down.
With the RS facing, join deep rust or red at the left side of the stem where the stem meets the center ring.
Work 1 sc into the end of each of the 15 stem rows down the first side of the stem. 15 sc.
Work 3 sc into the single stitch at the stem tip.
Work 1 sc into the end of each of the 15 stem rows up the opposite side. 15 sc.
Sl st into the center ring at the base of the lower right lobe.
Lower right lobe: Work 1 sc into each of the 9 row ends up the first side. At the lobe tip work (sc, ch 1, sc) into the single tip stitch. Work 1 sc into each of the 9 row ends down the second side. Sl st into the center ring at the valley between the lower right and upper right lobes.
Upper right lobe: Work 1 sc into each of the 11 row ends up the first side. At the tip work (sc, ch 1, sc). Work 1 sc into each of the 11 row ends down the second side. Sl st into the center ring at the valley between the upper right and center lobes.
Center lobe: Work 1 sc into each of the 13 row ends up the first side. At the tip work (sc, ch 1, sc). Work 1 sc into each of the 13 row ends down the second side. Sl st into the center ring at the valley between the center and upper left lobes.
Upper left lobe: Work 1 sc into each of the 11 row ends up the first side. At the tip work (sc, ch 1, sc). Work 1 sc into each of the 11 row ends down the second side. Sl st into the center ring at the valley between the upper left and lower left lobes.
Lower left lobe: Work 1 sc into each of the 9 row ends up the first side. At the tip work (sc, ch 1, sc). Work 1 sc into each of the 9 row ends down the second side.
Sl st into the center ring, then join with a sl st to the first red edging stitch at the stem base.
Fasten off.
The completed red border contains 149 sc around the stem and five lobes, plus five ch-1 principal lobe points and 16 ch-2 picots. The slip stitches worked into the center-ring valleys do not count as border sc.
Golden Maple Leaf Center Vein
Use golden yellow for all vein work.
Surface crochet is worked on the RS. Keep every surface slip stitch loose enough that the leaf remains flat.
Join golden yellow at the center ring directly above the stem.
Working up the middle of the center lobe, make 11 surface sl sts, placing approximately one stitch at each row junction from the center ring through Row 11.
Stop before the final pointed rows so the gold vein ends inside the orange lobe rather than reaching the red tip.
Fasten off on the WS.
Golden Upper Branch Veins
Join golden yellow again at the center ring at the base of the upper right lobe.
Work 8 surface sl sts along the center of the upper right lobe, following the row junctions toward the point.
Fasten off before the final tapered rows.
Repeat on the upper left lobe.
Golden Lower Branch Veins
Join golden yellow at the center ring at the base of the lower right lobe.
Work 6 surface sl sts along the center of the lower right lobe.
Fasten off.
Repeat on the lower left lobe.
The completed vein structure should have exactly five visible gold lines radiating from the same central area: one long center vein, two medium upper veins and two shorter lower veins.
Final Maple Leaf Shape Check
Before blocking, confirm all of the construction counts:
Center lobe: 13 rows
Upper side lobes: 11 rows each
Lower side lobes: 9 rows each
Stem: 15 rows
Red edging: 149 sc, five ch-1 principal lobe points and 16 ch-2 picots
Gold veins: one 11-stitch center vein, two 8-stitch upper veins and two 6-stitch lower veins
At the stated working gauge of approximately 15 sc and 16 rows per 4 inches, the lightly blocked maple leaf is expected to measure approximately 6 1/2 to 7 inches across and about 7 1/2 to 8 inches from the center-lobe tip to the end of the stem.
The center lobe should be clearly tallest. The upper side lobes should be shorter and spread diagonally outward. The lower lobes should be smaller again and angle outward from the stem. The red edging should define the entire outside silhouette, while the gold veins should remain inside the orange body.
Light blocking is enough. Pin the center lobe first, then the two upper lobes, then the two lower lobes and finally the stem. Do not stretch any lobe beyond the proportions created by its row count.
Oak Leaf Crochet Pattern
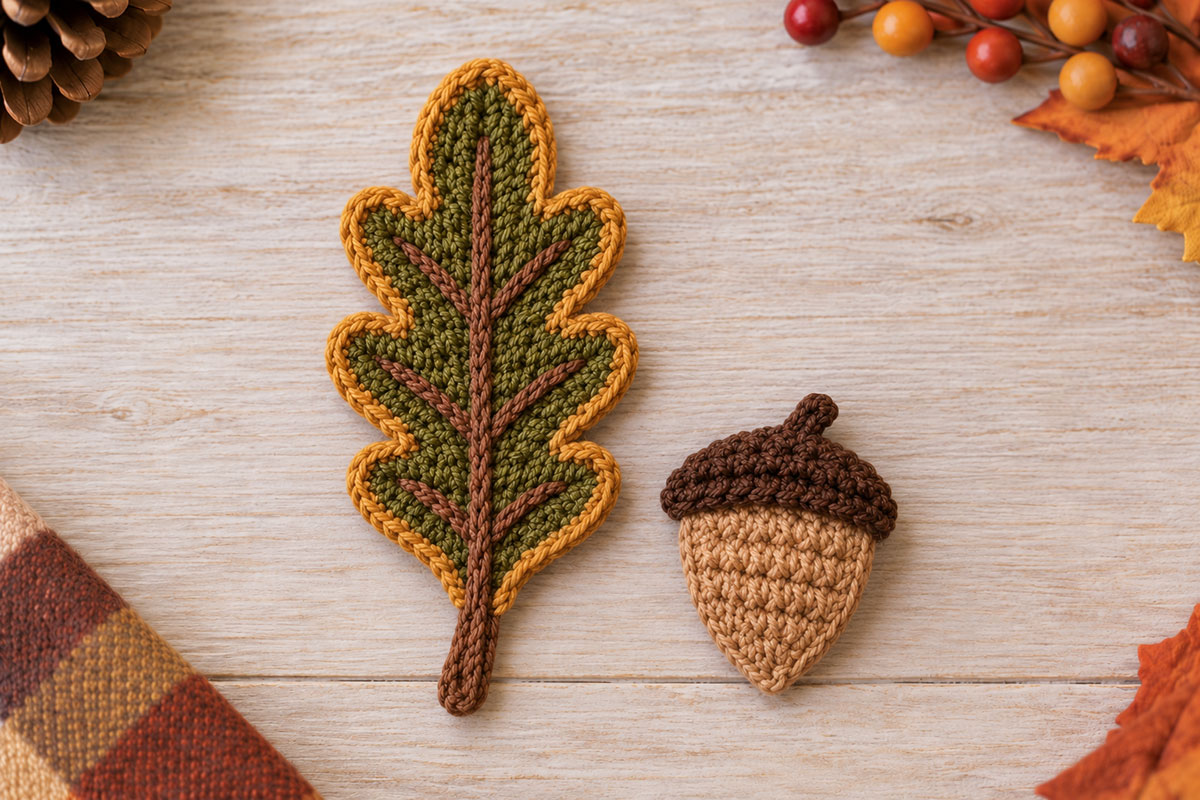
The oak leaf is deliberately narrower and quieter than the maple leaf. It has three rounded lobe pairs, one rounded top lobe and a long center vein that continues into the stem. Keep those proportions intact. The acorn belongs with this leaf, so I like the two pieces to look as though they were designed together rather than pulled from two unrelated patterns.
Make the Oak Leaf Center
With olive green, ch 4.
Row 1: Sc in 2nd ch from hook and in next 2 ch. Turn. 3 sts.
Rows 2 through 14: Ch 1, sc in each of the 3 sts across. Turn. 3 sts.
Fasten off.
You now have a narrow 14-row center strip. The three rounded oak-lobe pairs are added along both long sides next.
First Side of the Oak Leaf
With the RS facing, join olive green in the end of Row 1 along one long edge of the center strip.
Work 1 sc into the end of Row 1.
Lower Lobe 1: Work (hdc, 3 dc, hdc) into the end of Row 2. Sc in the end of Row 3. Sl st in the end of Row 4.
Sc in the end of Row 5.
Middle Lobe 2: Work (hdc, 4 dc, hdc) into the end of Row 6. Sc in the end of Row 7. Sl st in the end of Row 8.
Sc in the end of Row 9.
Upper Lobe 3: Work (hdc, 3 dc, hdc) into the end of Row 10. Sc in the end of Row 11. Sl st in the end of Row 12.
Sc in the end of Row 13 and hdc in the end of Row 14.
Shape the Top Oak Lobe
You should now be at the short upper edge of the center strip.
Sc in the first stitch across the top.
In the center top stitch work (hdc, 3 dc, 1 tr, 3 dc, hdc).
Sc in the final top stitch.
This makes the single rounded terminal lobe shown at the top of the example oak leaf.
Second Side of the Oak Leaf
Work down the opposite long edge, mirroring the first side.
Hdc in the end of Row 14 and sc in the end of Row 13.
Sl st in the end of Row 12. Sc in the end of Row 11.
Upper Lobe 3: Work (hdc, 3 dc, hdc) into the end of Row 10. Sc in the end of Row 9. Sl st in the end of Row 8.
Sc in the end of Row 7.
Middle Lobe 2: Work (hdc, 4 dc, hdc) into the end of Row 6. Sc in the end of Row 5. Sl st in the end of Row 4.
Sc in the end of Row 3.
Lower Lobe 1: Work (hdc, 3 dc, hdc) into the end of Row 2. Sc in the end of Row 1.
Join with a sl st at the base of the center strip.
Fasten off olive green.
Add the Mustard-Gold Oak Leaf Edging
With the RS facing, join mustard or muted gold at the lower edge of the first side of the oak leaf.
Sl st into each of the 27 olive stitches along the first outside edge, continue across all 11 stitches of the rounded top lobe, then sl st into each of the 27 stitches down the opposite outside edge. 65 sl sts.
Fasten off at the lower edge of the leaf.
Keep these slip stitches relaxed so the gold edging follows the rounded lobes without pulling the leaf into a cup. The bottom edge between the two sides remains unedged because the brown center vein and stem begin there.
Oak Leaf Center Vein and Stem
With medium brown and the RS facing, join at the lower center of the leaf.
Surface sl st straight up the middle of the 14-row center strip, stopping just below the rounded top lobe.
Keep the stitches relaxed enough that the center strip stays flat.
Fasten off at the top.
Join brown again at the lower center of the leaf.
Ch 12.
Beginning in the 2nd ch from hook, sl st in next 3 ch, sc in next 5 ch and sl st in the remaining 3 ch.
Sl st into the base of the leaf and fasten off.
Add the Oak Leaf Side Veins
With brown, add one short line of surface slip stitches from the center vein toward the center of each of the three rounded side lobes.
Repeat on the opposite side so you have three branch veins on each side. Let the center vein continue alone toward the rounded top lobe.
Stop each side vein inside its lobe rather than carrying it all the way to the outside edge. The finished leaf should have one dominant center vein and six shorter branch veins, matching the vein structure shown in the reference image.
Check the Oak Leaf Shape
Before blocking, count the structure.
You should have three rounded side lobes on the left, three on the right and one rounded top lobe.
The middle pair should be the fullest, with the upper and lower pairs slightly smaller. The finished leaf should remain noticeably longer than it is wide.
If one lobe spreads much farther than its mate on the opposite side, check that the 4-dc middle-lobe groups and 3-dc upper and lower groups were placed in matching row-end spaces.
Flat Crochet Acorn Appliqué Pattern
The acorn is made from two flat pieces: the shaped nut body and the textured cap. The cap overlaps the body when the two are joined. There is no stuffing, and there shouldn't be enough thickness here to make the finished acorn look like amigurumi.
Crochet the Acorn Body
With tan or caramel, ch 2.
Row 1: Work 3 sc in the 2nd ch from hook. Turn. 3 sts.
Row 2: Ch 1, work 2 sc in each st across. Turn. 6 sts.
Row 3: Ch 1, 2 sc in first st, sc in next 4 sts, 2 sc in last st. Turn. 8 sts.
Row 4: Ch 1, 2 sc in first st, sc in next 6 sts, 2 sc in last st. Turn. 10 sts.
Rows 5 through 7: Ch 1, sc in each st across. Turn. 10 sts.
Row 8: Ch 1, sc2tog, sc in next 6 sts, sc2tog. Turn. 8 sts.
Row 9: Ch 1, sc2tog, sc in next 4 sts, sc2tog. 6 sts.
Fasten off.
The beginning of the piece forms the gently tapered bottom of the acorn. The wider middle gives the nut its rounded body, and the narrower final row sits beneath the cap.
Edge the Acorn Body
Join the same tan yarn at one upper corner.
Work 1 sc into the end of each of the 9 rows down the first side. 9 sc.
Work 2 sc into the lower foundation-chain space to shape the bottom point.
Work 1 sc into the end of each of the 9 rows up the opposite side. 9 sc.
Work 1 sc in each of the 6 stitches across Row 9. 6 sc.
Join with a sl st to the first edging sc and fasten off. 26 sc total.
Don't add a decorative scallop here. The nut body should stay smooth so the textured cap remains the obvious contrast.
Crochet the Textured Acorn Cap
With dark brown, ch 10.
Row 1: Sc in 2nd ch from hook and in each ch across. Turn. 9 sts.
For the cap only, BLO means work into the back loop only.
Row 2: Ch 1, sc in BLO of each st across. Turn. 9 sts.
Row 3: Ch 1, sc2tog, sc in next 5 sts, sc2tog. Turn. 7 sts.
Row 4: Ch 1, sc in BLO of each st across. Turn. 7 sts.
Row 5: Ch 1, sc2tog, sc in next 3 sts, sc2tog. 5 sts.
Fasten off and weave in this upper-edge tail. Cut a separate length of dark brown yarn about 18 inches long for attaching the lower edge of the cap to the nut body.
The decreasing rows round the cap toward the upper center while the back-loop rows add the shallow ridged texture shown in the example. Once the cap is sewn over the top of the nut body, the broad lower edge should remain visibly wider than the tan body beneath it.
Add the Acorn Stem
Join dark brown at the center of the cap's upper edge.
Ch 7.
Beginning in the 2nd ch from hook, sl st in next 2 ch, sc in next 2 ch and sl st in final 2 ch.
Sl st back into the cap.
Fasten off.
Let the stem lean slightly to one side when you block it. It should look natural, not like a straight antenna coming out of the center of the acorn.
Join the Acorn Cap and Body
Place the cap across the upper portion of the tan body with the RS of both pieces facing you.
The cap should overlap approximately the upper quarter of the nut body.
Center it so roughly the same amount of cap extends past each side of the body.
Thread the separate 18-inch length of dark brown yarn onto a yarn needle. Beginning at one lower corner of the cap, sew the lower edge of the cap to the nut body with small, even stitches.
Add a few concealed stitches along the upper corners if needed to keep the cap flat.
Do not stitch around every outside edge of the cap. Leaving the ridged outer edge free gives you the slight overlapping look shown in the example without adding another layer of visible edging.
Weave the remaining tail into the WS.
Check the Acorn Shape
Lay the acorn flat beside the oak leaf.
The cap should be wider than the narrow upper portion of the nut body, and the tan body should taper gently toward the bottom.
If the cap pulls the body into a cup, the assembly stitches are too tight. Undo that section and resew it more loosely.
Finishing and Blocking the Crochet Leaves and Acorn
Weave in every loose end on the WS before blocking. Pay particular attention to the join and fasten-off tails where the maple lobes meet the center ring, along with the ends from the red edging and surface-crocheted veins. I wouldn't trim those tails right against the fabric. Weave them through several stitches first so the joins and decorative lines stay secure.
Block the Maple Leaf
Lightly dampen the maple leaf or use the blocking method recommended for your yarn fiber.
Lay it RS up on a blocking surface.
Pin the center lobe first.
Next pin the two upper side lobes, then the two smaller lower lobes.
Pin the stem last with its slight natural curve.
Check the overall silhouette before leaving it to dry. The center point should be highest, the two upper side lobes should sit below it and the lower pair should spread outward without becoming as tall as the upper pair.
Don't pull every point as far as it will go. Blocking is there to clarify the shape, not enlarge the leaf until the stitch proportions change.
Block the Oak Leaf
Pin the oak leaf by its center first so the long axis stays straight.
Shape the three lobe pairs one pair at a time, working from the bottom toward the top.
Round the lobe edges instead of pulling them into points.
Pin the top lobe last and straighten the brown center vein if needed.
The finished oak leaf should remain narrower than the maple leaf. If you spread it as wide as the maple during blocking, you lose the contrast between the two designs.
Block the Acorn
The acorn usually needs very little blocking.
Flatten the tan body, smooth the cap across the top and pin the short stem at a slight angle.
Make sure the cap stays visibly wider than the top of the nut body and that the lower point remains centered.
Attaching the Appliqués to Another Project
Use matching yarn and a yarn needle to sew the motifs in place.
For the leaves, stitch around the center area and along several portions of the outer edge. Add a few secure stitches beneath the larger lobes so they don't fold forward during use.
For the acorn, secure both the body and the cap. The cap should not be attached only to the nut body if the finished acorn is also being sewn onto another piece.
If you're putting one of these appliqués on something intended for a baby, secure every edge and yarn end carefully. Skip beads, buttons or other loose additions. The crochet itself gives you plenty of detail.
Ways to Use the Fall Crochet Appliqués
You can use all three motifs together, but you don't have to. That's one reason I wanted this to be a small collection rather than one leaf with an acorn tacked onto the pattern as an afterthought.
Add One Leaf to a Baby Hat
A single maple leaf gives you the strongest fall look. Place it slightly off center instead of directly over the forehead, and sew the center and lower lobes down securely so the points don't flop forward.
The smaller oak leaf works better when you want something less dramatic. Pair it with the acorn only if the hat has enough room for both without crowding the brim.
Make a Fall Baby Blanket Appliqué Group
For a blanket corner, try one maple leaf with the oak leaf angled underneath and the acorn tucked close to the oak stem.
Leave a little background showing between the pieces. You don't need to pile one motif directly on top of another to make the arrangement look complete.
Use the Leaves for a Fall Garland
Make several leaves in related autumn colors and join them to a crocheted chain or narrow cord.
If you repeat the maple leaf, vary the yarn colors while keeping the five-lobe construction the same. The pattern shape should stay recognizable even when one leaf is more gold and another leans toward rust.
Mix the smaller oak leaves and acorns between the larger maple leaves so the garland doesn't look like the same motif repeated end to end.
Decorate a Fall Bag or Basket
The flat construction works especially well on a tote, gift bag or fabric basket because there isn't much bulk sticking out from the surface.
I'd use the oak leaf and acorn together here. Their proportions make a neat little pair, and you can save the larger maple leaf for a second corner or another project.
Use Them for Thanksgiving or Autumn Decorating
The appliqués can also be sewn onto reusable napkin rings, fabric place-card pockets, a wreath base or a seasonal banner.
If you're making something that will be handled often, sew around more of the outside edge instead of relying only on a few anchor stitches.
Once you've made one of each, you'll know which one you want more of. The maple gives you the unmistakable fall leaf, while the oak leaf and acorn make the set feel more woodland and a little less expected.
Frequently Asked Questions
Can I make the leaves with a different yarn weight?
Yes. A lighter yarn and smaller hook will give you smaller appliqués, while a heavier yarn and larger hook will make them larger. Keep the same stitch counts if you want to preserve the locked shapes.
I would make all three motifs from the same yarn weight if you're planning to use them together. Otherwise the size relationship between the maple leaf, oak leaf and acorn can change quickly.
Can I make the maple leaf in one color?
Yes. The three-color treatment shown in the example is part of the finished design, but it is not required for the five-lobe shape to work.
A solid rust, orange, gold or deep red maple leaf is the simplest variation. Keep the contrasting vein work if you want the structure to stand out.
Can I use only the oak leaf and acorn?
Absolutely. Those two motifs were designed as a pair. The rounded oak lobes and coordinating acorn make sense together even without the maple leaf.
Why is the acorn made in two pieces?
Making the body and cap separately gives the cap a real overlapping edge and lets you use a different stitch texture without turning the acorn into a thick or stuffed piece.
It also makes the cap easier to position before you sew it down.
Do I have to block crochet appliqués?
You can sometimes skip blocking on a small acorn, but I would block both leaves. The maple points and rounded oak lobes are much easier to define with light blocking.
Is this pattern tested?
This pattern has been mathematically worked through against the finished reference design, but it has not been physically test-made from these written instructions. The stitch counts have been reconciled, while the finished dimensions and final blocked appearance remain expected rather than measurements and observations taken from a completed test sample.
When you click on links to various merchants on this site and make a purchase, this may result in this site earning a commission. This does not affect the price you pay.

UBGI Gold Standard 2026
Reviewed under the site's
editorial checklist.
Photos, decorating ideas, party setups and reader submissions are shared for inspiration unless a page is specifically presented as a pattern, tutorial, reference guide or step-by-step project. Follow the instructions, measurements, safety guidance and manufacturer directions provided for the particular project or product.
About Jan | Contact | Baby Nursery Ideas (Blog) | Site Map | Privacy Policy | Disclosure Policy | Disclaimer | Affiliate Disclosure | Earnings Disclosure | Facebook | Pinterest
I am a participant in the Amazon Services LLC Associates Program, an affiliate advertising program designed to provide a means for us to earn fees by linking to Amazon. As an Amazon Associate I earn from qualifying purchases.
Copyright © 2006-2026. All Rights Reserved.