Free Woodland Squirrel Lovey Crochet Pattern with Acorns
By Jan Bay
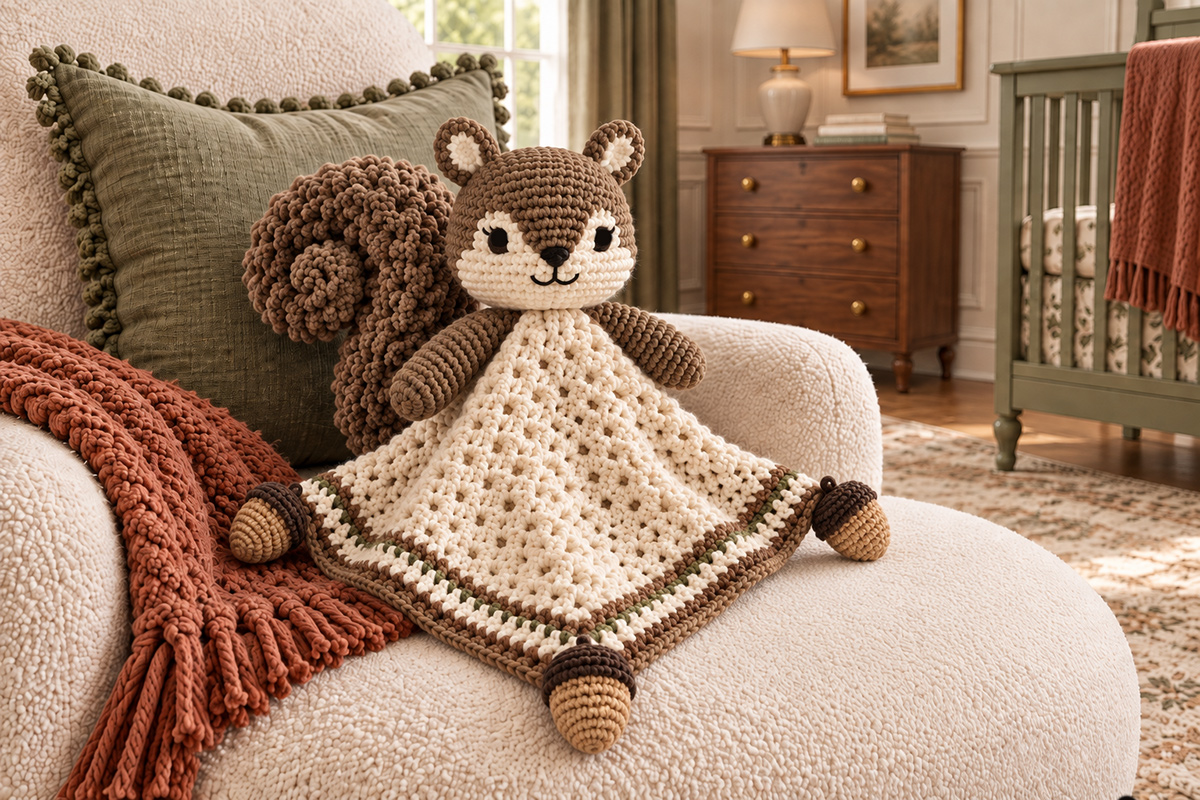
This free woodland squirrel lovey crochet pattern with crochet acorns attached to the blanket is one of my favorites for fall. Who wouldn't love that fluffy, curly tail? I think it's adorable, and it gives the squirrel its unmistakable personality. The little acorns proclaim "fall" from every corner and can also be used as matching nursery decorations, gift toppers or seasonal accents.
Explore More Woodland Crochet Lovey Patterns
🌲 Winter Woodland Animal Lovey Patterns
Supplies for This Crochet Project
Jump to:
Materials for the Free Woodland Squirrel Lovey Crochet Pattern
I’d keep the yarn choices fairly simple here. The big curly tail, soft squirrel brown and acorn corners are spot on for autumn. You don’t need a long list of colors for the squirrel since I decided to save the fall leaves for other patterns.
Yarn: Worsted weight #4 yarn in the following colors:
Squirrel Brown: allow approximately 425 yards for the head, ears, arms and large textured tail
Cream: allow approximately 300 yards for the muzzle, inner ears and lovey blanket
Medium Brown: approximately 55 yards for the blanket border
Muted Olive: approximately 25 yards for the narrow woodland border stripe
Tan: approximately 35 yards for the acorn bodies
Dark Brown: approximately 30 yards for the acorn caps
These yarn amounts are planning estimates based on the stated size and stitch counts rather than yarn measured from a physically test-crocheted sample. I’d rather have a little left over than come up short, especially with that bobble-textured tail.
The squirrel brown should be a true medium walnut, mushroom brown or soft taupe brown rather than a rusty orange. That color choice matters. A reddish brown can push the finished animal toward fox instead of squirrel. The only other palette I seriously considered was grey. We have a lot of grey squirrels here, and I thought about taking the pattern in that direction, but I wanted to include the acorns and I liked them better with the warmer brown squirrel. If you decide to make a grey squirrel instead, consider swapping the acorns for colorful autumn leaf appliqués.
You’ll also need:
4.0 mm crochet hook for the head, ears, arms, tail and acorns
4.5 mm crochet hook for the lovey blanket
Polyester fiberfill for the head, arms, tail and acorns
Black embroidery floss for the eyes, nose and mouth
A small amount of cream embroidery floss for the eye highlights
Yarn needle
Stitch markers
Scissors
Removable pins for positioning pieces before sewing
Skip plastic safety eyes and buttons on this one. The finished squirrel shown here uses embroidered facial features, including open black satin-stitched eyes.
Finished Size and Gauge
The finished measurements below are the expected measurements for this design based on the stitch counts and construction given in the pattern. They are not measurements from a physically test-made sample.
Expected finished size:
Lovey blanket: approximately 16 inches square before the acorn corners are added
Squirrel head: approximately 4 1/2 inches wide
Curled tail: approximately 7 to 7 1/2 inches across at its widest point
Each acorn: approximately 2 1/2 inches long
The overall top-to-bottom measurement will vary depending on how the finished square is positioned and allowed to drape, so I haven't assigned a fixed assembled length.
Gauge for stuffed pieces: approximately 18 single crochet stitches and 20 rounds = 4 inches using the 4.0 mm hook.
Gauge for the blanket: approximately 4 granny-style clusters = 4 inches measured across the side of the granny-square fabric using the 4.5 mm hook.
The exact gauge isn’t critical in the same way it would be for a sweater, but it does matter if you want the proportions to match the example. If your head comes out much larger while the blanket stays the same size, the squirrel can start looking top-heavy. If your gauge is loose enough for stuffing to show between stitches, go down a hook size for the stuffed pieces.
Abbreviations and Pattern Notes
US crochet terms are used throughout this pattern.
Piece count: Before assembly you should have 18 crocheted pieces: 1 head, 2 arms, 1 cream face patch, 2 brown outer ears, 2 cream inner ears, 1 tail, 1 lovey blanket, 4 tan acorn bodies and 4 dark brown acorn caps. The four acorn stems are crocheted directly onto the caps and are not separate pieces.
ch = chain
sl st = slip stitch
sc = single crochet
hdc = half double crochet
dc = double crochet
inc = work 2 sc in the same stitch
dec = single crochet decrease
st/sts = stitch/stitches
sp = space
rnd/rnds = round/rounds
FO = fasten off
Magic ring: Use a magic ring to begin the stuffed round pieces unless another starting method is given.
Continuous rounds: The head, arms and acorns are worked in continuous rounds. Do not join at the end of each round unless the instructions specifically tell you to do so. Move your stitch marker up at the end of every round. The squirrel tail is worked flat in turned rows, then folded, stuffed and shaped into its spiral.
Blanket construction: The cream lovey blanket is worked from the center outward in joined rounds. The brown, cream and muted olive border is added after the cream center is complete.
Acorn corners: The four crocheted acorns replace ordinary corner bobbles. Sew one acorn securely to each blanket corner after the border is finished. That detail is intentional. It ties the acorns directly to the squirrel and the fall season.
Tail construction: The tail is not a flat oval. It needs enough bulk and curl to sit prominently behind the head, as shown in the finished example. The pattern builds the tail as a shaped stuffed piece and then curls and secures it during assembly.
Face placement: Embroider the eyes before final assembly so you can keep them level and centered. Use black embroidery floss and fill the eye shapes with close satin stitches. Use the same black floss for the nose and mouth, and cream floss for the tiny eye highlights.
Stuff the head and tail firmly enough to hold their shapes, but don’t pack the arms or acorns quite as hard. They should still feel soft when the lovey is handled.
Crochet the Squirrel Head and Arms
The head is worked from the top down in squirrel brown. Keep the stuffing firm enough to hold the rounded shape, but don't stretch the stitches so far that the fiberfill shows through.
Squirrel Head
Rnd 1: Make 6 sc in a magic ring. (6)
Rnd 2: Inc in each st around. (12)
Rnd 3: [Sc 1, inc] around. (18)
Rnd 4: [Sc 2, inc] around. (24)
Rnd 5: [Sc 3, inc] around. (30)
Rnd 6: [Sc 4, inc] around. (36)
Rnd 7: [Sc 5, inc] around. (42)
Rnd 8: [Sc 6, inc] around. (48)
Rnd 9: [Sc 7, inc] around. (54)
Rnd 10: [Sc 8, inc] around. (60)
Rnds 11–18: Sc in each st around. (60)
Rnd 19: [Sc 8, dec] around. (54)
Rnd 20: [Sc 7, dec] around. (48)
Rnd 21: [Sc 6, dec] around. (42)
Rnd 22: [Sc 5, dec] around. (36)
Rnd 23: [Sc 4, dec] around. (30)
Begin stuffing the head now. Shape it as you go instead of waiting until the opening gets tiny.
Rnd 24: [Sc 3, dec] around. (24)
Rnd 25: [Sc 2, dec] around. (18)
Rnd 26: [Sc 1, dec] around. (12)
Rnd 27: Dec around. (6)
Finish stuffing. FO, leaving a long tail. Thread the tail through the front loops of the remaining 6 stitches and pull the opening closed. Secure the yarn firmly, then bury the tail inside the head.
Arms, make 2
The arms in the finished lovey are short and softly stuffed rather than long dangling limbs.
Rnd 1: With squirrel brown, make 6 sc in a magic ring. (6)
Rnd 2: Inc in each st around. (12)
Rnd 3: [Sc 1, inc] around. (18)
Rnds 4–12: Sc in each st around. (18)
Rnd 13: [Sc 1, dec] around. (12)
Rnds 14–15: Sc in each st around. (12)
Add a small amount of stuffing to the lower two-thirds of the arm. Leave the top fairly flat so it will sit neatly against the head and blanket.
Flatten the opening and crochet through both layers with 6 sc to close. FO, leaving a long tail for sewing.
Make the Ears and Embroidered Squirrel Face
The cream face is important to the look of the finished squirrel. It softens the dark brown head and gives you a clean area for those open embroidered eyes. Don't substitute plastic eyes here.
Cream Face Patch
Ch 9.
Rnd 1: Sc in second ch from hook and in next 6 ch, 3 sc in last ch. Working along the opposite side of the foundation chain, sc in next 6 ch, 2 sc in the final ch. (18)
Rnd 2: Inc, sc 6, inc in each of next 3 sts, sc 6, inc in each of last 2 sts. (24)
Rnd 3: [Sc 1, inc], sc 6, [sc 1, inc] 3 times, sc 6, [sc 1, inc] twice. (30)
Rnd 4: [Sc 4, inc] 6 times. (36)
FO with a long sewing tail. The finished patch should be roughly 3 1/4 to 3 1/2 inches wide. Pin it across the lower front of the head and make sure it is level before sewing it down.
Outer Ears, make 2 in squirrel brown
Rnd 1: 6 sc in a magic ring. (6)
Rnd 2: Inc around. (12)
Rnd 3: [Sc 1, inc] around. (18)
Rnd 4: [Sc 2, inc] around. (24)
FO, leaving a long tail.
Inner Ears, make 2 in cream
Rnd 1: 6 sc in a magic ring. (6)
Rnd 2: Inc around. (12)
Rnd 3: [Sc 1, inc] around. (18)
FO, leaving a sewing tail. Use that tail to sew one cream inner ear to each brown outer ear. Pinch the lower edge of the finished ear slightly before sewing so the ear cups forward instead of lying completely flat.
Place the ears symmetrically near the top sides of the head. Sew through the lower 5 to 6 stitches of each ear so the upper portion stays rounded.
Embroider the Face
Use black embroidery floss for the eyes, nose and mouth. Mark both eyes before stitching. They should sit evenly on the cream face area, about 1 1/4 inches apart.
Build each open eye with closely packed vertical black satin stitches until you have a small oval approximately 3/8 inch tall. Keep the two eyes the same size. Add one tiny cream highlight stitch near the upper-right area of each black eye as viewed from the front.
Embroider a small upside-down triangular nose between and slightly below the eyes. Add one short vertical stitch from the bottom of the nose, then stitch a shallow curved mouth to each side.
Keep the expression simple. The brown color, curly tail and acorns already give this little fellow lots of personality.
Make the Fluffy Curly Squirrel Tail
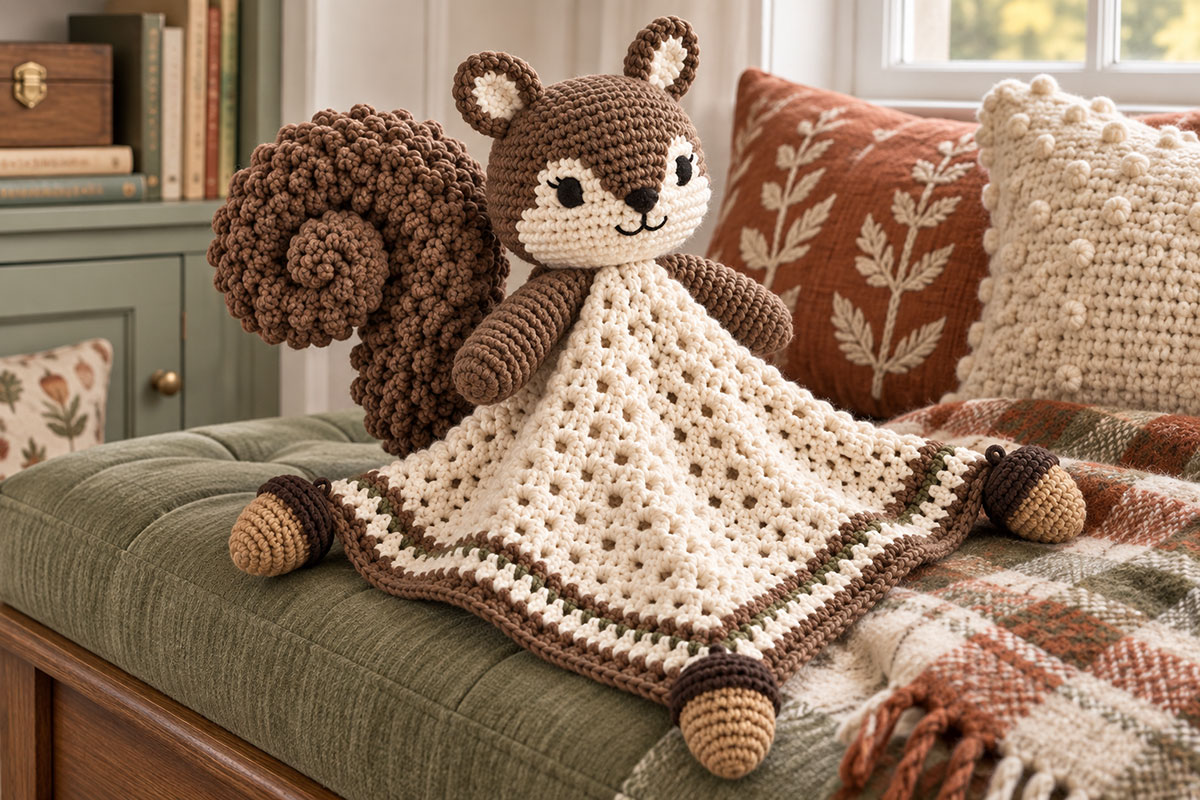
The tail is the feature I wouldn't compromise on. A plain straight stuffed tail won't give you the squirrel in the example image. This one is made as a textured panel, lightly stuffed and then curled into that big rounded spiral behind the head.
4-dc bobble: Yarn over, insert hook in indicated stitch, yarn over and pull up a loop, yarn over and pull through 2 loops. Repeat that sequence 3 more times in the same stitch. You will have 5 loops on the hook. Yarn over and pull through all 5 loops.
Tail Panel
With squirrel brown, ch 73.
Row 1: Sc in second ch from hook and across. (72)
Row 2: Ch 1, turn. Sc in first st, [4-dc bobble in next st, sc in next st] 35 times, sc in last st. (72)
Row 3: Ch 1, turn. Sc across. (72)
Repeat Rows 2 and 3 until you have completed 35 rows. For Row 36, ch 1, turn and sc across. (72) The expected panel size before folding is approximately 16 inches long and about 7 to 8 inches wide. That extra width is important because the finished squirrel has a very thick, fluffy spiral tail rather than a narrow cord-like curl.
FO, leaving a long sewing tail.
Fold the panel lengthwise with the textured bobble side facing outward. Use the long yarn tail to sew the two long edges together. When you reach the first short end, run the yarn through the stitches around that opening, pull it closed securely and weave the remaining yarn into the inside of the tail.
Stuff the tail through the remaining open end. Add fiberfill a little at a time and spread it evenly through the full length of the tube. The tail should feel full and supportive without becoming so firmly packed that it will not bend. Don't leave soft empty sections between the stuffed areas because those spots can collapse when the tail is standing upright.
Thread a separate length of squirrel-brown yarn through the stitches around the remaining short opening. Pull the opening closed securely, knot the yarn and bury the ends inside the tail.
Bend the stuffed tail into a broad C first, then continue curling the upper portion inward to form the rounded spiral shown in the finished lovey. Use several hidden stitches through adjoining sections of the tail to secure the spiral to itself. Don't pull those shaping stitches so tightly that they flatten the tail. The finished curl should remain fat and dimensional and measure approximately 7 inches across.
Crochet the Cream Woodland Lovey Blanket
The blanket is a traditional square worked from the center outward. Most of it stays cream. Then the narrow brown, cream and muted olive border adds just enough woodland color without competing with the squirrel.
3-dc cluster: Work 3 dc in the indicated space.
With cream and the 4.5 mm hook, make a magic ring.
Rnd 1: Ch 3, work 2 dc in the ring, ch 2. [3 dc in ring, ch 2] 3 times. Join with a sl st to the top of beginning ch 3. You now have 4 clusters and 4 corner spaces.
Rnd 2: Sl st across to the first corner ch-2 space. Ch 3, 2 dc in same corner, ch 2, 3 dc in same corner, ch 1. In each remaining corner work [3 dc, ch 2, 3 dc], ch 1. Join with a sl st to the top of the beginning ch 3.
Rnd 3: Sl st across the next 2 dc and into the first corner ch-2 space. Ch 3, work 2 dc in the same corner space, ch 2, 3 dc in the same corner space, ch 1. Work 3 dc in the next side ch-1 space, ch 1. In the next corner ch-2 space work [3 dc, ch 2, 3 dc], ch 1. Continue around in the same manner, working 3 dc in each side ch-1 space and [3 dc, ch 2, 3 dc] in each corner ch-2 space, with ch 1 between clusters. Join with a sl st to the top of the beginning ch 3.
Rnds 4–13: At the beginning of each round, sl st across the next 2 dc and into the corner ch-2 space. Ch 3, work 2 dc in the same corner space, ch 2, 3 dc in the same corner space, ch 1. Work 3 dc in every ch-1 space along the side, with ch 1 between clusters. In each remaining corner ch-2 space work [3 dc, ch 2, 3 dc], ch 1. Continue around and join with a sl st to the top of the beginning ch 3.
After Round 13, the cream center should measure roughly 13 to 14 inches square with the yarn and hook specified. If yours is noticeably smaller or larger, use the finished measurement rather than blindly adding or removing several rounds. The finished blanket, including the striped border, should land close to 16 inches square.
FO the cream yarn and weave in the end before beginning the striped border.
Border note: The beginning ch 1 does not count as a stitch in any of the border rounds.
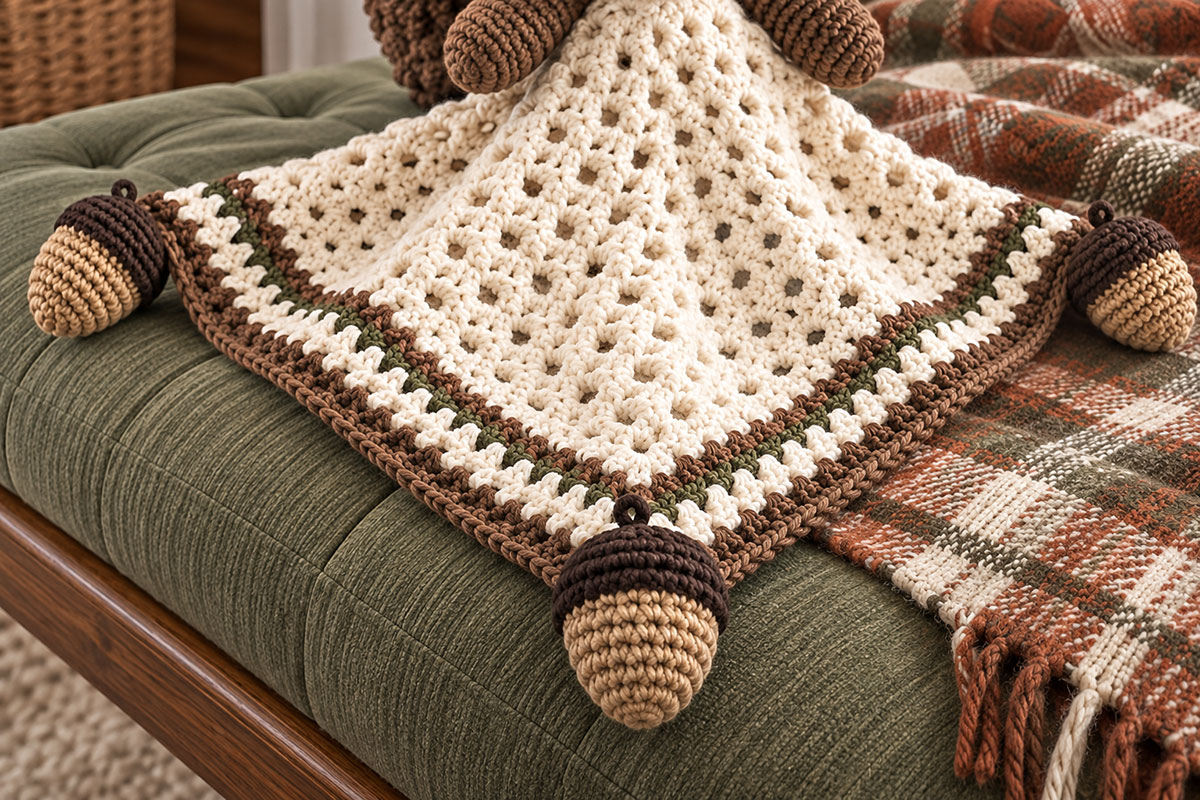
Border Rnd 14, medium brown: Join medium brown in any corner ch-2 space. Ch 1. Work 3 sc in the same corner space. Across the next side, work 1 sc in each dc and 1 sc in each ch-1 space. You will have 51 sc across the straight portion of the side. Work 3 sc in the next corner ch-2 space. Repeat around the remaining sides and corners. Join with a sl st to the first sc. (216 sts total) FO.
Place a removable stitch marker in the center stitch of each 3-sc corner. Move each marker into the center stitch of the new 3-stitch corner as you complete every following border round.
Border Rnd 15, cream: Join cream in any marked corner stitch. Ch 1. The beginning ch 1 does not count as a stitch. Work 3 hdc in each marked corner stitch and 1 hdc in every other stitch around. Join with a sl st to the first hdc. (224 sts) Move the four corner markers. FO.
Border Rnd 16, muted olive: Join muted olive in any marked corner stitch. Ch 1. Work 3 sc in each marked corner stitch and 1 sc in every other stitch around. Join with a sl st to the first sc. (232 sts) Move the four corner markers. FO.
Border Rnd 17, cream: Join cream in any marked corner stitch. Ch 1. Work 3 hdc in each marked corner stitch and 1 hdc in every other stitch around. Join with a sl st to the first hdc. (240 sts) Move the four corner markers. FO.
Border Rnd 18, medium brown: Join medium brown in any marked corner stitch. Ch 1. Work 3 sc in each marked corner stitch and 1 sc in every other stitch around. Join with a sl st to the first sc. (248 sts) FO.
Remove all four corner markers and weave in the border ends securely before attaching anything else.
Crochet the Acorn Blanket Corners
Make four acorns. These aren't separate little props. Each one is attached directly to a blanket corner in place of an ordinary bobble or tassel. That's what makes the fall and squirrel connection feel deliberate.
Acorn Body, make 4 in tan
Rnd 1: With tan, make 6 sc in a magic ring. (6)
Rnd 2: Sc in each st around. (6)
Rnd 3: [Sc 1, inc] 3 times. (9)
Rnd 4: Sc in each st around. (9)
Rnd 5: [Sc 2, inc] 3 times. (12)
Rnd 6: [Sc 1, inc] 6 times. (18)
Rnd 7: [Sc 2, inc] 6 times. (24)
Rnds 8–10: Sc in each st around. (24)
Stuff the acorn body lightly, adding a little more fiberfill near the wide upper half than at the tip. Leave the 24-stitch opening unclosed. The narrow starting end forms the softly rounded point of the acorn, while the open 24-stitch end fits directly inside the cap.
FO and weave in the ending yarn tail. Do not close the opening.
Acorn Cap, make 4 in dark brown
Rnd 1: 6 sc in a magic ring. (6)
Rnd 2: Inc around. (12)
Rnd 3: [Sc 1, inc] around. (18)
Rnd 4: [Sc 2, inc] around. (24)
Rnd 5: Sc around in back loops only. (24)
Rnd 6: Sc around. (24)
FO with a long sewing tail. Fit the 24-stitch opening of the cap over the 24-stitch opening at the wide end of the tan acorn body. Sew through the final round of the cap and the final round of the body all the way around, matching the stitches evenly. Add a little more stuffing before closing the last few stitches if needed.
Stem: Join dark brown yarn at the center top of the cap. Ch 4. Sl st in the second ch from the hook and in each of the next 2 ch, then sl st into the cap at the base of the stem. FO and weave in the end.
Repeat for all four acorns.
Position one finished acorn at each blanket corner with the cap touching the blanket and the tan nut pointing outward. Sew the cap firmly to the corner through several stitches on both sides of the corner.
Don't attach the acorn by its little stem. The cap itself needs to carry the attachment so there isn't a narrow strand taking all the strain.
Assemble the Woodland Squirrel Lovey
Lay the blanket flat before sewing anything to it. The head belongs directly over the center of the square, not several inches toward one corner. Pin everything first. It takes only a minute and saves a lot of unpicking.
1. Attach the head. Center the bottom of the squirrel head over the middle of the blanket. Sew around the lower portion of the head through the blanket stitches with squirrel-brown yarn. Make several passes so the head doesn't wobble.
2. Add the arms. Position one arm on each side of the head, angling them slightly downward over the blanket. Sew the flattened top of each arm securely to the side of the head and through the upper blanket stitches beneath it.
3. Position the tail. With the squirrel facing you, position the large curled tail behind the head on the viewer’s left, which is the squirrel’s right side. Turn the spiral so the bobble-textured curl faces forward and remains clearly visible, as shown in the finished example. Sew the lower end of the tail firmly to both the back of the head and the blanket center, making several passes through a broad section of the tail base rather than attaching it at only one small point.
Add two or three hidden support attachments farther up the inner curve of the tail. At each point, pass the sewing yarn through the tail and securely into the back of the squirrel head, then back through the tail several times. Space these attachments along the lower and middle portion of the inner curl so the entire spiral cannot tip backward as one piece. Keep the stitches buried in the bobble texture and do not pull them tightly enough to flatten the tail.
4. Check the acorns. Tug each acorn gently after sewing. If the blanket corner pulls away from the cap or you can see a gap, add another round of sewing stitches around the cap.
5. Check the finished proportions. Set the lovey upright as it appears in the example. You should see the face clearly, the arms resting over the cream blanket, the large curled tail rising behind the head and an acorn at each blanket corner.
Finishing and Baby-Safe Details
Weave every yarn end back through several stitches before trimming it. Pay extra attention to the ears, arms, tail and acorns because those pieces will get more handling than the center of the blanket.
Run your fingers over the entire finished lovey. There shouldn't be loose yarn tails, loose decorative pieces, hard attachments or openings where stuffing can escape. Remove every temporary pin and stitch marker before the lovey is used or gifted.
I would keep the face exactly as shown and use embroidery rather than buttons or plastic safety eyes. The open satin-stitched eyes give the squirrel plenty of expression without adding separate eye pieces.
If you're substituting yarn, match the yarn weight and then check your gauge rather than assuming every yarn marked #4 will work exactly the same. The Craft Yarn Council yarn weight standards explain the standard weight categories and recommended gauge ranges.
One other distinction matters with any handmade lovey. A soft lovey can be used for supervised cuddling and play, but it shouldn't be placed loose in an infant's crib or other sleep space. The American Academy of Pediatrics recommends keeping blankets, stuffed toys and other soft objects out of an infant's sleep area. You can read the AAP safe sleep guidance at HealthyChildren.org.
If you like this squirrel, you'll find more woodland shapes and personalities in my Winter Woodland Animal Lovey Patterns collection. You can also browse the larger free crochet animal lovey pattern collection.
When you click on links to various merchants on this site and make a purchase, this may result in this site earning a commission. This does not affect the price you pay.

UBGI Gold Standard 2026
Reviewed under the site's
editorial checklist.
Photos, decorating ideas, party setups and reader submissions are shared for inspiration unless a page is specifically presented as a pattern, tutorial, reference guide or step-by-step project. Follow the instructions, measurements, safety guidance and manufacturer directions provided for the particular project or product.
About Jan | Contact | Baby Nursery Ideas (Blog) | Site Map | Privacy Policy | Disclosure Policy | Disclaimer | Affiliate Disclosure | Earnings Disclosure | Facebook | Pinterest
I am a participant in the Amazon Services LLC Associates Program, an affiliate advertising program designed to provide a means for us to earn fees by linking to Amazon. As an Amazon Associate I earn from qualifying purchases.
Copyright © 2006-2026. All Rights Reserved.