Free Christmas Teddy Bear Quilt Pattern
By Jan Bay
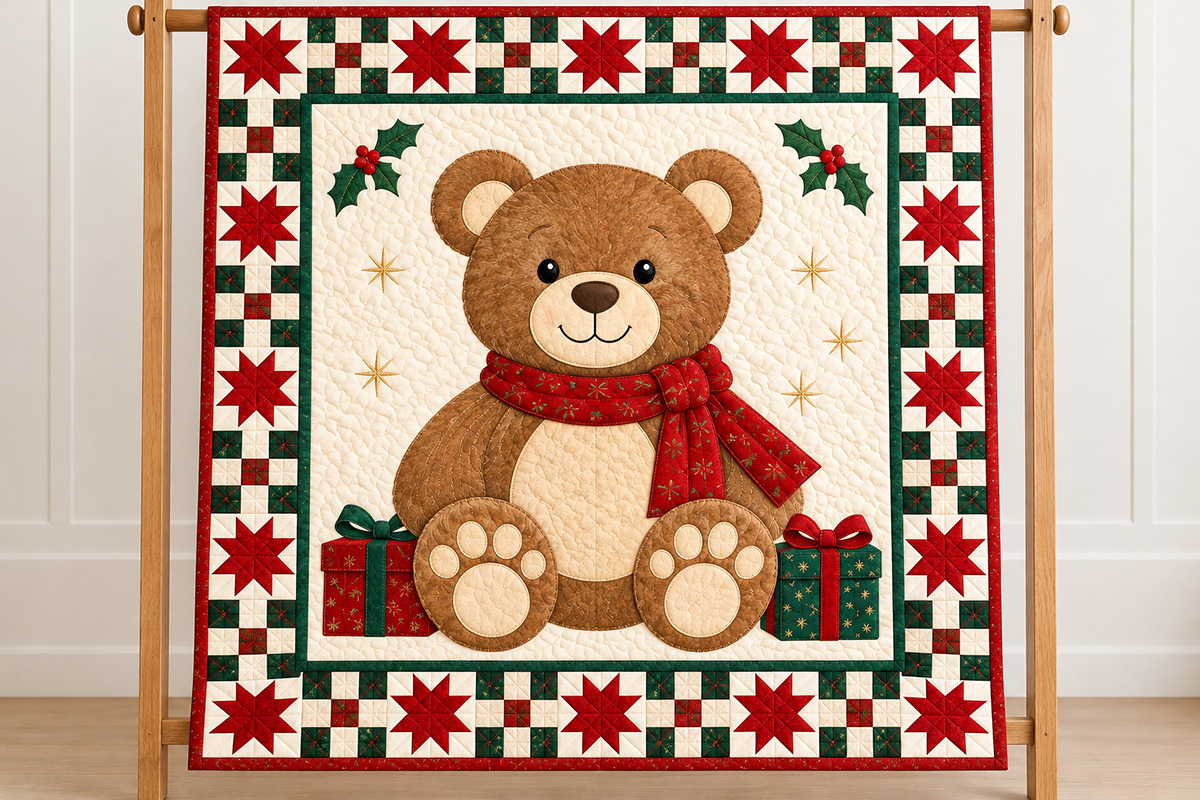
This free Christmas teddy bear quilt pattern features one big, smiling brown bear wearing a holly-berry-red scarf, with little Christmas gifts at his feet and a patchwork border filled with red stars, evergreen fabric prints and warm-white solids. The oversized bear appliqué gives the quilt its vintage storybook personality, while the classic pieced border makes it a lovely Christmas sewing project and handmade keepsake. Enjoy it as a wall hanging or a comforting bit of cover on a chilly evening.
Explore More Baby Quilt Patterns
Teddy Bear Patchwork Quilt Pattern
See quilting supplies for this project
Jump to the Christmas Teddy Bear Quilt Pattern
Teddy Bear Appliqué and Templates
Free Christmas Teddy Bear Quilt Pattern PDF Downloads
I've put the complete pattern into a printable PDF package, including fabric cutting charts, full-size appliqué templates, star and checkerboard construction instructions, an exact quilt layout and a full-size teddy bear placement map. You can print the whole pattern or just the pages you need. No need to use a whole stack of paper twice!
Download Your Free Quilt Pattern
Download the Complete Christmas Teddy Bear Quilt Pattern PDF (93 pages, including instructions and full-size templates)
Download the Full-Size Appliqué Templates (81 US Letter pages, including the tiled placement map)
Download the Full-Size Teddy Bear Placement Master (29 × 39 inches, for large-format printing)
About the quilt design: The Christmas quilt photograph is an illustrative rendering, so its border arrangement and proportions differ slightly from the finished pattern. The downloadable PDFs provide the exact 40 × 50-inch quilt layout with 16 red stars, 16 checkerboards, full-size teddy bear appliqué templates and the placement master. Follow those diagrams and measurements when cutting and sewing. The pattern has been digitally checked but has not been physically test sewn.
If you're printing at home, choose the US Letter templates and print at 100% or Actual Size. Turn off Fit to Page and other automatic scaling settings. Check the one-inch calibration square with a ruler before printing the rest. The larger appliqué shapes are divided into numbered pages that you'll tape together.
The complete pattern already contains the templates, so you don't need to download both the complete pattern and the template-only file. The large placement master is an alternative to taping together the placement-map pages. You'll still need the individual cutting templates.
A note before you cut: This pattern has been digitally measured and checked, but the complete quilt has not been physically test sewn. I'd make one sample star, one checkerboard block and a paper layout of the bear before cutting all that beautiful Christmas fabric.
Materials for the Christmas Teddy Bear Quilt Pattern
The finished quilt measures 40 × 50 inches. It's made with a large appliqué teddy bear on a warm-white center panel, a narrow evergreen frame and a five-inch-wide border of traditional Christmas stars and checkerboard blocks.
I'd choose good-quality quilting cotton throughout. A lightly patterned brown cotton gives the teddy a soft, furry appearance without the difficulties of working with thick plush fabric. Keep the tummy, muzzle and paw pads lighter so his sweet little face doesn't disappear into all that brown.
Fabric and supplies:
Warm-white quilting cotton: 2 1/4 yards for the center panel, white star backgrounds and checkerboard squares.
Christmas-red quilting cotton: 1 1/2 yards for the star blocks, checkerboard squares, scarf, red present and binding. You can mix coordinating red prints with solids.
Evergreen quilting cotton: 1 yard for the narrow inner border, checkerboard squares, green present and gift ribbons.
Teddy-brown quilting cotton: 1 1/4 yards for the head, body, ears, paws and main arm pieces.
Slightly lighter brown cotton: 1 fat quarter, optional, for the visible arm. This little fabric change helps the arm stand out from the body without changing its shape.
Cream quilting cotton: 1/2 yard for the tummy, muzzle, inner ears, paw soles and toe pads.
Dark brown cotton: One 3 × 3-inch scrap for the nose.
Backing fabric: 3 yards of quilting cotton with at least 40 inches of usable width. Buy 3 1/4 yards if you plan to prewash or expect substantial shrinkage.
Batting: At least 49 × 59 inches.
Lightweight fusible web: Approximately 4 yards of 18-inch-wide fusible web, or an equivalent amount. Large appliqué pieces use plenty, so plan your cutting before fusing.
Other supplies: Coordinating sewing thread, matching appliqué thread, dark and white embroidery floss, optional red, green and gold embroidery floss, quilting ruler, rotary cutter, cutting mat, fabric scissors, iron, sewing machine, removable fabric marker and paper for printing templates.
These yardages assume at least 40 inches of usable fabric width after removing the selvages. Large directional prints and substantial shrinkage may require extra fabric.
Finished measurements:
The teddy bear's center panel finishes at 29 × 39 inches. The evergreen frame adds 1/2 inch on every side, bringing the finished center assembly to 30 × 40 inches. The five-inch patchwork border then brings the completed quilt to 40 × 50 inches.
Use an accurate 1/4-inch seam allowance for all patchwork piecing. The appliqué templates are designed for raw-edge fusible appliqué, so don't add a turn-under seam allowance to those shapes.
Cutting the Christmas Quilt Fabric
Before you start cutting the little patchwork pieces, set aside the fabric for the teddy, scarf and presents. I would also cut the large warm-white background first. It's much easier to work around one big rectangle than to discover later that you've cut all your white fabric into strips.
Center Panel and Evergreen Frame
Warm-white background: Cut one rectangle measuring 30 1/2 × 40 1/2 inches, with the 40 1/2-inch measurement running along the length of your yardage rather than across its width. After completing the appliqué, trim the panel to 29 1/2 × 39 1/2 inches, keeping the teddy bear centered.
Evergreen side borders: Cut two strips measuring 1 × 39 1/2 inches.
Evergreen top and bottom borders: Cut two strips measuring 1 × 30 1/2 inches.
Cutting for 16 Christmas Star Blocks
Each star finishes at 5 × 5 inches and should measure 5 1/2 × 5 1/2 inches before joining it to another block.
Cut the following pieces for all 16 stars:
Red star centers: 16 squares measuring 3 × 3 inches.
Red star-point squares: 128 squares measuring 1 3/4 × 1 3/4 inches.
Warm-white flying-geese rectangles: 64 rectangles measuring 1 3/4 × 3 inches.
Warm-white star corners: 64 squares measuring 1 3/4 × 1 3/4 inches.
Keep the red centers, red point squares and white pieces in separate piles. You'll be making four flying-geese units for each star, so sorting everything now makes the sewing much easier.
Cutting for 16 Checkerboard Blocks
Each checkerboard also finishes at 5 × 5 inches. Every block contains sixteen small squares arranged in four rows.
Cut 64 red squares, 64 evergreen squares and 128 warm-white squares, all measuring 1 3/4 × 1 3/4 inches.
Each checkerboard will use four red squares, four evergreen squares and eight warm-white squares.
Binding
Cut six red binding strips, each 2 1/2 inches wide across the usable width of the fabric. These will be joined with diagonal seams after the quilt is assembled and quilted.
Cutting the Appliqué Pieces
Use the full-size PDF templates for the teddy bear and Christmas presents. These shapes are already drawn at their intended cutting size, including the portions that will disappear beneath overlapping pieces.
Don't try to estimate the bear's shape from the photograph. The template package is what controls the finished dimensions and placement.
For the warm-white fabric, the calculated strip plan uses fourteen 1 3/4-inch strips after cutting the large center panel. Five strips provide the flying-geese rectangles and nine provide the small white squares. The extra yardage gives you working room for trimming and squaring.
Making the Large Teddy Bear Appliqué
Now for the part that gives this quilt its personality. The teddy is deliberately large, with a rounded head, little cream-colored ears, a smiling muzzle and two oversized feet. His red scarf and the Christmas presents turn an otherwise traditional bear quilt into something special for the holidays.
I'd arrange the entire bear on the background before fusing a single piece permanently. Once you see his face, tummy, arms and paws together, it's much easier to check that everything looks natural.
Prepare the Templates
Print the template PDF at 100% or Actual Size. Measure the one-inch calibration square before cutting the paper pieces.
The large shapes are printed across numbered sheets with 7 × 8 1/2-inch assembly windows. Trim along the indicated rectangles, bring matching edges together and tape from the back. Don't overlap the design areas, or the finished shapes will become smaller than intended.
Assemble the placement-map tiles in four columns and four rows. The completed tiled map measures 28 × 34 inches. Position it within the marked 29 × 39-inch finished center area, leaving 1/2 inch on the left and right and 2 1/2 inches at the top and bottom. Measure these margins from the finished-area markings, not the raw fabric edges. If you have access to large-format printing, the separate 29 × 39-inch placement master can be aligned directly with the marked finished area.
Cut the individual appliqué shapes from their own template sheets, not from the placement map. The placement map shows how the finished layers look together, including areas where one piece covers another.
Prepare the Background
Lay out the 30 1/2 × 40 1/2-inch warm-white rectangle and mark a centered 29 × 39-inch finished-area rectangle. Its edges will be 3/4 inch inside the raw edges of the larger fabric rectangle.
Use those marks to position the placement master. The bear must stay inside the finished-area lines so his fabric pieces won't disappear into the border seams.
Prepare the Fusible Appliqué
The printed cutting templates show the shapes as they'll appear on the finished quilt, viewed from the front. Reverse each shape when tracing onto the paper backing of the fusible web so the finished fabric faces the correct direction.
Trace each complete shape onto the fusible web, rough-cut around it and fuse it to the wrong side of the selected quilting cotton, following the fusible manufacturer's instructions. Then cut carefully along the final outline.
For the largest head and body pieces, you can remove some fusible web from the center and leave a generous web frame around the edges. Test this on a scrap first. It reduces bulk, but the curved appliqué edges still need enough support.
Arrange the Teddy Bear Pieces
Begin with the large brown body, template A. Position the two outer ears, B and C, with their cream inner-ear pieces, D and E, behind the head area.
Next, arrange the two brown arms, F and G, and the cream tummy, H. The tummy overlaps the body, while the head will cover the upper arm and ear attachment areas.
Add the large rounded head, I, followed by the cream muzzle, J. Check that the face is centered and that the muzzle sits low enough to give him the sweet, rounded expression shown in the pattern.
Place the two presents, K and L, near the lower sides of the teddy. The red present belongs on the viewer's left and the evergreen present on the right. Add their ribbon strips, M through P, followed by the flat fabric bows, Q and R.
Now position the two oversized paws, S and T, over the lower body and the inner edges of the presents. Add the cream soles, U and V, and the eight separate cream toe pads, W1 through W4 and X1 through X4.
Finally, arrange the red scarf tails, Y and Z, followed by the scarf band, AA, and knot, AB. The dark brown nose, AC, goes on the muzzle.
Secure the Appliqué
Once you're happy with the arrangement, fuse and stitch the pieces in manageable layers. Work carefully around the rounded edges using a narrow zigzag or blanket stitch with thread that closely matches each fabric.
Don't rely on fusible web alone to hold the appliqué permanently. Every exposed fabric edge needs stitching, especially around the large paws, muzzle and scarf.
Giving the Teddy Bear's Arms Their Shape
The arm on the viewer's left is worth a little extra attention. Its shape is already built into the template, so you don't need to change the outline or add another piece.
I'd use a brown fabric just a shade lighter than the body for this arm. Stitch around its visible edge with matching thread, and later, when you're quilting the finished sandwich, add two gentle curved lines inside the arm. Follow the curve from the shoulder toward the lower end, stopping before the lines reach the overlapping foot.
Those quilting lines give the arm definition without making it look detached from the body. Keep the arm behind the scarf exactly as shown in the placement pattern.
Embroider the Teddy Bear's Face
Transfer the facial markings from the placement map using a removable fabric marker. Fill the eyes with dark satin stitches or closely spaced machine stitches, then give each eye a tiny white stitched highlight.
Backstitch the eyebrows and curved smile, including the little vertical line beneath the nose. Secure the thread ends carefully on the back.
I would not use buttons, plastic eyes or beads on this quilt. Embroidery gives him all the expression he needs.
Optional Christmas Embroidery
If you want the extra Christmas details shown in the example, add small holly sprigs near the upper corners of the center panel and four little gold starbursts in the open background.
The placement master shows suggested positions. Outline the holly leaves with dark-green stem stitch or backstitch, then fill the berries with small red satin stitches. For the gold stars, use short straight stitches radiating from a central point.
These details are optional. If your background fabric already has a pretty Christmas print, you may prefer to leave the extra embroidery off. Keep any decorative stitching clear of the seam allowances.
Once the appliqué and embroidery are complete, press gently from the back and square the background panel to exactly 29 1/2 × 39 1/2 inches, keeping the marked finished area centered.
Sewing the Christmas Star and Checkerboard Border
The border gives this teddy bear quilt its traditional patchwork look. You'll make sixteen red sawtooth stars and sixteen little red, green and white checkerboards, all the same finished size.
The repeated blocks look more complicated than they are. Once you've sewn one accurate star and one checkerboard, the rest follow the same measurements.
Make the Flying-Geese Units
For each flying-geese unit, take one warm-white rectangle measuring 1 3/4 × 3 inches and two red squares measuring 1 3/4 inches.
Draw a diagonal line across the wrong side of each red square. Place the first square right sides together with one end of the white rectangle and stitch directly on the marked diagonal.
Trim the excess outer corner fabric to a 1/4-inch seam allowance and press the red triangle outward. Repeat at the other end with the diagonal sloping in the opposite direction, forming the pointed white center with red corners.
The unfinished flying-geese unit should still measure 1 3/4 × 3 inches. Check that there is a full 1/4-inch seam allowance beyond the white point so it won't be cut off when the star is assembled.
Make 64 flying-geese units altogether, four for each star.
Assemble the Sixteen Stars
Each star has three rows.
Top row: One warm-white 1 3/4-inch corner square, one flying-geese unit and another warm-white corner square.
Middle row: One flying-geese unit turned vertically, one red 3-inch center square and another vertically oriented flying-geese unit.
Bottom row: Repeat the top-row arrangement.
Arrange each flying-geese unit so its white V-shaped center points toward the red 3-inch center square. The two red triangles form the outward-facing star points. Check all four units against the quilt diagram before joining the rows so the finished block has eight red points surrounding its center.
Sew the pieces together with 1/4-inch seams. Press the row seams in directions that allow neighboring seams to nest, then join the three rows.
Each completed star block should measure exactly 5 1/2 × 5 1/2 inches before it is sewn into the border. Don't trim away those star points to make a block fit. Correct the seam allowance if necessary.
Make the Sixteen Checkerboards
Each checkerboard uses sixteen squares arranged in four rows of four. All squares are cut 1 3/4 inches.
Use this color arrangement, reading from left to right:
Row 1: Green, white, green, white.
Row 2: White, red, white, red.
Row 3: Green, white, green, white.
Row 4: White, red, white, red.
Sew the squares into four rows, then join the rows. Press neighboring row seams in opposite directions so the intersections nest together.
Each finished checkerboard block should measure 5 1/2 × 5 1/2 inches before joining.
Arrange the Border Blocks
Lay out all thirty-two blocks around the center before sewing the border strips. Label the top, bottom, left and right groups so you won't accidentally reverse their order.
Top border, left to right: Star, checkerboard, star, checkerboard, star, checkerboard, star, checkerboard.
Bottom border, left to right: Checkerboard, star, checkerboard, star, checkerboard, star, checkerboard, star.
Left side border, top to bottom: Checkerboard, star, checkerboard, star, checkerboard, star, checkerboard, star.
Right side border, top to bottom: Star, checkerboard, star, checkerboard, star, checkerboard, star, checkerboard.
The top and bottom rows include the four corner blocks. The side strips do not. This arrangement uses exactly sixteen stars and sixteen checkerboards around the quilt.
Sew the eight blocks for each border strip together with 1/4-inch seams. Every completed strip should measure 40 1/2 × 5 1/2 inches, including seam allowances.
Assembling the Christmas Teddy Bear Quilt Top
By now you'll have the large teddy bear appliqué panel, the narrow evergreen strips and four completed patchwork border strips. The important thing is to keep the measurements accurate as you join them. Don't stretch the patchwork to make a border reach.
Step 1: Attach the Evergreen Side Borders
Place one 1 × 39 1/2-inch evergreen strip against each long side of the finished appliqué panel, right sides together.
Pin or clip the strips in place and sew using a 1/4-inch seam allowance. Press toward the green fabric.
The unfinished unit should now measure 30 1/2 × 39 1/2 inches.
Step 2: Add the Top and Bottom Evergreen Borders
Sew the two 1 × 30 1/2-inch evergreen strips across the top and bottom of the panel. Press toward the green fabric.
The unfinished framed panel should measure 30 1/2 × 40 1/2 inches. That narrow green frame gives the bear a clean separation from the busier Christmas patchwork.
Step 3: Attach the Pieced Side Borders
Take the left and right patchwork strips, each measuring 5 1/2 × 40 1/2 inches.
Place the strips right sides together with the framed center panel, matching both ends and the midpoint. Add pins at the quarter points if needed.
Stitch each side with a 1/4-inch seam, then press without stretching the fabric.
The unfinished quilt top should now measure 40 1/2 × 40 1/2 inches.
Step 4: Sew on the Top and Bottom Patchwork Borders
Position the remaining two patchwork strips along the top and bottom. Each strip is 40 1/2 × 5 1/2 inches and includes its corner blocks.
Match the block seams at the corners and check that the entire strip lies flat before sewing. Stitch using a 1/4-inch seam allowance and press.
Your completed, unbound quilt top should measure 40 1/2 × 50 1/2 inches, giving a finished quilt of approximately 40 × 50 inches.
If the border ripples, stop and check the block sizes. Stretching a short border or easing too much fabric into a long one can leave the finished quilt wavy. It's worth correcting the seam before adding the next section.
Quilting, Binding and Finishing the Teddy Bear Quilt
I'd keep the quilting soft and fairly simple. The pieced Christmas border already has plenty of detail, and the teddy's face deserves to stay the center of attention.
Prepare the Backing and Batting
For the pieced backing, cut two pieces measuring 40 × 50 1/2 inches from the backing fabric. Sew the two 50 1/2-inch edges together using a 1/2-inch seam, then press that seam open.
The joined backing will measure approximately 79 × 50 1/2 inches. Turn it so the 79-inch dimension runs along the quilt's length and trim a backing rectangle at least 49 × 59 inches.
Cut batting at least 49 × 59 inches, too. That leaves roughly four inches of extra material beyond the unfinished quilt top on every side for basting and quilting.
Layer the backing wrong side up, then the batting, followed by the quilt top right side up. Smooth everything from the center outward and baste securely with your preferred method.
Quilt the Christmas Patchwork Border
Stitch in the ditch around the evergreen inner frame and along the main patchwork seams. You can add simple quilting lines inside the star and checkerboard blocks, but I'd avoid crowding them with extra decorative stitching.
Keep the quilting even across the entire sandwich and follow the batting manufacturer's maximum recommended spacing between quilting lines.
Quilt the Teddy Bear
Follow the rounded contours of the teddy's head, tummy and oversized paws with gentle quilting curves. You can also stitch around the larger appliqué shapes to help secure all three quilt layers.
Pay particular attention to the visible arm on the viewer's left. Add two gently curved quilting lines inside the brown arm fabric, following the direction from the shoulder toward the lower paw. Stop the lines before they reach the overlapping foot.
Those small details matter. The fabric contrast and quilting lines will help the arm look rounded and separate from the tummy without requiring a different appliqué shape.
Leave the embroidered facial features clearly visible. Heavy quilting through the eyes or smile would take away from the little bear's expression.
Make and Attach the Binding
Join the six red 2 1/2-inch binding strips end to end using diagonal seams. Trim the seam allowances to 1/4 inch and press them open.
With 40-inch usable fabric width, the joined strips provide approximately 227 1/2 inches of binding before final trimming. The quilt perimeter is 180 inches, so you'll have enough for the corners and finishing joins.
Fold the binding in half lengthwise with wrong sides together and press.
Align the raw edges of the folded binding with the raw edge of the quilt front. Leave a starting tail of approximately 10 inches and sew with a 1/4-inch seam allowance.
At each corner, stop stitching 1/4 inch before the edge. Backstitch, fold the binding upward at a 45-degree angle, then fold it back down along the next edge to form a miter.
Continue around the quilt, leaving an opening of approximately 10 to 12 inches for joining the binding ends. Join the ends without twisting the strip, trim the excess fabric and finish sewing the binding to the quilt.
Turn the binding to the back and stitch it securely in place by hand or machine, making neat folds at the corners.
Final Checks and Display Ideas
Give the finished quilt a careful inspection. Remove every basting pin, safety pin and temporary basting stitch, and remove any remaining fabric markings according to the marker manufacturer's instructions. Check the appliqué edges, embroidered eyes, gift ribbons, star points and binding corners for loose stitches before displaying or using the quilt.
For a Christmas wall hanging, add a properly secured hanging sleeve to the back if desired. The warm-white background, red stars and green patchwork would also look lovely folded across the foot of a guest bed or displayed on a wooden quilt rack.
If you're making it as a baby keepsake, remember that quilts are for decoration or supervised use, not loose bedding in an infant's crib. The U.S. Consumer Product Safety Commission's safe sleep guidance explains why blankets and other loose bedding should be kept out of infant sleep spaces.
The finished design is meant to be enjoyed long after Christmas decorations are packed away. I'd keep the color palette traditional, let the smiling bear do the talking and resist adding too many extra ornaments.
If you'd like another teddy bear project without the Christmas colors, take a look at my teddy bear patchwork crib quilt pattern. For a woodland version, visit my bear baby quilt patterns page. Both make lovely companions to this Christmas design.
When you click on links to various merchants on this site and make a purchase, this may result in this site earning a commission. This does not affect the price you pay.

UBGI Gold Standard 2026
Reviewed under the site's
editorial checklist.
Photos, decorating ideas, party setups and reader submissions are shared for inspiration unless a page is specifically presented as a pattern, tutorial, reference guide or step-by-step project. Follow the instructions, measurements, safety guidance and manufacturer directions provided for the particular project or product.
About Jan | Contact | Baby Nursery Ideas (Blog) | Site Map | Privacy Policy | Disclosure Policy | Disclaimer | Affiliate Disclosure | Earnings Disclosure | Facebook | Pinterest
I am a participant in the Amazon Services LLC Associates Program, an affiliate advertising program designed to provide a means for us to earn fees by linking to Amazon. As an Amazon Associate I earn from qualifying purchases.
Copyright © 2006-2026. All Rights Reserved.