Bear Baby Quilt Patterns for Woodland and Rustic Nurseries
By Jan Bay
Bear baby quilt patterns add woodland charm, soft texture, and handmade detail to a forest animal themed nursery while creating a cozy focal point for the crib.

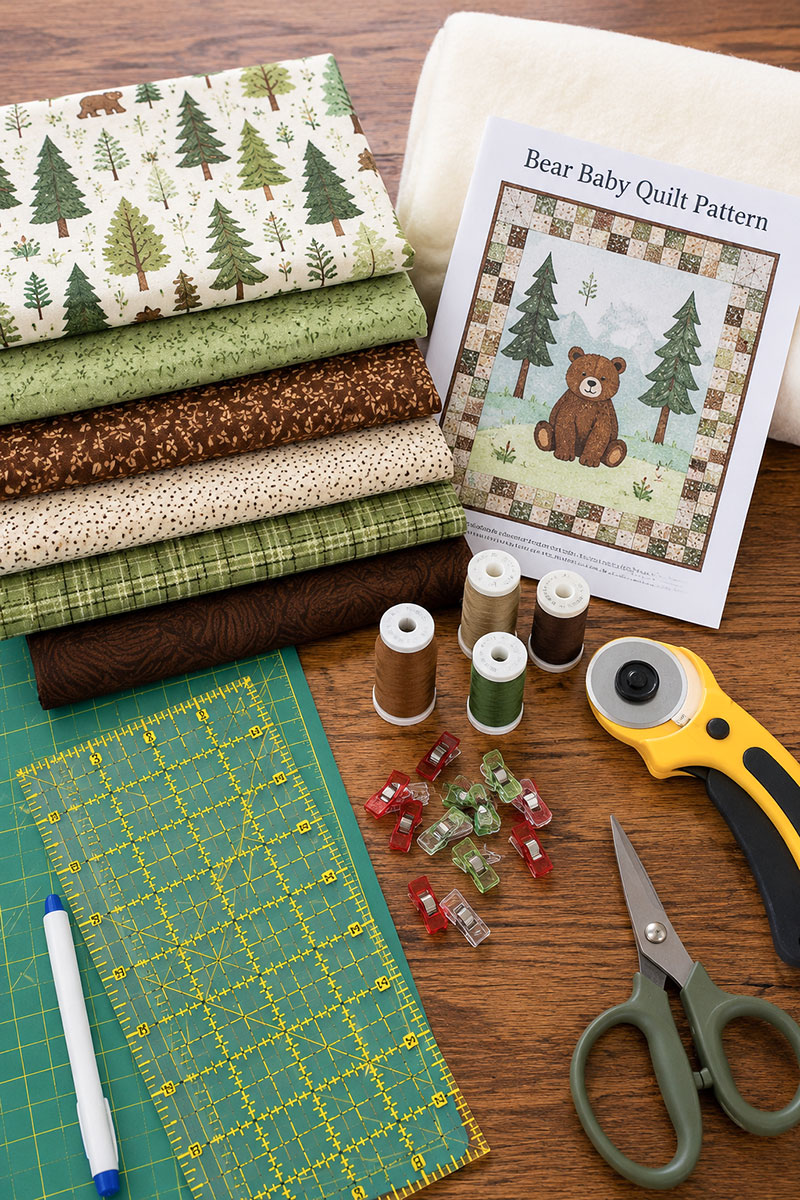
Bear Baby Quilt Fabric and Sewing Supplies For This Project
Bear Baby Quilt Ideas on This Page
Bear Baby Quilt Pattern for a Woodland Nursery
Quick Answer: This bear baby quilt pattern uses simple patchwork, fusible appliqué, and beginner-friendly construction to produce a finished crib quilt measuring approximately 36 inches by 45 inches. The bear, hillside, mountains, clouds, pine trees, leaves, and twig accents are supplied as full-size printable templates, while the border is assembled from easy 3½ inch patchwork squares.
Getting the layout balanced is what gives this quilt its finished appearance. Once the bear, trees, and hillside are positioned, the remaining sewing becomes a series of manageable steps.
The sample quilt shown throughout this pattern is the visual reference for the template set below. Follow the placement guide and your finished quilt should closely match the example while still leaving room to choose fabrics that suit your nursery. The same layout can look rustic with plaids, playful with small prints, or almost modern with simple solids.
Every construction step in this pattern references the finished quilt shown above, making it easy to compare your progress as the quilt comes together.
Template accuracy matters more than extra decoration.
If you're decorating an entire woodland room, you'll find coordinating projects on my Woodland Baby Quilt Patterns page along with additional ideas on my Baby Quilt Patterns hub.
Bear Baby Quilt Pattern Finished Specifications
Reading through the complete bear baby quilt pattern before making the first cut helps everything go much more smoothly. A little planning now saves a lot of second guessing later.
- Finished quilt size: approximately 36" × 45"
- Center appliqué panel: 24" × 32"
- Finished border width: approximately 6"
- Skill level: Confident beginner
- Construction: Pieced border with fusible appliqué center panel
- Appliqué pieces include bear, hillside, mountains, clouds, pine trees, leaves, and twig accents
- Finished using raw edge appliqué with a blanket stitch
Pattern Notes
- Piecing seam allowances are ¼ inch unless otherwise noted.
- Appliqué templates are raw-edge cut lines and do not need added seam allowance.
- Measurements include seam allowances where applicable.
- Print every template at 100 percent.
- Measure the one inch test square before cutting fabric.
- The sample quilt uses raw edge fusible appliqué finished with a blanket stitch. A narrow satin stitch or straight stitch may also be used if preferred.
Before cutting into your feature fabrics, trace one small template onto a scrap of cotton and stitch around it first. It's a quick way to check your stitch width, thread color, and appliqué settings before working on the quilt itself.
Bear Baby Quilt Pattern Materials and Supplies
The sample bear baby quilt pattern is sewn entirely with quilting cotton. Using fabrics of similar weight helps the quilt remain flat after quilting and produces cleaner appliqué stitching around curved edges.
Fabric
- 1¼ yards cream background fabric
- ½ yard dark brown for the bear
- ¼ yard tan for the muzzle, tummy, ears, and paws
- ¼ yard medium brown for tree trunks
- ¼ yard dark evergreen fabric
- ¼ yard medium evergreen fabric
- ⅛ yard olive fabric for the hillside
- ⅛ yard muted gray or taupe fabric for the mountains
- ⅛ yard off-white fabric for the clouds
- Assorted woodland prints for border blocks
- 2¾ yards backing fabric
- ⅜ yard binding fabric
- 40" × 48" cotton batting
Tools
- Rotary cutter
- Self healing cutting mat
- Acrylic quilting ruler
- Fabric scissors
- Temporary fabric marking pencil
- Fusible web
- Iron and pressing surface
- Neutral piecing thread
- Matching appliqué thread
- Walking foot
Prepare the Fabric Before Cutting
Many quilters are eager to start sewing right away. Spending a few minutes getting organized first makes the entire project more enjoyable.
- Press every fabric before measuring.
- Square one edge of each fabric with the rotary cutter.
- Print every template at full size.
- Measure the one inch test square.
- Cut the paper templates.
- Label every paper piece before tracing onto fusible web.
I believe paper templates are far easier to rearrange than fabric. Lay every paper piece on the background first and step back several feet before fusing anything permanently. A layout that looks centered from the sewing table sometimes changes when viewed from across the room.
Prepare the Center Panel
The center panel becomes the foundation for the entire quilt. Once the reference lines are marked, positioning the appliqué becomes much more straightforward.
- Cut one cream rectangle measuring 24½" × 32½".
- Press the fabric flat.
- Lightly fold in half vertically and horizontally to establish center reference lines.
- Finger press the center folds lightly so the reference lines disappear easily after quilting.
- Leave the panel unquilted until the appliqué has been stitched.
When the layout is viewed from a few feet away, your eye naturally lands on the bear first, then follows the trees across the quilt. Positioning those larger pieces before adding the smaller details keeps the entire design balanced.

Cutting Chart
Cut all border pieces before beginning the appliqué. Keeping similar fabrics together in small trays or labeled bags makes assembly much faster.
| Fabric | Cut |
|---|---|
| Cream prints | 8 squares measuring 3½" |
| Green prints | 8 squares measuring 3½" |
| Brown prints | 8 squares measuring 3½" |
| Tan prints | 8 squares measuring 3½" |
| Inner border | Four strips 2½" wide |
| Outer border | Four strips 3½" wide |
The appliqué templates are supplied separately as full-size printable downloads, so they are not included in the cutting chart.
Keep each fabric group in its own stack until the border is assembled. Woodland prints often share similar colors, and it's surprisingly easy to pick up the wrong square once everything is spread across the sewing table.
Download the Full-Size Bear Appliqué Templates
Every template in this bear baby quilt pattern prints at actual size. Confirm the one inch test square before tracing onto fusible web. That simple step helps ensure every piece fits the placement guide exactly as intended.
Do not trim the paper closely until you've confirmed every page printed at full size. The extra paper makes handling the templates much easier while tracing onto fusible web.
- Master Appliqué Reference Sheet
- Template A. Bear Body
- Template B. Bear Head
- Template C. Muzzle
- Template D. Chest Insert
- Template E. Ear Set
- Template F. Hillside
- Template G. Large Pine Tree
- Template H. Small Pine Tree
- Template I. Tree Trunk
- Template J. Woodland Leaves
- Template K. Twig Accent
- Template L. Mountain Background
- Template M. Cloud Set


Template Assembly Order
- Print the Master Appliqué Reference Sheet first.
- Print every individual template at 100%.
- Measure the 1-inch test square before cutting.
- Cut the paper templates.
- Arrange the clouds, mountains, hillside, trees, and bear on the center panel using the placement guide.
- When you're satisfied with the layout, begin tracing onto fusible web.
These original templates were developed for this bear baby quilt pattern and should be printed, checked against the 1-inch test square, and compared with the example image before cutting fabric. Small differences in printer scaling can change the finished appliqué layout.
Before You Cut Fabric
- Confirm every template file opens correctly.
- Measure the 1-inch test square on each page.
- Compare the master reference sheet with the finished quilt image.
- Print again if the test square is not accurate.
- Do not cut fabric until the paper layout matches the center panel arrangement.
The next section walks through positioning every appliqué piece using simple placement measurements before anything is permanently fused to the background. Taking a few extra minutes here makes the finished quilt much easier to assemble accurately.
Bear Baby Quilt Pattern Template Placement Guide
Arrange all paper templates on the center panel before removing any fusible backing. It is easier to correct paper placement than to lift a fused appliqué shape after the iron has touched it.
Use the vertical and horizontal reference folds from the center panel as your guide. These measurements are based on the finished quilt shown above, with the clouds and mountains placed first, then the hillside, trees, bear, and small accents.

| Piece | Placement |
|---|---|
| Mountain Background | Place the mountain pieces behind the bear and trees before adding the hillside, keeping the lower mountain edges hidden under the hillside fabric. |
| Hillside | Place along the lower center of the panel, about 3" above the bottom raw edge. |
| Bear Body | Center over the vertical fold line with the lower body overlapping the hillside by about ½". |
| Bear Head | Place directly above the body with the neck edges touching. |
| Chest Insert | Center on the bear body, leaving an even brown border around the insert. |
| Muzzle | Center on the lower half of the bear head. |
| Large Trees | Place one large tree on each side of the bear, with trunks beginning just behind the hillside. |
| Small Trees | Place slightly behind the large trees to fill the side spaces without touching the border seam allowance. |
| Cloud Set | Place the cloud pieces in the upper background area before fusing, keeping them above the trees and away from the border seam allowance. |
| Leaves and Twigs | Add last, keeping them at least 1" away from the inner border seam line. |
Step back from the panel before fusing. From across the room, the bear should read as the center of the quilt, with the trees acting as a frame rather than a second focal point.
Trace and Fuse the Appliqué Pieces
Trace each appliqué template onto the paper side of fusible web. Any piece with a definite left or right direction should be traced in reverse so it appears correctly after fusing.
- Trace each template onto fusible web, leaving space between shapes.
- Cut roughly around each traced shape, leaving extra web around the line.
- Fuse the web to the wrong side of the chosen fabric according to the product directions.
- Let the fabric cool completely.
- Cut each appliqué shape on the traced line.
- Keep each finished piece with its paper template until placement begins.
Warm fusible web can distort if it is handled too quickly. Letting pieces cool before cutting helps curved edges stay cleaner.

Build the Bear Appliqué Center
Lay every piece in place before turning on the iron. It's surprising how often moving a single tree or cloud a half inch changes the balance of the entire quilt. The background pieces go down first, then the mountains, hillside, trees, bear, and smaller details.
- Fuse the cloud pieces in the upper background area.
- Fuse the mountain background pieces to the center panel.
- Fuse the hillside over the lower edges of the mountains.
- Fuse the tree trunks first, then layer the tree tops over them.
- Add the large tree shapes.
- Add the small tree shapes.
- Fuse the bear body over the hillside.
- Add the chest insert.
- Place and fuse the bear head.
- Add the ears.
- Fuse the muzzle.
- Add leaves and twig accents last.
Do not rush the small pieces. Tiny shifts may not look like much on the ironing board, but they can change the expression and balance of the finished bear.

Stitch Around the Bear Appliqué
The sample quilt uses raw edge appliqué finished with a narrow blanket stitch. Matching thread gives a quieter finish, while a slightly darker thread makes the stitched outline more visible.
- Stitch around the cloud pieces first.
- Stitch around the mountain background pieces next.
- Stitch around the background trees.
- Stitch the hillside next.
- Stitch around the bear body before stitching the chest insert.
- Stitch the head before the muzzle.
- Stitch leaves and twig accents last.
Press from the back whenever possible after stitching each section. That helps protect the thread while keeping the quilt top lying flat before the quilting begins.
Reduce sewing speed around curves. Keep the needle down when pivoting, and turn the fabric a little at a time instead of forcing a full curve in one motion.
Assemble the Patchwork Border
The border uses thirty two 3½" squares. Arrange the border squares before sewing so similar prints are evenly distributed around the quilt rather than grouped together.

- Use 8 cream squares, 8 green squares, 8 brown squares, and 8 tan squares.
- Sew 8 squares together for the left border strip.
- Sew 8 squares together for the right border strip.
- Sew 8 squares together for the top border strip.
- Sew 8 squares together for the bottom border strip.
- Press seams in alternating directions so the seams nest more easily.
- Attach the left and right border strips first.
- Press toward the border.
- Attach the top and bottom border strips.
- Press again and check that the quilt top lies flat.
Do not stretch a border strip to make it fit. If the strip is too long or too short, recheck the seam allowances before sewing it to the quilt top.
Prepare the Quilt Sandwich
Once the quilt top is complete, layer the backing, batting, and quilt top on a clean flat surface.
- Press the backing fabric.
- Place the backing wrong side up.
- Center the batting over the backing.
- Place the quilt top right side up.
- Smooth each layer from the center outward before adding the next layer.
- Baste with curved safety pins or temporary quilting spray.

If this is your first appliqué quilt, baste a little closer than you would on a plain patchwork quilt. Extra pins help keep the center panel from shifting while you quilt around the bear and trees.
If you'd like another bear project after finishing this quilt, my Teddy Bear Patchwork Crib Quilt uses a different layout while keeping the same handmade nursery direction. The next section finishes this quilt with machine quilting, binding, care instructions, and a few ideas for displaying it in a woodland nursery once the last stitch is complete.
Machine Quilt the Bear Baby Quilt
With the quilt sandwich basted, it's time to stitch the three layers together. The quilting supports the appliqué, keeps the batting from shifting, and gives the finished quilt its final texture.
If this is your first appliqué quilt, begin near the center and work outward. That approach helps distribute any fullness evenly instead of pushing it toward one corner.

Recommended Quilting Pattern
- Stitch in the ditch around the center panel.
- Outline quilt approximately ¼ inch outside each appliqué shape.
- Echo quilt around the trees following their outline.
- Add gently curving quilting lines across the hillside.
- Finish the border with evenly spaced diagonal quilting lines to create a light crosshatch.
The goal isn't to cover every inch with stitching. Leaving some open space allows the appliqué to remain the focus while still securing the batting.
If your walking foot seems to hesitate around thicker appliqué layers, slow down rather than pushing the quilt through the machine. Let the feed dogs do the work.

Finish the Quilt With Double Fold Binding
Binding protects the edges from everyday use and gives the quilt a finished appearance. A medium brown binding coordinates nicely with the bear while quietly framing the entire design.
- Trim the quilt evenly on all four sides.
- Join the binding strips with diagonal seams.
- Press the binding in half lengthwise with wrong sides together.
- Sew the binding to the front of the quilt using a ¼ inch seam allowance.
- Miter each corner as you sew.
- Wrap the binding to the back and secure it by hand or machine.
Take a moment to check each corner before stitching the binding permanently. Small adjustments are much easier before the final seam is sewn.

Finished Bear Baby Quilt Dimensions and Care
After quilting and binding, give the quilt one final inspection before its first wash. Clip any remaining thread tails and check that every appliqué edge has been securely stitched.
- Finished size: approximately 36" × 45"
- Machine wash on a gentle cycle using cool water.
- Tumble dry on low heat or lay flat to dry.
- Avoid bleach.
- Store flat or loosely folded when not in use.
The first wash often gives quilting cotton a lightly puckered texture that many quilters enjoy because it highlights both the patchwork and the appliqué stitching.

Displaying Your Bear Baby Quilt in a Woodland Nursery
A handmade quilt doesn't have to stay tucked away in a closet. During the day it can become part of the nursery décor, supervised floor time, or a cozy reading corner while still being easy to reach when needed.
In many nurseries, a quilt displayed on a quilt ladder, wall rail, or nursery rocker brings the room together without adding extra decorations. Keep loose quilts out of the crib when a baby is sleeping, and store the quilt where it stays visible but out of the sleep space.

If you're building a coordinated woodland room, you may also enjoy my Woodland Nursery Ideas page for decorating inspiration that complements quilts like this one.
For fabric storage and preservation guidance, the Smithsonian Museum Conservation Institute offers helpful textile care recommendations.
For current crib sleep safety guidance in the United States, check the CPSC Safe Sleep recommendations before placing any loose bedding near a baby’s sleep area.
Frequently Asked Questions
Can I hand stitch the appliqué instead of using fusible web?
Yes. The templates work equally well for traditional needle turn appliqué, although construction will take longer than the fusible method used for the sample quilt.
Can I enlarge this quilt for a toddler bed?
Yes. Increase the border widths or add additional pieced borders around the outside while keeping the center appliqué panel the same size.
Should I prewash my quilting fabric?
Quilters have different preferences. If you're concerned about fabric shrinkage or color transfer, prewashing before cutting is a sensible choice.
Can I personalize the quilt?
Absolutely. Embroidering a baby's name or birth date in one corner is an easy way to make the quilt an even more meaningful keepsake without changing the overall design.
When you click on links to various merchants on this site and make a purchase, this may result in this site earning a commission. This does not affect the price you pay.

UBGI Gold Standard 2026
Reviewed under the site's
editorial checklist.
Photos, decorating ideas, party setups and reader submissions are shared for inspiration unless a page is specifically presented as a pattern, tutorial, reference guide or step-by-step project. Follow the instructions, measurements, safety guidance and manufacturer directions provided for the particular project or product.
About Jan | Contact | Baby Nursery Ideas (Blog) | Site Map | Privacy Policy | Disclosure Policy | Disclaimer | Affiliate Disclosure | Earnings Disclosure | Facebook | Pinterest
I am a participant in the Amazon Services LLC Associates Program, an affiliate advertising program designed to provide a means for us to earn fees by linking to Amazon. As an Amazon Associate I earn from qualifying purchases.
Copyright © 2006-2026. All Rights Reserved.