Free Crochet Rubber Duck Pattern for a Classic Yellow Duck
By Jan Bay
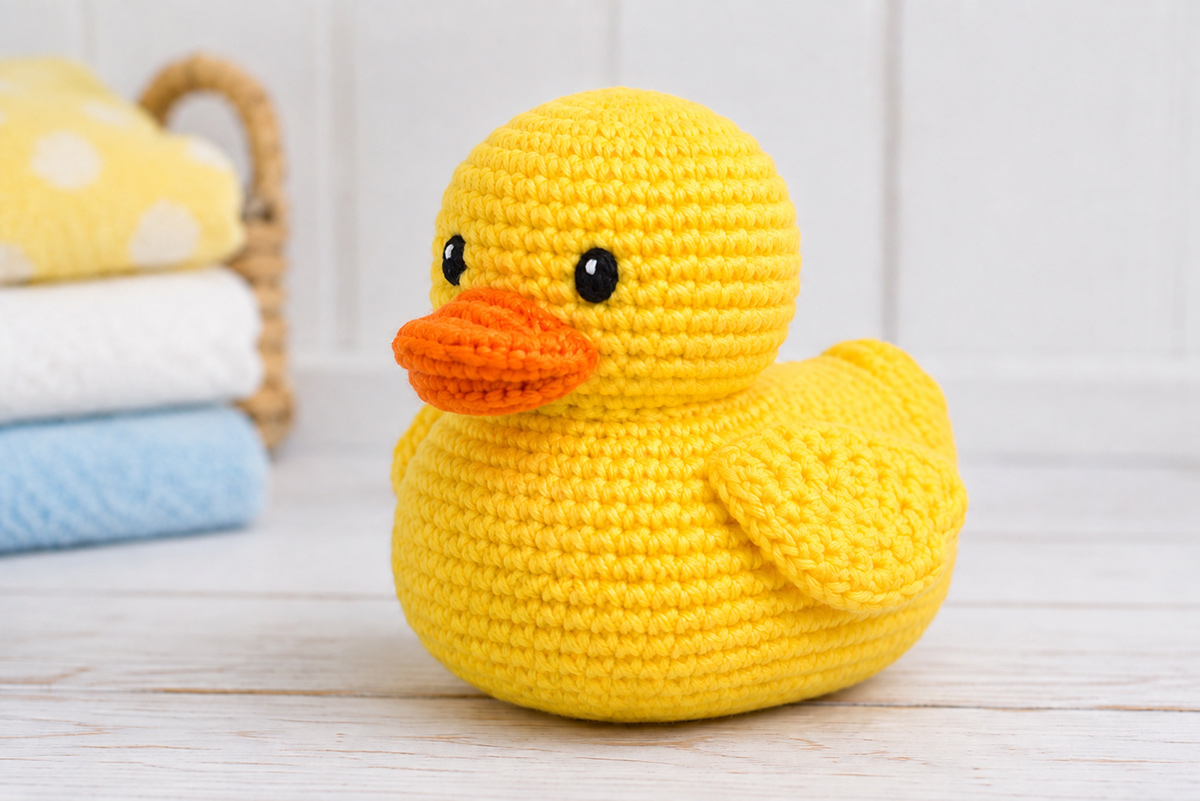
This free crochet rubber duck pattern turns that familiar little yellow bath duck into a soft yarn version with a low rounded body, raised head, wide orange bill, small wings and embroidered eyes. I wanted this one to look unmistakably like the classic rubber ducky instead of simply another yellow crochet duck, so the shape is fuller through the body and the head sits slightly forward above the chest. It is made as a dry crochet toy or nursery decor project and is not intended for use in bath water.
Explore More Free Crochet Duck Patterns
Free Crochet Mallard Duck Pattern
Crochet Duck Baby Blanket Pattern
See crochet supplies for this project here
Jump to a Section
Supplies for This Free Crochet Rubber Duck Pattern
This duck is worked with a smaller hook than the yarn label might suggest. The tighter fabric helps the body keep its low rubber-duck shape and keeps the stuffing from showing between the stitches.
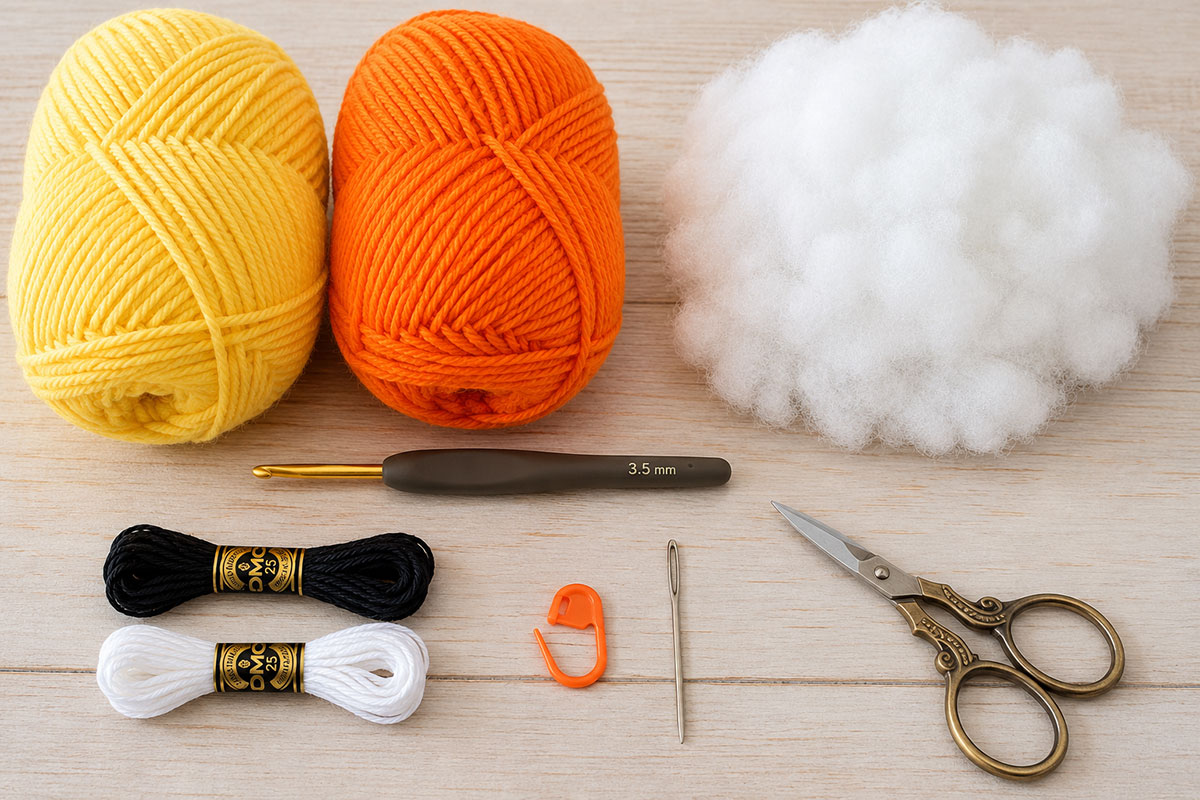
- Approximately 120 yards of bright yellow worsted-weight #4 yarn
- Approximately 25 yards of orange worsted-weight #4 yarn
- Black embroidery floss for the satin-stitched eyes
- A small amount of white embroidery floss for one tiny highlight stitch in each eye
- 3.5 mm crochet hook
- Polyester fiberfill
- Tapestry needle
- Long embroidery or doll needle, about 3 inches or longer, for the eyes
- Locking stitch marker
- Several straight pins or locking stitch markers for assembly
- Scissors
A smooth cotton or washable acrylic yarn gives the shape good definition. Very fuzzy yarn can hide the curved bill and the small wing outline, which are two details that help this little fellow read as a rubber duck instead of a generic yellow bird.
Finished Size and Gauge
At the stated gauge, expect the finished duck to measure approximately:
- 5 to 5 1/2 inches long from the front of the bill to the rear of the body
- 4 3/4 to 5 1/4 inches tall at the top of the head
- 2 1/2 to 3 inches wide across the fullest part of the body
Approximate gauge: 18 single crochet stitches and 20 rounds = 4 inches.
Skill level: Advanced beginner. You should be comfortable working in continuous rounds, increasing, decreasing, sewing crochet pieces in place and making simple satin-stitch embroidery.
Exact gauge is less important here than a dense fabric. If you can see obvious gaps when you stretch the crochet slightly, move down one hook size. If the fabric becomes so tight that it is difficult to insert the hook, move up one size.
Do not overstuff the body to make up for a loose gauge. Too much stuffing makes the body tall and egg-shaped. The finished body should stay broad and fairly low, with a rounded front and a gentle lift at the rear.
Crochet Abbreviations and Pattern Notes
This pattern uses U.S. crochet terminology.
- MR = magic ring
- ch = chain
- sc = single crochet
- inc = work 2 sc in the same stitch
- dec = single crochet decrease over the next 2 stitches
- sl st = slip stitch
- st / sts = stitch / stitches
- rnd / rnds = round / rounds
The body, head, bill pieces and wings are worked in continuous rounds. Do not join unless the instructions specifically tell you to do so. Move the stitch marker to the first stitch of each new round.
For a neater decrease, insert the hook through the front loop of each of the next 2 stitches, yarn over, pull through the first 2 loops, yarn over again and pull through the remaining loops.
How This Rubber Duck Is Constructed
The pattern uses six crochet pieces: one low oval body, one round head, one upper bill, one lower bill and two matching wings. There are no separate feet and no separate tail piece. The raised rear profile comes from the body shape and the way the stuffing is distributed.
That simplified construction is deliberate. A classic rubber duck has a smooth little boat-shaped body, a large round head and a broad bill. Extra legs or a long pointed tail would change the silhouette.
Crochet the Low Rounded Rubber Duck Body
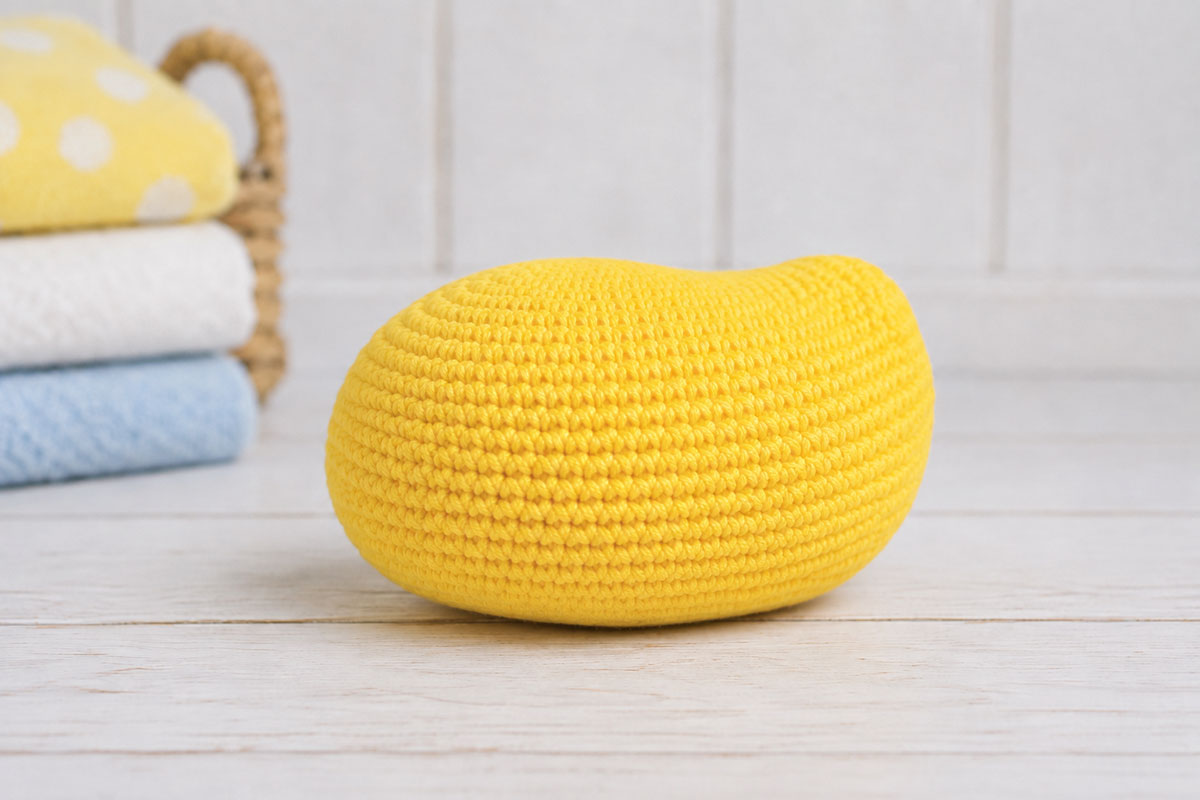
The body begins as a flat oval and then grows upward around that base. When you start decreasing, the upper surface closes over the stuffing and creates the squat rounded shape shown in the finished duck.
With yellow yarn, ch 12.
Rnd 1: Sc in the 2nd ch from the hook. Sc in each of the next 9 ch. Work 3 sc in the last ch. Continue along the unused loops on the opposite side of the foundation chain. Sc in each of the next 9 ch. Work 2 sc in the same ch that holds the first sc. 24 sts.
Place the stitch marker in the first stitch of the next round.
Rnd 2: Inc in the first st, sc in the next 9 sts, inc in each of the next 3 sts, sc in the next 9 sts, inc in each of the final 2 sts. 30 sts.
Rnd 3: Sc in the next st, inc in the next st, sc in the next 9 sts, [sc in the next st, inc in the next st] 3 times, sc in the next 9 sts, [sc in the next st, inc in the next st] 2 times. 36 sts.
Rnd 4: Sc in the next 2 sts, inc in the next st, sc in the next 9 sts, [sc in the next 2 sts, inc in the next st] 3 times, sc in the next 9 sts, [sc in the next 2 sts, inc in the next st] 2 times. 42 sts.
Rnd 5: Sc in the next 3 sts, inc in the next st, sc in the next 9 sts, [sc in the next 3 sts, inc in the next st] 3 times, sc in the next 9 sts, [sc in the next 3 sts, inc in the next st] 2 times. 48 sts.
The increases at the beginning and end of these rounds meet across the round marker. That is intentional. Together they shape one curved end of the oval.
Rnds 6-12: Sc in each st around. 48 sts.
Rnd 13: [Sc in the next 6 sts, dec] 6 times. 42 sts.
Rnd 14: Sc in each st around. 42 sts.
Rnd 15: [Sc in the next 5 sts, dec] 6 times. 36 sts.
Rnd 16: Sc in each st around. 36 sts.
Rnd 17: [Sc in the next 4 sts, dec] 6 times. 30 sts.
Begin stuffing. Fill the lower center and both rounded ends first. Keep the stuffing even, but do not pack it hard.
Rnd 18: [Sc in the next 3 sts, dec] 6 times. 24 sts.
Add more stuffing. Choose one rounded end to be the rear of the duck. Place a little extra filling beneath the upper rear curve. This gives the back that gentle rubber-duck lift without adding a separate tail.
Rnd 19: [Sc in the next 2 sts, dec] 6 times. 18 sts.
Rnd 20: [Sc in the next st, dec] 6 times. 12 sts.
Check the body before you close it. Press the underside against a flat surface. The body should settle into a low oval rather than rolling onto its side.
Rnd 21: Dec 6 times. 6 sts.
Fasten off, leaving a 10-inch tail. Thread the tail through the front loops of the remaining 6 stitches and pull the opening closed. Secure the yarn and bury the tail inside the body.
Mark the opposite rounded end as the front. The head will sit over this end.
Body Shape Check
Before moving on, look at the body from the side. If it resembles a ball, redistribute some stuffing toward the front and rear ends and press the underside flatter. I would rather leave this body a little softer than stuff it so firmly that the duck loses its low rubber-duck profile.
Crochet the Round Duck Head
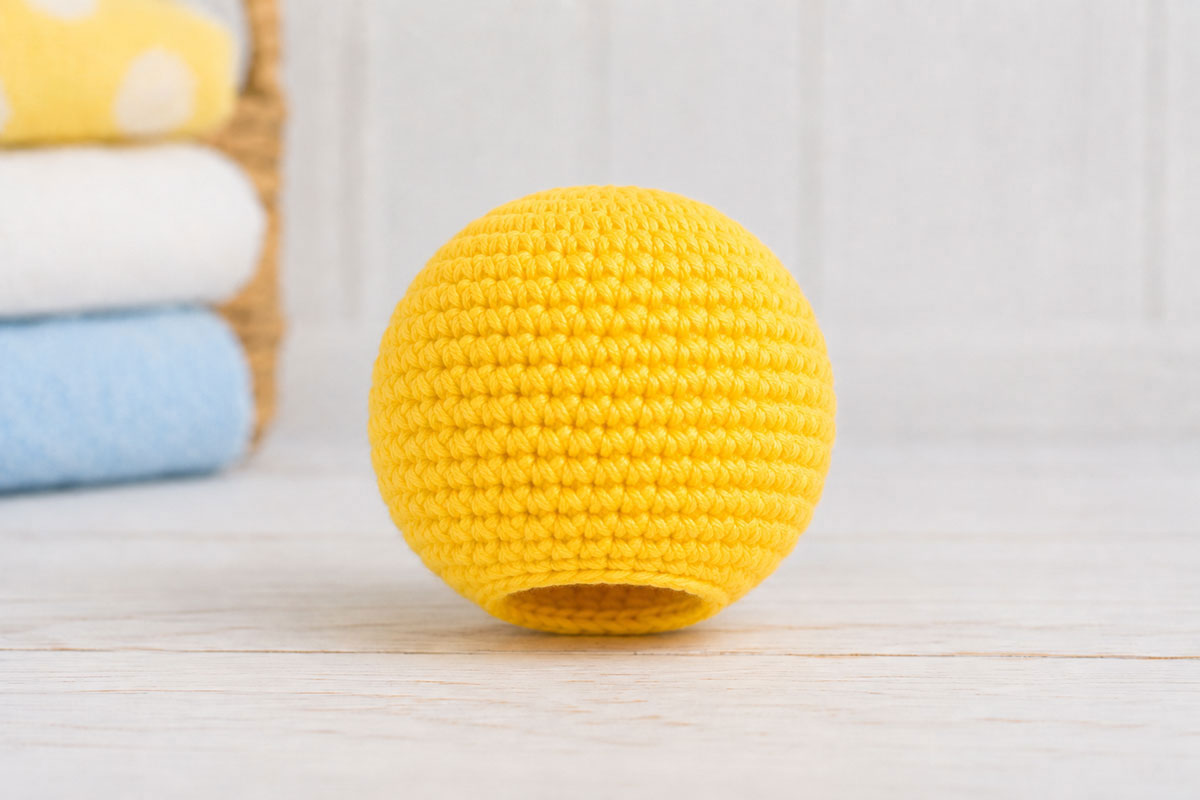
The head is deliberately large in relation to the body. That oversized round head, paired with the wide orange bill, gives the finished project the familiar rubber-duck expression.
With yellow yarn, make an MR.
Rnd 1: Work 6 sc in the MR. 6 sts.
Rnd 2: Inc in each st around. 12 sts.
Rnd 3: [Sc in the next st, inc] 6 times. 18 sts.
Rnd 4: [Sc in the next 2 sts, inc] 6 times. 24 sts.
Rnd 5: [Sc in the next 3 sts, inc] 6 times. 30 sts.
Rnd 6: [Sc in the next 4 sts, inc] 6 times. 36 sts.
Rnds 7-12: Sc in each st around. 36 sts.
Rnd 13: [Sc in the next 4 sts, dec] 6 times. 30 sts.
Rnd 14: Sc in each st around. 30 sts.
Rnd 15: [Sc in the next 3 sts, dec] 6 times. 24 sts.
Begin stuffing the head. Fill the crown and sides first so the round shape stays even.
Rnd 16: [Sc in the next 2 sts, dec] 6 times. 18 sts.
Add enough stuffing to make the head rounded but still slightly squeezable.
Rnd 17: [Sc in the next st, dec] 6 times. 12 sts.
Do not close the remaining opening. Fasten off and leave an approximately 24-inch yellow yarn tail for sewing the head to the body.
The head should measure approximately 2 3/4 to 3 inches across at the widest point, depending on yarn, tension and stuffing. Roll it gently between your hands if one side looks flatter than the other.
Crochet the Wide Orange Duck Bill
The bill is made from two flat pieces. The upper bill is slightly wider than the lower one, and neither piece is stuffed. Layering them creates the soft two-part bill visible on the finished duck without turning it into a thick muzzle.
Upper Bill
With orange yarn, ch 8.
Rnd 1: Sc in the 2nd ch from the hook. Sc in each of the next 5 ch. Work 3 sc in the final ch. Continue along the unused loops on the opposite side of the foundation chain. Sc in each of the next 5 ch. Work 2 sc in the same ch that holds the first sc. 16 sts.
Rnd 2: Inc in the first st, sc in the next 5 sts, inc in each of the next 3 sts, sc in the next 5 sts, inc in each of the final 2 sts. 22 sts.
Sl st in the next st. Fasten off, leaving an 18-inch tail for sewing.
Lower Bill
With orange yarn, ch 7.
Rnd 1: Sc in the 2nd ch from the hook. Sc in each of the next 4 ch. Work 3 sc in the final ch. Continue along the unused loops on the opposite side. Sc in each of the next 4 ch. Work 2 sc in the same ch that holds the first sc. 14 sts.
Rnd 2: Inc in the first st, sc in the next 4 sts, inc in each of the next 3 sts, sc in the next 4 sts, inc in each of the final 2 sts. 20 sts.
Sl st in the next st. Fasten off, leaving an 18-inch tail.
Flatten both pieces with the foundation chains running from side to side. Do not stuff them and do not sew them together yet.
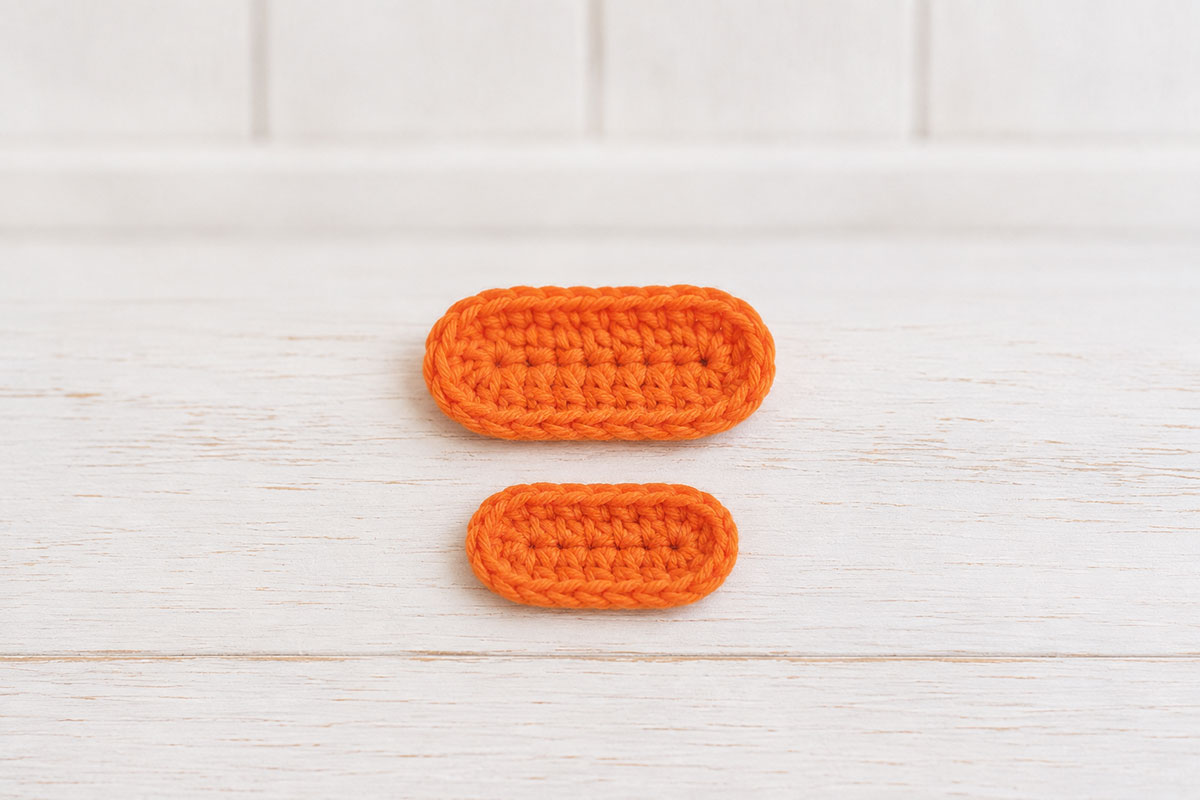
If either piece curls into a cup, flatten it between your fingers and gently stretch the foundation-chain direction from side to side. A flatter bill looks much closer to the familiar molded shape of a rubber duck.
Crochet the Small Yellow Duck Wings
Make two matching wings. Each begins as a simple oval, then one curved end is pinched slightly to create a narrower front attachment point.
With yellow yarn, ch 8.
Rnd 1: Sc in the 2nd ch from the hook. Sc in each of the next 5 ch. Work 3 sc in the final ch. Continue along the unused loops on the opposite side of the foundation chain. Sc in each of the next 5 ch. Work 2 sc in the same ch that holds the first sc. 16 sts.
Rnd 2: Inc in the first st, sc in the next 5 sts, inc in each of the next 3 sts, sc in the next 5 sts, inc in each of the final 2 sts. 22 sts.
Sl st in the next st and fasten off, leaving an 18-inch sewing tail.
Choose one curved end of the oval to be the front of the wing. Pinch the two outer edge stitches at that end together. Take one small stitch through both layers with the yarn tail to hold the pinch in place.
Repeat for the second wing and compare the pieces before assembly. They should be the same length and should narrow at matching ends.
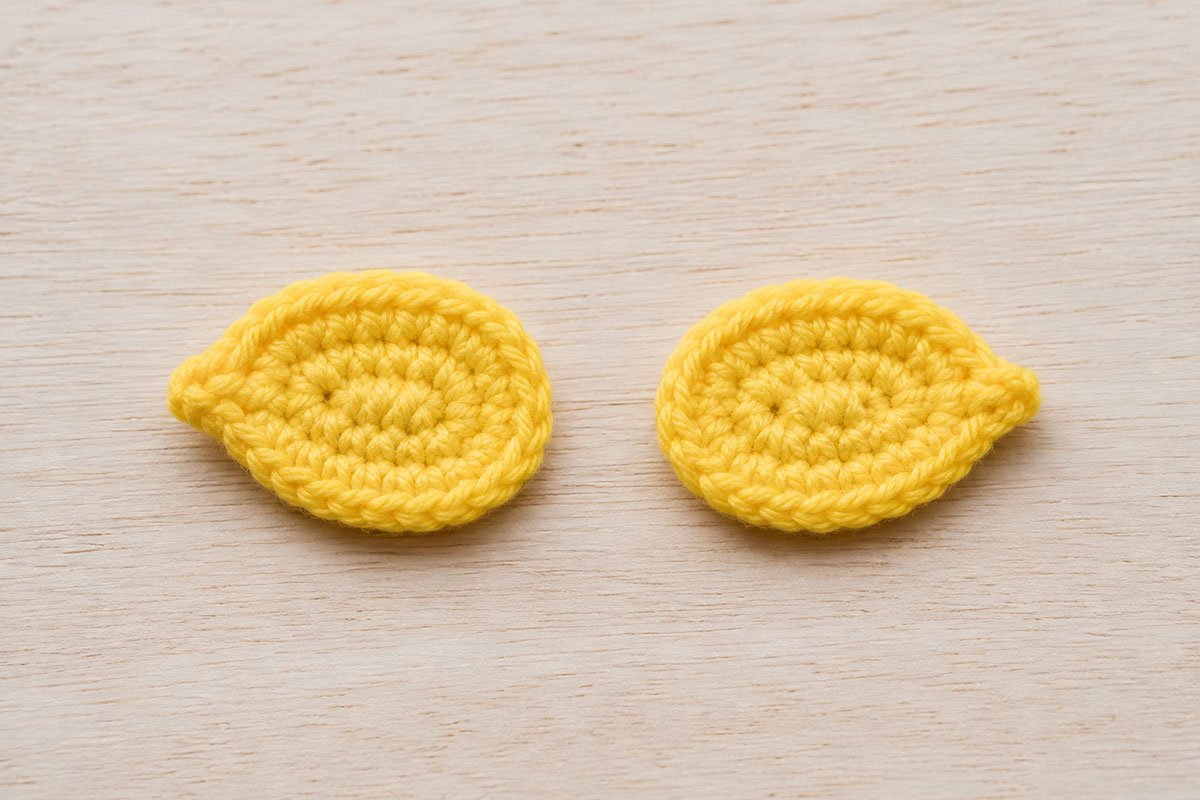
The wings stay small on purpose. Large wings can make a crochet duck look more like a bird plushie. On this project, they act almost like the shallow molded wing marks on a classic yellow bath duck.
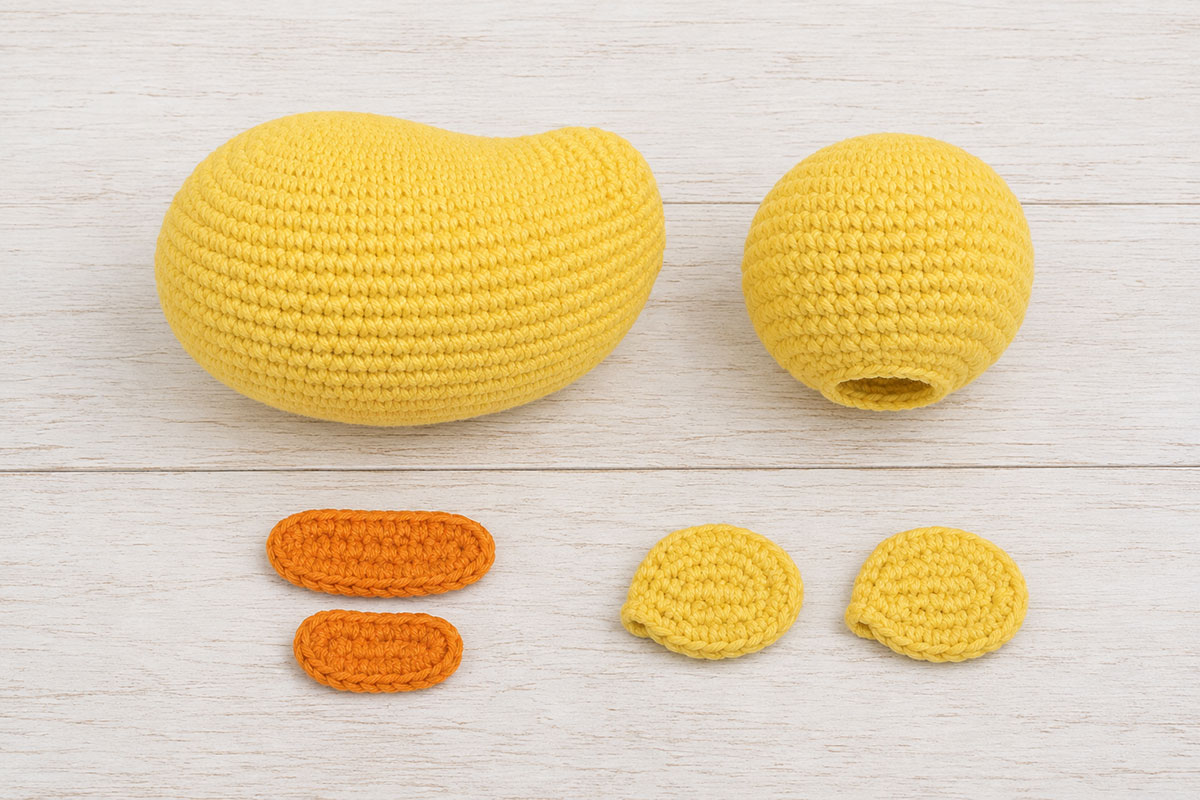
Assemble the Crochet Rubber Duck
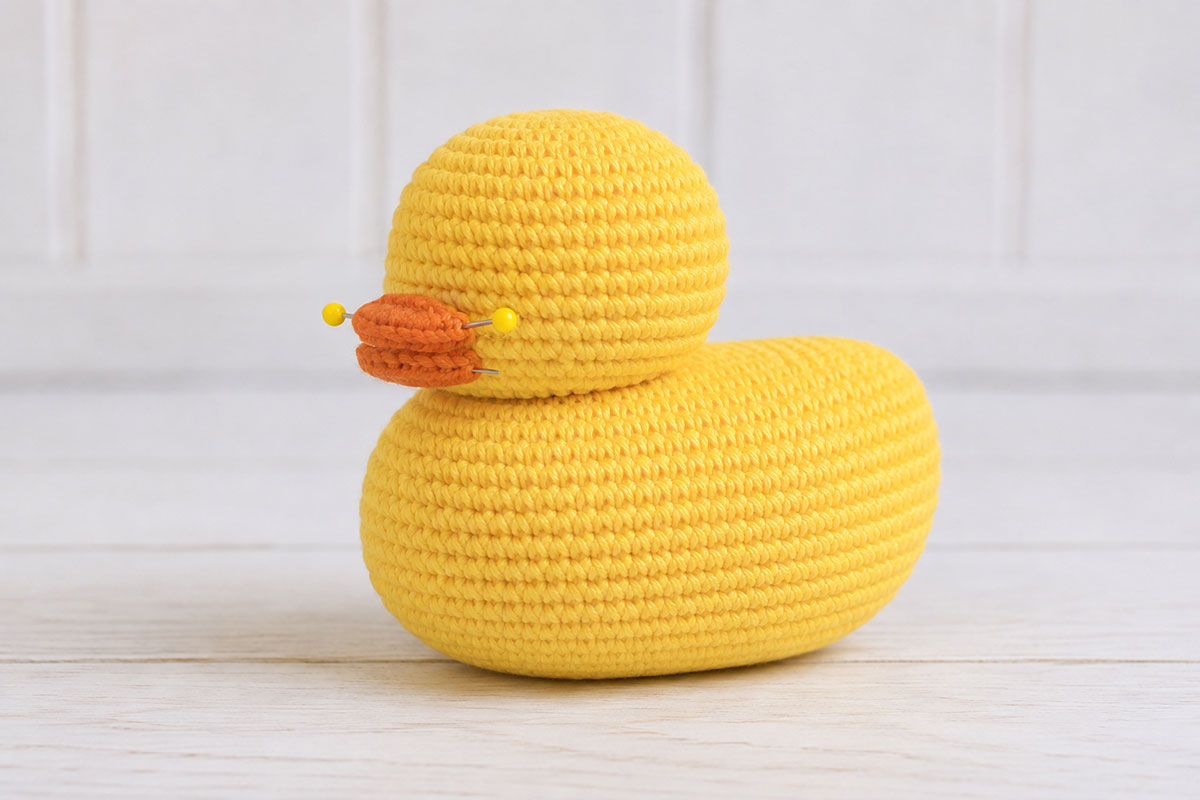
Take a few minutes to pin the pieces before sewing. Small placement changes can make the duck look upright, sleepy, top-heavy or much more birdlike. For the shape shown here, keep the head low over the front of the body and let it lean slightly forward.
1. Position the head.
Set the body on a flat surface with the marked front end facing you. Center the head over the upper front third of the body. The front edge of the neck opening should sit approximately 1 inch back from the front curve of the body.
Tilt the head very slightly forward. Do not place it directly on top of the center of the body. The finished silhouette should show more body extending behind the head than in front of it.
Pin the 12-stitch neck opening evenly to the body.
2. Sew the head to the body.
Using the long yellow yarn tail, sew around most of the neck opening, passing through each neck stitch and the corresponding body fabric as you work. Keep the stitches even so the neck stays round.
Stop before sewing the final section and leave approximately a 1-inch gap at the back of the neck. Do not close that gap yet. You will use it to hide and secure the embroidery threads for the eyes.
3. Position the upper bill.
Center the wider orange bill on the lower front of the head. Keep its long foundation-chain line horizontal.
The rear third of the upper bill should rest against the head while most of the oval projects forward. Pin it approximately 1/2 inch below the planned eye position.
Sew the rear edge firmly to the head. Continue a short distance around each side, but keep the front edge flat and free.
4. Add the lower bill.
Place the smaller orange piece directly beneath the upper bill with both pieces centered on the same vertical line. Let the front of the lower bill extend just slightly below the upper one.
Sew its rear edge securely to the head. Add one small tack stitch at each side where the upper and lower bill pieces meet. These stitches keep the bill layers aligned while preserving the narrow separation along the front.
Do not add stuffing between the bill pieces.
5. Attach the wings.
Place one wing on each side of the body. Point the pinched end toward the head. Position that narrow end about 1/2 to 3/4 inch behind the neck seam.
Angle each wing slightly downward toward the rear. Sew the upper and front edges securely to the body. Then add two small tack stitches along the lower rear edge so the wing cannot lift away from the body.
Check both sides from the front and from above before knotting the yarn. The wings should sit at the same height.
Embroider the Black Satin-Stitch Eyes
The eyes on this duck are embroidered, not plastic. Each eye is a small black satin-stitched oval with one tiny white highlight stitch.
Use the center of the bill as your placement guide. Position the eyes approximately 1/2 inch above the upper bill. Leave about 4 to 5 crochet stitches between the inner edges of the eyes.
Each finished black eye should measure approximately 3/8 inch high and 1/4 inch wide.
1. Thread the long embroidery or doll needle with black embroidery floss. Using all 6 strands gives the small satin stitches enough coverage to read as a solid eye.
2. Insert the needle through the open gap at the back of the neck and bring it out at the lower edge of the first eye position.
3. Make 6 to 8 close vertical satin stitches. Work the stitches side by side over approximately 2 rounds of crochet and about 2 stitch columns. Keep the outside stitches slightly shorter so the eye becomes oval rather than rectangular.
4. Return the needle to the neck opening and repeat for the second eye. Compare both eyes from the front before securing the floss.
5. Tie the black thread ends securely inside the neck opening and trim the excess.
6. Thread the needle with 2 strands of white embroidery floss. Make one tiny straight highlight stitch near the upper outside area of each black eye. Keep each white stitch about 1/8 inch long.
7. Return the white thread ends through the neck gap, secure them inside and trim the excess.
The white stitch should look like a pinprick of light rather than a second eye color. If it becomes too large, remove it and make a shorter single stitch.
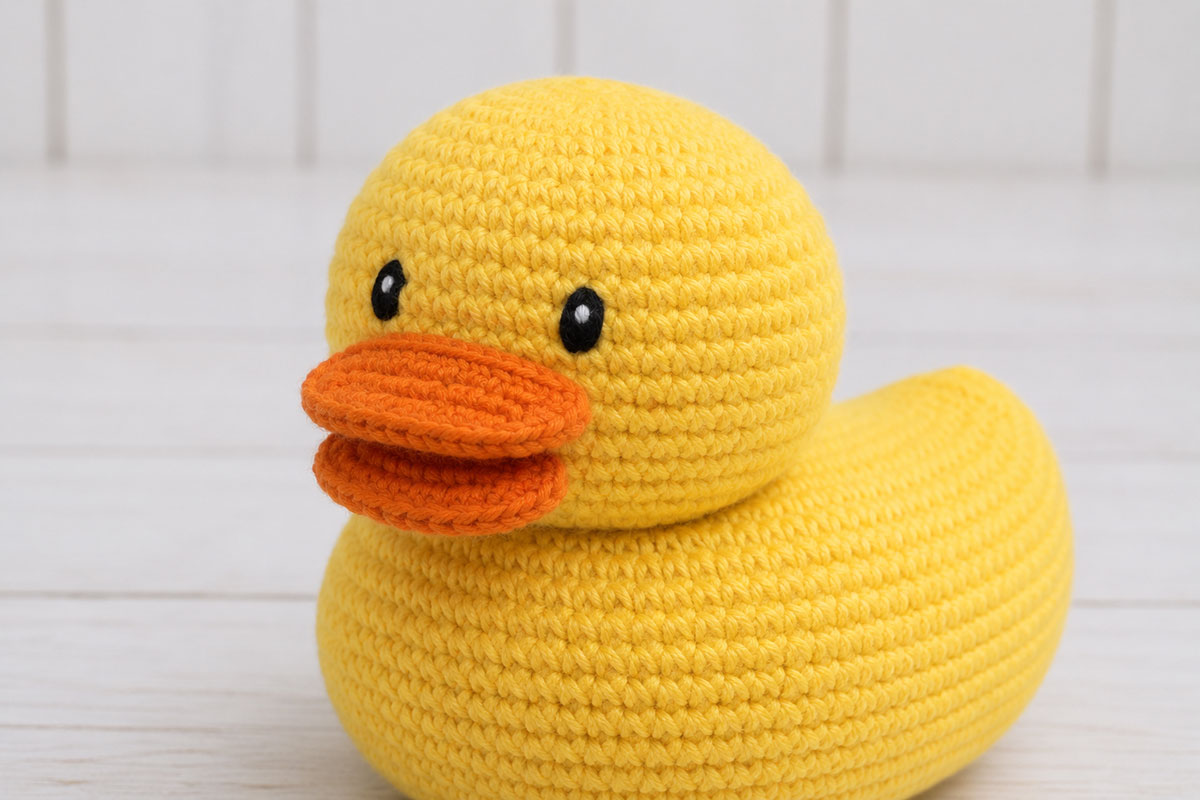
Before closing the neck gap, look at the head and neck from the side. If the lower head looks hollow where it meets the body, add a small amount of fiberfill through the opening and smooth it into place. Add only enough to support the shape without making the neck bulge.
After the embroidery is secure, use the remaining yellow neck-seam yarn to close the 1-inch gap at the back of the head. Knot securely and bury the yarn tail inside the body.
Finish and Shape the Crochet Rubber Duck
Set the duck on a flat surface and look at it from the side before weaving in the final yarn tails.
Press the underside lightly against the surface so the body sits instead of rolling. Use your fingers to distribute a little more stuffing toward the rear upper curve if the back looks completely flat.
Flatten the bill between your fingers. The upper and lower pieces should project almost straight forward rather than pointing sharply up or down.
Smooth the head into a round shape and check that it still leans just slightly toward the bill.
Check the wings from above. Their front ends should begin at approximately the same point on each side, and the rear edges should follow the curve of the body.
Weave every remaining yarn tail several stitches through the dense crochet fabric before trimming it.
Final Rubber Duck Shape Check
- The body is wider than it is tall.
- The head sits over the front third rather than the center.
- The orange bill is broad, flat and made from two visible layers.
- The wings are small compared with the body.
- The rear body line rises gently without a separate pointed tail.
- The face uses black satin stitching with one tiny white highlight stitch in each eye.
Secure Details, Toy Safety and Care
Do not place this stuffed duck in an infant's crib, bassinet or other sleep space. The U.S. Consumer Product Safety Commission recommends keeping infant sleep spaces bare except for a fitted sheet. See the CPSC safe sleep guidance for current information.
If you are making this duck for a baby or young child, keep the embroidered face used in this pattern rather than adding plastic eyes, buttons or other removable decorations.
Pull firmly on the bill and wings after assembly. If any edge lifts or any stitch looks loose, reinforce it before the duck is used.
Before the duck is handled by a child, remove every straight pin and locking stitch marker used during assembly and check the entire surface by hand to make sure none remain.
Inspect the crochet fabric periodically for broken yarn, loose embroidery or exposed filling. Stop using the duck if damage appears.
This project is inspired by the shape of a rubber bath duck, but the finished crochet duck is not a bath toy. Yarn and polyester filling absorb water. Keep it out of the tub, pool and other wet play areas.
For general toy-safety information and age-related guidance, visit the U.S. Consumer Product Safety Commission toy safety guidance.
If the yarn manufacturer permits washing, place the duck in a mesh laundry bag and use a gentle cycle. Air-dry it completely before storing or returning it to use. Reshape the body and bill while they are still damp.
Free Crochet Rubber Duck Pattern FAQ
Why does my crochet rubber duck look too tall?
The most common reason is too much stuffing in the center of the body. The body should be broad and fairly low. Gently redistribute the filling toward the two ends and press the underside flatter. If the stitches are already stretched open, removing a small amount of filling can improve the silhouette.
Can I crochet this rubber duck with cotton yarn?
Yes. Smooth worsted-weight cotton works well because it gives the bill, wings and body clear edges. Cotton can produce a slightly firmer finished fabric than acrylic, so adjust the hook size if your stitches become difficult to work.
Can I use plastic safety eyes instead of embroidery?
For a duck intended for a baby or young child, I would keep the satin-stitched eyes shown in this pattern. The embroidery also gives the finished face the same soft look as the main page image.
Why are there two separate bill pieces?
A single stuffed bill tends to become thick and rounded. The two flat layers create the wide upper and lower sections that make the face look more like a classic rubber duck.
How can I keep the orange bill from curling?
Do not stuff either piece. Flatten both ovals before attaching them and secure the rear edges carefully. The small tack stitch at each side also helps the two layers stay level.
Does this crochet duck need separate feet?
No. The finished design is based on the familiar floating rubber-duck silhouette, so the feet are not visible. Leaving them off also keeps the underside smooth enough for the duck to sit level.
Can I make a smaller version with thinner yarn?
You can use a thinner yarn and a hook that produces a dense fabric, and the same stitch counts will make a proportionally smaller duck. For a baby or young child, however, do not deliberately miniaturize a toy without considering the finished size and applicable toy-safety requirements.
Can this crochet rubber duck go in bath water?
No. It only borrows the appearance of a rubber bath duck. Crochet yarn and fiberfill hold water, so keep the finished project dry.
Do I need weighted pellets to make the duck sit upright?
No. Polyester fiberfill is enough. The flat oval base and the placement of the head provide the balance. I would not add loose pellets to a project intended for a baby or young child.
Crochet Rubber Duck Pattern Quick Reference
If you set the project aside and come back later, use these stitch counts and shape checkpoints before continuing. They make it easier to catch a missed increase or decrease before the pieces are assembled.
| Piece | Largest Count | Finished Shape |
|---|---|---|
| Body | 48 stitches | Low stuffed oval, closed after decreasing to 6 stitches |
| Head | 36 stitches | 12-stitch neck opening |
| Upper bill | 22 stitches | Flat unstuffed oval |
| Lower bill | 20 stitches | Flat unstuffed oval |
| Each wing | 22 stitches | Flat oval with one end pinched slightly |
Total crochet pieces: Six: one body, one head, two bill pieces and two wings.
Placement checkpoint: Keep the head over the front third of the body rather than centered over it. Position each wing with the pinched end about 1/2 to 3/4 inch behind the neck seam. The upper and lower bill pieces should remain flat and centered on the same vertical line.
More Free Crochet Duck Patterns
If you want another three-dimensional duck with a different silhouette, try my free crochet duck pattern. For natural brown, green and cream coloring, the free crochet mallard duck pattern takes the duck idea in a completely different direction.
For a softer baby project, the free crochet duck lovey pattern combines a duck head with a small comfort blanket.
If you want the duck worked flat instead of as a stuffed figure, the crochet duck baby blanket pattern includes the yellow duck appliqué used across the blanket. That flat motif is the better choice for decorating blankets, nursery pieces and other crochet projects.
You can also browse the free crochet bird patterns collection for more bird designs, or return to the free baby crochet patterns collection for blankets, loveys and other handmade projects.
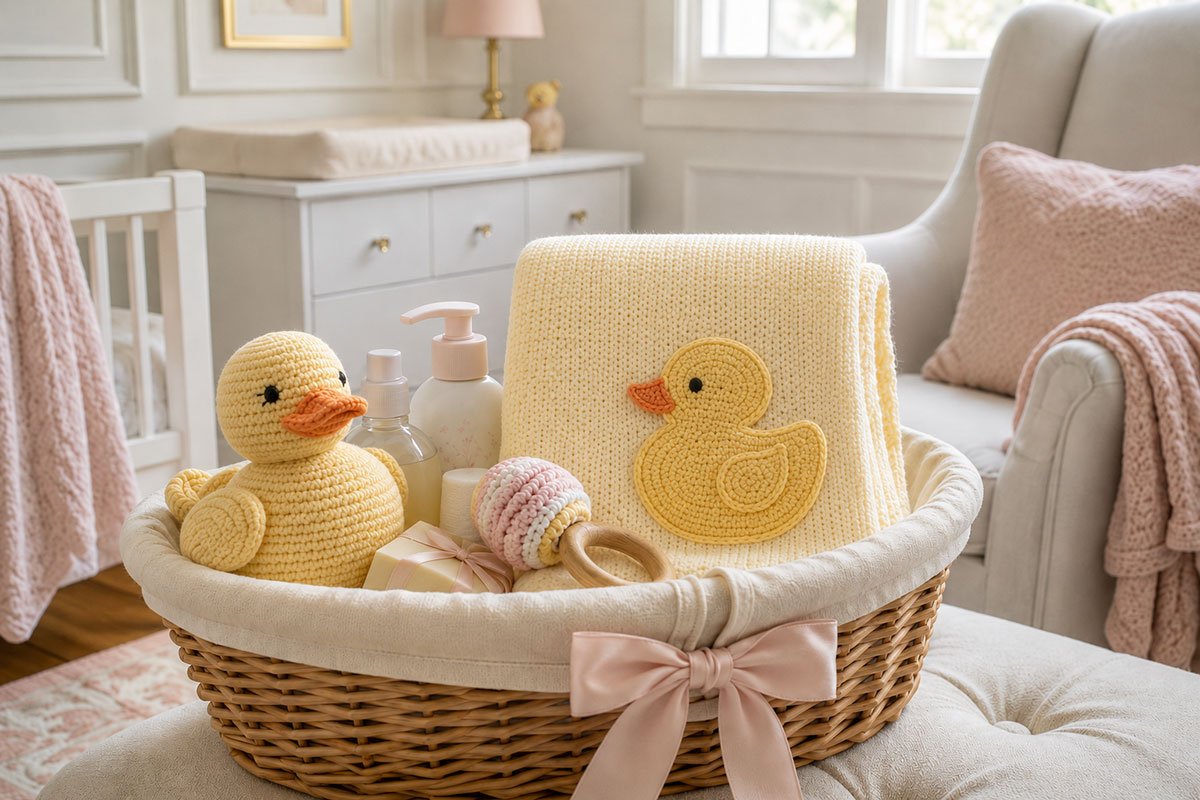
To make the matching blanket shown with the rubber duck, visit my crochet duck baby blanket pattern. The yellow duck motif coordinates naturally with this little rubber duck, making the two projects an easy handmade baby shower gift set.
When you click on links to various merchants on this site and make a purchase, this may result in this site earning a commission. This does not affect the price you pay.

UBGI Gold Standard 2026
Reviewed under the site's
editorial checklist.
Photos, decorating ideas, party setups and reader submissions are shared for inspiration unless a page is specifically presented as a pattern, tutorial, reference guide or step-by-step project. Follow the instructions, measurements, safety guidance and manufacturer directions provided for the particular project or product.
About Jan | Contact | Baby Nursery Ideas (Blog) | Site Map | Privacy Policy | Disclosure Policy | Disclaimer | Affiliate Disclosure | Earnings Disclosure | Facebook | Pinterest
I am a participant in the Amazon Services LLC Associates Program, an affiliate advertising program designed to provide a means for us to earn fees by linking to Amazon. As an Amazon Associate I earn from qualifying purchases.
Copyright © 2006-2026. All Rights Reserved.