Free Crochet Mallard Duck Pattern with Realistic Mallard Colors
By Jan Bay
I wanted this crochet mallard to look like a mallard right away, not like a plain duck made with darker yarn. The green head, narrow white neck ring, chestnut brown breast, gray body and yellow bill do most of that work, so I kept the shapes simple and let those familiar mallard colors make the bird recognizable. This free crochet mallard duck pattern walks you through the body, head, bill, wings, tail, feet, color changes and final assembly so you can make the same finished duck without having to guess where each feature belongs.
Explore More Free Crochet Duck and Bird Patterns
Free Crochet Duck Lovey Pattern
Crochet Duck Baby Blanket Pattern
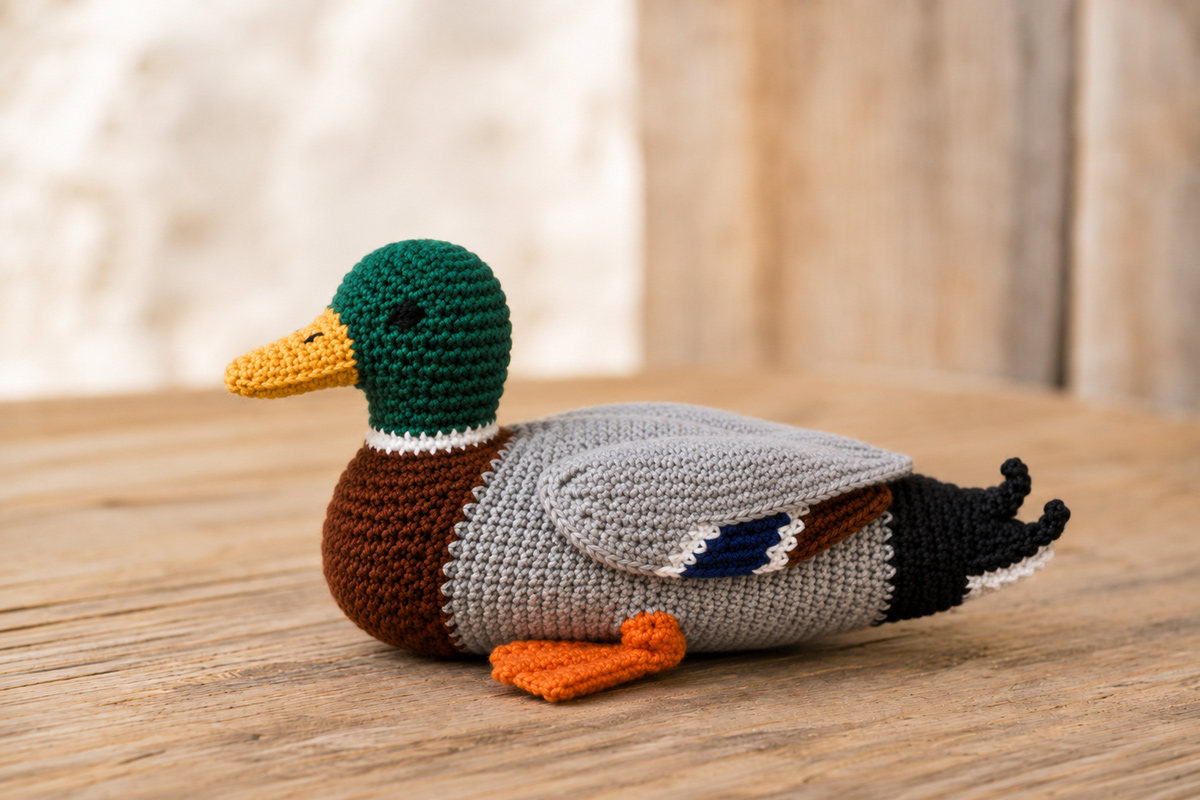
This crochet mallard uses the green head, white neck ring, chestnut breast and gray body that make a male mallard easy to recognize.
Worsted Weight Yarn for Crochet Projects
Jump to the Crochet Mallard Pattern
Free Crochet Mallard Duck Pattern Materials and Yarn Colors
This mallard is worked with firm single crochet fabric so the finished bird keeps the long, low shape shown in the example image. The color placement matters almost as much as the shaping. The green head, narrow white collar, chestnut breast, soft gray body, dark tail and small blue wing marking are what make the finished bird read as a male mallard instead of a general crochet duck.
I recommend choosing yarns with a similar weight and surface texture. If one color is much thicker or softer than the others, the color changes can create bumps where the sections meet. A smooth worsted weight yarn makes it easier to keep the body even and to sew the flat wing pieces neatly in place.
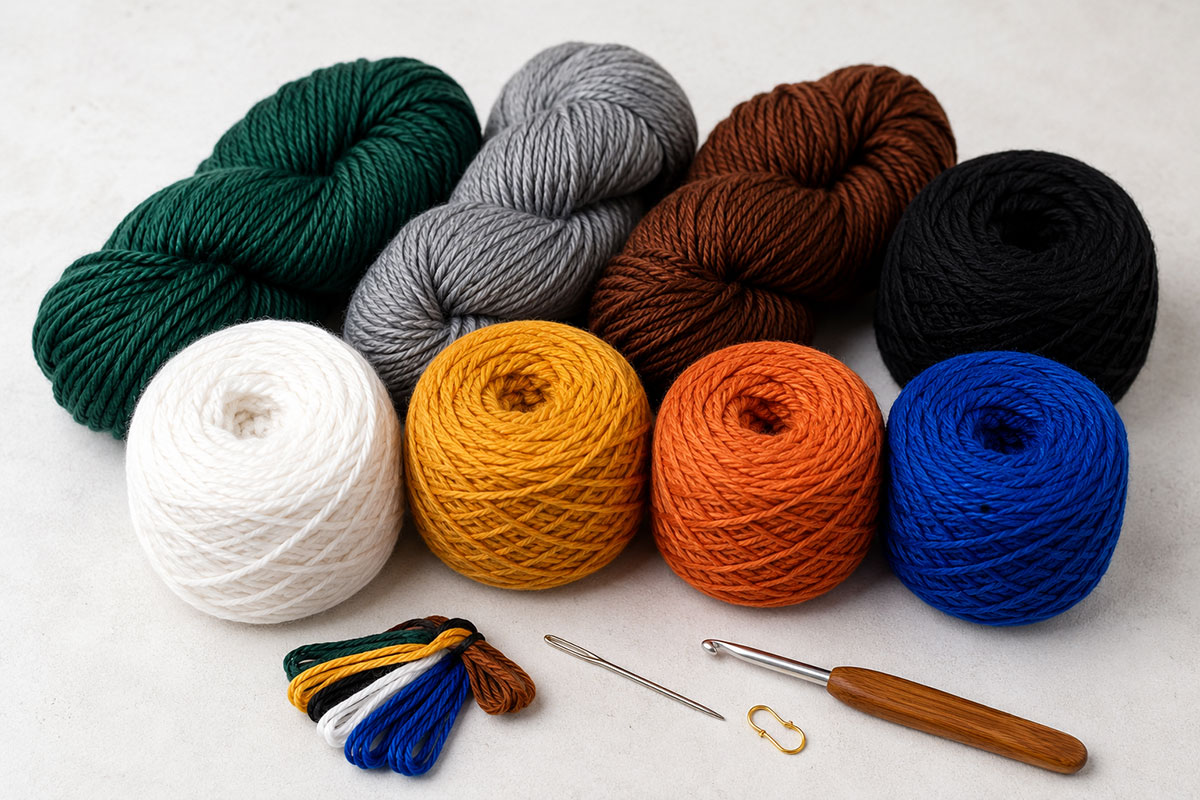
- Yarn: #4 worsted weight yarn in gray, chestnut brown, deep mallard green, black, white, golden yellow, orange and royal or deep blue
- Gray: approximately 75 to 90 yards for the main body and wings
- Chestnut brown: approximately 25 to 35 yards for the breast and wing detail
- Deep mallard green: approximately 20 to 30 yards for the head and neck
- Black: approximately 10 to 15 yards for the rear body and tail feathers
- White: approximately 8 to 12 yards for the neck ring, wing markings and under tail detail
- Golden yellow: approximately 10 to 15 yards for the bill
- Orange: approximately 15 to 20 yards for the legs and webbed feet
- Royal or deep blue: approximately 5 yards for the narrow wing speculum
- Hook: 3.5 mm crochet hook
- Stuffing: polyester fiberfill
- Black embroidery floss: for the eyes and bill details
- Tapestry needle: for sewing pieces and weaving in ends
- Stitch marker: for marking the first stitch of continuous rounds
- Scissors
- Optional sewing pins: useful for checking wing, head and foot placement before sewing
Finished Size
Using worsted weight yarn and a 3.5 mm hook, the finished mallard should measure approximately 11 to 12 inches from the end of the bill to the end of the tail and about 5 to 5 1/2 inches from the bottom of the feet to the top of the head. The body should measure about 4 to 4 1/2 inches across at its widest point.
Those measurements are a guide rather than a rule. Your finished size can change with yarn, hook size and tension. The important proportion is the silhouette. The body should remain noticeably longer than it is high, and the duck should sit low rather than stand on long legs.
Gauge and Fabric
Exact gauge is not critical for this project, but the crochet fabric must be firm enough that the stuffing does not show between stitches. With the recommended yarn and hook, aim for approximately 20 to 22 single crochet stitches across 4 inches.
If you can see obvious gaps when you gently stretch a swatch, move down one hook size. If the fabric becomes so stiff that increases and decreases are difficult to work, move up one hook size.
Keep the tension consistent when changing colors. A tight color change can pinch the body at the chest or tail, while a loose change can leave a visible step between sections.
Skill Level
This is not a first-time crochet project. I would place it at advanced beginner to intermediate. The individual stitches are simple, but the project requires careful shaping, several color changes, flat piece construction and accurate assembly.
You should be comfortable working in continuous rounds, using a magic ring, increasing, decreasing, changing yarn colors and sewing crocheted pieces together. The bill, wings, speculum details and feet are worked separately and attached after the main body is complete.
How the Mallard Colors Are Used
The body begins at the rounded chest in chestnut brown. It then changes to gray for the long middle section and finally to black near the rear. Working those colors directly into one continuous body keeps the finished duck smooth and avoids the bulky look that a separate breast panel could create.
The head and neck are made as one green piece. A narrow white section is worked at the base of the neck before the piece is sewn to the body. Keep that white collar narrow. A wide band changes the proportions and makes the neck look striped rather than giving it the familiar mallard ring.
The blue on the wing should also be restrained. A real male mallard has a noticeable blue speculum, but it is only one feature within the wing. On this crochet version, the blue section is made as a narrow flat detail and partly covered by the gray outer wing. That construction keeps the blue visible without turning it into a large decorative patch.
The bill is golden yellow rather than bright orange. Save the deeper orange for the feet and short legs. The contrast between the yellow bill and orange feet helps keep the finished color placement close to the mallard shown on this page.
Before You Begin
Work the main body and head in continuous rounds unless the instructions specifically tell you otherwise. Do not join each round with a slip stitch. Move the stitch marker to the first stitch of every new round.
Use an invisible decrease when possible. Standard decreases can leave small gaps in stuffed pieces, especially along the gray body where the stitches are easy to see.
Stuff gradually instead of waiting until the final few rounds. The chest should feel firm and rounded, but the long gray section should not be packed so tightly that it becomes a ball. As you add stuffing, press the body gently between your hands to keep the belly long and the upper back relatively flat.
The head should also be firm without becoming oversized. The finished head is intentionally smaller than the body width. Overstuffing it can quickly change the mallard into a round headed cartoon duck.
Leave long sewing tails on the head, wings, bill, feet and small tail pieces. A sewing tail that is long enough to work with makes it much easier to secure the pieces neatly without adding extra knots.
For the eyes, use black embroidery floss rather than plastic safety eyes. Make each eye with several short satin stitches and secure the floss ends inside the head. The small embroidered eye suits the more natural mallard proportions and avoids a removable plastic component.
Before sewing any major piece permanently, pin it in place and look at the duck from the side and from the front. The neck should sit near the chestnut to gray transition, the wings should follow the long line of the back, and the feet should remain low beneath the body.
If you enjoy the more natural bird shape used here, you can also browse my free crochet bird patterns for other bird projects and construction ideas.
Crochet Abbreviations and Pattern Notes
This pattern uses US crochet terms.
- ch = chain
- sc = single crochet
- sc3tog = single crochet 3 stitches together
- sl st = slip stitch
- inc = work 2 sc in the same stitch
- dec = single crochet 2 stitches together, preferably with an invisible decrease
- st = stitch
- sts = stitches
- FO = fasten off
Numbers in parentheses at the end of a round show the total stitch count after that round. Instructions inside parentheses followed by a multiplication sign are repeated around the round. For example, (9 sc, inc) x 6 means work 9 single crochet stitches, increase in the next stitch, and repeat that sequence six times.
The main body and head are worked in continuous spiral rounds. Do not join with a slip stitch unless the instructions specifically tell you to do so. Place a stitch marker in the first stitch of each round and move it up as you work.
When the pattern tells you to change color, complete the final yarn-over of the stitch before the color change with the new yarn. Pull the old color gently to remove slack, but do not tighten it enough to draw the fabric inward.
For this project, the right side of the crochet remains on the outside. The wrong side faces the stuffing.
The body is shaped from the rounded chest toward the tail. That direction is useful because the chest can expand gradually into the long gray body instead of looking like a separate ball attached to it.
Count your stitches at every increase and decrease round. A missed increase near the chest can twist the body shape, and a missed decrease near the tail can make the rear section lean to one side.
Stuffing and Shape Checkpoints
Do not pack every part of the duck with the same amount of stuffing. The rounded chest needs firm support, while the gray middle should have enough give that you can shape it into a long oval.
As you work the body, add stuffing in small amounts. Push it toward the front before adding more. When the gray portion is several inches long, place the body on a flat surface and press the upper side gently downward. The lower side should remain rounded, while the back becomes flatter.
The finished body should not stand on one narrow point. It should have a broad lower surface that rests naturally behind the feet.
Check the body from above as well as from the side. It should remain centered and symmetrical. If one side begins to bulge, redistribute the stuffing before the opening becomes too small to reach comfortably.
Crochet the Long Mallard Body
The body is worked as one continuous stuffed piece. It begins in chestnut brown at the front of the breast, changes to gray for the long middle section, and finishes in black at the rear. The gradual color changes and shaping are built directly into the body, so there is no separate breast panel to sew on later.
The pattern reaches 66 stitches at its widest point. Keep that stitch count through most of the middle section. Those straight rounds are what give the mallard its longer bird-shaped body rather than a round amigurumi torso.
Chestnut Breast
With chestnut brown yarn, make a magic ring.
Round 1: Work 6 sc into the magic ring. (6)
Round 2: Inc in each st around. (12)
Round 3: (1 sc, inc) x 6. (18)
Round 4: (2 sc, inc) x 6. (24)
Round 5: (3 sc, inc) x 6. (30)
Round 6: (4 sc, inc) x 6. (36)
Round 7: (5 sc, inc) x 6. (42)
Round 8: (6 sc, inc) x 6. (48)
Round 9: (7 sc, inc) x 6. (54)
Round 10: (8 sc, inc) x 6. (60)
Round 11: (9 sc, inc) x 6. (66)
Rounds 12 to 13: Sc in each st around. (66)
After Round 13, the chestnut section should form a broad rounded cup rather than a flat circle. Begin adding small amounts of stuffing now. Fill the center of the breast first and keep the outer edge flexible enough for the gray section to continue smoothly.
Do not fasten off. Change to gray yarn in the final stitch of Round 13.
Long Gray Body
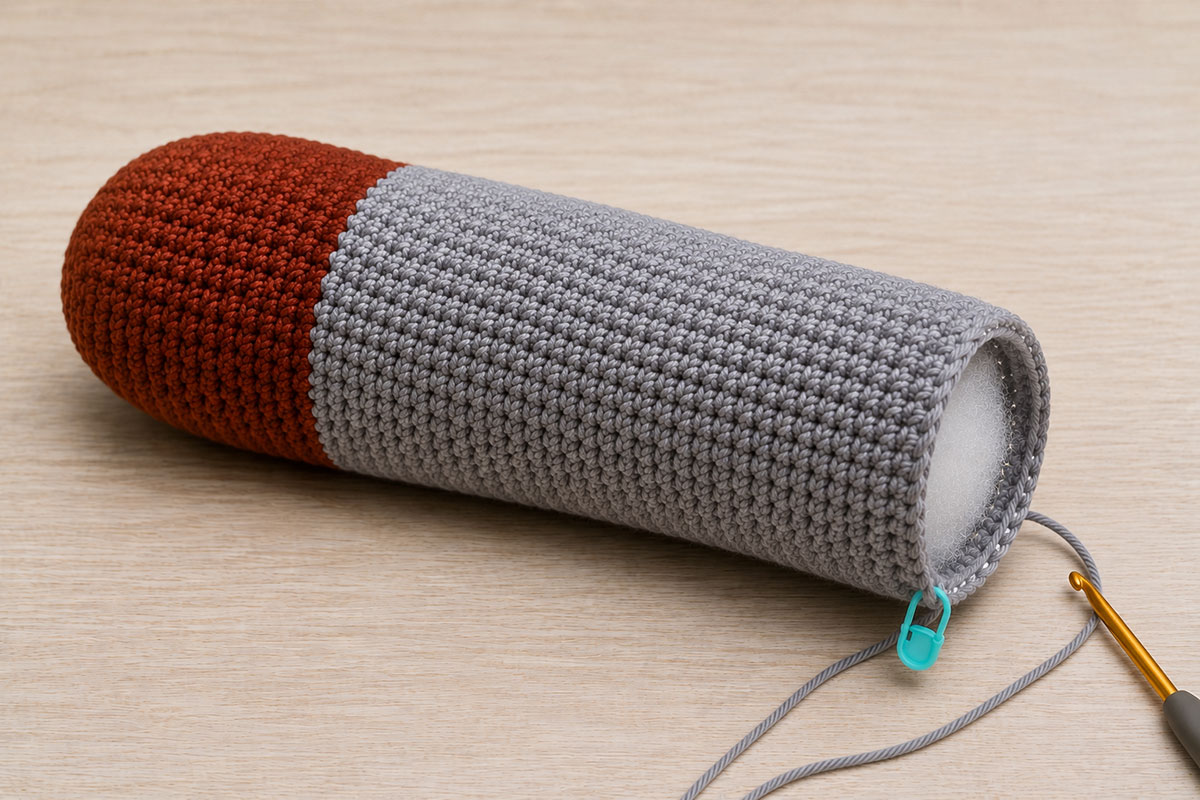
Rounds 14 to 27: With gray yarn, sc in each st around. (66)
These fourteen even rounds create most of the length of the mallard. Resist the temptation to add decreases early. The nearly straight gray section is intentional.
Add more stuffing every four or five rounds. Push the new stuffing toward the chest and then fill the middle. Keep checking that the body stays long and level.
By Round 20, begin shaping the body with your hands after each stuffing addition. Hold the duck horizontally and press gently along the upper gray surface. The back should become flatter while the belly stays softly rounded.
After Round 27, the gray section should look much longer from the side than it does from front to back. If it appears almost spherical, remove some stuffing from the upper middle and reshape it before you begin the rear decreases.
Begin the Rear Taper
Round 28: (9 sc, dec) x 6. (60)
Rounds 29 to 30: Sc in each st around. (60)
Round 31: (8 sc, dec) x 6. (54)
Round 32: Sc in each st around. (54)
Stop and add stuffing before the color change. The rear of the gray section should taper gently, but it should not narrow abruptly. From the side, the upper line should flow from the broad back toward the tail without a sharp step.
Change to black yarn in the final stitch of Round 32.
Black Rear Body
Round 33: With black yarn, sc in each st around. (54)
Round 34: (7 sc, dec) x 6. (48)
Round 35: Sc in each st around. (48)
Round 36: (6 sc, dec) x 6. (42)
Round 37: (5 sc, dec) x 6. (36)
Add the final substantial amount of stuffing now. Fill the black section enough to support the taper, but do not force stuffing into the last few rounds. An overfilled rear becomes round instead of narrowing toward the tail.
Round 38: (4 sc, dec) x 6. (30)
Round 39: (3 sc, dec) x 6. (24)
Round 40: (2 sc, dec) x 6. (18)
Add a final small amount of stuffing if needed. Use the handle of the crochet hook or the blunt end of a larger hook to move stuffing into the narrow area. Do not pack it tightly.
Round 41: (1 sc, dec) x 6. (12)
Round 42: Dec x 6. (6)
FO, leaving a tail about 8 inches long. Thread the tail onto a tapestry needle. Run it through the front loops of the remaining 6 stitches and pull the opening closed. Secure the yarn and weave the tail into the black section.
Shape the Finished Body Before Adding Other Pieces
Place the body on a flat surface with the chestnut end facing forward. Roll it gently from side to side to distribute the stuffing evenly.
Press the gray back downward with the palm of your hand. Do not crush the stitches. You are only asking the stuffing to settle into a lower, longer shape.
The chestnut breast should remain fuller and more rounded than the middle of the body. From the side, it should curve outward at the front and then flow into the gray body without an obvious ridge at the color change.
The black rear should narrow smoothly behind the gray section. It does not need to form the visible curled tail feathers yet. Those small feather details are added later.
Turn the body so the chestnut end faces you. It should look centered, with no obvious lean to the left or right. If the front appears uneven, massage the stuffing rather than pulling on the crochet fabric.
Now look at the body from above. The gray section should be a long oval. The front should be wider and rounder than the black rear.
Set the body aside without attaching the head yet. The next pieces will establish the neck height and front profile, and it is easier to position them accurately after the head, collar and bill are complete.
Check the Chestnut Breast Before You Add the Head
The chestnut section is already built into the main body, but take a minute to check its shape before you attach anything to it. The front should look rounded from the side and broad from the front. It should not project upward like a separate ball.
Set the body on a flat surface with the chestnut end facing left or right. The fullest part of the breast should sit low, close to the lower half of the body. The top of the chest should slope gently toward the gray back.
If the chest looks too tall, press the upper chest lightly toward the gray section and redistribute some stuffing downward. If it looks flat, move a small amount of stuffing forward from the gray body. Make these adjustments now. Once the neck is sewn in place, the chest will be harder to reshape.
The color boundary between chestnut and gray does not need to be perfectly vertical. A slight curve is natural on a stuffed piece. What matters is that both colors meet smoothly without a tight groove between them.
Crochet the Green Mallard Head and White Neck Ring
The head and neck are crocheted as one piece. Keeping them together gives the duck a cleaner profile and avoids the thin neck that can make a crochet bird look too upright.
The crown reaches 36 stitches at its widest point. The lower head then decreases to 30 stitches and continues straight into the neck. That small change in circumference gives the head some roundness without turning it into a large ball.
With deep mallard green yarn, make a magic ring.
Round 1: Work 6 sc into the magic ring. (6)
Round 2: Inc in each st around. (12)
Round 3: (1 sc, inc) x 6. (18)
Round 4: (2 sc, inc) x 6. (24)
Round 5: (3 sc, inc) x 6. (30)
Round 6: (4 sc, inc) x 6. (36)
Rounds 7 to 10: Sc in each st around. (36)
At this point the upper head should be rounded, but not deeply spherical. Begin stuffing with small pieces of fiberfill. Push the stuffing into the crown first.
Round 11: (4 sc, dec) x 6. (30)
Rounds 12 to 15: Sc in each st around. (30)
Add more stuffing through the lower head and neck. Keep the sides of the lower green section fairly straight. Do not pack enough stuffing into these rounds to widen them back to the size of the crown.
Change to white yarn in the final stitch of Round 15.
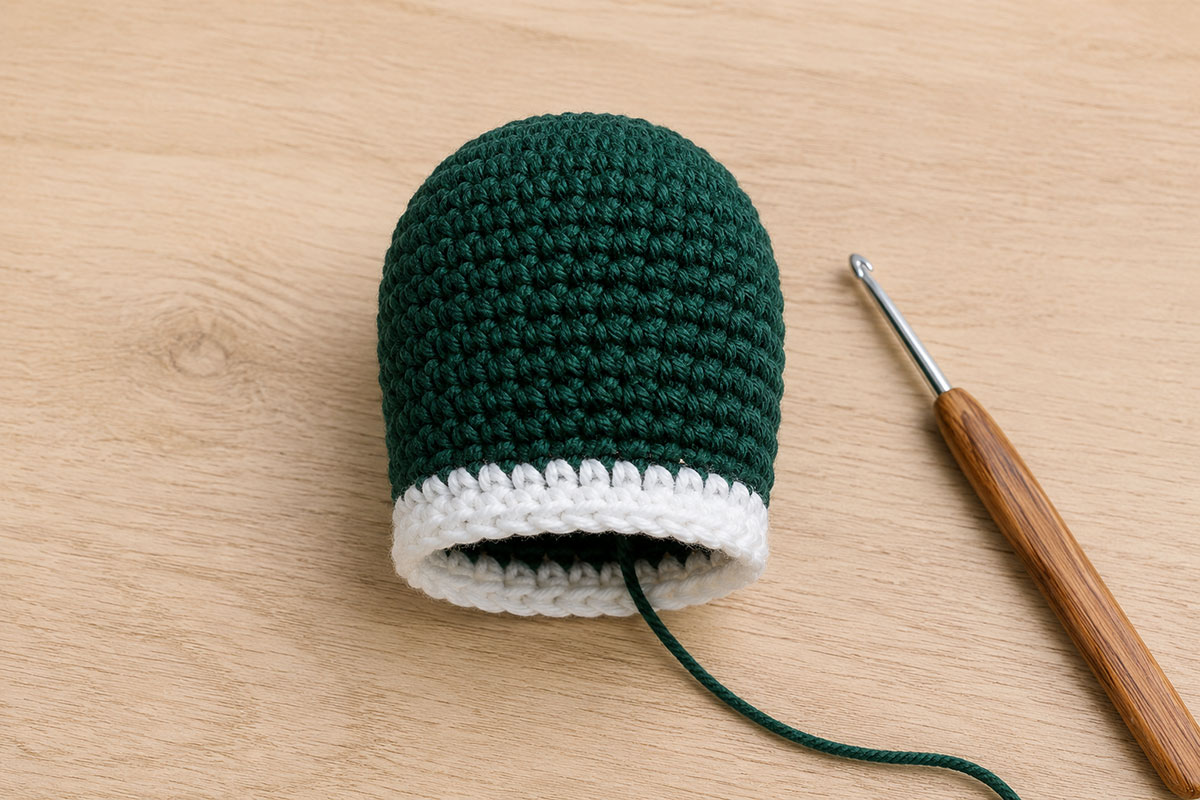
Rounds 16 to 17: With white yarn, sc in each st around. (30)
FO, leaving a sewing tail about 24 inches long.
Do not close the bottom. The open 30-stitch neck edge will be sewn directly to the body.
Shape the Head Before Assembly
Hold the head upright with the white neck ring at the bottom. The green crown should be softly rounded, while the lower green portion should narrow slightly and then continue almost straight to the white collar.
If the head looks like a perfect ball sitting on a white band, remove a little stuffing from the lower half and press the sides inward. If the crown collapses when you touch it, add a small amount of stuffing near the top.
Now look at the head from the side. The front can be pressed very slightly flatter where the bill will attach. Do not make a deep indentation. You only need enough of a surface to sew the bill securely against the green stitches.
The white collar should remain narrow. Two crochet rounds are enough to show clearly beneath the green head without becoming a wide stripe.
Where the Head Will Sit on the Body
Do not sew the head permanently yet, but test the position now.
Place the body on a flat surface. Set the open white neck edge over the top of the body near the chestnut and gray color change. The neck should overlap that transition rather than sitting entirely on the chestnut section.
From the side, the center of the neck should sit just slightly forward of the color boundary. This keeps the breast visible in front of the neck while allowing the long gray back to begin behind it.
The head should be close to upright with a slight forward tendency. It should not lean far back toward the wing, and it should not project forward so far that the white collar pulls away from the body.
Look at the temporary placement from the front. Center the neck across the body. The head should not tilt toward either side.
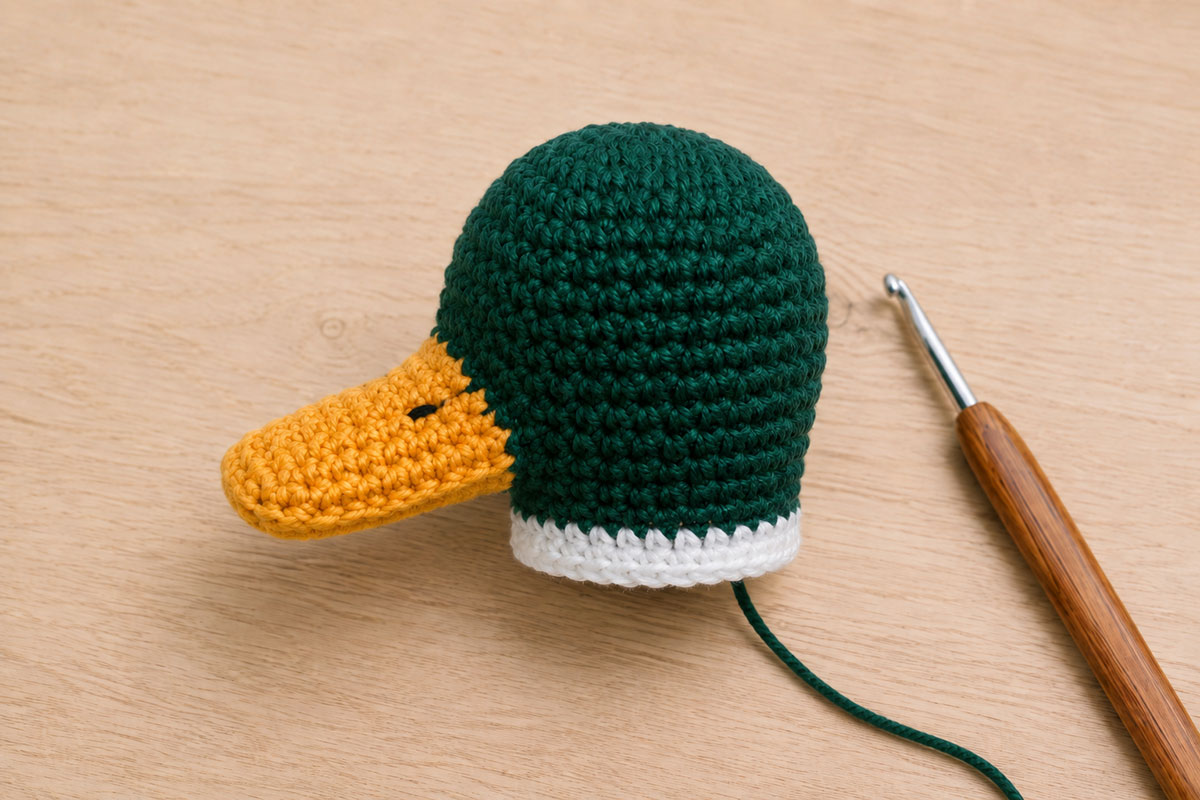
Remove the head after you check the placement. The bill and embroidered eye are easier to position while the head is still separate.
Crochet the Flat Golden Mallard Bill
A mallard bill is broad and fairly flat, so this one is made from two matching crochet panels rather than as a stuffed cone. The joined layers give it enough body to hold its shape without making it thick.
Make 2 identical panels with golden yellow yarn.
Bill Panel
Ch 5.
Row 1: Sc in the second ch from the hook and in each ch across. (4)
Ch 1 and turn after each row unless the instructions say otherwise. The turning chain does not count as a stitch.
Row 2: Inc in first st, sc in next 2 sts, inc in last st. (6)
Row 3: Sc across. (6)
Row 4: Inc in first st, sc in next 4 sts, inc in last st. (8)
Row 5: Sc across. (8)
Row 6: Inc in first st, sc in next 6 sts, inc in last st. (10)
Rows 7 to 9: Sc across. (10)
FO after the first panel and weave in the tail.
After the second panel, do not fasten off.
Join the Two Bill Panels
Place the two panels together with the neat sides facing outward. Match the rows and edges carefully.
Beginning at one rear corner, sc through both layers along the long side of the bill. Work around the narrow front edge and continue along the opposite long side.
Stop when you reach the second rear corner. Leave the 10-stitch rear edge open.
FO, leaving a sewing tail about 18 inches long.
Do not stuff the bill.
Roll the joined bill gently between your fingers to smooth the outer edge. It should stay flat with a softly rounded tip. If the tip curls upward, dampen your fingertips slightly and shape the bill flat while the yarn dries.
Add the Bill Details
Thread a tapestry needle with a short length of black embroidery floss.
Make one tiny nostril stitch on each side of the upper bill. Place the nostrils toward the rear half of the bill rather than near the tip.
Use only one or two short stitches for each nostril. Large black marks can make the bill look spotted.
Secure the floss between the two bill layers so the ends do not remain exposed.
Sew the Bill to the Head
Hold the head with the white collar at the bottom. Center the open rear edge of the bill across the lower front of the green head.
The upper edge of the bill should sit below the midpoint of the head. The bill should project almost horizontally when the head is held upright.
Pin the bill temporarily and view the head from the front. The bill should extend evenly to the left and right of center.
Use the golden yellow sewing tail to stitch the open rear edge of the bill securely to the green head. Sew through both bill layers and the head fabric with small stitches.
Work across the upper rear edge first. Then secure the lower rear edge so the bill cannot flip upward.
Do not pull the sewing stitches so tightly that the green head puckers around the attachment.
When the bill is secure, weave the yellow tail into the head and trim the excess.
Embroider the Mallard Eyes
Use black embroidery floss for the eyes. Do not use plastic safety eyes.
Thread the floss through the head from the open neck edge so the starting end remains inside the stuffed piece.
Place the first eye approximately 3 to 4 stitches behind the rear edge of the bill and slightly above the top line of the bill.
Make several short satin stitches in the same area to create a small horizontal oval. Aim for an eye about 1/4 inch wide.
Keep the eye compact. A large round eye changes the expression and makes the mallard look more like a cartoon duck.
Embroider the second eye at the matching position on the opposite side of the head. Count stitches from the bill and from the white collar to place both eyes at the same height.
Bring the floss ends out through the open neck edge. Tie them securely together inside the head and trim the excess before the head is attached.
Final Head, Bill and Eye Check
Hold the completed head over the body again before sewing anything permanently.
From the side, check that the bill projects forward rather than downward. The eye should sit behind and above the bill. The green crown should look smaller than the broad gray body beneath it.
From the front, check that the bill is centered and that the head remains straight over the white collar.
When all three features line up, set the head aside. The wing markings and wings are made next so you can compare their size with the body before final assembly.
Crochet the Wings and Blue Speculum
The wings are made as separate flat pieces and sewn over small colored details on each side of the body. Layering the pieces this way keeps the gray wing smooth while allowing a narrow band of blue, white and chestnut to show beneath the lower edge.
Make 2 gray wings, 2 blue speculum panels, 4 white speculum border strips and 2 chestnut trailing strips.
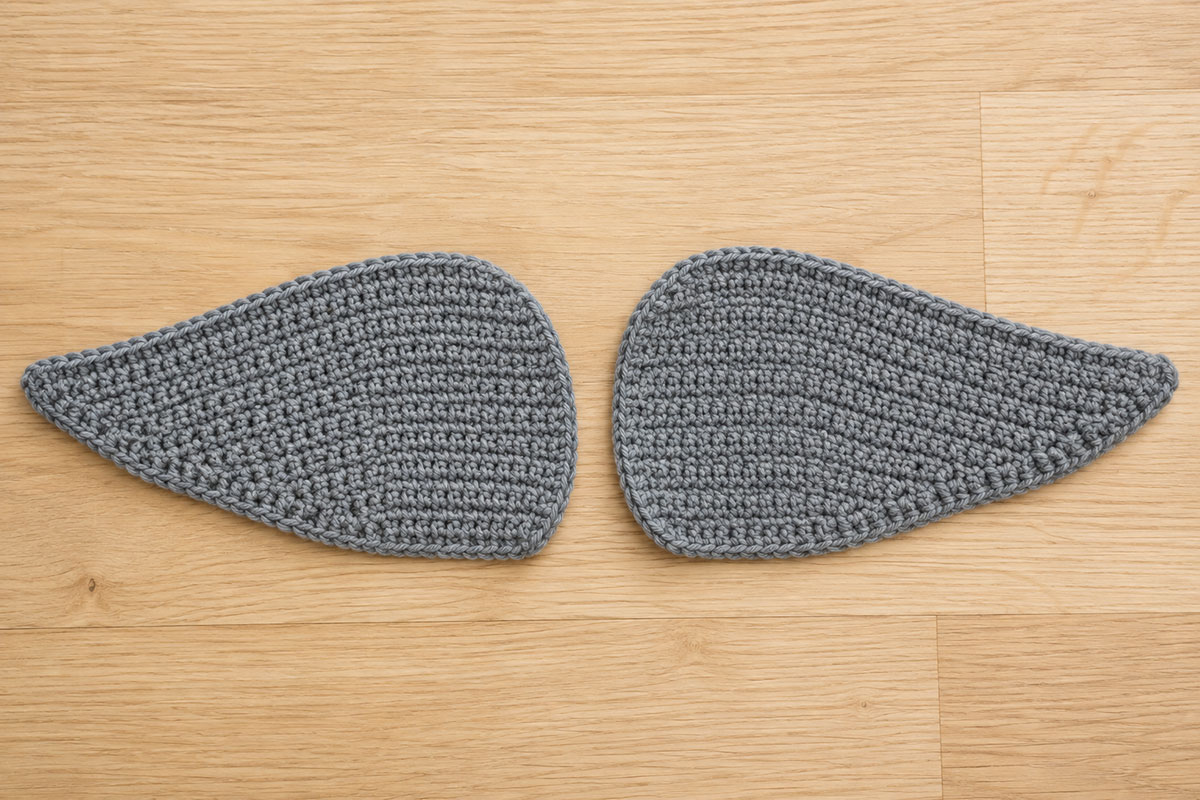
Gray Wing Panels
The wings are worked from the rounded shoulder toward the tapered rear point. Make two identical pieces. Flip one over during assembly so the wings mirror each other.
With gray yarn, ch 8.
Row 1: Sc in the second ch from the hook and in each ch across. (7)
Ch 1 and turn after each row unless instructed otherwise. The turning chain does not count as a stitch.
Row 2: Inc in first st, sc in next 5 sts, inc in last st. (9)
Row 3: Sc across. (9)
Row 4: Inc in first st, sc in next 7 sts, inc in last st. (11)
Row 5: Sc across. (11)
Row 6: Inc in first st, sc in next 9 sts, inc in last st. (13)
Rows 7 to 9: Sc across. (13)
Row 10: Dec, sc in next 9 sts, dec. (11)
Row 11: Sc across. (11)
Row 12: Dec, sc in next 7 sts, dec. (9)
Row 13: Sc across. (9)
Row 14: Dec, sc in next 5 sts, dec. (7)
Row 15: Sc across. (7)
Row 16: Dec, sc in next 3 sts, dec. (5)
Row 17: Sc across. (5)
Row 18: Dec, sc, dec. (3)
Row 19: Work a sc3tog across the remaining 3 sts. (1)
FO.
Join gray yarn at one lower corner of the wing. Work sc evenly around the entire outer edge, placing 2 sc in the rounded shoulder corners and 2 sc near the rear point if needed to keep the edging flat.
Join with a sl st to the first edging stitch. FO, leaving a sewing tail about 24 inches long.
Repeat for the second wing.
Lay both wings flat with the wider ends at the front. They should measure approximately 4 to 4 1/2 inches long. At the widest point, each wing should be 13 stitches across before the edging is added. The finished edged width can vary with tension, so compare the two wings and make sure they match.
If one wing is noticeably longer or wider, remake the shorter piece before assembly. Matching wings make a considerable difference when you view the finished mallard from the front or from above.
Blue Speculum Panels
The blue speculum is intentionally small. It should appear as a narrow flash of color beneath the gray wing rather than covering a large section of the duck's side.
With deep blue yarn, ch 7.
Row 1: Sc in the second ch from the hook and in each ch across. (6)
Rows 2 to 4: Ch 1, turn, sc across. (6)
FO and weave in the ends.
Make a second identical blue panel.
Each blue panel should be a small horizontal rectangle. It will be partly covered during assembly, so do not make it larger to increase visibility.
White Borders for the Speculum
The white markings are made as narrow strips placed at the front and rear edges of each blue panel.
With white yarn, ch 5.
Row 1: Sc in the second ch from the hook and across. (4)
Row 2: Ch 1, turn, sc across. (4)
FO.
Make 4 white strips total.
These pieces are deliberately narrow. Two will frame the blue panel on one side of the mallard, and the other two will frame the blue panel on the opposite side.
Chestnut Trailing Wing Strips
With chestnut brown yarn, ch 8.
Row 1: Sc in the second ch from the hook and across. (7)
Rows 2 to 3: Ch 1, turn, sc across. (7)
FO, leaving a sewing tail about 10 inches long.
Make a second identical strip.
The chestnut strip should extend slightly farther toward the tail than the blue panel. Only part of it will remain visible after the gray wing is sewn over the top.
Arrange the Wing Markings Before Sewing
Place the mallard body on its side with the chestnut breast toward the front and the black rear section toward the back.
Set one blue panel against the gray side of the body. Position it slightly behind the midpoint of the body and above the lower belly line.
Turn each white strip so its 4-stitch length runs from top to bottom beside the blue panel. Place one narrow white strip immediately in front of the blue panel and a second white strip immediately behind it. The 2-row width of each strip forms the narrow white border.
Place the chestnut trailing strip behind the rear white strip. The pieces should form a short horizontal sequence:
white, blue, white, chestnut.
Do not place this colored band too low. It should sit beneath the lower edge of the gray wing, not along the belly.
Pin all four pieces temporarily.
Now place a gray wing over them. Position the rounded front of the wing just behind the chestnut breast and below the neck area. Aim the tapered rear point toward the beginning of the black tail section.
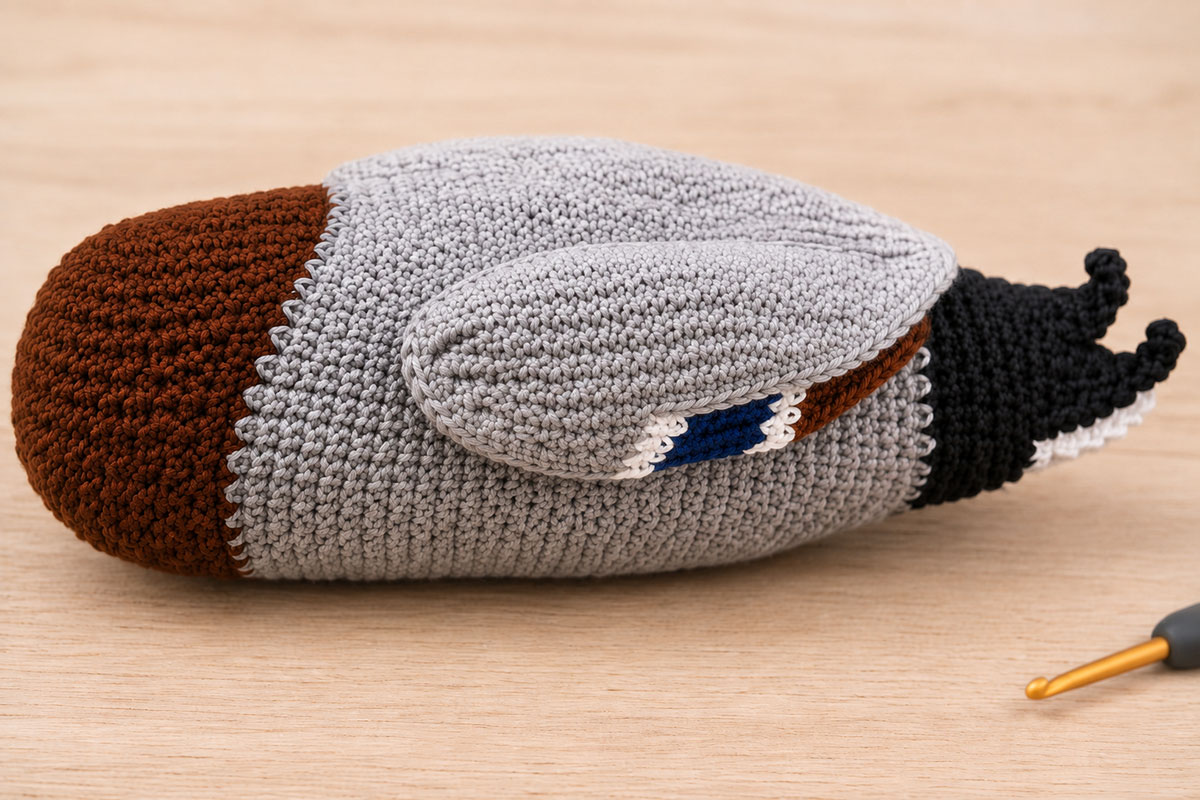
Lower the gray wing until it covers roughly the upper half of the colored pieces. From the side, you should see a narrow blue rectangle with thin white marks at its ends and a small amount of chestnut extending behind it.
If most of the blue panel is visible, move the gray wing slightly lower. If the blue disappears completely, move the wing upward by one or two stitch rows.
The gray wing should follow the long horizontal direction of the body. Do not angle the rear point sharply upward.
Sew the Speculum Pieces to the Body
Remove the gray wing while leaving the colored pieces pinned in place.
Using matching yarn and a tapestry needle, sew the blue panel to the gray body with small stitches around its outer edge.
Sew the two white strips in place immediately beside it. Keep their edges close to the blue so gray body stitches do not show as wide gaps between the colors.
Sew the chestnut strip behind the rear white border.
Secure all yarn tails inside the body fabric. Do not pull the stitches tightly enough to flatten the stuffed body.
Repeat the same arrangement on the opposite side.
Before continuing, set the body upright and compare both sides. The blue markings should begin at approximately the same distance behind the breast, and they should sit at approximately the same height above the belly.
Sew the Gray Wings Over the Speculum
Place the first gray wing over the colored marking again.
Pin the rounded shoulder area first. It should begin behind the chestnut breast and below the neck attachment area.
Pin the upper wing edge along the back. Keep that edge almost horizontal as it moves toward the tail.
Pin the rear point so it aims toward the black rear body without extending past it.
Check the exposed speculum before sewing. Only a narrow section of blue should show beneath the lower wing edge.
Thread the long gray sewing tail onto a tapestry needle.
Begin at the front shoulder and sew the upper edge of the wing to the body with small whip stitches.
Continue along the upper edge toward the rear point.
Sew around the rear point and then along the lower rear portion of the wing.
When you reach the area directly above the blue speculum, sew carefully through the gray wing and into the body without catching large sections of the blue panel. This keeps the layered effect clean.
Continue toward the front until the wing is secure.
The wing should lie flat against the body, but do not stretch it while sewing. Stretching can make the lower edge curl when you release it.
Repeat on the opposite side.
Wing Placement Check
Set the body on a flat surface and look at it from above.
The two gray wings should begin at the same distance behind the breast. Their rear points should end at approximately the same position near the black tail section.
Now look at the duck from each side. The blue markings should be visible, but the gray wings should remain the dominant feature.
Press each wing lightly against the body. There should be no large gaps along the upper edge and no loose points that can easily catch on something.
If one wing sits higher than the other, correct it before continuing. Once the feet and tail details are attached, small alignment differences become easier to see.
Add the Mallard Tail Feathers and White Under Tail Detail
The black rear section of the body already forms the main tail. The small pieces in this section add the two upward curling black feather tips and the narrow white detail visible beneath the tail.
Keep these additions small. The tail should finish the long body line rather than becoming a large decorative feature.
Black Curled Tail Feathers
Make 2.
With black yarn, ch 8.
Beginning in the second ch from the hook, sc in the first 2 chs, work 2 sc in the next ch, sc in the next 2 chs, work 2 sc in the next ch, then sc in the final ch. (9)
The two increases create a gentle curve without turning the feather into a tight spiral.
FO, leaving a sewing tail about 10 inches long.
Make the second feather in the same way.
Shape each feather between your fingers so it points backward and curves slightly upward. Keep the curl small so it follows the tapered black tail rather than forming a full circle.
Attach the Tail Feathers
Place the mallard body with the black rear section facing you.
Position the first curled feather near the upper left side of the closed black tail end. Position the second near the upper right side.
The two feathers should point backward and then curl slightly upward.
Do not place them directly on top of each other. A small amount of space between the bases helps both curves remain visible.
Sew the first 1/2 to 3/4 inch of each feather securely to the black body. Leave the curled ends free.
Weave the yarn tails into the black body.
White Under Tail Patch
With white yarn, ch 7.
Row 1: Sc in the second ch from the hook and across. (6)
Row 2: Ch 1, turn, dec, sc in next 2 sts, dec. (4)
Row 3: Ch 1, turn, dec twice. (2)
FO, leaving a sewing tail about 12 inches long.
Place this small white piece beneath the black tail with its widest edge toward the gray body and its narrow point facing the rear.
Only a slim white edge should remain visible from the side. If the entire patch can be seen, move it farther under the black section.
Sew it securely to the underside of the body. Weave in the yarn tail.
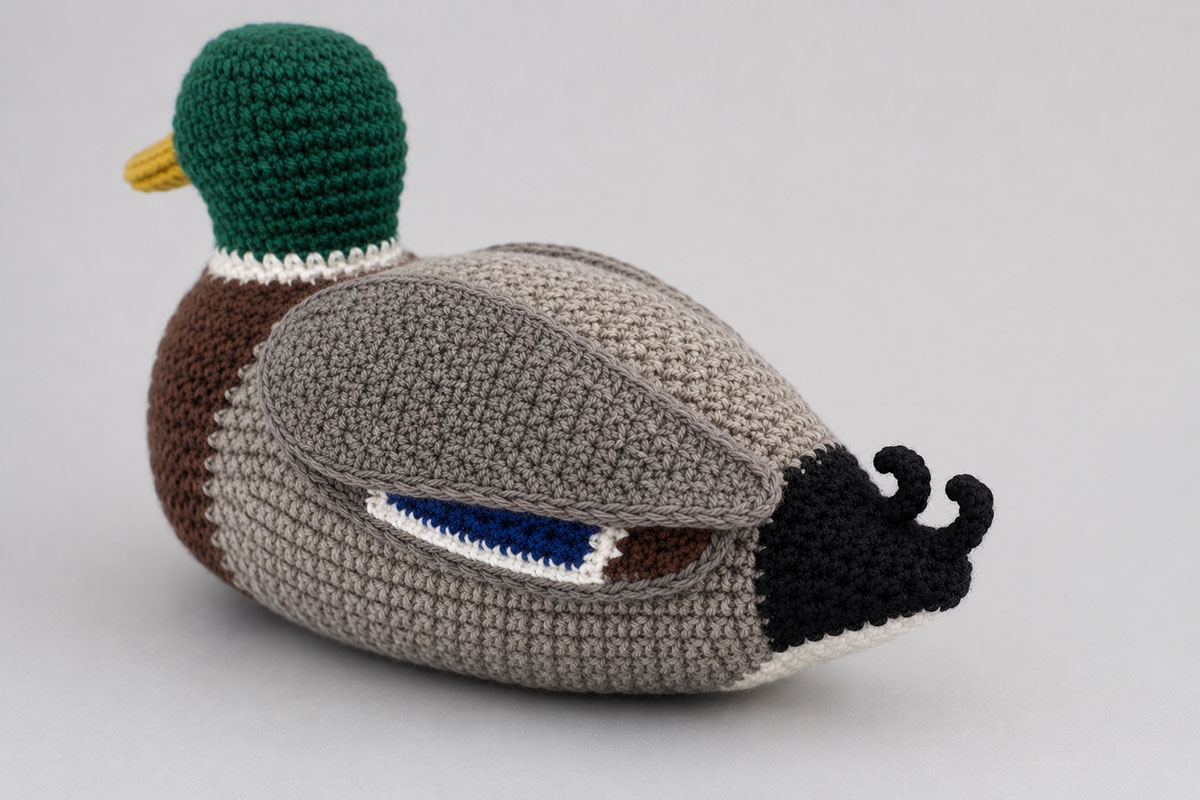
The finished rear should taper smoothly from gray into black. The two small curls should be visible from the side and from above, while the white patch should remain a minor detail beneath them.
Crochet the Short Legs and Webbed Mallard Feet
The feet are kept low and fairly broad so the finished mallard rests close to the surface. Long legs would change the whole silhouette. The body should appear to settle just behind the feet, much like the mallard shown in the main page image.
Make 2 legs and 2 matching webbed feet with orange yarn.
Short Legs
With orange yarn, make a magic ring.
Round 1: Work 6 sc into the magic ring. (6)
Round 2: Inc in each st around. (12)
Rounds 3 to 5: Sc in each st around. (12)
FO, leaving a sewing tail about 18 inches long.
Make the second leg in the same way.
Do not stuff the legs firmly. A tiny amount of fiberfill is enough to keep each tube open. You can also leave them unstuffed if your crochet fabric is firm.
Keep the open end of each leg at the top. This 12-stitch edge will be sewn to the underside of the body later, so leave its 18-inch sewing tail free. The closed magic-ring end is the lower end that will attach to the foot. You can press the open upper edge into a shallow oval when you pin it to the body, but do not flatten it shut. The finished leg should measure only about 3/4 inch long. If yours is much taller, remove one straight round rather than letting the mallard stand high above its feet.
Webbed Foot
Each foot is worked flat from the heel toward the toes.
With orange yarn, ch 7.
Row 1: Sc in the second ch from the hook and in each ch across. (6)
Ch 1 and turn after each row unless instructed otherwise. The turning chain does not count as a stitch.
Row 2: Inc in first st, sc in next 4 sts, inc in last st. (8)
Row 3: Sc across. (8)
Row 4: Inc in first st, sc in next 6 sts, inc in last st. (10)
Rows 5 to 6: Sc across. (10)
The heel and center of the foot are now complete. The next row forms three shallow toe points.
Row 7: Ch 1 and turn. Sc in first 2 sts, ch 2, sl st in second ch from hook, sc in next 3 sts of Row 6, ch 3, sl st in second ch from hook, sc in next ch, sc in next 3 sts of Row 6, ch 2, sl st in second ch from hook, sc in final 2 sts of Row 6.
FO, leaving a sewing tail about 18 inches long.
The center toe should extend slightly farther than the two outer toes. The three points do not need to be sharply separated. They are meant to suggest a webbed mallard foot while keeping the piece sturdy and easy to sew.
Make a second identical foot.
Edge and Shape the Feet
Lay both feet beside each other with the toe points facing forward. Check that the center toes are the same length and that the heels are approximately the same width.
If you want a smoother outer edge, join orange yarn at one rear corner and work sl sts loosely along each side of the foot. Do not work slip stitches across the toe chains. FO and weave in the edging tail.
Gently flatten the feet with your fingers. Do not stuff them.
Each finished foot should measure approximately 1 3/4 to 2 inches from heel to the end of the center toe.
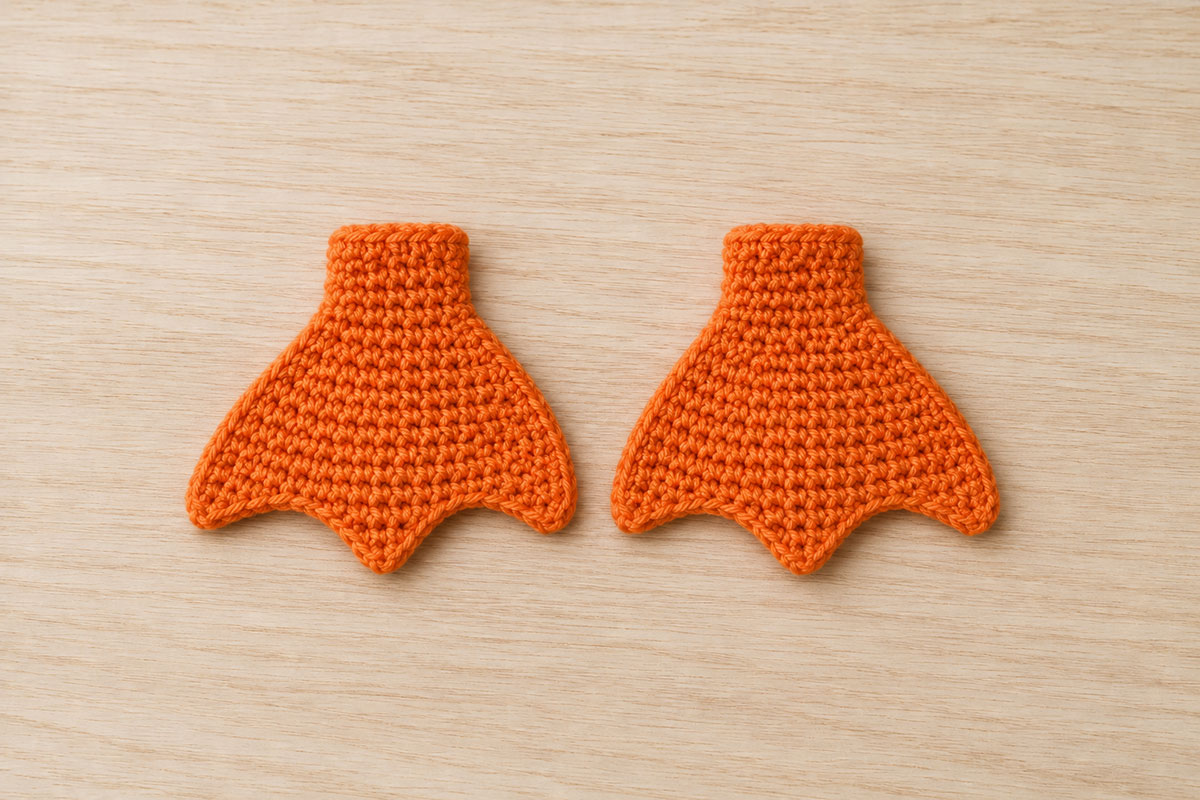
Attach Each Leg to a Foot
Place the closed magic-ring end of one short leg over the rear half of one foot. Keep the open 12-stitch edge facing upward and center the leg from side to side.
The front edge of the leg should sit behind the base of the three toe points. Leave enough of the flat foot visible in front so the webbed shape is easy to see.
Thread the 18-inch sewing tail from the foot onto a tapestry needle. Weave it through a few stitches on the underside of the foot to bring it to the leg position, then sew around the closed base of the leg and through the foot.
Keep your stitches close to the base of the leg. Do not sew through the toe extensions. Secure and weave in the foot tail. Leave the 18-inch tail at the open upper edge of the leg free for attaching the leg to the body.
Repeat with the second leg and foot.
Set the two completed feet next to each other before attaching them to the duck. The center toes should point in the same direction, and the legs should rise from approximately the same place on each foot.
Assemble the Crochet Mallard and Shape the Finished Duck
Assembly determines whether the finished bird keeps the long mallard profile you have been building. Take your time with placement. Pin the major pieces first, look at the duck from several angles, and sew only after the proportions look balanced.
I would rather move a pinned head three times than sew it once in the wrong place. A small adjustment at this stage can change the entire expression and posture of the finished mallard.
1. Position the Head and Neck
Place the body on a flat surface with the chestnut breast at the front.
Set the open white neck edge over the top of the body near the chestnut and gray color transition.
The neck should overlap both colors slightly. From the side, most of the chestnut breast should remain visible in front of the neck.
Center the neck from left to right.
Pin the front of the white collar first. Add a second pin at the rear and then one on each side.
Look at the duck from the side. The green head should rise above the chest but should not tower over the body. The bill should project forward almost horizontally.
Look at the duck from the front. The bill, head and center of the chest should form one vertical alignment.
Make a final check from above. The head should not twist toward either wing.
2. Sew the Head to the Body
Thread the long white neck tail onto a tapestry needle.
Begin at the rear of the neck where the stitches will be less noticeable.
Sew through one stitch along the open neck edge and then through a small section of body fabric directly below it.
Continue around the entire neck with close, even stitches.
As you sew across the chestnut side, keep the white collar visible. Do not pull the neck edge so far downward that the front half of the collar disappears into the breast.
Pause after sewing about three quarters of the way around.
Check the head again from the side and front. If it has shifted, correct the position before closing the remaining section.
Add a tiny amount of stuffing through the remaining opening only if the base of the neck looks hollow.
Finish the seam, knot the yarn securely and bury the tail inside the body.
3. Position the Feet Under the Body
Set the assembled mallard on a flat surface.
Place one foot beneath each side of the lower body. The legs should sit slightly behind the fullest part of the chestnut breast.
Do not position the feet under the middle of the gray body. That moves the visual balance too far backward and can make the bird appear to be standing on stilts.
Point both center toes forward.
Space the feet far enough apart to support the body without making them look splayed. From the front, each foot should appear beneath its own side of the breast.
The belly should remain close to the surface. The short legs are not intended to hold the entire body high in the air.
Pin both legs in place.
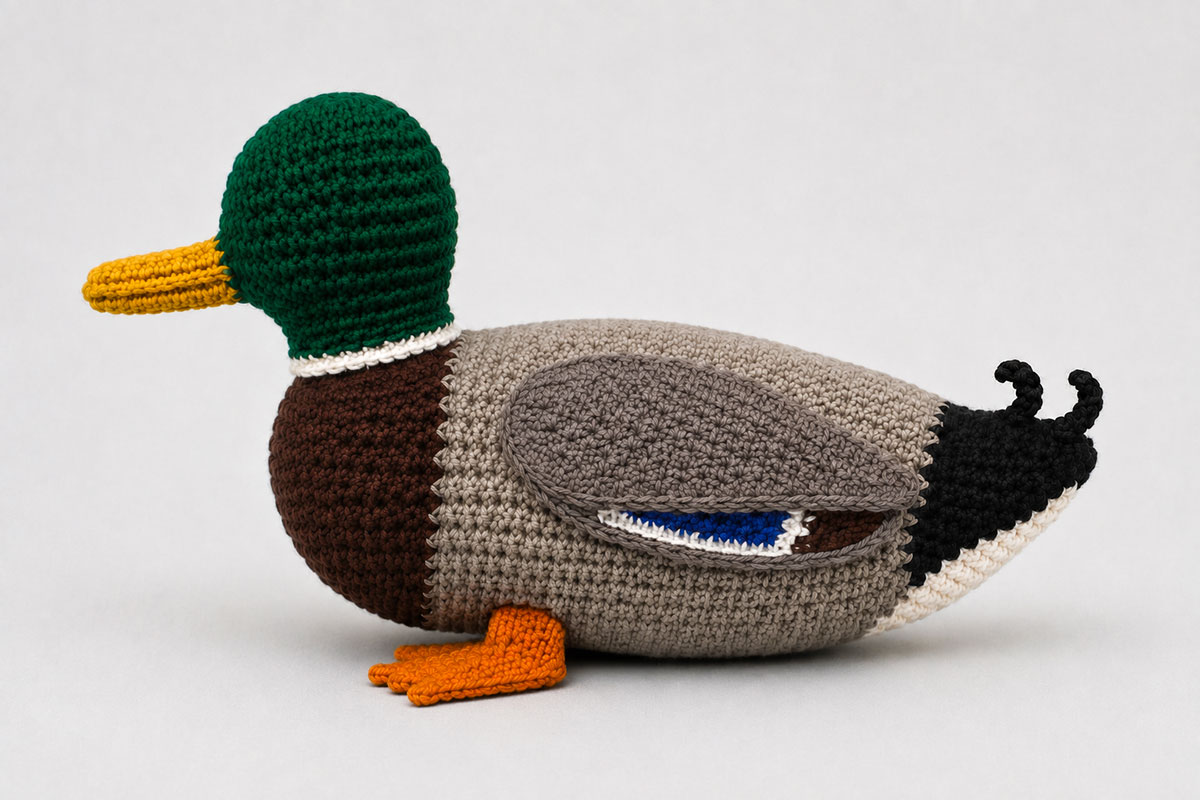
4. Sew the Legs to the Body
Thread the orange sewing tail from one leg onto a tapestry needle.
Sew around the upper edge of the leg and into the underside of the body.
Use several passes through the front and rear of the attachment so the leg cannot pivot easily.
Do not pull so tightly that the orange tube disappears into the body.
Secure the yarn and bury the tail.
Repeat with the second leg.
Place the mallard upright after both legs are attached. Adjust the feet so they lie flat against the surface.
If one foot points outward, turn it into position before adding any reinforcing stitches. A small stitch through the upper heel and lower body can hold the direction if necessary.
5. Check the Wing Alignment
The wings were attached earlier, but the finished head and feet make their alignment easier to judge.
Look at the mallard from above.
The rounded front of each gray wing should begin at approximately the same distance behind the neck. The tapered points should extend toward the tail at matching angles.
From each side, check that the narrow blue speculum remains visible beneath the wing.
If a wing edge has lifted during assembly, add one or two small gray stitches to hold it flat against the body.
6. Shape the Breast and Back
Hold the mallard with both hands and press gently along the gray back.
The upper line should remain relatively flat from behind the neck toward the beginning of the black tail.
Use your fingertips to move a little stuffing toward the chest if the front has lost its rounded shape during assembly.
The chestnut breast should project forward and downward. It should not form a tall mound under the neck.
Now place the duck on the table again. The body should rest low behind the feet, with the long gray section extending toward the tail.
7. Shape the Head and Bill
Roll the green head gently between your palms to smooth the stuffing.
Press the crown only enough to remove obvious bumps. Keep the head smaller than the width of the body.
Check the bill from above. It should be centered and nearly symmetrical.
If one edge has curled, pinch the two bill layers lightly between your fingers and flatten them.
The bill should not point sharply upward or downward.
8. Arrange the Tail Feathers
Use your fingertips to loosen the two black curled feather tips.
Direct them backward with a slight upward curl.
Keep the curls close to the body. Long upright curls can make the tail look decorative rather than birdlike.
Check that the small white under tail patch remains visible beneath the black section but does not extend beyond it.
9. Final Front View Check
Turn the mallard so it faces you.
The head should sit centered over the body.
The bill should extend evenly on both sides of the face.
The white collar should form a narrow visible band beneath the green neck.
The two feet should appear at similar distances from the center of the breast, and both center toes should point forward.
If one foot sits farther forward than the other, correct it now with a small attachment stitch.
10. Final Side View Check
Turn the duck sideways and compare it with the proportions established at the beginning of the pattern.
You should see a smaller green head, narrow white collar, rounded chestnut breast, long gray body, tapered black rear and short orange feet.
The wing should follow the horizontal direction of the back. The blue speculum should appear as a narrow accent beneath it.
The body should look longer than it is tall.
If the mallard appears too round, press the gray body gently from the top and redistribute the stuffing toward the front and rear. Do not add more stuffing simply to make the body firmer.
11. Secure and Hide All Yarn Ends
Inspect every sewn seam before trimming remaining tails.
Check the neck, bill, wings, speculum pieces, feet, tail curls and white under tail patch.
If you can lift an attached piece away from the body easily, reinforce that area with matching yarn.
After each seam is secure, weave the yarn tail through the stuffed body for at least 1 inch. Bring the needle out through a different area, pull the yarn gently and trim it close to the surface. The cut end should retreat into the stuffing.
Do the same with embroidery floss ends if any remain accessible.
Finished Mallard Checkpoint
Your finished crochet mallard should measure approximately 11 to 12 inches from bill to tail with the recommended yarn and hook.
It should have a low horizontal posture rather than an upright toy shape. The green head and white collar establish the front, the chestnut breast adds the familiar drake coloring, and the gray body carries the eye toward the dark tail.
The blue speculum is small on purpose. From several feet away, the overall mallard colors should be what you notice first.
If you would like another duck project with a very different construction, the free crochet duck lovey pattern combines a duck head with a soft comfort blanket. The crochet duck baby blanket pattern uses flat duck appliqués instead of a stuffed bird.
Why These Colors Make the Crochet Duck Read as a Mallard
The shaping gives this bird its low duck profile, but the color arrangement does much of the identification work. A male mallard has a green head, yellow bill, white neck ring, brown breast, gray body and darker rear. The blue speculum on the wing is bordered with white. Those are the details I chose to keep in the crochet version rather than adding extra markings that would make the pattern harder without improving the finished bird very much.
If you want to compare the crocheted color placement with a real bird, the Cornell Lab of Ornithology mallard identification guide has clear photographs of breeding males and explains the major field marks.
The crochet version is simplified on purpose. Real feathers create much finer changes in tone than yarn can reproduce cleanly at this scale. Instead of trying to copy every feather, the pattern concentrates the green, chestnut, gray, black, white and blue in the places where they contribute most to the mallard appearance.
That is also why I would not replace the narrow blue speculum with a large blue wing panel. The little flash of blue is enough. The gray wing still needs to look like the main wing when you view the duck from the side.
Care and Finishing for Your Crochet Mallard
Before washing the finished mallard, check the care instructions for every yarn used in the project. When several colors are combined in one stuffed piece, use the instructions for the fiber that requires the gentlest treatment.
If you are uncertain whether the colors will bleed, test short yarn scraps before washing the completed duck. This is especially useful when deep green, black, chestnut and white yarns are used next to each other.
For light cleaning, spot clean the surface with cool water and a small amount of mild detergent. Blot rather than scrub the stitches. Press the cleaned area between towels to remove extra moisture, then reshape the body and allow it to dry completely.
If your yarn and stuffing are both labeled as machine washable, place the mallard inside a mesh laundry bag or pillowcase before washing. Use the gentlest cycle allowed by the yarn manufacturer. Avoid high heat unless every material in the project is specifically labeled for it.
Reshape the mallard while it is damp. Press the gray back into its long, lower profile, flatten the bill, arrange the feet and smooth the gray wings over the colored speculum pieces.
Check the black tail curls after washing. If they have tightened into little spirals, stretch them gently with your fingers until they return to soft backward curves.
Check the Seams Before Giving the Mallard as a Gift
Run your fingers around every attachment point. Pay particular attention to the bill, neck, wing edges, feet and curled tail feathers.
Pull each attached piece gently. Nothing should separate from the body or expose stuffing.
Inspect the embroidered eyes and nostrils as well. The floss should lie flat against the crochet with no loose loops.
An embroidered face removes the hard plastic eye pieces commonly used on amigurumi, but careful construction still matters. If a seam loosens or stuffing becomes accessible, repair the mallard before it is handled again.
A Note About Babies and Sleep Spaces
If you make this mallard for a baby, treat it as a handmade gift for supervised use and display rather than something to leave in an infant sleep space.
The American Academy of Pediatrics recommends keeping stuffed toys and other soft objects out of a baby's crib, bassinet and other sleep areas. You can read the current guidance at HealthyChildren.org's safe sleep guide.
A handmade mallard can still be a sweet nursery piece. Place it on a shelf or other secure surface that a baby cannot reach, then bring it down when an adult is there to supervise.
Free Crochet Mallard Duck Pattern FAQ
Is this a male or female mallard?
This pattern represents an adult male mallard, also called a drake. The green head, narrow white neck ring, chestnut breast, gray body and yellow bill are the clearest clues.
A female mallard would require a completely different color plan. Females are predominantly mottled brown rather than green, chestnut and gray, so simply changing the head color would not produce a convincing female version.
Can I use a different yarn weight?
Yes, but the finished size will change. A lighter yarn and smaller hook will produce a smaller bird. A heavier yarn and larger hook will produce a larger one.
Use the same yarn weight for all of the main colors. Mixing a bulky gray yarn with a thinner chestnut yarn, for example, can change the body circumference at the color transition.
Choose a hook that creates dense fabric without making the stitches difficult to work. Stuffing should not show through the finished crochet.
Why is the body crocheted in one piece?
The chestnut breast, gray middle and black rear are worked in one continuous body because that construction produces a smoother mallard silhouette. Three separately stuffed sections would create visible joins and make the duck more segmented.
The continuous body also lets you shape the stuffing from the breast all the way through the tail. That helps maintain the long back and low belly that distinguish this project from a round amigurumi duck.
Why is the head separate from the body?
A separate head gives you more control over the neck position, bill angle and white collar. It also lets you complete the embroidered face before the head is sewn onto the body.
The head and neck themselves are one piece. That avoids a second seam between the green head and green neck.
Can I use safety eyes instead of embroidery?
I recommend the embroidered eyes given in the pattern. They fit the scale and expression of this mallard and do not add separate plastic eye components.
Keep each eye small and slightly oval. Large round eyes can change the appearance from a recognizable mallard to a more cartoon-like duck.
Why doesn't my mallard look as long as the example?
First check the gray body rounds. Rounds 14 through 27 are all worked without increases or decreases. Those straight rounds create much of the length.
Next check the stuffing. Too much fiberfill in the middle can push the body outward and upward. If the opening has not been closed yet, remove a little stuffing from the upper gray section and redistribute it toward the chest and rear.
After the body is closed, you can still improve the profile by pressing the upper gray section gently and shaping the stuffing through the crochet fabric.
Why does my finished duck stand too high?
Check the legs first. They should be very short. The body is meant to rest close behind the webbed feet rather than balance high above them.
Also check where the legs are attached. Position them slightly behind the fullest part of the breast rather than under the center of the gray body.
Can I leave off the blue wing patch?
You can, and the green head and chestnut breast will still identify the bird as a mallard. I would keep it if possible, though. The narrow blue speculum adds a characteristic wing detail without requiring difficult colorwork inside the gray wing.
If you simplify the wing, leave the entire wing gray rather than enlarging the blue section.
My blue speculum is almost hidden. Is that wrong?
No. Only a narrow portion is meant to show beneath the gray wing.
If no blue can be seen at all, loosen the lower wing attachment and move that edge upward by one or two stitch rows. If most of the blue rectangle is exposed, move the wing slightly downward.
Can I make the bill in one layer?
You can, but two layers hold the broad flat shape more reliably. A single crochet panel can curl with handling or washing.
The two-layer bill is still left unstuffed. Joining the matching panels gives it structure without making it bulky.
Can I make this crochet mallard without the curled tail feathers?
Yes. The black rear section already forms the main tail, so the duck will still be complete without the two curls.
The small curled feathers add another recognizable detail of the male mallard. Keep them if you want the finished bird to match the example image closely.
Do I need to block the pieces?
No formal blocking is necessary. Flatten the bill, wings, speculum pieces and feet with your fingers before assembly.
If a flat piece curls badly, lightly dampen it and let it dry flat before sewing. Do not stretch it larger than the pattern measurements.
What should I check if the head looks too large?
First confirm that the head reached a maximum of 36 stitches and decreased to 30 stitches before the lower green neck.
Then check the stuffing. The crown needs enough filling to stay rounded, but packing the entire head tightly can make it much larger than intended.
The green head should be clearly smaller than the widest part of the body when you look at the finished mallard from the front.
Can I turn this into a generic yellow crochet duck?
The construction could be adapted, but I would use a pattern designed around a yellow duck if that is the look you want. Much of this project's character comes from the mallard color changes, narrow collar, wing marking and dark tail.
For that look, use my free crochet duck pattern, which is designed as a freestanding yellow duck with a rounded body, orange bill, flat wings and webbed feet. For a softer blanket-style project, see my free crochet duck lovey pattern, or make the flat ducks in my crochet duck baby blanket pattern when you want a duck motif instead of a complete dimensional bird.
How to Match the Shape in the Example Image
The finished mallard is meant to look like a recognizable bird first and an amigurumi project second. You do not need to reproduce every feather or contour of a real mallard. A few proportions do most of the work.
Start with the body. It should form one long horizontal shape from the chestnut breast through the gray middle and into the black rear. The breast is fuller, but it should flow into the body rather than look like a separate round section.
The head is intentionally modest in size. When you look at the mallard from the front, the widest part of the body should be clearly broader than the green head.
The white neck ring should remain narrow enough to read as a collar. If it dominates the neck, fold a small amount of the white section toward the body as you sew the head in place.
The gray wings should sit close to the sides. Their tapered ends follow the direction of the body toward the tail rather than pointing upward. Only a narrow portion of the blue speculum should show below each wing.
The feet provide another useful proportion check. They are broad enough to look webbed, but the legs are deliberately short. When the mallard is sitting on a table, the lower body should remain close to the surface behind them.
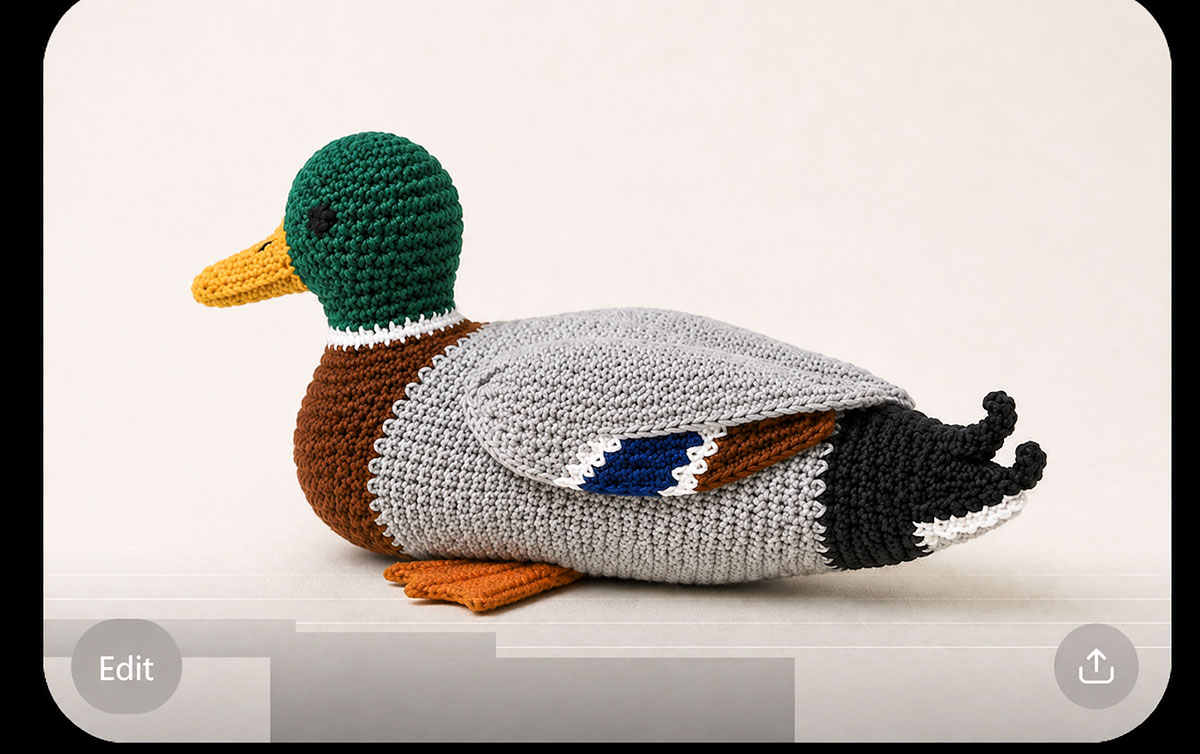
If the Body Looks Too Round
A round body usually comes from one of two things: too much stuffing in the gray middle or not enough length before the decreases begin.
If you are still crocheting the body, confirm that you completed all of the even gray rounds before starting the rear taper. Do not remove those rounds just because the body already seems large. They create length rather than width.
If the body is already finished, work with the stuffing through the fabric. Press the upper gray section down gently while supporting the belly with your other hand. Then massage some of the filling toward the breast and rear.
Do not flatten the body completely. The belly still needs a rounded lower curve.
If the Breast Looks Like a Separate Ball
The chestnut section should be full at the front but smooth where it joins the gray.
Massage stuffing away from the upper chestnut edge and toward the center of the breast. Press the gray section toward the chest slightly so the two areas form one continuous body line.
A tight yarn change can also create a groove at the boundary. If you have not finished the body yet, loosen the first few gray stitches enough that they match the tension of the chestnut rounds.
If the Neck Looks Too Tall
First check the head placement. The white collar should sit directly against the body rather than resting above it on an exposed column of green stitches.
If the head has not been sewn on yet, lower the neck slightly over the chestnut and gray transition.
If the head is already attached securely, press a small amount of stuffing away from the lower green neck and toward the crown. That can shorten the visual length without changing the crochet.
If the Bill Points Down
The bill should leave the face close to horizontal.
Check the lower attachment stitches first. If they are much tighter than the stitches across the top edge, they can pull the bill downward.
Loosen or remove the tight stitches and resew the lower edge with less tension.
If the bill itself has curled, dampen it lightly, press the two layers flat between your fingers, and allow it to dry before making another adjustment.
If the Wings Look Too Small
Before remaking them, check the placement. The front of each wing begins behind the breast rather than directly under the bill or eye.
The rear point should extend toward the black portion of the body. Moving the whole wing slightly backward can make the intended length much clearer.
If the wing still covers too little of the gray body, compare it with the approximate finished measurement of 4 to 4 1/2 inches. Differences in gauge can reduce the size even when every row is correct.
If Too Much Blue Shows on the Wing
Move the lower edge of the gray wing downward before adding more stitches to the speculum.
The blue panel is meant to sit partly beneath the gray wing. A thin white edge should appear on each side of it, followed by a small amount of chestnut toward the rear.
Do not enlarge the gray wing only to hide the blue. Changing its placement is usually enough.
If the Tail Curls Too Much
The two black tail additions are made with extra stitches so they curl naturally, but yarn tension can make the curl tighter than expected.
Stretch each tail piece gently between your fingers. Hold it in a loose backward curve for several seconds before attaching it.
After sewing, use one small black stitch through the base of the curl and the body if you need to control its direction.
The free end should still lift slightly away from the body.
If the Feet Will Not Lie Flat
Check the connection between the foot and short leg. The leg should sit over the rear portion of the foot, not over the toe points.
If the heel curls upward, dampen the flat foot lightly and press it into shape before attaching the leg to the body.
When positioning the finished feet beneath the mallard, let them rest naturally on the surface before you pin the legs. Then sew the legs where they meet the body without lifting the feet.
Changing the Mallard Colors Without Losing the Bird Details
You can change yarn brands or adjust the shades without changing the construction. Look for colors that maintain clear separation between the major sections.
The head works well in forest green, bottle green or another deep green. A very pale green can make the head look less distinct from the gray body.
The breast can range from warm chestnut to medium reddish brown. It should remain noticeably warmer than the gray body.
For the body, choose a medium gray, taupe gray or soft brownish gray. Avoid using the same brown as the breast because the two sections need enough contrast to remain visible.
The rear body and curled tail feathers can be black or very dark charcoal.
Choose a clear white or soft off white for the neck ring and wing borders. You only need a small amount.
The speculum can be royal blue, deep cobalt or a rich blue with a slight violet cast. Keep it darker than a pastel blue so the narrow marking remains visible beneath the gray wing.
The bill should stay closer to golden yellow than to the orange used for the feet.
Can You Crochet a Female Mallard From This Pattern?
The body shape can be reused, but a female mallard needs more than a green-to-brown color swap. Female mallards have mottled brown plumage across the head and body, so the solid chestnut, gray and green sections in this pattern would no longer match the bird.
If you want to experiment, use several related browns and tans and distribute them in smaller markings rather than following the drake color blocks. Keep the blue speculum because it is present on both male and female mallards.
I would treat that as a separate colorwork project rather than a quick variation of these instructions.
Ways to Use the Finished Crochet Mallard
The completed mallard works well as a handmade shelf piece, bird themed gift or part of a collection of crochet animals. Its long body also makes it easy to recognize when displayed from the side.
For a nursery display, keep the surrounding arrangement simple enough that the green head and chestnut breast remain easy to see. A small stack of books, a framed bird illustration or other securely placed decor can carry the nature theme without surrounding the mallard with many small accessories.
Keep handmade stuffed pieces out of an infant sleep area. A high shelf or another secure location outside the crib gives you the decorative effect without placing a soft object in the sleep space.
If you prefer crochet projects that become part of a blanket rather than a separate stuffed piece, the crochet duck baby blanket pattern uses flat duck appliqués that are sewn directly to the blanket.
Before You Call the Mallard Finished
Set the duck on a flat surface and give it one final inspection in good light.
- Check that the body is longer than it is tall.
- Check that the gray back remains relatively flat.
- Make sure the chestnut breast is rounded without looking separate from the body.
- Confirm that the green head is smaller than the widest part of the body.
- Make sure the white neck ring remains narrow and visible.
- Look at the bill from above and confirm that it is centered.
- Check that both embroidered eyes sit at matching heights.
- Compare the two wings from above.
- Make sure only a narrow blue speculum shows beneath each gray wing.
- Check that the black tail feathers curve backward rather than straight upward.
- Make sure both center toes point forward.
- Confirm that the belly rests close to the surface behind the short legs.
- Check every sewn piece for loose edges.
- Make sure no fiberfill is visible through a seam or decrease.
- Weave in and bury every remaining yarn and embroidery tail.
When those details are in place, the finished bird should have the same low profile and recognizable male mallard coloring shown in the example image. The pattern uses simple crochet shapes, but their proportions and placement are what keep the result from turning into a generic stuffed duck.
More Free Crochet Bird Patterns
This mallard gets its character from realistic bird proportions and carefully placed colors, but you do not have to make every crochet bird this detailed. Some species need only a distinctive body shape, bill or color marking to become recognizable.
Continue with my free crochet bird patterns to find more bird projects and ideas for using shaped wings, embroidered features and species-inspired colors in crochet.
When you click on links to various merchants on this site and make a purchase, this may result in this site earning a commission. This does not affect the price you pay.

UBGI Gold Standard 2026
Reviewed under the site's
editorial checklist.
Photos, decorating ideas, party setups and reader submissions are shared for inspiration unless a page is specifically presented as a pattern, tutorial, reference guide or step-by-step project. Follow the instructions, measurements, safety guidance and manufacturer directions provided for the particular project or product.
About Jan | Contact | Baby Nursery Ideas (Blog) | Site Map | Privacy Policy | Disclosure Policy | Disclaimer | Affiliate Disclosure | Earnings Disclosure | Facebook | Pinterest
I am a participant in the Amazon Services LLC Associates Program, an affiliate advertising program designed to provide a means for us to earn fees by linking to Amazon. As an Amazon Associate I earn from qualifying purchases.
Copyright © 2006-2026. All Rights Reserved.