Crochet Duck Baby Blanket Pattern with an Easy Duck Appliqué
By Jan Bay
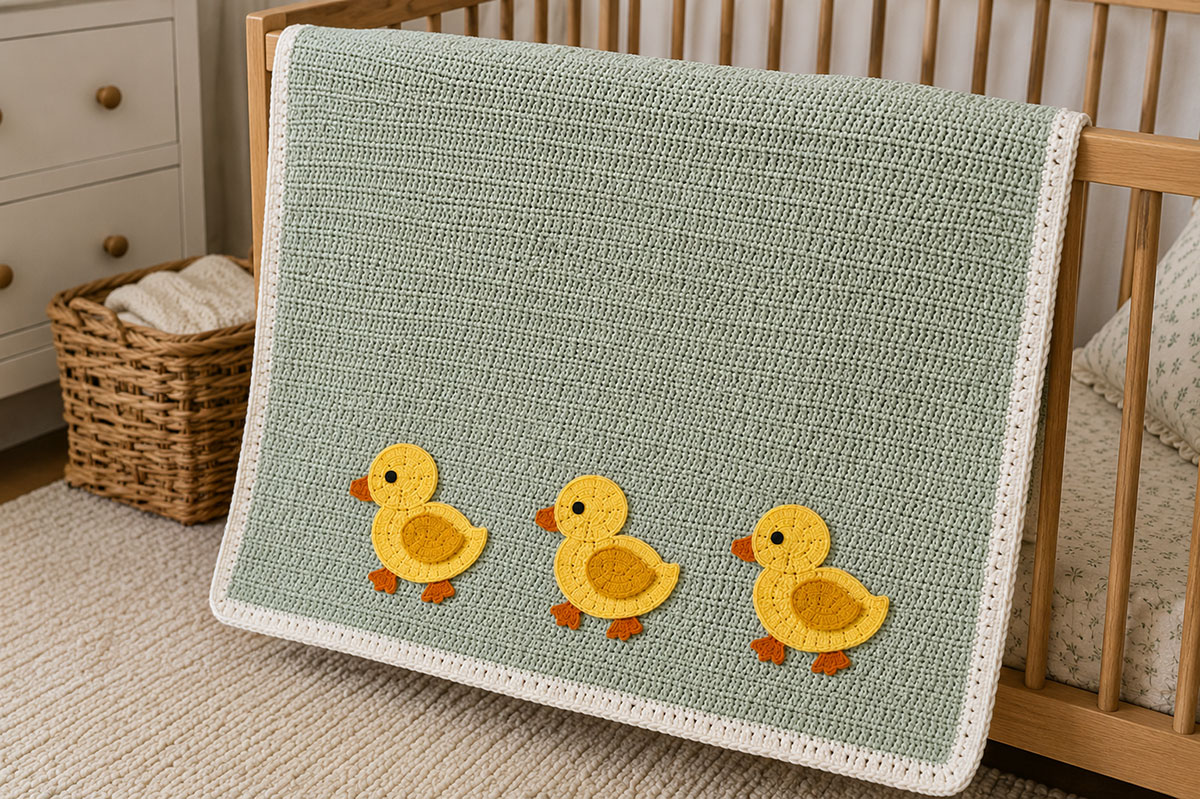
This free crochet duck baby blanket pattern combines a simple sage half double crochet blanket with three flat baby duck appliqués arranged along the lower edge. The ducks are crocheted separately and sewn securely to the finished blanket before the narrow white border is added, creating a handmade baby gift that works well for supervised cuddling, stroller outings and nursery keepsake use.
Explore More Free Crochet Baby Patterns
Free Crochet Baby Blanket Patterns
Free Crochet Duck Lovey Pattern
Baby Blanket Yarn and Crochet Supplies
Jump to the Pattern
Materials for This Crochet Duck Baby Blanket Pattern
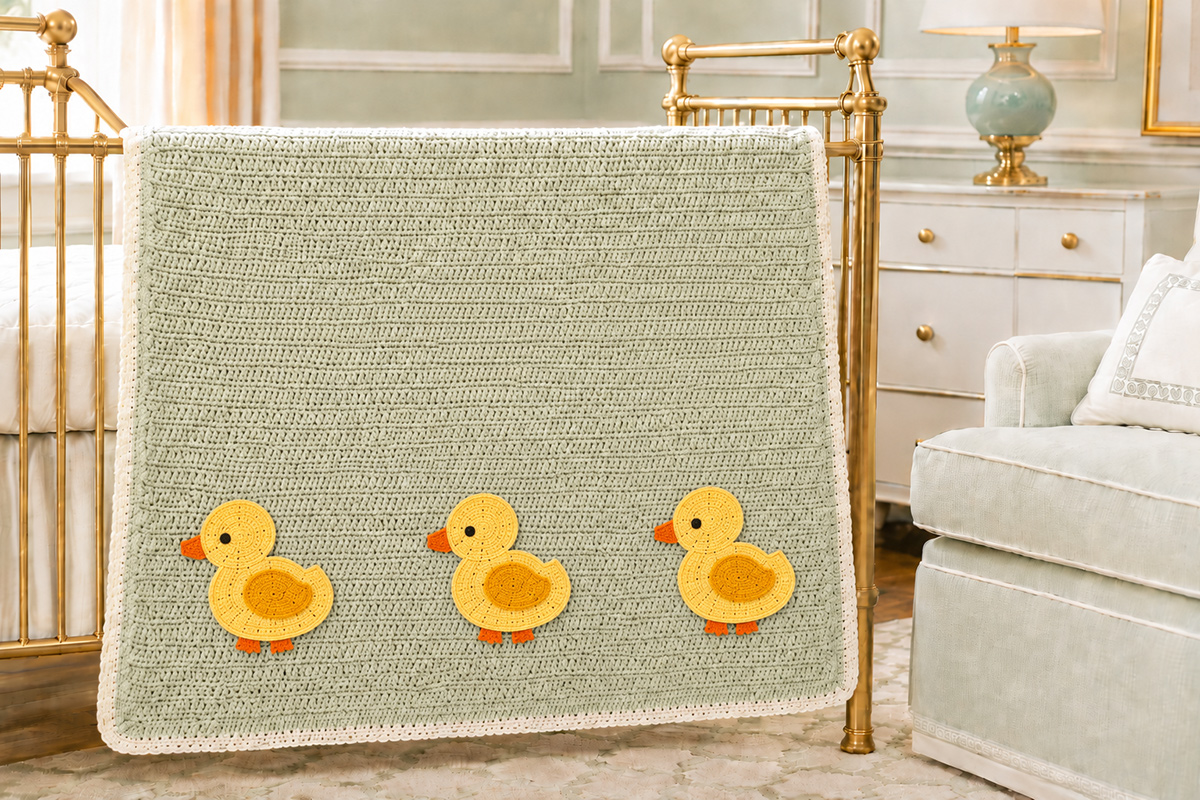
I like the ducks to do the decorating here. The blanket base stays simple and smooth, which gives the yellow appliqués enough contrast to read clearly from across the room instead of disappearing into a busy stitch pattern.
The finished design uses three flat ducks arranged in one evenly spaced row near the lower edge. All three face the same direction. Each duck is made separately and sewn to the completed blanket before the final border is added.
The pictured blanket uses soft sage for the background, golden yellow for the ducks, a slightly deeper yellow for the wings, orange for the beaks and feet, and white for the narrow border. You can change the palette, but keep enough contrast between the blanket and the ducks to preserve their shapes.
- Medium weight #4 yarn, Color A: approximately 1,200 yards soft sage for the blanket
- Medium weight #4 yarn, Color B: approximately 150 yards golden yellow for the duck bodies, heads and tails
- Medium weight #4 yarn, Color C: approximately 50 yards deeper yellow or gold for the wings
- Medium weight #4 yarn, Color D: approximately 40 yards orange for the beaks and feet
- Medium weight #4 yarn, Color E: approximately 220 yards white for the border
- Black embroidery floss or smooth black yarn: a small amount for the embroidered eyes
- 5 mm crochet hook: for the blanket
- 4 mm crochet hook: for the duck appliqués
- Yarn needle with a blunt tip
- Scissors
- Stitch markers
- Measuring tape
- Rustproof blocking pins and blocking surface, if you plan to block the finished blanket
Choose a smooth, washable yarn rather than a heavily textured or fuzzy one. A smooth yarn makes the edges of the duck pieces easier to see while you crochet them, and it also gives you a cleaner line when you sew the appliqués to the blanket.
The 4 mm hook is intentionally smaller than the blanket hook. It makes the duck pieces a little denser so the body, head, wing, beak and feet keep their shape without stuffing. These ducks are flat appliqués, not small toys attached to the blanket.
Finished Size, Skill Level and Gauge
Finished blanket size: approximately 33 inches wide by 38 inches long after the border is added.
Blanket size before border: approximately 31 3/4 inches wide by 36 3/4 inches long.
Finished duck size: approximately 5 1/2 inches from the back of the body to the tip of the beak and about 4 1/2 inches from the top of the head to the bottom of the feet.
Number of duck appliqués: 3.
Skill level: Advanced beginner. You should be comfortable making basic crochet stitches, increasing, decreasing, working in rows and rounds, fastening off, and sewing flat crochet pieces together.
Blanket gauge: 13 half double crochet stitches and 10 rows = 4 inches using the 5 mm hook.
Measure your gauge across the center of a swatch rather than along its outer edges. If you have more than 13 stitches in 4 inches, try a larger hook. If you have fewer than 13 stitches, try a smaller hook.
The exact gauge of the duck appliqués is less important, but the pieces should lie flat and feel firm enough to hold a recognizable outline. If your duck pieces feel loose or floppy with the 4 mm hook, go down one hook size.
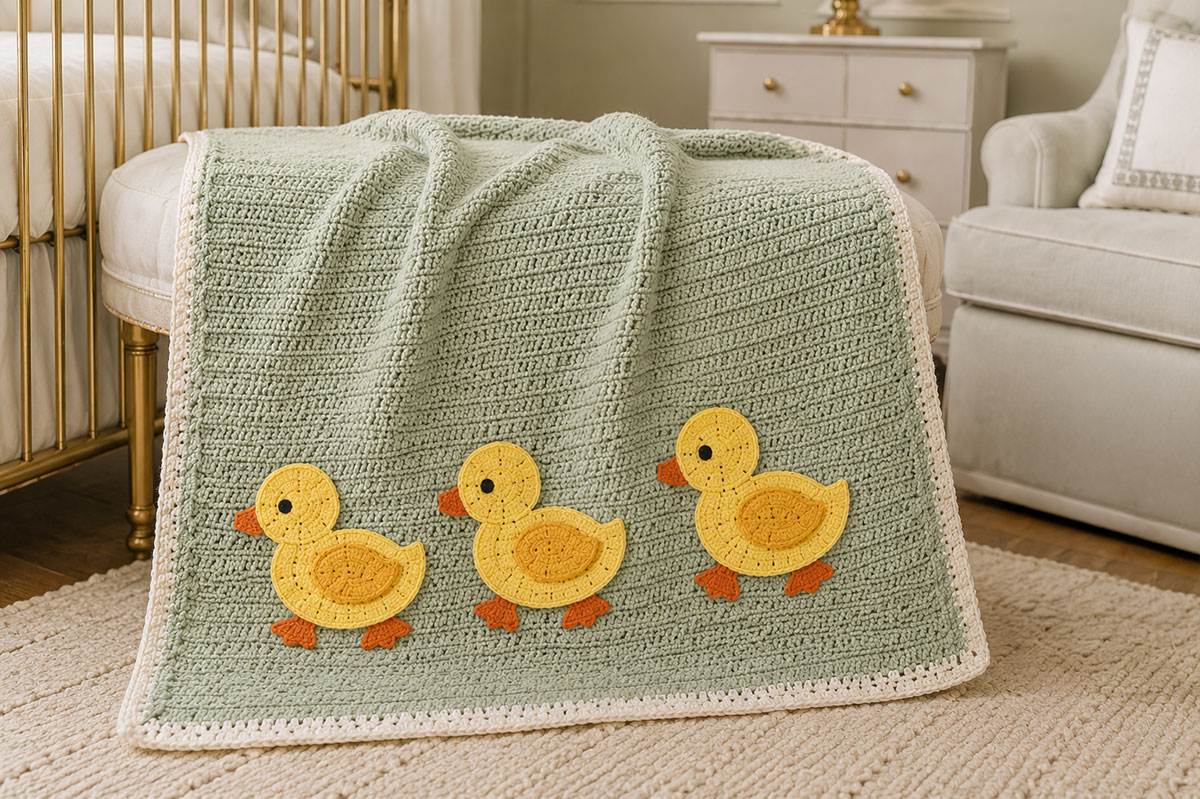
The full view is useful before you begin because it shows how much open sage background belongs above and around the ducks. I would not crowd additional motifs into that open area. Keeping the decoration near the lower edge is what gives the blanket its cleaner, more tailored look.
Crochet Abbreviations Used in the Pattern
This pattern uses standard U.S. crochet terminology.
- ch = chain
- ch-sp = chain space
- sc = single crochet
- hdc = half double crochet
- dc = double crochet
- sl st = slip stitch
- st = stitch
- sts = stitches
- inc = increase by working 2 stitches into the same stitch
- dec = decrease by working 2 stitches together
- hdc2tog = half double crochet 2 stitches together
- sc2tog = single crochet 2 stitches together
- RS = right side
- WS = wrong side
- rep = repeat
Turning chains do not count as stitches unless the instructions specifically say that they do. Count the first and last stitch of each blanket row before you turn. Keeping those edge stitches consistent now will make the border much easier to add later.
For the joined appliqué rounds, the beginning ch 1 does not count as a stitch. Work the first sc into the first stitch of the previous round. When an instruction says to join, use a slip stitch in the first sc of that round.
Crochet the Baby Blanket Base
Use Color A and the 5 mm hook for the blanket. The base is worked back and forth in half double crochet. It is intentionally uncomplicated because the duck appliqués need a smooth background.
Foundation: Ch 104.
Row 1: Hdc in the second ch from the hook and in each ch across. Ch 1 and turn. 103 hdc.
Rows 2 through 92: Hdc in each st across. Ch 1 and turn after Rows 2 through 91. Do not turn after Row 92. 103 hdc.
Fasten off after Row 92 and weave in all yarn ends securely before adding the appliqués.
Measure the blanket before you continue. The unbordered rectangle should be close to 31 3/4 inches wide and 36 3/4 inches long. A small difference is fine, but check your stitch count if one side has begun to slope.
Choose the face of the plain HDC rectangle that you prefer as the right side and place a stitch marker on that face. Keep this marked side facing up when you position and sew the ducks, and keep it facing you when you work the border.
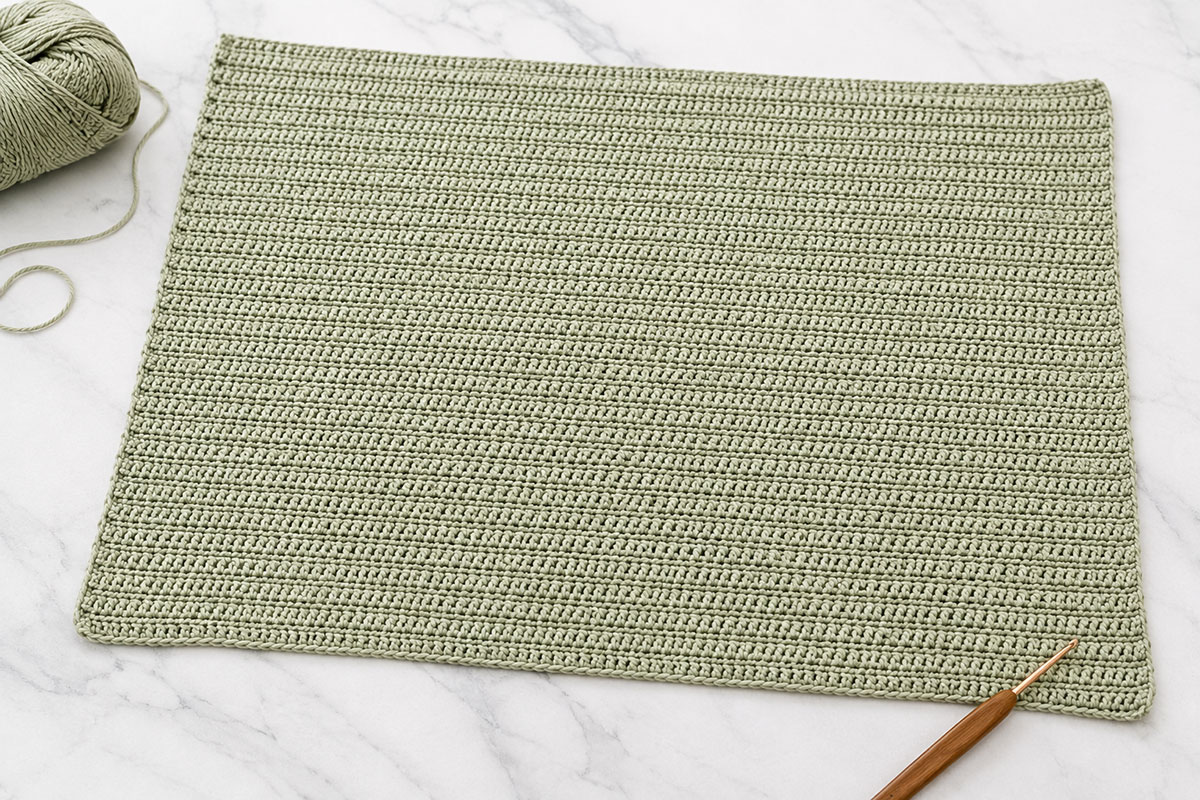
Set the blanket aside while you make the ducks. Do not add the white border yet. Sewing the appliqués to the plain rectangle first gives you better access to the edges and makes it easier to keep the duck arrangement centered.
Crochet the Flat Duck Appliqués
Make three complete ducks. Each one uses a golden yellow body and head, a small matching tail, a deeper yellow wing, one orange beak and two orange feet. The eye is embroidered after the pieces are assembled.
All three ducks on the pictured blanket face the same direction. The body remains a simple oval, and the small separate tail adds just enough shape at the back without turning the body itself into a complicated silhouette.
Duck Body
Use Color B and the 4 mm hook.
Ch 13.
Round 1: Work 2 sc in the second ch from the hook. Sc in each of the next 10 ch. Work 4 sc in the last ch.
Rotate the foundation chain so you can work along the unused loops on the opposite side. Sc in each of the next 10 ch. Work 2 sc in the same foundation ch that holds the first 2 sc. Join with a sl st to the first sc. 28 sc.
Round 2: Ch 1. Work 2 sc in each of the first 2 sts. Sc in the next 10 sts. Work 2 sc in each of the next 4 sts. Sc in the next 10 sts. Work 2 sc in each of the last 2 sts. Join. 36 sc.
Round 3: Ch 1. [Sc in the next st, 2 sc in the next st] twice. Sc in the next 10 sts. [Sc in the next st, 2 sc in the next st] four times. Sc in the next 10 sts. [Sc in the next st, 2 sc in the next st] twice. Join. 44 sc.
Round 4: Ch 1. [Sc in each of the next 2 sts, 2 sc in the next st] twice. Sc in the next 10 sts. [Sc in each of the next 2 sts, 2 sc in the next st] four times. Sc in the next 10 sts. [Sc in each of the next 2 sts, 2 sc in the next st] twice. Join. 52 sc.
Round 5: Ch 1. Sc in each st around. Join. 52 sc.
Fasten off, leaving a long tail for sewing.
The body should look like a broad horizontal oval. If it cups instead of lying flat, check the increases in Rounds 2 through 4 before continuing.
Small Duck Tail
Use Color B and the 4 mm hook.
Ch 4.
Row 1: Sc in the second ch from the hook, hdc in the next ch and dc in the last ch. 3 sts.
Fasten off, leaving a long tail for sewing.
This tiny piece adds the slight upward tail shape shown on the finished ducks. The dc end is the wider end and will be tucked beneath the back edge of the body. Only the narrow end should extend beyond the oval.
Duck Head
Use Color B and the 4 mm hook.
Round 1: Make a magic ring and work 6 sc into the ring. Join. 6 sc.
Round 2: Ch 1. Work 2 sc in each st around. Join. 12 sc.
Round 3: Ch 1. [Sc in the next st, 2 sc in the next st] six times. Join. 18 sc.
Round 4: Ch 1. [Sc in each of the next 2 sts, 2 sc in the next st] six times. Join. 24 sc.
Round 5: Ch 1. [Sc in each of the next 3 sts, 2 sc in the next st] six times. Join. 30 sc.
Fasten off, leaving a long tail.
Do not stuff the head. It stays completely flat.
Duck Wing
Use Color C and the 4 mm hook.
Ch 7.
Round 1: Work 2 sc in the second ch from the hook. Sc in each of the next 4 ch. Work 4 sc in the last ch. Rotate the foundation chain and work along the opposite side. Sc in each of the next 4 ch. Work 2 sc in the same foundation ch that holds the first 2 sc. Join. 16 sc.
Round 2: Ch 1. Work 2 sc in each of the first 2 sts. Sc in the next 4 sts. Work 2 sc in each of the next 4 sts. Sc in the next 4 sts. Work 2 sc in each of the final 2 sts. Join. 24 sc.
Round 3: Ch 1. [Sc in the next st, 2 sc in the next st] twice. Sc in the next 4 sts. [Sc in the next st, 2 sc in the next st] four times. Sc in the next 4 sts. [Sc in the next st, 2 sc in the next st] twice. Join. 32 sc.
Fasten off, leaving a long tail.
The wing is another oval, but it is much smaller than the body. When it is placed on the duck, angle it slightly toward the tail instead of setting it straight up and down.
Duck Beak
Use Color D and the 4 mm hook.
Ch 5.
Row 1: Sc in the second ch from the hook and in each ch across. Ch 1 and turn. 4 sc.
Row 2: Sc2tog twice. Ch 1 and turn. 2 sts.
Row 3: Sc2tog. 1 st.
Fasten off, leaving a long tail.
The four-stitch edge is the base of the beak. That edge will be sewn to the side of the head, with the single-stitch point facing away from the duck.
Duck Feet
Make two for each duck using Color D and the 4 mm hook.
Ch 5.
Row 1: Sc in the second ch from the hook and in each ch across. Ch 1 and turn. 4 sc.
Row 2: Sc in each st across. Ch 1 and turn. 4 sc.
Row 3: Sc2tog twice. 2 sts.
Fasten off, leaving a long tail.
These small tapered pieces make simple flat feet rather than dangling legs. They are easier to sew securely to a baby blanket and keep the finished appliqué low against the blanket surface.
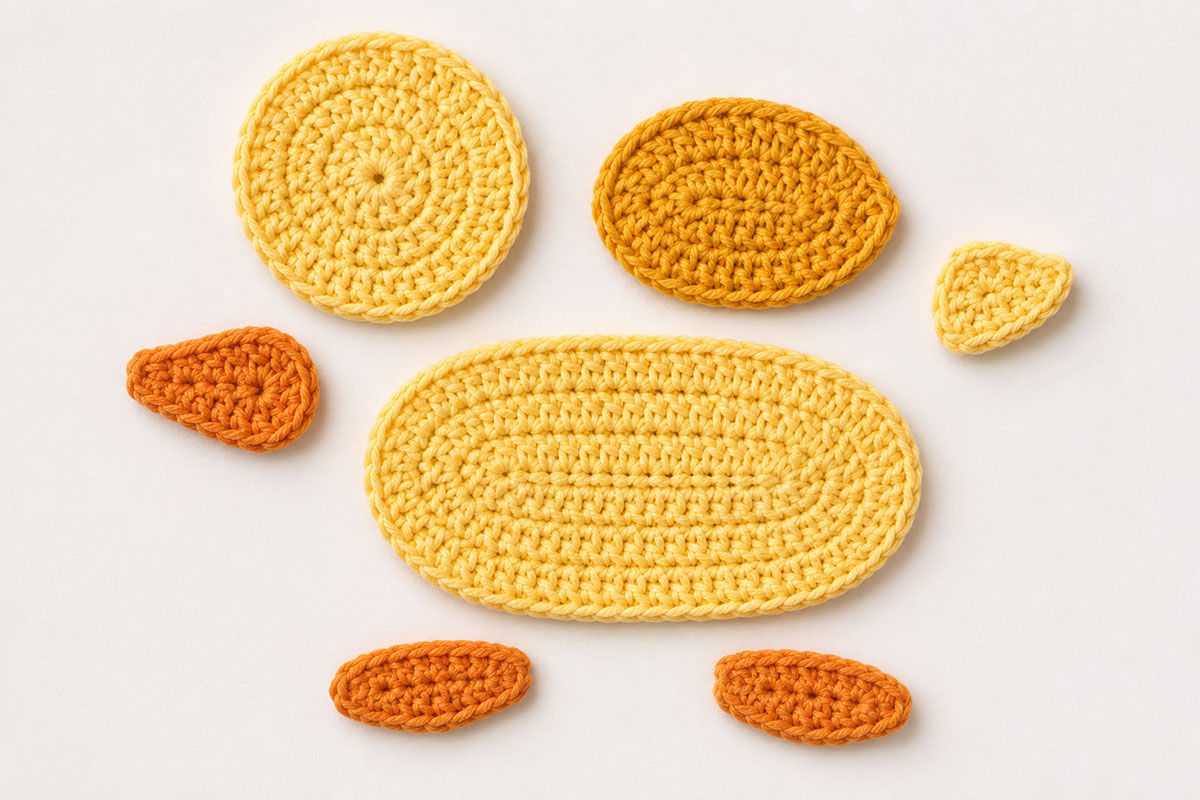
Before you sew anything, make all three sets of pieces and compare them side by side. Small differences are normal in handmade work, but the bodies and heads should be close enough in size that one duck does not look noticeably larger than the others.
If you enjoy using flat animal motifs on blankets, you can also browse my free crochet animal appliqué patterns. For a different duck project, my free crochet duck pattern makes a freestanding yellow duck, while the free crochet duck lovey pattern makes a smaller comfort item instead of a full baby blanket.For a more natural-looking freestanding bird, my free crochet mallard duck pattern uses a green head, narrow white neck ring, chestnut breast, long gray body and layered wing details.
Assemble Each Duck Before It Goes on the Blanket
Lay the pieces on a flat surface before threading your yarn needle. All three ducks on this blanket face left.
Place the oval body horizontally. Position the round head over the upper-left end of the body so about the lower third of the head overlaps the body.
Sew the head to the body around the section where the two pieces overlap. Use small stitches and keep the yarn on the back as much as possible.
Position the small tail at the upper-right end of the body. Tuck the wider end beneath the body and angle the narrow tip slightly upward. Sew the covered section securely so only a small tail point remains visible.
Position the oval wing slightly behind the center of the body. Leave a visible band of the yellow body around the wing instead of allowing the wing to reach the outer edge. Sew all the way around the wing.
Place the wide edge of the beak against the outer side of the head. The pointed end should face away from the body. Sew the entire four-stitch base of the beak to the head, then add one or two tiny securing stitches farther toward the point if the beak tries to curl.
Position the two feet along the bottom of the body. Space them apart rather than placing them directly beside each other. Tuck the narrow two-stitch end of each foot slightly behind the body and sew that covered section securely in place.
Use black embroidery floss or smooth black yarn to make one small embroidered eye on the head. Make several short satin stitches in the same area until the eye is solid and neat. Knot and secure the thread on the back of the appliqué where the knot will later be enclosed between the duck and the blanket.
Do not add plastic safety eyes, buttons, beads or glued decorations. The face should stay soft and flat.
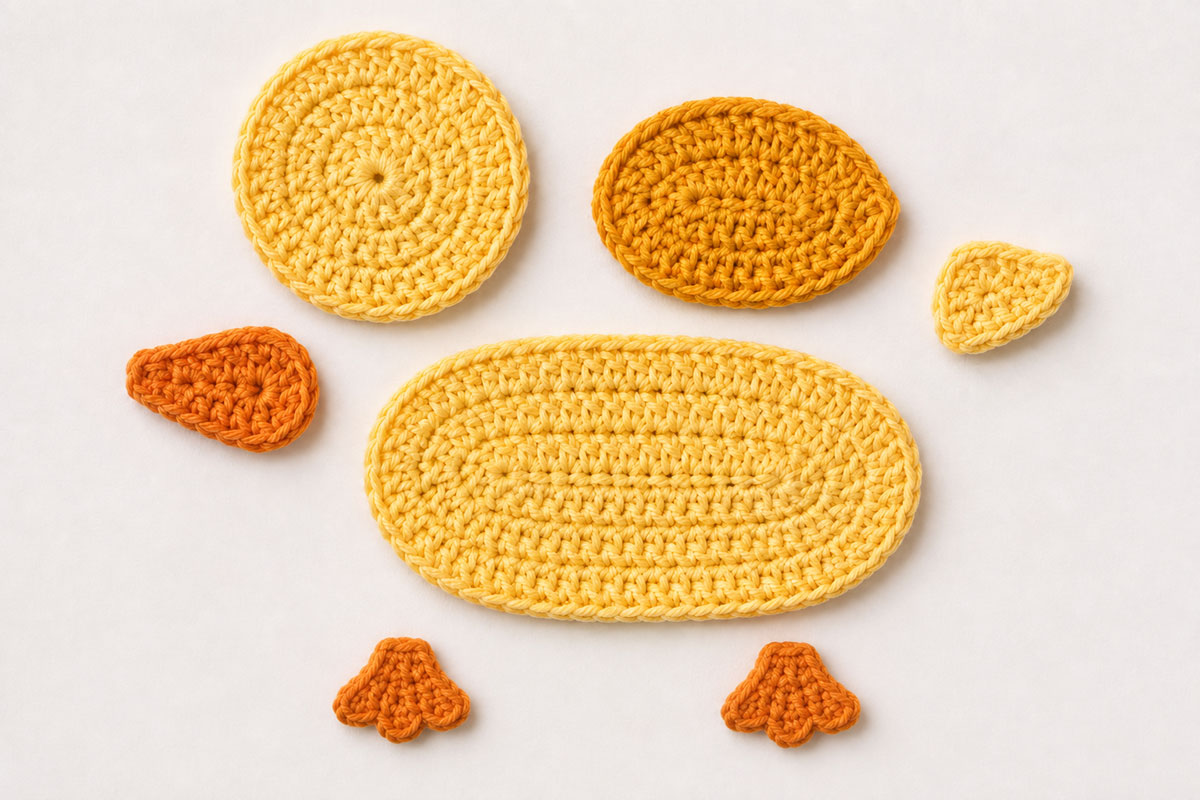
When the first duck is assembled, set it on the blanket and look at it from several feet away. You should be able to read the head, beak, wing and feet without needing a close view. That simple check matters more here than adding extra decorative details.
How to Position the Ducks on This Crochet Duck Baby Blanket Pattern
Do not sew the ducks down as soon as they are finished. Arrange all three appliqués on the blanket first. The ducks form one row near the lower edge, with the large open area above them left intentionally undecorated.
Spread the blanket flat with the right side facing up and the shorter 31 3/4-inch edges at the top and bottom. Smooth it with your hands, but do not stretch it. Place all three ducks facing left and line them up visually along the lower short edge.
Start by placing the center duck on the vertical centerline of the blanket. Position the other two ducks the same distance to the left and right. Leave about 2 1/2 to 3 inches between neighboring appliqués and about 2 to 3 inches between the feet and the lower edge before the border is added.
Keep the two outer ducks comfortably inside the side edges. The exact measurement can shift slightly with your finished gauge, so judge the three ducks as one group rather than forcing a measurement that makes the row look crowded.
Step away from the blanket before you pin anything. The three ducks should read as one intentional detail along the bottom, with plenty of sage background above them. I would resist filling that open space simply because it is available. The undecorated area is what keeps the row of ducks from taking over the whole blanket.
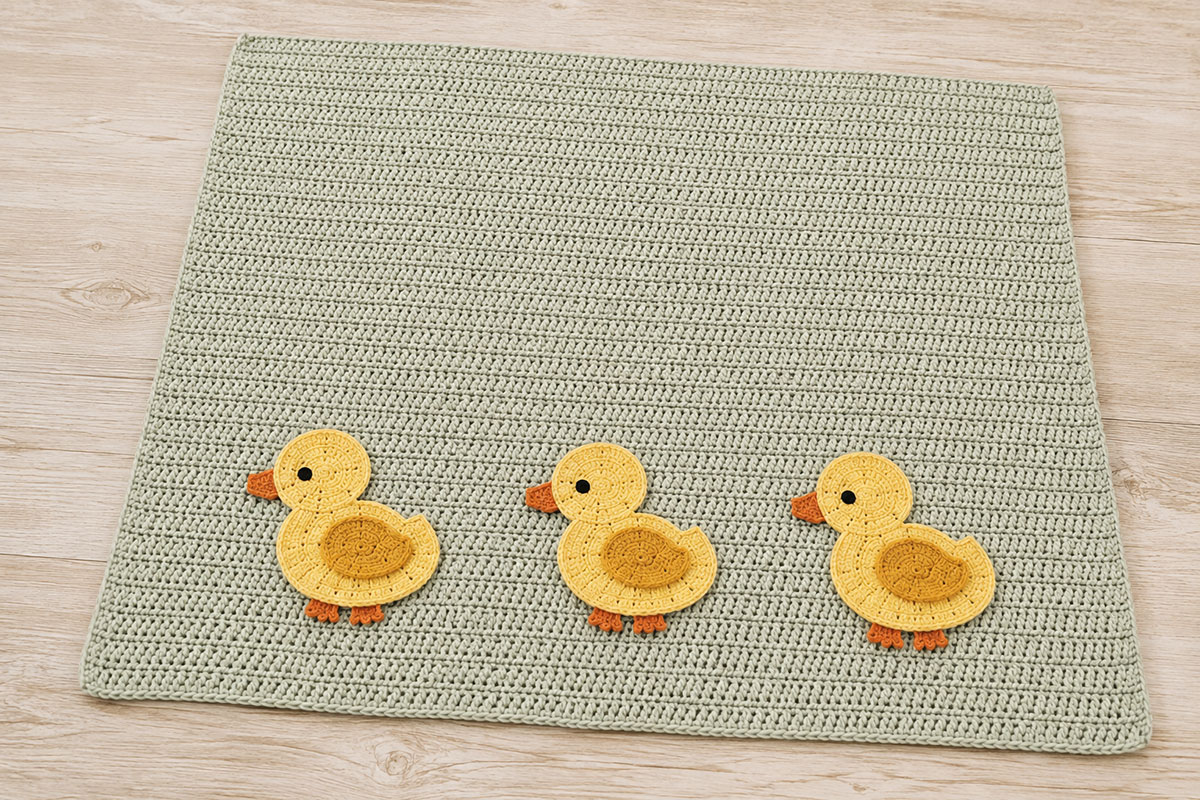
Pin the Appliqués Without Distorting the Blanket
When you are satisfied with the arrangement, secure one duck at a time. Place pins through the body, head and wing so the pieces cannot shift while you sew.
Do not pull the blanket fabric outward while pinning. If the blanket is stretched when the appliqué is attached, the fabric can pucker when you release it.
Check the beak and feet before sewing. These smaller pieces should lie flat against the blanket rather than lifting away from it.
Sew Each Duck Securely to the Blanket
Thread a yarn needle with a length of Color B. Use a manageable length of yarn so it does not twist or become fuzzy while you work.
Begin at the back of the blanket behind the body. Bring the needle through the outer edge of the appliqué, then pass it back through the blanket close to the same point. Continue around the entire body with small, evenly spaced stitches.
Catch the blanket fabric without pulling the stitches tight enough to create dents. The appliqué should rest against the surface rather than being cinched into it.
After the body is attached, use Color B to sew the exposed outer edge of the head and the visible edge of the tail securely to the blanket. Use Color C to secure the outer edge of the wing. Keep these stitches snug enough to hold the pieces flat without pulling the blanket fabric.
Use Color D to secure the outer edges of the beak and feet. Pay special attention to the pointed end of the beak and the lower corners of each foot. There should be no loose tip that a small finger can easily lift.
Secure the yarn ends on the wrong side of the blanket and weave them through several stitches. Trim only after the end feels firmly anchored.
Repeat the process for all three ducks.
Check the Blanket After All Three Ducks Are Attached
Lay the blanket flat again and run your fingertips around every appliqué. Look for an edge that curls upward, a foot that moves independently or a beak that needs another securing stitch.
Then lift the blanket and let it hang naturally. The appliqués should move with the blanket instead of pulling the fabric into three stiff areas.
Turn the blanket over and inspect the wrong side as well. Long loose strands should not cross the back of an appliqué. Secure and weave in any remaining ends before you begin the border.
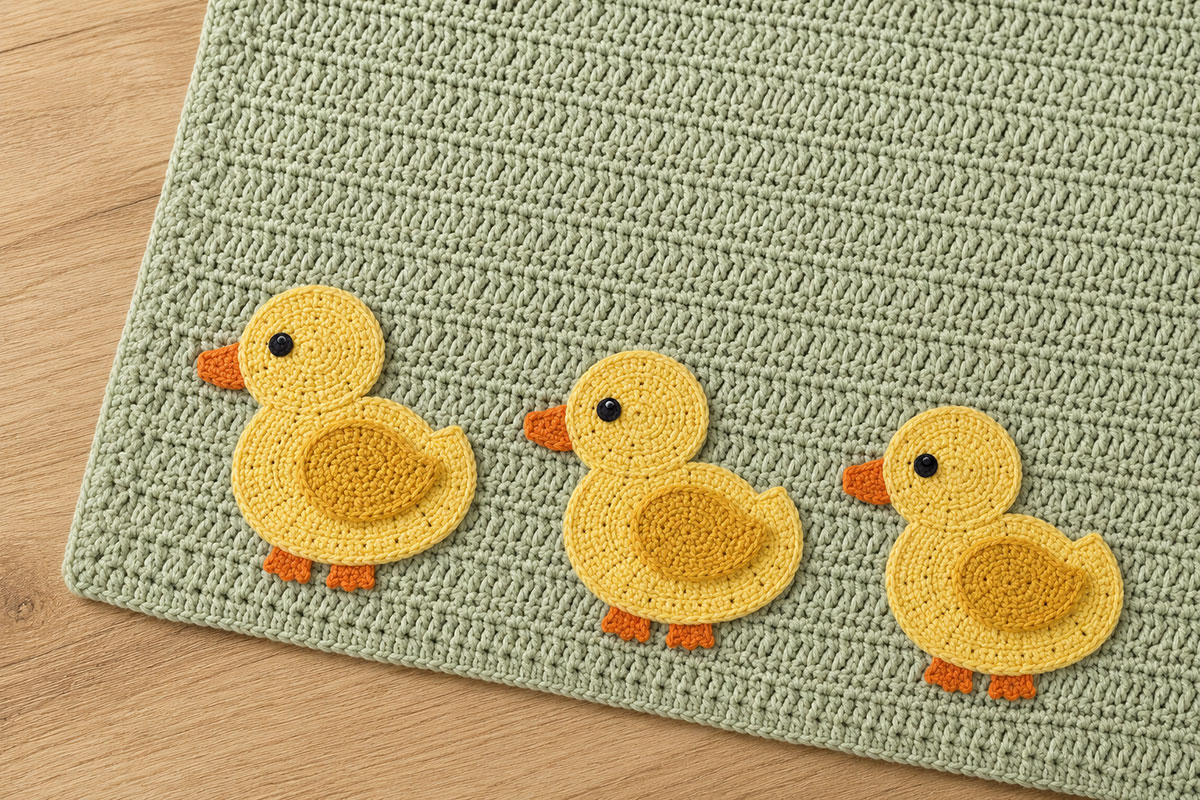
At this stage the blanket should already look finished from a distance. The border comes next, but it is meant to frame the ducks rather than compete with them.
Crochet the White Border
The narrow white border gives the blanket a clean finish and separates the sage background from anything it rests against. I would keep it simple. A wide or highly textured edging would pull attention away from the ducks.
Use Color E and the 5 mm hook. Keep the right side of the blanket facing you.
Border Round 1: Join Color E in any corner stitch and ch 1. Work 3 sc in that same corner stitch.
Continue around the blanket. Across the top and bottom, work 1 sc in each hdc between the corner stitches. Along each side edge, distribute the stitches evenly across the ends of the 92 rows.
A useful starting rhythm along each side is to work approximately 5 sc across every 4 row ends. You can do this by placing 1 sc in each of three row ends and 2 sc in the fourth row end, then repeating that rhythm. Adjust the spacing slightly if your own gauge requires it.
At each of the remaining three corners, work 3 sc in the corner stitch. Do not add a separate 1 sc in a corner that already receives the 3 sc. Join with a sl st to the first sc.
Before starting the next round, lay the blanket flat. The first border round should rest against the blanket without ruffling or drawing the edges inward.
If the border ruffles, remove a few stitches from the affected edge. If the blanket edge pulls inward, add a few stitches. A flat edge is more important than forcing an exact side count when individual row height can vary.
Border Round 2: Ch 1. Sc in each st around, working 3 sc in the center corner st at each corner. Join with a sl st.
Border Round 3: Repeat Round 2.
Border Round 4: Repeat Round 2. Join and fasten off.
Weave the final yarn end securely into the border.
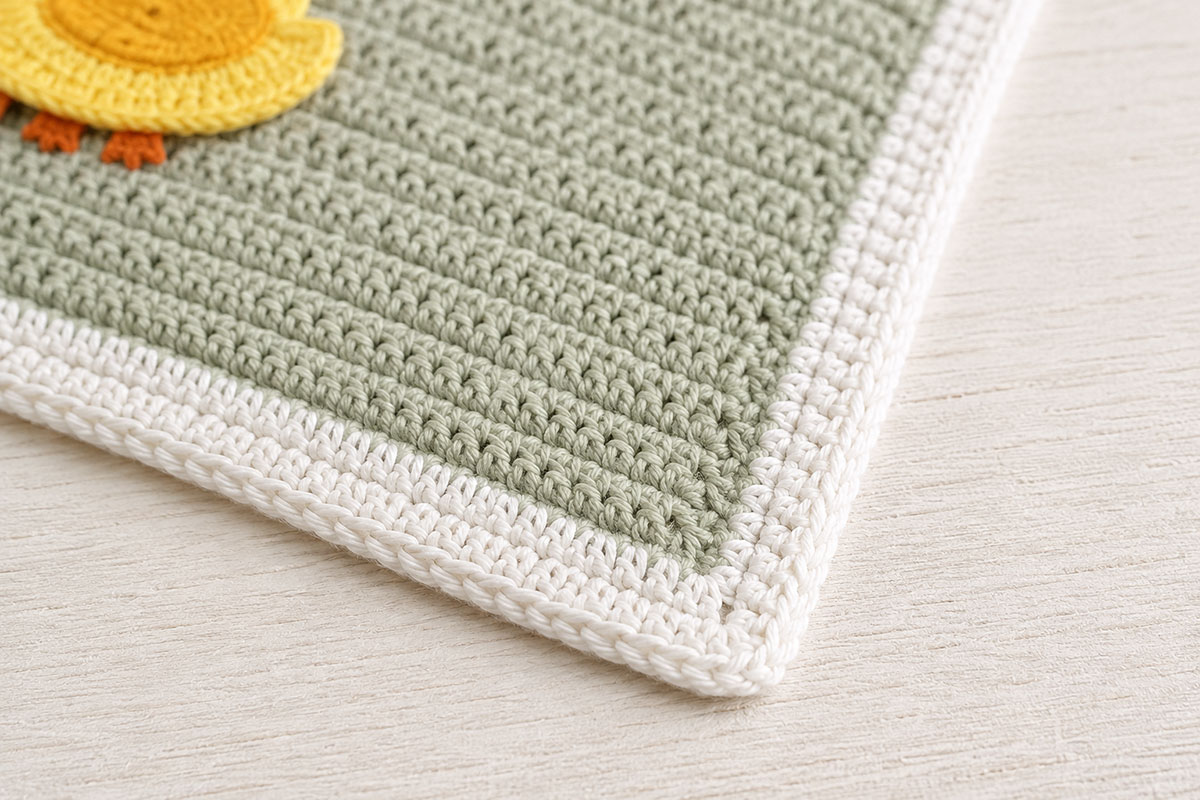
Check each corner after the final round. It should lie flat instead of curling upward or forming a pointed flap. If one corner puckers badly, it is worth correcting those few stitches before you weave in all the ends.
Finishing, Blocking and Caring for the Blanket
Turn the finished blanket over and inspect the back before blocking it. Look closely behind every duck, especially around the beaks and feet. Trim an end only after it has been woven securely through several stitches.
Check the front again with your fingertips. Every appliqué edge should remain attached when you gently lift it. Add another small sewing stitch anywhere an edge moves away from the blanket.
Block the Finished Blanket
Check the yarn label before washing, soaking or applying heat. Fiber content matters, so follow the care instructions for the yarn you actually used.
For a washable acrylic or acrylic-blend blanket, light wet blocking is enough in many cases. Dampen the blanket according to the yarn manufacturer's care directions, then place it on a clean blocking surface.
Shape it into an even rectangle without stretching the fabric. Straighten the four sides and adjust the corners until they lie flat.
Arrange the ducks with your fingers while the blanket is flat. Smooth the heads, wings, beaks and feet so their outlines remain clear.
Allow the blanket to dry completely before folding or storing it.
Do not press a hot iron directly onto the crochet fabric. Heat can damage some synthetic fibers and can flatten the texture that gives the blanket its handmade appearance.
Washing the Finished Blanket
Use the care directions printed on the yarn label as your first guide. A baby blanket will eventually need cleaning, which is one reason I prefer washable yarn for this project.
Before each wash, check the appliqués for a loose edge or broken sewing stitch. Repair it before laundering.
If you are making the blanket as a gift, include the yarn care instructions with it. That little bit of information is much more useful than making the recipient guess whether the finished blanket belongs in the washer, dryer or hand-wash basin.
Baby Blanket Safety and Use
A handmade blanket can be a useful gift, but it should not be placed in an infant's sleep space. The U.S. Consumer Product Safety Commission recommends a bare sleep space with only a fitted sheet and specifically advises caregivers not to add blankets, pillows or other soft items to a crib, bassinet or play yard. You can read the current CPSC safe sleep guidance before using or gifting any baby blanket.
Use this blanket for awake, supervised activities such as cuddling with an adult, floor time with direct supervision, photographs or nursery display outside the crib. If a baby falls asleep, move the baby to an appropriate safe sleep space and remove the blanket.
The appliqués on this pattern are designed to remain flat. Do not add plastic eyes, beads, buttons, bells, pom-poms or other small decorations.
Inspect the blanket regularly. Stop using it around a baby if yarn has broken, an appliqué has loosened, or a long loop has formed that could catch a finger or toe.
Secure repairs before the blanket goes back into use.
Ways to Change the Look Without Changing the Pattern
You can give this blanket a very different personality without changing the stitch counts. The easiest way is to change the color relationships while keeping the duck bodies clearly different from the blanket background.
A pale aqua blanket with yellow ducks gives the project a traditional baby-room look. Navy with golden ducks feels more graphic. Soft gray with warm yellow ducks puts almost all of the attention on the appliqués.
I would avoid using yellow for both the blanket and the ducks. Even if the shades are different, the outer edges of the appliqués can disappear when the colors are too close.
You can also reverse the wing colors. A lighter wing on a deeper yellow body changes the look without changing a single stitch.
Use One Duck for an Even Simpler Look
The pictured pattern uses three ducks along the lower edge, but you can make only one appliqué if you prefer a more understated blanket.
I would probably use one duck myself, placed near a lower corner with plenty of open sage background around it. That version keeps the handmade duck detail without turning the appliqué into the entire design.
Before sewing a single duck in place, spread the finished blanket flat and move the motif around until the placement looks balanced. Do not shrink it just because you are using only one. The duck should remain large enough to look intentional from across the room.
Use the Duck Appliqué on Another Crochet Project
The flat duck can also be sewn to another smooth crochet surface if the scale fits the project. It works best when the background stitch is simple enough that the edges can be sewn down evenly.
If you would rather start with a different blanket design, browse the free crochet baby blanket patterns and choose a base with enough uninterrupted space for an appliqué.
For more small motifs that can be used in the same way, see the crochet animal appliqué patterns.
Frequently Asked Questions About the Crochet Duck Blanket
Is this a free crochet duck blanket pattern?
Yes. The complete blanket base, flat duck appliqué, assembly, placement and border instructions are included on this page.
Can I make the duck appliqués first?
Yes. Crochet all three sets of duck pieces first so you can compare the matching bodies and heads before assembly. Then assemble one duck and check its finished size, shape and color contrast against the sage blanket.
Once you are satisfied with the first assembled motif, put the other two together with the same placement and sewing method.
Why are the ducks crocheted separately instead of worked into the blanket?
Separate appliqués make the duck shapes much clearer. They also let you position the complete motifs on the blanket before committing to the final spacing.
The blanket itself remains a straightforward rectangle, so you do not have to carry several colors across long rows or follow a large color chart.
Do all three ducks face the same direction?
Yes. The pictured blanket uses three left-facing ducks in one row along the lower edge. Make all three appliqués with the head on the left side of the body so the finished row matches the example images.
Do I have to add the duck feet?
No. The feet can be omitted if you want an even simpler silhouette. The body, head, wing and beak are enough to make the motif recognizable as a duck.
If you do use the feet, sew their complete attachment area securely to the blanket rather than leaving them loose.
Can I use safety eyes instead of embroidered eyes?
No. Use embroidered eyes for this blanket. They keep the appliqué flat and avoid adding a separate small component to an item intended for use around a baby.
What yarn is best for a crochet duck baby blanket?
A smooth, washable medium weight #4 yarn is a practical choice for this pattern. Smooth yarn shows the appliqué outlines clearly and is easier to sew through than heavily textured yarn.
Always check the yarn manufacturer's washing and drying instructions before you begin, especially if the finished blanket will be given as a gift.
Can I make the blanket larger?
Yes. The simplest method is to make a larger half double crochet rectangle while keeping the same gauge. Add foundation chains until you reach the width you want, then continue working rows until you reach the desired length.
If you change the blanket dimensions substantially, arrange the three completed ducks on the larger rectangle before deciding whether you need additional motifs. Extra blanket space does not automatically mean that more ducks will improve the design.
Can I use the duck pattern without making the blanket?
Yes. The duck is a flat appliqué and can be used on another suitable crochet project. If you are looking for a separate duck comfort-item pattern instead, see my free crochet duck lovey pattern.
A Finished Blanket That Still Looks Handmade
The plain sage base, three flat ducks along the lower edge and narrow white border give this project enough detail to feel special without making every inch compete for attention. That is the balance I would keep if you change the colors or arrangement.
Make the blanket first, build the ducks separately, and take your time with the final placement. Once the appliqués are securely sewn and the border is finished, the result is a complete crochet baby blanket rather than a plain blanket with a small decoration added at the end.
When you are ready for another project, continue through the free baby crochet patterns for more blankets, appliqués, loveys and handmade baby projects.
When you click on links to various merchants on this site and make a purchase, this may result in this site earning a commission. This does not affect the price you pay.

UBGI Gold Standard 2026
Reviewed under the site's
editorial checklist.
Photos, decorating ideas, party setups and reader submissions are shared for inspiration unless a page is specifically presented as a pattern, tutorial, reference guide or step-by-step project. Follow the instructions, measurements, safety guidance and manufacturer directions provided for the particular project or product.
About Jan | Contact | Baby Nursery Ideas (Blog) | Site Map | Privacy Policy | Disclosure Policy | Disclaimer | Affiliate Disclosure | Earnings Disclosure | Facebook | Pinterest
I am a participant in the Amazon Services LLC Associates Program, an affiliate advertising program designed to provide a means for us to earn fees by linking to Amazon. As an Amazon Associate I earn from qualifying purchases.
Copyright © 2006-2026. All Rights Reserved.