Free Crochet Reindeer Ornament Pattern with Holly and Berries
By Jan Bay
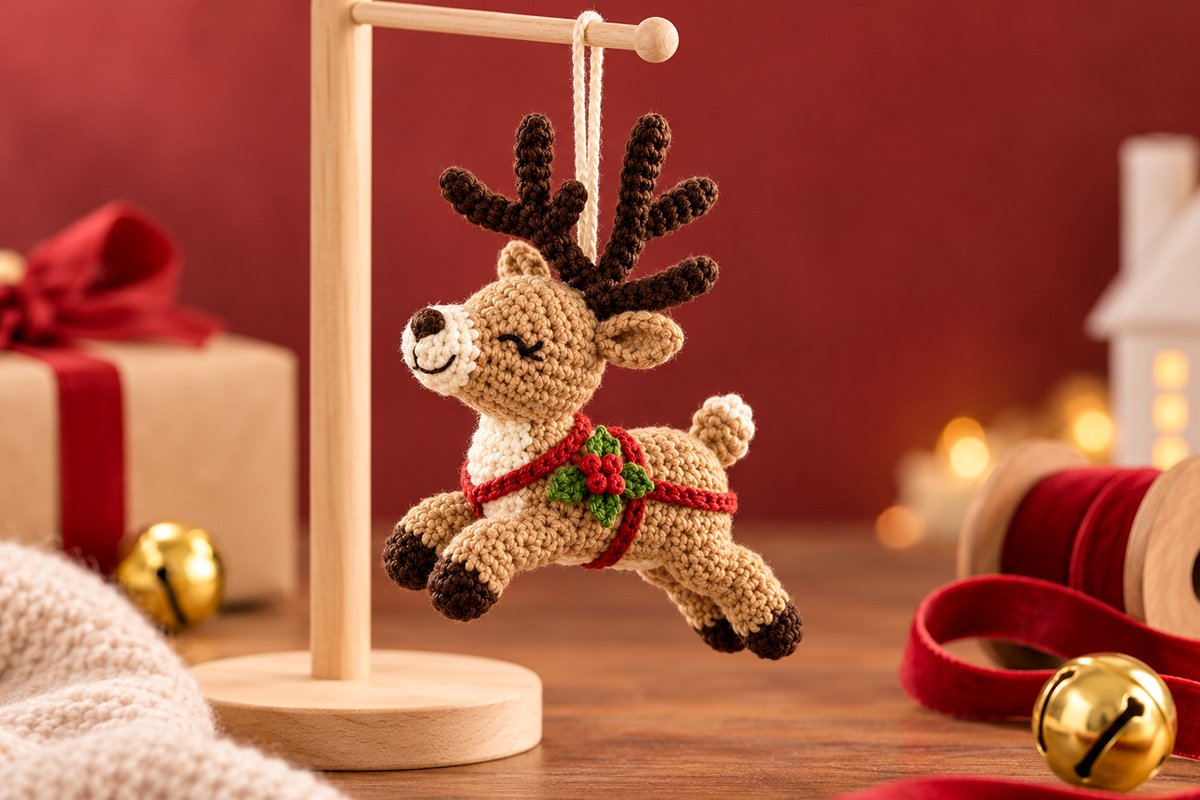
This free crochet reindeer ornament pattern makes a cheerful little flying reindeer with branching crocheted antlers, a cream muzzle, dark hooves and a red harness decorated with green crocheted holly leaves and three red yarn berries. Hang him on your Christmas tree, add him to a handmade holiday garland or make another for our matching Christmas baby mobile featuring Santa and other enchanting holiday motifs.
Explore More Free Christmas Crochet Patterns
See Supplies for This Project Here.
Jump to the Free Crochet Reindeer Pattern
Materials for the Free Crochet Reindeer Ornament Pattern
You won't need much yarn for this little reindeer, but I'd stick with the same yarn weight for every piece. That matters especially for the antlers, muzzle and tiny holly decoration. Using a thicker yarn for just one of those parts can change his expression and proportions.
Yarn: DK-weight (#3) cotton or cotton-blend yarn in the following colors:
- Tan or warm caramel: Have approximately 100 yards available for the body, head, neck, legs, ears, tail and assembly. Actual consumption will depend on yarn and tension.
- Ivory: approximately 12 yards for the muzzle, chest, belly, tail tip and hanging loop.
- Dark brown: approximately 12 yards for the hooves and branching antlers.
- Cranberry red: Have approximately 12 yards available for the four harness strips, three crocheted berries and their sewing tails. Actual consumption will depend on yarn and tension.
- Holly green: approximately 3 yards for the two leaves.
- Small amounts of black or very dark brown embroidery thread for the eyes, nose and smile.
These yardages are estimates. They're intended to help you gather supplies rather than represent measured yarn consumption from a finished sample.
Other supplies:
- 2.5 mm crochet hook, or the size needed to produce tight stitches without visible stuffing.
- Polyester fiberfill for light stuffing.
- Blunt yarn needle for assembly.
- Embroidery needle for facial details.
- Stitch marker.
- Scissors.
- Small straight pins or removable stitch markers for positioning pieces before sewing.
Use a smaller hook rather than packing in extra stuffing if you can see gaps between the stitches. The body should hold its shape without becoming hard, and the legs need enough flexibility to be positioned in that flying pose.
Finished Size and Gauge
Estimated finished size: Approximately 6 to 7½ inches long from the nose to the farthest extended hoof. The finished height will depend on the angle of the antlers, neck and legs. Measure the completed ornament from its highest antler to its lowest hoof before recording a final height. The hanging loop is excluded from these measurements.
Target gauge: Approximately 24 single crochet stitches and 28 rounds over 4 inches, using DK yarn and a 2.5 mm hook.
Skill level: Intermediate. You'll be working small amigurumi pieces, making narrow antler branches, embroidering the face and sewing the legs in specific positions.
The most important measurement is the body. At the target gauge, its 26 rounds should produce approximately 3¾ inches of length before the legs and neck are attached. The maximum 36-stitch circumference should measure approximately 6 inches around.
Don't worry if your reindeer ends up a little smaller or larger. Keep your yarn and hook consistent, and pay attention to the relative size of the head, body and legs. Those proportions matter more than matching an exact finished measurement.
Crochet Abbreviations and Pattern Notes
This pattern uses US crochet terminology.
- MR: Magic ring
- ch: Chain
- sc: Single crochet
- hdc: Half double crochet
- dc: Double crochet
- sl st: Slip stitch
- inc: Work 2 single crochets into the same stitch
- dec: Invisible single crochet decrease over the next 2 stitches
- st/sts: Stitch/stitches
- Rnd: Round
- RS: Right side
- FO: Fasten off
Work in continuous spiral rounds unless a section specifically tells you to turn. Mark the first stitch of every round. Numbers in parentheses show the stitch count at the end of that round.
Repeat instructions enclosed in square brackets the stated number of times. For example, [sc 2, inc] 6 times means you'll work 2 single crochets followed by an increase six times altogether.
When changing colors, work the last stitch of the previous color until two loops remain on your hook. Pull the new color through those loops to finish the stitch, then continue in the new color. Secure and weave in the yarn ends on the inside of the piece.
Keep all facial features embroidered. The crocheted berries and every other decoration must be sewn permanently in place.
Free Crochet Reindeer Ornament Instructions
We're going to make the reindeer in separate pieces and sew everything together after the body and head are finished. That gives you much better control over the flying position than trying to crochet the legs directly into the body.
Start with the body, then make the neck and head. Keep the stuffing light enough that you can still shape each piece with your fingers.
Part 1. Crochet the Reindeer Body
Make 1 in tan.
The body is worked from the front chest toward the rump. Its widest section stays the same size through the middle, giving the reindeer a rounded but elongated shape.
Rnd 1: Work 6 sc into a MR. (6)
Rnd 2: Inc in each st around. (12)
Rnd 3: [Sc 1, inc] 6 times. (18)
Rnd 4: [Sc 2, inc] 6 times. (24)
Rnd 5: [Sc 3, inc] 6 times. (30)
Rnd 6: [Sc 4, inc] 6 times. (36)
Rnds 7–18: Sc in each st around. (36 per round)
Rnd 19: [Sc 4, dec] 6 times. (30)
Rnds 20–21: Sc in each st around. (30 per round)
Rnd 22: [Sc 3, dec] 6 times. (24)
Rnd 23: Sc in each st around. (24)
Rnd 24: [Sc 2, dec] 6 times. (18)
Begin stuffing the body. Add small amounts at a time, spreading the filling toward both ends. You want the body rounded and firm enough to support the legs, but not stretched into a hard cylinder.
Rnd 25: [Sc 1, dec] 6 times. (12)
Rnd 26: Dec 6 times. (6)
FO, leaving a tail. Thread the tail through the front loops of the remaining 6 stitches, draw the opening closed and weave the end securely inside.
Body checkpoint: You should have 26 rounds. At the target gauge, the body will be approximately 3¾ inches long with a maximum circumference of about 6 inches. The front and rear ends should both be rounded, with the rear tapering a little more gradually.
Part 2. Crochet the Upright Neck
Make 1 in tan.
Rnd 1: Work 6 sc into a MR. (6)
Rnd 2: Inc in each st around. (12)
Rnd 3: [Sc 1, inc] 6 times. (18)
Rnds 4–14: Sc in each st around. (18 per round)
FO, leaving a long sewing tail. Leave the 18-stitch upper opening unclosed.
Stuff the neck lightly, keeping the lower end narrow. The top opening will be sewn directly to the 18-stitch opening at the base of the head.
At the target gauge, the neck will measure approximately 2 inches before its lower portion is sewn into the body. Once assembled, only part of that length will be exposed.
Part 3. Crochet the Rounded Reindeer Head
Make 1 in tan.
Start at the top of the head and work downward. The opening at the bottom must remain available for the neck.
Rnd 1: Work 6 sc into a MR. (6)
Rnd 2: Inc in each st around. (12)
Rnd 3: [Sc 1, inc] 6 times. (18)
Rnd 4: [Sc 2, inc] 6 times. (24)
Rnd 5: [Sc 3, inc] 6 times. (30)
Rnd 6: [Sc 4, inc] 6 times. (36)
Rnds 7–10: Sc in each st around. (36 per round)
Rnd 11: [Sc 4, dec] 6 times. (30)
Rnd 12: Sc in each st around. (30)
Rnd 13: [Sc 3, dec] 6 times. (24)
Rnd 14: Sc in each st around. (24)
Rnd 15: [Sc 2, dec] 6 times. (18)
Rnd 16: Sc in each st around. (18)
FO, leaving a long sewing tail. Do not close the 18-stitch opening.
Stuff the head until it is nicely rounded. Keep the stuffing evenly distributed, especially across the cheeks. Don't pack the lower opening so tightly that it becomes difficult to join to the neck.
Head checkpoint: The widest portion has 36 stitches. The head should be rounded rather than pointed, with enough space across the front for the cream muzzle and embroidered sleepy eyes.
Part 4. Crochet the Cream Muzzle
Make 1 in ivory.
Rnd 1: Work 6 sc into a MR. (6)
Rnd 2: Inc in each st around. (12)
Rnds 3–4: Sc in each st around. (12 per round)
Rnd 5: [Sc 1, inc] 6 times. (18)
FO, leaving a long sewing tail. Leave the 18-stitch opening unclosed.
Add a very small amount of stuffing. The muzzle should project gently from the face without looking like a long snout.
Position the open edge against the front of the head, centered approximately over head rounds 8–13. Adjust its placement so the muzzle points forward when the reindeer faces left in profile.
Sew all 18 edge stitches securely to the head, catching the underlying head stitches without pulling the muzzle out of shape. Hide the yarn tail inside the head.
Part 5. Embroider the Sleepy Reindeer Face
Let's keep his expression soft and friendly, just like the finished example. The closed eyes are part of his character, so there's no need to replace them with plastic eyes.
Eyes: Use black or very dark brown embroidery thread. On each side of the head, work a short, gently curved line around head rounds 9–11, beginning just behind the muzzle. Each closed eye should span approximately 3–4 stitches.
Add two or three very short downward eyelashes toward the outer end of each eye. Keep the stitches snug against the head.
Nose: Use dark brown or black thread to embroider a small rounded oval at the upper front of the ivory muzzle. Build up the shape with several closely placed satin stitches.
Smile: Work a short curved line beneath the nose using one or two strands of dark embroidery thread. A slightly raised curve at one end gives the reindeer his cheerful expression without making the smile too large.
Repeat the closed-eye embroidery on the opposite side. The nose and smile are centered on the muzzle and do not need to be duplicated.
Secure all embroidery ends inside the head. No knots or thread ends should remain visible on the face.
Part 6. Crochet the Cream Chest Marking
Make 1 in ivory. Work in turned rows.
Ch 4.
Row 1: Sc in the second ch from the hook and in each remaining ch. Ch 1, turn. (3)
Row 2: Inc, sc 1, inc. Ch 1, turn. (5)
Rows 3–9: Sc in each st across. Ch 1, turn. (5 per row)
Row 10: Dec, sc 1, dec. Ch 1, turn. (3)
Row 11: Sc in each st across. (3)
FO, leaving a long sewing tail.
This narrow ivory patch runs down the front of the neck and slightly onto the upper chest. Position its wider portion toward the lower front of the neck, with the narrower end just below the chin.
Center the ivory patch along the front of the neck, with its narrower upper end just below the chin. Sew the upper and middle portions flat against the neck using small stitches along both edges. Leave the bottom two rows nearest the body temporarily unsewn. After attaching the neck to the body in Assembly Step 2, bring those two rows down over the upper chest and sew them securely to the body. This keeps the ivory marking continuous without leaving a loose edge.
Part 7. Crochet the Cream Belly Marking
Make 1 in ivory. Work in turned rows.
Ch 4.
Row 1: Sc in the second ch from the hook and in each remaining ch. Ch 1, turn. (3)
Row 2: Inc, sc 1, inc. Ch 1, turn. (5)
Rows 3–11: Sc in each st across. Ch 1, turn. (5 per row)
Row 12: Dec, sc 1, dec. Ch 1, turn. (3)
Row 13: Sc in each st across. (3)
FO, leaving a long tail.
Lay the patch lengthwise along the lower portion of the body, approximately between body rounds 6 and 19. Center it on the underside so a narrow ivory strip will remain visible in profile between the legs.
Sew the edges flat against the tan body without stretching the patch. The red harness and front legs will overlap small portions of this marking after assembly.
Set the completed head, neck and body aside while you make the legs, ears, antlers and tail.
Part 8. Crochet the Two Front Legs
Make 2. Begin with dark brown for the hooves, then change to tan.
The front legs are a little shorter than the rear legs. That difference helps give the finished reindeer his stretched-out flying position.
Rnd 1: With dark brown, work 6 sc into a MR. (6)
Rnd 2: [Sc 1, inc] 3 times. (9)
Rnd 3: Sc in each st around. (9)
Change to tan while completing the final stitch of round 3.
Rnd 4: Sc in each st around. (9)
Rnd 5: [Sc 2, inc] 3 times. (12)
Rnds 6–11: Sc in each st around. (12 per round)
Rnd 12: [Sc 3, inc] 3 times. (15)
Rnd 13: Sc in each st around. (15)
FO, leaving a long sewing tail. Leave the 15-stitch opening unclosed.
Stuff the dark hoof and the lower portion of the leg lightly. Continue with just enough filling to maintain the tapered shape. Leave the uppermost two rounds flexible so the leg can be attached at an angle.
Make the second front leg exactly the same way.
Front leg checkpoint: Each leg has 13 rounds and ends with a 15-stitch opening. Both should have rounded dark-brown hoof tips and longer tan upper sections.
Part 9. Crochet the Two Rear Legs
Make 2. Begin with dark brown and change to tan.
The rear legs use the same shaping as the front legs, but with four additional rounds in the tan section. That extra length is intentional. It allows the rear hooves to extend farther behind the body when the legs are positioned diagonally.
Rnd 1: With dark brown, work 6 sc into a MR. (6)
Rnd 2: [Sc 1, inc] 3 times. (9)
Rnd 3: Sc in each st around. (9)
Change to tan while completing the final stitch of round 3.
Rnd 4: Sc in each st around. (9)
Rnd 5: [Sc 2, inc] 3 times. (12)
Rnds 6–14: Sc in each st around. (12 per round)
Rnd 15: [Sc 3, inc] 3 times. (15)
Rnds 16–17: Sc in each st around. (15 per round)
FO, leaving a long sewing tail. Leave the 15-stitch opening unclosed.
Stuff lightly, keeping the upper two rounds flexible.
Make the second rear leg to match.
Rear leg checkpoint: Each rear leg has 17 rounds and ends with a 15-stitch opening. Set all four legs side by side. The rear pair should be visibly longer, but the dark-brown hooves should match across all four legs.
Part 10. Crochet the Reindeer's Ears
Make 2 in tan.
Rnd 1: Work 4 sc into a MR. (4)
Rnd 2: [Sc 1, inc] 2 times. (6)
Rnd 3: [Sc 1, inc] 3 times. (9)
Rnd 4: Sc in each st around. (9)
Rnd 5: [Sc 2, inc] 3 times. (12)
Rnd 6: Sc in each st around. (12)
FO, leaving a long sewing tail.
Do not stuff the ears. Flatten each opening so the final 12 stitches form two layers of 6 stitches. Sew those layers together across the base using 6 small stitches.
Pinch the base slightly while sewing so the ear forms a shallow cup rather than a completely flat oval.
Make the second ear to match.
Position the ears on the upper sides of the head, approximately around head rounds 5–7. Their narrow tips should point outward and slightly upward, just below the antlers.
Use the sewing tails to attach each ear firmly. Pass the yarn through the flattened base and into the head several times, then secure the ends inside the head.
Part 11. Crochet the Branching Brown Antlers
Make 2 main stems and 4 side branches in dark brown.
These are little crocheted tubes, not chains laid flat against the head. That's what gives the antlers their rounded, branching appearance.
You'll make one main stem for each antler, then attach two smaller branches to it. The finished pair should spread outward from the top of the reindeer's head.
Main Antler Stems: Make 2
Rnd 1: Work 5 sc into a MR. (5)
Rnds 2–16: Sc in each st around. (5 per round)
FO, leaving a yarn tail approximately 16 inches long. Thread it through the front loops of the final 5 stitches and pull the upper tip closed. Use the yarn needle to carry the remaining tail down through the hollow stem and out through the magic-ring base. Leave this tail available for attaching the completed antler to the head.
Do not stuff these narrow tubes. The tight crochet stitches and additional reinforcing yarn will help them keep their shape.
Long Side Branches: Make 2
Rnd 1: Work 4 sc into a MR. (4)
Rnds 2–8: Sc in each st around. (4 per round)
FO, leaving a tail approximately 12 inches long. Draw it through the front loops of the final 4 stitches to close the tip. Carry the remaining tail through the hollow branch and out through its magic-ring base. Leave it available for sewing the branch to the main stem.
Short Side Branches: Make 2
Rnd 1: Work 4 sc into a MR. (4)
Rnds 2–6: Sc in each st around. (4 per round)
FO, leaving a tail approximately 12 inches long. Draw it through the front loops of the final 4 stitches to close the tip. Carry the remaining tail through the hollow branch and out through its magic-ring base. Leave it available for sewing the branch to the main stem.
Assemble Each Branching Antler
Place one main stem vertically on your work surface, with its magic-ring end at the bottom.
Sew one long branch to the side of the stem around main-stem rounds 8–10. Angle it diagonally outward and upward, approximately 45 degrees from the main stem.
Attach one short branch around main-stem rounds 11–13, pointing slightly outward and upward in a different direction. Keep the attachment points staggered so the two branches don't sit directly on top of one another.
Sew each branch around its entire base. Catch several stitches of the main stem with every pass. Once it's attached, pass the yarn back through the inside of the stem and secure it.
For additional support, thread a doubled length of dark-brown yarn lengthwise through the main stem and its base, then secure it. This provides some reinforcement without wire or pipe cleaners.
Make the second antler as a mirror image of the first. When both are upright, their branches should spread away from the center of the head.
Antler checkpoint: You should now have two upright main stems and four side branches, six crocheted antler pieces altogether. Each main stem carries one longer branch and one shorter branch.
Position the two assembled antlers on the upper back portion of the head, approximately around head rounds 3–5, leaving several stitches between their bases.
The bases belong behind the forehead and above the ears. Sew through the bottom of each main stem and into several head stitches, working around the entire base. Reinforce the attachment with additional passes through the head.
Check that the branches face outward and that both antlers remain visible when the reindeer is viewed from the side.
Don't expect yarn antlers to behave exactly like wire-supported ones. Their stiffness will depend on your yarn, hook size and tension. Keep the stitches tight and make the attachments firm, but don't introduce hidden wire into a decoration intended for a nursery mobile.
Part 12. Crochet the Short Upturned Tail
Make 1. Begin with ivory, then change to tan.
Rnd 1: With ivory, work 4 sc into a MR. (4)
Rnd 2: Inc in each st around. (8)
Rnd 3: Sc in each st around. (8)
Change to tan while completing the final stitch of round 3.
Rnds 4–7: Sc in each st around. (8 per round)
FO, leaving a long sewing tail. Leave the lower opening unclosed.
Stuff very lightly or use a few tucked-in yarn ends to support the small rounded tip.
Attach the tan base to the upper rear portion of the body, approximately around body rounds 22–24. Angle the tail upward so the ivory tip curves toward the back of the reindeer.
Secure the base all the way around its opening. Add one or two small anchoring stitches along the lower side of the tail to hold its upward position.
Crochet the Red Harness, Holly Leaves and Berries
The red harness is what gives our little reindeer his Christmas personality. I wouldn't replace it with a ribbon. Crocheting the straps keeps the texture consistent with the rest of the ornament, and it lets you stitch everything securely to the body.
We're making four narrow red strips. They'll form the collar, the band around the body, the long rein-like strap along the side and a shorter diagonal connector across the chest.
All four strips are crocheted in one row of single crochet. The starting counts below are based on the target gauge. Check their fit against your stuffed reindeer before fastening them down. Add or remove foundation chains if your yarn produces a different length.
Before chaining each red strip, leave a 12-inch starting yarn tail. Leave another 12-inch tail when fastening off so you'll have yarn available at both ends for sewing.
Assembly order: Crochet all four red strips, both holly leaves and all three berries now, but keep them separate. The positioning and sewing directions in Parts 13–18 are for Assembly Step 6, after the head, neck and all four legs are attached. Don't sew any harness or holly pieces onto the reindeer yet.
Part 13. Red Neck Collar
Make 1 in cranberry red.
Ch 20.
Row 1: Sc in the second ch from the hook and in every remaining ch. (19)
FO, leaving a sewing tail at each end.
Wrap the strip around the lower neck, approximately at neck rounds 9–11, just beneath the head. Join the ends at the back of the neck.
The collar should lie flat without pulling the neck out of shape. Sew it down at several points around the circumference so it cannot slide upward.
Part 14. Red Body Band
Make 1 in cranberry red.
Ch 38.
Row 1: Sc in the second ch from the hook and in every remaining ch. (37)
FO, leaving long sewing tails.
Wrap the strip around the middle of the body, approximately over body rounds 12–14. Keep it just behind the front-leg attachment area.
Join its ends on the underside and stitch the band to the body around its entire length. It should lie close against the stuffing without making a deep indentation.
Part 15. Long Side Rein
Make 1 in cranberry red.
Ch 19.
Row 1: Sc in the second ch from the hook and in every remaining ch. (18)
FO, leaving long sewing tails.
Position this strip along the visible side of the reindeer's body. Begin near the red collar at the front shoulder and run the strip diagonally backward toward the upper rump, approximately near body round 20.
The strip should pass over the body band at its midpoint. Sew it down continuously, including where the two straps cross.
This is a fitted decorative rein, not a loose cord. Keep its entire length against the crocheted body.
Part 16. Diagonal Chest Connector
Make 1 in cranberry red.
Ch 13.
Row 1: Sc in the second ch from the hook and in every remaining ch. (12)
FO, leaving long sewing tails.
Position one end just below the collar on the side of the neck. Carry the strip diagonally downward across the shoulder and connect it to the body band near the front leg.
Sew down the entire strip. Make several extra stitches where it joins the other red pieces.
Harness checkpoint: From the side, you should see a red band around the lower neck, a second band around the body, a longer red strip extending backward and a short diagonal crossing near the shoulder.
The straps should meet neatly without dangling ends. Keep the opposite side tidy as well, especially if you're making the ornament for a mobile where it can turn around.
Part 17. Crochet the Two Green Holly Leaves
Make 2 in holly green.
Each leaf is worked around both sides of a foundation chain. The little chain picots along the edges give the leaves their pointed holly shape.
Ch 7.
Work along the first side of the foundation chain:
Sc in the second ch from the hook, hdc in the next ch, dc in the next ch.
Make a small side point: Ch 2, sl st into the second ch from the hook.
Continue with dc in the next foundation ch, hdc in the next ch and sc in the last ch. You have worked 6 main stitches along this side.
At the pointed end of the leaf, ch 2 and sl st into the second ch from the hook.
Rotate the work to reach the unused loops on the opposite side of the foundation chain.
Sc into the opposite side of the same foundation ch that holds the last sc, hdc in the next foundation ch and dc in the next foundation ch.
Make another side point: Ch 2, sl st into the second ch from the hook.
Continue with dc in the next foundation ch, hdc in the next ch and sc in the final foundation ch.
Sl st into the first sc to close the leaf outline.
FO, leaving a long sewing tail.
Gently straighten the leaf with your fingers. It should have a narrow pointed shape with small projections along both sides.
Make the second leaf the same way.
Cross the two green holly leaves over one another at the shoulder, arranging them in a compact X shape beneath the three red berries. Overlap the middle portions of the leaves rather than placing only their narrow ends together. Angle them so the green foliage spreads above, below and to either side of the berry cluster, as shown in the finished photograph. Sew both leaves securely against the red harness and tan body, keeping their pointed edges visible. Position the three crocheted red berries together over the center where the leaves cross.
Part 18. Crochet Three Little Red Berries
Make exactly 3 in cranberry red.
Rnd 1: Work 6 sc into a MR. (6)
Rnd 2: Sc in each st around. (6)
Rnd 3: Dec 3 times. (3)
FO, leaving a long sewing tail. Draw the tail through the front loops of the remaining 3 stitches and pull the opening closed. Thread the remaining tail onto a yarn needle and carry it through the center of the berry, bringing it out at the original magic-ring base. Leave this tail available for sewing the berry onto the holly decoration.
These tiny crocheted berries don't need separate stuffing. Tuck the short starting yarn end into the center to help round the shape, but keep the longer sewing tail free. The magic-ring end will sit against the holly leaves when the berry is attached.
Make two more berries.
Arrange the three berries together where the two green leaves meet. Place them in a small triangle, with one berry slightly above the other two.
Sew each berry individually through its base and into the underlying green leaves, red harness and tan body. Make several secure passes with the yarn needle, then weave the ends deeply into the body.
Don't use glued-on decorations or substitute plastic berries. The finished ornament needs the three raised red crocheted berries shown in our example, and they must be permanently attached.
Holly checkpoint: You should have two pointed green leaves and three rounded red berries, sitting together near the shoulder over the red harness. Keep the arrangement compact rather than spreading the leaves across the entire body.
Assemble the Flying Crochet Reindeer Ornament
Now comes the part that really makes the reindeer look like he's flying. Before sewing everything permanently, arrange the pieces on a table and use the finished example image as your guide.
The head should be raised, the front legs should reach forward and downward, and the longer rear legs should stretch backward. We're aiming for a leaping reindeer, not one that looks as if he's standing flat on his feet while in mid-air.
Step 1. Join the Head and Neck
Align the 18-stitch opening at the bottom of the head with the 18-stitch opening at the top of the neck.
Use the long sewing tail from the head and a yarn needle to sew the two openings together, matching one head stitch to one neck stitch all the way around.
Work through both loops of each corresponding stitch, making 18 joining stitches in total. Keep the seam snug and even.
The head should sit naturally on the neck, with the muzzle pointing forward. If necessary, add a small amount of stuffing before closing the final part of the seam.
Secure the tail inside the neck.
Step 2. Attach the Neck to the Body
Identify the front of the body at its starting magic-ring end. The neck attaches to the upper front portion of the body, approximately over body rounds 4–9.
Position the closed base of the neck against the body, with the neck rising upward and leaning slightly toward the front.
Use a fresh length of tan yarn to sew the closed magic-ring base of the neck firmly to the upper front of the body. Then anchor both lower sides of the neck, catching stitches across approximately neck rounds 2–6 and the adjoining body stitches around rounds 4–9. Work several closely spaced securing stitches along each side so the head's weight is supported by this wider attachment area rather than the six-stitch starting ring alone. Keep the neck leaning slightly forward and check that the head holds its raised position before fastening off and hiding the yarn tail.
The lower portion of the neck should overlap the body rather than sitting on top of it like a narrow post.
Now bring the two unsewn lower rows of the ivory chest marking onto the upper front of the body. Sew them flat with small ivory stitches, then hide the yarn tail inside the body. The cream marking should run smoothly from beneath the chin onto the chest without puckering or lifting away from the tan crochet.
Check the profile before securing the final stitches. The head should sit above the front chest with the muzzle projecting forward, just as it does in the example photograph.
Assembly checkpoint: The joined head and neck should feel secure when gently handled. The neck should not rotate freely or collapse forward under the weight of the head.
Step 3. Position the Front Legs
Place one front leg on the near side of the body and the second on the opposite side, approximately between body rounds 6–11.
Both leg openings should sit on the lower half of the body, one on each side of the cream belly marking. Keep the attachment positions symmetrical around the underside.
Angle both legs forward and downward toward the reindeer's nose. The near leg can extend slightly farther downward than the far leg so both hooves remain visible in profile.
Pin the legs temporarily or hold them in position with removable stitch markers.
Use each leg's long tan sewing tail to attach the entire 15-stitch opening to the body. Work around the circular opening, taking small stitches through the leg edge and adjacent body stitches.
Don't flatten the upper opening before sewing. Keeping it rounded gives the leg a fuller shoulder.
After completing the seam, take two or three additional stitches from the upper side of the leg into the body. These anchoring stitches should hold the leg in its forward-reaching position.
Secure the yarn ends inside the body.
Step 4. Position the Rear Legs
Attach the longer rear legs approximately around body rounds 18–22, one on each lower side of the body.
The rear legs should point backward and downward, away from the head. Their hooves should extend beyond the rump rather than hanging directly beneath it.
Position the near rear leg slightly lower so the two rear legs remain distinguishable when viewed from the side.
Sew each 15-stitch opening completely around its edge, just as you did for the front legs.
Use additional anchoring stitches along the upper portion of each leg to hold the backward angle.
Once the four legs are attached, place the reindeer on its side and compare the arrangement with the finished image.
The front hooves should reach toward the nose. The rear hooves should reach behind the body. All four legs should form an open, stretched-out flying silhouette.
If a leg is pointing too far downward, adjust the anchoring stitches now. It's much easier to correct the position before adding the harness.
If a leg won't stay raised: Thread a yarn needle with matching tan yarn and bring it out through the body just above the leg attachment. Catch two or three stitches along the upper side of the leg, about two rounds below its attachment seam, then pass the needle back into the body. Repeat once or twice, gently tightening the yarn until the leg holds its intended angle. Don't pull so tightly that the leg becomes flattened. Check the reindeer from the side before fastening off. The front legs should reach forward and the longer rear legs should stretch backward.
Step 5. Check the Ears, Antlers and Tail
Make sure both ears point outward and slightly upward from the sides of the head. The antlers should rise behind the forehead, with their smaller branches spreading outward.
Check the antler bases for loose stitches. Add a few reinforcing stitches if necessary, hiding the ends inside the head.
If your antlers lean or droop: Use a length of matching brown yarn to make two or three additional securing stitches through the base of each antler and into the head. Pull them snug enough to straighten the antler without puckering the head. If the stem itself bends halfway up, try reinforcing it with doubled yarn threaded through its center. If that still doesn't hold, remake the stem with a slightly smaller hook and tighter stitches. Don't add extra crochet stitches to widen the antlers, and skip wire or pipe cleaners for the nursery-mobile version.
The tail should curve upward from the rump. Its ivory tip should be clearly visible above the back of the body.
Keep the tail short. A long, dangling tail would change the appearance of our reindeer and could catch on the other ornaments when used in a mobile.
Step 6. Check the Harness and Holly Decoration
Now that the head, neck and all four legs are attached, it's time to sew on the decorations you made in Parts 13–18. Follow the placement and sewing directions in those parts, working in this order: red neck collar, red body band, long side rein, diagonal chest connector, two green holly leaves and finally the three red crocheted berries.
Keep the main body band behind the front-leg attachments, with the longer red side strap running toward the rump. The shorter diagonal connector should cross the shoulder.
Attach the two green holly leaves near that crossing and sew the three red berries together at their center.
Check that the red straps do not cover the cream chest marking completely. A little ivory should remain visible beneath the head and along the belly.
Turn the reindeer over and inspect the opposite side. Make sure every harness strip is firmly stitched down and every yarn end is secured.
Step 7. Crochet and Attach the Hanging Loop
Use ivory yarn.
Before beginning, leave a 12-inch starting yarn tail.
Ch 80 for the initial hanging cord.
Sl st into the second ch from the hook and into every remaining ch. (79 sl sts)
Hanging cord measurement: The finished crocheted cord should measure approximately 12–14 inches from end to end, excluding the sewing tails. This is a starting target, not an exact measurement guaranteed by the chain count. If your cord is shorter, undo the slip-stitch row and add foundation chains before working it again. If it is longer than needed, remove some foundation chains and rework the row. The completed slip-stitch count will always be one fewer than the number of foundation chains.
Before fastening off, fold the cord into an inverted U and hold its ends at the proposed attachment points on the upper body. The center of the loop must rise above both antler tips without resting against the antlers, ears or head. Leave enough clearance to suspend the reindeer freely. Adjust the cord length if necessary.
FO, leaving another 12-inch yarn tail at the finishing end. Keep both sewing tails available for attaching the cord to the upper body after checking the ornament's balance.
You'll have a narrow, reinforced crocheted cord that can be curved into a hanging loop.
Position one end on the upper back of the body just behind the neck, approximately around body round 8. Position the second end farther back, approximately around body rounds 14–16.
These are starting positions, not permanent attachment points. Hold both ends with removable markers and suspend the ornament temporarily while checking its balance.
Adjust the attachment positions until the body hangs as close to horizontal as possible, with the head raised slightly and the legs extending diagonally beneath it.
If the nose drops too far, move the temporary loop attachment points toward the head. If the rump drops, move them toward the rear. Make these adjustments one or two body rounds at a time.
If your reindeer twists sideways: Check that both ends of the hanging loop are centered along the top of the body rather than slipping down either side. Adjust their positions and lift the ornament again.
Hanging checkpoint: Before permanently sewing the loop, lift the reindeer and let him hang freely. His body should be nearly horizontal, his head slightly raised and all four hooves visible. Keep adjusting the temporary attachment points until you're happy with the flying position.
Once the reindeer hangs correctly, sew each end of the loop firmly through several sturdy body stitches. Make multiple passes with the yarn needle and secure the ends deeply inside the body.
Do not attach the hanging loop to the antlers or ears. They are decorative parts, not load-bearing supports.
Lift the reindeer once more to confirm that the finished loop holds its position. If an attachment shifts or the ornament tilts, reinforce or reposition that attachment before displaying the ornament.
Step 8. Final Finishing
Check the entire ornament for loose yarn ends, gaps in the stuffing and uneven joins. Remove every temporary positioning pin and stitch marker. Check both sides, beneath the harness and around the leg attachments before hanging the finished reindeer.
Weave in any remaining ends by passing them through several stitches in different directions before trimming. Don't leave short loose tails on the outside of the ornament.
Gently shape the head, neck, body and legs with your fingers. Straighten the holly leaves and spread the antler branches.
There's no need to wet-block the stuffed reindeer. If the crocheted leaves need flattening, you can lightly dampen and reshape them before they're sewn to the harness, then let them dry completely.
Final appearance check: Our finished reindeer should have a rounded tan head, cream muzzle, embroidered sleepy eyes, two branching dark antlers, four dark-tipped flying legs, an upturned ivory-tipped tail and a red harness decorated with two green holly leaves and three red crocheted berries.
That's the design. Keep the little details exactly as they are rather than adding extra bells, ribbons or ornaments.
Using the Reindeer on a Christmas Tree or Nursery Mobile
For a Christmas tree, hang the reindeer from a sturdy branch using its reinforced ivory loop. Leave enough space around him so the extended legs and antlers don't catch on nearby decorations.
For a matching Christmas garland, position the reindeer between other crocheted ornaments and attach him securely to the garland support. Avoid putting tension on the antlers, tail or harness.
We're also using this same design in our Christmas baby mobile. The reindeer should hang freely in the completed arrangement, with its legs stretching outward so the flying shape can be seen from the side.
Important nursery safety note: This ornament is a hanging decoration, not a baby toy. Keep the entire mobile, its hanging cords and every crocheted decoration completely out of baby's reach. Secure the mobile support independently and inspect its attachments regularly. Remove a crib mobile as soon as baby begins pushing up on hands and knees or reaches 5 months of age, whichever comes first. The American Academy of Pediatrics' nursery safety guidance explains these precautions.
Don't place this ornament loose inside a crib, bassinet or other infant sleep space.
Frequently Asked Questions About the Crochet Reindeer Ornament
Can I use worsted-weight yarn instead?
Yes, but your reindeer will be larger. Use the same yarn weight for all the main pieces and choose a hook that produces tight stitches. You may also need to adjust the red harness lengths and hanging loop. The stitch counts can remain the same, but the finished measurements will change.
What if the crocheted antlers won't stand upright?
Try a slightly smaller hook and keep the antler stitches firm. Make sure the branch bases are stitched all the way around and that the main stems are securely anchored to the head. You can also reinforce the stems internally with doubled yarn. I wouldn't use wire for the nursery-mobile version.
Can I give the reindeer a red nose?
You can certainly make a Rudolph-inspired variation for your own Christmas decorations. For the particular reindeer shown in this pattern, keep the dark embroidered nose, sleepy eyes and cream muzzle. Those details are part of the finished design.
Is this reindeer suitable for a baby to hold or play with?
No. It's designed as a decorative hanging ornament. Even though its eyes, nose and berries are made from yarn rather than plastic parts, the small antler branches, decorations and hanging loop are not intended for infant handling.
Can I make several reindeer for a Christmas mobile?
Yes. Make several using the same yarn weight and hook size so they'll be reasonably consistent in weight and scale. Keep the harness and holly decorations stitched down on every ornament, and attach each reindeer independently to the mobile support. Check the balance of each ornament before hanging the completed mobile safely out of reach.
A Little Reindeer Ready for Christmas
I like the idea of making one reindeer for the tree and another for the Christmas mobile. You get to use the same pattern twice, and the red harness with its little crocheted holly decoration ties everything together.
If you're putting together a whole collection of handmade Christmas decorations, our crochet Santa ornament would make a lovely companion. Add the matching sleigh and Christmas tree ornaments, and you've got the makings of a coordinated holiday display.
And that flying reindeer? He's cute enough to display all by himself.
When you click on links to various merchants on this site and make a purchase, this may result in this site earning a commission. This does not affect the price you pay.

UBGI Gold Standard 2026
Reviewed under the site's
editorial checklist.
Photos, decorating ideas, party setups and reader submissions are shared for inspiration unless a page is specifically presented as a pattern, tutorial, reference guide or step-by-step project. Follow the instructions, measurements, safety guidance and manufacturer directions provided for the particular project or product.
About Jan | Contact | Baby Nursery Ideas (Blog) | Site Map | Privacy Policy | Disclosure Policy | Disclaimer | Affiliate Disclosure | Earnings Disclosure | Facebook | Pinterest
I am a participant in the Amazon Services LLC Associates Program, an affiliate advertising program designed to provide a means for us to earn fees by linking to Amazon. As an Amazon Associate I earn from qualifying purchases.
Copyright © 2006-2026. All Rights Reserved.