Free Crochet Snowman Pattern
By Jan Bay
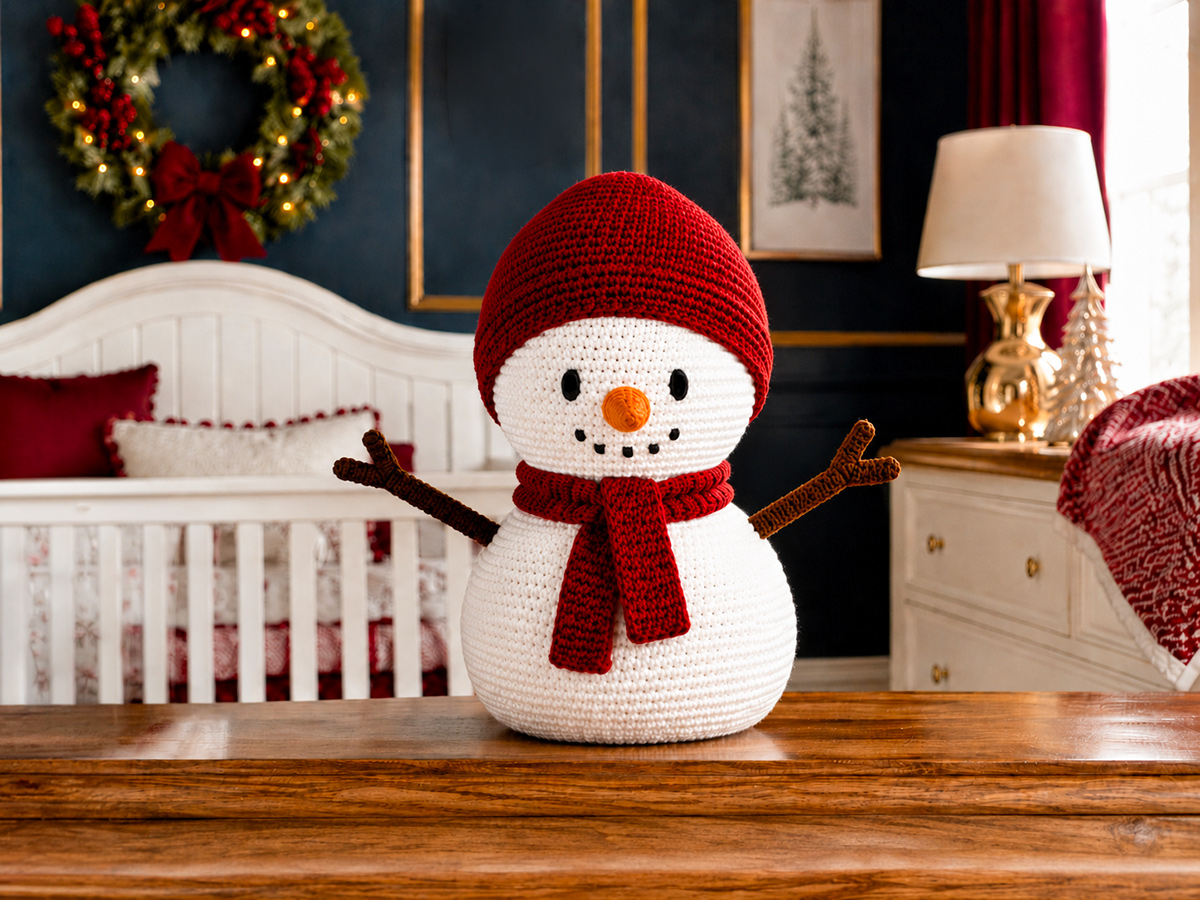
This free crochet snowman pattern makes a classic stuffed snowman with a flat crocheted base, round white body, embroidered face, carrot nose, twig arms, winter hat and scarf. With the stated worsted weight yarn and 4 mm hook, the finished figure is expected to stand about 10 1/2 to 11 1/2 inches tall. The body is shaped to stand without pellets or added weights, and the facial details are embroidered instead of made with plastic eyes or buttons.
Explore More Free Crochet and Christmas Projects
Yarn for This Crochet Snowman
A smooth worsted weight white yarn works well for the snowman's head and body because it gives the finished stitches a clean, even appearance. You can use any comparable #4 worsted weight yarn that gives you the fabric and size you want.
Jump to the Crochet Snowman Pattern
Supplies for the Crochet Snowman
This snowman is made with worsted weight yarn and a hook that gives you a firm fabric. The stitches should sit close enough together that the stuffing does not show through when the pieces are filled.
- Approximately 250 to 300 yards of #4 worsted weight white yarn for the body and head
- Approximately 60 to 80 yards of #4 worsted weight yarn for the hat and scarf
- Small amount of orange #4 worsted weight yarn for the carrot nose
- Small amount of medium or dark brown #4 worsted weight yarn for the twig arms
- Black embroidery floss for the eyes, mouth and optional embroidered coal details
- 4 mm crochet hook, or the hook size needed to make a firm stuffed fabric
- Polyester fiberfill
- Yarn needle
- Embroidery needle
- Scissors
- Stitch marker
- Straight pins or locking stitch markers for positioning pieces before sewing
Skill level: Confident beginner to intermediate. You will work in continuous rounds, increase and decrease, crochet a small cone, make a simple hat and scarf, embroider the face and sew the finished pieces together.
The pattern uses no plastic safety eyes or buttons. The face and optional coal details are embroidered, which also keeps the finished snowman looking soft and handmade.
Use the same yarn weight for the head and body so the proportions stay balanced. The hat and scarf can be made from another worsted weight yarn as long as it is reasonably close in thickness.
Finished Size and Gauge
Expected finished size: approximately 10 1/2 to 11 1/2 inches tall from the bottom of the body to the top of the hat. Your exact size will depend on yarn, hook size, tension and how firmly you stuff the pieces.
At the stated gauge, expect the body to be approximately 4 1/2 to 5 inches across at its widest point and the head to be approximately 3 1/2 to 4 inches across.
Suggested working gauge: approximately 17 sc and 18 rounds per 4 inches in single crochet. Exact gauge is not critical for this stuffed project, but the stitches should be firm enough to keep the fiberfill from showing through.
What matters more is the fabric. Stretch a small section between your fingers before you begin stuffing. If large spaces open between the stitches, change to a smaller hook. If the fabric is very stiff and difficult to work, move up one hook size.
The snowman body begins with a flat circular base rather than a completely round ball. That small construction choice gives the finished figure a broader place to stand without adding pellets, beads or other weights inside it.
Abbreviations
- ch: chain
- hdc: half double crochet
- inc: work 2 single crochet stitches in the same stitch
- MR: magic ring
- sc: single crochet
- dec: single crochet decrease over the next 2 stitches
- sl st: slip stitch
- st/sts: stitch/stitches
- BLO: back loop only
Unless a section says otherwise, work the body, head and carrot nose in continuous rounds without joining or turning. Place a stitch marker in the first stitch of each round and move it up as you work.
The number in parentheses at the end of a round is the total number of stitches you should have after completing that round.
Crochet Snowman Pattern: Make the Body
Use white yarn.
The first ten rounds form the flat base. Round 11 is worked in the back loops to create the fold where the sides begin. Continue working in the same direction without turning.
Round 1: Work 6 sc into a MR. (6)
Round 2: Inc in each st around. (12)
Round 3: *Sc in next st, inc in next st.* Repeat around. (18)
Round 4: *Sc in next 2 sts, inc in next st.* Repeat around. (24)
Round 5: *Sc in next 3 sts, inc in next st.* Repeat around. (30)
Round 6: *Sc in next 4 sts, inc in next st.* Repeat around. (36)
Round 7: *Sc in next 5 sts, inc in next st.* Repeat around. (42)
Round 8: *Sc in next 6 sts, inc in next st.* Repeat around. (48)
Round 9: *Sc in next 7 sts, inc in next st.* Repeat around. (54)
Round 10: *Sc in next 8 sts, inc in next st.* Repeat around. (60)
Lay the circle on a flat surface. It should sit reasonably flat. A slight curve is fine. If the circle ruffles strongly, check the stitch count before continuing. Each increase round from Round 2 through Round 10 adds exactly 6 stitches.
Round 11: Working in the BLO, sc in each st around. (60)
Rounds 12 through 20: Sc in each st around. (60)
The body should now look like a shallow white bowl with straight sides. Begin shaping the upper half.
Round 21: *Sc in next 8 sts, dec.* Repeat around. (54)
Round 22: *Sc in next 7 sts, dec.* Repeat around. (48)
Round 23: *Sc in next 6 sts, dec.* Repeat around. (42)
Round 24: *Sc in next 5 sts, dec.* Repeat around. (36)
Round 25: *Sc in next 4 sts, dec.* Repeat around. (30)
Begin stuffing the body. Push the fiberfill firmly into the lower corners where the flat base meets the sides. Add smaller amounts at a time instead of pushing one large piece through the opening.
The body should feel full without stretching the stitches far enough apart to expose the filling.
Round 26: *Sc in next 3 sts, dec.* Repeat around. (24)
Add more stuffing. Shape the sides with your hands as you fill so the lower body stays broad and the top becomes smoothly rounded.
Round 27: *Sc in next 2 sts, dec.* Repeat around. (18)
Round 28: *Sc in next st, dec.* Repeat around. (12)
Add the final small amount of stuffing before the opening becomes too narrow.
Round 29: Dec around. (6)
Fasten off, leaving a tail. Thread the tail through the front loops of the remaining 6 stitches and pull the opening closed. Secure the yarn and weave the tail into the body.
Set the body upright on its flat base. If one side looks fuller than the other, roll and shape the body gently between your hands before attaching the head.
Crochet the Snowman Head
Use white yarn.
Round 1: Work 6 sc into a MR. (6)
Round 2: Inc in each st around. (12)
Round 3: *Sc in next st, inc in next st.* Repeat around. (18)
Round 4: *Sc in next 2 sts, inc in next st.* Repeat around. (24)
Round 5: *Sc in next 3 sts, inc in next st.* Repeat around. (30)
Round 6: *Sc in next 4 sts, inc in next st.* Repeat around. (36)
Round 7: *Sc in next 5 sts, inc in next st.* Repeat around. (42)
Round 8: *Sc in next 6 sts, inc in next st.* Repeat around. (48)
Rounds 9 through 15: Sc in each st around. (48)
Pause here to embroider the face while you can still reach the inside of the head easily.
Place the eyes between Rounds 11 and 12, with approximately 7 to 8 stitches between their inner edges. Use black embroidery floss to make a small vertical or slightly oval satin stitch for each eye. Keep both eyes compact rather than making long black bars across the face.
The carrot nose will sit midway between the eyes and slightly lower. Leave the center of the face open for it.
Use black embroidery floss to make 5 small mouth marks in a gentle curve below the nose position. Small straight stitches or compact embroidered dots both work. Keep the curve shallow so the expression stays friendly.
Check the face from several feet away before tying off the embroidery. A tiny change in eye spacing can alter the whole expression, and it is much easier to correct before the head is stuffed.
Continue shaping the head.
Round 16: *Sc in next 6 sts, dec.* Repeat around. (42)
Round 17: *Sc in next 5 sts, dec.* Repeat around. (36)
Round 18: *Sc in next 4 sts, dec.* Repeat around. (30)
Round 19: *Sc in next 3 sts, dec.* Repeat around. (24)
Begin stuffing the head. Fill the area around the face first, taking care not to push so firmly behind the embroidery that the features distort.
Round 20: *Sc in next 2 sts, dec.* Repeat around. (18)
Add more fiberfill and shape the head into an even round form.
Round 21: *Sc in next st, dec.* Repeat around. (12)
Add the final stuffing.
Round 22: Dec around. (6)
Fasten off, leaving a long tail for sewing the head to the body. Thread the tail through the front loops of the remaining stitches and pull the opening closed.
Crochet the Arms
Make 2 with brown yarn.
These arms are crocheted as slim flat branches instead of stuffed tubes. The small side branch gives them a twig shape without adding separate pieces that have to be sewn on later.
Step 1: Ch 18.
Step 2: Starting in the second ch from the hook, sl st in the next 6 ch.
Step 3: Ch 5 to make the small side branch.
Step 4: Starting in the second ch from the hook, sl st in the next 4 ch. You are now back at the main arm.
Step 5: Sl st in each of the remaining 11 ch of the original foundation chain.
Fasten off, leaving a long tail for sewing.
Repeat for the second arm.
Lay both arms beside the body before attaching them. Turn one over if necessary so the small branches point in opposite directions rather than both facing the same way.
Crochet the Carrot Nose
Use orange yarn. Work in continuous rounds.
The nose begins at the pointed end and becomes wider toward the face.
Round 1: Work 4 sc into a MR. (4)
Round 2: Sc in each st around. (4)
Round 3: *Sc in next st, inc in next st.* Repeat twice. (6)
Round 4: Sc in each st around. (6)
Round 5: *Sc in next 2 sts, inc in next st.* Repeat twice. (8)
Round 6: Sc in each st around. (8)
Fasten off, leaving a long sewing tail.
Add only a tiny amount of fiberfill. The nose should keep a narrow carrot shape rather than becoming round.
Do not close the open end. You will sew those 8 stitches directly to the face during assembly.
Crochet the Snowman Hat
Use your chosen hat color.
The hat is worked from the crown downward in joined rounds. Do not turn after joining a round. Ch 2 at the beginning of an hdc round does not count as a stitch. Ch 1 at the beginning of a sc round does not count as a stitch.
Round 1: Work 8 hdc into a MR. Join with a sl st to the first hdc. (8)
Round 2: Ch 2. Work 2 hdc in each st around. Join. (16)
Round 3: Ch 2. *Hdc in next st, work 2 hdc in next st.* Repeat around. Join. (24)
Round 4: Ch 2. *Hdc in next 2 sts, work 2 hdc in next st.* Repeat around. Join. (32)
Round 5: Ch 2. *Hdc in next 3 sts, work 2 hdc in next st.* Repeat around. Join. (40)
Round 6: Ch 2. *Hdc in next 4 sts, work 2 hdc in next st.* Repeat around. Join. (48)
Rounds 7 through 10: Ch 2. Hdc in each st around. Join. (48)
Round 11: Ch 1. Sc in each st around. Join. (48)
Rounds 12 and 13: Ch 1. Sc in each st around. Join. (48)
Fasten off and weave in the ends.
Try the hat on the finished head before assembly. It should sit low enough to cover the upper portion of the head without covering the eyes.
If your hat is loose, thread matching yarn through several stitches along the inside edge and draw it in slightly. If you are making the snowman strictly as a decoration, the hat can remain removable. You can also sew it to the head during finishing so it stays in the position you prefer.
Crochet the Scarf
Use the same accent color as the hat or choose a coordinating worsted weight yarn.
The scarf is deliberately simple and has no loose fringe.
Row 1: Ch 71. Sc in the second ch from the hook and in each ch across. (70)
Rows 2 through 4: Ch 1 and turn. Sc in each st across. (70)
Fasten off and weave in both ends.
At the stated gauge, the 70-stitch scarf is expected to measure approximately 16 1/2 inches long. Your actual length can vary with yarn and tension. It should be long enough to wrap once around the neck and cross the ends at the front without forming a bulky knot.
If your scarf is much longer, shorten the foundation chain before completing all four rows. The snowman's face and body should remain visible after the scarf is added.
Before assembly, count 7 finished pieces: 1 body, 1 head, 2 twig arms, 1 carrot nose, 1 hat and 1 scarf. The eyes and mouth should already be embroidered on the head.
Assemble the Crochet Snowman
Assembly is easier if you pin every piece in place before sewing. Set the body on its flat base and look at it from the front, side and back as you position the head.
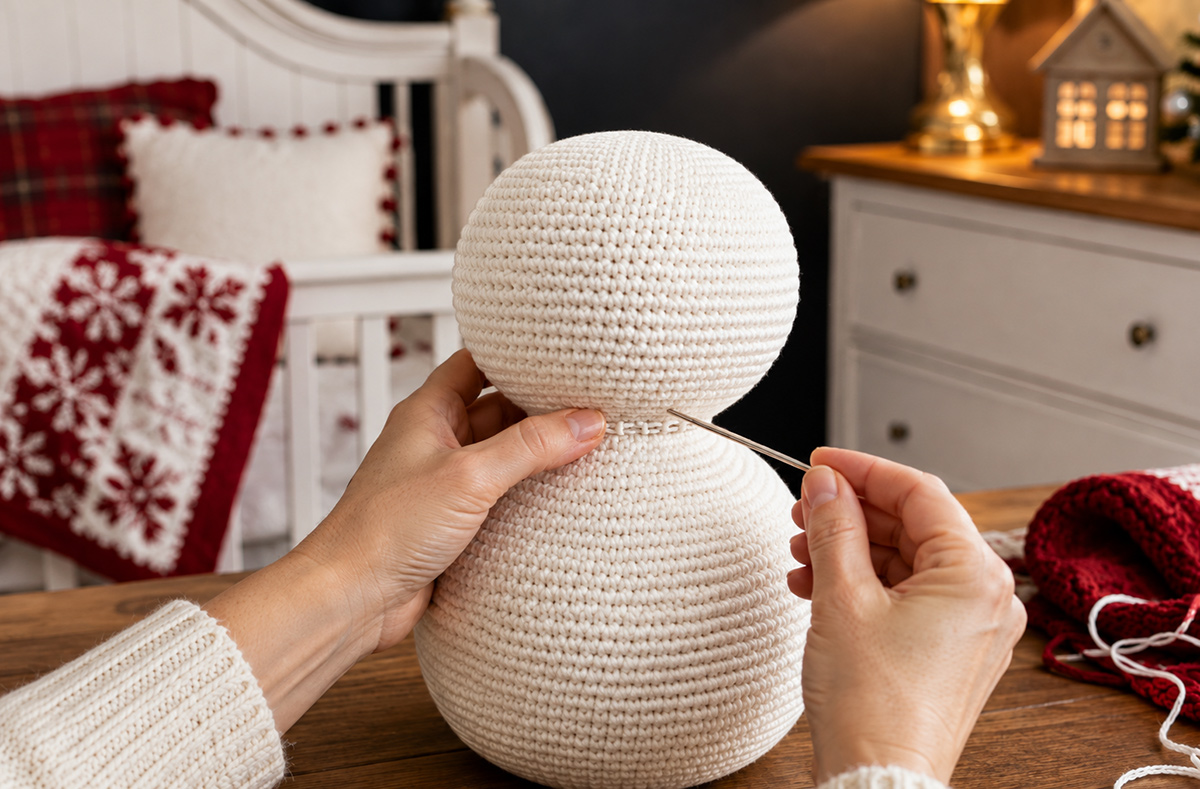
1. Attach the head. Center the head directly over the closed top of the body and pin it in place. Use the 12-stitch ring from Head Round 21 and the 12-stitch ring from Body Round 28 as the sewing path.
Starting at the back, use the long white yarn tail to sew through 1 stitch of Head Round 21 and the corresponding stitch of Body Round 28. Continue around all 12 matched stitch positions until you return to the starting point. Make a second pass around the same path if the join needs more support. Secure the yarn, weave the tail into the body and remove the positioning pins. The head should sit centered over the body without tipping forward.
2. Attach the carrot nose. Center the open end of the orange nose between the eyes. Pin it before sewing. The base should sit flat against the face while the pointed end projects outward.
Use the orange tail to sew through each stitch around the open base and into the white head. Make a second pass around the base if needed, then secure the yarn inside the head.
3. Attach the arms. Position one brown twig arm on each side of the upper body, approximately 1 to 1 1/2 inches below the head seam. Turn one arm over if needed so the two small branches point in opposite directions.
For each arm, pin the final 4 slip stitches at the end nearest the sewing tail flat against the body. Starting at the lower end of this pinned section, sew through each of those 4 arm stitches and the corresponding body stitches. Return along the same 4-stitch path for a second pass, then secure the yarn and weave the tail into the body. Remove the pin and leave the remainder of the arm and its small branch free.
Check both arms from the front before finishing the second attachment. They do not need to sit at exactly the same angle, but the attached portions should begin at approximately the same height.
4. Add optional embroidered coal details. If you want the classic coal-button look, use black embroidery floss to make 2 or 3 small satin-stitch circles down the front of the white body.
These are embroidered details, not attached buttons. Keep them centered below the scarf.
5. Add the hat. Place the hat on the head with the lower edge sitting above the eyes. Leave it removable for seasonal display, or use matching yarn to make several small stitches through the lower edge of the hat and the head.
6. Add the scarf. Wrap the scarf once around the neck and cross the ends at the front. Arrange it so it does not hide the mouth or all of the embroidered body details.
Finishing and Shaping the Snowman
Set the completed snowman on a flat surface and turn it slowly while you check the shape. Massage any uneven areas with your fingertips rather than pulling hard on individual stitches.
The flat base should carry most of the weight. If the snowman leans, first check whether the head is centered. A head sewn slightly forward can make the entire figure appear unstable even when the body is shaped correctly.
Before you call the snowman finished, remove every straight pin, locking stitch marker and round marker used during construction or positioning. Check the head, nose, arms, hat and scarf one more time for temporary markers. Make sure every sewn piece is secure, weave each remaining yarn tail through several stitches inside the work, and then trim the excess.
If the hat will stay permanently attached, make several small stitches around the lower edge instead of sewing continuously around the entire brim. This keeps the hat from looking pulled tightly against the head.
The finished snowman is intended as a handmade seasonal decoration, not as an infant toy. Keep removable pieces such as the hat and scarf out of a baby's reach, and do not place the snowman in an infant crib, bassinet, play yard or other sleep space. The U.S. Consumer Product Safety Commission recommends keeping infant sleep spaces bare except for a fitted sheet. You can review its current guidance on the CPSC Safe Sleep page.
If you are making Christmas projects for a baby's first holiday, you can also browse these baby Christmas ornament ideas. For a crochet project designed around a small blanket rather than a freestanding decoration, see the crochet animal lovey patterns.
If you want to keep the snowman theme but switch to a floppy snuggler body, use my crochet snowman snuggler lovey pattern; it will not disappoint.
To make another holiday favorite that cuts a dashing figure, my free crochet reindeer pattern that makes a seated brown reindeer with crocheted antlers and an optional red nose will not disappoint.
Frequently Asked Questions About the Crochet Snowman Pattern
Can I use a different yarn weight?
Yes, but the finished size will change. A lighter yarn makes a smaller snowman, while a thicker yarn makes a larger one. Use a hook that produces firm fabric and use the same yarn weight for both the head and body so the proportions remain balanced.
Why does the body start with a flat base?
The flat circular base gives the snowman a broader surface to stand on. It avoids the need to add plastic pellets or other weights inside the body and still keeps the upper portion rounded.
Can I make the snowman larger?
The simplest method is to use thicker yarn with the appropriate hook rather than adding extra increase rounds. Changing the stitch counts also changes the rate of shaping and requires the decrease rounds to be recalculated.
Do I need safety eyes or buttons?
No. This pattern uses black embroidery floss for the eyes, mouth and optional coal details. The embroidered face is also easier to adjust because you can change the spacing before the head is fully stuffed.
Can I leave off the hat or scarf?
Yes. Neither piece is needed to hold the snowman together. You can make the basic white snowman with the carrot nose and embroidered face, then add only the winter accessories you want.
Can this crochet snowman go in a baby's crib?
No. Treat the finished snowman as seasonal decor and keep it outside an infant sleep space. The scarf, hat and stuffed figure are decorative pieces, and infant sleep spaces should remain bare except for the fitted sheet recommended by current safe-sleep guidance.
When you click on links to various merchants on this site and make a purchase, this may result in this site earning a commission. This does not affect the price you pay.

UBGI Gold Standard 2026
Reviewed under the site's
editorial checklist.
Photos, decorating ideas, party setups and reader submissions are shared for inspiration unless a page is specifically presented as a pattern, tutorial, reference guide or step-by-step project. Follow the instructions, measurements, safety guidance and manufacturer directions provided for the particular project or product.
About Jan | Contact | Baby Nursery Ideas (Blog) | Site Map | Privacy Policy | Disclosure Policy | Disclaimer | Affiliate Disclosure | Earnings Disclosure | Facebook | Pinterest
I am a participant in the Amazon Services LLC Associates Program, an affiliate advertising program designed to provide a means for us to earn fees by linking to Amazon. As an Amazon Associate I earn from qualifying purchases.
Copyright © 2006-2026. All Rights Reserved.