Free Crochet Pumpkin Hat Pattern for Newborns and Babies
By Jan Bay
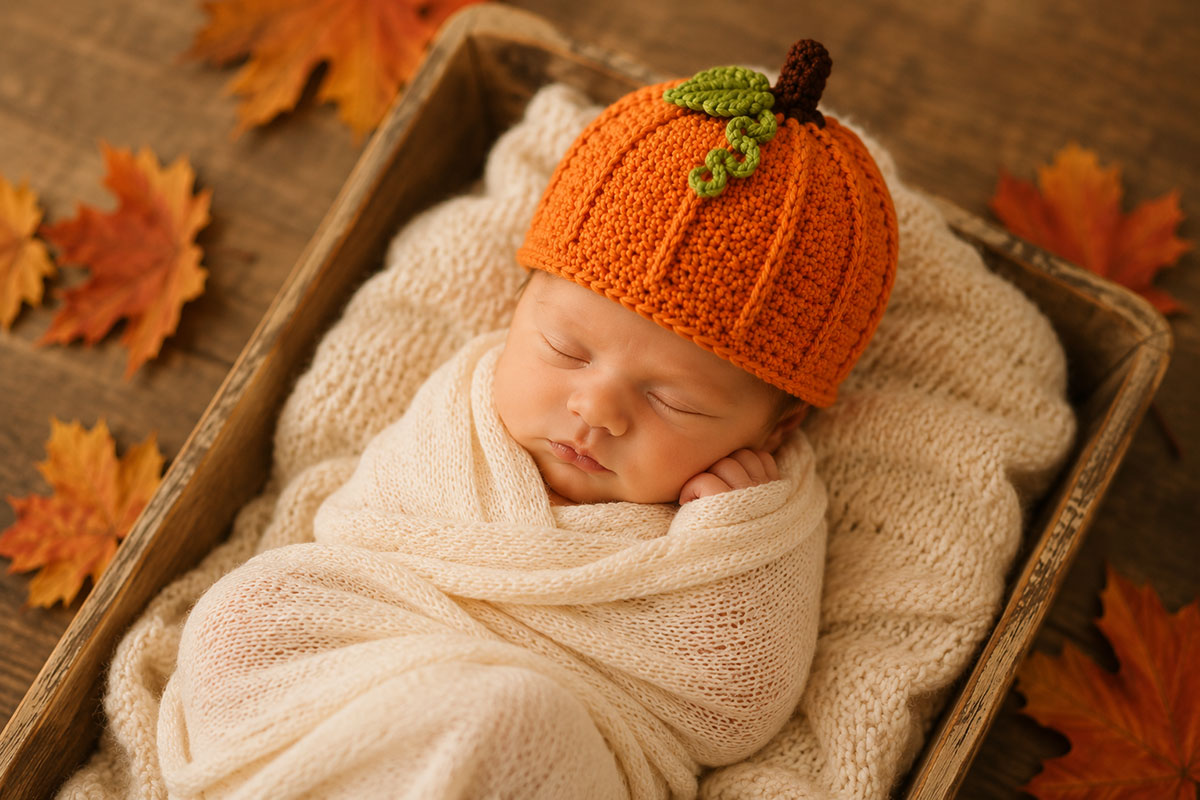
This free crochet pumpkin hat pattern makes a ribbed orange baby beanie with a short stem, green leaf and curly vine that give the finished hat a clear pumpkin shape. The pattern includes newborn, 0–3 month, 3–6 month, 6–12 month and toddler sizes for fall baby photos, pumpkin patch outings, Halloween outfits and handmade autumn gifts.
Explore More Free Crochet Baby Patterns
Free Baby Crochet Hat Patterns
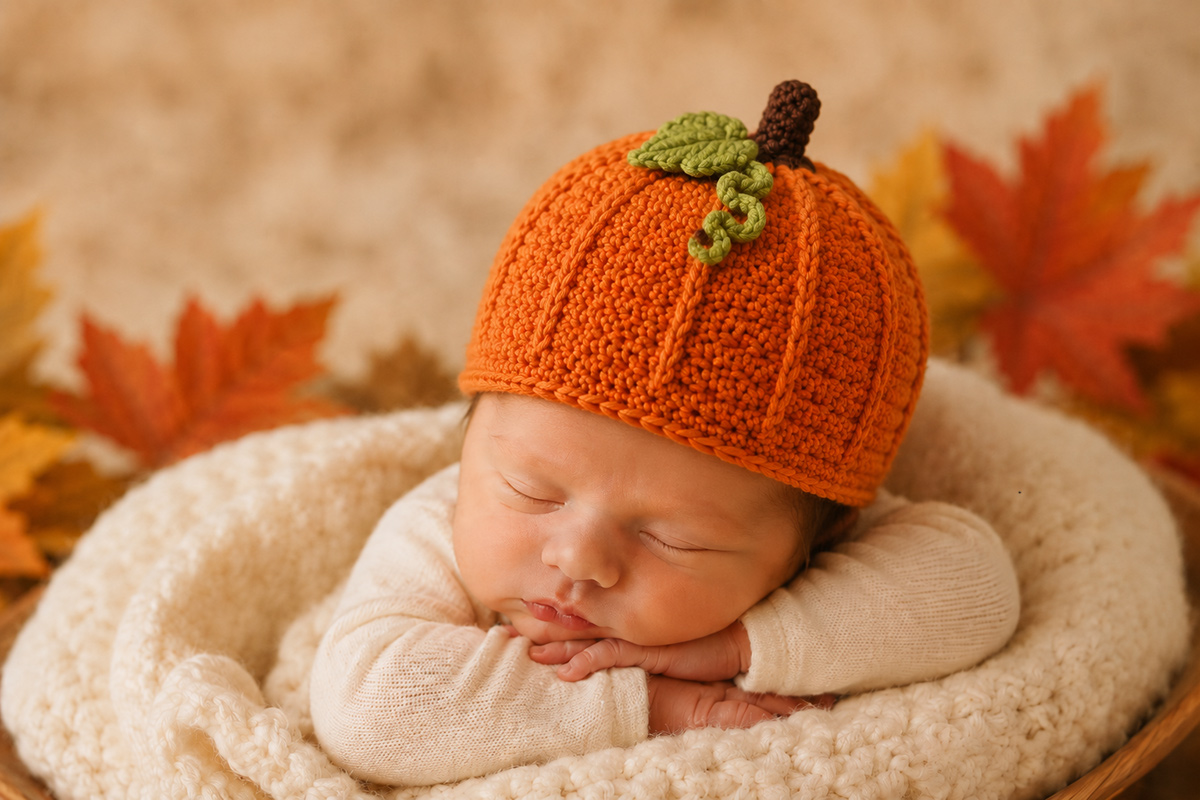
Baby hat safety: The newborn photos on this page are styled portraits, not examples of safe sleep use. The American Academy of Pediatrics safe sleep guidance advises against hats on infants indoors after leaving the hospital because of overheating risk. Remove the hat before sleep and use it only when the temperature makes a hat appropriate.
See Orange Worsted Weight Yarn for This Crochet Pumpkin Hat
Jump to:
Free Crochet Pumpkin Hat Pattern
The pumpkin shape comes from six raised ribs that run from the lower edge of the hat all the way to the crown. The ribs matter. Without them, an orange hat with a stem can look more like an ordinary fall beanie than a pumpkin.
This version is worked from the bottom up in joined rounds. The main body stays full around the head, then the decreases are worked between the six ribs so each pumpkin section narrows toward the stem. That gives the crown a rounded shape instead of gathering a straight tube into a bulky bunch at the top.
I wouldn't make this one as a plain ribbed rectangle and simply cinch the top closed. That construction is fine for an ordinary beanie, but the shaped crown here gives the stem, leaf and vine a cleaner place to sit and keeps the six pumpkin sections visible almost to the top.
The brown stem, green leaf and curly vine are crocheted separately. You'll sew all three to the closed crown after the hat itself is finished. Keep those pieces fairly small. They should finish the pumpkin, not cover half of it.
The instructions include newborn through toddler sizes. The stitch counts change by six stitches at a time so every size keeps exactly six pumpkin sections.
Crochet Pumpkin Hat Sizes
Use the finished circumference as your main guide rather than relying only on the age label. Baby head sizes vary, and a hat that is a little smaller than the actual head measurement will generally stay in place better than one made to exactly the same circumference.
Newborn: approximately 12 inches finished circumference and 5 inches from lower edge to crown. Starts with 48 stitches.
0–3 months: approximately 13 1/2 inches finished circumference and 5 1/4 inches from lower edge to crown. Starts with 54 stitches.
3–6 months: approximately 15 inches finished circumference and 5 3/4 inches from lower edge to crown. Starts with 60 stitches.
6–12 months: approximately 16 1/2 inches finished circumference and 6 1/4 inches from lower edge to crown. Starts with 66 stitches.
Toddler: approximately 18 inches finished circumference and 7 inches from lower edge to crown. Starts with 72 stitches.
Those finished measurements are calculated from the gauge and round counts below rather than taken from physically test-made hats. If you're making the hat for a particular baby, measure the head around the widest part above the eyebrows and ears before choosing a size.
If the measurement falls between two sizes, I'd usually choose the smaller size if your fabric has comfortable stretch. If your crochet is firm and doesn't stretch easily, use the larger size or go up only enough in hook size to reach the stated gauge. Don't add random stitches to the starting round because the six-section pumpkin shaping depends on stitch counts divisible by six.
Materials and Gauge for the Crochet Pumpkin Hat
Yarn: Smooth worsted weight number 4 yarn in pumpkin orange, a small amount of brown for the stem and green for the leaf and curly vine.
Have approximately 60 yards of orange available for newborn, 70 yards for 0–3 months, 80 yards for 3–6 months, 95 yards for 6–12 months and 115 yards for toddler. Keep about 10 yards of brown and 15 yards of green available for the top pieces. These are practical working allowances, not physically measured yarn totals from completed test hats.
A traditional medium pumpkin orange works well, but you don't have to use bright orange. Burnt orange, rust and muted pumpkin shades still read clearly as pumpkins once the ribs, stem and green details are added.
I'd keep the stem darker than the hat. Brown gives you the clearest separation, while olive or moss green works well for the leaf and vine. Using the exact same green for both small pieces also keeps you from needing another partial skein.
Hook: US G/7, 4.5 mm crochet hook, or the hook size needed to match gauge.
Also needed: Yarn needle, scissors, six removable stitch markers and measuring tape.
Gauge: 16 half double crochet stitches and 12 rounds = 4 inches.
Make the gauge swatch in regular half double crochet with the yarn you plan to use for the hat. Measure across the center of the swatch without stretching it. If you have more than 16 stitches in 4 inches, use a larger hook. If you have fewer than 16 stitches, use a smaller hook.
Gauge is especially important here because the starting stitch count controls the finished circumference. A difference of only two stitches per inch becomes noticeable once it's multiplied around an entire baby hat.
If you need to compare the number on your yarn label with standard yarn categories, the Craft Yarn Council Standard Yarn Weight System is a useful reference.
Pumpkin Hat Pattern Notes
This pattern uses US crochet terms.
ch: chain
sc: single crochet
hdc: half double crochet
hdc2tog: half double crochet two stitches together
FPhdc: front post half double crochet
dc: double crochet
tr: treble crochet
sl st: slip stitch
st/sts: stitch/stitches
The hat is worked in joined rounds from the lower edge to the crown. Do not turn after joining a round.
The chain 1 at the beginning of a hat round does not count as a stitch. Join each round with a slip stitch to the first actual stitch.
For Round 1 of every size, work the first hdc in the same foundation chain used for the join, then work one hdc in each remaining foundation chain exactly once. This gives you the stated stitch count for that size.
Six front post half double crochet stitches form the raised pumpkin ribs. Once those six ribs have been established, work each new FPhdc around the FPhdc directly below it. Don't work into the top loops of that same rib stitch as well or you'll accidentally add stitches.
To make an FPhdc: Yarn over. Insert the hook from front to back and then back to front around the post of the indicated stitch. Yarn over and pull up a loop. Yarn over again and pull through all three loops on the hook.
To make an hdc2tog: Yarn over, insert the hook into the next stitch, yarn over and pull up a loop. Yarn over, insert the hook into the following stitch, yarn over and pull up a loop. Yarn over and pull through all five loops on the hook.
The six pumpkin sections always contain the same number of stitches as one another. In the earlier crown-shaping rounds, each section uses two hdc2tog decreases, one after the rib and one before the next rib. That removes 12 stitches from the hat in each of those rounds. Once the sections are small enough, the final shaping rounds use one hdc2tog per section and remove 6 stitches from the hat.
Keep each FPhdc lined up with the raised rib directly below it. The decreases stay inside the pumpkin sections instead of replacing the rib stitches, so all six raised lines continue toward the crown.
Pattern status: The stitch counts and finished measurements have been checked mathematically against the stated gauge and the finished design. This pattern has not been physically test-crocheted, so the finished measurements are calculated or expected measurements rather than measurements taken from completed sample hats.
Place a removable marker in each rib stitch when you first establish the six sections. Move the markers up as you work. That takes a few extra seconds, but it makes the crown shaping much easier to follow.
I would keep all of the pumpkin details crocheted and sewn in place. The stem, leaf and vine give the hat plenty of detail without adding buttons, beads or other separate decorations.
Leave long sewing tails on the stem, leaf and vine. You'll use those tails to attach the pieces securely after the crown has been closed.
Newborn Crochet Pumpkin Hat Pattern
The newborn hat starts with 48 stitches divided into six sections of 8 stitches. Each section has one raised rib and seven regular half double crochet stitches before the crown shaping begins.
Starting chain: Loosely ch 48. Join with a sl st to the first chain, taking care not to twist the chain.
Round 1: Ch 1. Hdc in the same chain and in each chain around. Join with a sl st to the first hdc. (48 sts)
Round 2: Ch 1. *FPhdc around the next hdc, hdc in each of the next 7 sts.* Repeat from * to * 5 more times. Join with a sl st to the first FPhdc. (48 sts)
Place a stitch marker in each of the six FPhdc stitches. These are the pumpkin ribs.
Rounds 3–11: Ch 1. *FPhdc around the marked rib directly below, hdc in each of the next 7 sts.* Repeat from * to * around. Join. Move each marker into the new FPhdc as you work. (48 sts)
At this point the hat should have six evenly spaced raised ribs. Don't stretch it when you check the length. The crown shaping adds about another 1 1/3 inches at the stated gauge.
Round 12: Ch 1. *FPhdc around the marked rib, hdc2tog over the next 2 sts, hdc in each of the next 3 sts, hdc2tog over the last 2 sts before the next rib.* Repeat around. Join. (36 sts)
Each pumpkin section now has 6 stitches.
Round 13: Ch 1. *FPhdc around the marked rib, hdc2tog over the next 2 sts, hdc in the next st, hdc2tog over the last 2 sts before the next rib.* Repeat around. Join. (24 sts)
Each section now has 4 stitches.
Round 14: Ch 1. *FPhdc around the marked rib, hdc2tog over the next 2 sts, hdc in the remaining stitch before the next rib.* Repeat around. Join. (18 sts)
Round 15: Ch 1. *FPhdc around the marked rib, hdc2tog over the next 2 sts.* Repeat around. Join. (12 sts)
Cut the orange yarn, leaving a tail about 12 inches long. Thread the tail onto a yarn needle and pass it through the top loops of all 12 remaining stitches. Pull firmly to close the crown, then secure the yarn on the inside of the hat.
Don't worry if the center closure isn't completely invisible. The stem will sit directly over it.
Baby Crochet Pumpkin Hat Pattern
The three baby sizes use the same six-rib construction. What changes is the number of stitches between the ribs and the number of straight rounds worked before you begin shaping the crown.
0–3 Month Pumpkin Hat
Starting chain: Loosely ch 54 and join with a sl st to the first chain without twisting.
Round 1: Ch 1. Hdc in the same chain and in each chain around. Join. (54 sts)
Round 2: Ch 1. *FPhdc around the next hdc, hdc in each of the next 8 sts.* Repeat from * to * 5 more times. Join. (54 sts)
Place a marker in each of the six FPhdc stitches.
Rounds 3–12: Ch 1. *FPhdc around the marked rib, hdc in each of the next 8 sts.* Repeat around. Join and move the markers up. (54 sts)
Round 13: Ch 1. *FPhdc around the rib, hdc2tog over the next 2 sts, hdc in each of the next 4 sts, hdc2tog over the last 2 sts before the next rib.* Repeat around. Join. (42 sts)
Round 14: Ch 1. *FPhdc around the rib, hdc2tog over the next 2 sts, hdc in each of the next 2 sts, hdc2tog over the last 2 sts before the next rib.* Repeat around. Join. (30 sts)
Round 15: Ch 1. *FPhdc around the rib, hdc2tog over the next 2 sts, hdc2tog over the last 2 sts before the next rib.* Repeat around. Join. (18 sts)
Round 16: Ch 1. *FPhdc around the rib, hdc2tog over the next 2 sts.* Repeat around. Join. (12 sts)
Cut the yarn with a 12-inch tail. Run the tail through the remaining 12 stitches, pull the opening closed and secure it inside the hat.
3–6 Month Pumpkin Hat
Starting chain: Loosely ch 60 and join without twisting.
Round 1: Ch 1. Hdc in the same chain and in each chain around. Join. (60 sts)
Round 2: Ch 1. *FPhdc around the next hdc, hdc in each of the next 9 sts.* Repeat around. Join. (60 sts)
Mark all six FPhdc stitches.
Rounds 3–12: Ch 1. *FPhdc around the marked rib, hdc in each of the next 9 sts.* Repeat around. Join and move the markers up. (60 sts)
Round 13: Ch 1. *FPhdc around the rib, hdc2tog over the next 2 sts, hdc in each of the next 5 sts, hdc2tog over the last 2 sts before the next rib.* Repeat around. Join. (48 sts)
Round 14: Ch 1. *FPhdc around the rib, hdc2tog over the next 2 sts, hdc in each of the next 3 sts, hdc2tog over the last 2 sts before the next rib.* Repeat around. Join. (36 sts)
Round 15: Ch 1. *FPhdc around the rib, hdc2tog over the next 2 sts, hdc in the next st, hdc2tog over the last 2 sts before the next rib.* Repeat around. Join. (24 sts)
Round 16: Ch 1. *FPhdc around the rib, hdc2tog over the next 2 sts, hdc in the remaining stitch before the next rib.* Repeat around. Join. (18 sts)
Round 17: Ch 1. *FPhdc around the rib, hdc2tog over the next 2 sts.* Repeat around. Join. (12 sts)
Cut the yarn, close the remaining opening with the yarn tail and secure it inside.
6–12 Month Pumpkin Hat
Starting chain: Loosely ch 66 and join without twisting.
Round 1: Ch 1. Hdc in the same chain and in each chain around. Join. (66 sts)
Round 2: Ch 1. *FPhdc around the next hdc, hdc in each of the next 10 sts.* Repeat around. Join. (66 sts)
Mark the six FPhdc stitches.
Rounds 3–14: Ch 1. *FPhdc around the marked rib, hdc in each of the next 10 sts.* Repeat around. Join and move the markers up. (66 sts)
Round 15: Ch 1. *FPhdc around the rib, hdc2tog over the next 2 sts, hdc in each of the next 6 sts, hdc2tog over the last 2 sts before the next rib.* Repeat around. Join. (54 sts)
Round 16: Ch 1. *FPhdc around the rib, hdc2tog over the next 2 sts, hdc in each of the next 4 sts, hdc2tog over the last 2 sts before the next rib.* Repeat around. Join. (42 sts)
Round 17: Ch 1. *FPhdc around the rib, hdc2tog over the next 2 sts, hdc in each of the next 2 sts, hdc2tog over the last 2 sts before the next rib.* Repeat around. Join. (30 sts)
Round 18: Ch 1. *FPhdc around the rib, hdc2tog over the next 2 sts, hdc2tog over the last 2 sts before the next rib.* Repeat around. Join. (18 sts)
Round 19: Ch 1. *FPhdc around the rib, hdc2tog over the next 2 sts.* Repeat around. Join. (12 sts)
Cut the yarn, draw the remaining 12 stitches together and secure the tail inside.
Toddler Crochet Pumpkin Hat Pattern
The toddler size keeps the same six sections but begins with 12 stitches in each section. That gives you 72 stitches around the lower edge.
Starting chain: Loosely ch 72. Join to the first chain with a sl st without twisting.
Round 1: Ch 1. Hdc in the same chain and in each chain around. Join. (72 sts)
Round 2: Ch 1. *FPhdc around the next hdc, hdc in each of the next 11 sts.* Repeat from * to * around. Join. (72 sts)
Mark each of the six FPhdc stitches.
Rounds 3–15: Ch 1. *FPhdc around the marked rib, hdc in each of the next 11 sts.* Repeat around. Join and move the markers up. (72 sts)
Round 16: Ch 1. *FPhdc around the rib, hdc2tog over the next 2 sts, hdc in each of the next 7 sts, hdc2tog over the last 2 sts before the next rib.* Repeat around. Join. (60 sts)
Round 17: Ch 1. *FPhdc around the rib, hdc2tog over the next 2 sts, hdc in each of the next 5 sts, hdc2tog over the last 2 sts before the next rib.* Repeat around. Join. (48 sts)
Round 18: Ch 1. *FPhdc around the rib, hdc2tog over the next 2 sts, hdc in each of the next 3 sts, hdc2tog over the last 2 sts before the next rib.* Repeat around. Join. (36 sts)
Round 19: Ch 1. *FPhdc around the rib, hdc2tog over the next 2 sts, hdc in the next st, hdc2tog over the last 2 sts before the next rib.* Repeat around. Join. (24 sts)
Round 20: Ch 1. *FPhdc around the rib, hdc2tog over the next 2 sts, hdc in the remaining stitch before the next rib.* Repeat around. Join. (18 sts)
Round 21: Ch 1. *FPhdc around the rib, hdc2tog over the next 2 sts.* Repeat around. Join. (12 sts)
Cut the yarn with a long tail. Thread it through the remaining stitches, pull the crown closed and secure the tail inside.
Crochet Pumpkin Stem
The stem should be short and fairly narrow. A tall stem starts to look more like a stalk sitting on top of the hat, while the compact stem keeps the pumpkin shape closer to the example.
With brown yarn, make a magic ring.
Round 1: Work 6 sc into the ring. Do not join. (6 sts)
Rounds 2–5: Sc in each stitch around. (6 sts)
Fasten off, leaving a long sewing tail.
The finished stem should be about 1 to 1 1/4 inches tall, depending on your tension. Leave it unstuffed. The narrow six-stitch tube should have enough structure once its open edge is sewn securely to the crown. Gently shape it upright with your fingers before you finish sewing it in place.
Leave the bottom open. The open edge gives you six stitches to sew securely around the center of the crown.
Crochet Pumpkin Leaf
The leaf is intentionally small. It should sit beside the stem and extend onto one pumpkin section without covering the raised ribbing.
With green yarn, ch 8.
Beginning in the second chain from the hook, work: sl st in the next ch, sc in the next ch, hdc in the next ch, dc in the next ch, hdc in the next ch, sc in the next ch, 3 sc in the last ch.
Now work along the unused loops on the opposite side of the starting chain: sc in the next ch, hdc in the next ch, dc in the next ch, hdc in the next ch, sc in the next ch, sl st in the final ch.
Fasten off, leaving a long tail for sewing.
Gently flatten the leaf with your fingers and pull the starting and ending tails toward the narrow base. You should have a pointed oval leaf approximately 2 inches long.
If your leaf comes out much larger, don't force it onto the hat. Use a slightly smaller hook for the leaf rather than shortening the chain enough to lose the pointed shape.
Crochet Curly Vine for the Pumpkin Hat
The little green curl is worth adding. The stem and leaf already tell you this is a pumpkin, but the vine gives the top the same finished garden-pumpkin look as the example without adding much bulk.
With green yarn, ch 14.
Beginning in the second chain from the hook, work 3 sc in each chain across.
The extra stitches will make the chain curl on its own as you work. Don't straighten it afterward.
Fasten off with a long sewing tail.
The finished vine should form a compact spiral rather than a long dangling cord. If your yarn makes a looser curl, turn the spiral gently around your finger before attaching it.
Finishing the Crochet Pumpkin Hat
Set the hat on a flat surface with the crown facing you before you sew anything down. You want the stem in the center, the leaf lying to one side and the vine curling away from it. Don't line all three pieces up in a row.
1. Attach the stem. Center the open bottom of the brown stem directly over the closed crown. Using the long brown tail, sew through each stitch around the bottom of the stem and through the orange crown beneath it. Go around the stem twice if needed so it stands securely rather than tipping to one side.
2. Attach the leaf. Place the narrow end of the green leaf against the base of the stem. Let the pointed end angle down across one pumpkin section. Sew the base firmly in place, then add two or three small stitches along the center of the leaf so it stays against the hat while the outer edges remain visible.
3. Attach the curly vine. Sew one end beside the stem and leaf. Let the spiral curl naturally across the crown, then tack one point near the middle of the curl securely to the hat. You still see the spiral, but it isn't hanging from the crown like a loose cord.
4. Check the six ribs. Smooth the hat from the crown toward the lower edge with your hands. Each raised rib should run through the center of one pumpkin section. If one rib has folded underneath the fabric, pull it gently forward before you weave in the last ends.
5. Secure every yarn end. Turn the hat inside out and weave the orange, brown and green tails through several stitches. Change direction at least once before trimming the yarn. Pay particular attention to the stem, leaf and vine because all three are attached pieces.
6. Remove every stitch marker. Check the hat inside and out and make sure all six removable stitch markers have been taken out before the hat is worn or given as a gift.
Don't add buttons, beads or a separate decoration to the top. The stem, leaf and curl are enough, and keeping the details crocheted and securely sewn makes more sense on a baby hat.
The finished hat should have a rounded orange body, six clear vertical pumpkin ribs and a crown that narrows smoothly into the short stem. The leaf should sit partly against the crown rather than standing straight up, and the vine should remain small enough that it looks like a pumpkin detail instead of a tie.
If you like the naturally ribbed pumpkin shape and want a fall project that doesn't require a huge investment in time or materials, my free crochet pumpkin pattern that makes a separate stuffed pumpkin for autumn decorating, or the free crochet pumpkin rattle pattern may be right up your alley.
You can compare the hat with more crochet, quilt and fall decor projects in my pumpkin craft ideas collection.
Before using the hat, check the fit and every sewn attachment. The hat should fit comfortably without covering the baby's eyes, and the stem, leaf and vine should not pull loose when you tug them gently.
When you click on links to various merchants on this site and make a purchase, this may result in this site earning a commission. This does not affect the price you pay.

UBGI Gold Standard 2026
Reviewed under the site's
editorial checklist.
Photos, decorating ideas, party setups and reader submissions are shared for inspiration unless a page is specifically presented as a pattern, tutorial, reference guide or step-by-step project. Follow the instructions, measurements, safety guidance and manufacturer directions provided for the particular project or product.
About Jan | Contact | Baby Nursery Ideas (Blog) | Site Map | Privacy Policy | Disclosure Policy | Disclaimer | Affiliate Disclosure | Earnings Disclosure | Facebook | Pinterest
I am a participant in the Amazon Services LLC Associates Program, an affiliate advertising program designed to provide a means for us to earn fees by linking to Amazon. As an Amazon Associate I earn from qualifying purchases.
Copyright © 2006-2026. All Rights Reserved.