Free Crochet Jack-o-Lantern Lovey Pattern
By Jan Bay
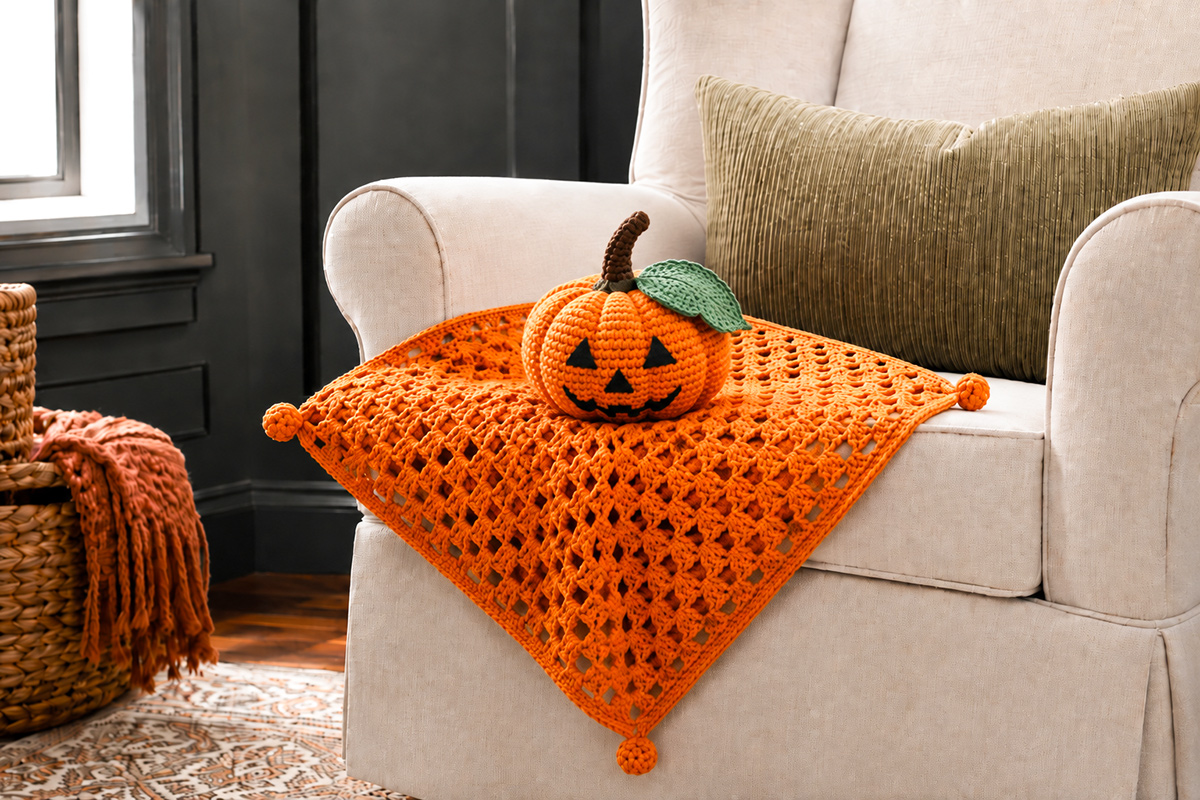
This free crochet Jack-o-lantern lovey pattern combines a ribbed pumpkin head with an orange granny-square security blanket, curved stem, leaf and an embroidered Halloween face. The triangular eyes and stitched Jack-o'-lantern smile are made with black embroidery floss instead of plastic eyes, beads or buttons, creating a Halloween version of the classic pumpkin lovey that works well for handmade baby gifts, supervised photos and seasonal nursery displays.
Explore More Halloween Crochet Patterns
Yarn for the Jack-o'-Lantern Lovey
Jump to the Jack-o'-Lantern Lovey Pattern
Crochet the Granny-Square Lovey Blanket
Crochet the Ribbed Pumpkin Head
Embroider the Jack-o'-Lantern Face
Quick answer: This free crochet Jack-o'-lantern lovey pattern makes an approximately 18-inch orange granny-square blanket topped with a ribbed pumpkin head, brown stem, sage-green leaf and an embroidered Halloween face. The triangular eyes, small nose and toothy smile are stitched with black embroidery floss, so there are no plastic eyes, beads or buttons to attach.
If you like the shape of a traditional pumpkin lovey but want it to look unmistakably ready for Halloween, the face does most of the work. The pumpkin construction stays simple and rounded while the black embroidery turns it into a Jack-o'-lantern without adding loose decorations.
Jack-o'-Lantern Lovey Pattern at a Glance
Skill level: Advanced beginner
Crochet terms: US terminology
Blanket shape: Square granny-style lovey blanket
Finished blanket size: Approximately 18 inches square before the corner balls are added
Pumpkin head: Approximately 4½ inches wide by 4 inches tall
Main colors: Pumpkin orange, warm brown, sage green and black
Face: Embroidered triangular eyes, small triangular nose and stitched Jack-o'-lantern smile
Construction: The blanket, pumpkin head and stem are crocheted separately and sewn together. The leaf and four corner balls are optional and can be added before final finishing.
Best use: Handmade Halloween baby gift, supervised seasonal comfort item, October baby shower gift or nursery display
The face is embroidered before the pumpkin head is stuffed and closed. That gives you room to secure the floss neatly on the inside and makes it much easier to keep the eyes and smile centered between the pumpkin ribs.
The finished project is meant to look like a Jack-o'-lantern first, not a pumpkin with a few Halloween details added afterward. Keep the facial shapes bold and simple enough to remain easy to recognize against the texture of the crochet.
Materials and Supplies for the Jack-o-Lantern Lovey
Choose a smooth, washable medium-weight yarn that keeps the granny-square blanket flexible while still giving the stuffed pumpkin enough stitch definition to hold its ribbed shape. A soft worsted-weight acrylic or baby yarn works well for both parts of the project.
- Approximately 500 yards of pumpkin-orange medium-weight yarn for the blanket, pumpkin head and four corner balls
- Approximately 25 yards of warm brown yarn for the stem
- Approximately 35 yards of sage-green yarn for the leaf
- Black embroidery floss for the triangular eyes, nose and Jack-o'-lantern smile
- Size H-8, 5 mm crochet hook for the granny-square blanket
- Size G-6, 4 mm crochet hook for the pumpkin head, stem, leaf and corner balls
- Polyester fiberfill for the pumpkin head, stem and corner balls
- Yarn needle with a blunt tip
- Embroidery needle
- Removable stitch markers
- Scissors
- Flexible measuring tape
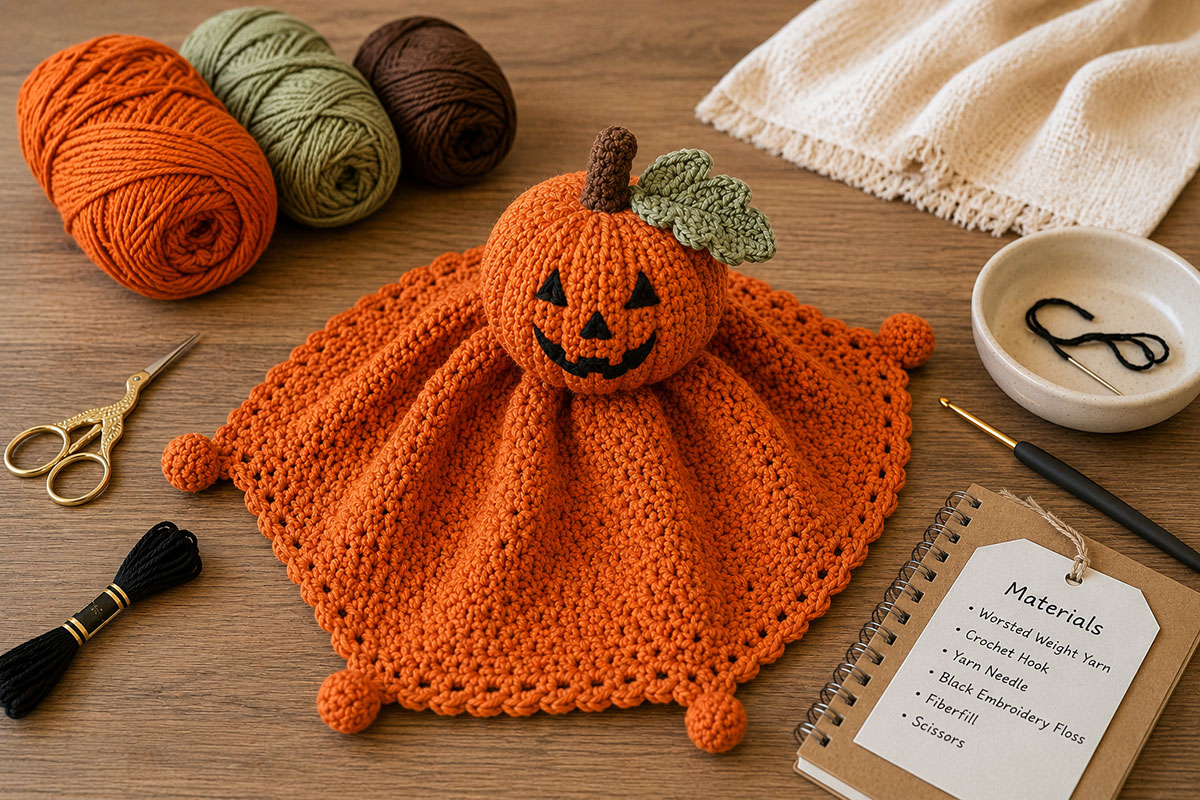
Yarn note: Use the same orange yarn for the blanket and pumpkin head. The tighter stitches of the head and the more open granny clusters of the blanket will create enough texture difference without introducing another orange shade.
Choosing Colors for a Jack-o'-Lantern Lovey
A clear pumpkin orange gives the embroidered black face enough contrast to be visible at a glance. Very pale peach and muted beige-orange yarns can make the face feel less defined, especially once the texture of the stitches is added.
Warm brown works well for the stem, while sage or olive green keeps the leaf visible without competing with the face. If you prefer a more traditional Halloween palette, use a deeper burnt orange with dark brown and a slightly richer green.
Keep the black embroidery floss truly dark. The Jack-o'-lantern expression depends on crisp contrast between the orange crochet and the stitched facial features.
I would not make this face delicate. If the eyes and grin disappear when you set the lovey down and step back, make the embroidery a little bolder before you stuff the head.
If you would rather make the more natural looking fall version without the jack o' lantern face, the crochet pumpkin lovey pattern uses the same general pumpkin-and-blanket idea with a sweeter embroidered expression.
If you prefer to work on small projects, my free crochet pumpkin rattle pattern would be perfect for you. It has a detailed pumpkin shape on a wooden ring and includes a Halloween face option. It's cute plain as well.
Finished Size and Gauge
The measurements below keep the pumpkin head clearly smaller than the blanket, so the finished project reads as a lovey rather than a stuffed pumpkin attached to a small square.
| Finished piece | Approximate measurement |
|---|---|
| Granny-square blanket | 18 inches square |
| Pumpkin head | 4½ inches wide by 4 inches tall |
| Stem | Approximately 3 inches long |
| Leaf | Approximately 4 inches long |
| Corner balls | Approximately 1¼ to 1½ inches across |
Blanket gauge: Four complete granny clusters with the spaces between them should measure approximately 4¾ to 5 inches after the work is gently smoothed flat.
The more useful checkpoint is the overall blanket measurement. After the last granny-square round and before the two single-crochet finishing rounds, aim for approximately 17 inches square. The finished border should bring the blanket close to 18 inches square.
Pumpkin gauge: Approximately 17 single crochet stitches and 18 rounds measure 4 inches using the 4 mm hook.
The stuffed pumpkin needs a firmer fabric than the blanket. If fiberfill can be seen between the stitches, move down one hook size. If the pumpkin feels hard and difficult to shape into ribs, the stitches are probably too tight.
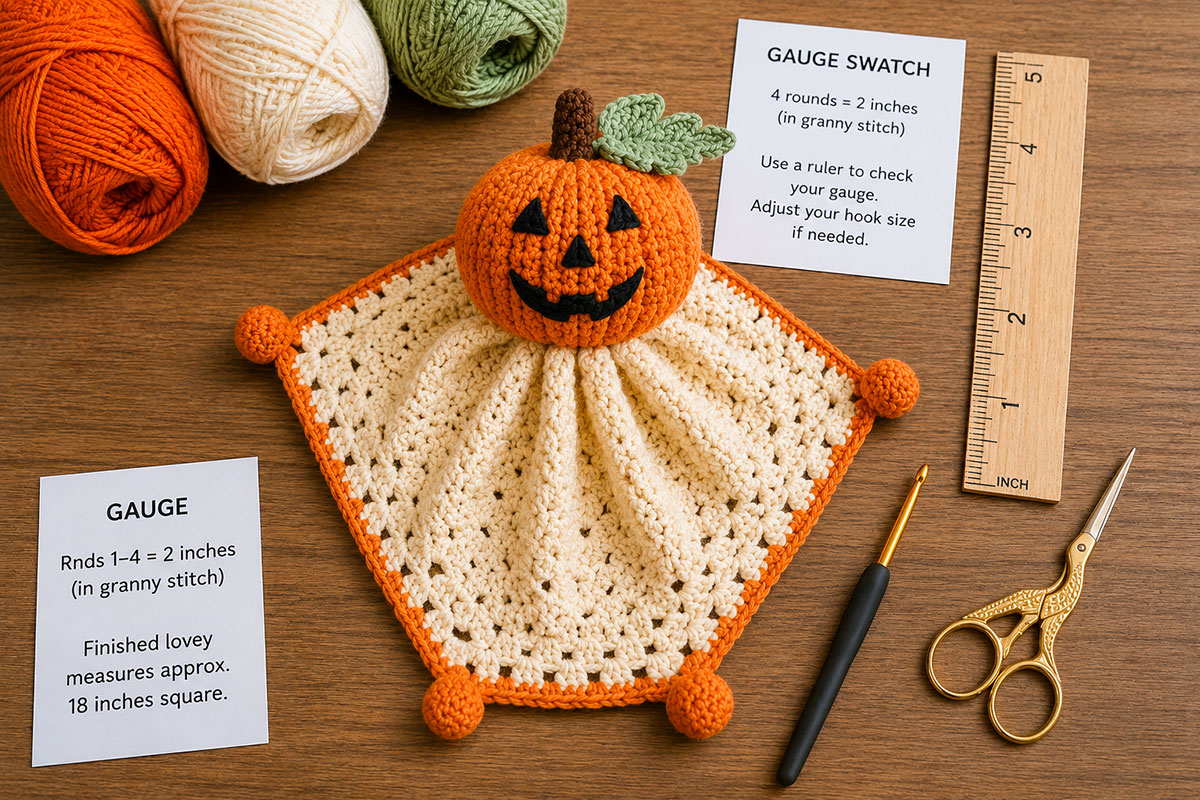
Before continuing: Make a small test section with each hook. The blanket should bend easily when lifted, while the pumpkin fabric should be dense enough to contain the stuffing without visible gaps.
Small differences in gauge are fine if the fabric behaves correctly. Keep the blanket flexible and the pumpkin firm, then use the finished measurements as your main checkpoints.
Stitches and Abbreviations
This pattern uses standard US crochet terms. If you need a refresher on stitch names or symbols, the Craft Yarn Council crochet abbreviation guide is a useful reference.
- ch: chain
- ch-sp: chain space
- dc: double crochet
- hdc: half double crochet
- sc: single crochet
- tr: treble crochet
- sl st: slip stitch
- st or sts: stitch or stitches
- inc: work 2 single crochet stitches in the same stitch
- dec: single crochet 2 stitches together
- rep: repeat
- rnd: round
Special Stitches Used in the Pattern
Granny cluster: Work 3 double crochet stitches into the same chain space.
Invisible decrease: Insert the hook through the front loop of each of the next 2 stitches. Yarn over and pull through the first 2 loops. Yarn over again and pull through the remaining 2 loops.
Adjustable ring: Form a loop with the yarn, crochet the required stitches into the loop and pull the starting tail to close the center.
Secure adjustable rings carefully: After completing at least two rounds, pull the starting tail firmly to close the center. Thread the tail onto a yarn needle, weave it beneath several stitches on the wrong side, secure it around a nearby stitch and weave it back through several more stitches before trimming. Do this before adding fiberfill to any stuffed piece.
The granny-square blanket is worked in joined rounds. The pumpkin head and corner balls are worked in continuous rounds, so place a removable stitch marker in the first stitch and move it up as each round is completed.
Count the stuffed pieces as you work them. A missed increase or decrease may not look obvious until the pumpkin is filled, and correcting the count before stuffing is much easier than trying to reshape an uneven head afterward.
After editing handmade baby patterns, I pay closest attention to the places where a reader can lose the count, miss a decrease or weaken an attachment seam. Those are the checkpoints I have called out throughout this pattern.
Crochet the Granny-Square Lovey Blanket
The blanket begins at the center and grows outward in joined rounds. Use the 5 mm hook and pumpkin-orange yarn. Keep the clusters compact but not tight. When you lift the finished square from the center, it should fall into soft folds rather than holding a stiff shape.
Beginning-chain note: The beginning ch-3 counts as the first dc of the first granny cluster in every granny-square round. Slip stitches used to move into a corner space do not count as stitches.
Round 1
Make an adjustable ring.
Ch 3. The beginning chain counts as the first double crochet.
Work 2 dc into the ring, ch 2.
Work the following sequence into the ring three times:
3 dc, ch 2.
Join with a sl st to the top of the beginning ch-3. Pull the adjustable ring closed.
Stitch count: Four granny clusters and four ch-2 corner spaces.
Round 2
Sl st across the next 2 dc and into the first ch-2 corner space.
Ch 3, work 2 dc into the same corner space, ch 2, then work 3 dc into the same corner space.
In each of the next three ch-2 corner spaces, work:
3 dc, ch 2, 3 dc.
Join with a sl st to the top of the beginning ch-3.
Stitch count: Eight granny clusters and four ch-2 corner spaces.
Round 3
Sl st across the next 2 dc and into the first ch-2 corner space.
Ch 3, work 2 dc in the same corner space, ch 2, then work 3 dc in the same corner space.
*Work 3 dc in the next space between clusters.
In the next ch-2 corner space, work 3 dc, ch 2, 3 dc.*
Repeat from * to * two more times.
Work 3 dc in the remaining space between clusters along the final side.
Join with a sl st to the top of the beginning ch-3.
Stitch count: Twelve granny clusters and four ch-2 corner spaces.
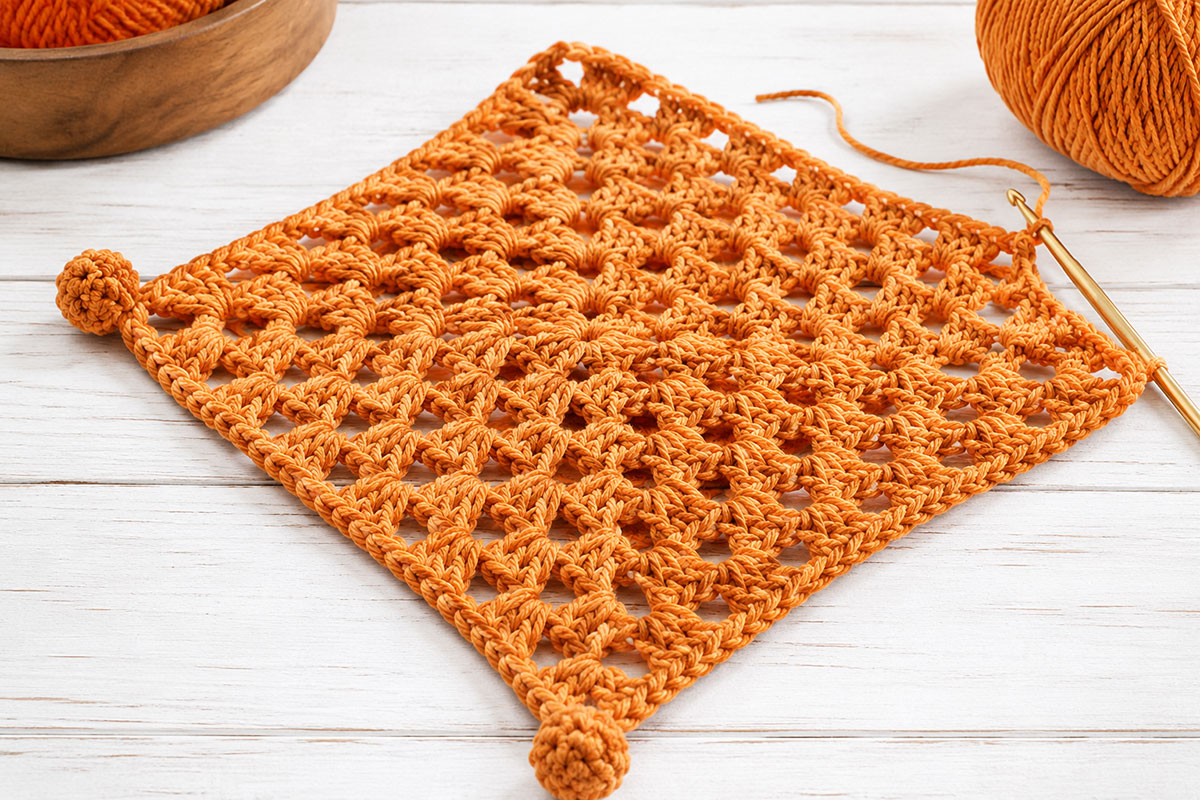
The orange blanket grows from the center in complete granny-square rounds before the firmer single-crochet border is added.
Rounds 4 Through 14
Continue in the established granny-square pattern.
At the beginning of each round, sl st across the next 2 dc and into the first ch-2 corner space.
Ch 3, work 2 dc in the same corner space, ch 2, then work 3 dc in the same corner space.
*Work 3 dc in every space between clusters across the next side.
In the next ch-2 corner space, work 3 dc, ch 2, 3 dc.*
Repeat from * to * two more times.
Work 3 dc in every remaining space between clusters across the final side.
Join with a sl st to the top of the beginning ch-3.
Repeat these instructions for each additional granny round.
Cluster-count checkpoint: Round 4 has 16 clusters, Round 5 has 20, Round 6 has 24, Round 7 has 28, Round 8 has 32, Round 9 has 36, Round 10 has 40, Round 11 has 44, Round 12 has 48, Round 13 has 52 and Round 14 has 56. Every round also has four ch-2 corner spaces.
Begin checking the blanket measurement as you approach Round 14. After completing a round, smooth the square flat without stretching it and measure from one outside edge to the opposite outside edge.
At the intended gauge, the blanket should measure approximately 17 inches square after Round 14 and before the finishing rounds.
If your blanket is smaller than 17 inches, continue working complete granny-square rounds until it reaches approximately 17 inches. If it reaches that measurement before Round 14, stop after the nearest complete round. Do not stop partway around the square.
Finishing Round 1: Firm Edge
Ch 1. The beginning chain does not count as a stitch.
Work 1 sc in the same stitch as the join and 1 sc in each remaining dc.
Work 1 sc in every space between granny clusters and 3 sc in every ch-2 corner space.
Join with a sl st to the first sc.
If you completed 14 granny rounds, this finishing round contains 232 sts.
Do not fasten off.
Finishing Round 2: Final Border
Ch 1. The beginning chain does not count as a stitch.
Work 1 sc in the same stitch as the join and 1 sc in each remaining stitch around, working 3 sc instead of 1 sc in the center stitch of each corner.
Join with a sl st to the first sc. Fasten off and weave in the yarn ends.
If you completed 14 granny rounds, the final border contains 240 sts.
Count adjustment: If you completed a different number of granny rounds, let n equal the number of granny rounds. Finishing Round 1 contains 16n + 8 stitches, and Finishing Round 2 contains 16n + 16 stitches. Each granny round added or removed changes both border counts by 16 stitches.
The completed blanket should measure approximately 18 inches square. Smooth it flat to check the corners, but avoid stretching or heavily blocking it. The finished Jack-o'-lantern head will sit at the center, and a little natural drape around it gives the lovey a much nicer shape than a sharply blocked square.
Make the Four Corner Balls
Use the 4 mm hook and pumpkin-orange yarn. Make four identical pieces. These are lightly stuffed so they stay soft and rounded without becoming heavy at the blanket corners.
Round 1: Work 6 sc into an adjustable ring. Pull the ring closed. Do not join. Place a marker in the first stitch. 6 sts
Round 2: Inc in each stitch around. 12 sts
Round 3: [Sc in the next stitch, inc in the next stitch] around. 18 sts
Rounds 4 Through 6: Sc in each stitch around. 18 sts
Add polyester fiberfill a little at a time. Shape the stuffing evenly so each piece stays round rather than becoming flat or elongated.
Round 7: [Sc in the next stitch, invisible dec] around. 12 sts
Add a little more fiberfill if needed. Keep the ball softly filled rather than firmly packed.
Round 8: Invisible dec around. 6 sts
Fasten off, leaving a 24-inch yarn tail. Thread the tail through the front loops of the remaining stitches and pull securely to close the opening. Leave the rest of the yarn tail attached for assembly.
The finished ball should measure approximately 1¼ to 1½ inches across. Make all four before moving on so you can compare their size and stuffing level side by side.
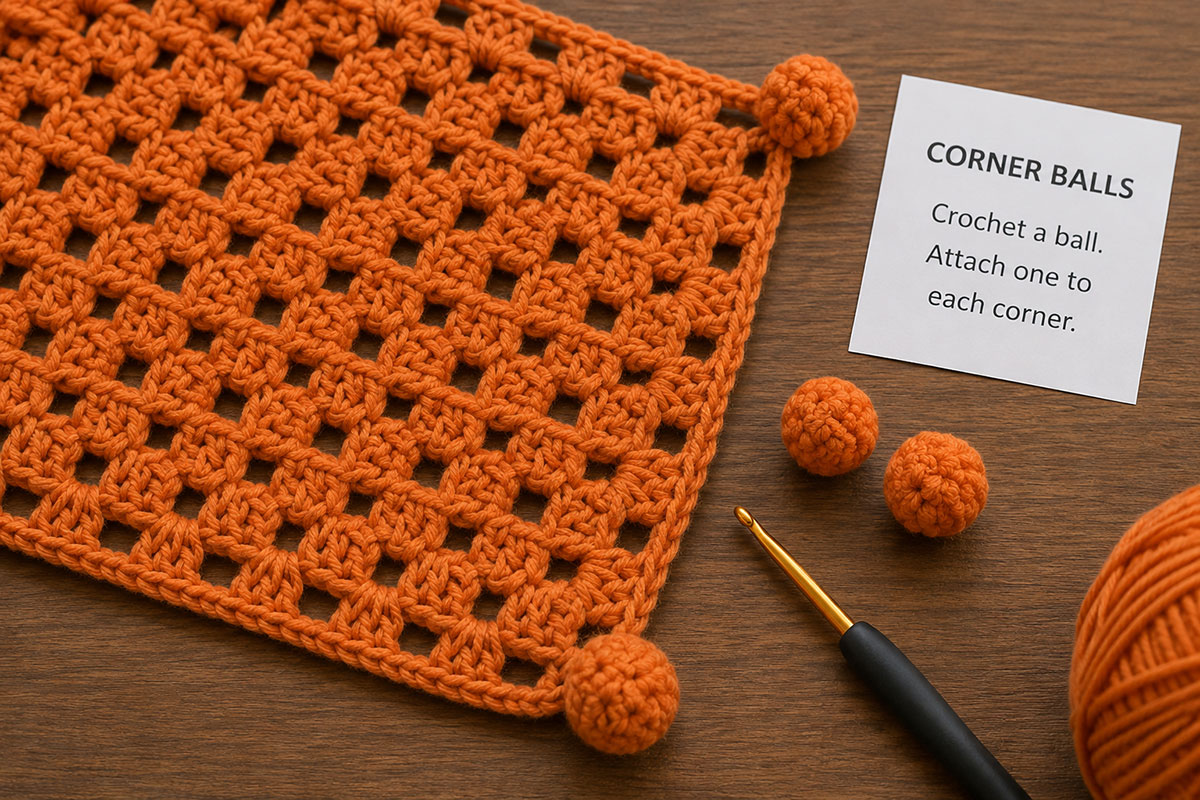
Keep all four corner balls similar in size and only lightly stuffed before sewing them to the blanket.
Assembly note: Do not attach the corner balls yet. Leaving them separate makes it easier to center and sew the Jack-o'-lantern head to the blanket first.
Crochet the Ribbed Pumpkin Head
The pumpkin head is crocheted as a smooth sphere first. The ribs are added after stuffing and closing, so do not try to shape the pumpkin by changing the stitch counts. The even crochet fabric gives the embroidered Jack-o'-lantern face a much cleaner background.
Use the 4 mm hook and pumpkin-orange yarn. Work in continuous rounds and move the stitch marker up as you complete each round.
Pumpkin orientation: The adjustable-ring end from Round 1 is the top center where the stem will be attached. The decrease closure at the opposite end becomes the bottom of the pumpkin and will eventually sit against the blanket. Keep track of the top and bottom before marking the face.
Begin at the Top of the Pumpkin
Round 1: Work 6 sc into an adjustable ring. Pull the ring closed. Do not join. Place a marker in the first stitch. 6 sts
Round 2: Inc in each stitch around. 12 sts
Round 3: [Sc in the next stitch, inc in the next stitch] around. 18 sts
Round 4: [Sc in the next 2 stitches, inc in the next stitch] around. 24 sts
Round 5: [Sc in the next 3 stitches, inc in the next stitch] around. 30 sts
Round 6: [Sc in the next 4 stitches, inc in the next stitch] around. 36 sts
Round 7: [Sc in the next 5 stitches, inc in the next stitch] around. 42 sts
Round 8: [Sc in the next 6 stitches, inc in the next stitch] around. 48 sts
Round 9: [Sc in the next 7 stitches, inc in the next stitch] around. 54 sts
Rounds 10 Through 19: Sc in each stitch around. 54 sts
Stop here before beginning the decrease rounds. Leave the pumpkin open and unstuffed while you embroider the Jack-o'-lantern face. Working from the inside is much easier now than it will be after fiberfill is added.
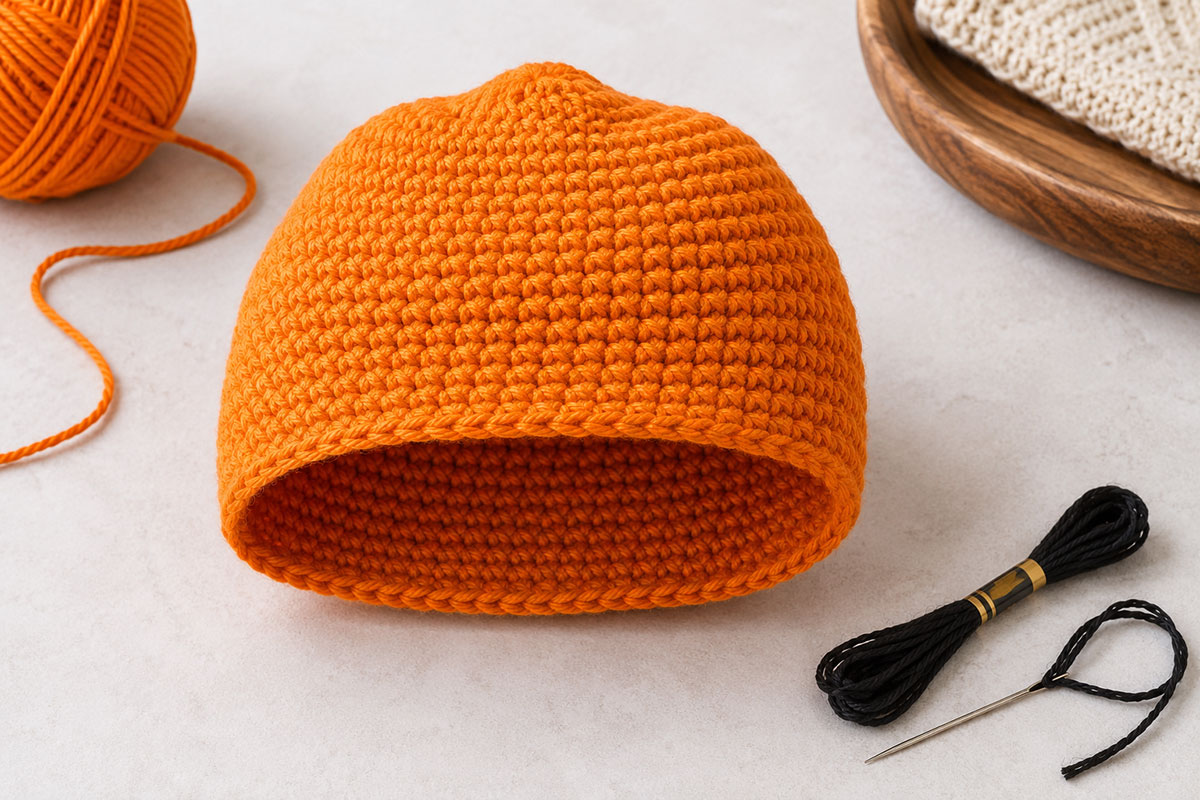
Pause after Round 19 while the pumpkin is still open so the embroidered face can be positioned and secured from the inside.
Gently flatten the pumpkin between your hands and choose the smoothest section for the front. Mark the center front with a removable stitch marker. Do not add the rib-shaping yarn yet because the face needs to be completed first.
Embroider the Jack-o'-Lantern Face
Keep the pumpkin open and unstuffed while you work the face. Black embroidery floss gives the features enough definition to show clearly against the orange stitches without adding separate pieces that need to be attached later.
Gently flatten the pumpkin with the top adjustable-ring end pointing upward. Use the removable marker placed at the center front as your guide.
Position the Eyes
Place the two eyes approximately 1¼ inches apart, centered between Rounds 12 and 15. Mark the three corners of each triangle with tiny removable yarn markers or short contrasting yarn strands before beginning the embroidery.
Each finished eye should measure approximately ½ inch wide and ½ inch tall.
Thread an embroidery needle with black floss. Build the first triangular eye with close satin stitches, working from the widest part of the triangle toward the point. Keep the stitches flat against the crochet surface rather than pulling them deeply into the pumpkin fabric.
Repeat for the second eye, checking that both triangles sit at the same height before securing the floss.
Add the Small Triangular Nose
Center the nose between the eyes around Rounds 15 and 16. Make a small downward-pointing triangle approximately ¼ to ⅜ inch wide.
Fill the shape with short black satin stitches. The nose should remain smaller than the eyes so the expression does not become crowded.
Stitch the Jack-o'-Lantern Smile
Center the mouth below the nose across approximately Rounds 17 and 18. Aim for a finished width of about 1¼ to 1½ inches.
First stitch a shallow curved line from one side of the mouth to the other. Then build a thicker black mouth around that guide line with short satin stitches.
Leave two small orange interruptions along the upper or lower edge to suggest the familiar square teeth of a carved Jack-o'-lantern. Keep those openings simple. Tiny, complicated teeth tend to disappear into the crochet texture.
Step back and look at the entire face before adding more stitches. The expression should be easy to recognize without filling most of the front of the pumpkin with black embroidery.
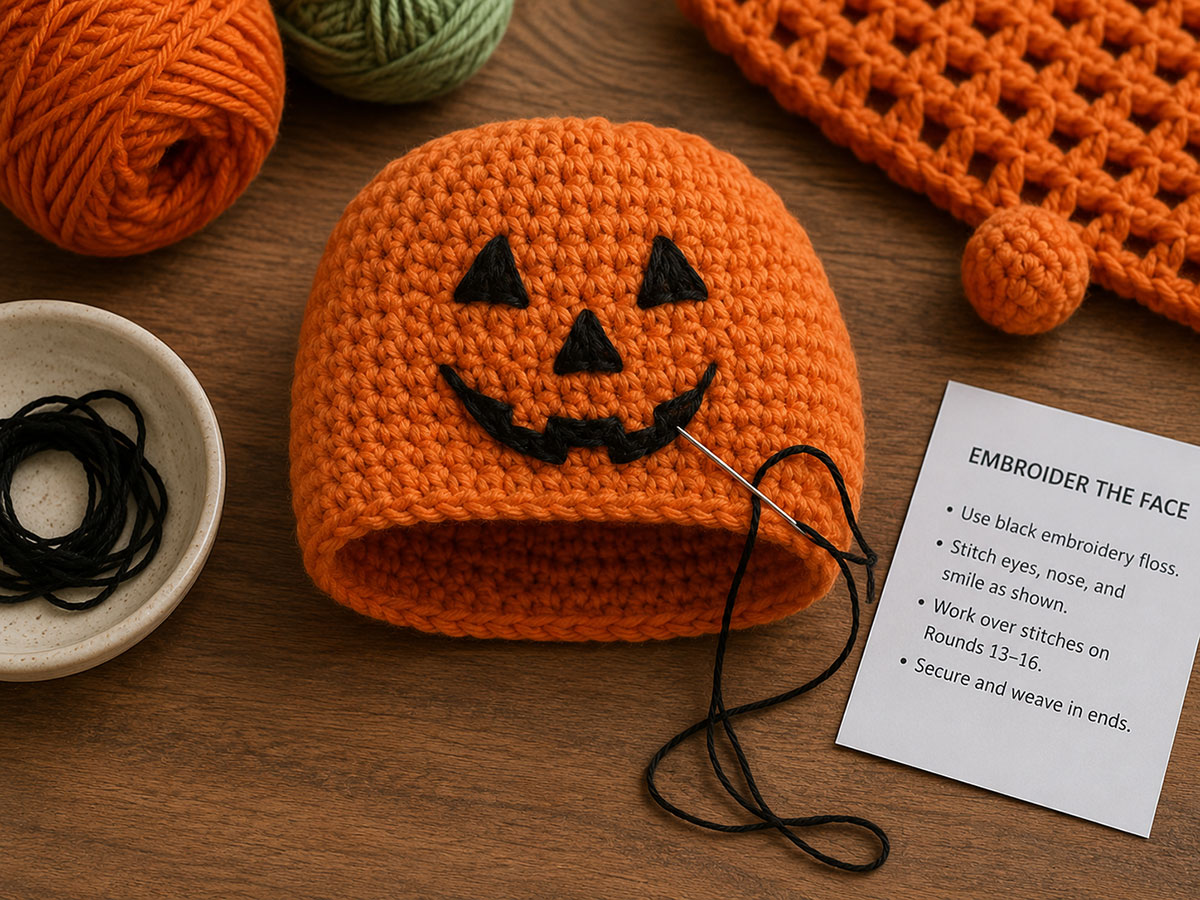
Complete and secure the entire Jack-o'-lantern face while the pumpkin head is still open and unstuffed.
Secure the Embroidery
Complete each facial feature separately rather than carrying long strands of black floss across the inside of the pumpkin.
On the inside, secure the beginning and ending floss tails around nearby crochet stitches. Weave each tail beneath several stitches before trimming it.
Run a fingertip over the finished face. The embroidery should lie flat with no loose loops, long floats or raised sections that can catch easily.
Keep the face embroidered: Do not substitute plastic safety eyes, beads or buttons for the stitched features. The Jack-o'-lantern expression is designed to be made entirely with black embroidery floss.
Once the face is finished, remove any temporary placement markers. Keep the center-front marker in place if it helps you maintain the orientation while stuffing, shaping the ribs and attaching the pumpkin to the blanket.
Stuff, Close and Shape the Jack-o'-Lantern Pumpkin
With the embroidered face complete, begin the decrease rounds and add the fiberfill gradually. Keep the front of the pumpkin facing you from time to time so the stuffing stays even behind the eyes, nose and mouth.
Round 20: [Sc in the next 7 stitches, invisible dec] around. 48 sts
Round 21: [Sc in the next 6 stitches, invisible dec] around. 42 sts
Round 22: [Sc in the next 5 stitches, invisible dec] around. 36 sts
Round 23: [Sc in the next 4 stitches, invisible dec] around. 30 sts
Begin adding polyester fiberfill. Add small amounts at a time and push the stuffing toward the outer sides rather than packing it tightly into the center.
Round 24: [Sc in the next 3 stitches, invisible dec] around. 24 sts
Round 25: [Sc in the next 2 stitches, invisible dec] around. 18 sts
Add the remaining fiberfill. Shape the pumpkin so it is slightly wider than it is tall, with a gentle indentation at the top and bottom.
Round 26: [Sc in the next stitch, invisible dec] around. 12 sts
Round 27: Invisible dec around. 6 sts
Fasten off, leaving a 12-inch yarn tail. Thread the tail through the front loops of the remaining stitches and pull tightly to close the opening. Secure the yarn and weave the tail into the pumpkin.
The finished head should measure approximately 4½ inches wide by 4 inches tall before the ribs are pulled into shape.
Create the Pumpkin Ribs
Cut a separate length of matching pumpkin-orange yarn approximately 8 feet long. Thread one end onto a yarn needle.
Insert the needle through the bottom center of the pumpkin and bring it out through the top center near the adjustable-ring opening, leaving an approximately 8-inch yarn tail at the bottom. Hold that tail securely so it does not pull through while you shape the first rib.
Bring the working yarn down along the outside of the pumpkin, keeping it between the embroidered facial features rather than directly across an eye, the nose or the mouth.
Insert the needle through the bottom center again and bring it back out through the top center. Pull gently while holding the starting tail at the bottom until a shallow groove forms in the pumpkin surface.
Repeat this outside-down, bottom-to-top path around the pumpkin until you have six evenly spaced ribs. After the sixth rib, the needle and working yarn will be at the top center.
Do not pull the shaping yarn so tightly that the pumpkin becomes narrow or deeply pinched. The goal is a rounded Jack-o'-lantern with visible sections, not a tightly cinched ball.
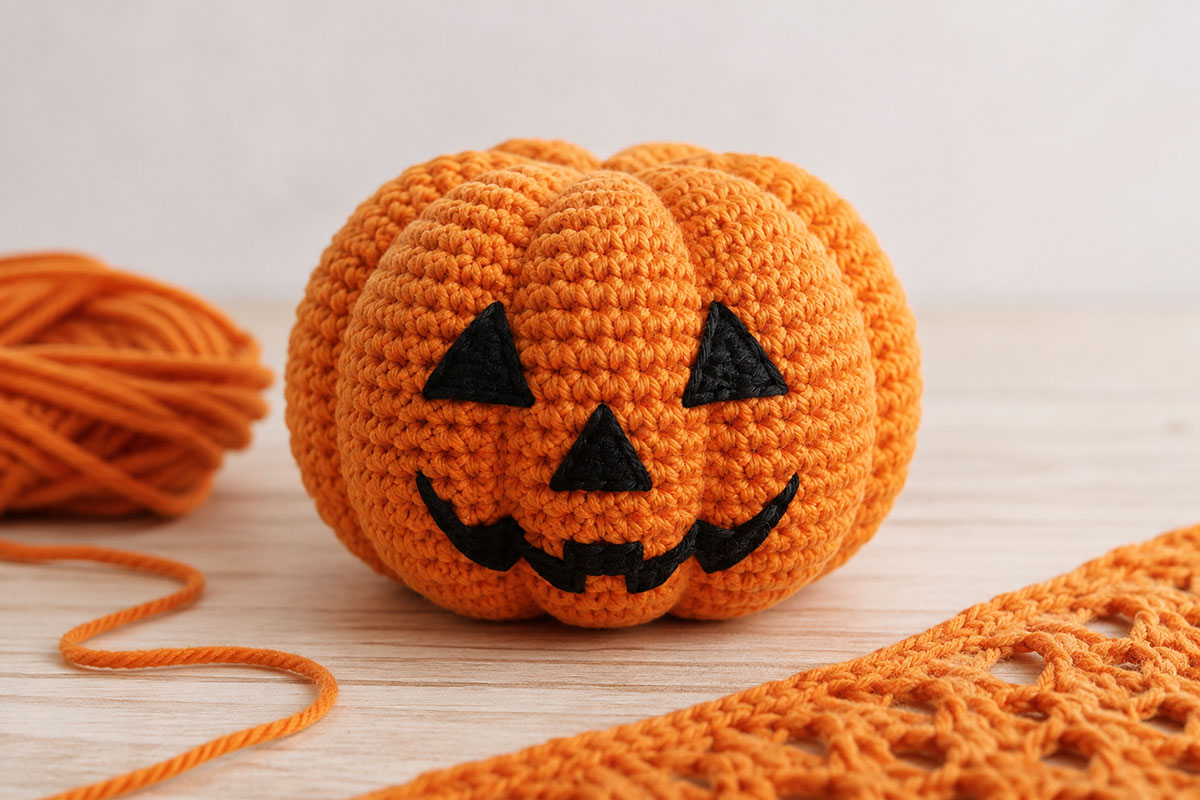
Shape six shallow ribs while keeping the embroidered eyes, nose and smile centered on the front of the pumpkin.
Check the face after shaping the first few ribs. If a groove begins to pull through one of the embroidered features, loosen that strand and shift it slightly to one side before continuing.
Face checkpoint: When the rib shaping is finished, the Jack-o'-lantern face should sit across the broad front section of the pumpkin. The shaping lines should frame the expression rather than divide it.
When all six ribs look even, pass the needle straight through the inside of the stuffed pumpkin from the top center to the bottom center without wrapping the yarn around the outside again. Secure the working yarn to the starting tail and a nearby bottom-center crochet stitch. Weave both yarn ends deeply into the stuffed head before trimming them.
Crochet the Pumpkin Stem and Leaf
The stem and leaf finish the top of the Jack-o'-lantern and help soften the bold black face. Make both pieces before attaching the pumpkin head to the blanket so you can check their size and position while the head is still easy to handle.
Crochet the Pumpkin Stem
Use the 4 mm hook and warm brown yarn. The stem is worked from the narrow closed tip toward the wider open base.
Round 1: Work 6 sc into an adjustable ring. Pull the ring closed. Do not join. Place a marker in the first stitch. 6 sts
Rounds 2 and 3: Sc in each stitch around. 6 sts
Round 4: [Sc in the next 2 stitches, inc in the next stitch] twice. 8 sts
Rounds 5 and 6: Sc in each stitch around. 8 sts
Round 7: [Sc in the next 3 stitches, inc in the next stitch] twice. 10 sts
Rounds 8 and 9: Sc in each stitch around. 10 sts
Round 10: [Sc in the next 4 stitches, inc in the next stitch] twice. 12 sts
Rounds 11 Through 14: Sc in each stitch around. 12 sts
Fasten off with the 12-stitch base left open, leaving a 24-inch yarn tail for attachment.
Add small amounts of polyester fiberfill through the open base. Fill the narrow tip lightly and leave the final ½ inch near the base unstuffed so the stem can sit flat against the pumpkin.
Gently bend the stem backward. If it will not hold the curve, use a separate 12-inch length of brown yarn to make one or two small hidden anchoring stitches along the inside of the bend. Secure the yarn and bury both ends inside the stem.
The finished stem should measure approximately 3 inches long and taper gradually from the wider base toward the tip. Keep the curve gentle rather than folding the stem sharply.
Crochet the Pumpkin Leaf
Use the 4 mm hook and sage-green yarn.
Ch 17.
Beginning in the second chain from the hook, work:
- 1 sc in each of the next 2 chains
- 1 hdc in each of the next 2 chains
- 1 dc in each of the next 3 chains
- 1 tr in each of the next 2 chains
- 1 dc in each of the next 3 chains
- 1 hdc in each of the next 2 chains
- 1 sc in the next chain
- 3 sc in the final chain
Continue along the unused loops on the opposite side of the starting chain and work:
- 1 sc in the next chain
- 1 hdc in each of the next 2 chains
- 1 dc in each of the next 3 chains
- 1 tr in each of the next 2 chains
- 1 dc in each of the next 3 chains
- 1 hdc in each of the next 2 chains
- 1 sc in each of the final 2 chains
Join with a sl st to the first sc.
Stitch count: 33 sts around the leaf.
Fasten off, leaving an 18-inch yarn tail for attachment.
The finished leaf should measure approximately 3½ to 4 inches long. Smooth the outer edges, pinch the base lightly and shape the three stitches at the tip into a gentle point.
Shape the Leaf
Roll the finished leaf gently between your fingers to soften the stitches. Pinch the base slightly so the leaf forms a shallow curve rather than lying completely flat.
If your yarn permits steaming, you can lightly steam the leaf to help set the shape. Keep the iron away from the yarn itself and follow the care instructions for the fiber you are using.
The leaf should angle across one side of the pumpkin without covering the embroidered Jack-o'-lantern face.
Optional Curling Vine for Decorative Display
If you are making a decorative display version, use sage-green yarn and ch 18.
Beginning in the second chain from the hook, work 3 sc in each of the 17 chains. 51 sts
The crocheted strip will curl naturally into a spiral.
Fasten off, leaving a 12-inch tail for attachment.
Use note: The curling vine creates a projecting loop. Keep it for a decorative display version that will remain out of a baby's reach. Omit the vine from a lovey intended for infant use.
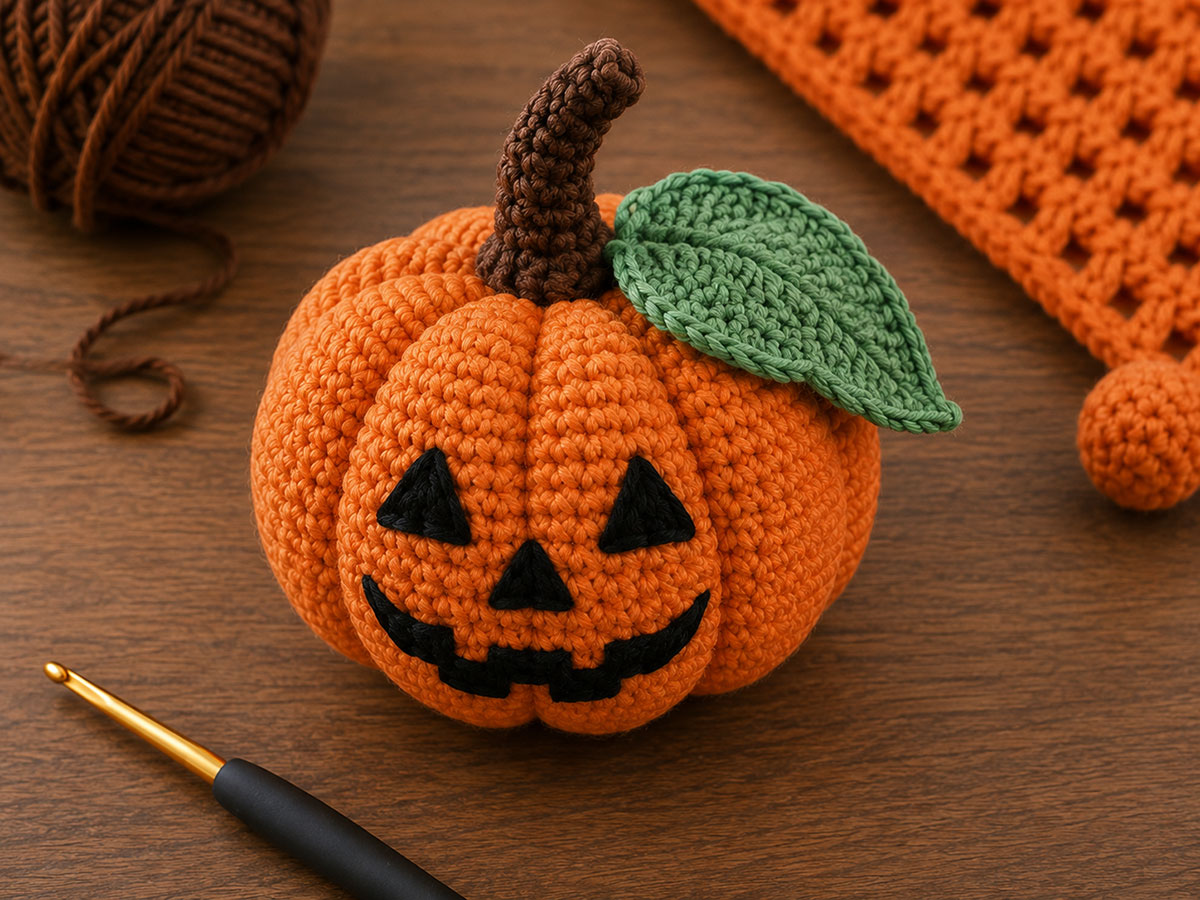
Shape the stem and leaf before sewing them to the top of the finished Jack-o'-lantern head.
Assemble the Jack-o'-Lantern Lovey
Arrange the pumpkin head, stem, leaf and four corner balls on the finished blanket before sewing anything in place. Check the face from the front as you position the pumpkin. The embroidered eyes and smile should face one straight side of the square rather than a corner.
Assembly Order
- Attach the Jack-o'-lantern head to the center of the blanket.
- Check the six pumpkin ribs and face placement.
- Sew on the stem.
- Attach the leaf.
- Add the optional vine only to a decorative display version.
- Attach the four corner balls, or leave them off if preferred.
Attach the Jack-o'-Lantern Head
Lay the granny-square blanket flat with the side you want visible facing up. Keep one straight side of the square parallel to the table rather than turning the blanket into a diamond.
Fold the blanket lightly in half from side to side, then from top to bottom, to locate the center.
Place the bottom decrease closure of the pumpkin directly over that center point. Turn the pumpkin so the embroidered face looks toward one straight side of the blanket.
The pumpkin should cover approximately the center 4½ inches of the blanket.
Press the pumpkin downward about ¼ inch so the lower curve settles into the blanket instead of appearing to balance on top of it.
Use removable markers or pins to mark a circular attachment area approximately 2½ to 3 inches across where the lower part of the pumpkin touches the blanket. Keep the seam underneath the pumpkin rather than sewing around its widest point.
Thread approximately 36 inches of matching pumpkin-orange yarn onto a yarn needle.
Beginning at the back, whip stitch around the marked attachment circle. With each stitch, catch one full crochet stitch from the pumpkin and one or two sturdy strands from the blanket directly below it.
Keep the sewing tension even. The pumpkin should be drawn securely against the blanket without flattening the stuffed head or puckering the granny square.
Complete a second circuit around the same attachment line, placing the new stitches between the first set for reinforcement.
Do not carry the sewing yarn across the inside diameter of the stuffed pumpkin or pull the needle through opposite sides of the head.
Knot the yarn securely in a hidden area and bury the end inside the pumpkin. When finished, the head should remain upright without rocking while the blanket stays flat around its base.
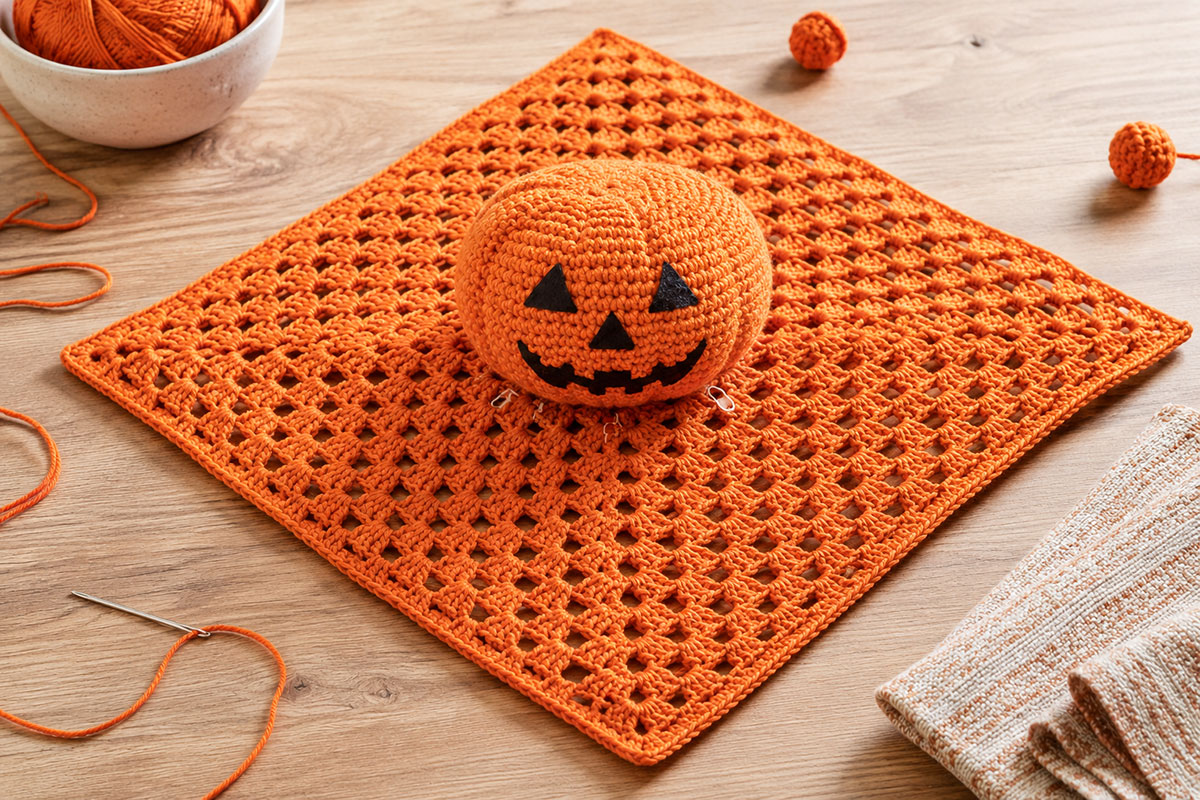
Center the Jack-o'-lantern head carefully and sew around the lower attachment area so the pumpkin remains upright.
Check the Pumpkin Ribs and Face
Attaching the head can shift one of the rib-shaping strands slightly. Look at the pumpkin from the front before adding the stem.
You should still see six balanced pumpkin sections, with the embroidered face centered across the broad front area.
If a rib strand has moved, use your fingertips or the blunt end of a yarn needle to ease it gently back into position. Do not pull on a buried shaping-yarn tail.
Make sure no rib crosses through a triangular eye, the nose or the stitched mouth.
Attach the Stem
Position the open base of the stem at the top center of the pumpkin, slightly behind the face.
Let the curved tip lean naturally toward the back of the lovey.
Using the long brown yarn tail, sew completely around the stem base. Add several extra stitches through the center of the base so the stem does not wobble during handling.
Secure the yarn and bury the remaining tail inside the pumpkin.
Attach the Leaf
Place the sage-green leaf beside the stem and rotate it slightly so it crosses one pumpkin rib at an angle. Keep it clear of the embroidered face.
Sew the lower half of the leaf firmly to the pumpkin.
Add several small anchoring stitches beneath the center and near the tip. The leaf can keep a gentle curve, but no long section should hang loose enough to twist or catch.
Add the Optional Vine to a Display Version
If you made the optional curling vine for decorative display, sew one end securely beside the stem.
Add small anchoring stitches at short intervals along the curl so a large loose loop does not hang from the pumpkin.
Omit the vine from a lovey intended for infant use.
Attach the Four Corner Balls
Place the closed opening of each orange ball directly over a blanket corner.
Fold the corner lightly to help position the ball, then pass its long yarn tail through the three-stitch corner increase and nearby stitches on both sides.
Sew through the center of the ball and several layers of the blanket corner.
Draw the ball snugly against the blanket without pulling tightly enough to curl or pucker the border.
Stitch around the entire base of the ball so it is attached across a broad area rather than hanging from a narrow yarn connection.
Repeat for the other three corners. Tug firmly on each ball after sewing to check the attachment.
If you prefer a simpler lovey with fewer projecting pieces, the corner balls can be omitted without changing the blanket or Jack-o'-lantern construction.
Final assembly check: Remove every pin and stitch marker. Secure and bury all yarn tails. Check the embroidered face, pumpkin attachment, stem, leaf and each corner ball individually. Nothing should feel loose when gently tugged.
Finishing, Washing and Care
Before washing the finished Jack-o'-lantern lovey, inspect every part of the project. Check the black embroidery, pumpkin attachment, rib-shaping yarn, stem, leaf and all four corner balls. Weave in any yarn tail that has worked toward the surface.
Follow the washing directions on the yarn and fiberfill labels. If the materials allow machine washing, place the lovey inside a mesh laundry bag to reduce pulling on the attached pieces.
- Use cool or lukewarm water.
- Choose a mild detergent.
- Use a gentle cycle if machine washing is permitted.
- Do not bleach.
- Avoid twisting or wringing the blanket.
- Reshape the pumpkin, stem, leaf and blanket while damp.
- Lay flat to dry unless the yarn label specifically allows another drying method.
High heat can change the shape of the stuffed pumpkin and flatten some yarn fibers, so check the yarn label before using a dryer.
Reshape the Jack-o'-Lantern After Washing
While the head is still damp, gently press the stuffing toward the sides to restore the rounded pumpkin shape. Use your fingertips to deepen the six ribs if they have relaxed during washing.
Check the embroidered face from straight ahead. Smooth the triangular eyes and nose with your fingertips and adjust the pumpkin ribs if one has shifted too close to the mouth.
Lay the blanket flat and straighten each corner without stretching the granny clusters. Shape the stem into its slight backward curve and smooth the leaf into position.
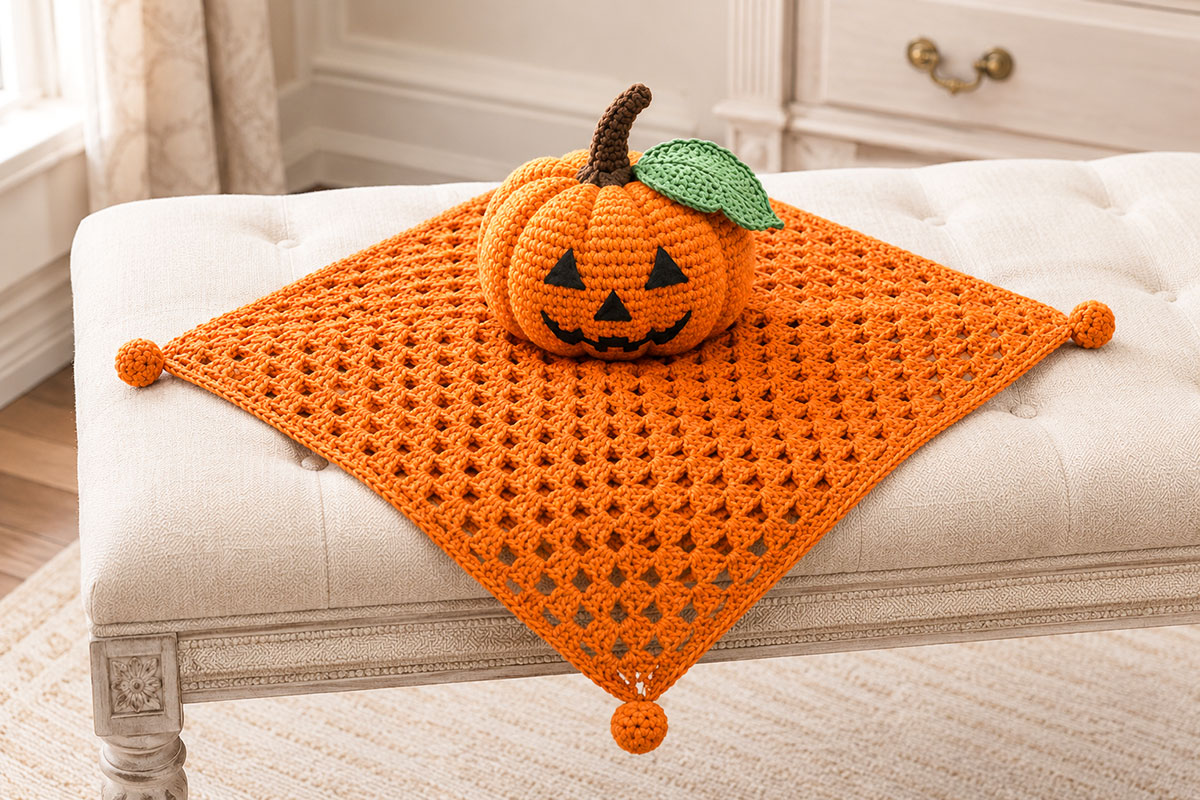
After washing, reshape the pumpkin ribs, stem and leaf while the lovey is still damp and allow it to dry completely.
Check the Lovey Before Each Use
Give the attached pieces a gentle tug before handing the lovey to a child. Repair or retire the project if the embroidery loosens, an attachment seam opens or stuffing becomes visible.
The embroidered Jack-o'-lantern face avoids plastic eyes, beads and buttons, but the finished lovey is still a soft object. Keep blankets, loveys and other soft items out of an infant's crib or sleep space. The American Academy of Pediatrics safe sleep guidance explains why an infant sleep area should remain free of blankets, stuffed items and other soft objects.
Halloween photo idea: The finished lovey can be placed beside a clothed baby for a supervised seasonal photograph, then removed when the photo session is finished. It does not need extra ribbons, bells or detachable Halloween decorations to look complete.
For another handmade Halloween project with a completely different silhouette, the crochet bat lovey pattern pairs a dark bat head and wings with a small security blanket. You can also browse the Halloween crochet patterns collection for more seasonal baby projects.
Frequently Asked Questions About the Crochet Jack-o'-Lantern Lovey
Can I make the Jack-o'-lantern without a nose?
Yes. The triangular nose is optional. Two bold triangular eyes and the stitched toothy smile are enough to make the pumpkin read clearly as a Jack-o'-lantern. Leaving off the nose also gives you a little more room if your embroidered face is smaller than the measurements in the pattern.
Can I change the Jack-o'-lantern expression?
Yes. Keep the facial features embroidered and fairly simple, but the mouth can be made happier, wider or slightly crooked. Mark the shape with removable yarn before stitching so you can check the expression against the pumpkin ribs before committing to it.
Can I use the regular pumpkin lovey face instead?
Yes. The pumpkin head and blanket construction are compatible with a softer embroidered expression. If that is the look you want, the crochet pumpkin lovey pattern shows the fall version with oval stitched eyes and a simple smile.
Can I make the granny-square blanket larger?
Yes. Continue adding complete granny-square rounds until the blanket reaches the size you want, then work the two finishing rounds. Keep the pumpkin head at its original size unless you are intentionally redesigning the proportions of the entire lovey.
Can I use cotton yarn?
Yes. A smooth cotton yarn can give the pumpkin very clear stitch definition, although the granny-square blanket will generally have less drape than one made with a soft acrylic or washable blend. Check your gauge because cotton yarns can also produce a slightly different finished size.
Can I use chenille or velvet yarn?
You can, but the result will look different. Plush yarn softens the definition of the pumpkin ribs, granny clusters and small embroidered facial shapes. If the Jack-o'-lantern expression is an important part of the project, a smoother yarn makes those details much easier to see.
Can I leave off the corner balls?
Yes. They are decorative and do not affect the blanket construction. A plain four-corner blanket gives the Jack-o'-lantern head more visual emphasis and also means fewer stuffed pieces to sew securely.
Can I leave off the leaf?
Yes. The brown stem alone is enough to identify the pumpkin shape. I would keep the leaf if you want a softer harvest look and omit it if you prefer the face and orange pumpkin to carry more of the Halloween character.
Is the curling vine required?
No. The vine is optional and is best reserved for a decorative display version. The stem and leaf look complete without it.
Is this pattern suitable for beginners?
A confident advanced beginner should be comfortable with this project. You will need to work granny-square rounds, continuous single-crochet rounds, increases, invisible decreases, embroidery, light stuffing and sewn assembly. The face placement and pumpkin rib shaping require patience, but none of the individual crochet stitches are unusually complicated.
Can I sell finished Jack-o'-lantern loveys made from this pattern?
You may sell finished handmade loveys if you wish. Please do not reproduce or redistribute the written pattern itself.
Free Crochet Jack-o-Lantern Lovey Pattern: Finished Project
Your completed lovey should have a soft orange granny-square blanket, a rounded pumpkin head with six visible ribs, a curved brown stem, sage-green leaf and a black embroidered Jack-o'-lantern face that is easy to recognize without extra decorations.
The face is what separates this project from the softer crochet pumpkin lovey. Triangular eyes and the toothy stitched smile give the same pumpkin construction a distinctly Halloween look, which also makes this pattern useful if you already know how to make the regular version.
Before calling the project finished, lay the blanket flat and look at the entire lovey from several feet away. The pumpkin should sit upright at the center without appearing oversized, and the face should remain readable even when the blanket falls into natural folds.
Final Project Checklist
- Blanket measures approximately 18 inches square.
- Pumpkin head is approximately 4½ inches wide by 4 inches tall.
- Six pumpkin ribs are visible and evenly spaced.
- Jack-o'-lantern eyes and mouth, plus the nose if you used one, are embroidered securely with black floss.
- No plastic eyes, buttons or beads are attached.
- The stem is firmly sewn to the pumpkin, and the leaf is firmly attached if you chose to use it.
- All four corner balls are firmly attached if you chose to use them.
- No yarn tails, loose loops or openings expose fiberfill.
- All stitch markers and pins have been removed.
If Halloween crochet is already on your hook, the crochet ghost lovey pattern makes a lighter companion project, while the crochet bat lovey pattern adds a completely different winged shape.
You can find those patterns together with more seasonal projects in the Halloween crochet patterns collection.
A finished Jack-o'-lantern lovey also fits naturally into an October gift basket or supervised seasonal display. For a themed celebration, the Halloween baby shower ideas page has coordinating inspiration for the rest of the event.
When you click on links to various merchants on this site and make a purchase, this may result in this site earning a commission. This does not affect the price you pay.

UBGI Gold Standard 2026
Reviewed under the site's
editorial checklist.
Photos, decorating ideas, party setups and reader submissions are shared for inspiration unless a page is specifically presented as a pattern, tutorial, reference guide or step-by-step project. Follow the instructions, measurements, safety guidance and manufacturer directions provided for the particular project or product.
About Jan | Contact | Baby Nursery Ideas (Blog) | Site Map | Privacy Policy | Disclosure Policy | Disclaimer | Affiliate Disclosure | Earnings Disclosure | Facebook | Pinterest
I am a participant in the Amazon Services LLC Associates Program, an affiliate advertising program designed to provide a means for us to earn fees by linking to Amazon. As an Amazon Associate I earn from qualifying purchases.
Copyright © 2006-2026. All Rights Reserved.