Free Crochet Frankenstein Monster Pattern for a Baby Lovey or Doll
By Jan Bay
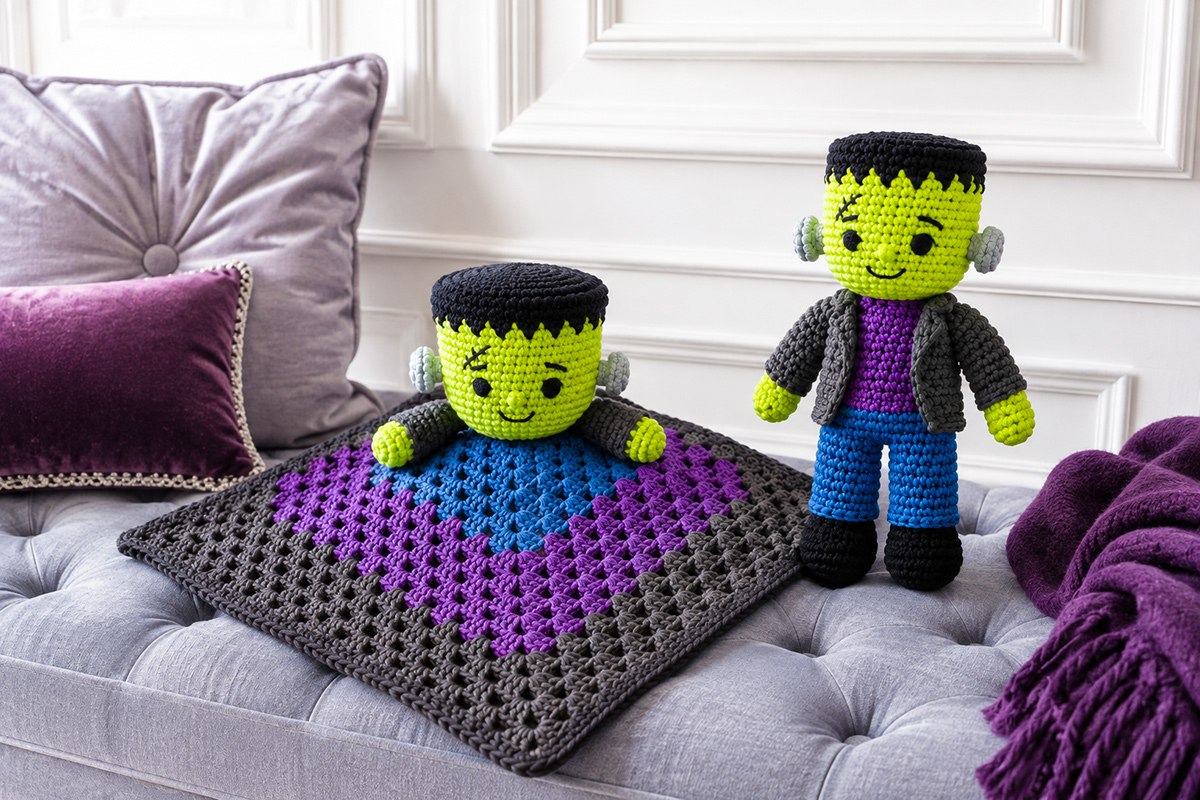
This free crochet Frankenstein monster pattern includes instructions for making either a soft baby lovey or a stuffed doll. Both versions use the same green monster head, crocheted black hair, soft side bolts and embroidered facial features, so you can choose the project that best fits a Halloween baby gift, nursery display or handmade keepsake.
Explore More Free Halloween Crochet Patterns
See Yarn and Crochet Supplies for This Frankenstein Monster Pattern
Jump to the Crochet Frankenstein Monster Pattern
Finished Sizes and Skill Level
Crochet the Frankenstein Monster Head
Make the Hair, Face and Soft Bolts
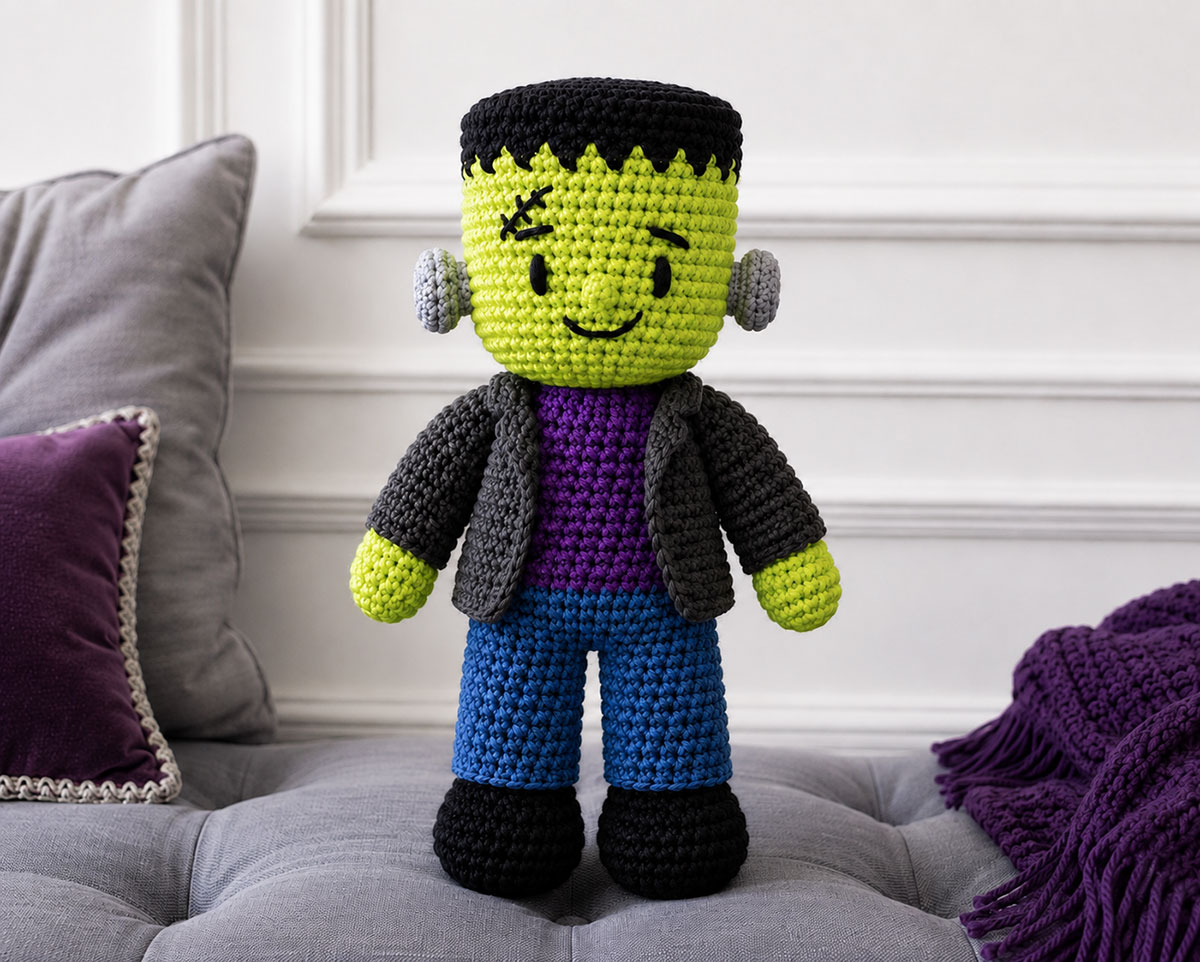
Make the Stuffed Frankenstein Doll
Make the Frankenstein Baby Lovey
Finished Sizes and Skill Level
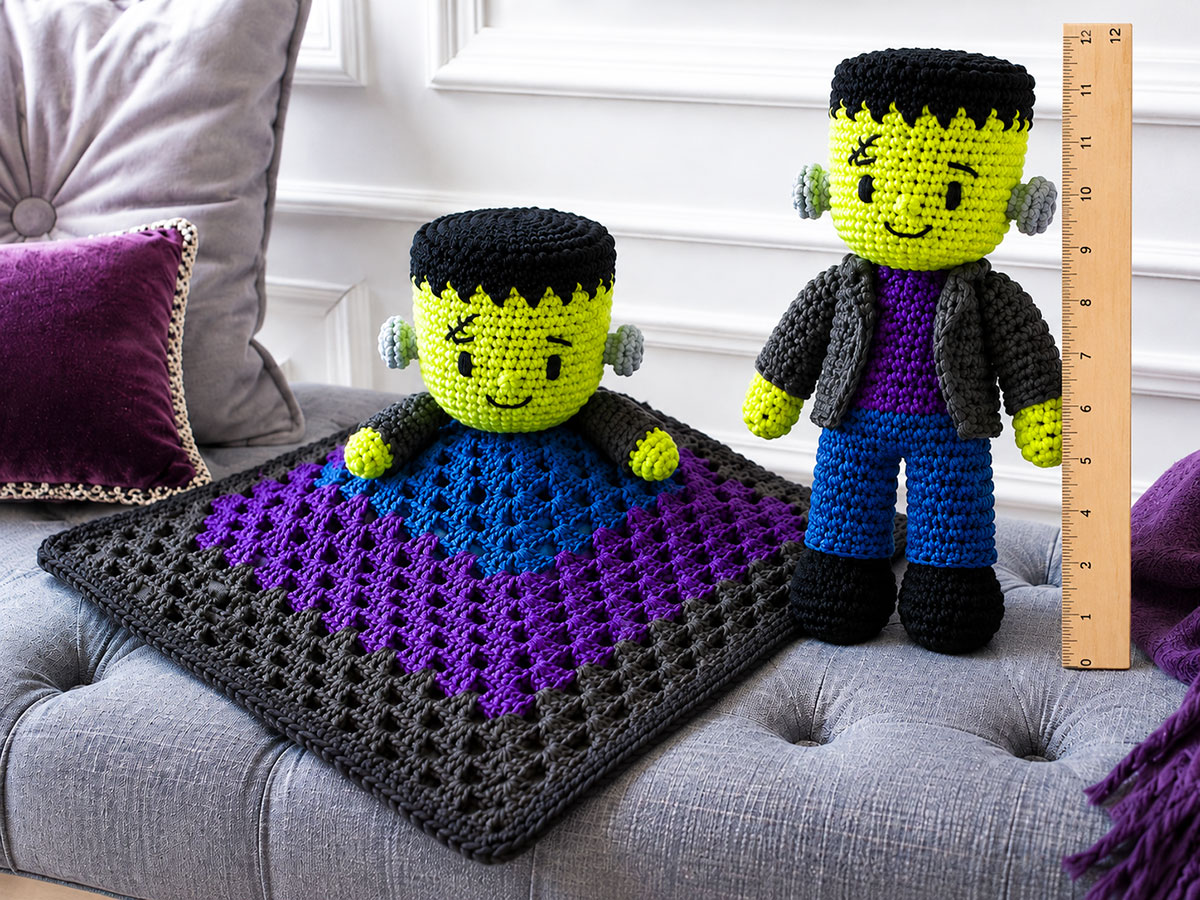
This crochet Frankenstein monster pattern includes two finished projects made from the same head, hair, face and soft side-bolt instructions. You can complete the stuffed doll, make the flatter baby lovey, or crochet both as a matching Halloween gift set.
- Stuffed Frankenstein doll: approximately 11 1/2 inches tall from the top of the hair to the feet
- Baby lovey: approximately 14 inches square, not including the head and arms
- Finished head: approximately 4 inches tall and 11 inches around at the widest point
- Skill level: advanced beginner
The pattern is worked primarily in single crochet. You will also need to make a magic ring, increase, decrease, change yarn colors, crochet through the back loop and sew several pieces together. Embroider the facial features while the lower opening is still wide enough to reach the back of the stitches, then add the stuffing.
I recommend reading through the head and face instructions before beginning. The black hair cap, embroidered brow and small stitched mouth give the monster much of his personality, while the soft crocheted bolts keep the design suitable for a baby-focused project.
The doll body is firmly stuffed so it can hold its shape. The lovey blanket remains flat and flexible. Only the lovey head and green hands receive a small amount of filling; the dark-gray sleeves remain unstuffed.
Materials and Yarn for the Frankenstein Monster
Use smooth worsted-weight yarn so the stitches remain easy to count and the embroidered face sits neatly on the surface. Cotton gives the monster a firm, crisp shape, while a washable acrylic or cotton-blend yarn makes a softer lovey. Choose yarns with a similar thickness so the head, clothing and hair stay in proportion.
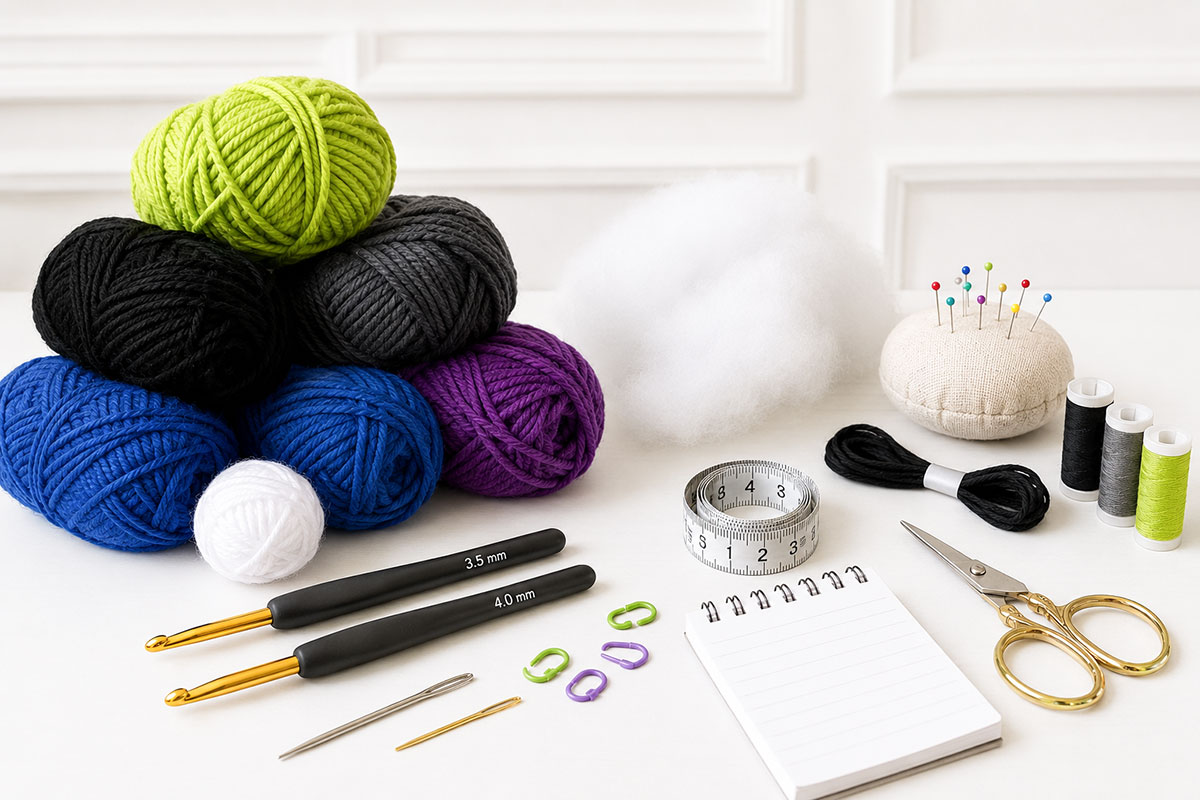
Yarn
- Green: approximately 120 yards for one head and pair of hands
- Black: approximately 75 yards for the hair cap and doll shoes
- Dark gray: approximately 90 yards for the jacket, sleeves and lovey border
- Light gray: a small amount for the two soft side bolts
- Purple: approximately 65 yards for the doll shirt and lovey blanket
- Medium blue: approximately 80 yards for the doll pants and lovey blanket
These amounts allow for either the stuffed doll or the baby lovey. To make both projects, plan on approximately twice the green, purple, blue and dark-gray yarn while keeping one skein of black for the shared finishing work.
Hooks and Tools
- 3.5 mm crochet hook
- 4 mm crochet hook for the lovey blanket body
- Locking stitch markers
- Yarn needle with a blunt tip
- Embroidery needle
- Sharp scissors
- Flexible measuring tape
- Row counter or paper for recording completed rounds
- Washable polyester fiberfill
- Rustproof straight pins for positioning pieces before sewing
Baby-Focused Face and Finishing Supplies
- Black cotton embroidery floss for the eyes, eyebrows, mouth and scar
- Green yarn scraps for covering and securing the ends of facial stitches inside the head
Do not use plastic safety eyes, buttons, beads, wire or hard pieces on the baby lovey. The eyes, eyebrows, mouth and scar are embroidered with black floss. The side bolts are crocheted with light-gray yarn, lightly filled and sewn directly to the head.
Before beginning, wind each yarn color into a separate ball and place the darker shades apart from the green. Black fibers can cling to pale yarn while you work, especially when the hair cap and face are made at the same sitting.
Gauge
Using the 3.5 mm hook, 18 single crochet stitches and 20 rows should measure approximately 4 inches square. Exact gauge is less important than creating a fabric with close stitches that will not allow the stuffing to show.
If gaps appear between stitches, move down one hook size. If the fabric feels stiff and difficult to shape, move up one hook size while keeping the stitches tight enough to contain the filling.
Abbreviations and Pattern Notes
This pattern uses standard U.S. crochet terms. Keep a stitch marker in the first stitch of every continuous round and move it up as you work. Unless the instructions say otherwise, do not join rounds with a slip stitch.
Abbreviations
- ch: chain
- sc: single crochet
- hdc: half double crochet
- dc: double crochet
- sl st: slip stitch
- st or sts: stitch or stitches
- rnd: round
- inc: work 2 single crochet stitches in the same stitch
- dec: single crochet 2 stitches together
- BLO: back loop only
- FO: fasten off
- rep: repeat
How to Make an Invisible Decrease
- Insert the hook through the front loop of the next stitch.
- Without making a yarn over, insert the hook through the front loop of the following stitch.
- Yarn over and pull through the first two loops on the hook.
- Yarn over again and pull through both remaining loops.
The invisible decrease keeps the head and stuffed body smoother than a standard single crochet decrease. Use it everywhere the pattern says dec, unless you find another decrease method more comfortable.
Important Pattern Notes
- Numbers inside parentheses show the total stitch count at the end of a round or row.
- Instructions inside brackets are repeated the stated number of times.
- The head, arms, legs and doll body are crocheted in continuous rounds.
- The lovey blanket is worked in joined rounds.
- Stuff the head gradually instead of adding all the filling at the end.
- Do not overfill the lovey head or hands. The head should hold its shape without becoming hard, and the sleeves remain unstuffed.
- Leave long yarn tails on pieces that will be sewn to another section.
- For color changes in the stuffed pieces, begin the final stitch in the old color and stop when two loops remain on the hook. Complete the final yarn-over with the new color. Cut the old yarn, leaving at least a 6-inch tail, and secure the color-change tails inside the piece before the opening becomes too small to reach. For the lovey blanket, fasten off at the end of the stated color section and join the new color in a corner ch-2 space as directed.
- Complete the facial embroidery before closing the doll head or sewing the green base disc over the lovey head opening.
Count the stitches at the end of every increase and decrease round. A missed stitch near the beginning of the head can shift the hairline, eyes and side bolts later in the pattern.
How to Crochet the Frankenstein Monster Head
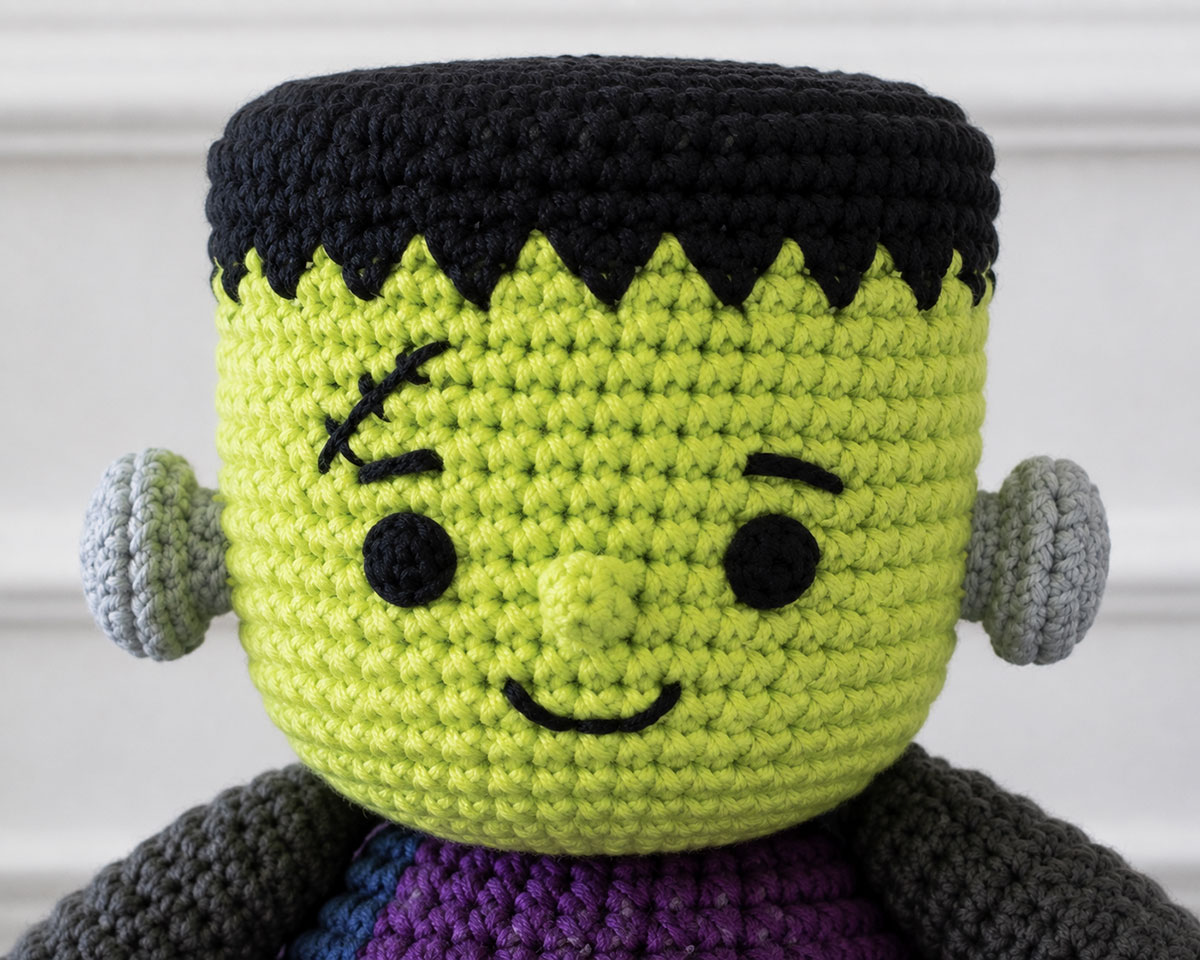
The Frankenstein monster head begins with a flat green circle and then turns downward to form a flat-topped, straight-sided shape. The slight edge created in Round 9 gives the top a flatter profile, so the black hair cap will sit neatly instead of rounding upward like a ball.
Use the 3.5 mm hook and green worsted-weight yarn. Work in continuous rounds and move the stitch marker after each completed round.
Green Head
- Round 1: Make a magic ring and work 6 sc into the ring. Pull the ring closed. (6)
- Round 2: Inc in each stitch around. (12)
- Round 3: [Sc in the next stitch, inc in the next stitch] 6 times. (18)
- Round 4: [Sc in the next 2 stitches, inc in the next stitch] 6 times. (24)
- Round 5: [Sc in the next 3 stitches, inc in the next stitch] 6 times. (30)
- Round 6: [Sc in the next 4 stitches, inc in the next stitch] 6 times. (36)
- Round 7: [Sc in the next 5 stitches, inc in the next stitch] 6 times. (42)
- Round 8: [Sc in the next 6 stitches, inc in the next stitch] 6 times. (48)
- Round 9: Working in the back loops only, sc in each stitch around. (48)
- Rounds 10 through 22: Sc in each stitch around. (48)
- Round 23: [Sc in the next 6 stitches, dec] 6 times. (42)
- Round 24: Sc in each stitch around. (42)
- Round 25: [Sc in the next 5 stitches, dec] 6 times. (36)
Pause after Round 25. Place a removable strand of yarn across the front between Rounds 16 and 17 to mark the eye line. Mark the approximate center of the face with a second strand running vertically from the top edge toward the lower opening.
Continue directly to the facial embroidery instructions below. After the eyes, eyebrows, mouth and scar are complete, follow the separate doll or lovey head finish before adding the hair cap and bolts.
Make the Hair, Face and Soft Monster Bolts
Embroider the face while the lower opening remains accessible. After the embroidery is secured, finish and stuff the head according to the doll or lovey instructions, then sew on the hair cap and side bolts. Use the removable guide strands to keep the eyes level and centered.
Embroider the Eyes
Thread an embroidery needle with three strands of black cotton floss. Place the eyes between Rounds 16 and 18, leaving approximately six visible crochet stitches between them.
- Bring the needle out at the lower edge of the first eye.
- Make four or five short vertical satin stitches over the same two rows.
- Keep the stitches close together to create a solid oval approximately 1/2 inch tall.
- Carry the floss through the inside of the head to the second eye.
- Repeat the same number of stitches so both eyes are similar in size.
- Secure the floss inside the open head with several small knots.
Do not pull the embroidery floss tightly enough to sink the eyes into the head. The stitches should rest flat on the green crochet surface without gathering it.
Add the Eyebrows, Mouth and Scar
Use three strands of black embroidery floss for the remaining features.
- Eyebrows: Place each eyebrow one round above its eye. Make a slightly slanted straight stitch approximately three crochet stitches wide.
- Mouth: Center a short horizontal stitch between Rounds 20 and 21. Add one tiny stitch at each end if you want a quiet, friendly expression.
- Scar: Make a diagonal line approximately four stitches long near one temple. Add three short crossing stitches over the line.
A simple face keeps the monster recognizable without making him look stern. Before knotting the final thread, turn the head toward you and check the expression from several angles.
Finish the Head for the Doll or Lovey
After the facial embroidery is complete, begin adding small portions of polyester filling. Press the stuffing evenly against the flat top and upper sides first, then fill the center and lower half. Keep the front smooth and do not stretch the stitches apart.
- Round 26: [Sc in the next 4 stitches, dec] 6 times. (30)
- Round 27: [Sc in the next 3 stitches, dec] 6 times. (24)
For the stuffed doll:
- Round 28: [Sc in the next 2 stitches, dec] 6 times. (18)
- Add the final small amounts of stuffing and smooth the lower sides evenly with your fingers.
- Round 29: [Sc in the next stitch, dec] 6 times. (12)
- Round 30: Dec 6 times. (6)
Fasten off, leaving an 8-inch yarn tail. Thread the tail through the front loops of the remaining six stitches, pull the opening closed and weave the end securely into the head.
For the baby lovey:
Stop after Round 27 with 24 stitches remaining. Add only enough filling for the head to hold its shape. Fasten off, leaving an 8-inch tail. Weave the tail securely into the head without closing the 24-stitch lower opening.
Crochet the Lovey Head Base
Use the 3.5 mm hook and green yarn. Work in continuous rounds.
- Round 1: Make a magic ring and work 6 sc into the ring. Pull the ring closed. (6)
- Round 2: Inc in each stitch around. (12)
- Round 3: [Sc in the next stitch, inc in the next stitch] 6 times. (18)
- Round 4: [Sc in the next 2 stitches, inc in the next stitch] 6 times. (24)
Fasten off, leaving a 20-inch tail. Place the base over the lower head opening with the right side of the base facing outward toward the blanket. Match one base stitch to each of the 24 head stitches.
Sew the base to the head one stitch at a time. Before closing the final inch, adjust the stuffing so the lower portion of the head is filled evenly without becoming firm. Complete the seam, knot the yarn securely and bury the tail inside the head. No fiberfill should remain visible through the base seam.
The finished head should have a level upper edge, gently rounded sides and a flat enclosed base. Shape it with your hands rather than steam or heavy pressing.
Crochet the Black Hair Cap
Use the 3.5 mm hook and black worsted-weight yarn. Work in continuous rounds.
Black yarn does not make the stitch harder; it makes the stitch harder to see. I put a pale towel beneath the work before I begin the hair cap so I am not guessing where the next stitch belongs.
- Round 1: Make a magic ring and work 6 sc into the ring. (6)
- Round 2: Inc in each stitch around. (12)
- Round 3: [Sc in the next stitch, inc] 6 times. (18)
- Round 4: [Sc in the next 2 stitches, inc] 6 times. (24)
- Round 5: [Sc in the next 3 stitches, inc] 6 times. (30)
- Round 6: [Sc in the next 4 stitches, inc] 6 times. (36)
- Round 7: [Sc in the next 5 stitches, inc] 6 times. (42)
- Round 8: [Sc in the next 6 stitches, inc] 6 times. (48)
- Round 9: Working in the back loops only, sc in each stitch around. (48)
- Rounds 10 through 12: Sc in each stitch around. (48)
Fasten off, leaving a 36-inch tail for sewing the cap to the head. Place the cap over the top of the head with the lower edge sitting approximately three rounds above the eyebrows. Pull the back slightly lower than the front, then pin the cap securely at the front, back and both sides.
Add the Jagged Hairline
Cut a separate 24-inch length of black yarn and thread it onto the yarn needle. Along the front half of the cap, make seven to nine small filled points. For each point, bring the yarn out at the cap edge, make one short diagonal stitch down no more than one round, then make a second diagonal stitch back to the cap edge to form a narrow V. Fill the center of the V with two or three short black stitches so no green yarn shows through the point. Vary the width and spacing slightly, and do not pull the stitches tightly enough to gather the head.
Secure and bury the separate hairline strand beneath the cap. Thread the original 36-inch cap tail onto the yarn needle and sew around the entire lower edge with small stitches. Pass the needle through the cap and the outer surface of the green head without pushing it through the full depth of the stuffing. Knot the tail beneath the back edge and weave it securely into the cap.
Crochet Two Soft Side Bolts
Use the 3.5 mm hook and light-gray yarn. Make two.
- Round 1: Make a magic ring and work 6 sc into the ring. (6)
- Round 2: Inc in each stitch around. (12)
- Round 3: Working in the back loops only, sc in each stitch around. (12)
- Rounds 4 and 5: Sc in each stitch around. (12)
Fasten off, leaving a 12-inch tail. Place a very small amount of stuffing inside each bolt. The pieces should remain soft enough to flatten when pressed.
Position one bolt on each side of the head between Rounds 20 and 23. Sew around the open edge twice, checking that both pieces sit at the same height. Knot the yarn securely and bury the tails inside the head.
Check every embroidered and sewn feature by gently pulling it in several directions. No thread loops, loose yarn ends or openings should remain on the finished head.
Make the Stuffed Frankenstein Monster Doll
The doll body is crocheted from the feet upward. The two legs are made separately, joined at the center and continued as one piece through the waist and torso. This construction reduces sewing and gives the finished doll a stable shape.
Use the 3.5 mm hook. Stuff the legs and body gradually, adding small pieces of filling instead of pushing one large amount into the opening.
Crochet the First Leg
Begin with black yarn for the shoe.
- Round 1: Make a magic ring and work 6 sc into the ring. (6)
- Round 2: Inc in each stitch around. (12)
- Round 3: [Sc in the next stitch, inc] 6 times. (18)
- Round 4: Working in the back loops only, sc in each stitch around. (18)
- Round 5: Sc in each stitch around. (18)
- Round 6: [Sc in the next 4 stitches, dec] 3 times. (15)
- Round 7: Sc in each stitch around. (15)
Change to medium blue yarn for the pants.
- Round 8: Working in the back loops only, sc in each stitch around. (15)
- Rounds 9 through 16: Sc in each stitch around. (15)
Lightly stuff the shoe and leg, leaving the upper two rounds unstuffed. Fasten off, leaving a 12-inch blue yarn tail for closing any gaps beside the leg join.
Crochet the Second Leg
Repeat Rounds 1 through 16, but do not fasten off. Stuff the second leg to match the first.
Join the Legs
Because the shoes are worked as matching round tubes without a shaped toe, choose the front before joining the legs. Lay the second leg on the table with its working loop at the inside edge. Place a removable marker on the side of the shoe facing you to mark the front. Position the first leg beside it and rotate that leg so the same side of its shoe faces forward. Do not crochet extra stitches to reposition the working loop.
- Chain 3.
- Insert the hook into the inside stitch of the first leg and sc in that stitch.
- Sc around the remaining 14 stitches of the first leg.
- Sc across one side of the 3 joining chains.
- Sc around all 15 stitches of the second leg.
- Sc across the opposite side of the 3 joining chains. (36)
Before continuing the body, inspect both ends of the three-chain bridge. Use the blue yarn tail from the first leg to close any visible gaps with small whipstitches. Do not pull the join tightly enough to draw the legs together. Knot the yarn securely, bury the tail inside the body and confirm that no stuffing can show through the crotch seam.
Place the stitch marker after the final stitch. The beginning of each new round will now sit near the back center of the doll.
Crochet the Waist and Torso
- Rounds 1 through 3: Using medium blue yarn, sc in each stitch around. (36)
- Round 4: [Sc in the next 4 stitches, dec] 6 times. (30)
- Round 5: Sc in each stitch around. (30)
Change to purple yarn for the shirt.
- Round 6: Working in the back loops only, sc in each stitch around. (30)
- Rounds 7 through 11: Sc in each stitch around. (30)
- Round 12: [Sc in the next 3 stitches, dec] 6 times. (24)
- Rounds 13 through 15: Sc in each stitch around. (24)
- Round 16: [Sc in the next 2 stitches, dec] 6 times. (18)
- Rounds 17 and 18: Sc in each stitch around. (18)
Stuff the body firmly through the center, then add smaller amounts around the sides. Keep the neck opening round and do not pack the final two rounds too tightly.
Fasten off, leaving a 36-inch purple yarn tail for attaching and reinforcing the head.
Crochet the Arms
Make two. Begin with green yarn for the hands.
- Round 1: Make a magic ring and work 6 sc into the ring. (6)
- Round 2: Inc in each stitch around. (12)
- Rounds 3 and 4: Sc in each stitch around. (12)
- Round 5: [Sc in the next 2 stitches, dec] 3 times. (9)
Change to dark gray yarn for the jacket sleeve.
- Round 6: Working in the back loops only, sc in each stitch around. (9)
- Rounds 7 through 15: Sc in each stitch around. (9)
Lightly stuff the hand and the lower half of the arm. Leave the upper portion unstuffed so it lies smoothly against the body.
Flatten the nine-stitch opening with the working loop at one side fold. Work 4 sc through the four pairs of stitches across the top. The ninth stitch remains at the opposite fold and is not worked separately. Fasten off and leave an 18-inch tail for sewing. Repeat for the second arm.
Crochet the Jacket Front Panels
Use dark gray yarn. Make two rectangular panels.
- Chain 8.
- Row 1: Sc in the second chain from the hook and in each remaining chain. Turn. (7)
- Rows 2 through 11: Ch 1; this chain does not count as a stitch. Sc in each of the 7 stitches across. Turn. (7)
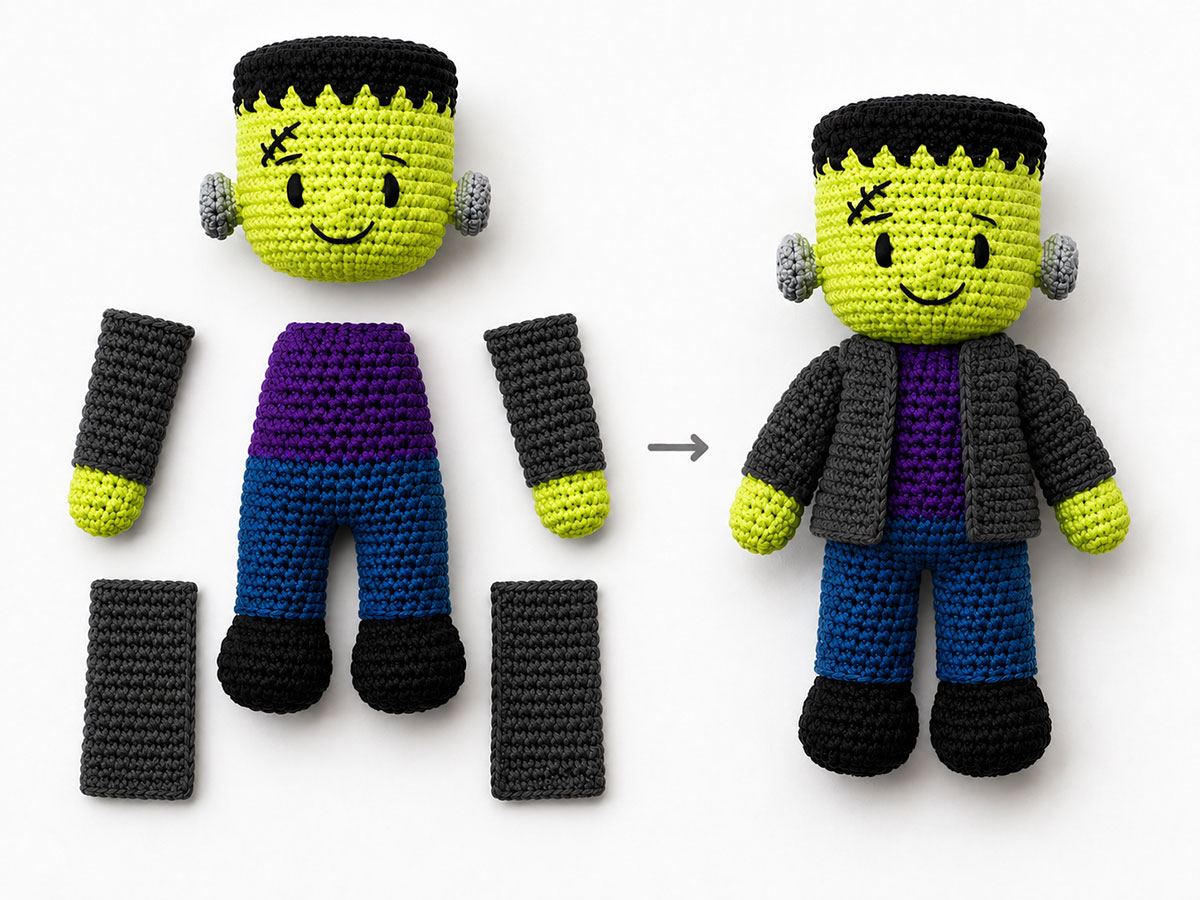
Fasten off, leaving a 20-inch tail. Position one panel along each side of the purple torso. Leave a narrow strip of purple visible down the center to resemble the shirt beneath the open jacket.
Sew along the outer edge, lower edge and shoulder edge of each panel. Leave the inner front edges unsewn so they lift slightly away from the shirt.
Attach the Arms
Pin one arm to each side of the body between Rounds 13 and 16. Angle the hands slightly forward rather than placing the arms directly against the sides.
Use the long yarn tails to sew through the flattened top of each arm and the body stitches beneath it. Sew across the attachment line twice, knot the yarn securely and bury the ends inside the torso.
Attach the Head to the Doll Body
Center the head over the 18-stitch neck opening with the face aligned above the purple shirt. Locate the 18 stitches of Head Round 28, which form the ring immediately outside the narrower Round 29 and Round 30 closure. Pin the neck to Head Round 28 at the front, back and both sides.
- Thread the 36-inch purple yarn tail from the body onto the yarn needle.
- Sew the first neck stitch to the first stitch of Head Round 28.
- Continue around the seam, matching each of the 18 neck stitches to one of the 18 stitches in Head Round 28.
- Before sewing the final three stitches, add a small amount of filling inside the neck opening if the head needs additional support.
- Complete the one-to-one seam without pulling the neck inward.
- Make a second reinforcing line of stitches just inside the first seam.
- Knot the yarn beneath the back of the head and bury the tail inside the body.
Set the doll upright and check it from the front, back and both sides. The feet should face forward, the jacket panels should lie evenly and the head should remain centered without pulling toward either shoulder.
Make the Frankenstein Monster Baby Lovey
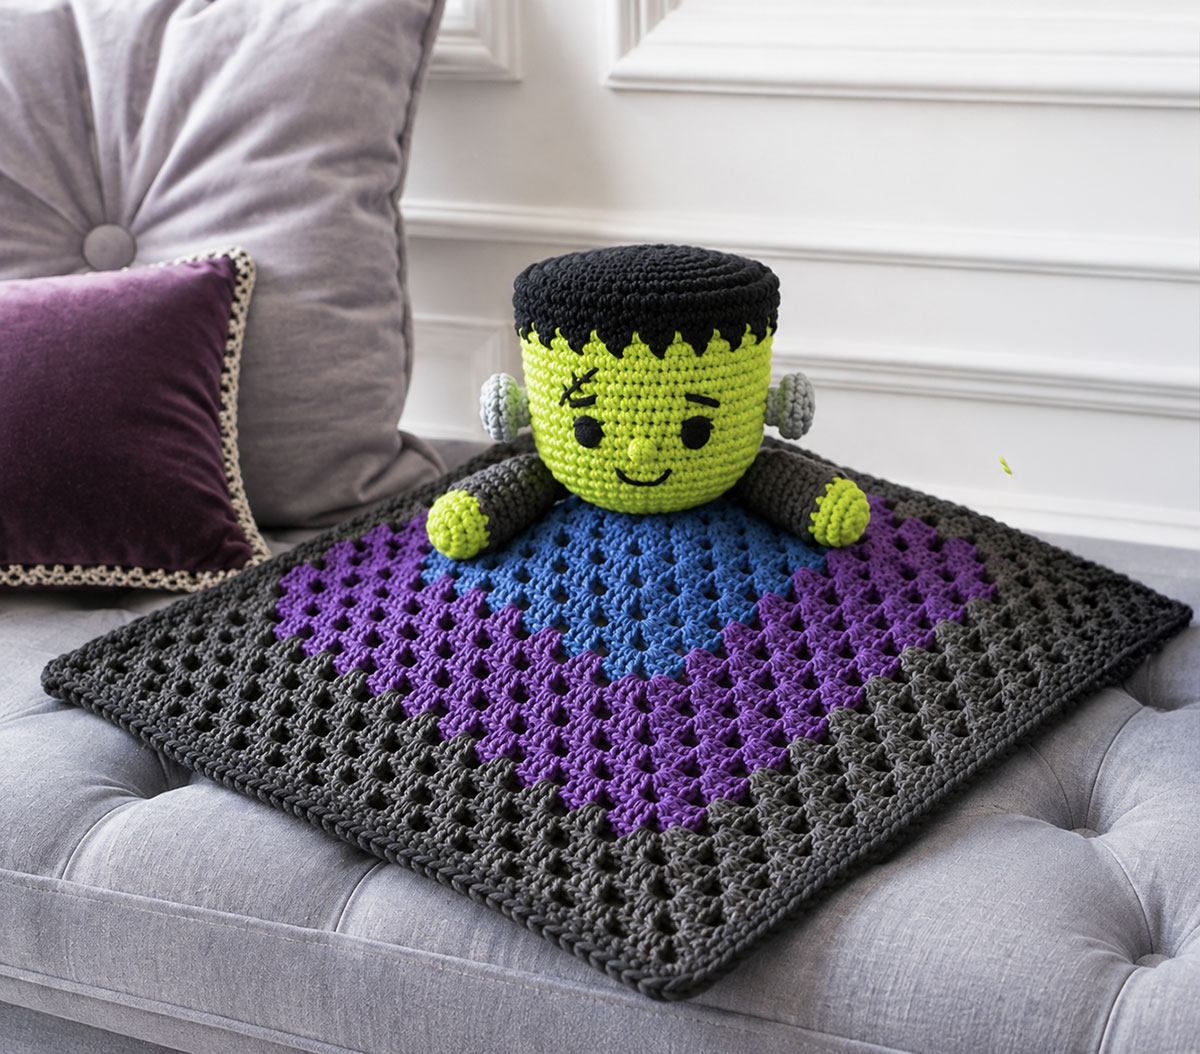
The lovey version uses the head finished at 24 stitches and closed with a matching green base disc, along with a flat center-out blanket and two short arms. The blanket is worked in joined granny-cluster rounds with the 4 mm hook, which gives it more drape than the firmly stuffed doll body.
Use medium blue, purple and dark gray yarn for the blanket. Four blue rounds form the center, four purple rounds form the middle and three dark-gray rounds create the outer section shown in the example image.
Crochet the Square Lovey Blanket
Begin with medium-blue yarn. The beginning chain 3 counts as the first double crochet throughout the blanket instructions. Each group of 3 dc is referred to as a three-double-crochet group. The blanket is not turned between rounds; the side facing you as you work is the right side. Keep this side facing upward when attaching the head and arms.
- Round 1: Make a magic ring. Ch 3, work 2 dc into the ring, ch 2, [work 3 dc into the ring, ch 2] 3 times. Join with a sl st to the top of the beginning ch 3. Pull the ring closed. (4 three-double-crochet groups total; 1 group on each side)
- Round 2: Sl st across the next 2 dc and into the first corner ch-2 space. Ch 3, work 2 dc, ch 2 and 3 dc in the same corner space, ch 1. [Work 3 dc, ch 2 and 3 dc in the next corner space, ch 1] 3 times. Join with a sl st to the top of the beginning ch 3. (8 groups total; 2 groups and 1 ch-1 space on each side)
Established increase round: Begin in a corner ch-2 space by slip stitching across from the previous join or by joining the new color in that space. Ch 3, work 2 dc, ch 2 and 3 dc in the same corner, then ch 1. Work 3 dc in each ch-1 space across to the next corner, making ch 1 after each group. In the next corner work 3 dc, ch 2 and 3 dc, then ch 1. Repeat around all four sides and join with a sl st to the top of the beginning ch 3.
- Round 3: Work the established increase round. (12 groups total; 3 groups and 2 ch-1 spaces on each side)
- Round 4: Work the established increase round. (16 groups total; 4 groups and 3 ch-1 spaces on each side)
Fasten off the medium-blue yarn. Join purple yarn in any corner ch-2 space.
- Round 5: Work the established increase round. (20 groups total; 5 groups on each side)
- Round 6: Work the established increase round. (24 groups total; 6 groups on each side)
- Round 7: Work the established increase round. (28 groups total; 7 groups on each side)
- Round 8: Work the established increase round. (32 groups total; 8 groups on each side)
Fasten off the purple yarn. Join dark-gray yarn in any corner ch-2 space.
- Round 9: Work the established increase round. (36 groups total; 9 groups on each side)
- Round 10: Work the established increase round. (40 groups total; 10 groups on each side)
- Round 11: Work the established increase round. (44 groups total; 11 groups and 10 ch-1 spaces on each side)
Measure the blanket across one side before adding the border. The finished size will vary with the selected yarn and tension. Add another dark-gray granny-cluster round only when additional size is needed. Each added granny round increases every side by one three-double-crochet group and one ch-1 space.
Add the Simple Border
Continue with dark-gray yarn. Slip stitch across the next 2 dc and into the first corner ch-2 space.
- Ch 1. This chain does not count as a stitch.
- Work 2 sc, ch 2 and 2 sc in the same corner space.
- For the standard eleven-round blanket, sc in each of the 33 dc and work 1 sc in each of the 10 ch-1 spaces across the first side. (43 sc between corner spaces)
- If you added another granny round, work 1 sc in every dc and 1 sc in every ch-1 space across the side. Each additional granny round adds 4 sc to the between-corner count on every side.
- [Work 2 sc, ch 2 and 2 sc in the next corner space. Work 1 sc in every dc and 1 sc in every ch-1 space across the next side] 3 times.
- Join with a sl st to the first sc. The standard eleven-round blanket border contains 188 sc total and four ch-2 corner spaces. Each additional granny round adds 16 sc to the complete border total.
Fasten off and weave the yarn tail through several stitches on the back of the blanket. Lay the blanket flat and ease each side and corner into shape with your hands. The square should lie flat without cupping at the center or rippling along the border.
Measure from the outer border edge to the opposite outer border edge across one side. The finished blanket should measure approximately 14 inches square without stretching. Record the actual finished measurement when your yarn or tension produces a slightly different size.
Crochet the Lovey Arms
Use the 3.5 mm hook. Make two arms. Begin with green yarn for the hands.
- Round 1: Make a magic ring and work 6 sc into the ring. (6)
- Round 2: Inc in each stitch around. (12)
- Rounds 3 and 4: Sc in each stitch around. (12)
- Round 5: [Sc in the next 2 stitches, dec] 3 times. (9)
Change to dark gray yarn for the sleeve.
- Round 6: Working in the back loops only, sc in each stitch around. (9)
- Rounds 7 through 11: Sc in each stitch around. (9)
Add a small amount of stuffing to the hand only. Leave the sleeve unstuffed so the arm remains soft and flexible.
Flatten the nine-stitch upper opening with the working loop at one side fold. Work 4 sc through the four pairs of stitches across the top. The ninth stitch remains at the opposite fold and is not worked separately. Fasten off and leave an 18-inch tail for sewing. Repeat for the second arm.
Attach the Head to the Lovey Blanket
Lay the blanket flat with the right side facing upward. Round 2 contains eight three-double-crochet groups, or 24 dc total. These 24 dc provide one attachment point for each of the 24 stitches around the green head-base disc.
- Divide the 24 stitches around the head-base disc into four groups of six. Place a marker between the groups.
- Center the base disc over Round 2 of the blanket. Align the four marked divisions with the four corner ch-2 spaces.
- Pin the head in place at all four marked divisions. The six base stitches between each pair of markers should rest above the six dc along one side of Round 2.
- Thread a separate 36-inch length of green yarn onto the yarn needle.
- Sew the first six base stitches one-to-one to the six dc along the first side of Round 2. Do not sew into the ch-1 side space or either corner ch-2 space.
- Repeat along the remaining three sides, matching all 24 base stitches to the 24 dc of Round 2.
- Complete a second reinforcing seam just inside the first attachment line.
- Knot the yarn beneath the head and weave the tail through the base disc in two directions.
Lift the head gently after sewing. The base should remain flat against the blanket, the stuffing should remain completely enclosed and the center of the blanket should not gather or pull upward.
I would rather sew the head twice than trust one neat-looking row of stitches to carry the weight of a stuffed head.
Attach the Arms
After the head is securely attached, place one arm beside each lower side of the head with the green hands pointing toward the nearest blanket corners. Align each flattened sleeve opening immediately outside the completed head-base seam. Do not try to push the sleeve beneath the closed head seam.
Pin each flattened sleeve top to stable double-crochet stitches in Blanket Round 3 directly beside the head. Avoid the ch-1 spaces. Use the long yarn tail to sew through the four sc across the flattened arm top and the blanket stitches beneath them.
Complete a second pass across the same attachment line, then continue the seam approximately 1/2 inch down the side of the sleeve so the arm cannot rotate around its top edge. Knot the yarn securely on the back of the blanket and weave the tail through nearby stitches in two directions.
Lift the lovey by the blanket and check how the head and arms hang. The face should remain visible, the head should not lean sharply and both arms should rest at approximately the same height.
Assembly and Final Shaping
Complete these checks after the doll and lovey pieces have been attached. The seams should already be sewn and reinforced according to the assembly instructions in the preceding sections.
Check the Finished Doll Alignment
- Place the doll on a flat surface with both shoes facing forward.
- Check that the legs are the same length and the joining chain rests at the center.
- Center the purple shirt above the pants.
- Make sure the jacket panels begin at the same height.
- Turn the arms so the green hands face slightly forward.
- Align the center of the face with the center of the shirt.
The head seam should already contain the one-to-one attachment line and the second reinforcing line. Check both rows of stitching at the front, back and sides. If the head remains centered and does not shift, no additional full seam is needed.
If the head leans after the seam has been completed, do not try to force stuffing through the closed neck. Carefully remove a short section of the seam at the back, add a small amount of filling to the side that needs support, then resew and reinforce only the opened section.
If the head still shifts after that adjustment, add one short anchoring stitch at the front and one at the back by passing the needle through several body stitches before returning to the head. Pull the stitches snugly without drawing the neck inward.
Shape the Hands, Feet and Head
Roll each stuffed piece lightly between your palms to distribute the filling. Smooth the upper sides of the head outward with your fingers and flatten the bottom of each shoe so the doll has a more even base.
The monster does not need to stand without support. A handmade doll with soft crocheted legs will naturally rest best while seated or leaning against a firm surface.
Finish the Lovey Assembly
- Spread the blanket on a table and smooth each side with your hands.
- Check that the head remains centered over the starting ring.
- Confirm that both arms are sewn the same distance from the face.
- Turn the lovey over and inspect the back of every attachment seam.
- Weave any remaining tails beneath several blanket stitches.
- Change direction and weave through another row before trimming the yarn.
A lovey should feel soft from every direction. Run your fingers around the base of the head and along both arm seams to find loose loops, protruding knots or firm clumps of filling.
Secure and Hide the Yarn Ends
Do not trim yarn directly beside a knot. Thread each tail through several nearby stitches, turn the needle and pass the yarn back through the fabric in a different direction.
For stuffed pieces, insert the needle close to the seam and bring it out several inches away. Pull gently, trim the yarn close to the surface and massage the crochet fabric until the cut end slips back inside.
For the flat blanket, weave each tail through at least two rows of stitches. Avoid carrying dark yarn beneath a light-colored section where it might show through the openings.
Complete the Final Inspection
- Count the embroidered eye stitches and make sure none have loosened.
- Pull gently on the hair cap, bolts, arms and jacket panels.
- Check that no fiberfill shows between the stitches.
- Confirm that the magic-ring openings are completely closed.
- Remove every pin, marker and temporary guide strand.
- Trim only after all yarn ends have been woven securely.
Turn the finished Frankenstein monster toward you one last time. Small differences between the eyebrows, hair points or feet are part of the handmade character, but the seams and attachments should be secure and evenly placed.
Baby-Focused Finishing, Use and Care
My rule for a baby-focused crochet piece is simple: a seam must feel secure from the back as well as look tidy from the front. Pull gently on the head, arms, hair and bolts from several directions before the finished project is handled.
This lovey is not safe for sleep and does not belong in a crib, bassinet, play yard or other infant sleep space.
Keep Every Feature Soft
- Embroider the eyes, eyebrows, mouth and scar directly onto the crocheted head.
- Do not add plastic eyes, buttons, beads, wire, snaps, bells or removable decorations.
- Use crocheted side bolts instead of hard plastic or wooden pieces.
- Keep knots and yarn ends buried inside the head or woven deeply into the blanket.
- Trim loose fibers that could wrap around small fingers or toes.
Inspect the monster before each use. Set it aside for repair if a seam opens, stuffing becomes visible or an embroidered feature begins to loosen.
Test the Head and Arm Seams
- Hold the blanket firmly near the center.
- Pull the head gently forward, backward and toward each side.
- Repeat the test with both arms and both soft bolts.
- Look beneath each attachment for stretched stitches or visible gaps.
- Add another line of sewing stitches whenever an attachment shifts.
Do not depend on glue to secure crocheted pieces. Sew each attachment through several complete stitches and reinforce the seam from more than one direction.
Keep the Lovey Out of an Infant Sleep Space
This Frankenstein lovey is intended for supervised cuddling, play and seasonal photographs. It should not be placed in a crib, bassinet or other infant sleep area.
The National Institute of Child Health and Human Development recommends keeping toys, blankets and other soft objects out of a baby's sleep area. Follow current Safe to Sleep guidance throughout a baby's first year.
Remove the lovey before naps and nighttime sleep, even when the baby appears settled with it. Store it nearby for awake, supervised use instead.
Wash the Finished Frankenstein Monster
Check the care directions printed on every yarn label before washing. When all the selected yarns are machine washable, place the doll or lovey inside a zippered mesh laundry bag and use a gentle cycle with cool water.
- Check every seam before washing.
- Place the project inside a mesh laundry bag or tied pillowcase.
- Wash with a mild, fragrance-free detergent.
- Do not use chlorine bleach.
- Press out extra water without twisting the head or arms.
- Reshape the face, hair and blanket corners while damp.
- Lay the project flat on a clean towel until completely dry.
Turn the project several times while it dries so moisture does not remain inside the stuffed head. Do not return it to a child until the center feels completely dry and every attachment has been checked again.
Guidance for Handmade Gifts and Items Made for Sale
Tell the recipient that the lovey is for supervised awake-time use and should be removed from the infant sleep area. Include the yarn fiber content and washing instructions when giving it as a gift.
Anyone making toys for sale or distribution should review the applicable U.S. Consumer Product Safety Commission toy-safety information. A free crochet pattern does not replace testing, labeling or other requirements that may apply to a children's product.
Frankenstein Monster Pattern Variations
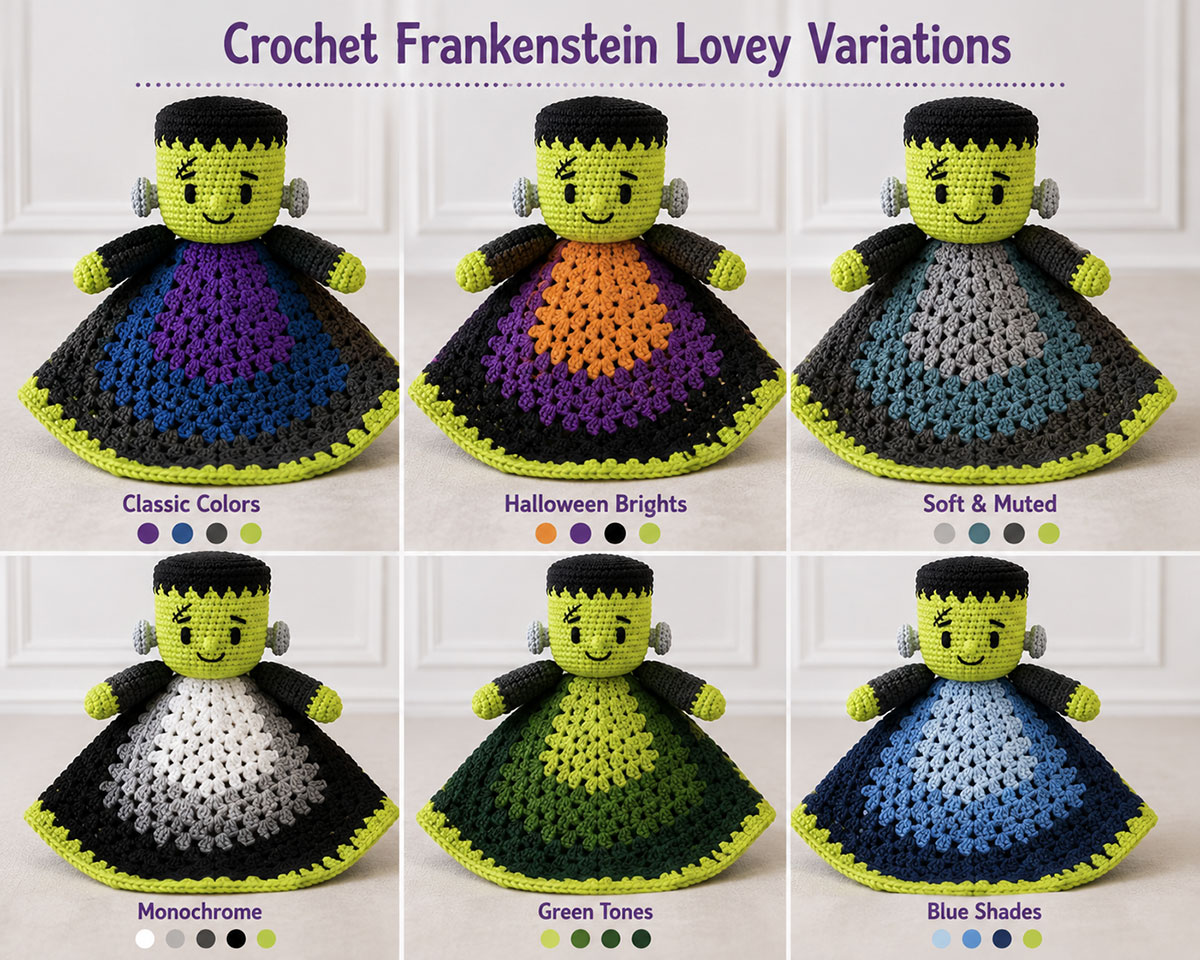
The green face, black hair and soft side bolts make this crochet monster easy to recognize, but the clothing and blanket colors can be changed without losing the Frankenstein look. Keep the face simple and let the yarn colors carry the Halloween character.
Make a Mini Frankenstein Monster
Use sport-weight yarn with a 2.75 mm hook and follow the same stitch counts. The finished doll will be smaller, although the exact measurement depends on the yarn and your tension.
Use less stuffing in the smaller head and embroider the face with two strands of floss instead of three. Tiny crocheted pieces require especially careful attachment, and a mini version should be treated as a decorative item rather than a baby toy.
Change the Doll's Clothing Colors
- Traditional Halloween: black jacket, deep purple shirt and charcoal pants
- Brighter monster: navy jacket, orange shirt and medium gray pants
- Soft nursery palette: dark gray jacket, muted blue shirt and slate pants
- Scrap-yarn version: use several coordinated colors while keeping the head green and the hair black
Very pale clothing can make dark joining stitches more noticeable. When changing to a lighter shade, weave the old yarn tail into the matching section before continuing.
Make a Striped Lovey Blanket
For a narrow striped blanket, alternate medium blue and dark gray, changing color after every two completed rounds. Keep the final border dark so it frames the lighter center and coordinates with the monster's jacket.
You can also make the entire blanket in one color and add a contrasting border. A solid blanket keeps the focus on the embroidered face and is easier when you prefer fewer yarn ends to weave in.
Give the Monster a Different Expression
Small changes to the eyebrows and mouth can make the same pattern look playful, sleepy or slightly puzzled.
- Angle both eyebrows upward near the center for a worried expression.
- Place the eyebrows almost level for a gentle face.
- Use a shallow curved mouth instead of a straight stitch.
- Add one small embroidered tooth with white floss for a playful monster.
- Move the scar to the opposite temple or place it near the jaw.
Keep all facial additions embroidered and avoid long loose stitches. Short stitches are less likely to snag during washing or supervised play.
Use the Head with Another Lovey Body
The finished head can be used with another blanket body only when its center provides 24 stable attachment stitches arranged around an area similar in size to Blanket Round 2. Match each of the 24 head-base stitches to one stable blanket stitch and reinforce the attachment with a second complete seam. Do not attach the head through open chain spaces, only a few center stitches or an unsupported center ring.
For another Halloween baby project with a very different shape, the free crochet ghost pattern offers a softer white character, while the crochet pumpkin lovey pattern uses warm autumn colors and a rounded pumpkin head.
Create a Coordinated Halloween Gift Set
Pair the Frankenstein monster with a small blanket, handmade burp cloth or another soft seasonal character. The crochet bat lovey pattern and free crochet witch lovey pattern can be made in related purple, black and gray yarns.
Choose two or three shared colors rather than making every piece identical. The set will look coordinated while each handmade character keeps its own personality.
Frequently Asked Questions About the Crochet Frankenstein Monster Pattern
Is this Frankenstein crochet pattern suitable for beginners?
The pattern is best for an advanced beginner who can make single crochet stitches, increases, invisible decreases and simple color changes. The head, body and arms are worked in continuous rounds, while the lovey blanket is made in joined rounds.
Read through each section before beginning and use a stitch marker in the first stitch of every round. Counting after each increase or decrease round will prevent many shaping problems.
Is this a Frankenstein doll or an amigurumi pattern?
The stuffed version can be described as both a crochet Frankenstein doll and a Frankenstein amigurumi. Amigurumi is the craft of crocheting or knitting small stuffed figures. This pattern also includes a flat baby-lovey option made with the same monster head.
Can I make only the Frankenstein monster doll?
Yes. Complete the head, face, hair, bolts, legs, torso and arms, then skip the lovey blanket instructions. The doll is a complete project on its own and does not require any pieces from the blanket version.
Can I make only the Frankenstein baby lovey?
Yes. Follow the head instructions through Round 27, then close the 24-stitch lower opening with the separate green head-base disc. Complete the embroidered face, hair cap, light-gray bolts, short arms and granny-cluster square. Sew the 24 stitches around the head base one-to-one to the 24 dc in Blanket Round 2. Skip the legs, stuffed torso and jacket-panel instructions.
Why are the eyes embroidered instead of using safety eyes?
Embroidered eyes keep the face soft and eliminate separate plastic eye pieces. This is especially important for a project intended as a baby gift. Use several short stitches, knot the floss securely inside the head and check the embroidery regularly for loose threads.
Can I use bulky or plush yarn?
You can change the yarn, but the finished measurements and stitch texture will change. Plush yarn can hide stitches and make the embroidered features harder to position evenly. Smooth worsted-weight yarn is easier to count and gives the face, hairline and soft bolts a clearer shape.
If you use thicker yarn, choose a hook that creates a close fabric without large openings. Make a small gauge swatch before beginning the head.
How can I make the Frankenstein monster smaller?
Use a lighter yarn and smaller hook while keeping the same stitch counts. Sport-weight yarn and a 2.75 mm hook will make a smaller figure, although the exact size depends on your tension and yarn choice.
A smaller version contains more compact pieces and should be treated as decoration unless every component has been evaluated for the intended recipient.
What should I do if stuffing shows between the stitches?
Remove the filling from that area and replace it with smaller portions. If gaps remain, use a smaller crochet hook and remake the piece with tighter stitches. Do not try to hide exposed filling by pulling the surrounding stitches tightly, since that can distort the shape.
How do I keep the Frankenstein doll's head from leaning?
Center the head carefully and pin it at the front, back and both sides before sewing. Add a small amount of filling around the neck opening, then sew the seam twice. Place the second row of stitches just inside the first for added support.
Can I make the lovey blanket larger?
Yes. Continue repeating the blanket increase round until it reaches the size you prefer. Each new round adds stitches along all four sides and preserves the square shape.
Keep in mind that a larger blanket requires additional yarn and will feel heavier beneath the head. Reinforce the head attachment carefully after changing the blanket size.
Can finished items be machine washed?
Follow the care instructions for the specific yarn and filling you used. When all materials are machine washable, place the project in a mesh laundry bag, wash it on a gentle cycle with cool water and lay it flat to dry.
Check the embroidered face, hair cap, bolts, arms and head seam after every wash.
Where can I find more free Halloween crochet patterns?
Visit the free Halloween crochet patterns collection for more seasonal projects. You can also make a companion character using the crochet candy corn lovey pattern or the black cat crochet pattern.
Finish Your Crochet Frankenstein Monster
Whether you choose the stuffed doll or the flat baby lovey, take time to check the shaping, embroidery and attachment seams before calling the project complete. The green head, uneven black hairline and soft gray bolts give the character his familiar Frankenstein monster look without adding hard pieces.
The doll makes a fun Halloween decoration or handmade gift for an older child. The lovey is designed for supervised awake-time cuddling and should always be removed from a baby's sleep space.
Save your leftover yarn for another seasonal project. The Halloween crochet patterns collection includes more handmade characters that can be coordinated with the same purple, gray, black and green yarn palette.
A crooked eyebrow, slightly uneven scar or unexpected bend in the hairline can give your monster an expression all his own. Secure every stitch carefully, then let the handmade personality show.
When you click on links to various merchants on this site and make a purchase, this may result in this site earning a commission. This does not affect the price you pay.

UBGI Gold Standard 2026
Reviewed under the site's
editorial checklist.
Photos, decorating ideas, party setups and reader submissions are shared for inspiration unless a page is specifically presented as a pattern, tutorial, reference guide or step-by-step project. Follow the instructions, measurements, safety guidance and manufacturer directions provided for the particular project or product.
About Jan | Contact | Baby Nursery Ideas (Blog) | Site Map | Privacy Policy | Disclosure Policy | Disclaimer | Affiliate Disclosure | Earnings Disclosure | Facebook | Pinterest
I am a participant in the Amazon Services LLC Associates Program, an affiliate advertising program designed to provide a means for us to earn fees by linking to Amazon. As an Amazon Associate I earn from qualifying purchases.
Copyright © 2006-2026. All Rights Reserved.