Free Crochet Bat Lovey Pattern
By Jan Bay
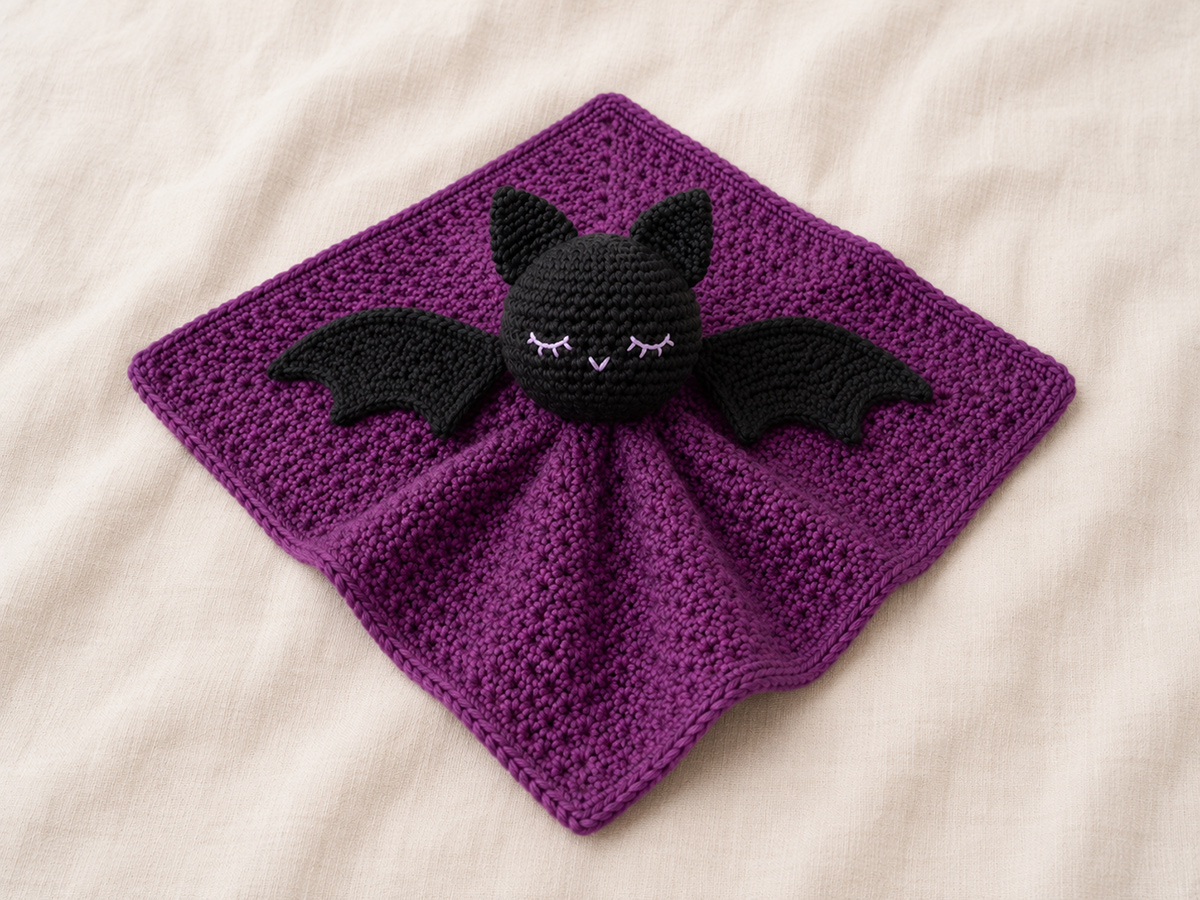
This free crochet bat lovey pattern makes a cute Halloween baby snuggler with a lightly stuffed bat head, pointed ears, wide wings and an attached security blanket body. The embroidered face keeps the bat friendly, while the simple shapes make each part easy to see and assemble.
Explore More Free Crochet Baby Patterns
See the Recommended Crochet Supply for This Project
Jump to the Crochet Bat Lovey Instructions
Crochet Bat Lovey Pattern at a Glance
This bat lovey combines a simple square blanket with a small bat head, two pointed ears and a pair of shaped wings. The head is lightly stuffed, but the blanket and wings stay flat and flexible.
The pattern is written in standard U.S. crochet terms. A confident beginner who is comfortable working in rounds, increasing, decreasing and sewing pieces together should be able to follow it.
Pattern Details
- Skill level: Confident beginner
- Crochet terms: Standard U.S. terms
- Blanket shape: Square worked from the center outward
- Finished blanket size: About 16 inches square
- Finished head height: About 4 inches, not including the ears
- Construction: Blanket worked in joined rounds, head worked in continuous rounds, wings worked in rows
- Suggested yarn weight: Worsted-weight yarn, category 4
- Main stitches: Chain, slip stitch, single crochet, half double crochet, double crochet, increases and invisible decreases
The finished size may change a little depending on your yarn, hook and tension. A slightly smaller hook can help the stuffed head hold its shape, while the blanket should still feel soft enough to drape.
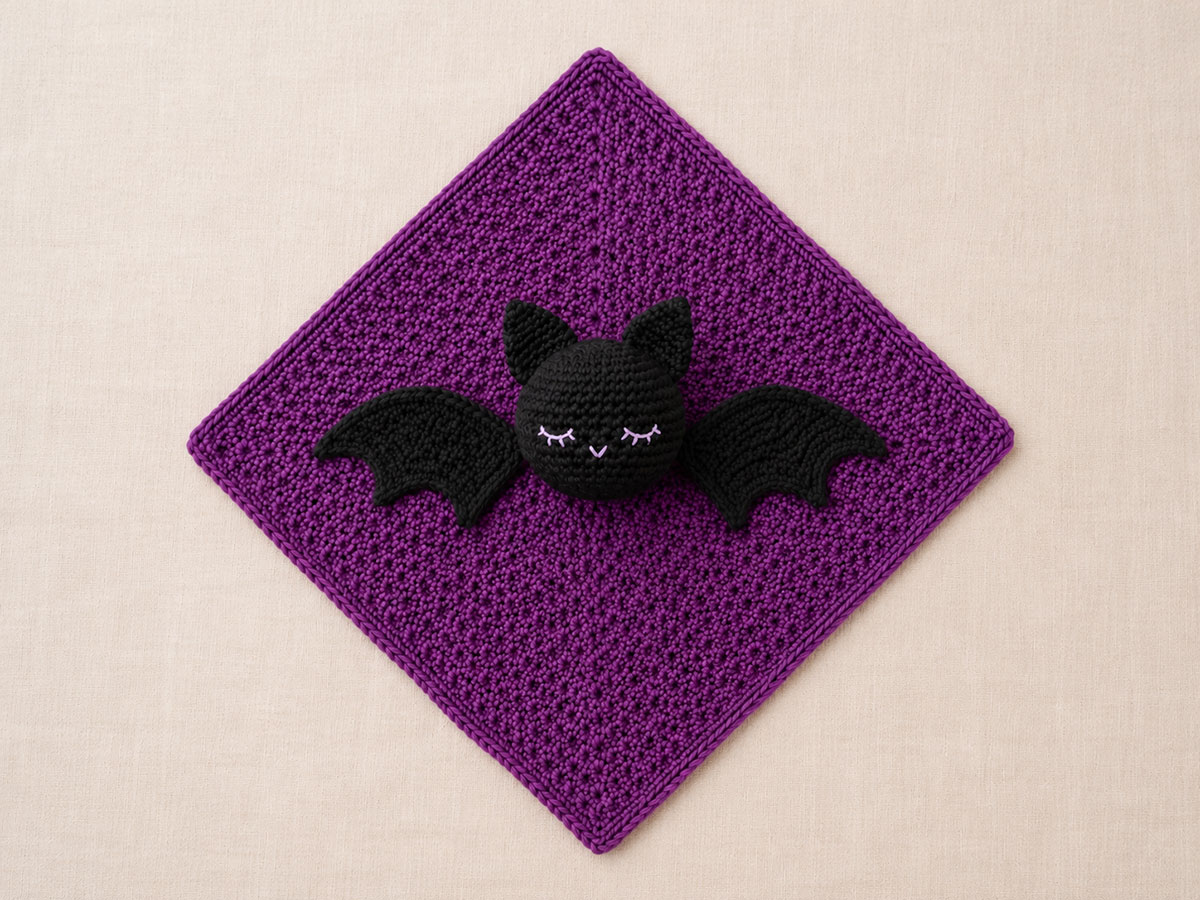
Laying the finished lovey flat makes it easier to check that the head and wings are centered before the final stitches are secured.
The bat can be made in black, charcoal, deep purple, plum or midnight blue. Lighter gray facial embroidery and a few inner-ear stitches can add contrast without changing the simple shape of the design.
Supplies and Yarn for the Bat Lovey
A smooth worsted-weight yarn gives the bat enough shape without making the blanket stiff. Choose a washable yarn that does not shed fibers easily. Plain acrylic, cotton-acrylic blends and soft washable wool blends can all work well.
Very fuzzy yarn can hide the stitches and make the wings harder to shape. It also makes embroidered facial features less clear, so I would save chenille, eyelash yarn and loose novelty fibers for a different project.
Materials List
- About 350 to 400 yards of worsted-weight yarn, category 4, for the blanket and a same-color border
- About 60 to 80 yards of worsted-weight yarn for the bat head, ears and wings
- About 25 to 35 additional yards of the bat color if you plan to use it for the blanket border
- A small amount of smooth contrasting yarn for the embroidered eyes and mouth
- 4.5 mm crochet hook for the blanket
- 4.0 mm crochet hook for the head, ears and wings
- Polyester fiberfill for the bat head
- Yarn needle with a blunt tip
- Stitch marker
- Scissors
- Measuring tape
- Rustproof straight pins or locking stitch markers for holding pieces in place during assembly
The two hook sizes serve different jobs. The larger hook gives the blanket a softer drape. The smaller hook creates tighter stitches around the stuffing and helps the head keep a neat rounded shape.
For a classic Halloween bat, use charcoal or black for the head and wings with a deep purple blanket. A softer nursery version could pair smoky gray with plum, navy with lavender, or dark brown with muted rust.
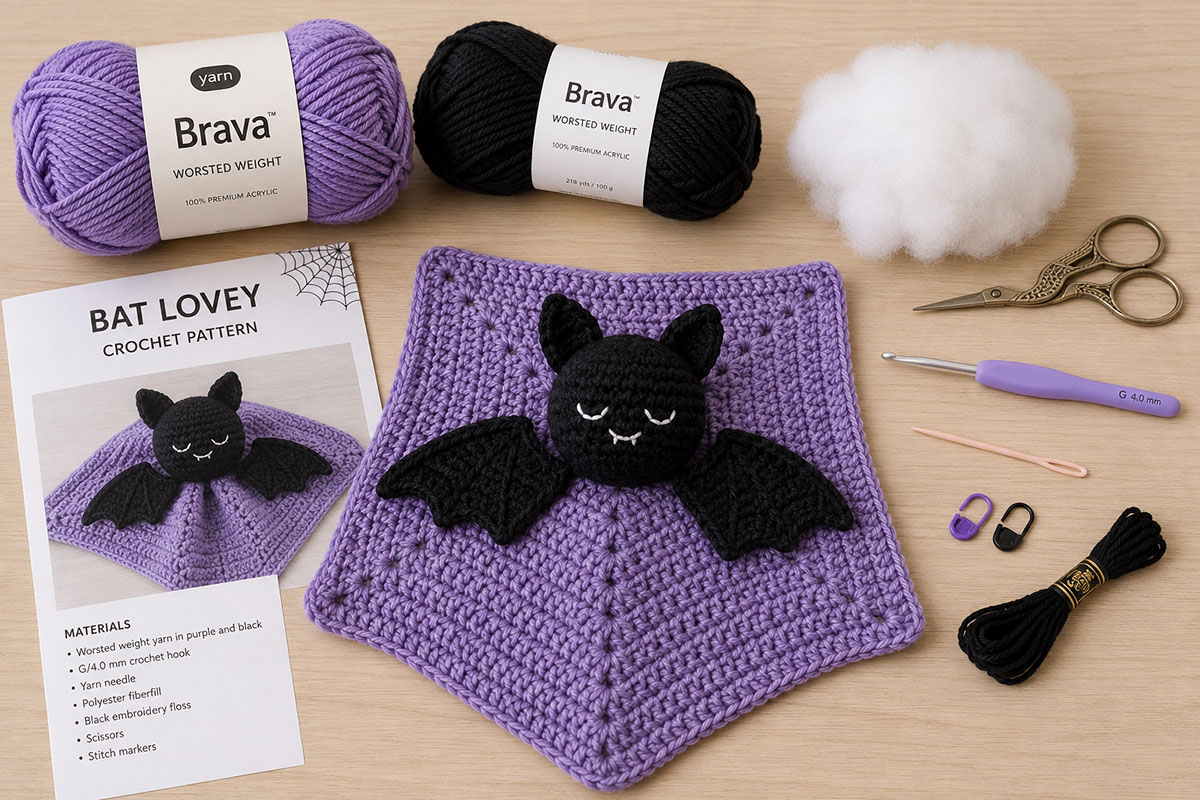
Using a slightly smaller hook for the stuffed pieces helps prevent gaps between the stitches.
Check the yarn label before beginning so you know how the finished piece should be washed. Mixing yarns with very different care instructions can make cleaning the completed lovey more difficult.
Abbreviations, Gauge and Pattern Notes
Read through the abbreviations before starting, especially if this is your first project with separate pieces. The blanket is worked in joined rounds, while the bat head is worked in continuous rounds without turning.
U.S. Crochet Abbreviations
- ch: chain
- sl st: slip stitch
- sc: single crochet
- hdc: half double crochet
- dc: double crochet
- st or sts: stitch or stitches
- sp: space
- ch-sp: chain space
- inc: work 2 single crochet stitches in the same stitch
- dec: single crochet 2 stitches together using an invisible decrease
- rep: repeat
- rnd: round
- RS: right side
- WS: wrong side
Gauge
Exact gauge is not critical for this project, but the stitches on the head should be tight enough that the fiberfill does not show through.
- Blanket gauge: About 14 double crochet stitches and 8 rows measure 4 inches with the 4.5 mm hook.
- Head gauge: About 16 single crochet stitches and 18 rounds measure 4 inches with the 4.0 mm hook.
Make a small swatch if your yarn is much thicker or thinner than a typical category 4 yarn. A loose head can be corrected by moving down one hook size. If the blanket feels firm instead of flexible, move up one hook size for the blanket only.
Helpful Pattern Notes
- The chain 1 at the beginning of every ear and wing row is a turning chain and does not count as a stitch.
- The chain at the beginning of a blanket round counts as the first stitch unless the instructions say otherwise.
- Join blanket rounds with a slip stitch to the top of the beginning chain.
- After closing each magic ring, weave the starting tail through several nearby stitches in at least two directions so the center cannot reopen.
- Do not join rounds while making the head. Place a stitch marker in the first stitch of every round and move it upward as you work.
- Stuff the head lightly. Too much filling can stretch the stitches and make the head feel hard.
- Leave long yarn tails on the head, ears and wings so the pieces can be sewn securely to the blanket.
- Embroider the facial features with yarn. Do not use buttons, beads, safety eyes or other removable pieces on a lovey intended for a baby.
Count the stitches at the end of every shaping round. A missed increase or decrease can tilt the face or leave one side of the head fuller than the other.
How to Crochet the Lovey Blanket
The blanket begins in the center and grows outward in joined rounds. The corner spaces keep the square shape clear, so there is no need to measure or mark four separate sides as you work.
Use the 4.5 mm hook and the main blanket color. The beginning chain counts as the first double crochet stitch in every round. Work all blanket rounds without turning. The side facing you as you crochet is the right side of the blanket.
Blanket Center
- Make a magic ring.
- Chain 3. Work 2 double crochet stitches into the ring.
- Chain 2.
- Work 3 double crochet stitches into the ring, then chain 2.
- Repeat the previous step two more times.
- Pull the magic ring closed.
- Join with a slip stitch to the top of the beginning chain 3.
You should now have four groups of 3 double crochet stitches with a chain-2 corner space between each group.
Round 1 stitch count: 12 double crochet stitches and four chain-2 corner spaces.
Round 2
- Slip stitch across the next 2 double crochet stitches and into the first chain-2 corner space.
- Chain 3 and work 1 double crochet in the same corner space. Chain 2, then work 2 double crochet stitches in that same corner space.
- Work 1 double crochet in each double crochet stitch across to the next chain-2 corner space.
- In the next corner space, work 2 double crochet stitches, chain 2 and 2 double crochet stitches.
- Repeat Steps 3 and 4 two more times. You will now have worked all three remaining corners.
- Work 1 double crochet in every stitch across the final side.
- Join with a slip stitch to the top of the beginning chain 3.
Round 2 stitch count: 28 double crochet stitches and four chain-2 corner spaces.
Rounds 3 and Later
- Slip stitch in the next double crochet and into the next chain-2 corner space.
- Chain 3 and work 1 double crochet in the same corner space. Chain 2, then work 2 double crochet stitches in that same corner space.
- Work 1 double crochet in every double crochet stitch across to the next chain-2 corner space.
- In the next corner space, work 2 double crochet stitches, chain 2 and 2 double crochet stitches.
- Repeat Steps 3 and 4 two more times. You will now have worked all three remaining corners.
- Work 1 double crochet in every stitch across the final side.
- Join with a slip stitch to the top of the beginning chain 3.
- Round 3: 44 double crochet stitches
- Round 4: 60 double crochet stitches
- Round 5: 76 double crochet stitches
- Round 6: 92 double crochet stitches
- Round 7: 108 double crochet stitches
- Round 8: 124 double crochet stitches
- Round 9: 140 double crochet stitches
- Round 10: 156 double crochet stitches
- Round 11: 172 double crochet stitches
- Round 12: 188 double crochet stitches
- Round 13: 204 double crochet stitches
- Round 14: 220 double crochet stitches
Each round also has four chain-2 corner spaces.
Continue until the square measures about 15 to 15 1/2 inches along one straight side after a complete round. Do not measure diagonally from corner to corner. At the suggested gauge, Round 13 or Round 14 should be close, but measure your actual blanket before adding the border.
Simple Single Crochet Border
Continue with the blanket color or change to the bat color.
- If you are continuing with the same color, slip stitch in the next double crochet and into the next chain-2 corner space. If you are changing colors, fasten off and join the new color in any chain-2 corner space.
- Chain 1. This chain does not count as a stitch. Work 2 single crochet stitches, chain 1 and 2 single crochet stitches in the same corner space.
- Work 1 single crochet in every double crochet stitch across to the next chain-2 corner space.
- In the next corner space, work 2 single crochet stitches, chain 1 and 2 single crochet stitches.
- Repeat Steps 3 and 4 two more times. You will now have completed all three remaining corners.
- Work 1 single crochet in every double crochet stitch across the final side.
- Join with a slip stitch to the first single crochet.
- Fasten off and weave in the yarn ends.
Border count: Work 1 single crochet in every double crochet stitch from the final blanket round, plus 16 single crochet stitches placed in the four corners. You will also have four chain-1 corner spaces. If you stop after Round 13, the border will have 220 single crochet stitches and four chain-1 spaces. If you stop after Round 14, the border will have 236 single crochet stitches and four chain-1 spaces.
Lay the blanket flat and smooth the corners with your hands. Light blocking can help straighten the edges, but avoid stretching the square larger than its natural size.
Set the finished blanket aside while you crochet the head and other bat pieces. The center of the square will later support the head, so place a removable stitch marker there before beginning assembly.
How to Crochet the Bat Head
The bat head is worked from the top down in continuous rounds. Use the 4.0 mm hook and the main bat color. Keep the stitches firm and even so the filling stays hidden.
Place a stitch marker in the first stitch of each round. Do not join or turn unless the pattern says to do so.
Bat Head Pattern
- Round 1: Make a magic ring and work 6 single crochet stitches into the ring. Pull the ring closed. You should have 6 stitches.
- Round 2: Work 2 single crochet stitches in each stitch around. You should have 12 stitches.
- Round 3: Work 1 single crochet in the next stitch, then 2 single crochet stitches in the next stitch. Repeat around. You should have 18 stitches.
- Round 4: Work 1 single crochet in each of the next 2 stitches, then 2 single crochet stitches in the next stitch. Repeat around. You should have 24 stitches.
- Round 5: Work 1 single crochet in each of the next 3 stitches, then 2 single crochet stitches in the next stitch. Repeat around. You should have 30 stitches.
- Round 6: Work 1 single crochet in each of the next 4 stitches, then 2 single crochet stitches in the next stitch. Repeat around. You should have 36 stitches.
- Rounds 7 through 12: Work 1 single crochet in every stitch around. Keep 36 stitches in each round.
- Round 13: Work 1 single crochet in each of the next 4 stitches, then make 1 invisible decrease. Repeat around. You should have 30 stitches.
- Round 14: Work 1 single crochet in each of the next 3 stitches, then make 1 invisible decrease. Repeat around. You should have 24 stitches.
- Round 15: Work 1 single crochet in each of the next 2 stitches, then make 1 invisible decrease. Repeat around. You should have 18 stitches.
- Round 16: Work 1 single crochet in the next stitch, then make 1 invisible decrease. Repeat around. You should have 12 stitches.
Fasten off and leave a yarn tail at least 24 inches long. Leave the 12-stitch opening at the bottom of the head unclosed. This opening gives you a flatter base for attaching the head to the blanket.
Embroider the Bat Face
Add the face before stuffing the head. It is much easier to guide the yarn needle through the stitches while the opening is still clear.
- Place the eyes between Rounds 9 and 10, leaving about 5 unused stitches between the inner ends of the two eyes.
- Use several short horizontal stitches to make each closed eye.
- Add one small angled stitch at the outer end of each eye if you want a sleepy expression.
- Embroider a tiny curved mouth between Rounds 11 and 12.
- Knot the embroidery yarn securely inside the head and trim the ends.
A simple face suits this bat better than a cluster of tiny details. The ears and wings will give it plenty of character once all the pieces are together.
Stuff the Head
Add small pieces of fiberfill a little at a time. Shape the top and sides with your fingers as you work. The head should feel soft and rounded, not packed tightly.
Keep the filling slightly lighter near the open base. That lower section will be pressed against the blanket during assembly, and a softer base makes it easier to sew the head in place without leaving a hard lump beneath it.
How to Crochet the Bat Ears
The ears are made as two small flat triangles. They begin at the pointed tip and widen toward the base, which makes it easy to adjust their position before sewing them to the head.
Use the 4.0 mm hook and the main bat color. Turn at the end of each row.
Make Two Bat Ears
- Beginning chain: Chain 2.
- Row 1: Work 1 single crochet in the second chain from the hook. You should have 1 stitch.
- Row 2: Chain 1 and turn. Work 2 single crochet stitches in the stitch. You should have 2 stitches.
- Row 3: Chain 1 and turn. Work 2 single crochet stitches in the first stitch, then work 1 single crochet in the remaining stitch. You should have 3 stitches.
- Row 4: Chain 1 and turn. Work 2 single crochet stitches in the first stitch, then work 1 single crochet in each remaining stitch. You should have 4 stitches.
- Row 5: Chain 1 and turn. Work 2 single crochet stitches in the first stitch, then work 1 single crochet in each remaining stitch. You should have 5 stitches.
- Row 6: Chain 1 and turn. Work 2 single crochet stitches in the first stitch, then work 1 single crochet in each remaining stitch. You should have 6 stitches.
- Row 7: Chain 1 and turn. Work 1 single crochet in each stitch across. You should have 6 stitches.
Fasten off and leave a yarn tail about 15 inches long for sewing. Repeat the instructions to make the second ear.
Shape the Pointed Ears
- Lay both ears beside each other and check that the pointed tips face in the same direction.
- Pinch the first and last stitch of the bottom row toward each other.
- Use the yarn tail to make two or three stitches through the pinched base.
- Repeat with the second ear.
Pinching the base gives each ear a gentle cup instead of leaving it completely flat. Do not fold the base tightly. A shallow curve is enough to help the ears stand away from the head.
Position the Ears on the Head
Place the ears between Rounds 3 and 7 of the head, with about 5 stitches between their inner edges. Angle the pointed tips slightly outward.
Hold the ears in place with locking stitch markers and look at the face from the front. Move either ear before sewing if the spacing makes the head look lopsided.
- Thread the long yarn tail through the yarn needle.
- Sew across the bottom edge of the ear, passing through both the ear and the head stitches.
- Sew back across the base a second time to secure it.
- Carry the yarn tail into the head, knot it securely and trim the excess.
- Repeat with the second ear.
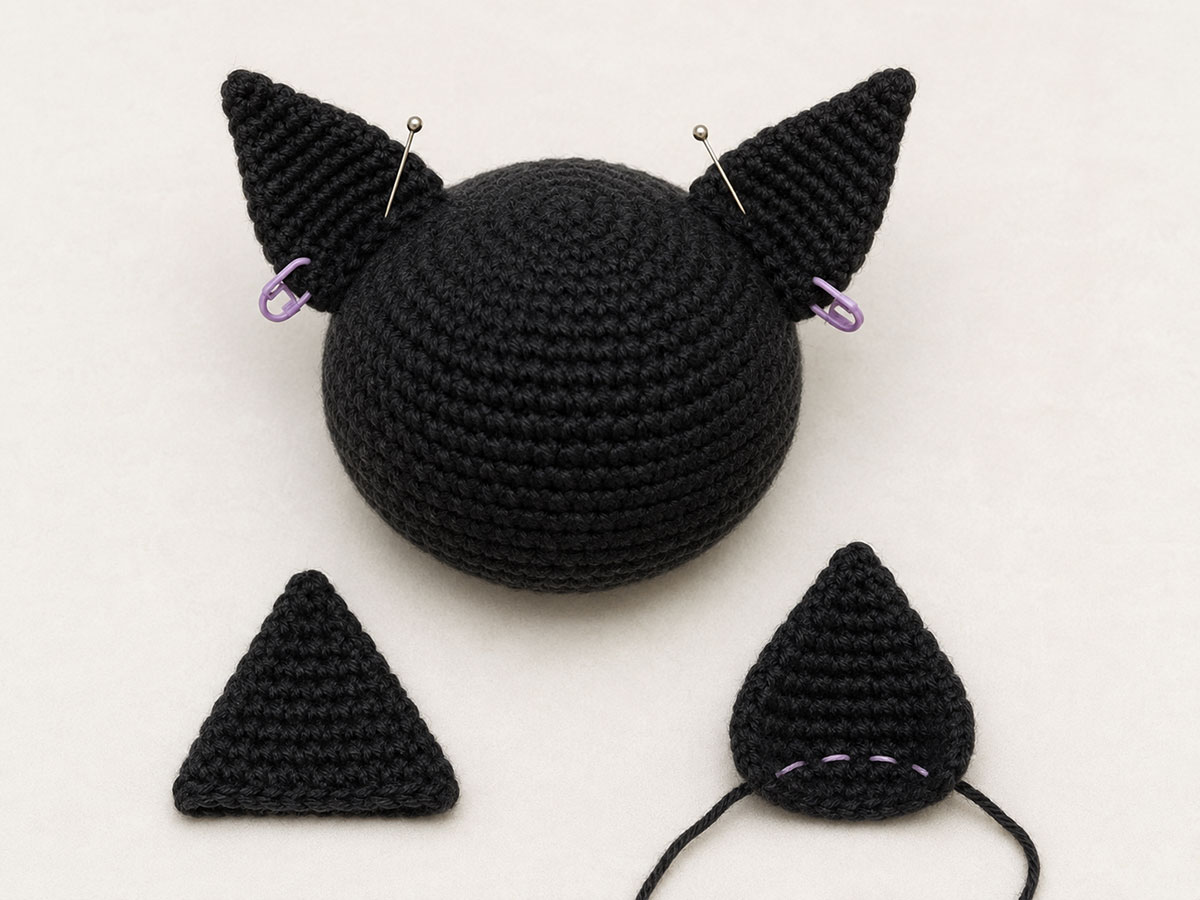
Pin the ears in place and check the spacing from the front before sewing through the bases.
The ears do not need stuffing. Keeping them flat and lightly curved makes the finished head softer and prevents the tips from becoming bulky.
The wings below are sized for this lovey. If you need a choice of proportions for appliqués, costumes or other projects, use the separate crochet bat wings pattern in three sizes.
If you want a complete flat bat instead of only the wing pieces, the crochet bat applique pattern may be exactly what you're looking for. This applique looks really impressive on baby blankets, clothes, costumes and other Halloween projects.
Free Crochet Bat Wings Pattern
Each wing begins with a narrow inner edge and widens as the rows grow. Three small points along the outer edge give the piece a clear bat-wing shape without adding difficult stitch work.
Use the 4.0 mm hook and the main bat color. Make two identical wings, then turn one over during assembly so the pair faces in opposite directions.
Make Two Wings
- Beginning chain: Chain 4.
- Row 1: Work 1 single crochet in the second chain from the hook and in each remaining chain. You should have 3 stitches.
- Row 2: Chain 1 and turn. Work 2 single crochet stitches in the first stitch, 1 single crochet in the next stitch and 2 single crochet stitches in the final stitch. You should have 5 stitches.
- Row 3: Chain 1 and turn. Work 2 single crochet stitches in the first stitch, 1 single crochet in each stitch across until 1 stitch remains, then work 2 single crochet stitches in the final stitch. You should have 7 stitches.
- Row 4: Repeat Row 3. You should have 9 stitches.
- Row 5: Repeat Row 3. You should have 11 stitches.
- Row 6: Repeat Row 3. You should have 13 stitches.
Shape the Three Wing Points
Chain 1 and turn. The turning chain does not count as a stitch.
- Work 1 single crochet in the first stitch.
- Work 1 half double crochet in the next stitch.
- Work 1 double crochet in the next stitch.
- Chain 2, then slip stitch in the second chain from the hook to form a small point.
- Work 1 half double crochet in the next stitch.
- Work 1 single crochet in the next stitch.
- Repeat Steps 2 through 6 two more times across the remaining stitches.
You should have three pointed sections across the wide outer edge. The side facing you after completing this shaping row is the right side of the wing. Fasten off and weave in this yarn tail.
Add a Neat Edge and Leave the Sewing Tail
Place the wing with the right side facing up. Join the yarn at the outer end of the slanted upper edge.
- Work 6 single crochet stitches along the upper edge toward the narrow 3-stitch foundation edge, placing 1 single crochet in each of the 6 row ends.
- Stop when you reach the narrow foundation edge.
- Fasten off and leave a yarn tail about 24 inches long for assembly.
- Repeat on the second wing.
Turn one completed wing over so the two narrow foundation edges face each other. The long sewing tail on each wing should now be beside the head when the pieces are arranged on the blanket.
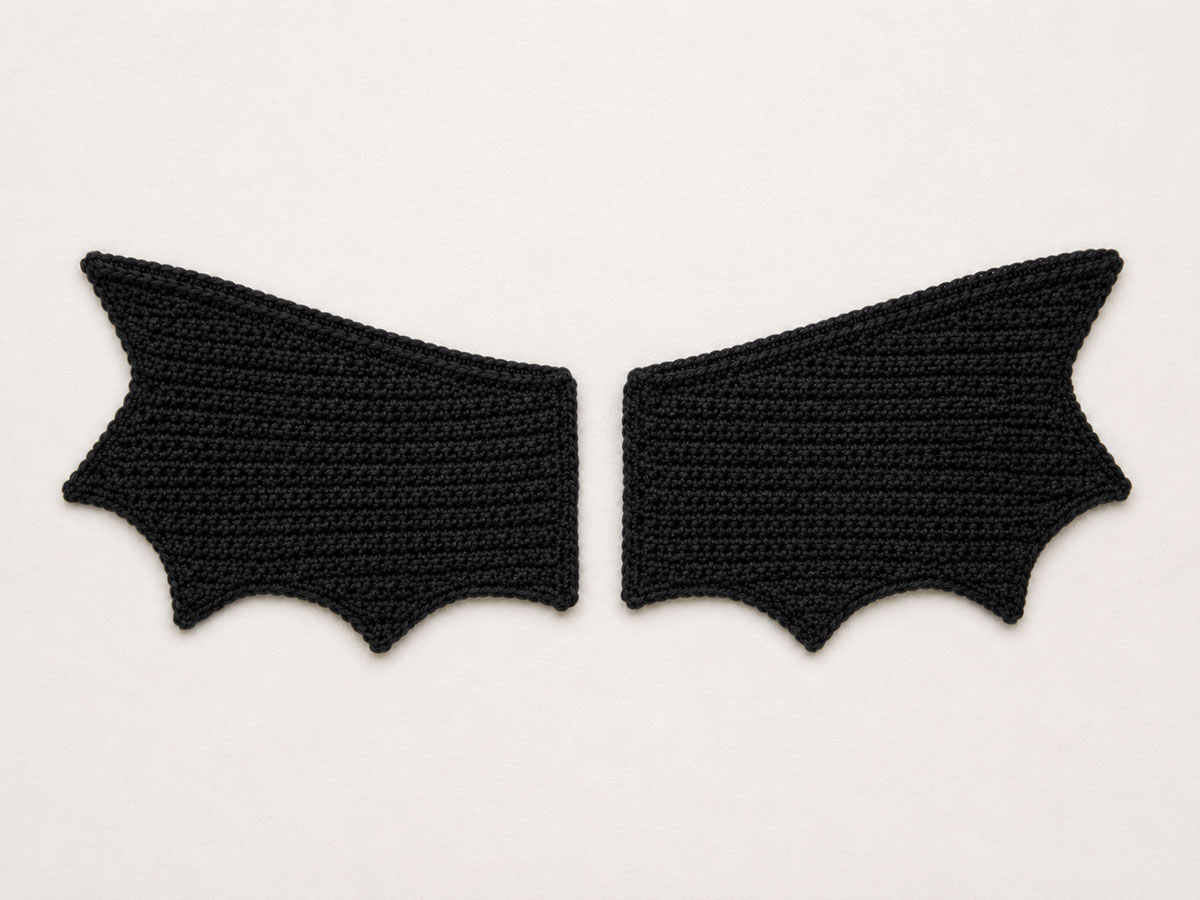
Turn one finished wing over so the two narrow attachment edges face the center of the lovey.
Check the Wing Pair
- Lay both wings flat with the pointed edges facing outward.
- Place the narrow foundation edges beside each other.
- Check that the three points are clear and that the wings are close to the same size.
- Gently smooth the rows with your fingers if either wing curls.
A little curl at the pointed edge is fine and may relax after assembly. Do not stretch the points sharply during blocking, or the wing may become much wider than the other one.
How to Assemble the Crochet Bat Lovey
Take a few minutes to arrange every piece before threading the yarn needle. Small placement changes can make the bat look cheerful, sleepy or slightly crooked, so it helps to view the whole lovey from above before sewing anything down.
Place the Head on the Blanket
- Lay the blanket flat with the right side facing up.
- Find the center of the square where the first blanket round began.
- Set the filled bat head over the center marker with the face pointing toward one corner of the blanket.
- Spread the 12-stitch opening at the bottom of the head into a small circle.
- Use locking stitch markers to hold the front, back and both sides of the opening against the blanket.
- Step back and check that the face points straight toward the chosen corner.
The head should sit on top of the blanket rather than sinking into it. Add a small amount of fiberfill if the lower part looks hollow, but keep the base soft enough to flatten against the crochet fabric.
Sew the Head in Place
- Thread the long yarn tail from the head through the yarn needle.
- Pass the needle through one stitch at the open base of the head and through a nearby blanket stitch.
- Continue around the opening with small, even whipstitches.
- After completing the first round of sewing, gently pull the yarn until the base rests snugly against the blanket.
- Sew around the base a second time, placing the new stitches between the first set.
- Pass the needle through the blanket several inches away from the head and bring it back up near the base.
- Make a secure knot beneath the head, carry the yarn end inside the stuffed section and trim it.
Run your fingers around the base when you finish. There should be no open spaces where a finger could slip between the head and the blanket.
Position the Bat Wings
Place one wing on each side of the head with the pointed edges facing outward. The narrow foundation edge of each wing should sit close to the head, while the wider portion spreads across the blanket.
- Position the top of each wing slightly below the bottom of the nearest ear.
- Angle the wings toward the two side corners of the blanket.
- Leave about 1 inch between the inner edges of the wings and the base of the head.
- Pin or clip the narrow edge and the upper edge of each wing to the blanket.
- Lift the blanket by one corner to check that the wings hang naturally and do not pull the center out of shape.
The wings do not need to match stitch for stitch when placed on the blanket, but their highest points should sit at about the same level.
Sew the Wings to the Blanket
- Thread the long yarn tail from the first wing through the yarn needle.
- Sew the narrow inner edge securely to the blanket.
- Continue sewing along the upper edge for about half the length of the wing.
- Leave the pointed lower edge free so the wing can move and drape with the blanket.
- Sew back across the attached section a second time.
- Knot the yarn on the wrong side of the blanket and weave the tail through several stitches before trimming it.
- Repeat with the second wing.
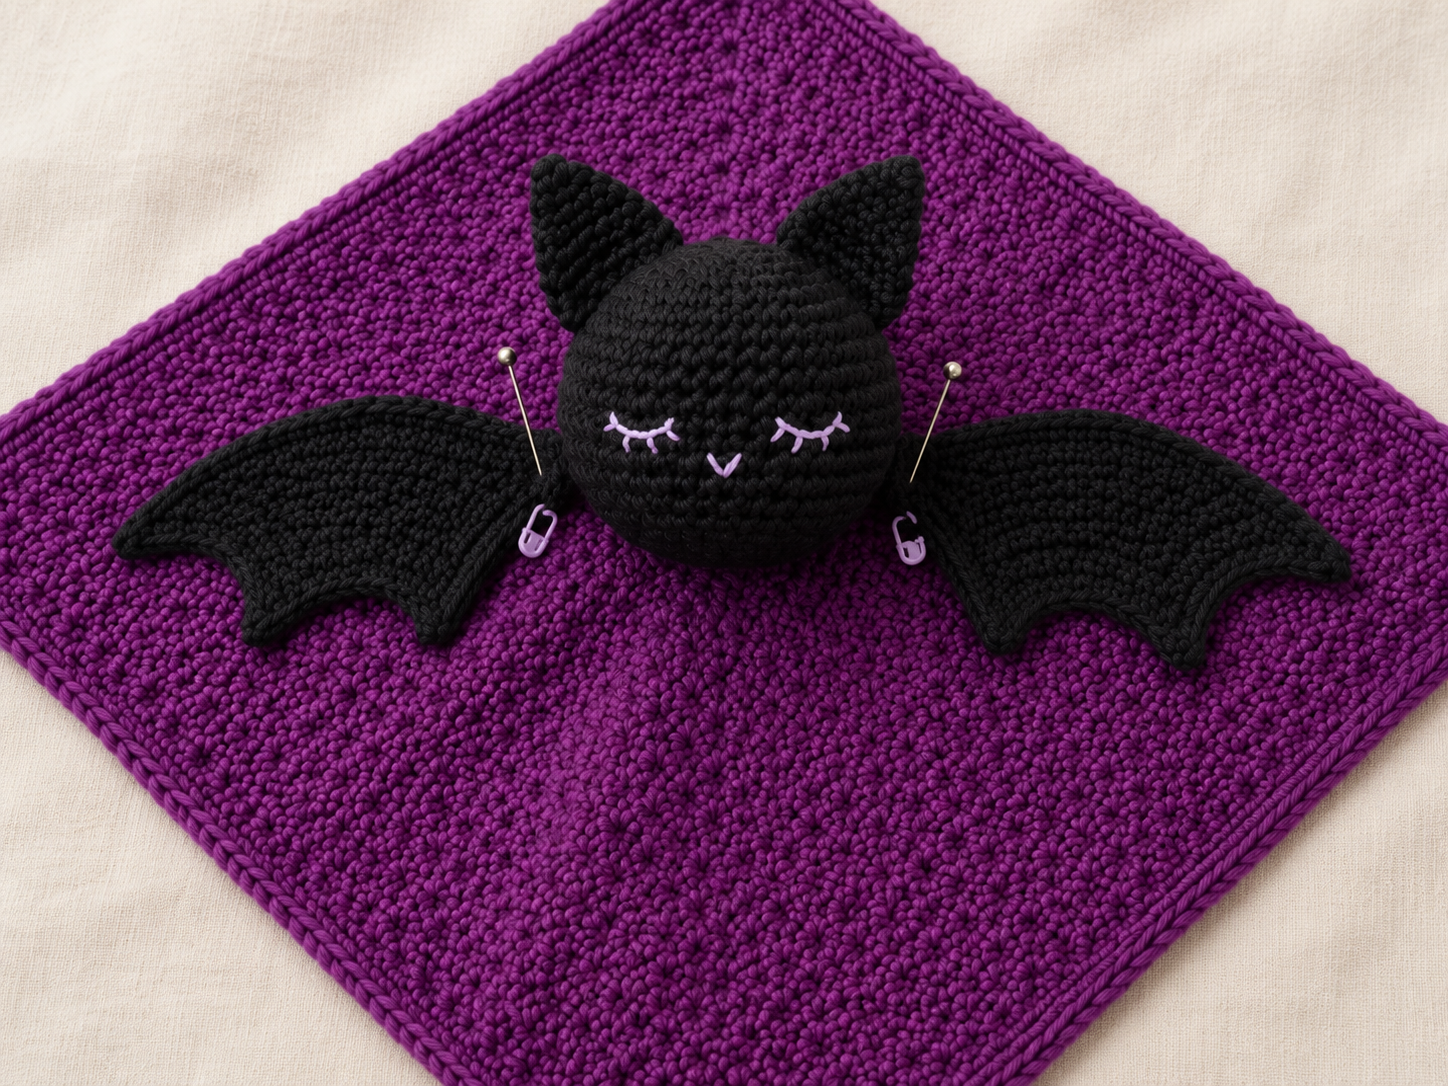
Pin the head and both wings in place, then view the lovey from above before making the final stitches.
Complete the Final Check
- Remove every straight pin and locking stitch marker. Count them to make sure none remain inside or beneath the crochet pieces.
- Turn the lovey over and look for loose yarn tails or long loops on the back.
- Check the base of both ears by gently moving each one from side to side.
- Run a fingertip around the full base of the head to find any missed spaces.
- Check that the attached edges of both wings stay flat when the blanket is lifted.
- Check the embroidered face for loose strands or loops.
- Weave in every remaining yarn end through several stitches in different directions.
- Trim the ends close to the fabric without cutting the surrounding stitches.
Give the completed lovey a gentle shake and smooth it flat again. The head should remain centered, the ears should keep their shape and the free wing points should rest softly over the blanket.
Bat Lovey Color Ideas and Easy Variations
A black bat is the obvious Halloween choice, but it is not the only one. Charcoal, dark plum, navy and warm brown can make the shape easier to see while keeping the little bat suitably shadowy.
For more contrast, crochet the blanket in a lighter shade and save the darkest yarn for the head, ears and wings. A lavender blanket with a charcoal bat feels playful, while rust and deep brown give the project a softer fall look.
Color Combinations to Try
- Classic Halloween: Black bat with a deep purple blanket
- Midnight sky: Navy bat with a smoky blue blanket
- Soft and sweet: Charcoal bat with a muted lavender blanket
- Woodland fall: Dark brown bat with a rust or pumpkin blanket
- Simple neutral: Medium gray bat with a pale gray blanket
A contrasting border can pull the two colors together. Work the blanket in plum, add a charcoal border, then use the same charcoal yarn for the head and wings.
Make the Blanket Larger or Smaller
Add more blanket rounds for a larger square or stop earlier for a small comfort cloth. Keep in mind that changing the blanket size does not change the head or wing instructions.
- Stop at about 12 inches for a small lovey.
- Continue to about 16 inches for the size used in this pattern.
- Add several more rounds for a stroller-size blanket, then check that the head still looks balanced at the center.
Change the Bat’s Expression
Closed embroidered eyes give the bat a sleepy face. Small curved eyes create a cheerful look, while two short straight stitches can make the expression very simple.
Keep the embroidery compact and place it before stuffing the head. A face with too many stitches can pull the crochet fabric inward and change the round shape.
Add Small Inner-Ear Details
For a little extra contrast, embroider a narrow triangle inside each ear with the blanket color. Use two or three loose stitches and avoid pulling them tight.
You can also leave the ears plain. The pointed shape is clear without another layer of crochet, and the flatter ears stay soft against the head.
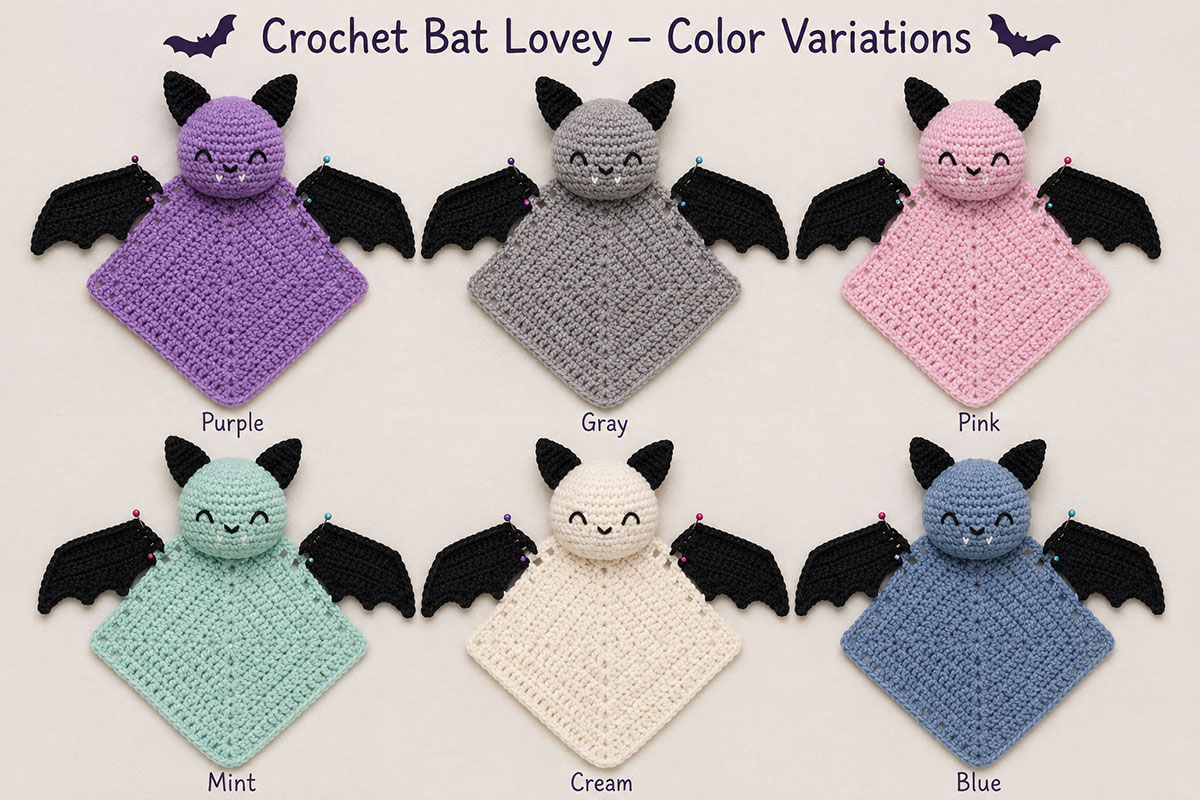
Dark plum, charcoal, navy and rust all keep the bat shape clear without limiting the project to solid black.
For another seasonal baby project, the crochet pumpkin lovey pattern uses the same friendly blanket-and-head format with a completely different shape. The free crochet ghost pattern is another playful choice for a handmade Halloween collection.
Crochet Bat Lovey Frequently Asked Questions
Is this crochet bat pattern suitable for beginners?
The pattern is best for a confident beginner who already knows how to make basic stitches and work in rounds. The blanket uses repeated double crochet rounds, while the head requires simple increases and invisible decreases.
The wings look more detailed than they are. Each one begins as a small triangle, followed by a shaping row that forms the three points.
Can I use bulky or chenille yarn?
You can change the yarn, but the stitch counts were written for worsted-weight yarn. Bulky yarn will make every piece larger and may leave the head much bigger than the blanket center.
Chenille yarn can also make the wing points less defined. Smooth category 4 yarn is the easier choice when you want the ears, face and wing edges to show clearly.
Why is my bat head showing gaps between the stitches?
Move down one hook size and keep the stitches slightly firmer. Add the fiberfill in small pieces rather than pushing one large clump into the head.
Dark stuffing can be used behind very dark yarn if tiny spaces remain visible, but tighter crochet fabric is the better fix. Do not pack in extra filling because that can stretch the spaces even wider.
Why are my crochet bat wings curling?
A slight curl along the pointed edge is normal before assembly. Smooth the wings with your hands, pin them flat and allow them to rest before sewing.
If they curl tightly, your shaping-row tension may be firmer than the earlier rows. Remake that row with a relaxed grip or use a hook one size larger for the pointed edge only.
Can I make the lovey without the bat wings?
The blanket and head can be joined without the separate wings, but the finished piece may not be easy to recognize as a bat. A smaller pair of wings is a better choice when you want a simpler design.
For a smaller pair of wings, stop after Row 4 with 9 stitches. Chain 1 and turn. Work the following sequence three times: 1 single crochet in the next stitch, 1 half double crochet in the next stitch, chain 2 and slip stitch in the second chain from the hook, then work 1 single crochet in the next stitch. This uses all 9 stitches and creates three smaller points. Join the yarn at the outer end of the upper edge and work 4 single crochet stitches toward the narrow foundation edge, placing 1 single crochet in each of the 4 row ends. Fasten off and leave a 24-inch tail for assembly.
How should I wash the finished bat lovey?
Follow the care directions printed on the yarn label. Place the lovey in a mesh laundry bag before washing to help protect the ears and wing points.
Check the head, ears, embroidery and attached wing edges after every wash. Allow the stuffed head to dry fully before the lovey is used again.
Can a baby sleep with this crochet lovey?
This handmade lovey is not an infant sleep product and should not be left in a crib, bassinet or play yard while a baby sleeps. The U.S. Consumer Product Safety Commission recommends keeping an infant sleep space bare except for a fitted sheet.
Use the lovey during supervised awake time, then store it outside the sleep space. You can read the current CPSC safe sleep guidance for more information.
Can I sell finished bat loveys made from this pattern?
Before selling a handmade item for babies or children, check the product rules, labeling requirements and other laws that apply where you live and sell. Requirements can vary by location and by the materials used.
Keep your yarn labels and supply records, and inspect every finished piece carefully. This free pattern provides crochet instructions, but it does not certify the finished item for commercial sale.
More Free Crochet Patterns to Make Next
This little bat fits nicely into a group of handmade fall projects, but it can also stand on its own as a baby shower gift or a first Halloween keepsake. Changing the blanket color makes it easy to move from a bold holiday look to something softer for a nursery.
Compare the bat with five more cute spooky crochet projects, including the friendly ghost, pumpkin, spider, black cat and candy corn loveys.
For a pumpkin design with a stronger Halloween face, make the free crochet Jack-o'-lantern lovey with triangular embroidered eyes, a stitched grin and an orange granny-square blanket.
Browse the crochet animal lovey patterns for more blanket-and-character projects made with familiar stitches. The larger free baby crochet patterns collection includes blankets, baskets, toys and other useful handmade ideas.
For another fall project, try the pumpkin crochet blanket pattern. It pairs well with the bat lovey when you want two seasonal pieces that do not look exactly alike.
The Halloween baby shower ideas page has more ways to use bats, pumpkins and friendly ghosts in decorations, food tables and party details without making the celebration feel too spooky.
Before putting the finished lovey away, check the sewn edges one final time and smooth the blanket flat. Then tuck the yarn labels with your craft notes so the washing instructions are easy to find later.
There is always room for one more soft little creature in the yarn basket.
Return to the free baby patterns page to explore more crochet, sewing and handmade baby projects.
When you click on links to various merchants on this site and make a purchase, this may result in this site earning a commission. This does not affect the price you pay.

UBGI Gold Standard 2026
Reviewed under the site's
editorial checklist.
Photos, decorating ideas, party setups and reader submissions are shared for inspiration unless a page is specifically presented as a pattern, tutorial, reference guide or step-by-step project. Follow the instructions, measurements, safety guidance and manufacturer directions provided for the particular project or product.
About Jan | Contact | Baby Nursery Ideas (Blog) | Site Map | Privacy Policy | Disclosure Policy | Disclaimer | Affiliate Disclosure | Earnings Disclosure | Facebook | Pinterest
I am a participant in the Amazon Services LLC Associates Program, an affiliate advertising program designed to provide a means for us to earn fees by linking to Amazon. As an Amazon Associate I earn from qualifying purchases.
Copyright © 2006-2026. All Rights Reserved.