Free Crochet Circus Drum Baby Blanket Pattern
By Jan Bay
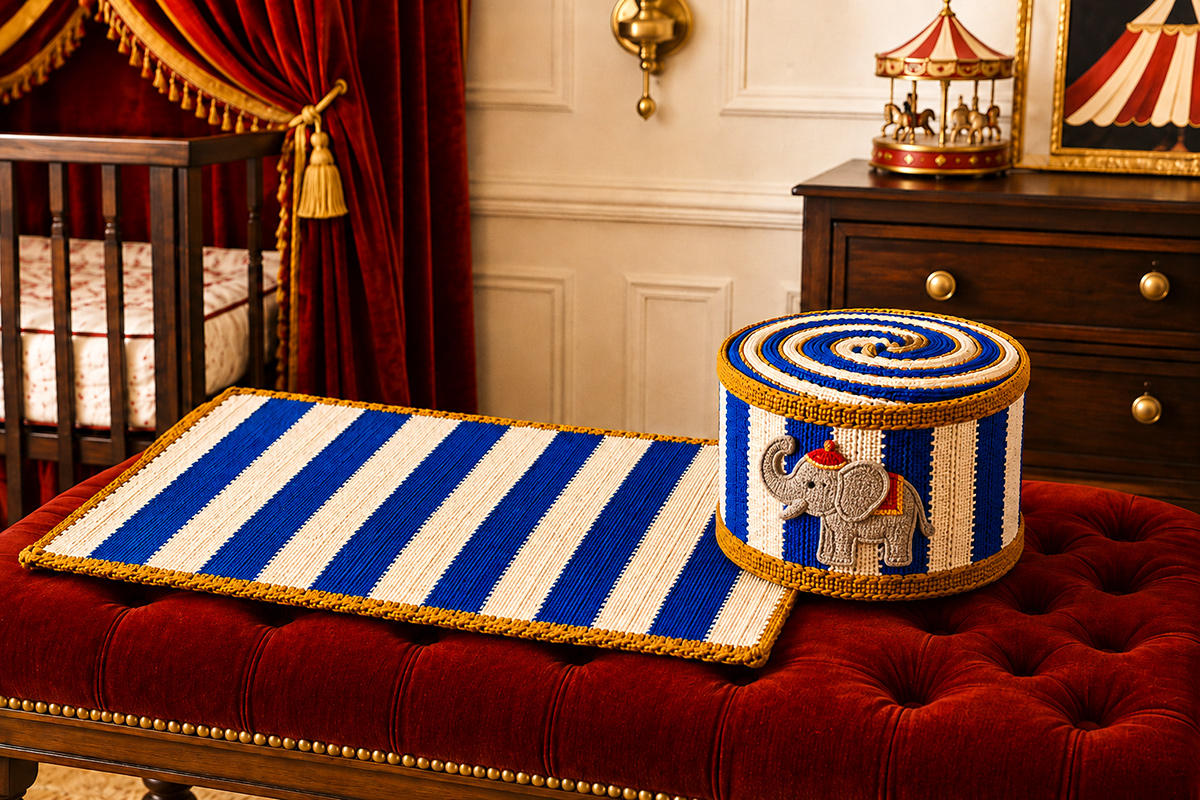
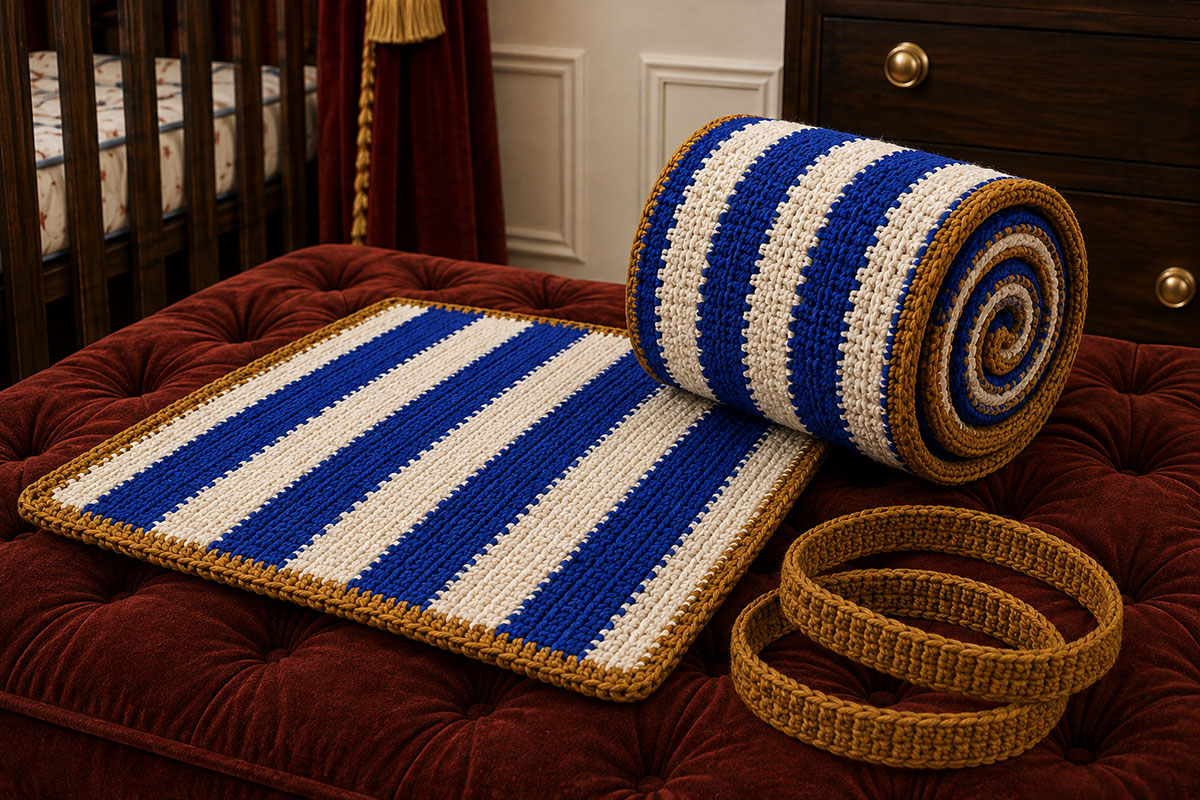
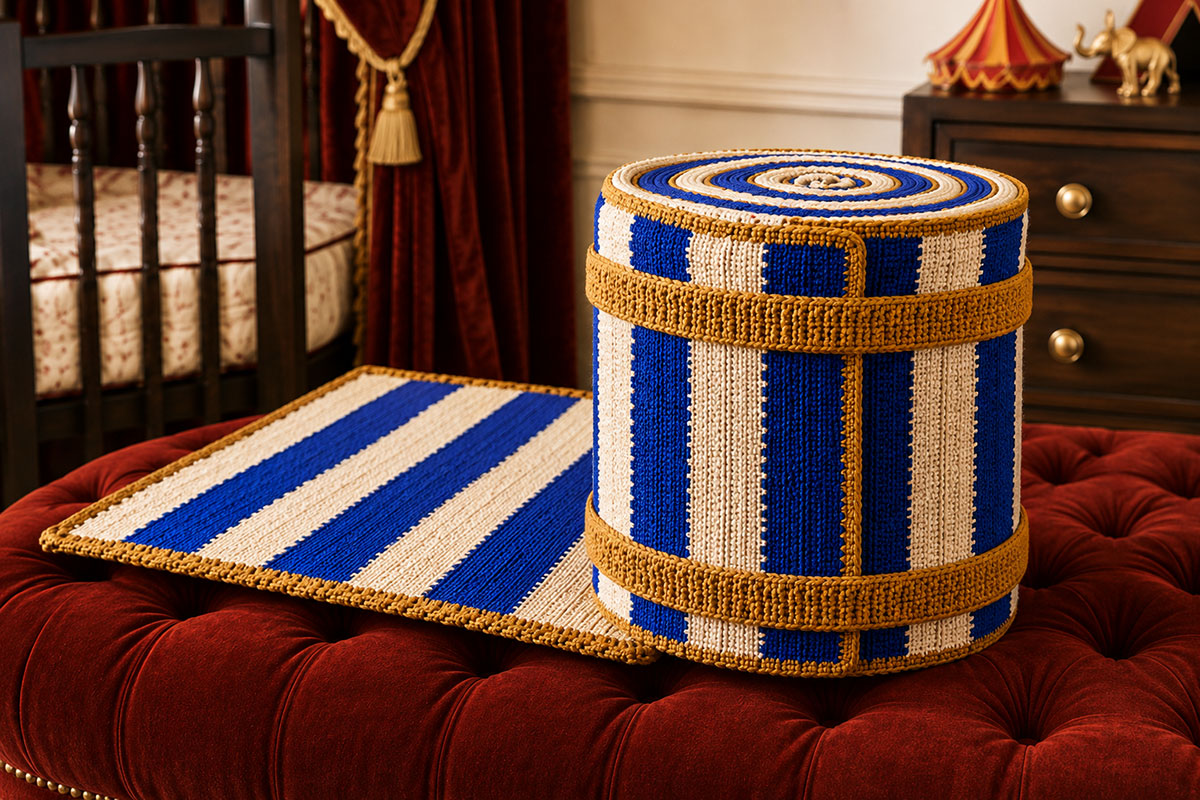
This free crochet circus drum baby blanket pattern makes a royal blue and white stroller blanket that looks like a vintage-style drum when it is folded and rolled. The antique-gold crochet border creates the raised braided look of the edging, while two removable crochet keeper hoops hold the rolled blanket in shape for display only when the blanket is not in use. Remove the hoops before using the blanket with a baby. Unroll it and the drum becomes a useful approximately 25.5 by 35.5 inch stroller blanket again. The circus elephant shown in the finished images is an optional crocheted appliqué made separately; this blanket pattern covers its placement and attachment rather than repeating the elephant crochet pattern here.
Explore More Free Crochet Baby Patterns
Worsted weight yarn for this project
Jump to the Pattern
How the Circus Drum Blanket Works
The drum shape comes from the blanket itself rather than from a separate stuffed base. You will crochet a rectangular royal blue and white stroller blanket, add a narrow raised antique-gold border, fold the finished blanket lengthwise, and roll it firmly from one short end. The gold edging winds through the top of the roll as a visible spiral, while the blue and white stripes become the vertical stripes around the outside of the drum.
Two separate gold crochet keeper hoops slide over the rolled blanket near the top and bottom. They help the roll keep its round shape and give it the finished look of an old-fashioned circus drum. The hoops are not attached to the blanket, so there are no buttons, snaps or ties to undo when you want to use it.
Important: The crochet keeper hoops are for holding the blanket in its rolled display position only. Remove both hoops completely and keep them away from the baby before using the blanket.
The finished blanket is approximately 25.5 by 35.5 inches including the border. That size is intentional. It gives you a useful stroller blanket while still providing enough length to form a compact drum when the blanket is folded and rolled.
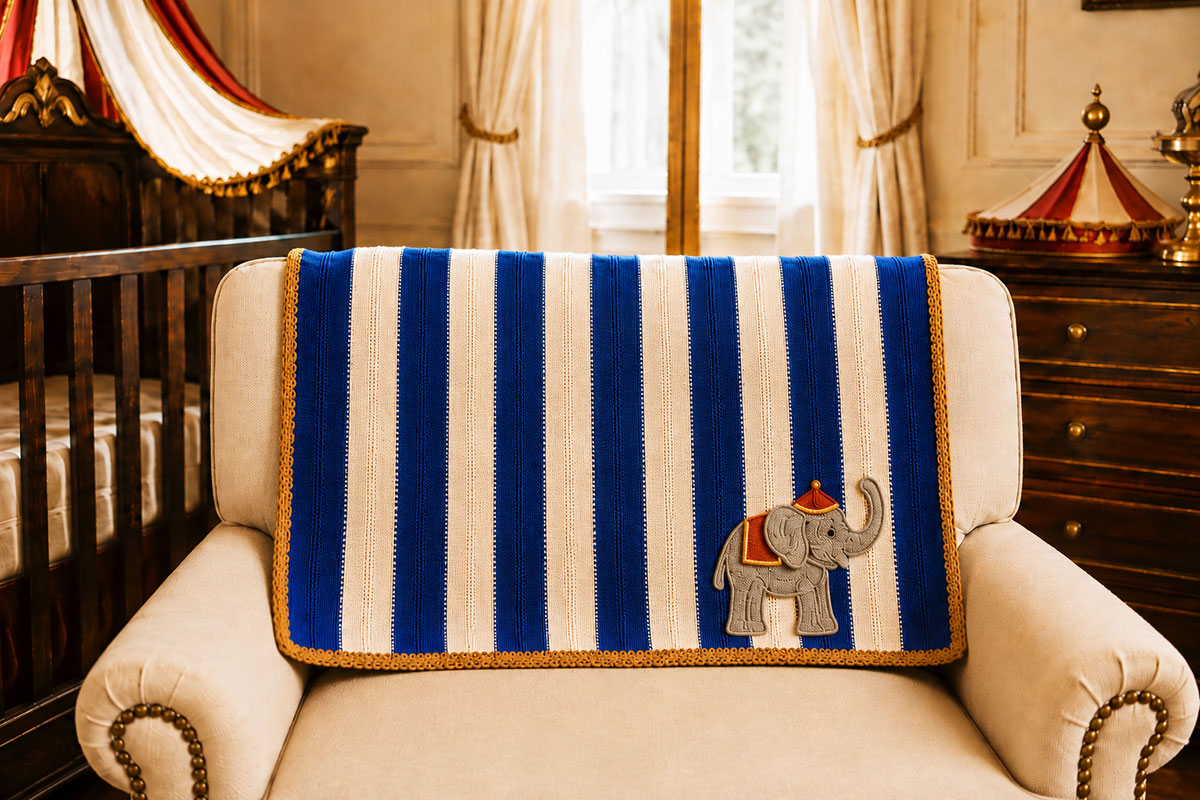
The flat version should still look finished enough to stand on its own. The gold border is part of the blanket pattern, not purchased decorative braid. Later in the pattern, you will work the raised edging directly into the blanket so the same detail that frames the flat blanket also helps create the drum effect when it is rolled.
Supplies for the Crochet Circus Drum Blanket
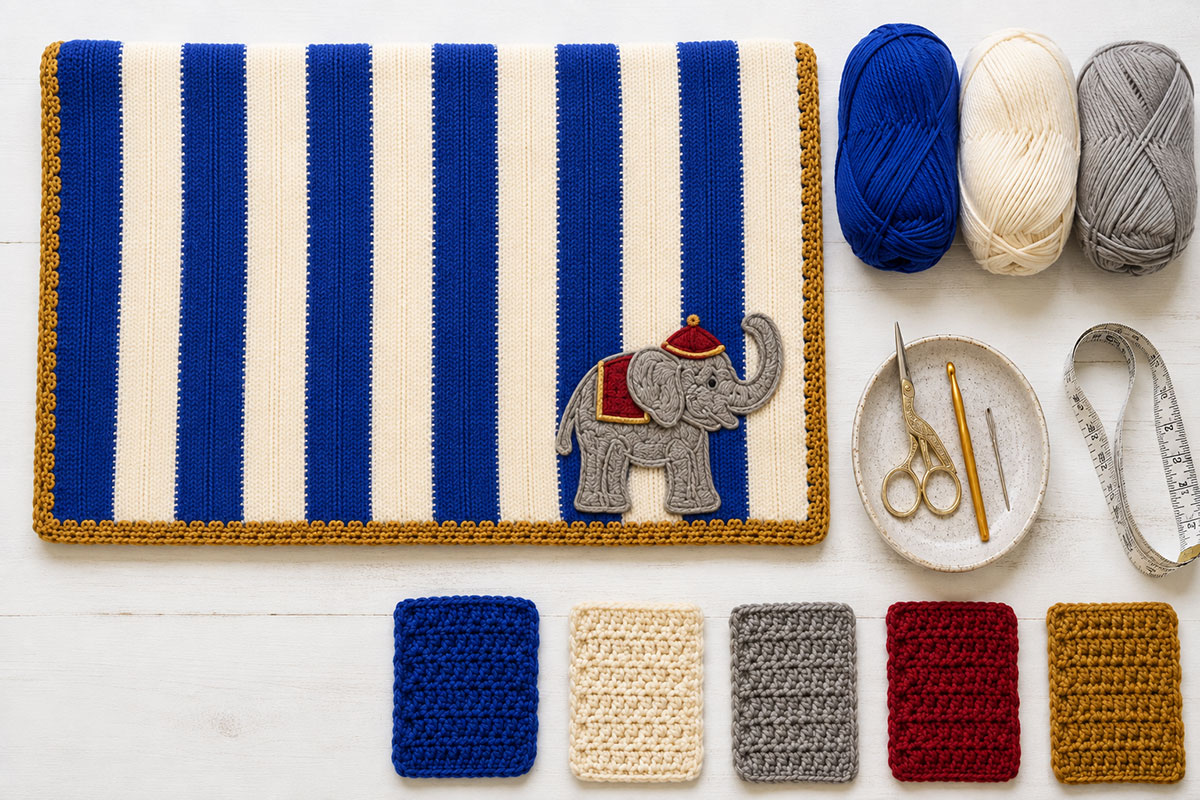
This pattern uses ordinary worsted weight yarn. You do not need purchased braid, upholstery trim or special hardware to make the gold details. The raised border and both removable keeper hoops are crocheted from the antique gold yarn.
- Royal blue worsted weight yarn: approximately 500 yards
- White worsted weight yarn: approximately 450 yards
- Antique gold worsted weight yarn: approximately 300 yards for the raised border and two removable keeper hoops
- Soft gray worsted weight yarn, optional: approximately 35 to 45 yards for the circus elephant appliqué
- Muted red worsted weight yarn, optional: approximately 10 yards for the elephant's small circus accents
- Black embroidery floss or a short length of black yarn, optional: for the embroidered elephant eye
- 5 mm crochet hook: or the hook size needed to obtain gauge
- Tapestry needle for weaving in ends and joining the keeper hoops
- Scissors
- Stitch markers for marking the blanket corners and border repeats
- Flexible measuring tape
The yardage includes a little room for a gauge swatch and normal differences in tension. Use the same yarn weight for all three colors so the stripes and border have an even thickness.
Choose a smooth, washable yarn with clear stitch definition. The gold yarn should be a warm antique gold color, not metallic cord or decorative rope. A smooth yarn lets the crossed stitches in the border create their own raised braided effect without adding anything hard or stiff to the blanket.
Before you begin: Make a gauge swatch with the royal blue yarn before you cut or divide any yarn for the project. The finished dimensions matter because the blanket needs enough length to form the drum without becoming so bulky that the keeper hoops cannot hold the roll securely.
Finished Size and Drum Measurements
Flat blanket body before the gold border: approximately 24 inches wide by 34 inches long.
Finished blanket including the gold border: approximately 25.5 inches wide by 35.5 inches long.
Rolled drum: approximately 12.5 to 13 inches tall. The diameter will depend on yarn thickness, crochet tension and how firmly you roll the blanket. With worsted weight yarn, expect a compact roll approximately 5 to 7 inches across rather than a large rigid drum. Size the removable keeper hoops to your finished roll instead of forcing the blanket to match a fixed diameter.
The proportions matter more on this project than they do on a blanket that will only be used flat. A few inches of extra length can make the finished drum noticeably wider, while a blanket that is too short will not create enough layers for the rolled top to look convincing.
Before adding the gold border, lay the striped rectangle flat without stretching it. Aim for about 24 by 34 inches. Small differences are fine, but I would correct a noticeably short or oversized blanket before moving on to the decorative edging.
Gauge
Gauge: approximately 14 half double crochet stitches and 11.5 rows measure 4 inches in the striped blanket pattern using worsted weight yarn and a 5 mm hook.
Make a swatch at least 5 inches square, then measure the center 4 inches. If you have more than 14 stitches across 4 inches, try a larger hook. If you have fewer than 14 stitches, try a smaller hook.
Row gauge is especially important for this project because the 34-inch rolling direction is created by the rows. Each color stripe contains 7 rows, and the completed body contains 98 rows arranged as 14 alternating royal blue and white stripes. The foundation edge forms the approximately 24-inch side of the blanket. This orientation is what makes the stripes stand vertically around the finished drum after the blanket is folded and rolled.
Pattern checkpoint: Do not stretch the blanket to reach the finished measurements. The keeper hoops will be sized to the actual rolled blanket later, but the 24 by 34 inch body is what keeps the finished drum close to the proportions shown in the example image.
The blanket body uses half double crochet rather than separately crocheted strips. Each row runs across the approximately 24-inch side of the blanket, while the alternating seven-row color bands build the approximately 34-inch rolling direction. This keeps the blanket seamless and places the stripes in the correct direction for the drum shape.
Crochet Abbreviations and Pattern Notes
- ch = chain
- st = stitch
- sts = stitches
- sl st = slip stitch
- sc = single crochet
- hdc = half double crochet
- FPhdc = front post half double crochet
- RS = right side
- WS = wrong side
Pattern terms: U.S. crochet terminology.
Turning chains: The beginning chain 1 does not count as a stitch unless the instructions specifically say otherwise.
Color changes: Complete the final yarn over of the last stitch of a stripe with the new color. Because each stripe is several rows deep, fasten off the previous color rather than carrying a long unused strand up the side of the blanket.
Right side and wrong side: Before beginning the border, choose the face of the striped blanket that you want visible as the right side and mark it near one corner with a removable stitch marker. Hide the woven-in yarn tails on the wrong side. Work the raised gold border with the right side facing you.
Free Crochet Circus Drum Baby Blanket Pattern: Striped Blanket Instructions
The blanket begins as one seamless rectangle. Each row runs across the approximately 24-inch width, while groups of seven rows form the royal blue and white stripes along the 34-inch length.
That stripe direction is deliberate. When the finished blanket is folded lengthwise and rolled from one short end, the color bands wrap around the roll and appear as vertical blue and white sections on the outside of the drum.
Blanket body: approximately 24 inches wide by 34 inches long before the gold border.
Total stitches in every row: 84 hdc.
Total rows: 98.
Total stripes: 14, with 7 royal blue stripes and 7 white stripes.
Stripe sequence: Begin with royal blue. Alternate royal blue and white throughout, working 7 rows in each color.
With royal blue yarn, chain 86.
Row 1: Work 1 hdc in the third chain from the hook and in each chain across. You should have 84 hdc. The two skipped chains do not count as a stitch.
Rows 2 through 7: Chain 1 and turn. Work 1 hdc in each of the 84 stitches across. The turning chain does not count as a stitch.
At the end of Row 7, change to white while completing the final hdc. Fasten off the royal blue yarn, leaving a tail long enough to weave in securely.
Rows 8 through 14: With white, chain 1 and turn. Work 1 hdc in each stitch across. You should still have 84 stitches in every row.
Continue alternating colors every 7 rows as follows:
- Rows 1 to 7: Royal blue
- Rows 8 to 14: White
- Rows 15 to 21: Royal blue
- Rows 22 to 28: White
- Rows 29 to 35: Royal blue
- Rows 36 to 42: White
- Rows 43 to 49: Royal blue
- Rows 50 to 56: White
- Rows 57 to 63: Royal blue
- Rows 64 to 70: White
- Rows 71 to 77: Royal blue
- Rows 78 to 84: White
- Rows 85 to 91: Royal blue
- Rows 92 to 98: White
Fasten off after Row 98.
Blanket body checkpoint
Lay the rectangle flat without stretching it. It should measure approximately 24 inches across and 34 inches from the beginning edge to Row 98. Count 14 distinct stripes. Each stripe should contain 7 rows, and the two long side edges should remain straight rather than pulling inward or flaring outward.
If the width is correct but the blanket is noticeably shorter or longer than 34 inches, check your row gauge before adding or removing rows. Keeping 7 rows in every stripe matters because changing individual stripe widths will alter the regular circus-drum pattern.
Weave in the blue and white color-change ends before beginning the border. Secure each tail on the wrong side without pulling the edge inward.
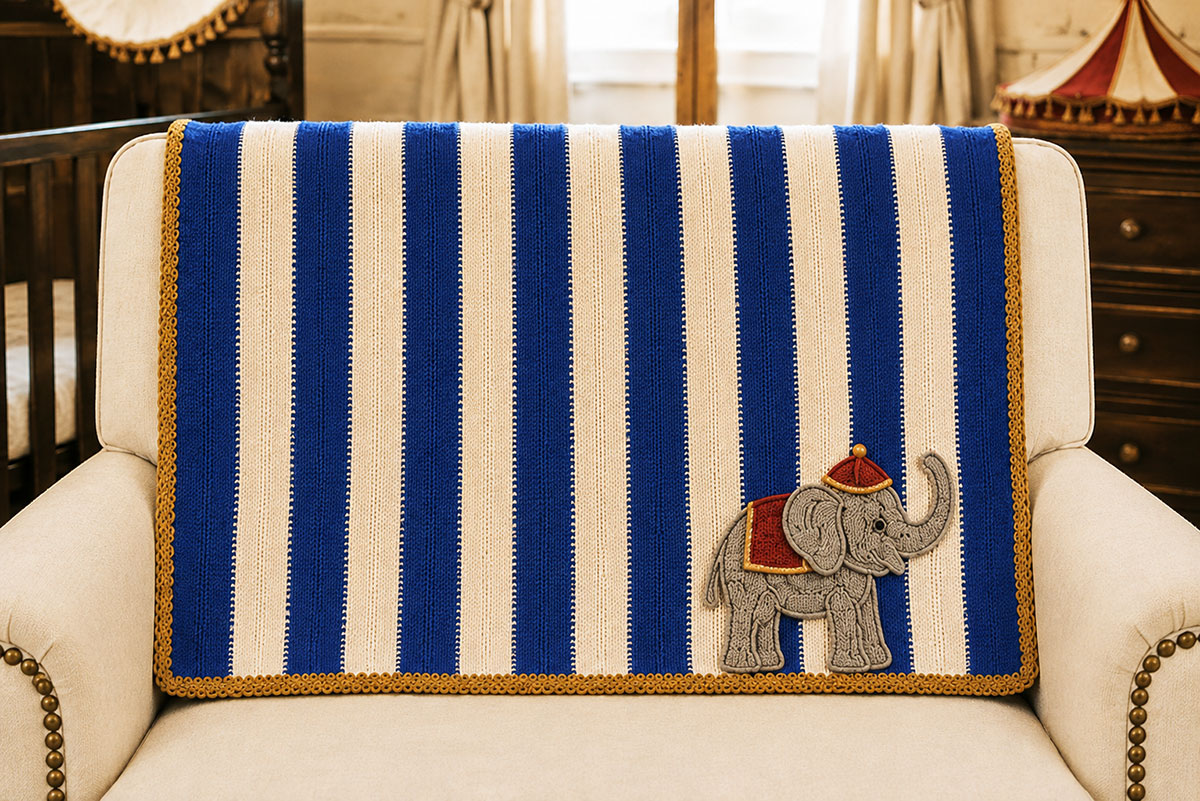
The blanket should look complete and useful even before it is rolled. The drum transformation is an extra way to fold and display it, not a reason to compromise the flat blanket.
Crochet the Raised Antique-Gold Braid-Look Border
The gold edging is crocheted directly onto the blanket. Nothing is sewn on, and there is no cord hidden inside it. A plain setup round gives the border a stable base, then crossed front-post stitches create the raised cable effect.
Aim for a finished border about 3/4 inch wide. Keep the stitches relaxed enough for the blanket to lie flat. The edging needs to bend easily because the two long gold edges will become part of the visible spiral when the blanket is folded and rolled.
Before starting: Place the blanket with the right side facing you. The two 84-stitch foundation and final-row edges are the short sides. The two 98-row edges are the long sides.
Round 1: Gold Setup Round
Join antique-gold yarn at one corner with a slip stitch. Chain 1. The beginning chain does not count as a stitch.
First short side: Work 1 sc in each of the 84 stitches across. You should have 84 sc.
Chain 2 to turn the corner.
First long side: Work 120 sc evenly along the 98 row ends.
Divide each 98-row long edge into four sections. Place stitch markers after Rows 24, 49 and 73. The four sections contain 24, 25, 24 and 25 row ends.
Across each 24-row section: Work 1 sc in every row end, but work 2 sc in the 4th, 8th, 12th, 16th, 20th and 24th row ends of that section. You will have exactly 30 sc.
Across each 25-row section: Work 1 sc in every row end, but work 2 sc in the 5th, 10th, 15th, 20th and 25th row ends of that section. You will also have exactly 30 sc.
Four sections of 30 sc give you exactly 120 sc along the long side. Repeat the same distribution on the second long side.
Chain 2 to turn the corner.
Second short side: Work 1 sc in each of the 84 stitches across.
Chain 2.
Second long side: Work 120 sc evenly along the row ends, using the same four-section method.
Chain 2 and join with a slip stitch to the first sc.
Round 1 checkpoint
You should have 84 sc on each short side and 120 sc on each long side, with a chain-2 corner space at all four corners. Lay the blanket flat before continuing. If an edge ripples, there are too many setup stitches in that area. If it pulls inward, the stitches are spaced too far apart.
Round 2: Foundation for the Raised Cable
Chain 1.
Work 1 hdc in every sc along the first straight side.
In the chain-2 corner space, work 1 hdc, chain 2, and 1 hdc.
Continue around the blanket in the same way: 1 hdc in each setup stitch along every straight side, then 1 hdc, chain 2, and 1 hdc in each corner space.
Join with a slip stitch to the first hdc.
The 84 hdc on each short side and the 120 hdc on each long side will become the posts used for the cable round. The two hdc worked at each corner are corner stitches and are not included in the cable repeats.
Round 3: Crossed Front-Post Cable
This round creates the raised braid-like surface. Work the cable only across the straight sides. Keep the corners simple so the blanket can still lie flat.
Begin at the first straight-side hdc immediately after a corner.
To make one crossed cable pair:
- Skip the next hdc post.
- Yarn over. Insert the hook from front to back and then back to front around the post of the following hdc. Complete 1 FPhdc.
- Yarn over. Return to the skipped hdc post and work 1 FPhdc around that post.
The two stitches cross each other and form one raised cable pair.
Repeat the crossed cable pair across the entire straight side.
Because both straight-side stitch counts are even, you will make:
- 42 crossed pairs across each 84-stitch short side
- 60 crossed pairs along each 120-stitch long side
At each corner: Work 1 sc in the first corner hdc, then work 1 sc, chain 1, and 1 sc in the chain-2 corner space. Work 1 sc in the second corner hdc. Begin the crossed cable pairs again with the first straight-side hdc.
Continue around all four sides. Join with a slip stitch to the first stitch and fasten off.
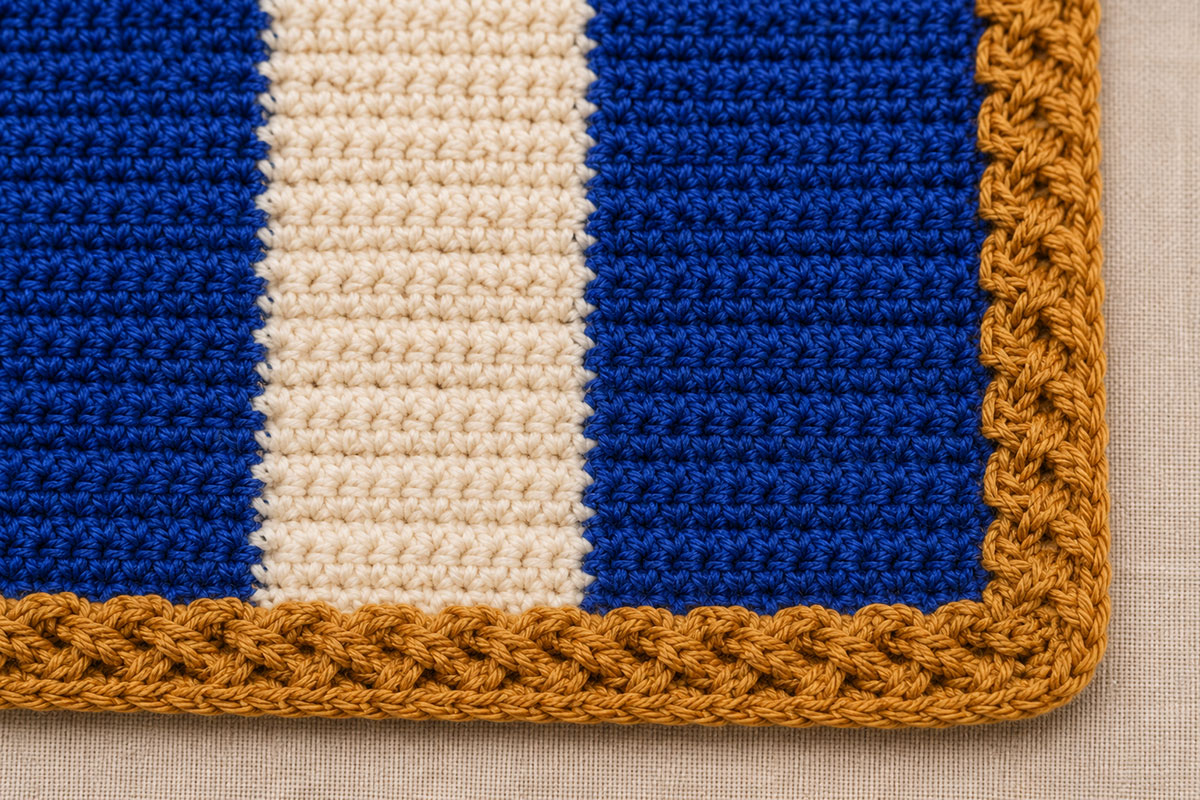
The finished edging should look raised and gently interlaced rather than like a thick rope sewn onto the blanket. Run your fingers along the border before moving on. It should flex with the fabric and fold without creating a stiff ridge.
Border measurement checkpoint: The gold edging should add approximately 3/4 inch around the outside of the blanket. The completed blanket should measure close to 25.5 inches by 35.5 inches when laid flat without stretching.
If the crossed stitches make the edge cup toward the front, the cable round is too tight. Undo that section and remake the crossed stitches with looser loops. The border needs enough give to follow the blanket when it is folded and rolled.
Add the Circus Elephant Appliqué
The small elephant gives the rolled blanket a clear circus focal point, but its placement matters. It needs to sit completely on one half of the blanket so the lengthwise fold does not run through the appliqué.
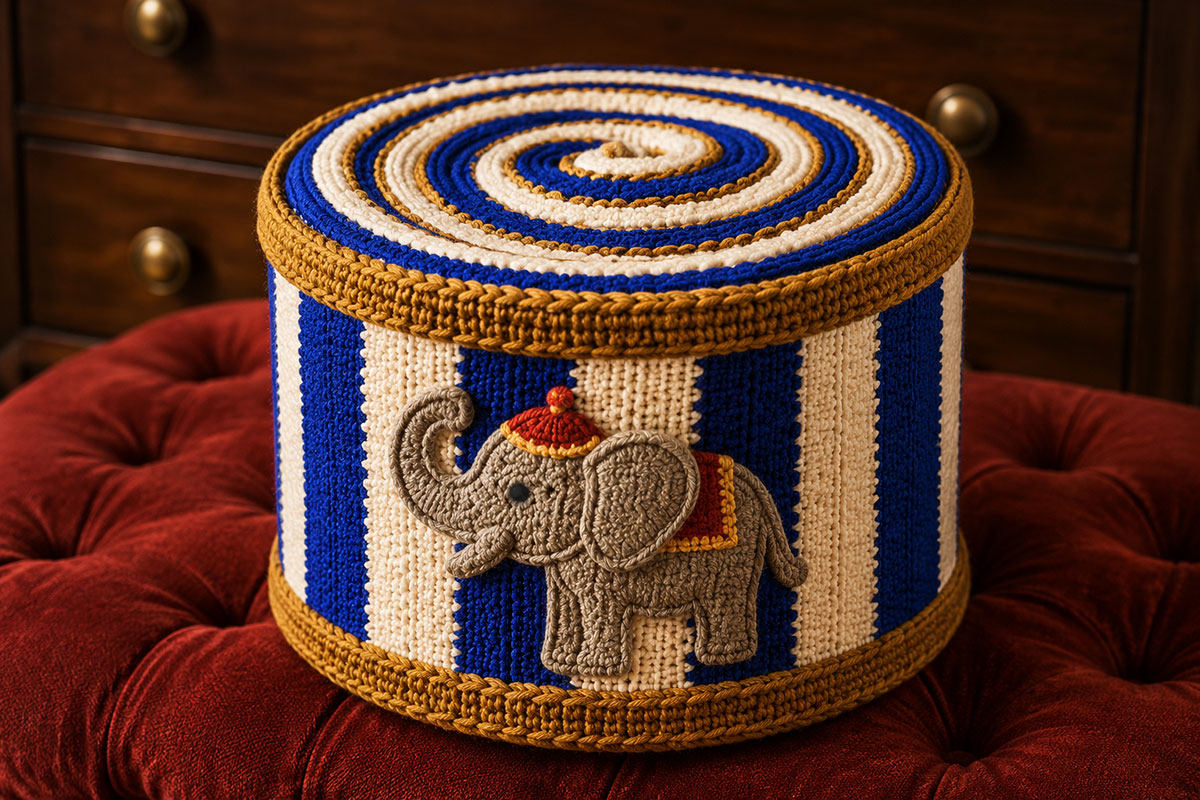
Use the flat circus version from my crochet elephant applique pattern, or another flat, flexible elephant appliqué approximately 4.5 to 5 inches wide and no more than about 5 inches tall. Keep the design simple enough that it bends naturally with the blanket. The elephant shown with this pattern has a soft gray body, an embroidered black eye, a raised trunk, and small muted-red and antique-gold circus accents.
Do not stuff the elephant and do not add plastic eyes, buttons, beads, bells or other hard decorations.
Mark the Appliqué Position
Lay the completed blanket flat with the right side facing upward. Place the royal blue short end on your right. This is the end that will become the final outside layer when the blanket is rolled into the drum.
Choose the half of the blanket that you want to become the front-facing outside surface after the lengthwise fold.
Measure approximately 6.25 to 6.5 inches inward from the nearest long gold-bordered edge. This marks the approximate vertical center of the elephant within that half of the blanket.
Before marking the elephant from side to side, temporarily fold the finished bordered blanket lengthwise and roll it from the white short end toward the royal blue short end. Measure around the outside of the roll at approximately the center height of the elephant, then unroll the blanket.
Measure inward from the royal blue short edge by approximately one-half of that circumference. Use that point, together with the 6.25 to 6.5 inch vertical measurement, as the approximate center of the elephant. This places the appliqué opposite the final blanket edge so the elephant can face forward while that edge remains at the back of the finished drum.
Example: If your finished roll measures 18 inches around, begin with the center of the elephant approximately 9 inches inward from the royal blue short edge.
Placement checkpoint: The entire elephant must stay on one side of the blanket's center line. Leave clear crochet between the appliqué and the center fold so the elephant does not crease when the blanket is folded lengthwise. Test the placement with the blanket rolled before sewing. The elephant's hat and feet should remain visibly clear of the upper and lower keeper hoops rather than touching or disappearing beneath either band.
Pin or clip the appliqué temporarily in position before sewing it down. Turn the blanket over so the wrong side is facing up and the right side with the appliqué is against the work surface. Fold the blanket lengthwise with the two long gold edges together. This places the right side and the appliqué on the outside of the folded blanket. Then loosely roll it from the white short end toward the royal blue end.
Stand the temporary roll upright and rotate it until the elephant faces forward. Check that the complete elephant is visible between the upper and lower keeper-hoop positions and that none of the motif wraps awkwardly around the side of the drum.
If necessary, unroll the blanket and move the appliqué slightly before sewing. This quick test is much easier than removing stitches after the elephant is permanently attached.
Sew the Elephant to the Blanket
Unroll the blanket and lay it flat again.
Thread a tapestry needle with gray yarn that matches the outer edge of the elephant.
Sew around the appliqué with small, evenly spaced stitches, catching the blanket surface without pulling the striped fabric out of shape. Work completely around the body, head, trunk, legs and other outer edges so no part of the elephant can lift away from the blanket.
Secure the yarn on the wrong side and weave in the end through several stitches.
Use matching muted-red or antique-gold yarn to secure any separate circus-cap or saddle details. Embroider the eye securely with black floss or black yarn rather than attaching a plastic eye.
Final appliqué checkpoint: Fold and roll the blanket again. The elephant should sit on the outside of the finished roll opposite the final short edge and remain fully visible between the two removable gold keeper hoops. Rotate the finished drum so the elephant becomes the front focal point and the final short edge of the blanket faces toward the back.
The elephant is permanently attached to the blanket. Only the two gold keeper hoops are removed before the blanket is used.
Crochet the Removable Gold Drum Keeper Hoops
The two gold keeper hoops are separate pieces. They slide over the rolled blanket near the top and bottom and provide the gentle pressure that keeps the blanket from opening while it is displayed as a drum.
Do not attach the hoops to the blanket. They should come off completely before the blanket is used.
The hoops use back-loop-only single crochet because the ribbed fabric has enough flexibility to slide over the roll while still returning to shape. Each finished band should be approximately 1.25 to 1.5 inches wide. The keeper hoops are flat strips of ordinary worsted-weight crochet fabric joined into continuous loops, not stuffed cords, rope-like rings or rigid hoops. When removed from the drum, they may relax into soft oval shapes instead of holding perfect circles.
Measure the actual roll before sizing the hoops.
If you plan to wash or block the blanket before its final display, complete that finishing step first and let the blanket dry completely before taking the final keeper-hoop measurements. Then fold the finished blanket lengthwise so the two long gold edges meet. Roll it firmly from one short end to the other. Do not add the hoops yet. Measure around the rolled blanket about 1.5 inches below the top and again about 1.5 inches above the bottom. Record both measurements. The two circumferences may differ slightly, so fit each hoop to its own position.
Make the First Keeper Hoop
With antique-gold yarn, chain 7.
Row 1: Work 1 sc in the second chain from the hook and in each chain across. You should have 6 sc.
Row 2: Chain 1 and turn. Working in the back loop only, work 1 sc in each of the 6 stitches across.
Repeat Row 2 until the ribbed strip wraps around the measured position on the rolled blanket with its short ends meeting under light tension.
Do not stretch the band as tightly as elastic. It should be snug enough to keep the roll closed, but it should still slide on and off without distorting the crochet stitches underneath.
As a fitting guide, make the unstretched strip approximately 1/2 inch shorter than the circumference you measured. Yarn and tension vary, so test the strip directly around the rolled blanket before joining it permanently.
Example: If the rolled blanket measures 18 inches around at the upper hoop position, begin checking the strip when it measures about 17.5 inches long.
Join the Hoop
Bring the two short ends of the ribbed strip together without twisting the band.
Slip stitch the ends together through both layers, matching one stitch with the corresponding stitch on the opposite end. Fasten off and weave in the yarn securely.
Turn the seam toward the inside of the hoop.
Slide the finished hoop over the rolled blanket and position it approximately 1.5 inches below the top edge.
The hoop should sit flat against the blue and white stripes. It should not dig deeply into the blanket or cause the cylinder to bulge above or below the band.
Make the Second Keeper Hoop
Repeat the same instructions for the lower hoop, using the circumference measurement taken near the bottom of the roll.
Do not assume that both hoops need exactly the same number of rows. Fit the second band to the lower part of the actual rolled blanket and stop when its ends meet under the same light tension as the first.
Position the lower hoop approximately 1.5 inches above the bottom edge of the rolled blanket.
Keeper hoop safety
The keeper hoops are removable display pieces. Take both hoops completely off the blanket and keep them away from the baby before using the blanket for a stroller outing, cuddling or supervised floor time. Never place the hoops around a baby or leave them loose in an infant sleep or play space.
With both hoops fitted correctly, the rolled blanket should stay together without buttons, snaps, elastic, cords or ties. The gold bands also create the upper and lower rims that help the rolled blanket read as a vintage circus drum.
How to Fold and Roll the Blanket Into a Circus Drum
The drum shape depends on folding the blanket in the correct direction before you roll it. The finished gold border helps make that direction easy to identify.
Lay the blanket flat with the wrong side facing up and the 35.5-inch length running from left to right. The right side, including the elephant appliqué if used, should be against the work surface. The royal blue and white stripes should also progress from left to right across that long direction.
Step 1: Fold the blanket lengthwise.
Bring one long gold-edged side up to meet the opposite long gold-edged side. Smooth the fold without stretching the crochet. The folded blanket should now measure approximately 12.75 inches high by 35.5 inches long.
Keep the folded edge along the bottom and the two matching gold-edged long sides together along the top. Those gold edges are important because they will wind inward as the blanket rolls and create the gold spiral visible across the top of the finished drum.
Step 2: Start at the white short end.
For the drum shown in the example images, begin rolling at the white short edge and roll toward the royal blue short edge. This leaves the royal blue section as the final outside layer. Keep the blue and white bands straight and keep the two gold top edges aligned as you roll.
Step 3: Start a firm center roll.
Roll the first few inches snugly by hand. Keep the center compact, but do not crush the stitches. Check the top as you begin. You should already see the paired gold edges starting to curve around the center of the spiral.
Step 4: Continue rolling across the full length.
Roll toward the opposite short end with even pressure. Use both hands to keep the bottom fold level and the top gold edges lined up. Stop occasionally and straighten the sides if one layer begins to climb higher than the others.
The alternating blue and white bands should now appear as vertical sections around the outside of the cylinder. The gold edging along the folded blanket should remain visible as a spiral across the top.
Step 5: Finish the outer layer.
Let the final short edge lie smoothly against the outside of the roll. Do not tuck it deeply into the center because that can distort the drum shape and make the blanket harder to unroll.
Step 6: Add the keeper hoops.
Slide the first removable gold hoop over the top of the rolled blanket and position it about 1.5 inches below the top edge. Slide the second hoop over the bottom and position it about 1.5 inches above the lower edge.
Adjust the hoops until they sit level. Turn the rolled blanket so the final outer edge is toward the back for display.
Drum-shape checkpoint
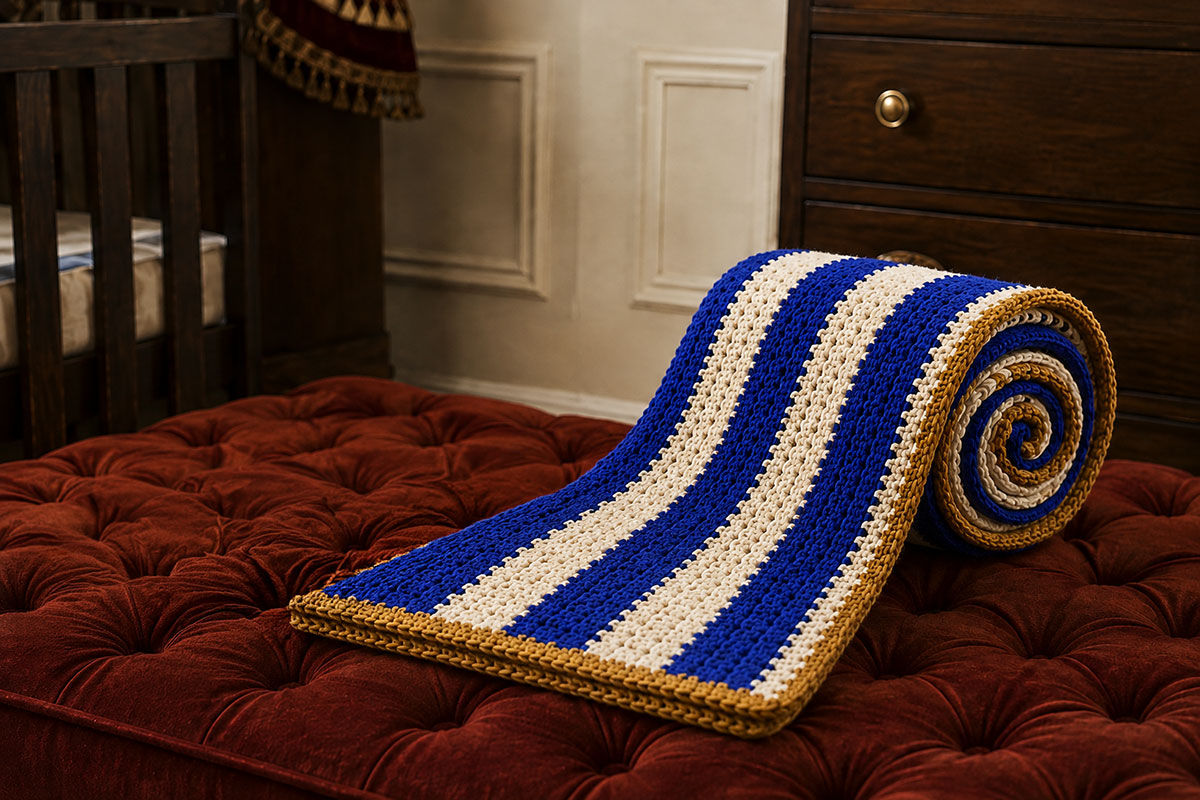
The finished roll should stand approximately 12.5 to 13 inches tall. Its diameter can vary with yarn thickness and rolling tension. The top should look like a soft crochet spiral with visible antique-gold edging between the layers, not like a separate flat drum lid.
If the roll leans, unroll the last several inches and try again rather than tightening one keeper hoop more than the other. An even fold and level roll do more to create the drum shape than very tight bands.
The keeper hoops are only for the rolled display. Remove both hoops completely and put them away before unfolding the blanket for use with a baby.
Finishing, Blocking and Caring for the Drum Blanket
Before you call the blanket finished, spread it out completely and check the flat version first. The blue and white body should lie square, the gold cable border should follow the edges without drawing them inward, and all four corners should rest flat.
Weave in every remaining yarn end securely on the wrong side. Pay special attention to the blue and white color changes and to the beginning and ending points of the gold border. Do not leave long floats or loose tails near the edge.
Shape the blanket gently to approximately 25.5 by 35.5 inches. If the yarn label permits blocking, use the method recommended for that fiber. Avoid aggressive stretching because the finished dimensions and rolling proportions are part of the drum design.
Allow the blanket to dry completely before rolling it for the first time.
Once dry, fold and roll the blanket using the method above. Fit both keeper hoops and check the drum from the front, side and top. The gold edging should make a visible spiral across the top, while the royal blue and white stripes remain upright around the outside.
If the roll looks uneven, fix the fold rather than forcing it into shape with tighter hoops. A keeper hoop should hold an already even roll. It should not be tight enough to compress the crochet into a hard ridge.
Using the Blanket After the Drum Is Unrolled
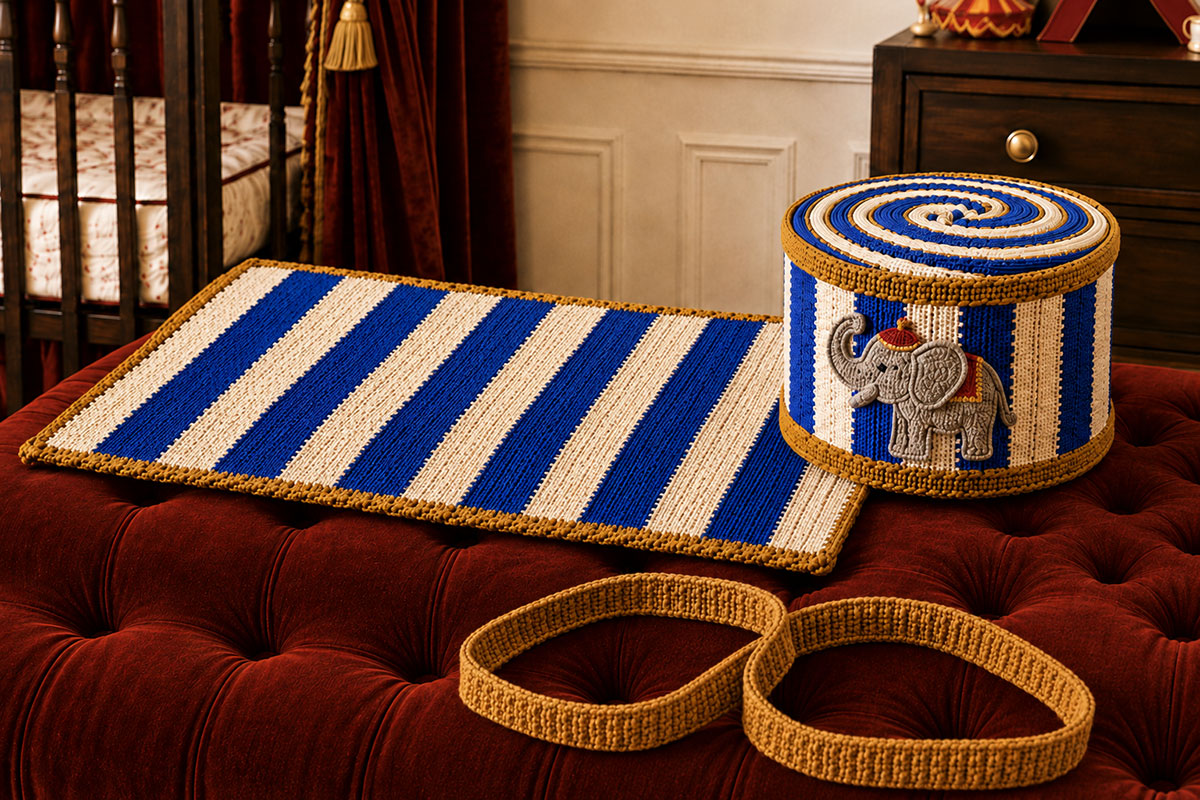
The rolled drum is the fun reveal, but the project still needs to work as a blanket. Remove both keeper hoops completely before using it with a baby. Store the hoops where the baby cannot reach them.
The approximately 25.5 by 35.5 inch finished size is suited to supervised stroller outings, being held by an adult, or other awake-time uses where a smaller blanket is convenient.
Do not place the blanket, keeper hoops or other soft items in a crib, bassinet, play yard or other infant sleep space. Current infant sleep guidance from the U.S. Consumer Product Safety Commission recommends a firm, flat sleep surface with only a fitted sheet and no blankets or other soft items in the sleep area. You can review the current guidance at CPSC Safe Sleep.
Wash the blanket according to the care instructions for the yarn you selected. Remove the keeper hoops before washing so the blanket body and small bands can be cleaned and reshaped separately.
If you like crochet projects that hide a little surprise in the finished presentation, the circus popcorn baby blanket pattern takes the same playful idea in a very different direction. For more handmade gift projects, browse the crochet baby shower gifts collection.
Circus Drum Baby Blanket FAQ
Does the blanket really roll into the drum shown on the page?
Yes. The drum is made from the finished blanket itself. Fold the blanket lengthwise so the two long gold edges meet, then roll it firmly from one short end. The two removable gold keeper hoops hold the finished roll in place for display. The exact diameter will vary with yarn thickness, tension and how firmly you roll.
Why does the gold edging show as a spiral on top of the drum?
The two long gold-edged sides meet when the blanket is folded. As the folded blanket rolls around itself, those edges travel around the top of the roll. That creates the visible antique-gold spiral between the blue and white crochet layers.
Are the gold keeper hoops attached to the blanket?
No. Both hoops are separate removable pieces. They slide over the rolled blanket to help it keep the drum shape, then come off completely when you want to use the blanket.
Can the keeper hoops stay on while a baby uses the blanket?
No. Remove both keeper hoops and store them out of the baby's reach before using the blanket. The hoops are only for the rolled display.
Is the gold braid purchased trim?
No. The antique-gold border is crocheted from worsted weight yarn. Crossed front-post stitches create the raised braid-like appearance, so you do not need decorative cord, upholstery braid or specialty trim.
Why is this a stroller-size blanket instead of a larger baby blanket?
The approximately 25.5 by 35.5 inch finished size balances the two jobs of the project. It provides a useful smaller blanket when open while keeping enough length to form a compact rolled drum. Making the blanket substantially larger would also make the rolled version bulkier and change the fit of the keeper hoops.
Can I make the blanket larger?
You can make a larger striped blanket, but it should be treated as a size variation rather than an exact version of this drum pattern. Extra width or length changes the height and diameter of the roll. If you enlarge it, make the keeper hoops only after the finished blanket has been folded and rolled so you can fit them to the actual circumference.
Do I have to use royal blue and white?
No. The stitch pattern will work in other color combinations. Royal blue, white and antique gold were chosen because the contrast gives the rolled version its vintage circus-drum character. If you change the colors, keep enough contrast between the alternating stripes for the drum effect to remain visible.
What if my blanket measures 24 inches wide but is not exactly 34 inches long?
A small difference is not a problem. Do not stretch the blanket to force it to the measurement. Check that all 14 stripes contain the same 7 rows and that the fabric lies flat. A noticeably different length usually means your row gauge differs from the pattern gauge.
What if the gold border curls?
First lay the blanket flat and check the setup round. Rippling usually means too many stitches were placed along that edge. An edge that pulls inward may need more evenly spaced setup stitches or looser tension. If the setup round lies flat but the cable round cups inward, remake the crossed front-post stitches with slightly looser loops.
How tight should the keeper hoops be?
They should hold the rolled blanket without squeezing deep grooves into it. Fit each hoop to the actual circumference of the finished roll. The band should slide over the roll with light tension and sit flat against the crochet.
Is this a beginner crochet pattern?
The blanket body is beginner-friendly half double crochet. The raised cable border, even stitch placement along the long edges and fitted keeper hoops add a little more technique, so the complete project is best suited to an advanced beginner or intermediate crocheter.
If the transforming blanket idea is what caught your attention, the circus popcorn baby blanket crochet pattern creates another rolled circus display with a completely different edging and construction. You can also find more projects on the free baby crochet patterns page.
Turn the Finished Drum Into a Circus Baby Shower Gift
The rolled drum gives you a presentation that does not need much extra decoration. Set it upright on a gift table with the blue and white stripes facing forward and let the antique-gold hoops do the work. The surprise comes when the recipient removes the hoops and discovers that the drum is actually a stroller blanket.
For a circus baby shower, I would keep the surrounding gift wrap fairly simple so the crocheted drum remains easy to recognize. Solid blue, white or kraft paper works better here than adding another layer of stripes.
The same restraint helps if the blanket will be displayed with a circus nursery theme. The royal blue and antique gold give the project a more vintage circus feeling without requiring cartoon animals, bright plastic decorations or a room full of matching props.
When the blanket is needed, remove both keeper hoops, store them away from the baby, and unroll the drum. That little change from decorative object to useful blanket is really the point of the pattern.
For another handmade project with a playful reveal, make the circus popcorn baby blanket, or browse the full collection of free baby crochet patterns.
A Blanket First, a Drum When You Want the Fun Part
The best part of this project is that nothing permanent has to happen to the blanket to create the drum. There is no stuffed insert, hidden form or sewn-on fastening system. Remove the two keeper hoops, open the roll and you have the same soft striped stroller blanket you crocheted at the beginning.
The antique-gold edging does more than frame the blue and white stripes. It becomes part of the reveal. Once the blanket is folded and rolled, that narrow raised border winds across the top in a visible spiral while the separate gold hoops finish the upper and lower edges of the drum.
If you make this as a gift, I would include the keeper hoops separately with a simple note that they are for the rolled display only and should be removed and stored away before the blanket is used with a baby. That makes the transformation easy to understand without asking the recipient to figure out what the two small crochet bands are for.
And when the drum has had its moment, unroll it. A handmade blanket should still earn its keep.
Troubleshooting the Rolled Circus Drum Shape
The flat blanket can be perfectly crocheted and still need a little adjustment the first time you roll it. The drum depends on an even fold, an even roll and keeper hoops that fit the finished blanket rather than a theoretical measurement.
If the drum is wider at the top than at the bottom: Unroll it and check the lengthwise fold. The two long gold edges should meet evenly from one short end to the other. A crooked fold creates a tapered roll.
If the blue and white stripes lean diagonally: The blanket is probably being pulled sideways as you roll. Unroll several inches, square the short edge and continue with even pressure from both hands.
If the gold spiral disappears inside the top: Check that the two long gold-bordered edges are together at the top before you begin rolling. Do not tuck those edges between the layers. They need to remain visible as the roll winds inward.
If the center of the spiral sticks up: The first few inches were rolled more loosely than the outer layers. Open the roll and make the center slightly firmer. Keep it soft enough that the crochet is not crushed.
If the keeper hoops slide down: Remake that hoop slightly shorter. Test the band around the actual rolled blanket before closing the seam. A keeper hoop should grip with light tension but should not squeeze a deep groove into the blanket.
If a keeper hoop is difficult to slide into position: Do not force it over the roll. Add enough ribbed rows to increase its circumference, then join it again. The hoop should be removable without pulling or stretching the blanket border.
If the drum will not stand neatly for display: Check the bottom fold before changing anything else. The lower edge of the folded blanket should remain level as you roll. Set the finished drum on a flat surface and gently straighten the layers inside the keeper hoops.
Do not solve an uneven drum by making the keeper hoops extremely tight. The hoops are there to retain a properly folded roll, not to compress an uneven blanket into shape.
The finished drum does not need to look rigid or machine-made. It should still look like what it is: a soft crochet blanket that has been cleverly folded and rolled into a circus drum for display.
Pattern Checkpoints at a Glance
Before finishing the project, use these measurements and counts to catch a problem while it is still easy to fix.
- Foundation chain: 86 chains
- Stitches per blanket row: 84 hdc
- Total blanket rows: 98
- Total color stripes: 14
- Rows per stripe: 7
- Royal blue stripes: 7
- White stripes: 7
- Blanket body before border: approximately 24 by 34 inches
- Gold setup stitches on each short side: 84 sc
- Gold setup stitches on each long side: 120 sc
- Raised cable pairs on each short side: 42
- Raised cable pairs on each long side: 60
- Finished gold border: approximately 3/4 inch wide
- Finished blanket: approximately 25.5 by 35.5 inches
- Keeper hoops: 6 sc wide, worked in back-loop-only single crochet until each band fits its measured position on the actual roll
- Rolled drum height: approximately 12.5 to 13 inches
Do not use the rolled drum diameter as a pass-or-fail measurement. Worsted weight yarns vary too much in loft and compression for that number to be exact. If the blanket measurements are close, the stripes are even, the border lies flat and the keeper hoops hold the roll with light tension, the construction is doing what it should.
Most important, check the project in both forms. The open blanket should lie comfortably flat, and the folded blanket should roll without forcing the border or stretching the keeper hoops. Neither version should depend on hiding a construction problem in the other.
Changing the Circus Drum Colors Without Changing the Pattern
The royal blue, white and antique-gold palette gives this blanket its vintage circus look, but the construction does not depend on those exact colors. You can change the palette without changing the stitch counts, stripe widths or rolling instructions.
Keep all 14 stripes at 7 rows each. Changing the number of rows in individual stripes can make the outside of the rolled drum look uneven and will also change the finished blanket length.
For the clearest drum effect, choose two body colors with noticeable contrast. A dark color beside white, ivory or another light shade makes the vertical sections easy to see after the blanket is rolled.
The third color should remain distinct from both stripe colors because it has two jobs. It outlines the flat blanket and creates the raised edging and removable hoops that make the rolled version read as a drum.
Other combinations that can keep the same vintage character include navy and ivory with antique gold, deep green and white with muted brass-gold, or burgundy and ivory with warm gold.
If you substitute yarn, stay with the same weight and make another gauge swatch before starting the full blanket. A yarn that is much thicker or loftier can change both the flat dimensions and the diameter of the rolled drum, even when the stitch counts stay exactly the same.
For more help comparing fibers and washable options before making a substitution, see the guide to choosing the best yarn for a baby blanket.
I would keep the gold border rather than matching it to one of the stripe colors. That narrow contrasting edge is what lets the spiral show across the top when the blanket is rolled.
Make the Drum Display Easy to Understand When You Give It as a Gift
If you are giving the blanket already rolled into its drum shape, include a short note with the two keeper hoops so the recipient knows they are removable display pieces.
A simple note can say: Remove both gold keeper hoops before using the blanket with a baby. To remake the drum, fold the blanket lengthwise, roll it from one short end, then slide the hoops back into place.
That small explanation makes the transformation much easier to appreciate. Otherwise, someone seeing the rolled blanket for the first time may assume the gold bands are permanently attached.
The circus drum is meant to be the surprise, not a puzzle.
Once the hoops are removed, the project becomes a straightforward striped stroller blanket with a textured gold border. When it is time to put it away or display it again, fold, roll and add the hoops.
If this project has you in the mood for more circus crochet, the circus popcorn baby blanket turns another striped blanket into something completely different when it is rolled. You can also browse more free baby crochet patterns for blankets, loveys and other handmade baby projects.
This free crochet clown pattern makes a vintage-style doll with a pointed hat, ruffled collar and embroidered face that is an excellent companion piece for the crocheted drum.
Final Check Before You Gift or Display the Blanket
Give the project one last check in both forms before wrapping it up. A transforming blanket has to work as a blanket first and as a drum second.
- Lay the blanket completely flat. Check that the striped body is close to 25.5 by 35.5 inches including the border and that the gold edging does not pull the corners inward.
- Check every yarn end. Make sure the blue, white and gold tails are securely woven in and trimmed. Pay extra attention to the color-change edges and the joins in the gold border.
- Fold and roll the blanket once more. The blue and white stripes should stay upright around the drum, while the paired gold edges form the visible spiral across the top.
- Test each keeper hoop separately. Both bands should slide into place with light tension and hold the roll without squeezing deep grooves into the crochet.
- Remove the hoops again. Make sure the blanket opens easily and returns to its flat shape without stretched stitches or a permanent crease.
If you are gifting the blanket in its drum form, tuck the removable hoops and the simple use note with the project so there is no question about taking them off before the blanket is used with a baby.
Then roll it up one last time and enjoy the reveal. From the front it looks like a little royal blue, white and gold circus drum. Open it up and there is a useful stroller blanket hiding inside.
How This Drum Blanket Differs From the Popcorn Blanket
Both projects begin with stripes and end with a surprise when the blanket is rolled, but the construction is quite different.
The circus popcorn baby blanket uses separate red and white crochet strips joined together and popcorn clusters along the short edges. Its rolled shape depends on bringing the popcorn edges together so they appear to spill from the top of a striped bucket.
This circus drum blanket is worked as one seamless blue and white rectangle. The antique-gold cable border goes around all four sides, and the two removable gold keeper hoops are what hold the finished roll in place for display.
The top is different, too. There is no separate drumhead. When you fold this blanket lengthwise and roll it, the long gold-bordered edges wind around with the fabric. That is why the finished drum shows a soft blue, white and gold spiral when viewed from above.
If you prefer very simple crochet stitches with more assembly afterward, the popcorn version may appeal to you. If you would rather crochet one continuous blanket and add a more decorative border, this drum pattern keeps the main body seamless.
Either way, unrolling the project should reveal a real blanket rather than a prop disguised as one. That is what makes these circus patterns fun to give.
Why the Gold Border and Keeper Hoops Do Different Jobs
The gold pieces may look like one decorative detail when the blanket is rolled, but they serve two different purposes.
The raised gold border belongs to the blanket. It frames all four sides when the blanket is open and creates the gold line that winds through the top spiral after the blanket is folded and rolled.
The two keeper hoops belong only to the drum display. They provide enough tension around the outside of the roll to keep the blanket from slowly opening. Because they are separate, the blanket does not need buttons, ties, elastic sewn into the edge or another fastening system that would remain attached during use.
I would not substitute a long crochet tie for the keeper hoops. A tie changes the clean drum shape, can loosen unevenly and leaves extra cord to manage. The fitted closed hoops are simpler: slide them on for display and remove them completely before the blanket is used.
After washing, roll the dry blanket again before deciding that a keeper hoop needs adjustment. Some yarns relax slightly after laundering. If a hoop becomes too loose, open its seam, remove one or more ribbed rows, and rejoin it. If it becomes too snug, add rows instead of stretching the band aggressively.
Keep the two systems separate: The permanent 3/4-inch gold cable border is part of the usable blanket. The wider ribbed gold hoops are removable display accessories and should be stored away from the baby whenever the blanket is open for use.
That distinction also keeps the transformation honest. Nothing hidden inside the blanket makes the drum work. You can see exactly what creates the shape: one striped blanket, its crocheted border and two removable bands.
Keep the Stripe Changes and Side Edges Neat
The gold border will hide small color-change tails, but it will not hide a wavy blanket edge. Take a few seconds at the end of every row to check that you still have 84 half double crochet stitches.
When you reach the last stitch of Row 7 in a color stripe, begin the final hdc with the old color. Yarn over and pull up a loop as usual. When three loops remain on the hook, use the new color for the final yarn over and pull it through all three loops.
Turn, chain 1 and begin the next row with the new color.
Fasten off the previous color rather than carrying it through the next seven rows. Carrying unused yarn that far along the edge can create a bulky ridge, and this project needs reasonably smooth long edges for the gold setup round.
Leave each yarn tail long enough to weave securely through several stitches on the wrong side. Do not knot the blue and white yarns together at the color changes.
Check the first and last stitch of every row. The turning chain does not count as a stitch, so work the first hdc into the first actual stitch and the final hdc into the last actual stitch. Missing either one repeatedly will make the 34-inch edge slope inward.
Easy checkpoint: After each seven-row stripe, count 84 stitches across and look down both side edges. If one side has started stepping inward or outward, correct it before adding another stripe. The straighter those row ends are now, the easier it will be to place the 120 gold setup stitches evenly later.
Do not worry if the raw row ends look slightly textured before the border is added. The first gold setup round will organize those edges. What matters is that every stripe has seven complete rows and the blanket keeps a consistent rectangular shape.
Storing the Blanket in Its Rolled Drum Shape
The blanket can stay rolled for short-term display, but do not cinch the keeper hoops tighter just to make the drum look more rigid. The crochet should remain soft enough to open without stretched stitches or deep impressions from the bands.
Before storing it as a drum, make sure the blanket and both keeper hoops are completely dry. Fold the blanket lengthwise, align the two gold long edges, and roll it with even pressure from one short end to the other.
Slide the keeper hoops into position only after the roll is even. Place one near the upper edge and one near the lower edge, then check that neither band is digging into the blue and white stitches.
If the blanket has been stored rolled for an extended period, remove the hoops and open it before use. Smooth the blanket flat by hand and allow the yarn to relax. If needed, reshape it according to the care instructions for the yarn you used.
For longer storage, I would keep the blanket folded rather than tightly rolled. Store the two keeper hoops separately with the blanket so they do not become stretched around the drum for long periods.
The drum is meant to be a clever display option, not the only way this blanket can live on a shelf. Keeping the crochet relaxed will help both the flat blanket and the rolled version keep their intended shape.
What to Do if Your Gauge Changes the Drum Size
This pattern is designed around a finished blanket close to 25.5 by 35.5 inches, but crochet fabric is never completely identical from one maker to another. A small difference in gauge will not ruin the project. It will change the rolled drum more than it changes the usefulness of the flat blanket.
If your blanket is slightly wider than 24 inches before the border: The finished drum will be a little taller after the blanket is folded lengthwise. If the fabric lies flat and the difference is less than about an inch, there is no need to remake it.
If your blanket is slightly narrower: The rolled drum will be shorter. Again, a small difference is acceptable as long as the blanket remains rectangular and the finished size still works for you.
If the 34-inch length is longer than planned: Expect a thicker rolled drum because there is more fabric winding around the center. Make the keeper hoops only after you have rolled the completed blanket and measured its actual circumference.
If the blanket is shorter than 34 inches: The drum will have fewer layers and a smaller diameter. Do not add an odd number of rows simply to reach the measurement. Keep every stripe at 7 rows so the blue and white pattern remains even.
If you need additional length, add one complete royal blue stripe and one complete white stripe, 7 rows of each. This adds 14 rows while preserving the alternating pattern. Remember that a longer blanket will create a larger roll and will require keeper hoops fitted to that new circumference.
Do not chase an exact drum diameter. The flat blanket measurements, even stripe sequence and properly fitted keeper hoops are the useful checkpoints. Yarn loft and rolling pressure can change the diameter even when two blankets have identical stitch counts.
If your gauge is far enough from the pattern that both dimensions are changing noticeably, stop before adding the gold border. Changing hook size and remaking a few rows is easier than trying to correct the proportions after the border and keeper hoops are finished.
Choose Yarn That Works in Both the Blanket and Drum Shapes
This project asks the yarn to do two different jobs. The open blanket should feel soft and flexible, but the same fabric also needs enough body to make a tidy roll instead of collapsing when the keeper hoops are added.
A smooth worsted weight yarn with moderate loft is a good fit. Very limp yarn can make the drum sides sag, while an unusually stiff yarn can make the folded blanket bulky and difficult to roll evenly.
Look for:
- a washable worsted weight yarn
- clear stitch definition for the raised gold cable border
- enough softness for a stroller blanket
- moderate spring or body so the rolled layers hold their shape
- similar thickness in the royal blue, white and antique-gold colors
Avoid replacing the antique-gold yarn with metallic cord, rope or decorative trim. The gold border needs to bend through the top spiral, and the keeper hoops need enough flexibility to slide over the rolled blanket.
Also avoid mixing yarn weights just to make the gold details look heavier. A much thicker gold yarn can distort the border, change the finished measurements and create bulky ridges when the blanket is rolled.
Before buying all three colors, make the gauge swatch with the yarn you plan to use for the body. Then work a few crossed front-post stitches in the gold yarn around the edge of the swatch. That quick test tells you whether the raised detail is visible without becoming stiff.
The guide to choosing yarn for a baby blanket can help if you are comparing fibers, care instructions and washable options.
Useful test: Fold your finished gauge swatch in half and roll it loosely. If the fabric bends without fighting the fold and springs back reasonably well when opened, the yarn is a better candidate for this transforming blanket than one that feels either floppy or rigid.
Before You Change the Stitch or Blanket Size
This pattern is more sensitive to changes than an ordinary rectangular baby blanket because the finished measurements affect the second form of the project. The blanket still needs to fold evenly, roll into a compact cylinder and leave the gold edging visible across the top.
If this is your first circus drum blanket, I recommend making the original size before changing the stitch pattern or proportions.
Changing the body stitch: You can substitute another flat, reversible crochet stitch, but make a new gauge swatch first. A heavily textured stitch may make the roll much thicker and can hide the clean blue and white stripe pattern around the drum.
Changing the width: Adding foundation stitches makes the open blanket wider and the folded drum taller. If you change the foundation count, keep the resulting blanket-row stitch count even so the short-side border can still be worked in complete crossed cable pairs. The starting chain should be 2 chains more than the number of HDC you want in each row.
Changing the length: Add or remove complete pairs of stripes rather than altering individual stripe widths. One royal blue stripe plus one white stripe adds 14 rows and preserves the alternating color sequence. If you change the total row count, recalculate the long-side gold setup count for the new length and keep that count even so the cable round can still be worked in complete crossed pairs. Do not automatically use the original 120-SC long-side count on a blanket with a different number of rows.
Changing yarn weight: Treat this as a new size rather than a simple substitution. Bulky yarn can produce a much larger roll, while lighter yarn may create a drum that is too narrow to resemble the example. Recalculate the foundation, row count and keeper hoops from your new gauge.
Changing the gold border: Keep any substitute edging narrow and flexible. A very deep shell, ruffle or stiff cable may look attractive when the blanket is flat but can stack awkwardly when the two long edges are rolled into the top spiral.
Protect the transformation: Whatever you change, test the blanket in its folded and partly rolled form before investing time in the keeper hoops. The open blanket and the rolled drum need to work from the same piece of crochet.
There is plenty of room to personalize the colors. I would be much more cautious about changing the proportions until you have made the original version once and seen exactly how the blanket behaves when it rolls.
Right Side, Wrong Side and Blanket Orientation
Before you begin the gold border, decide which face of the striped blanket you want to use as the right side. Half double crochet looks slightly different on its two faces, so choose the side that gives you the cleanest stripe changes and most even surface.
Place a stitch marker near one corner on the right side. Leave that marker in place until the entire border is complete. It prevents the blanket from being accidentally flipped while you work the raised front-post stitches.
For this pattern:
- Right side: the face you want visible when the blanket is displayed flat
- Wrong side: the reverse face where most woven-in yarn tails should be hidden
- Short sides: the approximately 25.5-inch finished edges
- Long sides: the approximately 35.5-inch finished edges
- Drum top: formed by the two long gold-bordered edges after they are brought together during the lengthwise fold
- Drum bottom: formed by the folded center of the blanket
The raised cable effect of the antique-gold border should face toward the right side of the blanket. That keeps the decorative texture visible when the blanket is open and also lets the raised gold edging show clearly through the spiral at the top of the rolled drum.
When you prepare the blanket for rolling, lay it with the right side facing down. Bring the two long edges together so the right side becomes the outside surface of the folded blanket. After rolling, the cleaner right-side stitches will therefore remain visible around the outside of the drum.
Orientation check before rolling: The two long antique-gold edges should meet along the top of the folded blanket, the center fold should run along the bottom, and the royal blue and white bands should travel from one short end toward the other. If those three details are correct, the stripes and gold spiral will appear in the intended positions after rolling.
Recheck the Keeper Hoop Fit After Washing
The blanket and the two keeper hoops may relax slightly after their first wash, especially if you use a soft acrylic or washable wool blend. Check the fit again only after every piece is completely dry.
Fold and roll the blanket exactly as described in the pattern. Measure the upper and lower hoop positions again, then slide each dry keeper hoop into place.
The fit is correct when:
- the hoop slides over the rolled blanket without being forced
- the band stays in position when the drum is standing upright
- the hoop does not leave a deep indentation in the blue and white crochet
- the blanket does not begin to unroll underneath the band
- you can remove the hoop without pulling hard on the gold border
If a hoop has become too loose, open its joining seam and remove enough ribbed rows to improve the fit. Rejoin the ends and test it again.
If a hoop is too tight, open the seam and add ribbed rows rather than stretching the band until it fits. The keeper hoops should hold the roll with light, even pressure.
Do this final fitting before giving the blanket as a rolled drum. It is better to adjust six small stitches across a keeper band than to ask a tight hoop to reshape the entire blanket.
Remember: The keeper hoops are part of the rolled display only. Remove both bands completely and store them away from the baby whenever the blanket is open for use.
Measure Once More Before You Join the Keeper Hoops
The keeper hoops are the only pieces in this pattern that should be fitted to the finished project rather than made from a fixed row count. That is intentional. Two crocheters can follow the same blanket instructions and still produce rolls with slightly different circumferences because yarn loft and rolling pressure vary.
Finish the blanket, complete the gold border, weave in the ends, and let the crochet relax before taking the hoop measurements.
For the upper hoop: Fold and roll the blanket into its drum shape. Measure around the roll approximately 1.5 inches below the top.
For the lower hoop: Measure again approximately 1.5 inches above the bottom.
Write down the two measurements separately. Do not average them if the roll is slightly different at the top and bottom.
Work each ribbed gold strip until it is about 1/2 inch shorter than the circumference measured at its intended position. Wrap the unfinished strip around the roll before joining the ends.
The short ends should meet with gentle tension. If you need to pull hard to bring them together, add more rows. If the ends overlap without any tension, remove a few rows.
Do not copy another maker's keeper-hoop row count. Fit the hoops to your own completed blanket. That small fitting step is what lets the drum stay rolled without requiring elastic, buttons, ties or an overly tight band.
After joining each hoop, slide it into position and stand the drum upright. The blanket should remain rolled without the bands cutting deeply into the stitches.
Then remove both hoops and unroll the blanket once more. The crochet should return easily to its flat shape. If it does, the display pieces are doing their job without asking the blanket to behave like something rigid.
How to Remake the Drum After Using the Blanket
You do not need to measure everything again each time you turn the blanket back into a drum. Once the keeper hoops have been fitted, the process is quick.
- Lay the clean, dry blanket flat with the wrong side facing up.
- Bring the two long antique-gold edges together so the right side faces outward.
- Keep the folded edge level along the bottom.
- Starting at one short end, roll toward the opposite end with even pressure.
- Watch the top as you roll. The two gold edges should remain visible and wind naturally into the spiral.
- Set the roll upright and straighten the blue and white stripes if needed.
- Slide the fitted upper keeper hoop into place.
- Add the lower keeper hoop and make sure both bands sit level.
There is no need to make the roll extremely tight. A neat fold and an even roll create a better drum than compressing the blanket as firmly as possible.
If the spiral looks different each time, that is normal. This is soft crochet, not a rigid container. The recognizable details are the vertical royal blue and white stripes, the gold spiral across the top and the two removable gold hoops around the outside.
When you want the blanket again, slide off both hoops and store them safely away. The little circus drum disappears almost as quickly as it was made.
Two Crochet Techniques to Practice Before You Start the Gold Details
The striped blanket body uses basic half double crochet. The two techniques that may be less familiar are the crossed front-post stitches in the permanent border and the back-loop-only single crochet used for the removable keeper hoops.
Crossed front-post stitches: Instead of inserting the hook through the top loops of a stitch, work around the vertical post of the stitch below. Skipping one post, working around the next post, and then returning to the skipped post makes the two raised stitches cross. Repeating those pairs creates the narrow braided appearance around the blanket.
Keep the loops relaxed while crossing the stitches. Pulling them very tightly can shorten the border and make the blanket edge curl.
Back-loop-only single crochet: Insert the hook through only the back loop of each stitch instead of both top loops. The unused front loops form horizontal ridges across the fabric. When the narrow strip is turned and joined into a ring, those ridges give the keeper hoop enough flexibility to stretch slightly over the rolled blanket.
If either technique is new to you, make a small practice strip with leftover yarn before working on the finished blanket. A few minutes of practice is especially worthwhile for the gold cable border because the crossed stitches need to remain even and flexible all the way around the four sides.
Keep the two gold textures visually different: The permanent blanket border should look raised and braided. The removable keeper hoops should look ribbed. That difference helps the rolled blanket read as a drum while making it easy to tell which gold pieces stay on the blanket and which pieces come off before use.
Check the Gold Spiral Before You Finish the Drum
The top spiral is the detail that makes the rolled blanket look different from an ordinary striped blanket stored in a roll. Check it before you decide that the keeper hoops are finished.
Fold the completed blanket lengthwise with the wrong side inside and the two long antique-gold borders meeting along the top. Roll from one short end while keeping those two gold edges together.
Look straight down at the top of the roll.
A correctly rolled top should show:
- a soft spiral of blue and white crochet layers
- the narrow antique-gold border winding through the spiral
- an outer gold-edged layer rather than a separate flat circle or lid
- layers that sit at roughly the same height instead of forming a cone
If most of the gold disappears, unroll the blanket and check the fold. The two long bordered edges may have slipped apart or turned inward between the layers.
If the gold is visible only around the outside edge, keep the two bordered sides more carefully aligned as you roll. The border should travel inward with each turn of the blanket.
If the center rises above the outer layers, loosen the center slightly and reroll with more even pressure. If the center sinks deeply, begin with a slightly firmer first turn.
Do not try to make the spiral perfectly geometric. The top should still look like rolled crochet fabric. The important detail is that the gold edging remains visible enough to connect the flat blanket border with the drum appearance.
Place the 120 Gold Setup Stitches Evenly Along Each Long Side
The long sides need a little more attention than the short sides because you are crocheting into row ends instead of into 84 clearly defined stitches. Each long edge has 98 row ends, but the gold setup round needs 120 sc so the border can lie flat and support the cable round.
Rather than guessing where to add the extra stitches, divide each 98-row edge into four sections. This gives you an exact placement plan that is easy to repeat on the opposite side.
Place stitch markers after Rows 24, 49 and 73. You will have four sections:
- Section 1: 24 row ends, Rows 1 through 24
- Section 2: 25 row ends, Rows 25 through 49
- Section 3: 24 row ends, Rows 50 through 73
- Section 4: 25 row ends, Rows 74 through 98
Each section will contain exactly 30 sc when complete.
Across each 24-row section: Work 1 sc into each row end, but work 2 sc into every fourth row end. In other words, place 2 sc into row ends 4, 8, 12, 16, 20 and 24 of that section. This gives you 30 sc.
Across each 25-row section: Work 1 sc into each row end, but work 2 sc into every fifth row end. Place 2 sc into row ends 5, 10, 15, 20 and 25 of that section. This also gives you 30 sc.
Repeat the same four-section arrangement along the second long side.
Long-side stitch-count checkpoint
Count 30 sc between each pair of markers. Four sections of 30 stitches give you exactly 120 sc along the long edge. Check the blanket while it is lying flat before beginning the next border round.
This distribution keeps the extra stitches spread through the entire edge instead of concentrating them near one end. If your personal row gauge has produced visibly taller or shorter edge stitches, let the flatness of the fabric be your final check. The setup round should follow the edge smoothly without ruffling or pulling it inward.
Ready to Roll the Circus Drum Blanket
Once the stripes are even, the gold border lies flat and both keeper hoops fit with light tension, the project is finished. Lay the blanket out one last time and make sure it still works beautifully in its simplest form: a soft royal blue and white stroller blanket with a raised antique-gold crochet edge.
Then fold the two long gold edges together, roll from one short end and add the removable hoops. From the side, the blue and white bands become the drum stripes. From above, the gold-edged blanket layers form the spiral that shows exactly how the drum was made.
There is no hidden insert and no purchased braid doing the work. The transformation comes from the proportions of the blanket, the direction of the stripes, the crocheted edging and the way the finished piece is folded and rolled.
When it is time to use the blanket, remove both keeper hoops completely and store them away from the baby. Unroll the drum and the novelty disappears, leaving the useful blanket underneath.
For another circus project with a different transformation, try the circus popcorn baby blanket crochet pattern. More blankets, loveys and handmade baby projects are collected with the free baby crochet patterns.
Hide the Final Blanket Edge at the Back of the Drum
The last short edge of the blanket becomes a visible vertical line on the outside of the finished roll. You do not need to sew it closed, but positioning that edge carefully makes the drum look much neater from the front.
As you approach the final few inches of rolling, slow down and keep the top gold edges aligned. Let the last short edge settle naturally against the outside of the cylinder rather than tucking it underneath another layer.
Stand the roll upright before adding the keeper hoops. Turn it until that final edge faces the back.
Now slide the upper and lower keeper hoops into place. The hoops should cross over the final edge and help hold it flat against the roll.
From the front: You should see clean royal blue and white vertical sections with the two gold hoops running level around the drum.
From the back: A narrow vertical line will show where the blanket ends. That is normal. It is the actual edge of the rolled blanket, not a seam that needs to be sewn shut.
Do not stitch the rolled blanket closed. The drum should always be reversible. The keeper hoops provide the temporary hold, while the blanket itself remains completely free to unroll for use.
If the final edge sticks out beneath a keeper hoop, reroll the last turn with slightly firmer pressure. Do not pull the hoop tighter to hide it. A smooth outer layer gives a cleaner result and makes the blanket easier to open again.
Five Mistakes That Can Change the Finished Drum Shape
This blanket is forgiving while it is flat, but a few small construction changes become much more obvious after it is rolled. Check these points as you work rather than waiting until the keeper hoops are finished.
- Changing the number of rows in individual stripes. Keep every royal blue and white stripe at 7 rows. Unequal bands can make the vertical sections around the rolled drum look irregular.
- Losing stitches at the beginning or end of a row. Every blanket row should contain 84 hdc. A gradual decrease or increase will create a tapered rectangle, which becomes a tapered drum.
- Pulling the gold setup round too tightly. The permanent border must lie flat when the blanket is open. A tight edge can also make the gold spiral bunch when the blanket is rolled.
- Making the keeper hoops before the blanket is finished. Border thickness, yarn loft and rolling tension all affect the final circumference. Measure the completed rolled blanket first, then fit each hoop to its actual position.
- Rolling with the gold long edges tucked inside. Keep both long gold-bordered edges together along the top of the folded blanket. Those edges must remain visible as the blanket rolls if you want the antique-gold spiral to appear across the top.
A useful rule for this pattern is simple: if something looks crooked while the blanket is flat, rolling it will make that difference easier to see. Correct the rectangle, border or fold before asking the keeper hoops to hold the drum shape.
Why the Long-Side Border Uses 120 Stitches
The blanket has 98 row ends along each long side, but working only 98 single crochet stitches into those edges would make the gold border too tight for this gauge. The setup round uses 120 stitches so the edging can follow the blanket without pulling the 34-inch side inward.
That does not mean every row end receives the same number of stitches. Most row ends receive 1 sc, while selected row ends receive 2 sc. Spreading those extra stitches evenly is what keeps the border smooth.
The 120-stitch count also gives the raised cable round an even number of stitches. That allows 60 complete crossed cable pairs along each long side without leaving a partial repeat at the end.
If your setup edge lies flat at 120 stitches: keep that count.
If it visibly ripples: first check the stitch distribution and your tension. At the stated gauge, the 120 setup stitches should lie flat when they are spread according to the four-section placement plan.
If it pulls the blanket inward: check that all 120 stitches were placed according to the marked distribution and that the setup stitches were not worked too tightly.
If you intentionally change the blanket gauge, yarn weight or finished size, treat the border as a size variation and recalculate it rather than altering the original 120-stitch count while following this version of the pattern.
Let the blanket settle before deciding. Place it on a flat surface without stretching it. A correctly spaced setup round should follow the edge naturally. The border count supports the blanket. It should never force the blanket to fit the border.
This is also why the long-side setup instructions give both a stitch count and an even-placement method. The count keeps the cable pattern organized, while the flatness check accounts for the small differences that come with real yarn and individual crochet tension.
Choose Which Stripe Finishes the Outside of the Drum
Because the blanket begins with a royal blue stripe and ends with a white stripe, the end you choose for rolling changes the color of the final outside layer.
If you begin rolling from the royal blue end, the white end becomes the outermost layer of the finished drum.
If you begin rolling from the white end, the royal blue end becomes the outermost layer.
The construction works either way. I prefer finishing with royal blue on the outside because the deeper color gives the gold keeper hoops a crisp outline and makes the back edge less noticeable.
To do that, lay the folded blanket with the white short edge as your starting edge. Roll from the white end toward the royal blue end. The final royal blue section will wrap around the outside of the drum.
Keep the two long gold-bordered edges together along the top while you roll. Changing the starting end does not change the gold spiral because those long edges still wind through the top in the same way.
For the appearance shown in the example images: Start rolling at the white short edge so a royal blue stripe forms the final outside layer of the drum.
If you prefer more white showing on the finished drum, simply roll from the opposite end. Nothing in the blanket or keeper-hoop pattern needs to change.
Block the Blanket Without Flattening the Gold Cable Border
Blocking can help square the finished blanket and settle the stripe edges, but the raised gold border should keep its texture. Do not press the cable stitches flat.
Check the care instructions for the yarn before using water, steam or heat. Different fibers respond differently, and high heat can permanently change some synthetic yarns.
For gentle wet blocking:
- Wash or dampen the finished blanket according to the yarn label.
- Remove excess water without wringing or twisting the crochet.
- Lay the blanket flat on a clean surface.
- Shape it gently to approximately 25.5 by 35.5 inches.
- Straighten the royal blue and white stripes by hand.
- Arrange the gold border so all four sides lie flat and the corners remain square.
- Use your fingers to lift and define the crossed cable stitches rather than pressing them downward.
- Allow the blanket to dry completely before folding or rolling it.
If the yarn label permits steam blocking, keep the heat source above the crochet rather than pressing directly against the raised gold stitches. Let the fibers relax, then shape the border by hand.
Do not block the keeper hoops around the rolled blanket. Wash and shape the two bands separately. Let them dry completely, then refit them to the finished roll.
After blocking, check the blanket flat before making the drum again. The border should remain flexible, the cable texture should still be visible, and neither long edge should pull inward.
Then fold and roll the blanket once more. If the blocking changed the thickness of the fabric enough to affect the roll, recheck the keeper-hoop fit before using the drum for display.
Make a Simple Care and Display Note for the Finished Gift
If you are giving the blanket in its rolled drum shape, include a small care note with it. The recipient should not have to remember which pieces stay with the blanket and which pieces are only used for display.
You can write:
Circus Drum Blanket
Remove both gold keeper hoops before using the blanket with a baby, and store the hoops out of the baby's reach.
To remake the drum, fold the blanket lengthwise with the two long gold edges together. Roll from the white short edge toward the royal blue end, then slide the two gold keeper hoops into place.
Wash and dry according to the care instructions for the yarn used in the project. Wash the removable keeper hoops separately from the blanket.
I would keep the note that simple. The unusual part of the gift is easy to understand once someone knows that the two gold bands come completely off and that the blanket itself supplies the drum shape.
The pattern instructions can stay with the gift too, especially if the recipient may want to remake the drum after washing. Once the fold and rolling direction are understood, it only takes a minute to change the blanket from one form to the other.
Plan the Project in Manageable Crochet Sessions
This is not a difficult blanket body, but there are enough stitches that I would treat it as a several-session project rather than something to rush through in one sitting.
A practical way to divide the work is:
- Session 1: Make the gauge swatch and crochet the first few royal blue and white stripes.
- Session 2: Continue the striped body, checking that every row still has 84 hdc.
- Session 3: Finish all 98 rows, weave in the blue and white ends, and measure the flat rectangle.
- Session 4: Work the antique-gold setup round and raised cable border.
- Session 5: Block or gently shape the finished blanket if needed, then fold and roll it to take the keeper-hoop measurements.
- Session 6: Crochet and fit the two keeper hoops, then make the final drum-shape adjustments.
The blanket body is the part you can crochet almost on autopilot once the stripe rhythm is established. The gold border deserves more attention because even tension there affects both the flat blanket and the spiral at the top of the drum.
Do not crochet the keeper hoops early just because they are small. They are deliberately the last pieces in the pattern. Their size comes from the circumference of your own completed, folded and rolled blanket.
If you stop between color stripes, finish the current row before setting the project aside. That makes it much easier to return later without wondering whether you were on Row 5, 6 or 7 of a stripe.
Simple progress marker: After every completed 7-row stripe, move a stitch marker to the outer edge of that stripe. Fourteen finished stripes means the blanket body is complete.
There is no prize for racing the gold edging. A straight rectangle, a flexible border and two properly fitted hoops are what make the final drum reveal work.
Finish the Project in This Order
The order matters on this pattern because the keeper hoops cannot be sized correctly until the blanket, border and final shaping are complete.
- Crochet all 98 rows of the striped blanket body. Confirm that you have 14 stripes with 7 rows in every stripe.
- Weave in the royal blue and white yarn ends. Make sure the rectangle lies flat and measures close to 24 by 34 inches before adding the border.
- Crochet the antique-gold setup and raised cable border. Check that all four sides remain flat and flexible.
- Weave in the gold border ends.
- Wash or block the blanket if needed. Let it dry completely before taking any drum measurements.
- Fold the blanket lengthwise. Bring the two long gold edges together and keep the folded center along the bottom.
- Roll from the white short edge toward the royal blue short edge if you want the royal blue section to form the final outside layer shown in the example.
- Measure the upper and lower circumferences of the actual roll.
- Crochet each keeper hoop to its measured position. Test the fit before joining each band permanently.
- Join and finish the keeper hoops. Slide them into place and make the final drum-shape adjustments.
Do not make the keeper hoops from an estimated drum diameter. The finished blanket itself determines their size. Waiting until the end accounts for your yarn, tension, border thickness and rolling pressure.
Following that sequence keeps the pattern honest. You make a complete usable blanket first, then fit the removable pieces to transform blanket you actually crocheted.
Join the Keeper Hoops Without a Bulky Ridge
The keeper hoops are small pieces, so a thick seam can be surprisingly noticeable once the bands are stretched around the rolled blanket. Keep the join as flat as possible.
Before joining, wrap the unfinished ribbed strip around its measured position on the drum one last time. Make sure the short ends meet comfortably under light tension.
To join each hoop:
- Place the two short ends together with the ribbed rows aligned.
- Insert the hook through the first stitch of both layers.
- Work a slip stitch through both layers.
- Continue across, matching each of the 6 stitches with the corresponding stitch on the opposite end.
- Fasten off after the sixth join.
- Weave the yarn tail through several stitches on the inside of the band.
Turn the finished hoop so the joining ridge faces inward toward the rolled blanket. The smooth side of the band should face outward.
Do not whipstitch the seam with a heavy doubled strand or add several knots at the join. A bulky seam can make one section of the hoop sit farther away from the blanket than the rest.
Seam checkpoint: Slide the finished hoop onto the drum and rotate the seam toward the back. The band should look nearly continuous from the front and should sit at the same height all the way around the roll.
If the seam feels noticeably stiff, undo the join and remake it with relaxed slip stitches. The keeper hoop needs enough flexibility to expand slightly as it slides over the blanket and then settle back into place.
Keep the Gold Cable Border Flat at the Corners
The straight sections of the gold border use crossed front-post stitches, but the corners stay simple. Trying to force a crossed cable through the turn can make the corner bulky and cause the blanket to cup.
As you approach each corner in the cable round, finish the final crossed pair on the straight side before working into the corner stitches.
At each corner:
- Work 1 sc in the first corner hdc.
- Work 1 sc, chain 1, and 1 sc in the chain-2 corner space.
- Work 1 sc in the second corner hdc.
- Begin the next crossed cable pair with the first hdc on the new straight side.
Keep the chain-1 corner loose enough to make the turn without pulling. The corner should look neat and slightly rounded rather than sharply pointed.
After completing each side, place the blanket flat for a quick check. The gold border should turn the corner without lifting the blanket body or creating a ruffle.
Corner checkpoint: If a corner curls upward, loosen the stitches around that turn. If it flares outward, remake the corner with slightly firmer tension. Do not add extra cable stitches at the corner just to make the braid look continuous.
The uncabled corners are intentional. They let the blanket fold cleanly and keep the raised braid effect concentrated along the straight edges where it will show best in both the flat blanket and the rolled drum.
Why This Blanket Uses Half Double Crochet
Half double crochet gives this project a useful middle ground between a dense single crochet fabric and the taller, more open look of double crochet.
The stitches are compact enough to keep the royal blue and white stripes visually solid, but the fabric still bends easily when the blanket is folded and rolled. That flexibility matters because the drum shape should come from the blanket without forcing the fabric into a rigid cylinder.
A denser single crochet body would use more yarn and create a heavier roll. Double crochet would work up faster, but the taller stitches could make the blanket softer and less structured around the outside of the drum.
Half double crochet also gives the raised antique-gold border a simple background. The permanent cable edging stands out against the smoother striped body instead of competing with another heavily textured stitch.
Keep the body simple on purpose: The stripes, gold border, top spiral and removable keeper hoops already provide plenty of visual interest. A complicated blanket stitch would add bulk without helping the drum transformation.
If you prefer practicing basic blanket construction before adding the crossed-post edging, the simple chunky crochet blanket pattern is another straightforward blanket project with an uncomplicated body.
How the Stripe Sequence Changes When the Blanket Is Rolled
The flat blanket has 14 equal color bands, but you will not see all 14 as separate vertical stripes around the outside of the finished drum. Most of the stripes become inner layers of the roll.
What you see from the side depends on where each turn of the blanket lands as the cylinder becomes larger. The outermost royal blue section will be the most prominent because the pattern is rolled from the white end toward the final royal blue end.
This is normal. The drum effect does not depend on displaying all seven blue and seven white stripes around the outside at the same time.
The important visual checkpoints are:
- the outside of the roll still shows clear royal blue and white vertical sections
- the final royal blue section lies smoothly around the outer layer
- the two gold keeper hoops remain level around the cylinder
- the antique-gold blanket edging is visible in the spiral when viewed from above
Do not loosen the roll just to expose more white. A looser cylinder may show additional layers from the side, but it will be harder for the keeper hoops to hold neatly.
If you want the finished drum to show a different balance of blue and white, change the starting end rather than changing the stripe widths. Rolling from the royal blue end toward the white end will put white on the final outside layer while preserving the same blanket dimensions and construction.
The flat blanket and rolled drum will not show the stripes in exactly the same way. The flat version displays all 14 bands. The rolled version layers those bands around one another, which is what creates the transformation.
Keep the Color-Change Edge at the Back of the Finished Drum
Every seven-row stripe creates a yarn change along one long side of the blanket. Even after the tails are woven in neatly, that edge may look slightly different from the opposite side.
Use that difference to your advantage when you make the drum.
After the blanket body is finished, compare the two long sides before adding the gold border. Choose the cleaner-looking edge as the front-facing long edge and mark the opposite edge with a removable stitch marker.
The gold border will finish both sides, but the marker will still help you remember which side contains most of the color-change joins.
When you fold the finished blanket lengthwise for rolling, place the marked color-change edge slightly toward the back of the top fold rather than toward the front.
Roll the blanket as directed, then turn the completed drum until the final short edge and the less tidy color-change area are both toward the back.
Do not carry the unused yarn through seven rows to avoid these joins. Fastening off at each color change keeps the side edge flatter and prevents a thick strand from building up beneath the gold border.
The goal is not to hide the handmade construction. It is simply to place the small finishing details where they interfere least with the clean blue, white and gold drum effect from the front.
If You Crochet Left-Handed
Left-handed crocheters can use the same stitch counts, stripe sequence, measurements and keeper-hoop instructions. The blanket does not need a separate left-handed version.
The only visible difference may appear in the antique-gold cable border. Because the crossed front-post stitches are worked in the opposite physical direction, the little raised crossings may slant the opposite way from those shown in the example image.
That does not change the construction or the finished size.
For each crossed cable pair: Skip the next post, work the front-post half double crochet around the following post, then return to the skipped post and work the second front-post half double crochet.
Repeat the same sequence across the straight sides. You should still have 42 crossed pairs on each short side and 60 crossed pairs on each long side when the original setup counts are used.
Do not reverse the stripe order or rolling direction simply because you crochet left-handed. The white short edge remains the starting end for the rolled version shown on this page, and the royal blue end becomes the final outside layer.
The cable can mirror without causing a problem. What matters is that every pair crosses consistently, the border stays flexible, and the edging lies flat before the blanket is folded and rolled.
Keep the Drum Round Without Stuffing or a Hidden Form
The rolled blanket does not need cardboard, foam, batting or another insert inside the center. The drum shape comes from an even fold, a compact first turn and consistent rolling pressure.
Start with the center: Roll the first 2 to 3 inches firmly enough to create a round core. Keep the two gold-edged long sides aligned at the top while you make those first turns.
Ease the pressure slightly as the roll grows: The outer layers travel around a larger circle, so forcing them as tightly as the center can make the sides buckle or push the middle upward.
Use the tabletop as a guide: After every few turns, set the lower folded edge against a flat surface. This helps keep the bottom level while you continue rolling.
Check from above before adding the hoops: The center should sit near the same height as the outer layers, and the gold edging should wind through the blue and white layers instead of disappearing underneath them.
Check from the side: The cylinder should look soft but reasonably round. A small amount of give is expected because the drum is still a folded crochet blanket.
Do not stuff the center to make the drum look fuller. Adding a separate insert would change the project from a blanket that genuinely rolls into a drum into a blanket wrapped around another object. The finished display should be created entirely by the folded blanket and its two removable keeper hoops.
If the center opening seems too loose, unroll the blanket and begin again with a slightly firmer first turn. If the entire roll feels hard and compressed, reroll it with less pressure on the outer layers.
The finished drum should look convincing without pretending to be rigid. That slight softness is also the visual clue that there really is a blanket inside.
When you click on links to various merchants on this site and make a purchase, this may result in this site earning a commission. This does not affect the price you pay.

UBGI Gold Standard 2026
Reviewed under the site's
editorial checklist.
Photos, decorating ideas, party setups and reader submissions are shared for inspiration unless a page is specifically presented as a pattern, tutorial, reference guide or step-by-step project. Follow the instructions, measurements, safety guidance and manufacturer directions provided for the particular project or product.
About Jan | Contact | Baby Nursery Ideas (Blog) | Site Map | Privacy Policy | Disclosure Policy | Disclaimer | Affiliate Disclosure | Earnings Disclosure | Facebook | Pinterest
I am a participant in the Amazon Services LLC Associates Program, an affiliate advertising program designed to provide a means for us to earn fees by linking to Amazon. As an Amazon Associate I earn from qualifying purchases.
Copyright © 2006-2026. All Rights Reserved.