Circus Popcorn Baby Blanket Crochet Pattern
By Jan Bay
This circus popcorn baby blanket crochet pattern makes a flat red-and-white stroller blanket that turns into a popcorn-bucket display when it is folded and rolled upright. The trick is structural, not complicated: narrow alternating stripes form the bucket and the popcorn clusters belong only on the two short ends. It works as a circus baby shower gift, nursery accent, photo prop, or stroller blanket.
More Circus Baby Ideas
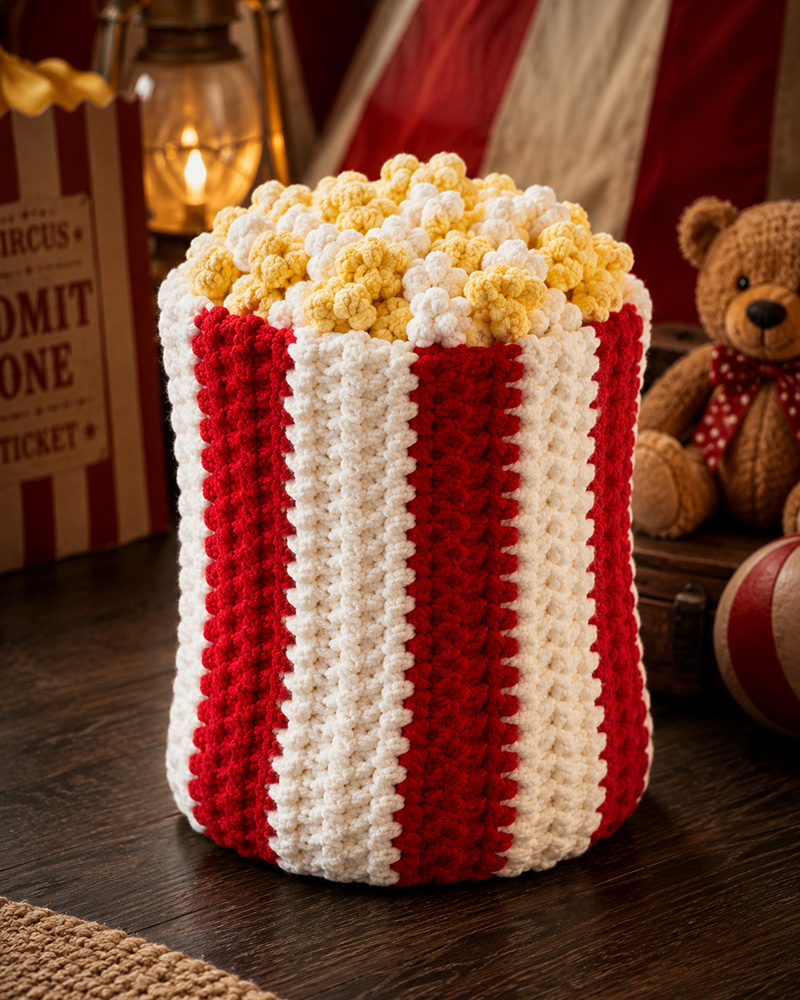
For this circus baby blanket project, look for washable super bulky blanket yarn in red, white, pale yellow, and cream.
Jump to the Circus Popcorn Blanket Details
Supplies for the Circus Popcorn Baby Blanket Crochet Pattern
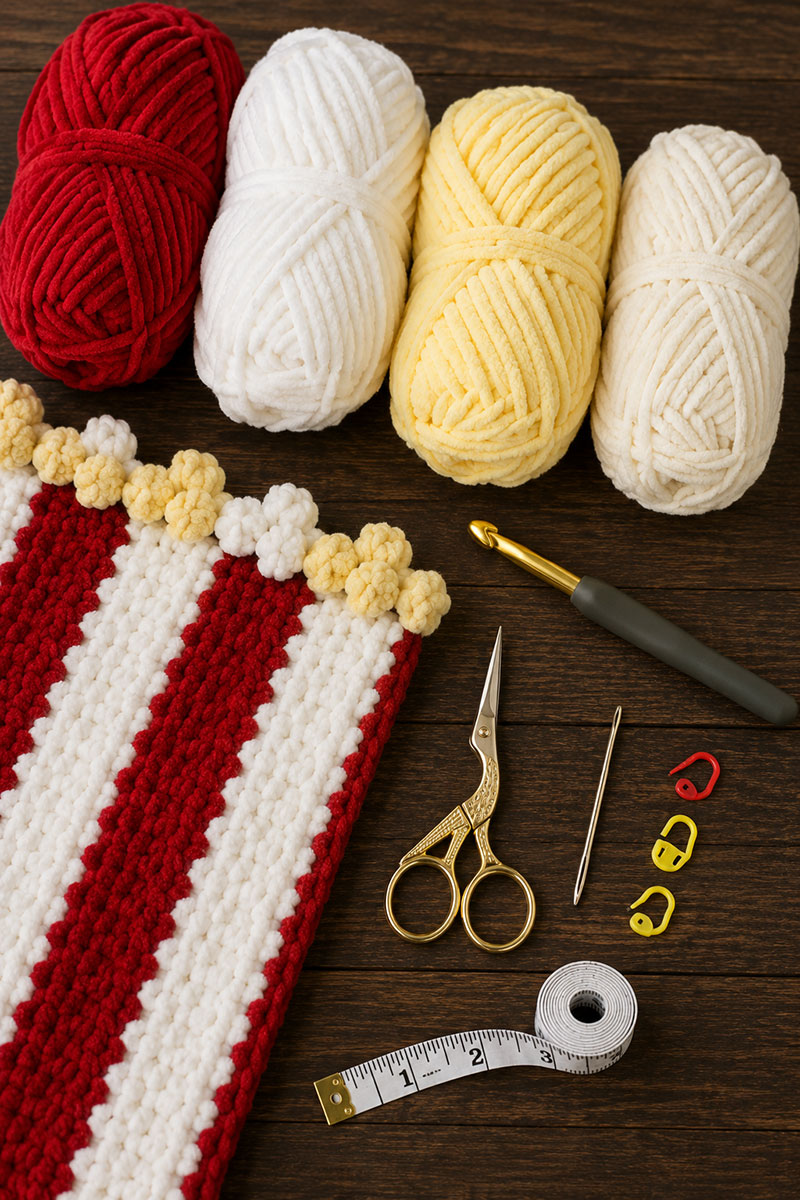
Quick answer: This circus popcorn baby blanket crochet pattern creates a flat striped blanket with popcorn-style crochet clusters only on the top and bottom edges so the blanket rolls into the look of a classic red-and-white popcorn bucket.
When the finished blanket is laid across a chair, it looks like a simple striped throw. Once it is folded, rolled, and stood upright, the red-and-white stripes and clustered edging create the look of a classic popcorn box. That transformation is the main feature of the design.
Blunt answer: The popcorn only belongs on the two short ends.
For a different circus construction, the crochet circus drum baby blanket pattern uses blue and white stripes, antique-gold edging and an optional circus elephant appliqué.
This project works as a stroller blanket, circus baby shower gift, nursery prop, or folded shelf accent. For another warm handmade option for supervised outings, see these hooded baby blanket ideas and patterns. Do not place either style in a crib, bassinet, play yard, or other infant sleep space. For infant sleep, use a firm, flat surface with only a fitted sheet and keep blankets and other soft items out of the sleep area. The U.S. Consumer Product Safety Commission provides current guidance at CPSC Safe Sleep.
Finished size: approximately 30.5 to 32 inches wide by 38 inches long for the striped blanket body before the popcorn edging is added. The completed blanket will be slightly longer after the popcorn clusters are added to both short ends, with the exact overall dimensions depending on yarn thickness, seam tension, and individual crochet tension.
Skill level: advanced beginner. The stitches are simple, but the pattern requires making 17 matching strips, joining long seams evenly, and adding popcorn clusters along both short edges.
Gauge: 4 single crochet stitches should measure approximately 1.8 to 1.9 inches wide using super bulky blanket yarn and a 9 mm hook. Row gauge may vary, so continue each strip until it measures approximately 38 inches long. Check the width of your first strip before making the remaining 16 strips because all 17 strips must match in both width and length.
Because super bulky fibers vary considerably in softness, weight and washability, review this guide to choosing yarn for a baby blanket before purchasing the full amount for all four colors.
Estimated yarn: These quantities are planning estimates and actual use will vary with the yarn selected, individual tension and joining method.
- Red super bulky blanket yarn: approximately 250 to 290 yards
- White super bulky blanket yarn: approximately 290 to 335 yards
- Pale yellow super bulky blanket yarn: approximately 70 yards
- Cream super bulky blanket yarn: approximately 50 yards
Hook: 9 mm crochet hook.
Other supplies: yarn needle, scissors, locking stitch marker, pins or crochet clips, measuring tape.
super bulky blanket yarn color options
The striped layout created with this circus popcorn baby blanket crochet pattern pairs naturally with a circus baby shower theme because it looks so much like a box of red and white carnival popcorn. It fits right into a circus nursery theme when the room already has red accents or vintage carnival decor.
How to Crochet the Circus Popcorn Baby Blanket
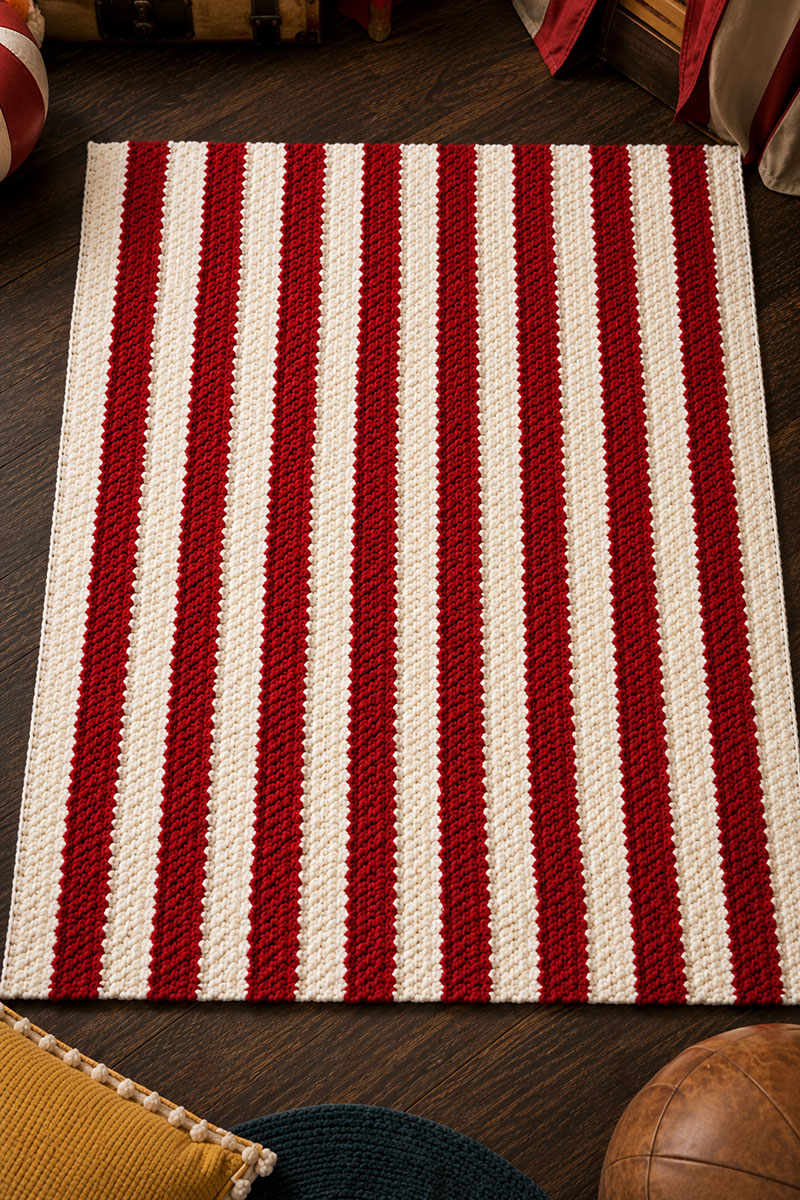
This core baby-size pattern is written to reproduce the alternating stripe layout shown in the finished project images. The photographed blanket has 17 narrow vertical strips: 9 white and 8 red, beginning and ending with white. The adult-size instructions farther down the page are a separate calculated variation and are not the size shown in the finished photographs.
Because super bulky yarns vary in thickness and tension, check the stated strip measurements as you work instead of relying only on stitch and row counts.
The blanket is made from long vertical strips that are sewn together afterward. This construction method keeps the stripes straight and creates the tall popcorn-box appearance when the completed blanket is folded and rolled for display.
You will make:
- 9 white strips
- 8 red strips
Stripe order from left to right:
White, red, white, red, white, red, white, red, white, red, white, red, white, red, white, red, white.
Each finished stripe width: about 1.8 to 1.9 inches.
Each finished stripe length: about 38 inches.
Each stripe uses the same stitch count and the same total row count. Crochet the first strip until it measures approximately 38 inches long, record the number of completed rows, and make each of the remaining 16 strips with that same row count.
For every stripe:
Chain 5.
Row 1: Single crochet into the second chain from the hook and into each remaining chain. You will have 4 stitches.
Rows 2 and beyond: Chain 1 and turn. The turning chain does not count as a stitch. Work 1 single crochet into each of the 4 stitches across, taking care not to work into the turning chain. Continue until the first strip measures approximately 38 inches long. This may require about 76 rows. Count and record the completed rows, then use that same row count for all 17 strips so the row ends align during joining.
Fasten off and leave a yarn tail approximately 72 to 90 inches long for joining. This provides enough yarn for the 38-inch mattress-stitch seam and for securing and weaving in the end. If you prefer working with shorter lengths, fasten off normally and join each pair of strips with a separate length of matching yarn, securing and weaving in each section before continuing.
Repeat until all 17 strips are complete.
Finished strip checkpoint: Before joining, each strip should measure about 1.8 to 1.9 inches wide and 38 inches long. If one strip is longer, remove or add rows before sewing. Do not stretch shorter strips to match longer ones.
Lay all 17 strips flat in the correct stripe order before joining. This is the stage where one strip can easily be flipped or stretched more tightly than its neighbor.
Before sewing each seam, align the top corners first, then pin or clip the strips together at the top, middle, and bottom. Keep both right sides facing upward and check that the row ends still line up before beginning the seam.
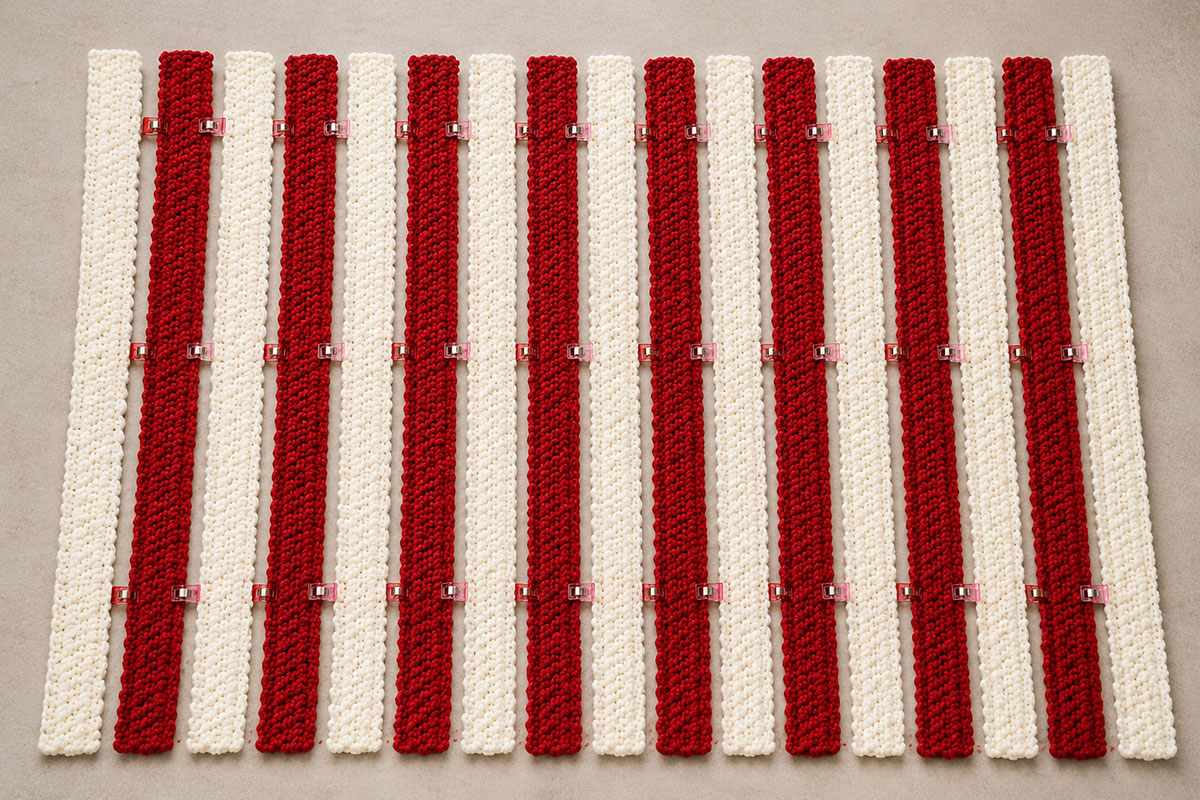
Joining instructions:
Place the first white strip beside the first red strip with both right sides facing upward and the long edges touching.
Thread the long yarn tail onto a yarn needle.
Insert the needle under the horizontal edge bar at the end of the first row on one strip. Then insert it under the corresponding edge bar on the adjacent strip.
Continue alternating between the two strips, matching one row end on the red strip with the same row end on the white strip.
After joining several inches, gently pull the yarn until the seam closes. Do not pull tightly because an overly tight seam will shorten the joined edge and make the blanket ripple.
Continue to the end of the strips, fasten securely, and weave in the yarn end.
Repeat this process until all 17 strips are connected in the correct white-and-red order.
After assembly, the blanket should lay flat with straight vertical stripes matching the reference photo.
Popcorn Border Placement for the Bucket Look
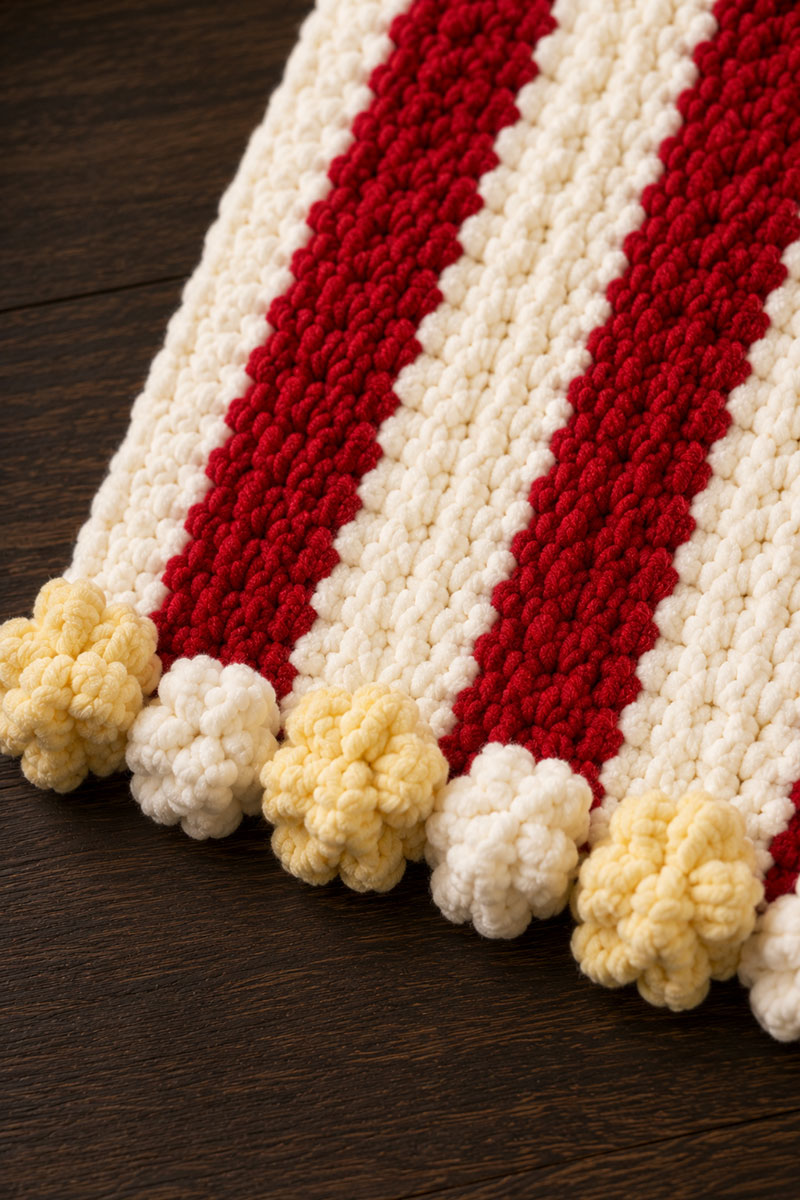
The popcorn edge should only appear across the two short ends. The long side edges remain plain.
That placement is what creates the illusion of popcorn overflowing from the top of a striped popcorn box when the blanket is rolled.
Top edge setup row:
Make a slip knot with white yarn and place it on the hook. Insert the hook into the first stitch, yarn over, and pull up a loop. Yarn over again and pull through both loops to complete a standing single crochet. This counts as the first stitch.
Work 1 single crochet into each of the remaining 67 stitches across the ends of all 17 strips. Do not add a beginning chain.
Because there are 17 strips with 4 stitches each, you should have exactly 68 single crochet stitches across the short edge.
Fasten off.
Repeat the same setup row across the bottom short edge. You should also have exactly 68 single crochet stitches along that edge.
Popcorn cluster row:
Place the assembled blanket with the right side facing upward. Work the popcorn clusters from this side so they project toward the front of the blanket.
Join pale yellow yarn with a slip stitch in stitch 1. This joining slip stitch counts as the slip stitch worked into stitch 1.
Make the first popcorn cluster in stitch 2: Chain 3, then work 4 double crochet stitches into the same stitch. Remove the hook from the working loop, insert the hook into the top of the beginning chain 3, pick up the dropped loop, and pull it through. Chain 1 to close the popcorn cluster.
Continue across: Slip stitch into each of the next 3 stitches, then make one popcorn cluster in the next stitch. Repeat this three-slip-stitches-plus-one-cluster sequence exactly 16 times after the first popcorn cluster.
You should finish with exactly 17 popcorn clusters, with one cluster positioned within each four-stitch stripe.
The final popcorn cluster is worked in stitch 66. Slip stitch into stitches 67 and 68 and fasten off.
Rotate the blanket 180 degrees without flipping it so the same right side remains facing upward. Repeat the complete popcorn cluster row across the other short edge. Both rows of popcorn clusters should project toward the same side of the blanket.
This placement preserves all 68 stitches across each edge and prevents the blanket from gathering or curling inward.
Changing popcorn colors: Keep pale yellow as the working yarn for the slip stitches between clusters. When the next popcorn cluster should be cream, remove the pale yellow working loop from the hook and secure it temporarily with a locking stitch marker. Join cream yarn in the stitch where the next popcorn cluster is scheduled, make and close the cream popcorn cluster, and fasten off the cream yarn. Return the pale yellow loop to the hook and continue in the next stitch after the cream cluster.
Carry the pale yellow yarn loosely behind only the single stitch occupied by the cream cluster. Do not carry either color across several stitches because long strands may show or become caught during use.
A simple color layout for the 17 clusters is: pale yellow, pale yellow, cream, pale yellow, cream, pale yellow, pale yellow, cream, pale yellow, pale yellow, cream, pale yellow, cream, pale yellow, pale yellow, cream, pale yellow.
Important: Keep the popcorn row slightly loose.
If the clusters are pulled tight, the blanket edge curls inward and loses the popcorn-bucket shape.
Finishing: Remove every pin, clip and locking stitch marker used during construction or color changes. Weave in all remaining yarn ends securely on the wrong side of the blanket, including the seam, setup-row, pale yellow, cream, and white yarn ends. Trim the ends only after they are secure. Lay the blanket flat, gently shape it to the finished measurements, and check that no loose strands or temporary construction items remain before using or gifting it.
Final measurement check: The striped blanket body should measure approximately 30.5 to 32 inches wide by 38 inches long. The completed blanket will be slightly longer after the popcorn clusters are added to both short ends. Both short edges should contain 68 stitches and should remain approximately the same width as the blanket body without gathering or curling inward.
The finished blanket should now have a red-and-white striped layout with popcorn edging across both short ends. When folded and rolled upright, those elements create the popcorn-bucket appearance, although the exact proportions may vary slightly with yarn thickness and crochet tension.
How to Make an Adult Size Circus Popcorn Blanket
If you would like a larger version for an adult, you can scale the same narrow-strip construction into an approximately 49 to 51 inch wide by 66 inch long striped blanket body before the popcorn edging is added. The completed throw will be slightly longer after the popcorn clusters are added to both short ends.
This adult size is a calculated variation of the core baby blanket pattern. It uses the same hook, gauge, strip construction, joining method and popcorn placement, but the larger finished size and yarn quantities have not been made as a separate sample shown in the photographs on this page.
I would keep the narrow stripe rhythm instead of making the adult stripes wider. Those repeated narrow bands are what keep the rolled blanket reading as a popcorn bucket instead of a generic striped throw.
For the adult size, make:
- 14 white strips
- 13 red strips
You will have 27 strips altogether.
Adult stripe order from left to right:
White, red, white, red, white, red, white, red, white, red, white, red, white, red, white, red, white, red, white, red, white, red, white, red, white, red, white.
Each finished stripe width: about 1.8 to 1.9 inches at the stated gauge.
Each finished stripe length: about 66 inches.
Make each strip exactly as described in the baby blanket pattern. Chain 5, work 4 single crochet stitches across each row, and continue until the first strip measures approximately 66 inches long. Record the number of completed rows and use that same row count for all 27 strips.
Your row count may be around 132 rows if your row gauge is similar to the smaller blanket, but use the 66 inch finished measurement as the deciding checkpoint rather than relying on an estimated row count.
Joining the adult size: Lay all 27 strips flat in the stated alternating color order and join the long edges using the same mattress-stitch method described for the baby blanket.
Because the adult strips have approximately 66 inch seams, fasten off the strips normally and use separate manageable lengths of matching yarn for joining instead of using the long joining tail specified for the smaller blanket. Secure and weave in each joining length before starting the next section of the seam.
Pin or clip each pair of strips together at several points before sewing. Match corresponding row ends and keep the joining tension loose enough that the 66 inch edges do not shorten or ripple.
Estimated yarn for the adult throw:
- Red super bulky blanket yarn: approximately 775 to 900 yards
- White super bulky blanket yarn: approximately 850 to 1,000 yards
- Pale yellow super bulky blanket yarn: approximately 125 yards
- Cream super bulky blanket yarn: approximately 90 yards
These adult-size yardages are planning estimates based on scaling the smaller blanket construction and include extra yarn for variation in tension and finishing. Actual yarn use will vary with the yarn selected, individual tension and joining method.
Adult border setup row: Work the popcorn edging only across the two short ends, just as you do for the baby blanket.
Because the adult version has 27 strips with 4 stitches across each strip, each short edge contains exactly 108 stitches.
With white yarn, work 1 single crochet into each of the 108 stitches across the first short edge. Fasten off and repeat across the opposite short edge. You should have exactly 108 single crochet stitches on each end.
Adult popcorn cluster row: Place the blanket with the right side facing upward. Join pale yellow yarn with a slip stitch in stitch 1.
Make the first popcorn cluster in stitch 2 using the same popcorn-cluster method described in the original border instructions.
After the first popcorn cluster, slip stitch into each of the next 3 stitches and make one popcorn cluster in the next stitch. Repeat this three-slip-stitches-plus-one-cluster sequence exactly 26 times after the first popcorn cluster.
You should finish with exactly 27 popcorn clusters, with one cluster positioned within each of the 27 stripes.
The final popcorn cluster is worked in stitch 106. Slip stitch into stitches 107 and 108 and fasten off.
Rotate the blanket 180 degrees without flipping it and repeat only the 27-cluster popcorn row across the opposite short edge, working into the 108-stitch white setup row already completed there. Do not add a second setup row.
If you want to mix pale yellow and cream popcorn clusters, use the same color-changing method described for the baby blanket. One simple 27-cluster color order is: pale yellow, pale yellow, cream, pale yellow, cream, pale yellow, pale yellow, cream, pale yellow, pale yellow, cream, pale yellow, cream, pale yellow, pale yellow, cream, pale yellow, pale yellow, cream, pale yellow, cream, pale yellow, pale yellow, cream, pale yellow, pale yellow, cream.
Final adult-size checkpoint: Before the popcorn edging, the joined striped body should measure approximately 49 to 51 inches wide by 66 inches long. Both short edges should contain exactly 108 stitches. After the border is complete, each short edge should have exactly 27 popcorn clusters and should remain approximately the same width as the blanket body without gathering or curling inward.
Adult finishing: Remove every pin, clip and locking stitch marker used while joining or changing colors. Weave in all remaining yarn ends securely on the wrong side, trim only after the ends are secure, and check the entire blanket for loose strands or temporary construction items before using or gifting it.
How to Roll the Blanket Into the Popcorn Bucket Shape
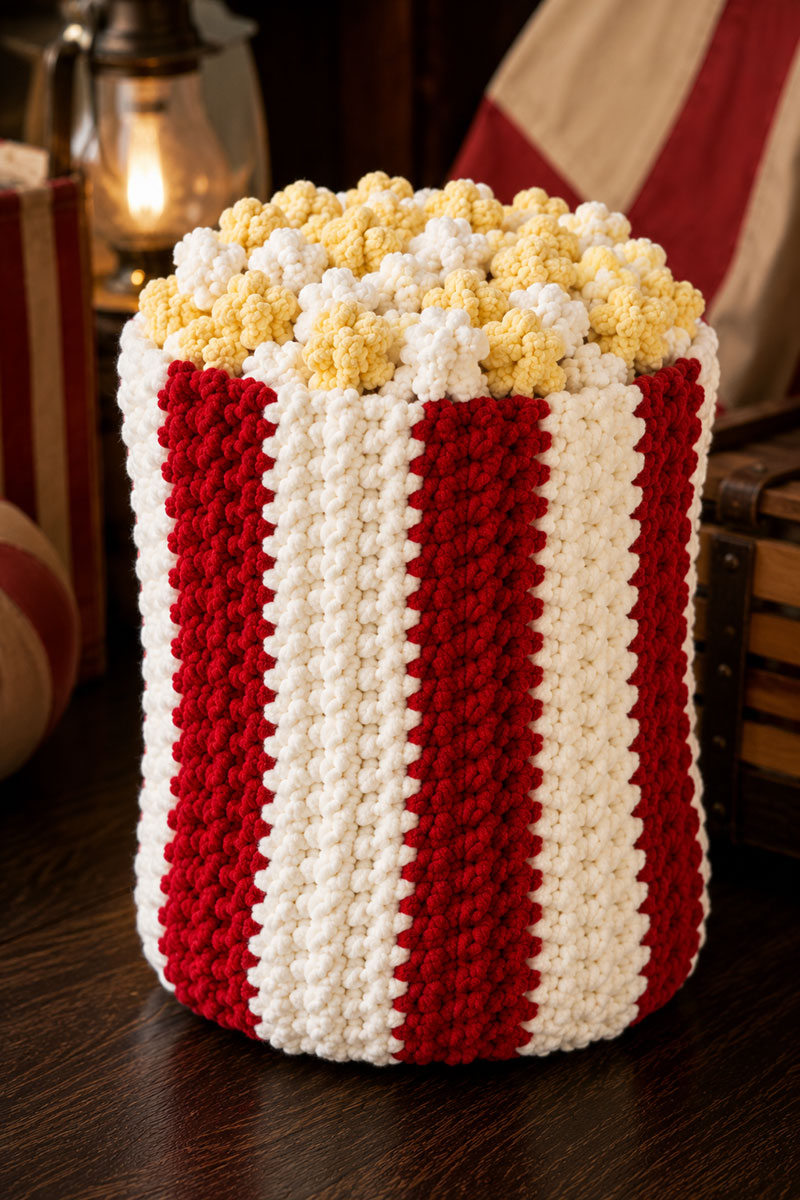
The rolled shape is what creates the classic carnival popcorn illusion.
Lay the blanket flat with the side from which the popcorn clusters project facing upward and the red-and-white stripes running vertically.
Bring the bottom popcorn edge upward behind the blanket to meet the top popcorn edge. The two rows of popcorn clusters should sit back-to-back at the top, with one row facing forward and the other facing backward, rather than facing each other inside the fold.
With the two popcorn edges aligned at the top, fold the closed lower edge upward behind the blanket until the folded piece is the height you want for the finished popcorn bucket display.
Starting at one long side, roll the folded blanket toward the opposite long side. Roll it firmly enough to stand upright, but do not pull so tightly that the stripes twist or the popcorn clusters flatten.
Stand the rolled blanket upright with both popcorn edges facing upward.
The red-and-white stripes will remain vertical around the roll, while the two rows of clustered edging create the appearance of popcorn overflowing from the top of the bucket.
When displayed on a baby shower table, the rolled blanket can look like a decorative popcorn prop before guests realize that it unfolds into a full stroller blanket.
Circus Baby Shower Gift Display Ideas
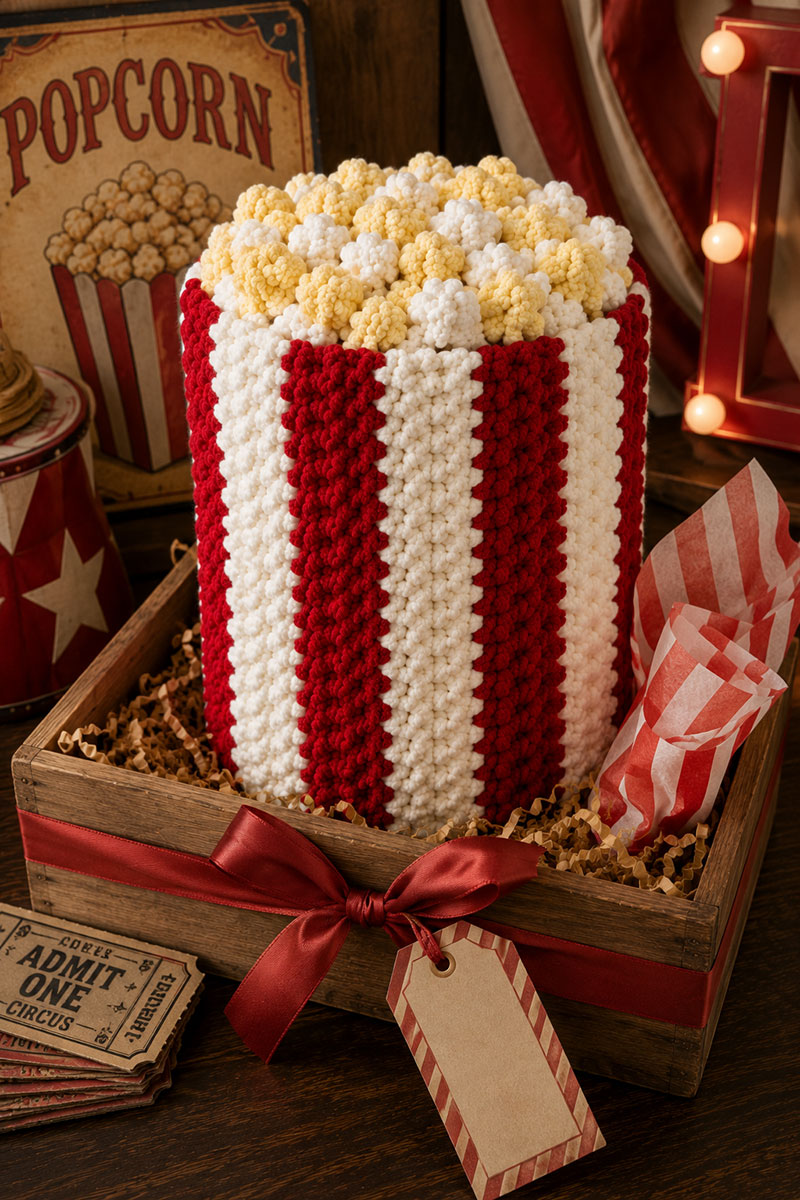
This blanket works best when the surrounding shower table display stays simple.
Too many striped decorations nearby can make the blanket disappear into the rest of the shower setup.
I believe this project looks strongest beside solid-color wrapping paper, wooden textures, brass accents, or vintage carnival details instead of bright party-store decorations.
For a baby shower display, place the rolled blanket inside a shallow crate or basket so the popcorn edge stays visible above the rim.
For nursery styling, fold it loosely over a chair or ladder outside the crib area. The vertical stripe layout keeps the circus theme obvious without needing wall murals or cartoon signs.
The pattern also fits naturally beside crochet baby shower gifts because it functions as both decor and an actual usable blanket.
Add a color coordinated doll made with my free crochet clown pattern to make a gift set for the baby shower basket.
Circus Popcorn Baby Blanket FAQ
Is this blanket made with popcorn stitch rows?
No. The blanket body uses simple single crochet rows worked into narrow strips. The popcorn effect appears only on the top and bottom edges.
Why are there only popcorn clusters on two sides?
Keeping the clusters on the two short ends creates the popcorn-bucket illusion when the blanket is folded and rolled upright.
Can advanced beginners make this blanket?
Yes. The individual stitches are simple, but the project requires making 17 matching strips, joining long seams evenly, and adding popcorn clusters across both short edges. Keeping every strip the same row count and finished length is the most important part.
Can I make this popcorn blanket large enough for an adult?
Yes. For an adult-size striped blanket body approximately 49 to 51 inches wide by 66 inches long before the popcorn edging, make 27 strips, with 14 white strips and 13 red strips. Work each strip to approximately 66 inches long while keeping the original four-stitch width. The larger blanket has 108 stitches across each short edge and uses 27 popcorn clusters on each end. The completed throw will be slightly longer after the popcorn edging is added.
Can this be used as nursery decor?
Yes. Fold it over a chair, shelf, or blanket ladder as a circus nursery accent, keeping it outside the crib and other infant sleep spaces.
Will the finished blanket look like the images on this page?
The core baby-size instructions are written to reproduce the 17-strip red-and-white layout, popcorn edging placement, and rolled popcorn-bucket presentation shown in the finished project images. Exact dimensions may vary slightly with yarn and individual tension. The adult-size version is a calculated variation and is not the size shown in the photographs.
When you click on links to various merchants on this site and make a purchase, this may result in this site earning a commission. This does not affect the price you pay.

UBGI Gold Standard 2026
Reviewed under the site's
editorial checklist.
Photos, decorating ideas, party setups and reader submissions are shared for inspiration unless a page is specifically presented as a pattern, tutorial, reference guide or step-by-step project. Follow the instructions, measurements, safety guidance and manufacturer directions provided for the particular project or product.
About Jan | Contact | Baby Nursery Ideas (Blog) | Site Map | Privacy Policy | Disclosure Policy | Disclaimer | Affiliate Disclosure | Earnings Disclosure | Facebook | Pinterest
I am a participant in the Amazon Services LLC Associates Program, an affiliate advertising program designed to provide a means for us to earn fees by linking to Amazon. As an Amazon Associate I earn from qualifying purchases.
Copyright © 2006-2026. All Rights Reserved.