Free Crochet Turkey Granny Square Pattern
By Jan Bay
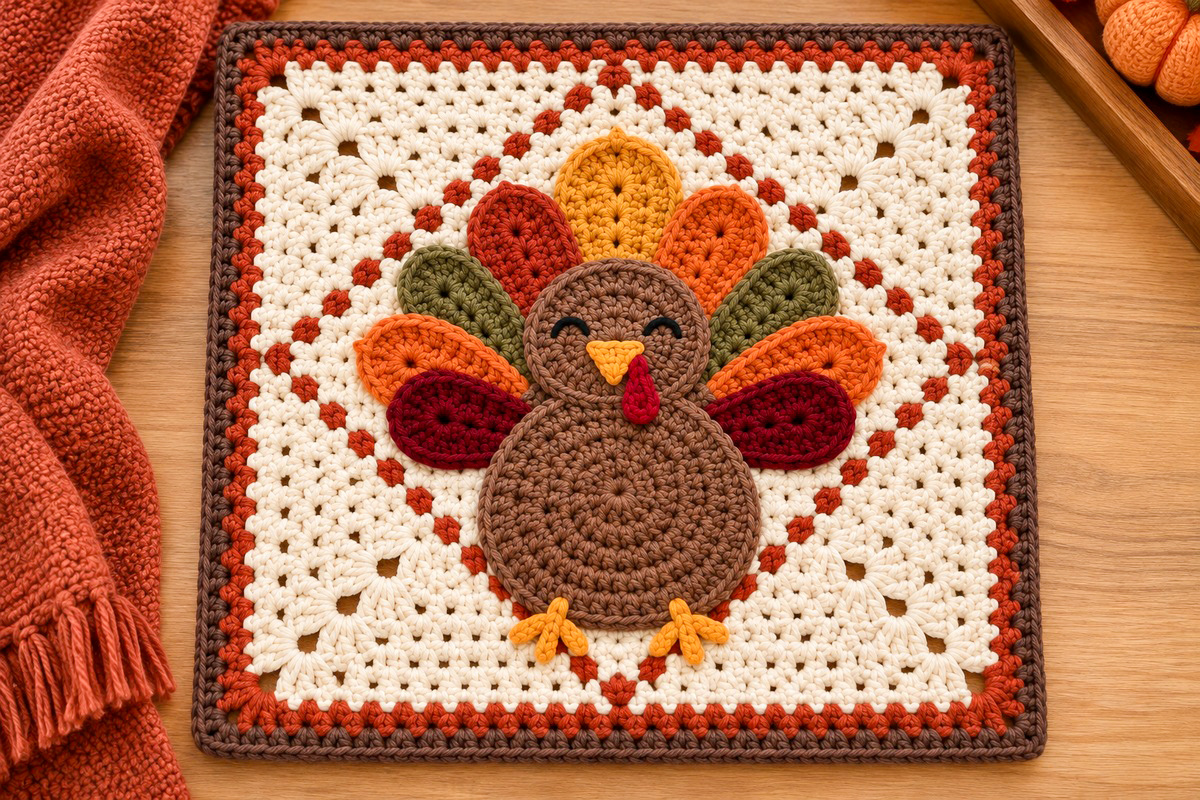
This free crochet turkey granny square pattern brings a cheerful Thanksgiving touch to handmade baby blankets and fall nursery decor. The 12-inch square features a brown turkey with sleepy embroidered eyes, nine colorful tail feathers, and a rust-colored diamond frame. Join a few squares for a baby blanket or lap throw, or make a whole stack for a larger autumn blanket. These squares won't “gobble” up much of your time, and they're fun to make!
Explore More Free Fall and Turkey Crochet Patterns
See Supplies for This Project.
Jump to the Pattern Sections
What Can You Make With a Crochet Turkey Granny Square?
A single turkey square makes a cute little piece of Thanksgiving nursery decor, but I especially like the idea of joining several into a blanket. The oatmeal background gives all those autumn colors some breathing room, and the brown outer edge helps neighboring squares look like they belong together.
Here are a few ways to use your finished squares:
- Baby blanket: Join nine squares in a three-by-three arrangement for a small seasonal blanket.
- Stroller blanket: Use a compact arrangement of squares, measuring the finished blanket to suit your needs.
- Larger autumn blanket: Make 12 or 16 squares, depending on the size you want.
- Nursery wall hanging: Display one finished square as seasonal wall decor.
- Pillow front: Join four squares and add a suitable fabric or crochet backing.
There's no need to put a turkey on every square, either. You can alternate turkey blocks with plain oatmeal granny squares and still get a lovely fall design.
If you're looking for smaller Thanksgiving projects first, my turkey crochet patterns collection has more ideas, including toys and baby accessories.
Materials for the Turkey Granny Square
This pattern uses worsted-weight yarn in a handful of warm fall colors. You don't need a full skein of every accent color, so it's a nice way to use some of those smaller leftovers in your yarn basket.
- Worsted-weight yarn, category 4, in light oatmeal for the background
- Chestnut or medium brown yarn for the turkey's head and body
- Dark brown yarn for the final border
- Rust yarn for the diamond outline and inner border
- Mustard-yellow yarn for the center feather, beak, and feet
- Burnt orange yarn for three feathers
- Olive-green yarn for two feathers
- Brick-red or deep rust yarn for one feather
- Burgundy yarn for two feathers and the wattle
- 5 mm (H/8) crochet hook, or the size needed for the intended measurements
- Yarn needle with a blunt tip
- Scissors
- Four removable stitch markers
- Tape measure
- Blocking mat and rustproof pins, if desired
- A small amount of black embroidery yarn for the eyes
Yarn note: The quantities haven't been established by a completed sample. Allow extra oatmeal yarn for the background, and keep enough of the chosen colors to repeat the motif if you're making a blanket. For a baby blanket, choose yarn that can withstand regular laundering.
Stitches and Abbreviations
This pattern uses U.S. crochet terms.
- ch = chain
- sl st = slip stitch
- sc = single crochet
- hdc = half double crochet
- dc = double crochet
- sc2tog = single crochet two stitches together
- inc = work two stitches in the same stitch
- st or sts = stitch or stitches
- sp = space
- RS = right side
- WS = wrong side
If you need a refresher on any abbreviation, the Craft Yarn Council's crochet abbreviation guide lists the standard U.S. terms.
Special stitches: The decorative granny cluster consists of one dc, one raised puff stitch, and one dc worked into the same chain space. A corner consists of two raised granny clusters separated by ch 2. The complete puff instructions are given in Part 1. The raised popcorn motifs used for the diamond are explained in Part 3.
Finished Size and Gauge
The intended finished size is 12 by 12 inches after blocking, including the outer border. That's a useful square for building a larger blanket, and it gives the turkey enough room without crowding the corners.
Gauge target: Approximately 15 hdc stitches across 4 inches in the round for the turkey motifs, using worsted-weight yarn and a 5 mm hook. This is a proposed working gauge, not a measurement taken from a completed sample.
For the background, measure the granny square after several rounds. The finished size target is 12 inches across, including the rust and brown edging. Before fastening off the oatmeal yarn, estimate the width of those two edging rounds from your own stitch gauge and stop when the foundation is that much smaller than 12 inches. Depending on your yarn and tension, the oatmeal square may need to measure approximately 11 1/2 inches or more before edging.
Granny-square rounds add width in fairly large increments, so you may not land on exactly 12 inches with your first attempt. Make the first complete square, block it, and use its actual finished measurement for any matching squares. Do not stretch it excessively just to reach a number.
Measure across the middle of the square, not diagonally from corner to corner. All four sides should match before you make a second block.
If you're making several squares for one blanket, consistency matters more than forcing an exact measurement with different yarn. Make one complete square, measure it, and use that square as the size reference for the rest.
Turkey Feather Color Placement Guide
The nine feathers make the turkey, so I'd lay them out before sewing down a single one. You want a full fan with a little overlap, not nine separate pieces sticking out in different directions.
Start with the mustard feather straight up at the center. Working outward, place a brick-red feather on the upper left and a burnt-orange feather on the upper right. Add an olive feather on each side, then the two orange feathers, and finish with the two burgundy feathers nearest the bottom of the fan.
The center feather should reach the highest point. Angle each following pair a little farther outward and downward. Tuck one rounded end of each feather behind the head and body, leaving the opposite rounded end visible as part of the fan.
Keep the colors in the same positions on every block if you're planning a matching blanket. You can vary them later if you'd like, but one consistent color arrangement gives the finished project a more orderly appearance.
The rust diamond sits behind the turkey and follows the diagonal lines between the middle areas of the square's four sides. Its stitches should remain visible around the motif without running across the turkey's face or feathers.
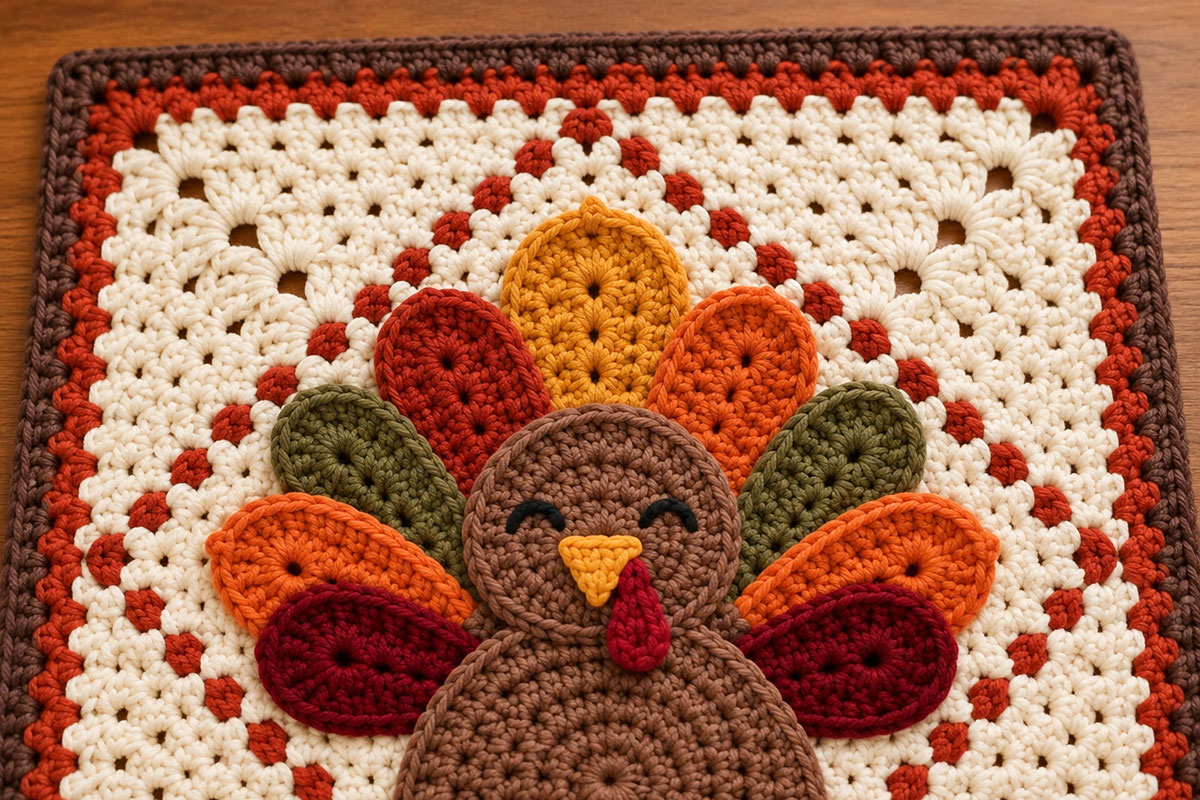
Pattern photo note: The finished square shown is a visual reference for the turkey design, nine-feather color arrangement, and placement of the decorative details. The pattern has not been physically sample-tested, so the exact stitch texture, feather proportions, and diamond spacing may differ from the image. Follow the written stitch instructions and count checkpoints when making your square.
Free Crochet Turkey Granny Square Pattern: Step-by-Step Instructions
You'll make the oatmeal granny square first, add the rust diamond, and then crochet the turkey pieces separately. The feathers go on before the body and head, so their lower ends disappear neatly underneath.
Work with the right side of the square facing you when positioning the turkey. The individual pieces should lie flat, with no stuffing.
Part 1: Crochet the Decorative Oatmeal Granny Square
With oatmeal worsted-weight yarn and a 5 mm hook, make a magic ring. This background uses a raised three-stitch granny cluster. The middle stitch is a small puff, giving the oatmeal fabric the softly textured appearance of the finished square.
Raised puff stitch: Yarn over, insert the hook into the indicated space, yarn over and draw up a loop. Repeat this action twice more in the same space. You now have 7 loops on the hook. Yarn over and pull through all 7 loops, then ch 1 to close the puff. The closing chain forms the top of the puff and counts as its single stitch. Do not work another chain to close it.
Raised granny cluster: Work (1 dc, 1 raised puff, 1 dc) into the indicated space. Each cluster contains 3 stitches: a dc, a puff, and a dc.
Corner: Work (1 raised granny cluster, ch 2, 1 raised granny cluster) into the same corner space.
Work in joined rounds with the right side facing throughout. At the beginning of each round, ch 3 counts as the first dc of the opening cluster. The puff's closing chain counts as part of the puff, not as a separate space between clusters.
Round 1: Ch 3, work 1 raised puff and 1 dc into the ring, then ch 2. Work (1 raised granny cluster, ch 2) three more times into the ring. Join with a sl st to the top of the beginning ch 3. Pull the magic ring closed.
Round 1 checkpoint: 4 raised granny clusters, 12 cluster stitches, and 4 corner ch-2 spaces.
Sl st into the tops of the puff and final dc of the opening cluster, then into the nearest corner ch-2 space.
Round 2: Ch 3, work 1 raised puff and 1 dc in the corner space, ch 2, then work another raised granny cluster in that same space. Ch 1. Work a complete corner in each remaining corner space, placing ch 1 between neighboring clusters. After the fourth corner, ch 1 and join to the beginning ch 3.
Round 2 checkpoint: 8 raised granny clusters, 24 cluster stitches, 4 side ch-1 spaces, and 4 corner ch-2 spaces.
Sl st through the next two cluster tops and into the nearest corner space.
Round 3: Begin with a complete corner. Ch 1, work one raised granny cluster in the next side ch-1 space, then ch 1. Work a complete corner in the next corner space and continue around, placing one raised granny cluster in every side ch-1 space. Keep ch 1 between neighboring clusters. Join to the beginning ch 3.
Round 3 checkpoint: 12 raised granny clusters, 36 cluster stitches, 8 side ch-1 spaces, and 4 corner ch-2 spaces.
Round 4: Work the same arrangement, beginning in a corner. Work one raised granny cluster in each side ch-1 space and a complete corner in each ch-2 corner space. Place ch 1 between neighboring clusters. Join as before.
Round 4 checkpoint: 16 clusters, 48 cluster stitches, 12 side ch-1 spaces, and 4 corners.
Round 5 and onward: Repeat the established granny-square arrangement. At each corner, work two raised granny clusters separated by ch 2. In every side ch-1 space, work one raised granny cluster. Place ch 1 between neighboring clusters. Before starting a new round, slip stitch across the next two cluster tops and into the nearest corner space.
Each round adds 4 raised granny clusters and 4 side ch-1 spaces. The number of clusters after Round N is 4 times N. All rounds contain exactly 4 corner ch-2 spaces.
Size checkpoint: Continue until the oatmeal foundation is large enough that the two planned single-crochet border rounds will bring the finished square close to 12 inches. Measure across the center, not diagonally. The raised puff construction may produce a different gauge from a plain granny square.
Fasten off and weave in the ends securely on the wrong side. The background should lie flat, with four even corners and visible raised centers in the granny clusters.
Part 2: Add the Rust and Brown Border
Rust border round: With the right side facing, join rust yarn in any corner ch-2 space. Work 3 sc in that corner space. Across the next side, work 1 sc in each of the 3 top stitches of every raised granny cluster, including the puff's closing-chain top, and 1 sc in each side ch-1 space. In the next corner ch-2 space, work 3 sc. Continue around all four sides and corners. Join with a sl st to the first sc. Fasten off.
Brown border round: Join dark brown yarn in the center stitch of any three-sc corner group. Work 3 sc in that same center stitch. Work 1 sc in every stitch along the next side until you reach the center sc of the next corner group. Work 3 sc in that center stitch. Repeat around the square, working 1 sc in each remaining stitch and 3 sc in each corner center. Join to the first sc and fasten off.
Border count checkpoint: If the foundation has N granny rounds, the rust border has (16 × N) + 8 stitches. The dark brown border adds 8 more stitches through its corner increases, giving (16 × N) + 16 stitches. Check these totals before continuing.
Lay the square flat and check the corners. The borders should follow the square without pulling inward or rippling. If the square cups or waves, check the granny-square gauge and corner placement before continuing.
Part 3: Crochet the Raised Rust Diamond
The diamond on this square is made from small raised crochet motifs rather than a continuous embroidered line. Each motif is attached separately, leaving a little oatmeal background visible between the rust-colored bumps.
Make 28 small rust-colored popcorn motifs. Four will mark the diamond's points, and six will sit between the points along each of the four diagonal sides.
Small Raised Popcorn Motif
With rust yarn, ch 4. Work 4 dc into the fourth chain from the hook. The skipped 3 chains form the first dc of the group, giving you 5 dc altogether.
Remove the hook from the working loop. Insert the hook through the top of the beginning ch 3, then through the released loop. Pull the loop through the top of the beginning chain to close the popcorn.
Ch 1 to secure the popcorn. Fasten off, leaving approximately 8 inches of yarn for attachment.
Make 28 identical motifs. Each contains one five-dc popcorn. The closing chain is not another dc.
Mark the Diamond
Lay the oatmeal granny square flat with the right side facing up. Use four removable stitch markers to identify the upper, right, lower, and left diamond points.
Place each marker approximately 1 to 1 1/4 inches inward from the midpoint of the corresponding outer edge. The marked points should form a balanced diamond surrounding the turkey's intended position.
Before sewing, lay one popcorn motif at each of the four points. Arrange six more motifs at approximately equal intervals along each diagonal side.
You should now have 4 corner motifs plus 24 intermediate motifs, for a total of 28. Adjust the spacing slightly where needed to keep the diagonal edges straight and the overall diamond symmetrical.
Leave small gaps between neighboring popcorn motifs. The raised marks should look separate, not like a continuous solid cord.
Attach the Diamond Motifs
Starting at the upper point, thread the sewing tail of the first popcorn through a yarn needle. Sew the base of the popcorn securely to the oatmeal background, catching neighboring stitch posts rather than spanning an open granny-square space.
Bring the yarn to the wrong side, secure it through several nearby stitches, and weave in the remaining end. The popcorn should stand slightly proud of the background without pulling the foundation inward.
Continue attaching the remaining motifs around all four sides of the diamond. Sew each one separately. Do not pull a continuous strand tightly between motifs.
Check the diamond from the front. Its four points should be centered, its diagonal sides should be balanced, and the foundation should still lie flat.
The turkey will overlap portions of the diamond during final assembly. Keep the popcorn motifs securely attached even in areas that will be partly covered.
Part 4: Crochet the Nine Tail Feathers
You'll make nine flat, oval feathers in three lengths. Each is worked around both sides of a foundation chain, giving it rounded ends rather than pointed ones. The longer feathers go toward the top of the fan, and the shorter ones spread outward around the turkey's body.
Use the same construction for every feather. Only the starting chain length and yarn color change.
Feather Sizes and Colors
- Longest feather: Make 1 mustard-yellow feather, starting with ch 11.
- Medium feathers: Make 1 brick-red and 1 burnt-orange feather, starting each with ch 10.
- Shorter feathers: Make 2 olive, 2 bright burnt-orange, and 2 burgundy feathers, starting each with ch 9.
That's exactly nine feathers: one long, two medium, and six shorter ones.
Oval Feather Instructions
These feathers are worked in three concentric rounds around both sides of a foundation chain. The six increases in each shaping round are distributed around the two rounded ends, leaving the long sides smooth.
Use the chain length listed above for each feather: ch 11 for the mustard center feather, ch 10 for the two upper feathers, and ch 9 for the remaining six.
Work with the right side facing throughout. Do not turn between rounds.
Round 1: Establish the Oval
Work 2 sc in the second chain from the hook. Sc in each following foundation chain until one chain remains. Work 3 sc in the final chain.
Rotate the work to crochet along the unused loops on the opposite side of the foundation chain. Sc in each available chain loop until you reach the chain containing the first 2 sc. Work 1 additional sc into the unused loop of that same chain. Join with a sl st to the first sc.
There are now three stitches around each rounded end, counting the two stitches at the beginning and the additional stitch at the end of the round together as the first end.
Round 1 counts:
- Ch 11: 22 sc
- Ch 10: 20 sc
- Ch 9: 18 sc
Round 2: Widen Both Rounded Ends
Ch 1, which does not count as a stitch.
Work 2 sc in each of the first 2 stitches. Sc in each stitch along the straight side until you reach the group of 3 stitches at the opposite rounded end.
Work 2 sc in each of those 3 end stitches. Sc in every stitch along the second straight side until one stitch remains. Work 2 sc in the final stitch.
Join with a sl st to the first sc.
Round 2 counts:
- Longest feather: 28 sc
- Medium feather: 26 sc
- Shorter feather: 24 sc
At this stage, each rounded end has 6 stitches. The first end is divided across the beginning and end of the round: its first 4 stitches are worked at the start, and its remaining 2 stitches are worked at the end.
Round 3: Create the Concentric Outer Band
Ch 1, which does not count as a stitch.
Work 2 hdc in the first stitch, 1 hdc in the next stitch, 2 hdc in the following stitch, and 1 hdc in the fourth stitch.
Hdc in every stitch along the first straight side until you reach the 6 stitches forming the opposite rounded end.
Across those 6 end stitches, repeat (2 hdc in the next stitch, 1 hdc in the following stitch) three times. This produces 9 hdc across that end.
Hdc in every stitch along the second straight side until only 2 stitches remain in the round.
Work 1 hdc in the next stitch and 2 hdc in the final stitch. Join with a sl st to the first hdc.
Round 3 counts:
- Longest feather: 34 hdc
- Medium feather: 32 hdc
- Shorter feather: 30 hdc
The three rounds should form visible concentric bands around the foundation chain. Both ends are rounded, with no pointed decreases or sharp corners.
Fasten off, leaving an approximately 18-inch yarn tail for sewing. Do not add another edging round.
Completed Feather Checkpoint
Make one mustard feather from ch 11, one brick-red and one burnt-orange feather from ch 10, and six shorter feathers from ch 9: two olive, two orange, and two burgundy.
Count all nine feathers before assembly. Matching feathers should have matching stitch totals and approximately the same finished dimensions.
Place the right side of each feather facing up. During assembly, one rounded end will tuck beneath the turkey's head and body, while the opposite rounded end remains visible as part of the fan.
Do not stuff the feathers. Sew their entire outer edges securely to the background so no tips are left loose.
Part 5: Crochet the Brown Turkey Body
With medium brown yarn, make a magic ring. Work in joined rounds with the right side facing. Begin each round with ch 1, which does not count as a stitch, and join with a sl st to the first hdc.
Round 1: Work 8 hdc into the ring. Join. (8 hdc)
Round 2: Work 2 hdc in each stitch. Join. (16 hdc)
Round 3: Repeat (1 hdc in the next stitch, 2 hdc in the following stitch) eight times. Join. (24 hdc)
Round 4: Repeat (hdc in the next 2 stitches, 2 hdc in the following stitch) eight times. Join. (32 hdc)
Round 5: Repeat (hdc in the next 3 stitches, 2 hdc in the following stitch) eight times. Join. (40 hdc)
Round 6: Repeat (hdc in the next 4 stitches, 2 hdc in the following stitch) eight times. Join. (48 hdc)
Round 7: Repeat (hdc in the next 5 stitches, 2 hdc in the following stitch) eight times. Join. (56 hdc)
Fasten off, leaving a long tail for sewing. Flatten the piece gently with the right side facing up.
The body should form a broad, nearly flat circle. When the head overlaps its upper portion, the visible body will have the softly rounded, slightly pear-shaped appearance shown in the finished design. Do not add stuffing.
Checkpoint: Count 56 stitches around the final round. The body is intended to be approximately 4 3/4 inches across at the proposed gauge, although the actual measurement must be checked against your yarn and tension.
Part 6: Crochet the Turkey Head
With medium brown yarn, make a magic ring. Work joined rounds with the right side facing. Begin each round with ch 1, which does not count as a stitch, and join to the first hdc.
Round 1: Work 8 hdc into the ring. Join. (8 hdc)
Round 2: Work 2 hdc in every stitch. Join. (16 hdc)
Round 3: Repeat (hdc in the next stitch, 2 hdc in the following stitch) eight times. Join. (24 hdc)
Round 4: Repeat (hdc in the next 2 stitches, 2 hdc in the following stitch) eight times. Join. (32 hdc)
Fasten off, leaving a long tail for sewing. Flatten the head with its right side facing up.
Checkpoint: The final round has 32 stitches. At the proposed gauge, the head is expected to measure approximately 2 3/4 inches across. It should be noticeably smaller than the body, with enough room for two embroidered eyes, the triangular beak, and the wattle.
Part 7: Crochet the Mustard Beak
With mustard-yellow yarn, ch 5.
Row 1: Sc in the second chain from the hook and each remaining chain. Ch 1, turn. (4 sc)
Row 2: Sc2tog twice. Ch 1, turn. (2 sc)
Row 3: Sc2tog. (1 sc)
Fasten off, leaving a tail for sewing. The wider edge is the top of the beak, and the single-stitch end forms the downward-pointing tip.
Part 8: Crochet the Red Wattle
With burgundy-red yarn, ch 7.
Working back along the chain, sl st in the second chain from the hook, sc in the next chain, work 2 hdc in the next chain, hdc in the following chain, sc in the next chain, and sl st in the last chain.
Fasten off, leaving a long tail. The wider middle section forms the rounded part of the wattle. It will hang below one side of the beak.
Part 9: Embroider the Sleeping Eyes
Before sewing the head to the square, use black embroidery yarn to make two gently curved closed eyes on its right side.
Place the eyes symmetrically, slightly above the head's horizontal center. Make each curve with a few short stitches rather than one long loose stitch. Secure the yarn ends on the wrong side.
Keep the expression simple. No plastic eyes, buttons, or glued facial pieces are needed.
Assembly and Finishing the Turkey Granny Square
Now comes the fun part. Lay the square on a flat surface with the right side facing up, and arrange every turkey piece before you start sewing.
Step 1: Arrange the Feathers
Find the center of the square. Position the mustard feather upright on the upper centerline, with its rounded end pointing toward the top diamond point.
Place the mustard feather made from the 11-chain foundation upright at the center of the fan. Position the two feathers made from 10-chain foundations immediately beside it, with brick red on the left and burnt orange on the right. Angle these feathers outward approximately 20 to 30 degrees from vertical.
Place the two shorter olive feathers next, angling them approximately 45 degrees outward. Add the two shorter orange feathers below the olive pair, nearly horizontal but with their rounded tips angled slightly upward. Finally, place the two shorter burgundy feathers along the lowest outside edges of the fan. These six feathers are all made from 9-chain foundations.
Overlap neighboring feathers enough to hide their lower rounded ends beneath the head and body. Both sides should spread to approximately the same width. The head must remain centered directly below the mustard feather.
Each feather should overlap its neighbor slightly. Arrange their lower rounded ends behind the area where the turkey's head and upper body will sit.
Check the arrangement from a short distance away. The fan should be balanced, with roughly the same spread on the left and right. The color placement doesn't have to be perfectly mirrored, but the overall shape should be symmetrical.
Step 2: Sew Down the Feathers
Once you're happy with the arrangement, pin the feathers temporarily. Using each feather's long yarn tail, sew along the outside edges with small whipstitches, catching stitches from the oatmeal square underneath.
Keep the stitches on the surface of the background fabric rather than stretching across its open granny-square spaces. Secure the rounded ends and sides of every feather, including the portions that will later be hidden by the body and head.
Remove the pins as you finish each feather. The feathers should remain flat when you lift the square.
Step 3: Position and Attach the Body
Place the brown body below the middle of the feather fan, keeping it centered from left to right. Its lower edge should leave enough oatmeal background visible for the feet and diamond outline beneath it.
The body should hide the lower rounded ends of the feathers. Adjust its position until the fan looks balanced above and beside it.
Use the long brown yarn tail to sew the body securely around its entire outside edge. Work through the background stitches without pulling them out of shape.
Don't stuff the body. Keeping it flat makes the finished square more practical for a blanket.
Step 4: Attach the Head
Center the smaller brown head above the body so that it overlaps the body's upper edge and covers the middle of the feather bases.
The turkey should have a clearly defined head and a rounded belly. Don't place the head so high that the neck looks stretched or disconnected.
Sew around the head's perimeter with small, closely spaced stitches. Catch the body or background underneath, depending on where the head overlaps. Make sure both sides of the head are securely attached.
Step 5: Sew on the Beak and Wattle
Position the mustard beak below and between the embroidered eyes, with its point facing downward.
Sew around all three sides of the beak. Keep the stitching small so the triangle retains its shape.
Place the burgundy wattle just to one side of the beak, with its rounded end pointing down. Sew along its length and around the end so no portion hangs loosely away from the turkey's face.
Step 6: Crochet and Attach the Turkey Feet
Make two small mustard-yellow feet. Each foot has a short crocheted leg and three separate toes that spread outward below the turkey's body.
Leg: With mustard yarn, ch 5. Sc in the second chain from the hook and in each remaining chain. (4 sc) Fasten off, leaving a long tail for sewing.
Toes: Make three for each foot. Ch 4, then sl st in the second chain from the hook and in each of the next 2 chains. Fasten off, leaving tails for attachment.
Assembly: Position the three toes at one end of the leg, with the middle toe pointing downward and the other two spreading diagonally outward. Sew their starting ends securely to the leg, then weave in the loose ends.
Make a second matching foot.
Place the two finished feet beneath the turkey's body, approximately 1 to 1 1/2 inches apart. Tuck the upper ends of the legs slightly beneath the body and sew each foot securely to the oatmeal background, including the full length of every toe.
Check that both feet lie flat and that no toe can lift away or pull loose.
Step 7: Weave In the Ends and Block
Turn the square over and inspect the wrong side. Weave in every loose end securely through several neighboring stitches. Keep the wrong side as smooth as you can.
If any appliqué edge lifts away from the square, add a few more matching stitches. Pay special attention to the feather tips, beak, wattle, and feet. There shouldn't be loose pieces a baby could pull free.
Block the square gently according to the yarn's care instructions. Pin the four corners square and measure across the center in both directions.
Let the square dry completely before removing it from the blocking mat. If you're making several blocks, use the same finished measurement for each one.
Before using the square or joining it to another block, remove every temporary pin and stitch marker. Check both sides for loose yarn ends, unsecured feather edges, and any stitches that could catch or pull free. If the square will be part of a baby blanket, every decorative component should be firmly attached.
For baby use: This square is intended for blankets and decorative projects, not as a loose item in an infant's sleep space. Keep blankets, pillows, and wall decorations out of a baby's sleeping area and reach as appropriate.
Quick Crochet Turkey Granny Square Checkpoints
Before making another square, check these details against your first finished block.
- Square shape: Four even corners, with no pulling or excessive rippling along the sides.
- Finished size: Approximately 12 inches square after blocking, subject to your yarn and gauge.
- Tail: Exactly nine feathers, with the mustard feather at the top center.
- Head: Small, round, and centered above the larger brown body.
- Face: Two closed embroidered eyes, one mustard beak, and one burgundy wattle.
- Background: A visible rust diamond surrounding the turkey.
- Border: Rust edging inside a final dark brown edging.
- Feet: Two securely attached crocheted mustard feet, each with three separate toes.
- Finishing: All feather edges and facial details sewn securely, with no loose yarn ends.
If the turkey looks a little off-center, check the feather layout before changing the body. Sometimes one outer feather is angled too far to the side, and moving it slightly brings the whole fan back into balance.
Don't rush into a second block until you're satisfied with the first one. That's the square you'll use to keep the rest of the blanket consistent.
Ways to Turn Your Turkey Squares Into a Baby Blanket
One finished square is fun, but a blanket made from several of them would be especially cute for a Thanksgiving baby gift. The rust and brown borders give you a natural joining edge, and the oatmeal background keeps the finished blanket from looking too busy.
Three-by-Three Turkey Blanket
Join nine finished squares in three rows of three. With 12-inch blocks, the joined squares would form an approximately 36-by-36-inch blanket before any additional border, although the final size depends on your joining method.
For a lighter-looking blanket, alternate five turkey squares with four plain oatmeal granny squares. You'd still have plenty of turkeys, but the solid blocks would give the design a little room to breathe.
A Larger Fall Blanket
For a larger project, arrange 12 blocks in three rows of four. That gives you an approximate 36-by-48-inch layout before the outside border, provided each block finishes at 12 inches.
Sixteen blocks in a four-by-four arrangement would make an approximately 48-by-48-inch blanket before joining adjustments and edging.
I'd keep the joining yarn oatmeal or dark brown. You already have several fall colors in the feathers, so adding another bright color around every block isn't necessary.
Joining Your Squares
Lay two finished squares side by side with their right sides facing up and the edges to be joined touching. Align the corner stitches and match the brown border stitches along both edges.
With matching yarn and your crochet hook, join at the first pair of corresponding corner stitches. Insert the hook through the back loop of the nearest edge stitch on the first square and the back loop of the matching edge stitch on the second square. Yarn over and pull through both loops and the loop already on your hook to make a slip stitch.
Continue joining one matching pair of stitches at a time along the entire edge. Keep the slip stitches relaxed so the seam doesn't pull the squares together or shorten the joined edge.
Fasten off at the opposite corner and weave in both yarn ends. The joined squares should lie flat, with a narrow slip-stitch seam visible between them.
Join the blocks into rows first, then join the rows together. When all the squares are connected, add a simple single crochet border around the whole blanket if you want a finished outer edge.
For the first round of a blanket border, work one sc in each available edge stitch and three sc at each outside corner. Check that the edges stay flat. Additional rounds can be worked in the same way, keeping the corners shaped with evenly spaced increases.
If you're interested in other autumn projects, take a look at my fall crochet patterns and Thanksgiving crochet patterns. You can make matching seasonal gifts without turning everything into a blanket.
More Thanksgiving Crochet Patterns to Try
If you've enjoyed making the turkey square, there are a few other projects that would make cute companions for a handmade Thanksgiving baby gift.
My free crochet turkey pattern is a separate stuffed turkey project, while the crochet turkey bib pattern is a smaller seasonal accessory.
For a matching outfit, you might like the turkey baby booties or the crochet turkey hat.
And if you're looking for another cuddly handmade gift, take a look at the crochet turkey lovey pattern.
There's enough variety here to put together a lovely little fall gift set, or you can keep making turkey squares until you have a whole autumn blanket. Your choice!
When you click on links to various merchants on this site and make a purchase, this may result in this site earning a commission. This does not affect the price you pay.

UBGI Gold Standard 2026
Reviewed under the site's
editorial checklist.
Photos, decorating ideas, party setups and reader submissions are shared for inspiration unless a page is specifically presented as a pattern, tutorial, reference guide or step-by-step project. Follow the instructions, measurements, safety guidance and manufacturer directions provided for the particular project or product.
About Jan | Contact | Baby Nursery Ideas (Blog) | Site Map | Privacy Policy | Disclosure Policy | Disclaimer | Affiliate Disclosure | Earnings Disclosure | Facebook | Pinterest
I am a participant in the Amazon Services LLC Associates Program, an affiliate advertising program designed to provide a means for us to earn fees by linking to Amazon. As an Amazon Associate I earn from qualifying purchases.
Copyright © 2006-2026. All Rights Reserved.