Free Crochet Pumpkin Diaper Cover Pattern for Baby
By Jan Bay
This free crochet pumpkin diaper cover pattern turns a simple baby basic into a cute little fall outfit to wear as a photo prop for pumpkin patch photos, Halloween, Thanksgiving and autumn baby pictures. What could be cuter than your little pumpkin wearing his or her own pumpkin? I’ve also included an optional jack-o’-lantern face for Halloween, while the plain pumpkin version can keep right on going through Thanksgiving and the rest of fall.
Explore More Free Baby Patterns
More Crochet Diaper Cover Patterns Pumpkin Craft Ideas Free Baby Crochet Patterns Free Baby Patterns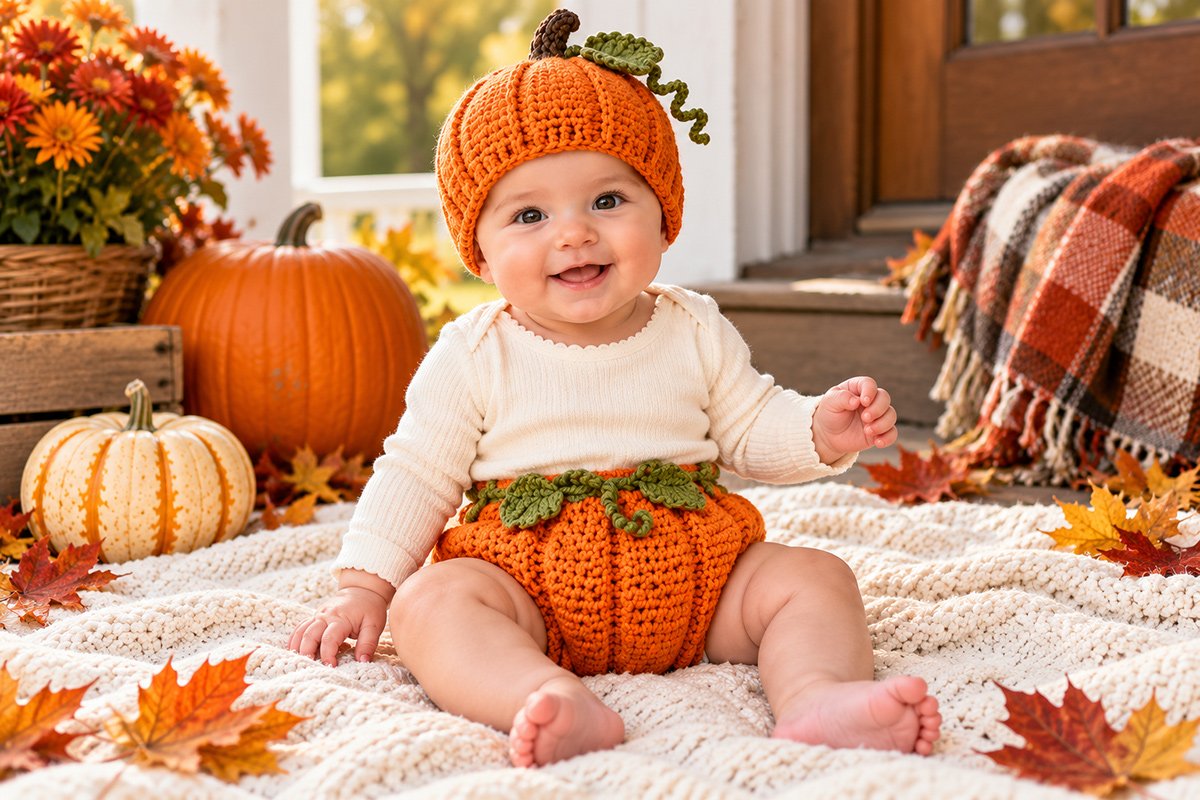
Helpful Crochet Supplies
See yarn and crochet supplies for this pumpkin diaper cover pattern
Jump to the Pumpkin Diaper Cover Pattern
Pattern Details and Finished Sizes
Crochet the Pumpkin Diaper Cover
Add the Pumpkin Waistband, Leaves and Vine
Pattern Details and Finished Sizes
This pumpkin diaper cover is worked as a pull-on bloomer rather than a flat diaper cover with buttons. I chose that construction because it gives us the rounded pumpkin shape in the main page image without interrupting those vertical ribs with a front opening.
The green waistband is crocheted separately as stretchy back-loop ribbing and joined into a ring. The orange body is worked down from that band in joined rounds. An increase immediately below the waistband gives the cover its little pumpkin belly, and eight raised crochet ribs divide that fullness into recognizable pumpkin sections.
After the upper body is finished, the front and back are worked separately to shape the leg openings and crotch. The two crotch edges are then joined. That keeps the outside of the cover neat and lets the pumpkin shaping continue right down toward the legs.
Pattern sizes: 0–3 months (3–6 months, 6–12 months)
Skill level: Intermediate. You should be comfortable working in joined rounds, making front post double crochet stitches, increasing and decreasing, working back-loop ribbing and shaping a garment in rows.
| Finished measurement | 0–3 mo. | 3–6 mo. | 6–12 mo. |
|---|---|---|---|
| Waist, relaxed | about 14¾ in. | about 16 in. | about 17¼ in. |
| Fullest hip circumference | about 18¼ in. | about 20½ in. | about 22¾ in. |
| Waistband depth | about 1½ in. | about 1½ in. | about 1½ in. |
| Expected body depth, lower edge of waistband to crotch | about 5⅜ in. | about 6¼ in. | about 7¼ in. |
Those finished measurements are calculated from the stitch counts and gauge below. This pattern has not been physically test-crocheted, so I would check the baby’s waist and diapered hip measurement before choosing a size rather than relying on age alone. The Craft Yarn Council baby size chart is also useful as a general sizing reference, but an actual measurement is better whenever you can get one.
The cover is meant to fit over a diaper, so don't try to make the hip area skin tight. We need some of that extra room anyway. It's what gives the orange body the round little pumpkin shape we're after.
Yarn, Hook and Materials
Yarn: Medium weight #4 yarn with enough body to hold the pumpkin ribs. A smooth worsted-weight acrylic, cotton blend or similar baby-friendly yarn will show the shaping better than a very fuzzy yarn.
Approximate yarn amounts:
- Orange: 120 (145, 175) yards
- Green: 35 (40, 45) yards
- Small amount of black yarn if you're making the optional jack-o'-lantern face
Hook: 5 mm (H-8) crochet hook, or the hook size needed to match gauge.
You will also need:
- Yarn needle
- Scissors
- 8 removable stitch markers for the pumpkin ribs
- Measuring tape
I would use the same orange and green yarns as the matching crochet pumpkin hat if you're making the set shown in the main page image. It makes the two pieces look intentional together instead of like two different pumpkin projects that happened to land in the same photograph.
Gauge, Abbreviations and Pattern Notes
Main orange fabric gauge: 14 dc = 4 inches and 9 rows or rounds = about 4 inches.
Waistband ribbing gauge: about 13 rows = 4 inches when the ribbing is lying relaxed and not stretched.
Waistband depth gauge: 5 sc across should measure approximately 1½ inches.
Gauge matters more than usual here because the waistband has to stretch over the diaper while the body still needs enough fullness to form the pumpkin. If your orange body is considerably tighter than gauge, the eight sections will flatten out and start looking more like striped shorts than a pumpkin.
Abbreviations:
- ch = chain
- sc = single crochet
- dc = double crochet
- FPdc = front post double crochet
- BPdc = back post double crochet
- dc2tog = double crochet 2 stitches together
- sl st = slip stitch
- st/sts = stitch/stitches
- BLO = back loop only
- RS = right side
- WS = wrong side
Important: Chains at the beginning of rounds and rows do not count as stitches unless a step specifically says otherwise.
Join each body round with a slip stitch to the first stitch. Turn only when the instructions tell you to turn.
While the body is worked in joined rounds, the eight FPdc columns form the pumpkin ribs. Keep each new FPdc stacked over the rib directly below it. Once the front and back shaping begins in turned rows, keep those same ribs on the outside of the cover by working FPdc on RS rows and BPdc on WS rows. Don't let the rib columns wander sideways.
If you're between sizes, I'd choose according to the diapered hip measurement first. Then check the waistband measurement against the baby's waist before joining it. Because the body stitch counts are based on the stated waistband row counts, don't add or remove waistband rows unless you also recalculate the body setup.
Free Crochet Pumpkin Diaper Cover Pattern
Sizes: Instructions are written for 0–3 months with changes for 3–6 and 6–12 months in parentheses.
Green Ribbed Waistband
With green yarn, ch 6.
Row 1: Sc in second ch from hook and in each ch across. 5 sc. Turn.
Row 2: Ch 1. Working in BLO, sc in each of the 5 sts. Turn.
Repeat Row 2 until you have worked a total of 48 (52, 56) rows.
Before joining the waistband, lay the ribbing flat without stretching it. The strip should measure approximately 14¾ (16, 17¼) inches long. If it is noticeably different, check your ribbing gauge before continuing.
Without twisting the strip, bring the first and last rows together. Slip stitch through both layers to join the short ends.
Turn the band so the seam is on the inside. The ridges should run vertically when the waistband is being worn.
Do not fasten off. With the green loop still on the hook, pull the orange yarn through the loop to complete the color change. Cut the green yarn, leaving a tail to weave in later.
Set Up the Orange Pumpkin Body
Continue with orange yarn.
Round 1: Ch 1. Work 1 sc into the end of each waistband row around the long edge. Join. 48 (52, 56) sc.
Round 2, increase round: Ch 2.
0–3 months: *Dc in next 2 sts, 2 dc in next st.* Repeat from * to * 16 times. Join. 64 dc.
3–6 months: *Dc in next 2 sts, 2 dc in next st, dc in next st, 2 dc in next st, dc in next 2 sts, 2 dc in next st, dc in next st, 2 dc in next st, dc in next 2 sts, 2 dc in next st.* Repeat the complete sequence 4 times. Join. 72 dc.
6–12 months: *Dc in next st, 2 dc in next st, dc in next st, 2 dc in next st, dc in next 2 sts, 2 dc in next st, dc in next st, 2 dc in next st, dc in next st, 2 dc in next st, dc in next 2 sts, 2 dc in next st.* Repeat the complete sequence 4 times. Join. 80 dc.
You now have the extra fullness that gives the cover its rounded pumpkin shape.
Use the waistband seam as the center back of the cover. Place the first marker in the stitch at center back. Moving around Round 2, place the remaining 7 markers in every 8th (9th, 10th) stitch. You will have 7 (8, 9) unmarked stitches between each pair of marked stitches. The marker directly opposite the center-back marker establishes the center front. Each marked stitch will become one raised pumpkin rib.
Establish the Eight Pumpkin Ribs
Round 3: Ch 2. Beginning with the first marked stitch, work FPdc around the post of that stitch. Dc in each stitch until you reach the next marked stitch. Work FPdc around that marked stitch. Continue around in this manner, keeping exactly 8 raised FPdc ribs evenly spaced around the cover. Join.
Move each marker up into its FPdc as you work.
Round 4: Ch 2. FPdc around each FPdc from the previous round. Dc normally in every stitch between the ribs. Join.
Repeat Round 4 until the orange body measures approximately 2¼ (2¾, 3¼) inches from the lower edge of the green waistband to the lower edge of the current round.
Use that measurement as the checkpoint rather than forcing a particular number of ribbed rounds. Small differences in the height of the single-crochet setup round and the raised FPdc rounds can change the round total slightly even when stitch gauge is correct.
Keep the eight raised columns lined up. They should pull the orange fabric inward just enough to divide the fuller body into pumpkin sections.
Remove the 8 rib markers now. The raised rib columns are established and easy to follow from this point. This leaves the next 4 markers free to identify only the front and back panel edges.
Divide for the Leg Openings
Lay the cover flat with one rib centered at the front and one rib centered at the back.
For size 0–3 months, count 24 stitches for the front panel and 24 stitches for the back panel, leaving 8 stitches unworked at each side.
For size 3–6 months, count 27 stitches for the front panel and 27 stitches for the back panel, leaving 9 stitches unworked at each side.
For size 6–12 months, count 30 stitches for the front panel and 30 stitches for the back panel, leaving 10 stitches unworked at each side.
Place markers at all four panel edges before you begin working back and forth.
Back Crotch Panel
With the right side of the cover facing you, join orange yarn at the first marked stitch of the back panel.
Row 1, RS: Ch 2. Dc2tog over the first 2 sts. Work across, working FPdc around each established pumpkin-rib post that falls within the panel and dc in all other stitches. Dc2tog over the last 2 sts. Turn. 22 (25, 28) sts.
Row 2, WS: Ch 2. Dc2tog over the first 2 sts. Work across, working BPdc around each established pumpkin-rib post and dc in all other stitches. Dc2tog over the last 2 sts. Turn. 20 (23, 26) sts.
Continue decreasing 1 stitch at each end of every row until 10 (11, 12) sts remain. On each RS row, work FPdc around each established rib post that remains between the two edge decreases. On each WS row, work BPdc around those same rib posts. If an outer rib reaches one of the 2-stitch edge decreases, work that rib stitch as part of the dc2tog and let that rib end at the shaped edge. Do not add a stitch to preserve it. Work dc in all remaining stitches and turn at the end of each row except the final shaping row. Keep every surviving rib stacked over the rib below it.
You will have worked 7 (8, 9) shaping rows total.
Fasten off.
Front Crotch Panel
With the right side of the cover facing you, join orange yarn at the first marked stitch of the front panel.
Work exactly as for the back crotch panel, decreasing at both ends of every row until 10 (11, 12) sts remain.
Do not fasten off after the final row.
Join the Crotch
Turn the cover inside out.
Place the final front and back rows together with their stitches matched.
Ch 1 and slip stitch through both layers across all 10 (11, 12) stitches.
Fasten off and turn the cover right side out.
You should now have two full leg openings and a closed crotch, with the waistband remaining completely continuous around the top.
Add the Green Pumpkin Leaves and Curly Vine
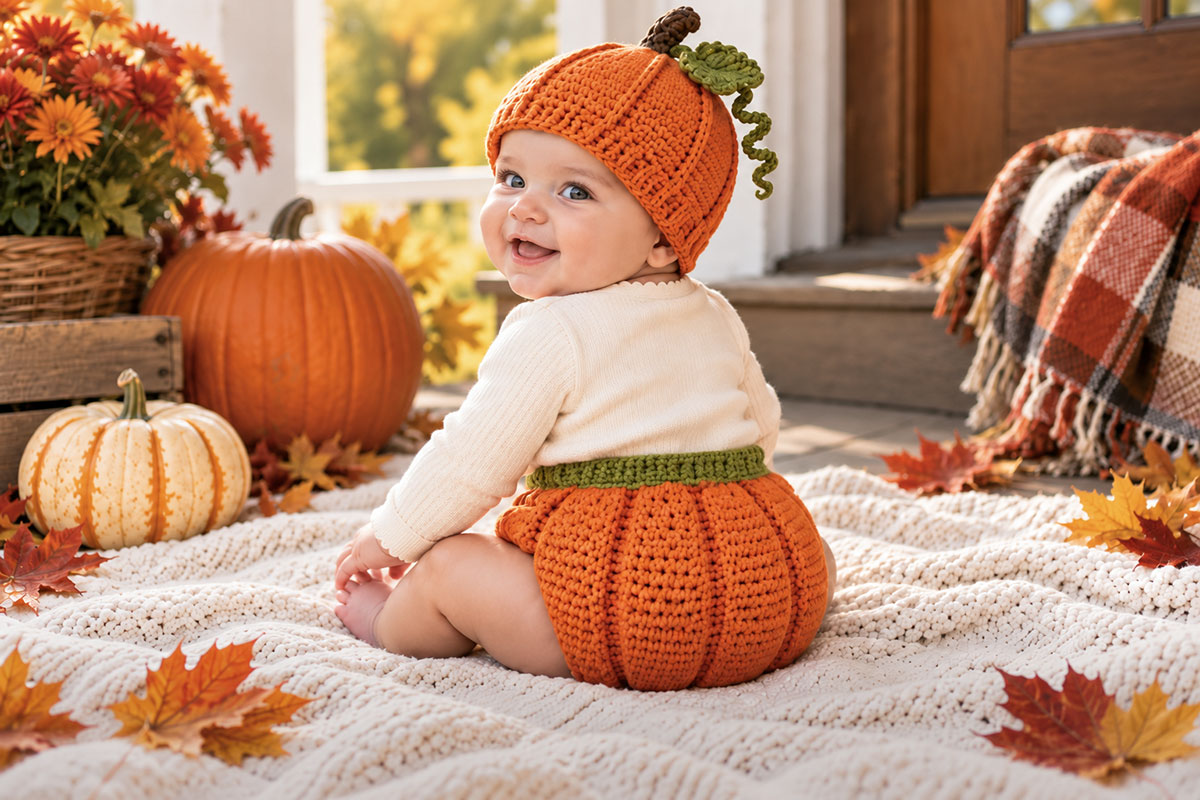
The green ribbed waistband is already part of the cover. Now we'll add the compact leaf cluster and short vine shown on the finished diaper cover.
Keep all of this detail near the center front. Four small overlapping leaves give us the fuller pumpkin-top look in the main page image without turning the entire waistband into a leafy garland.
Small Pumpkin Leaf, Make 4
With green yarn, ch 7.
Working in the second ch from the hook, work:
Sl st in next ch, sc in next ch, hdc in next ch, dc in next ch, hdc in next ch, 3 sc in final ch.
Continue along the unused loops on the opposite side of the foundation chain:
Hdc in next ch, dc in next ch, hdc in next ch, sc in next ch, sl st in final ch.
Fasten off, leaving a sewing tail.
Each finished leaf should measure about 2 to 2¼ inches long depending on gauge.
Curly Pumpkin Vine
With green yarn, ch 18.
Work 3 sc in the second ch from the hook and 3 sc in every remaining chain.
The extra stitches will force the chain into a natural spiral.
Fasten off, leaving a sewing tail.
Attach the Green Details
Arrange the four leaves in a compact overlapping cluster at the center front of the waistband. Angle the outer two leaves slightly toward the sides and layer the remaining two just inside them.
Sew the base and center spine of each leaf securely to the waistband. Let the outer edges stay a little dimensional, but don't leave a loose section that can pull away from the garment.
Attach one end of the vine near the center of the leaf cluster. Tack the first inch or so of the spiral to the waistband and leave only a short curled portion free.
Keep the entire cluster centered over the front of the green band. The orange pumpkin ribs below it should still be easy to see.
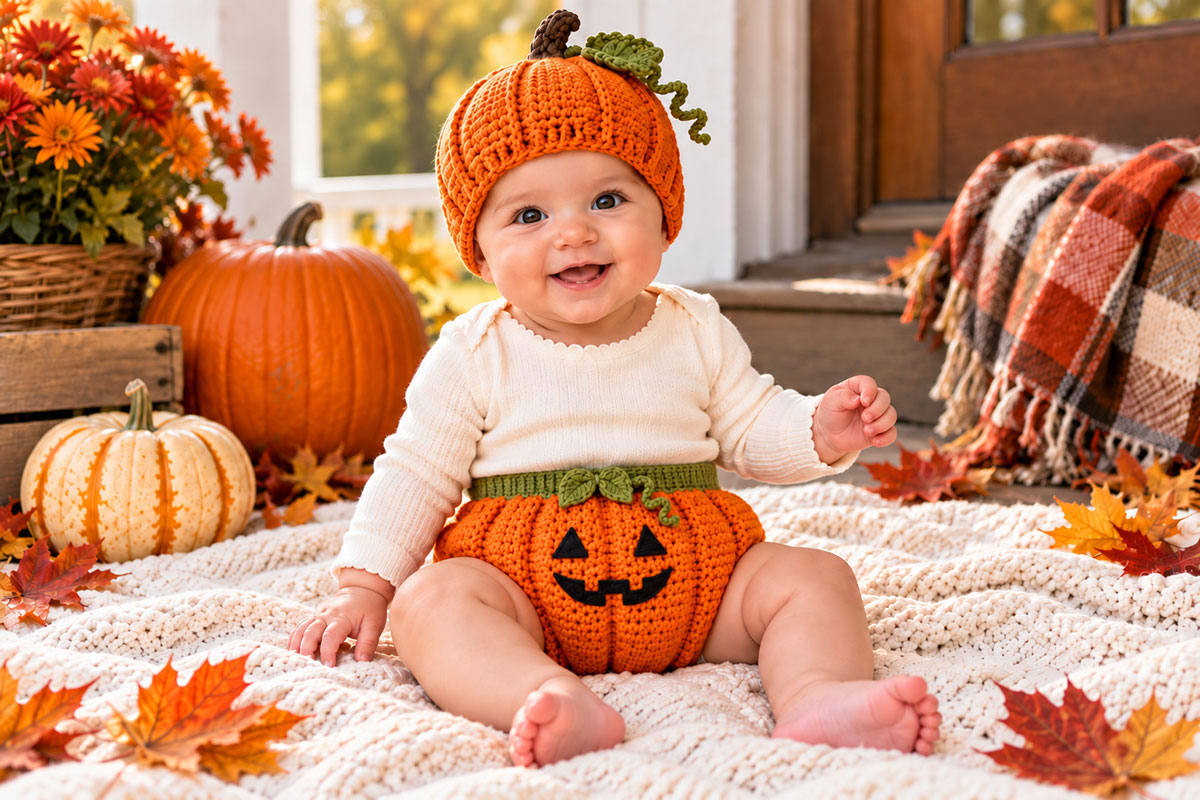
Optional Jack-o'-Lantern Crochet Diaper Cover
If you're making this mainly for Halloween, you can turn the same pumpkin diaper cover into a jack-o'-lantern without changing any of the construction.
I prefer adding the face with black yarn after the cover is finished. That keeps it flat against the garment and avoids buttons, beads or other loose pieces.
Eye Placement
Lay the cover flat with the center front rib facing you.
Position one eye on each side of that rib, approximately 1¼ (1½, 1¾) inches below the waistband.
Using black yarn and a yarn needle, embroider each eye as a small filled triangle about ¾ (⅞, 1) inch wide.
Keep the stitches broad and flat. Don't pull them so tightly that they pinch the orange fabric between the pumpkin ribs.
Jack-o'-Lantern Mouth
Place the mouth approximately 1 to 1¼ inches below the eyes.
Use black yarn to embroider a shallow zigzag smile approximately 3 (3½, 4) inches wide.
Make two or three small tooth points rather than filling half the front of the cover with black yarn. The pumpkin ribs should still be visible around the face.
Knot securely on the inside and weave the yarn ends well into the wrong side of the fabric.
If you want a diaper cover that can go from Halloween straight into Thanksgiving, make the plain pumpkin version instead. That's the version shown in the main page image.
Finish the Leg Openings and Shape the Pumpkin
Leg Edging
Join orange yarn at the crotch seam of one leg opening.
Round 1: Ch 1. Work 2 sc into the side of each dc row along the front shaping edge, 1 sc in each of the 8 (9, 10) unworked stitches at the top of the leg opening, then 2 sc into the side of each dc row along the back shaping edge. Join with a sl st. 36 (41, 46) sc.
Round 2: Ch 1. Sc in each stitch around. Join with a sl st. 36 (41, 46) sc.
Fasten off.
Repeat the same edging around the second leg opening.
I wouldn't add green edging around the legs. The waistband, leaves and vine already give us enough green, and leaving the leg edges orange keeps the cover looking like one round pumpkin.
Final Shaping
Remove all remaining stitch markers, then weave in every yarn end securely on the inside.
Before the cover is worn, check the waistband, leg openings, crotch seam, leaf cluster and vine once more to make sure no marker, loose yarn end or unsecured decoration remains.
Gently arrange the eight FPdc ribs so they run straight from the waistband toward the lower body.
The orange fabric between the ribs should bow outward slightly. Don't flatten those sections when you lay the cover down. That little bit of fullness is intentional.
If you block the cover, use only enough shaping to even the stitches. Heavy blocking can flatten the raised ribs and undo the pumpkin effect we worked for.
Make the Matching Crochet Pumpkin Hat
The pumpkin hat in the main page image isn't part of this diaper cover pattern. It already has its own complete pattern, and I'd keep it that way rather than repeat the same instructions on two pages.
You can make the free crochet pumpkin baby hat pattern here.
Use the same orange and green yarns for both projects if you want the coordinated outfit shown in the photograph. The hat has its own pumpkin ribs, brown stem, pointed green leaf and curly vine, so the two pieces read as a set without making the diaper cover any fussier.
Add a simple cream top and you're done. The pumpkin pieces already have plenty going on.
Using a Crochet Diaper Cover Safely
This is a clothing and photo outfit, not sleepwear.
Use the diaper cover only while the baby is awake and directly supervised.
Check the finished waistband and leg openings before putting the cover on a baby. They should sit comfortably without leaving a tight indentation, and you should be able to remove the cover without forcing it over the diaper.
All leaves, vines and embroidered jack-o'-lantern details need to be sewn down securely. Do not add buttons, beads, plastic eyes or other small detachable decorations.
Because babies grow at different rates and diaper bulk varies quite a bit, use the finished measurements as a guide and check the actual fit each time the cover is worn.
Remove the outfit if any yarn end, decoration or seam begins to loosen.
Pumpkin Diaper Cover Pattern FAQ
Can I make the pumpkin diaper cover without the jack-o'-lantern face?
Yes. The plain pumpkin is the main version of the pattern and the one shown in the main page image. The face is completely optional.
How many pumpkin ribs should the diaper cover have?
Eight. Keep those eight FPdc columns lined up from round to round. They divide the extra fullness into the rounded sections that make the cover look like a pumpkin.
Can I leave off the leaves and vine?
Yes. The green ribbed waistband can stand on its own. I like the small center-front leaf cluster and short vine because they match the pumpkin hat, but the cover doesn't depend on them for its shape.
What if the waistband is too loose or too tight?
Check the waistband against the baby's waist before you seam it into a ring. The published body counts are based on 48 (52, 56) waistband rows, so changing that row count also requires recalculating the body setup. If the band is noticeably too loose or tight at the stated gauge, I would choose the size that best fits the diapered hip rather than altering only the waistband and then continuing with the original stitch counts.
Can I use a different yarn weight?
You can, but I wouldn't simply swap yarn weights and keep the same stitch counts. The finished circumference depends directly on gauge. If you use a different yarn, make a gauge swatch first and recalculate the counts before starting the body.
Does the matching pumpkin hat come with this pattern?
The hat has its own pattern. You can find it on the free crochet pumpkin hat page.
Has this pumpkin diaper cover pattern been physically test-crocheted?
No. The measurements and construction are calculated from the stated gauge and stitch counts to reproduce the finished design shown on this page. I don't want to call a pattern tested when it hasn't been physically worked from these instructions.
When you click on links to various merchants on this site and make a purchase, this may result in this site earning a commission. This does not affect the price you pay.

UBGI Gold Standard 2026
Reviewed under the site's
editorial checklist.
Photos, decorating ideas, party setups and reader submissions are shared for inspiration unless a page is specifically presented as a pattern, tutorial, reference guide or step-by-step project. Follow the instructions, measurements, safety guidance and manufacturer directions provided for the particular project or product.
About Jan | Contact | Baby Nursery Ideas (Blog) | Site Map | Privacy Policy | Disclosure Policy | Disclaimer | Affiliate Disclosure | Earnings Disclosure | Facebook | Pinterest
I am a participant in the Amazon Services LLC Associates Program, an affiliate advertising program designed to provide a means for us to earn fees by linking to Amazon. As an Amazon Associate I earn from qualifying purchases.
Copyright © 2006-2026. All Rights Reserved.